Search the Community
Showing results for tags 'Mac'.
-
 'morning guys/gals, 2 quick questions please (and thanks): 1) in the image below (thumbnail and file attached) you will see a logo image that was originally on a black rectangular background. I cropped the L and R sides to get rid of portions of the background so as to create an even-ish border. How can I get rid of the still-remaining blue lines outlining the original boundaries of said black rectangle background? ...and, 2) in order to distort/stretch this image (logo portion), don't I simply 'convert to curves' the grouped layers then click/drag whichever node I'd like to 'pull' on? My goal is to be able to manipulate the image by independently move nodes to create perspective changes in some cases, or make the image look curved in other cases (as if on a cylindrical surface such as a telephone pole, etc). Does the image/layers need to first be flattened. Big thanks from a newbie! -Christo CVlogoBlueCropLines.afdesign
-
...me again - I am determined to learn this software (it's actually been a blast, just have so many basic questions - thanks for your patience) With the help of MEB, Alfred, R C-R, Callum, and MANY others I have learned a lot but am certainly still in the novice category. I have a relatively simple image (1 - 2 layers) that I want to save in my AD Assets-Panel (a custom panel created for this project). I've saved/moved a number of other images into this panel previously with no problem, simple click/drag operation. However, with this particular layer I'm seeing something I haven't seen before...when I click/drag, the image seems goes to go BEHIND the Assets panel and stays there, unseen. No vertical blue-bar appears in the A-panel, and upon release of the click/drag, the image does appear (or 'stick') in with other Assets. Anyone know why I would see this behavior? One additional Assets related query: what is the trick/procedure to assure the reasonable sizing of an image before dragging it into the Assets-panel so that it is not EXTREMELY LARGE when I access it for use on a newly opened image? Yet another basic skill that I'm 99.9% sure I've missed along the way. Cheers! Hope y'all have a great weekend. -Christo
-
Thanks in advance friends... ...when flattening into a single pixel layer, do I first need to rasterize the grouped layers? Not sure how to do this, i.e, I'm unclear on the steps involved, and the proper order in which to perform them. A brief walk-thru would be greatly appreciated. FYI - I am wanting to manipulate the Flat image (bend, curve around a cylindrical surface such as a large barrel or a utility pole, alter perspective and/or viewing angle, stretch by pulling/moving nodes independently of each other, etc). greateful for your help, -Christo
-
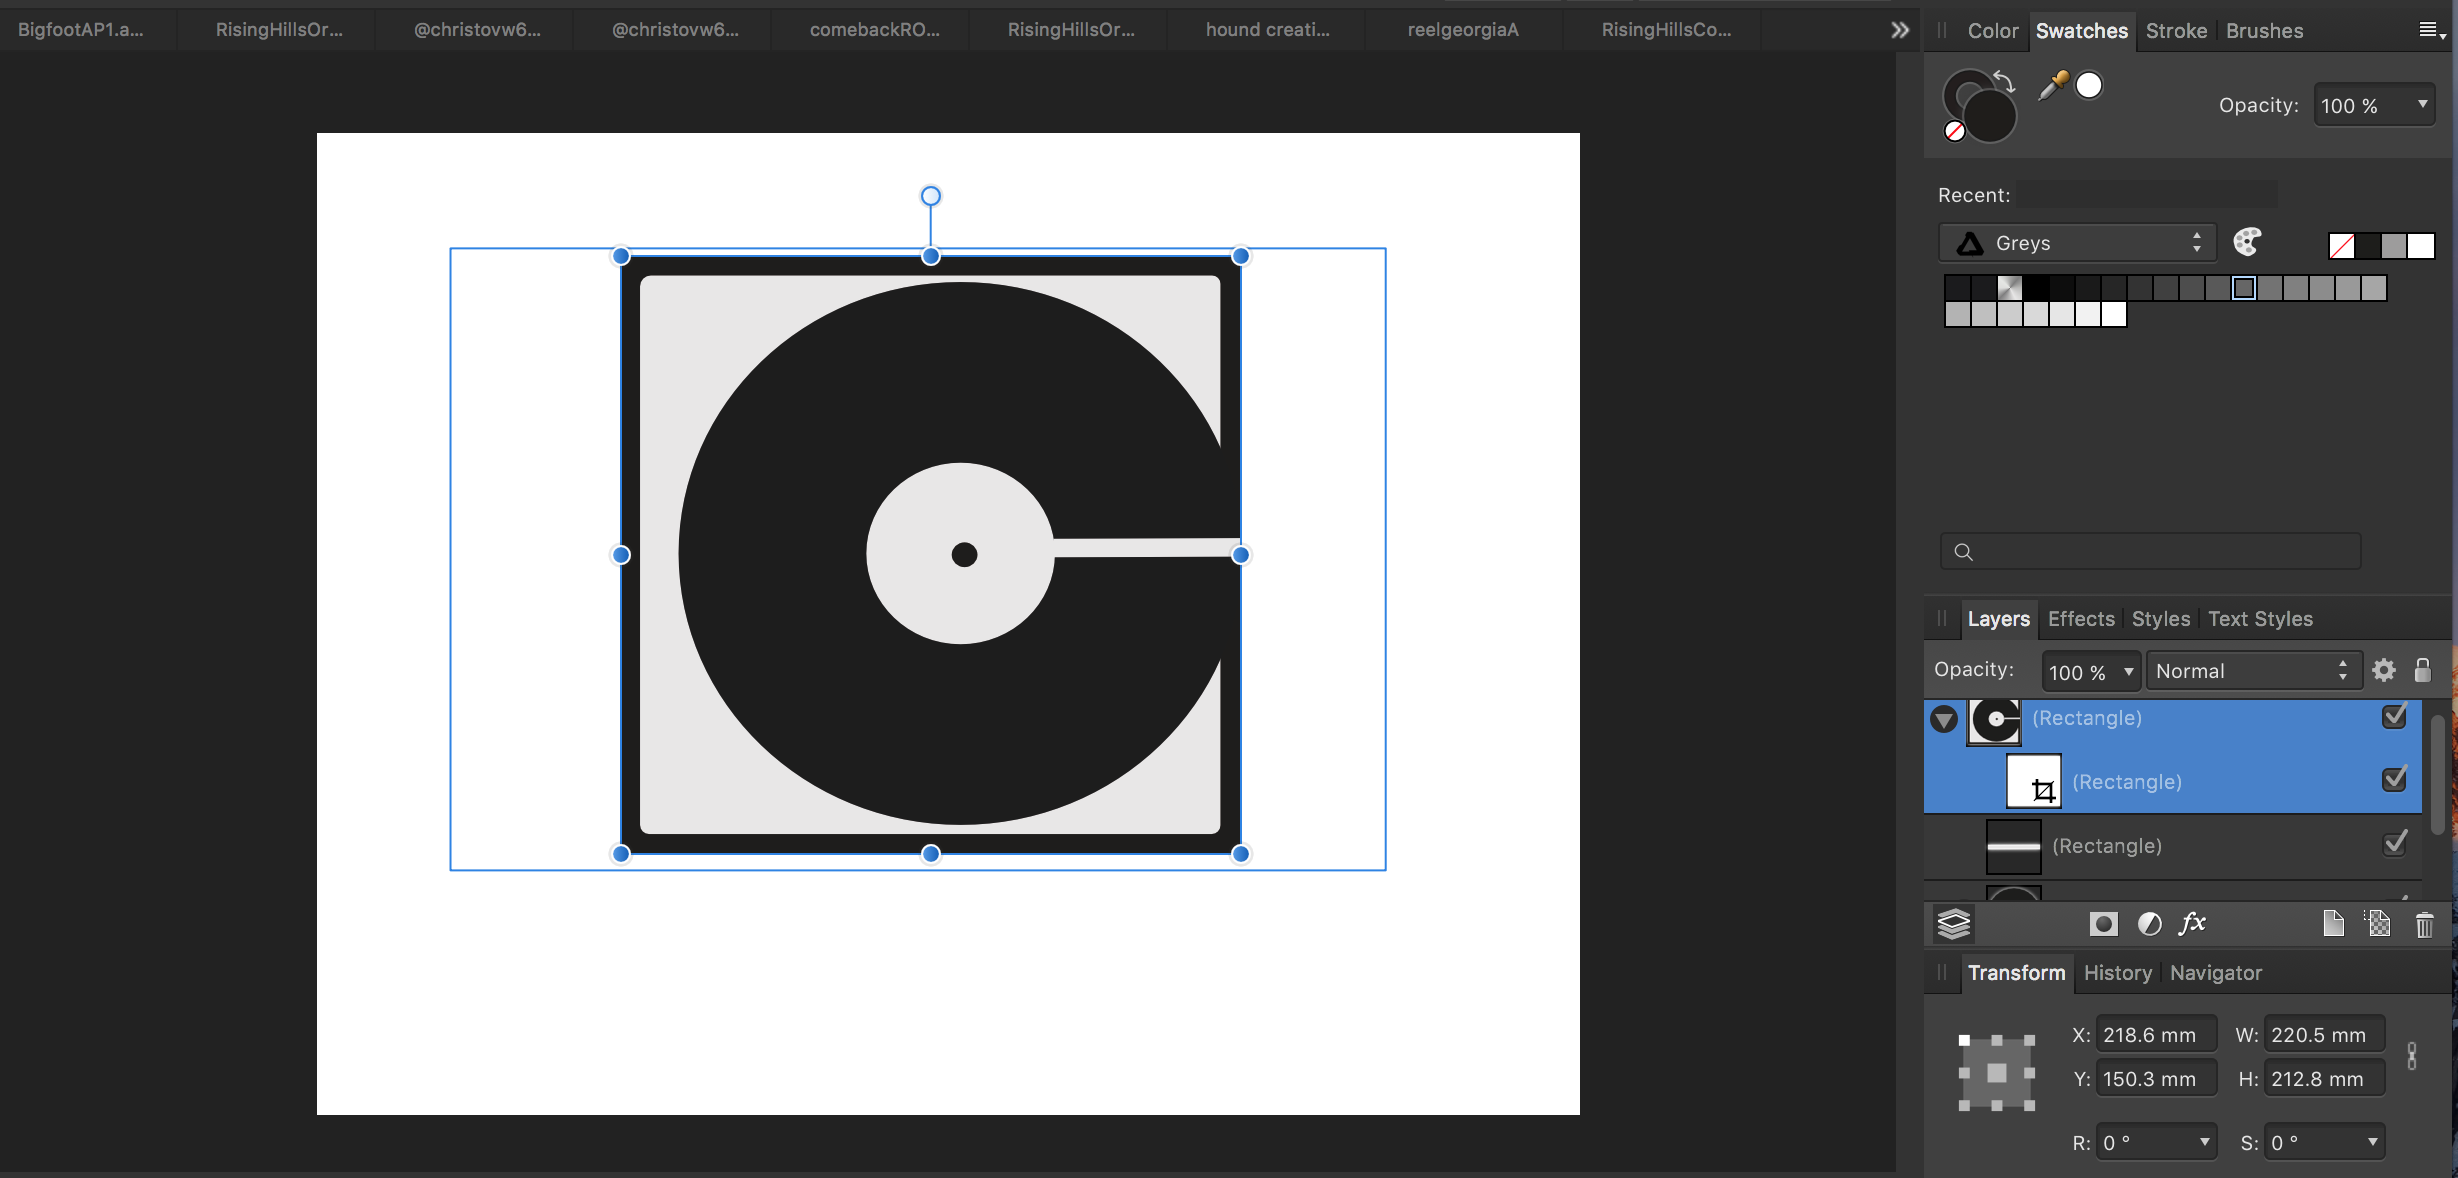
Quick and simple question guys... What is the best/most efficient way to reduce the outer dimensions of this document, while MAINTAINING the size of the logo image within it?...masking?...cropping? Not sure what direction to go. I attached a copy of the file for your viewing. My desired end result is a thin border around the outer edge of the white curved corner portion of the logo. Thanks! -Christo (sorry for all the newbie questions) @christovw66ComebackROUNDEDprimary2.afdesign
-
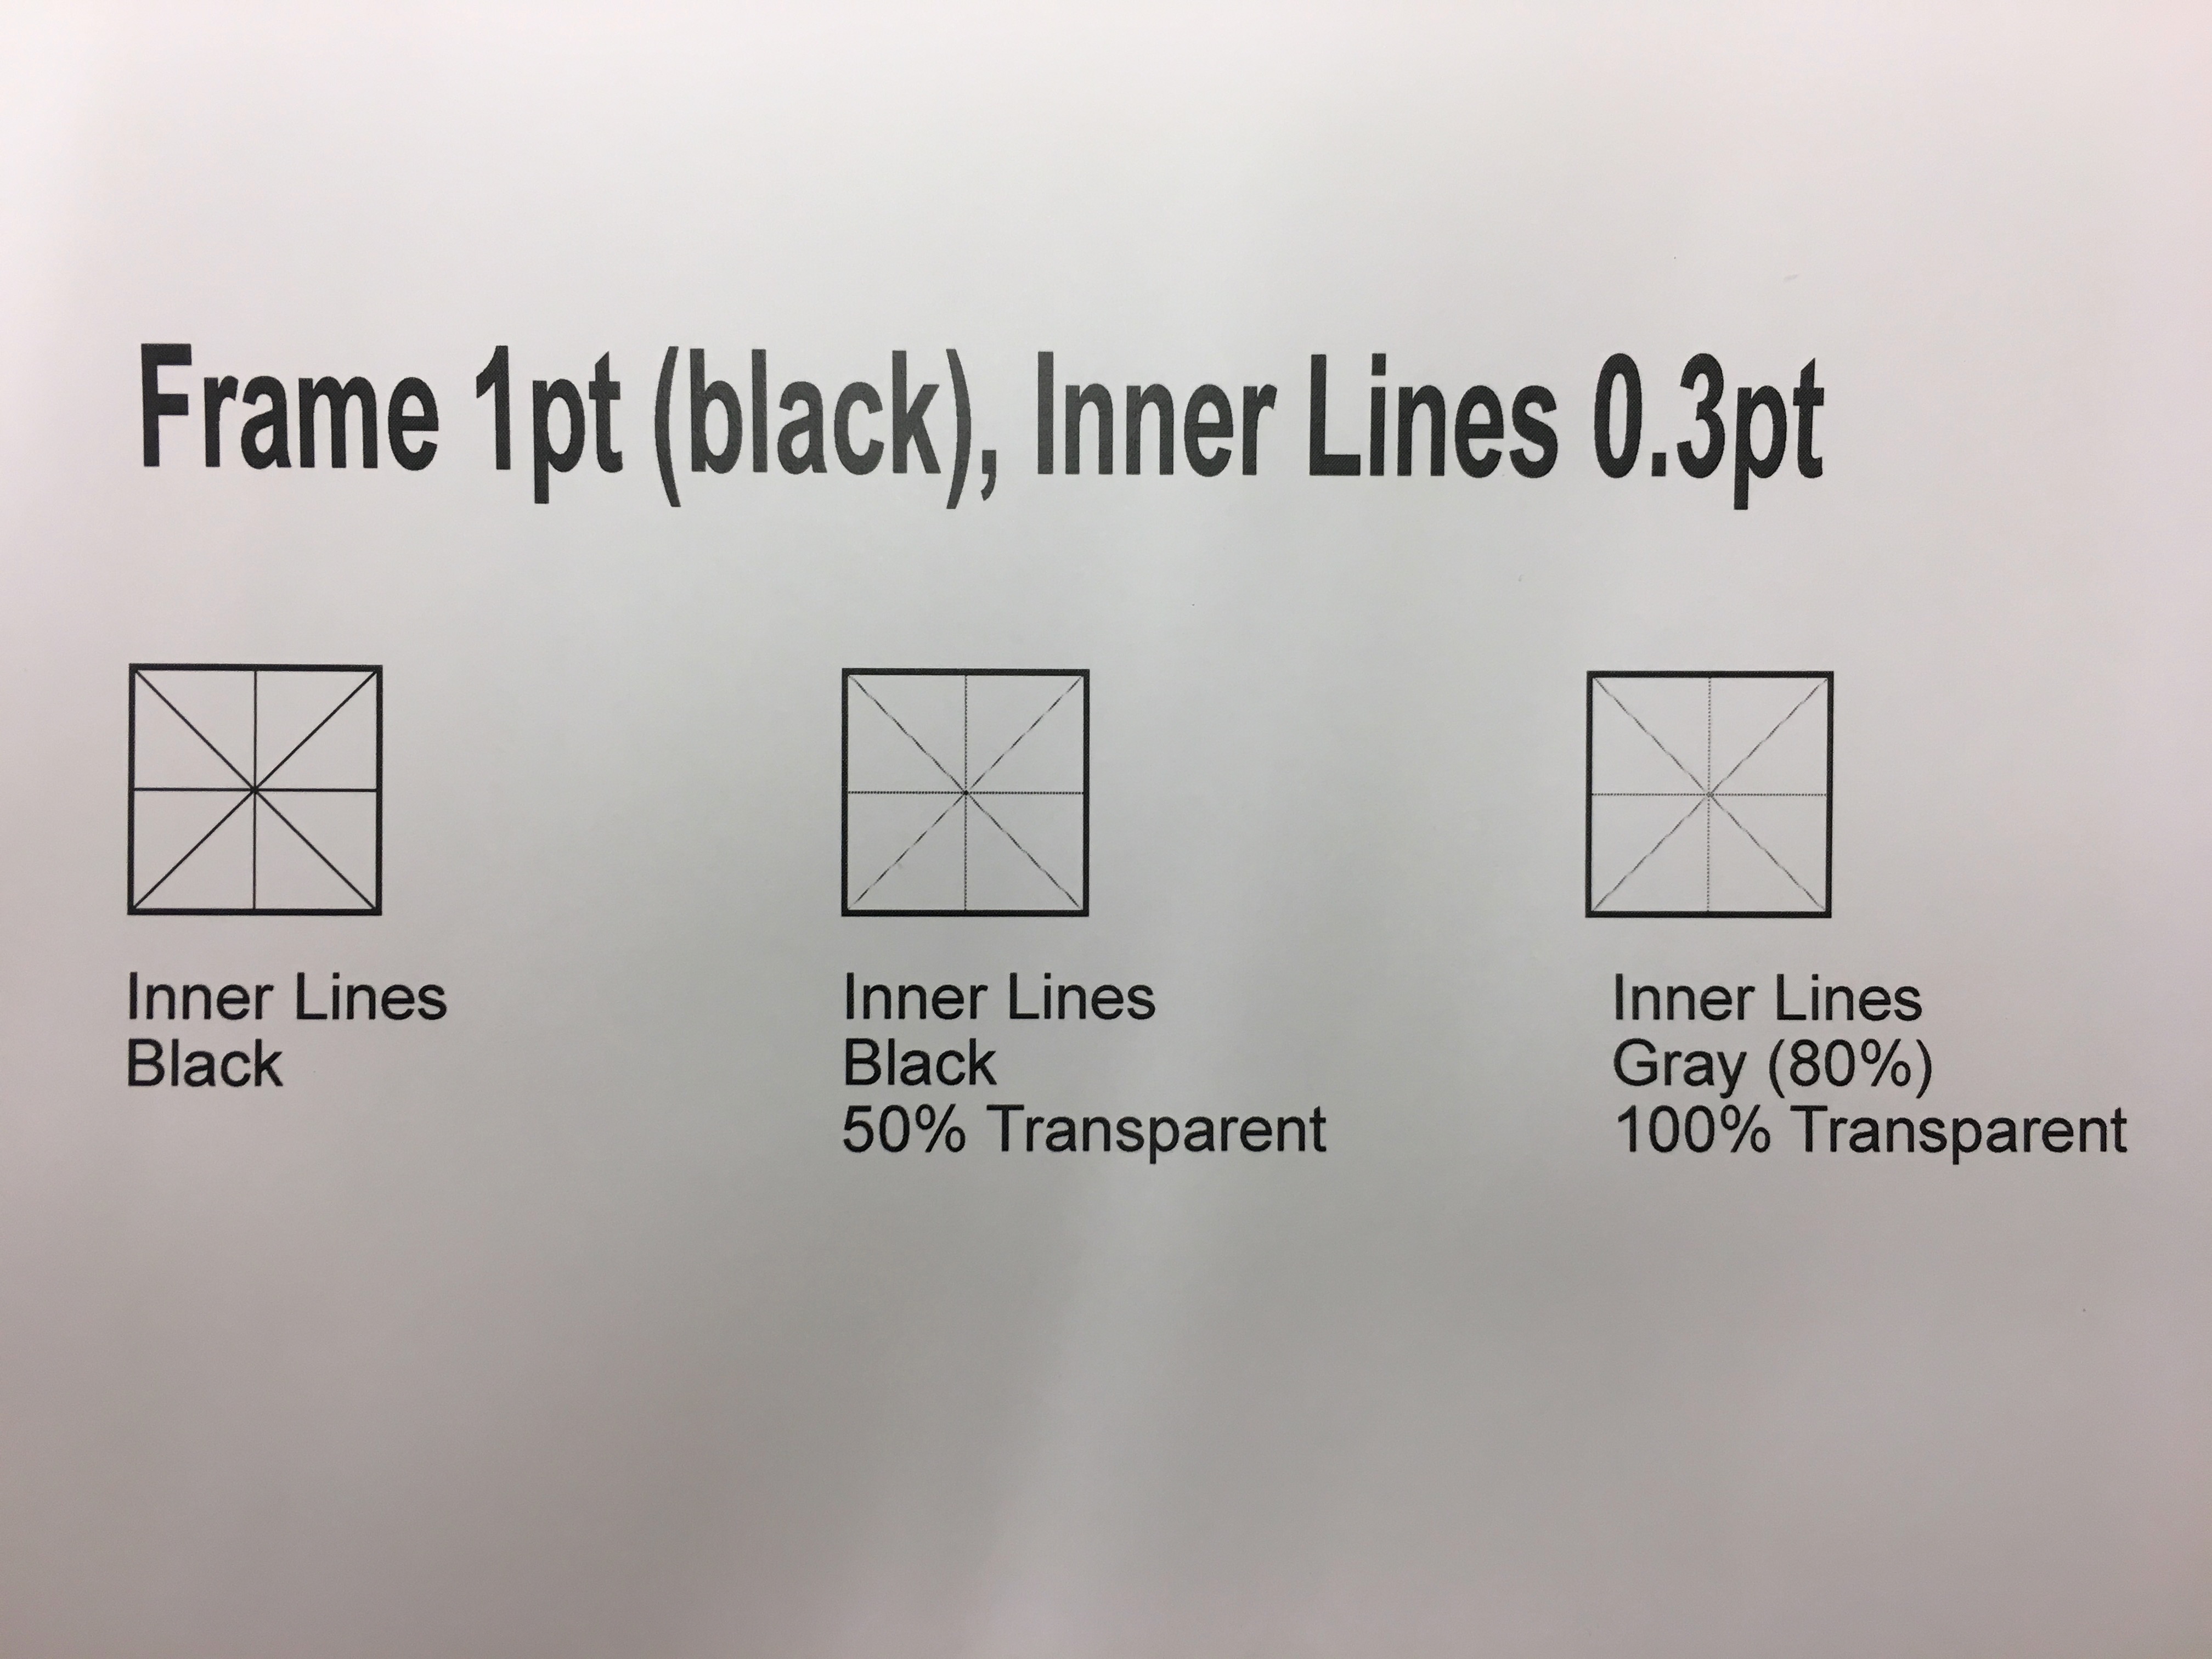
 I've the following problem: I just wanted to make a simple "symbol" with a frame (with a little bit bigger black contour 1pt) and 4 lines inside, somehow grey (and a little bit thinner 0.3pt). I could manage to design it quite fast (using a rectangle and 4 lines - using the Pen tool), but when printed, I had to find out, that the inner lines are somehow pixelated, when I use opacy or any kind of grey color for the contours. The black one is fine (see attached pic). I'm new to Affinity Designer, so I hope, it's just a problem because I did something wrong. Anyone any idea - what's the problem? By the way, the printer is not the problem. I checked it with other programs. There it works well. Test.afdesign
-
 Good news for us ! Perhaps I'm not the fist one but I found the way to use all the plugins of the Nik Collection in Affinity Photo. After installing the Nik Collection by following tutorials, we all have the same problems : Viveza 2, Sharpener Pro 3, Dfine 2 et Selective Tool doesn't work. The problem come from the Windows format of the config file of each plugins. In fact, this file is a text file format with the .config extension. Analog Efex Pro 2 - natively works Color Efex Pro 4 - natively works Dfine 2 - you have to replace the Dfine2.config HDR Efex Pro 2 - natively works Sharpener Pro 3 - you have to replace the SHP3.config Silver Efex Pro 2 - natively works Viveza 2 - you have to replace the Viveza2.config (after a quick test, this one doesn't work very well, because of a color problem - I'm not enought competent to solve it) Selective Tool - can't works in AP because it's a sort of scripts panel to call Nik plugins with different ways - We could create similar actions with AP Macros. How and where replacing the .config files ? Go to the folder you create before installing the Nik collection / Google / In Dfine 2 folder > replace Dfine2.config (you have to login) In Sharpener Pro 3 folder > replace SHP3.config (you have to login) In Viveza 2 folder > replace Viveza2.config (you have to login) If you didn't erase the way to access to these plugins in AP's preferences, they works now. Enjoy it ! configs files.zip
- 2 replies
-
- 2
-

-
- collection
- fonctional
- (and 5 more)
-
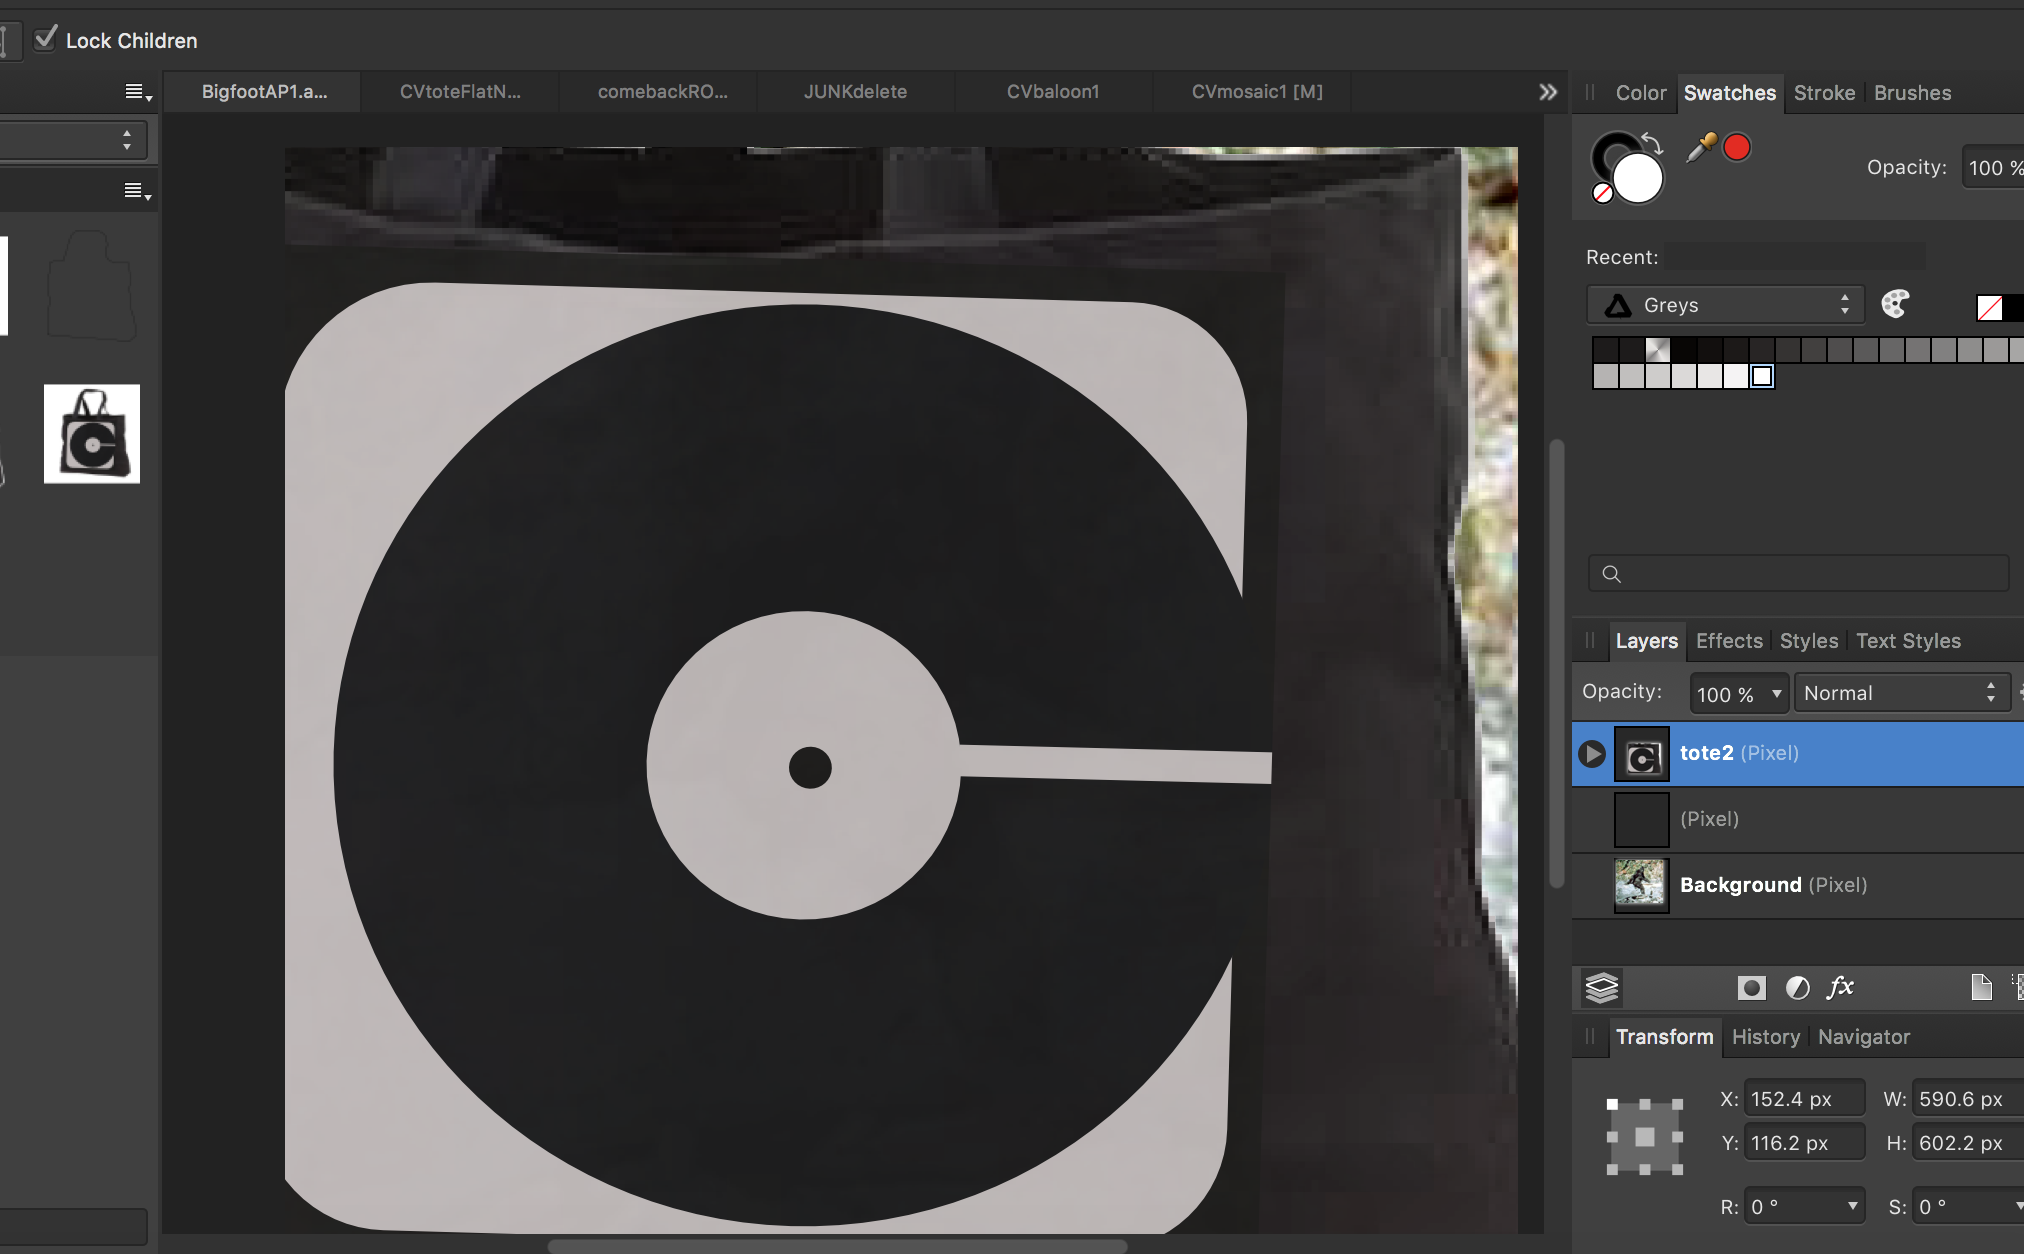
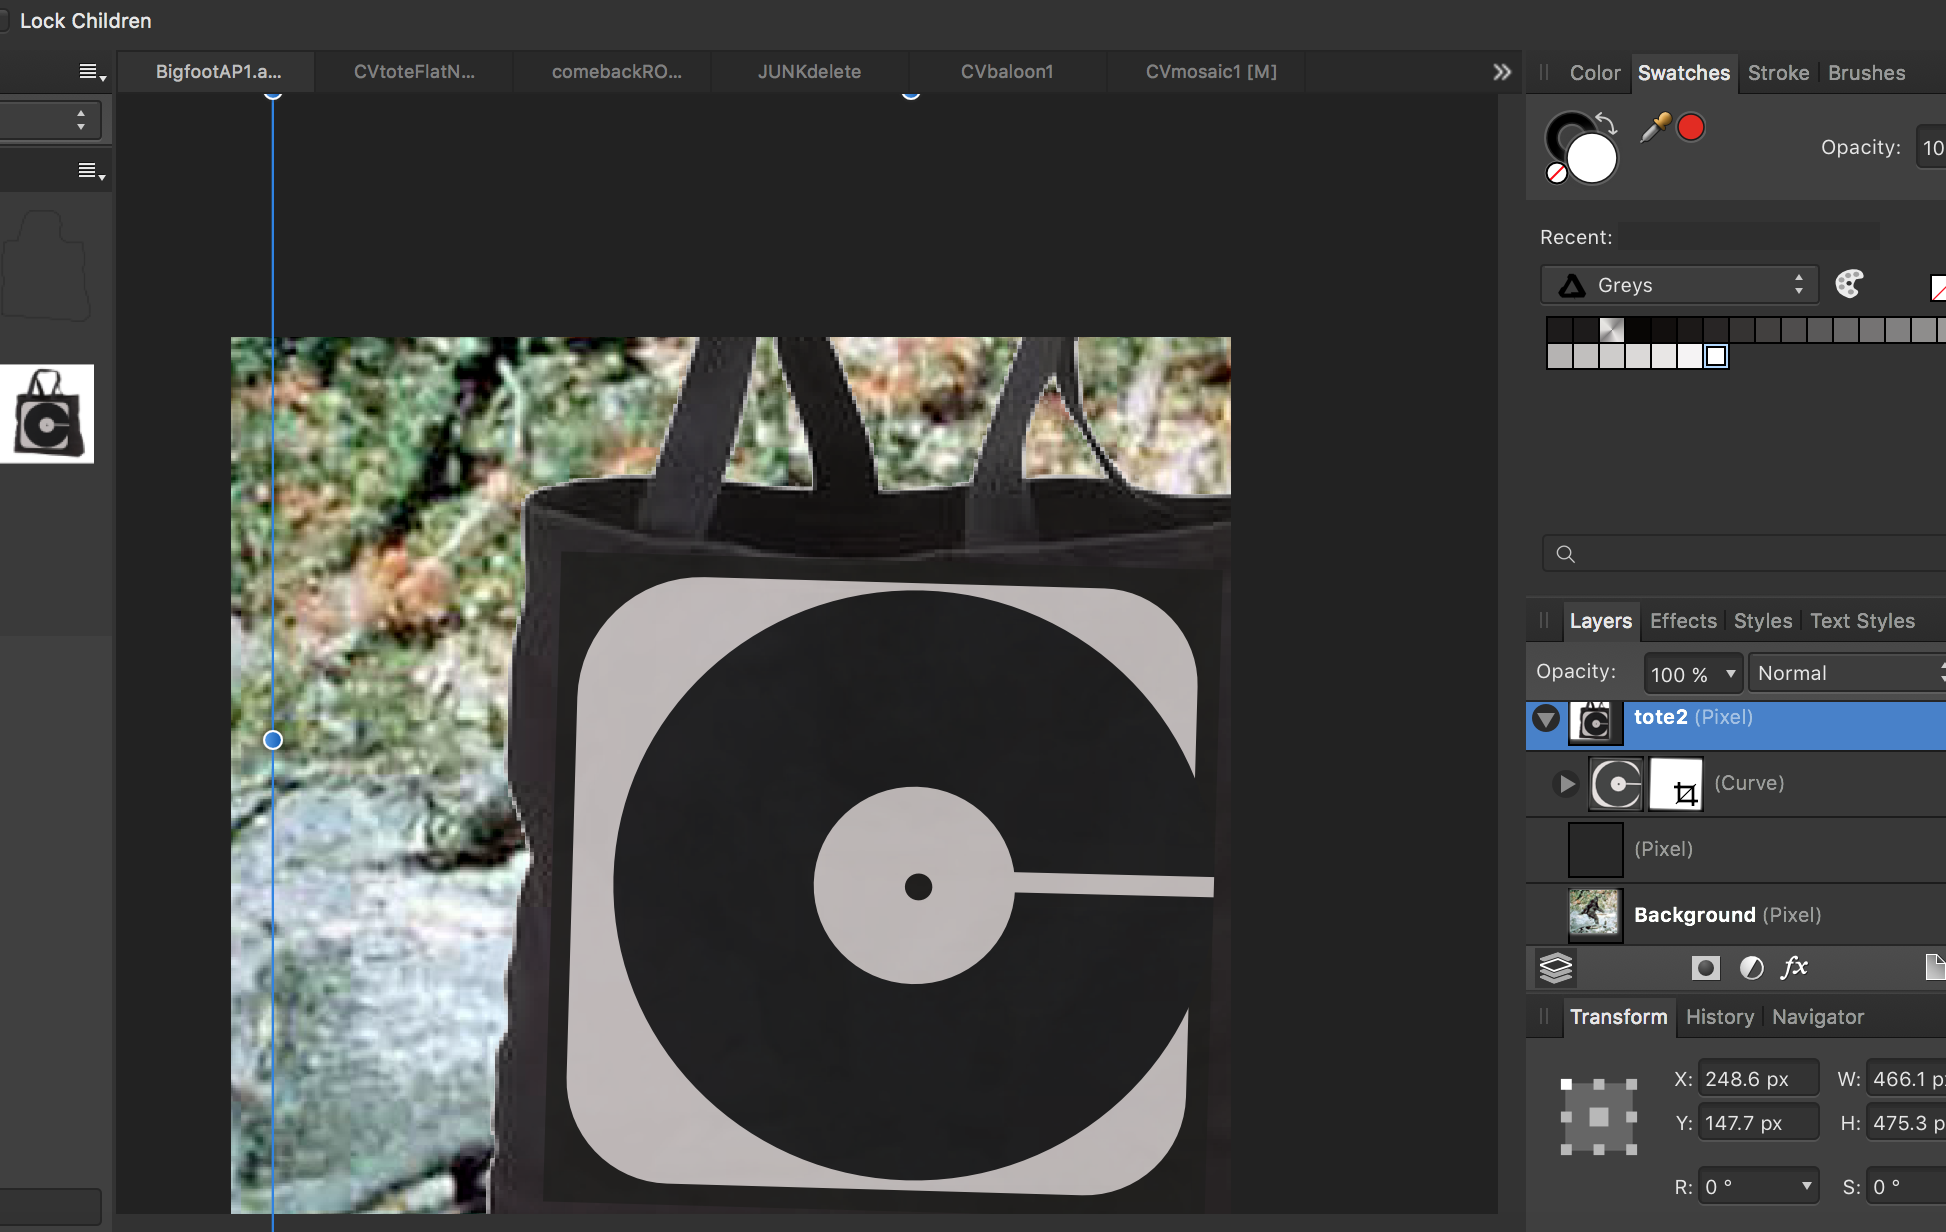
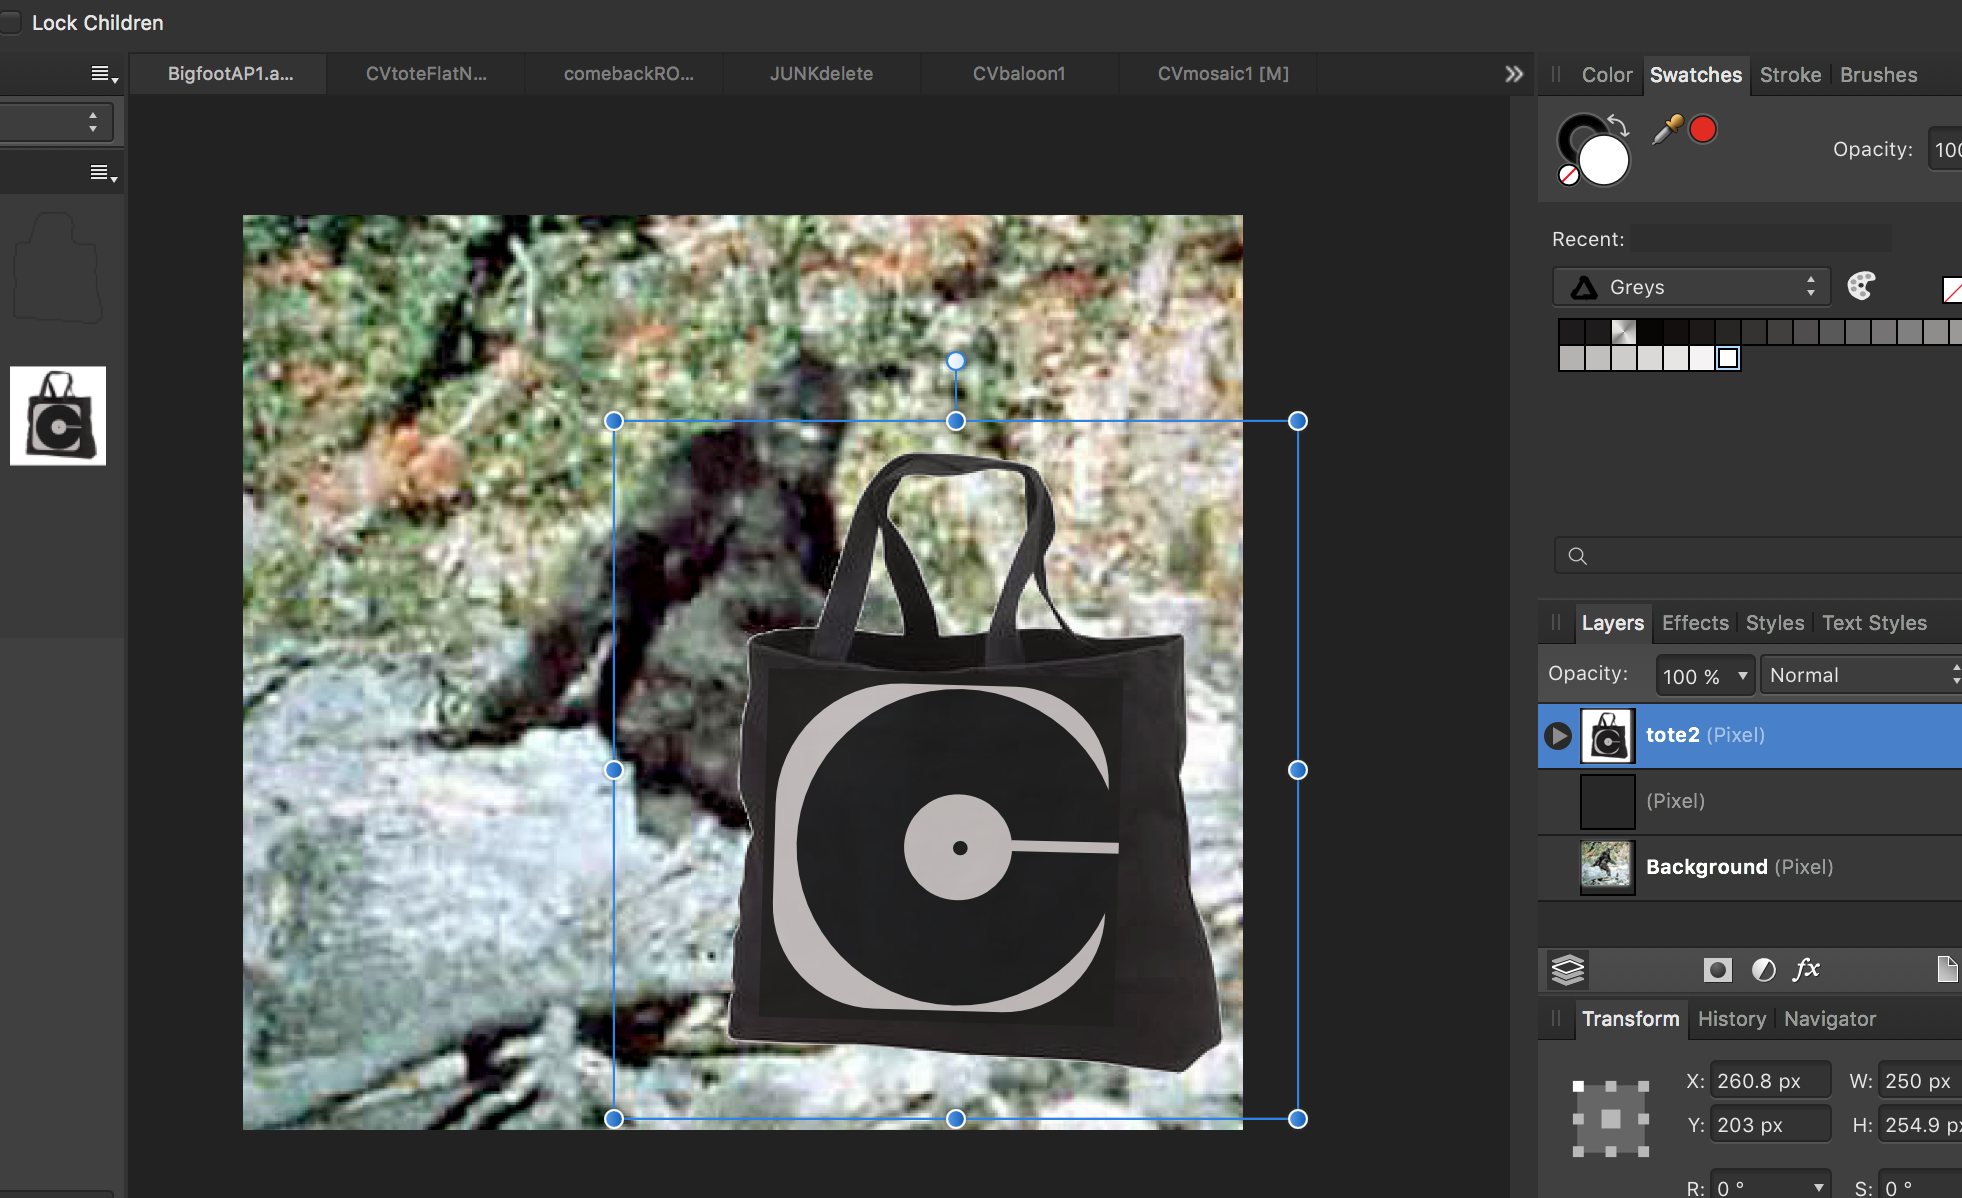
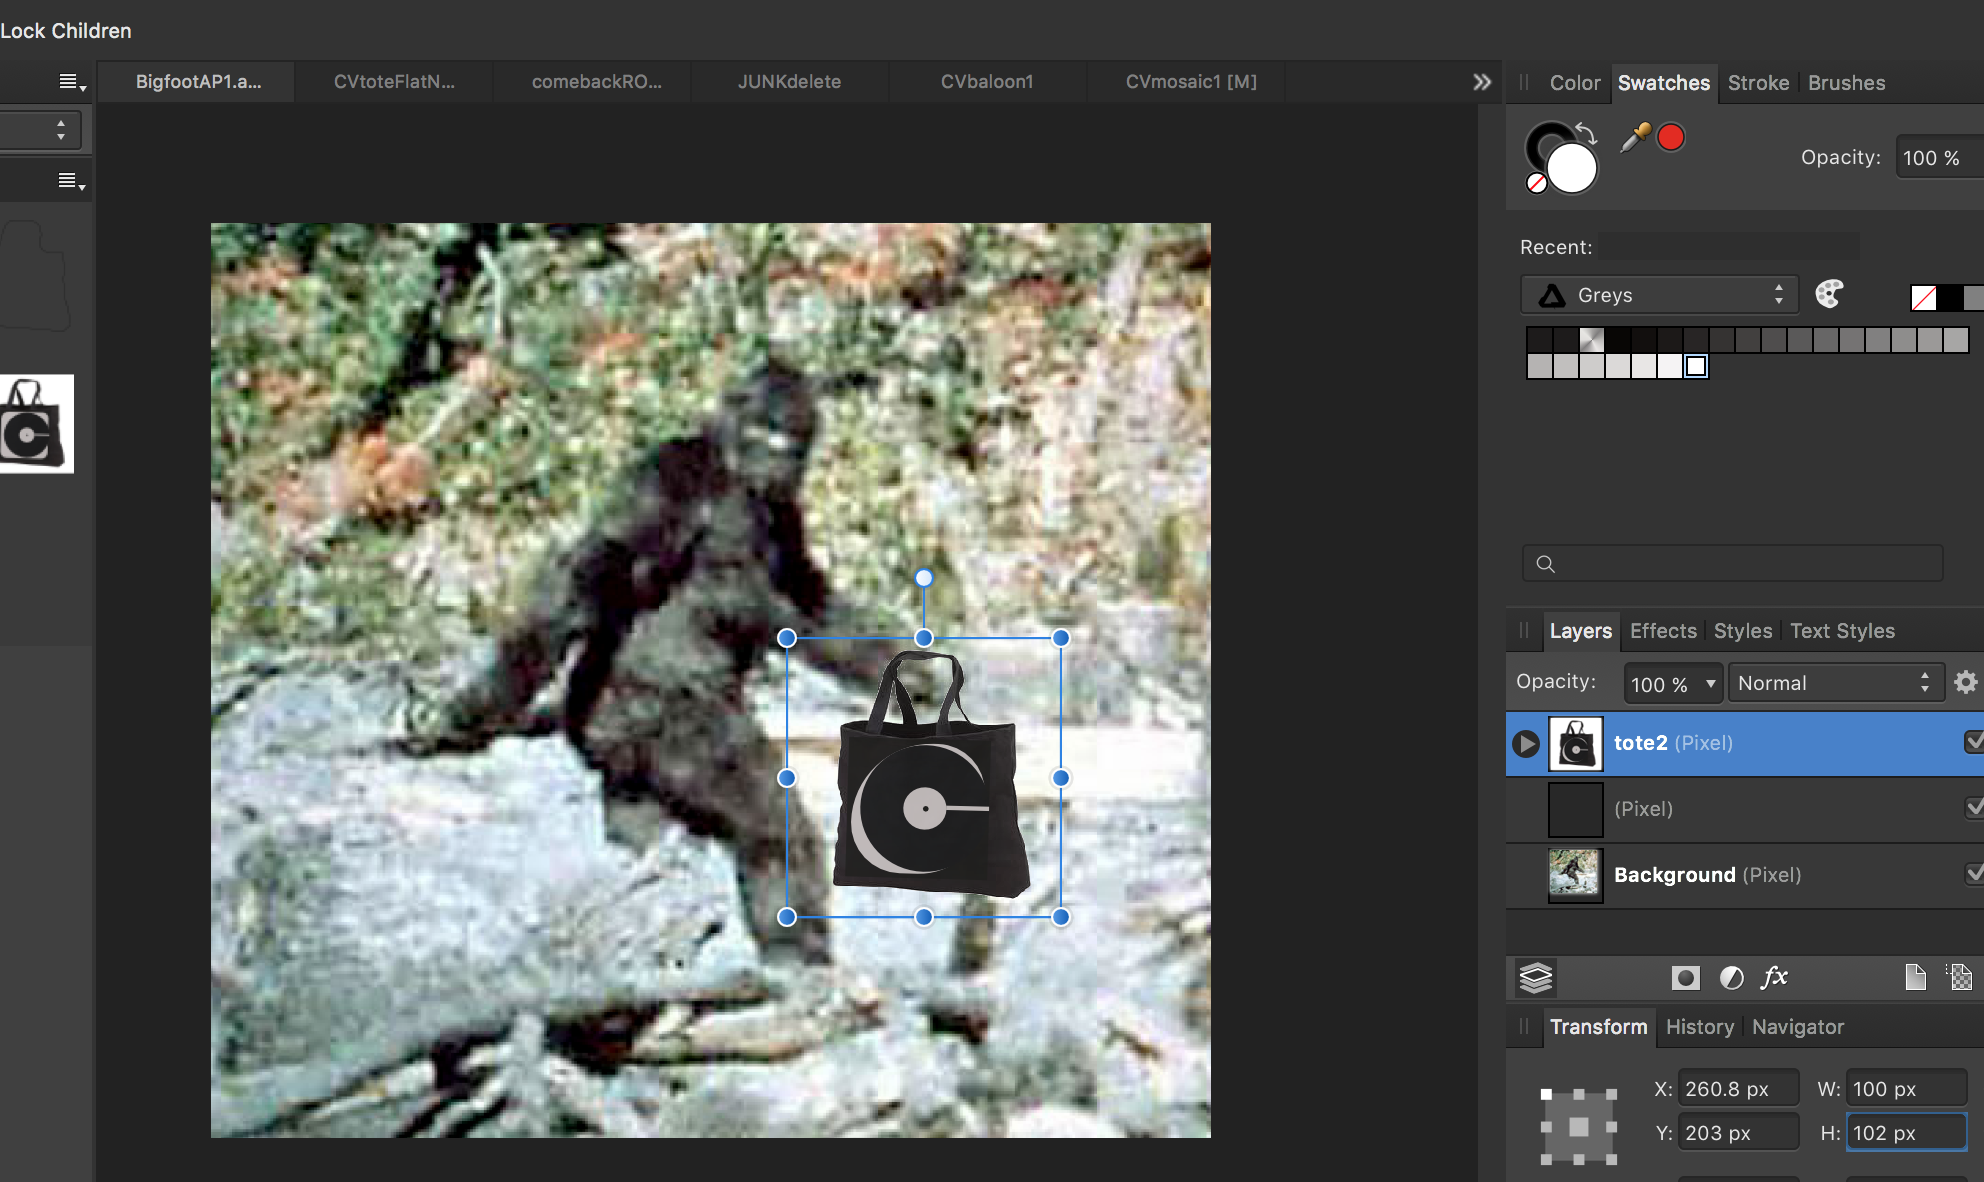
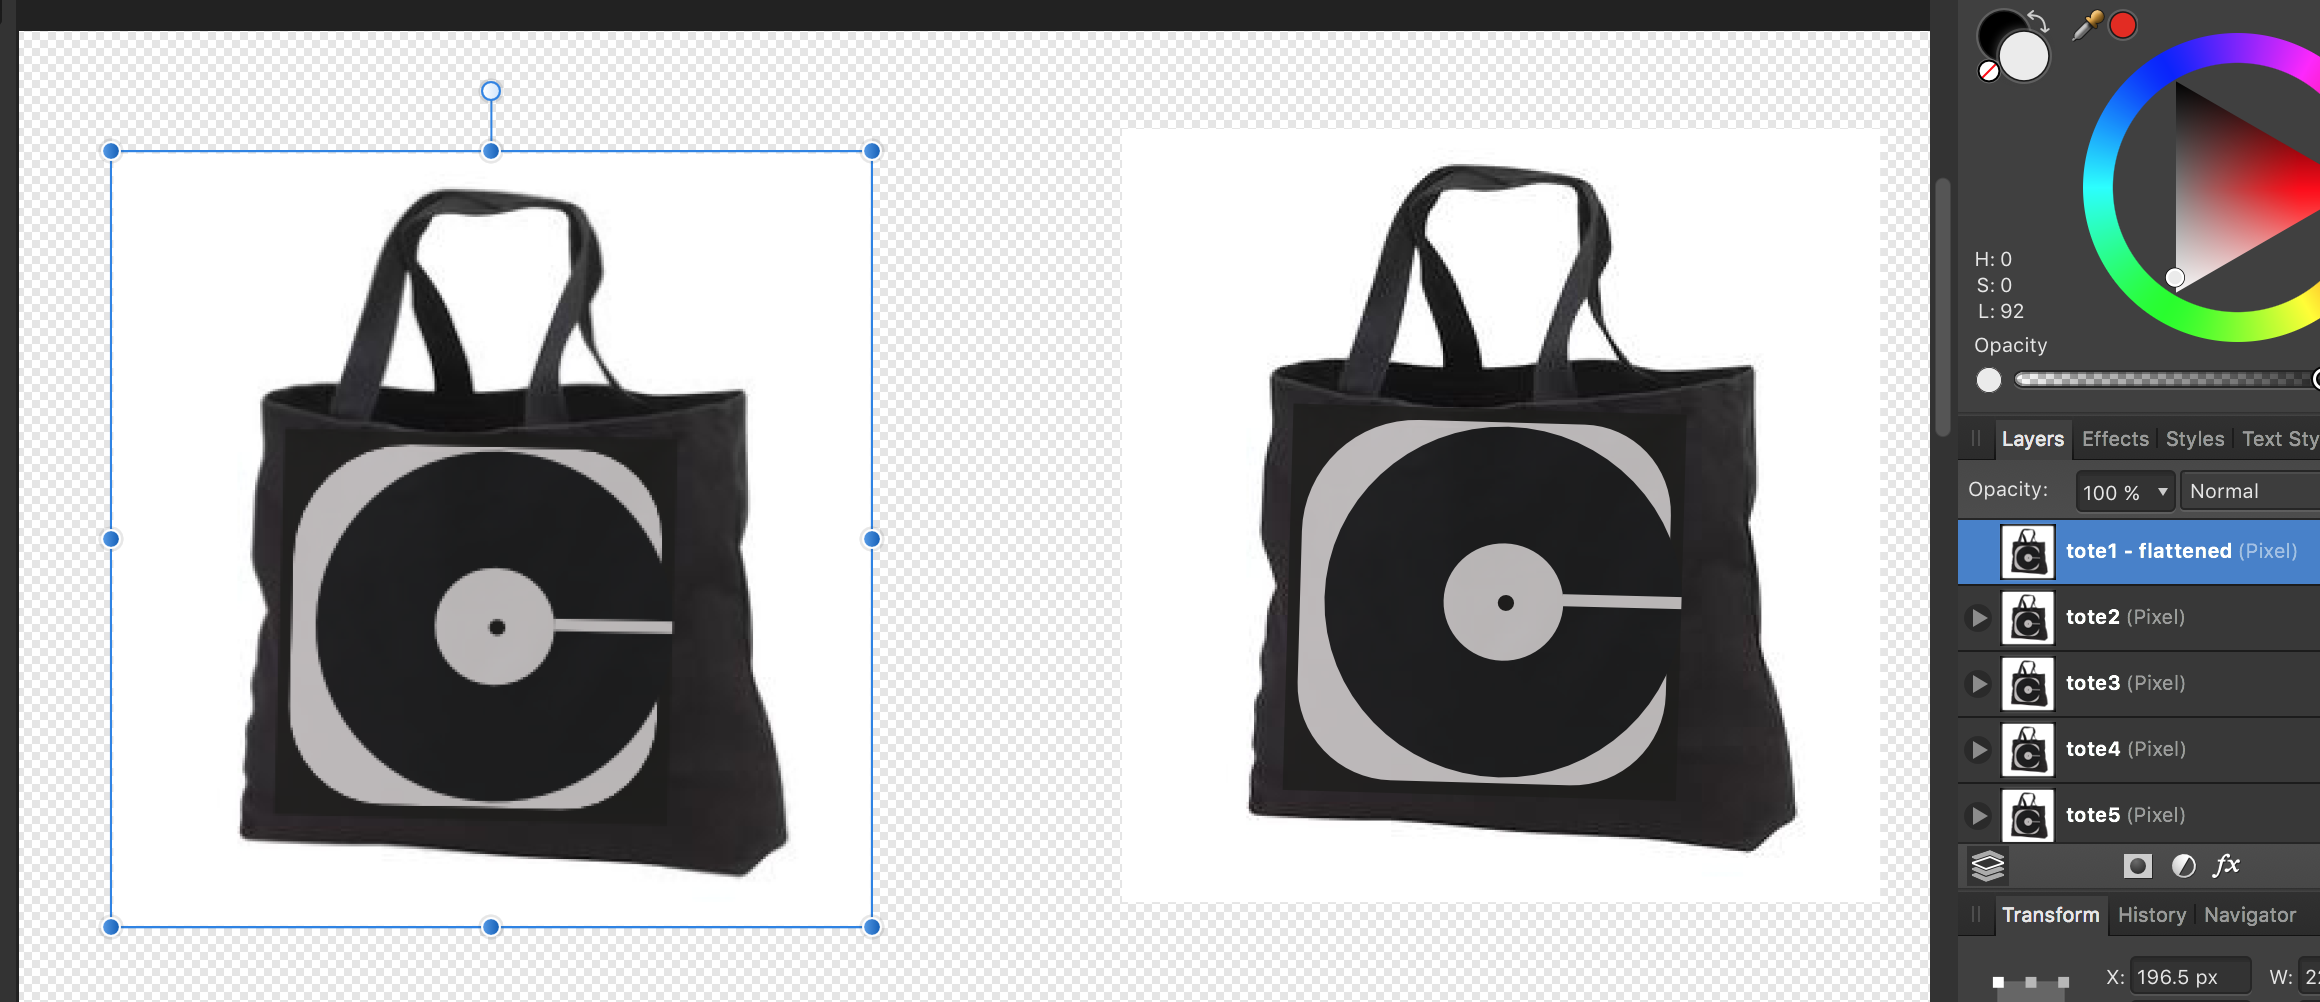
No doubt again something simple, again probably a simple fix, but I've already conceded my infant level AD knowledge - help please. How do y'all explain the following behavior upon my reducing the image size in AD, on a 3 month old MacBook Pro running AD 1.5? I've attached 4 thumbnails below to help illustrate. I drag a me-made asset (that stupid black tote bag) onto a photographic image of Bigfoot in an attempt create a crude image of him carrying a black tote bag with a logo on it. Obviously, the scale of the tote is way too large so I begin to reduce it's size. I used both the Transform Panel (W+H) as well as constraining via Shift/Drag. In both cases, the smaller I reduce, the more I see proportional changes in certain layers in the logo (which are grouped). I did NOT have the 'Loch Children' box ticked - would this have bearing on the effect I'm getting? Most obvious IMO is the change in the curvature around the black 'C'...just saying. Thanks for any help! (I love playing with this program - can't wait 'til i have a better grasp of it all) -Christo
-
Could someone please walk me through the steps required to insert an image I've created and saved as an Asset in AD 1.5, that I know want to insert in a photographic image I have in AP? I'm early in the learning process and still shaky on some of the most basic of operations. For example, I am unsure of the best/proper way to combine two separate documents (in this case, one in AD containing the Asset with the photographic image I referred to in AP) in order to lay the one on top on the other. Would this require me to export the AD Asset as a slice, then import into AP? I really am lacking in knowledge here, apologizing in advance for the elementary nature of the question. I'm working on a new MacBook Pro with AD 1.5 and just-purchased AP software. Thanks all! -Christo
-
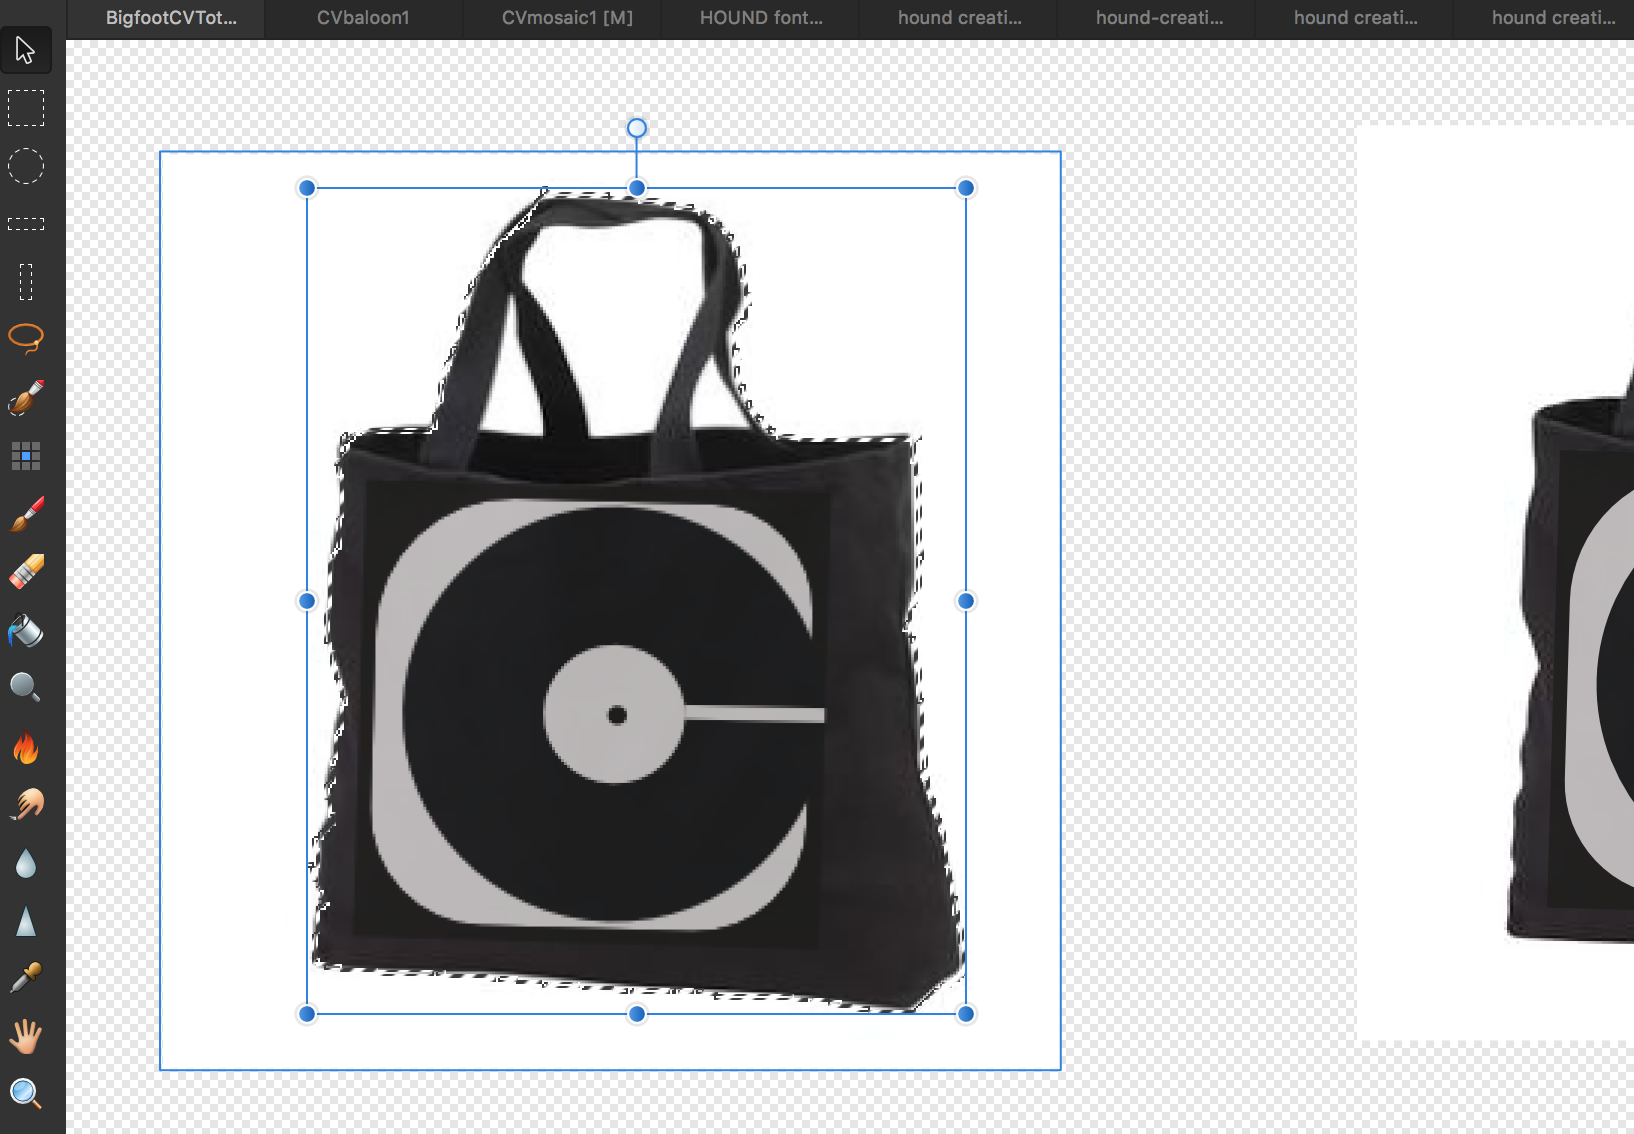
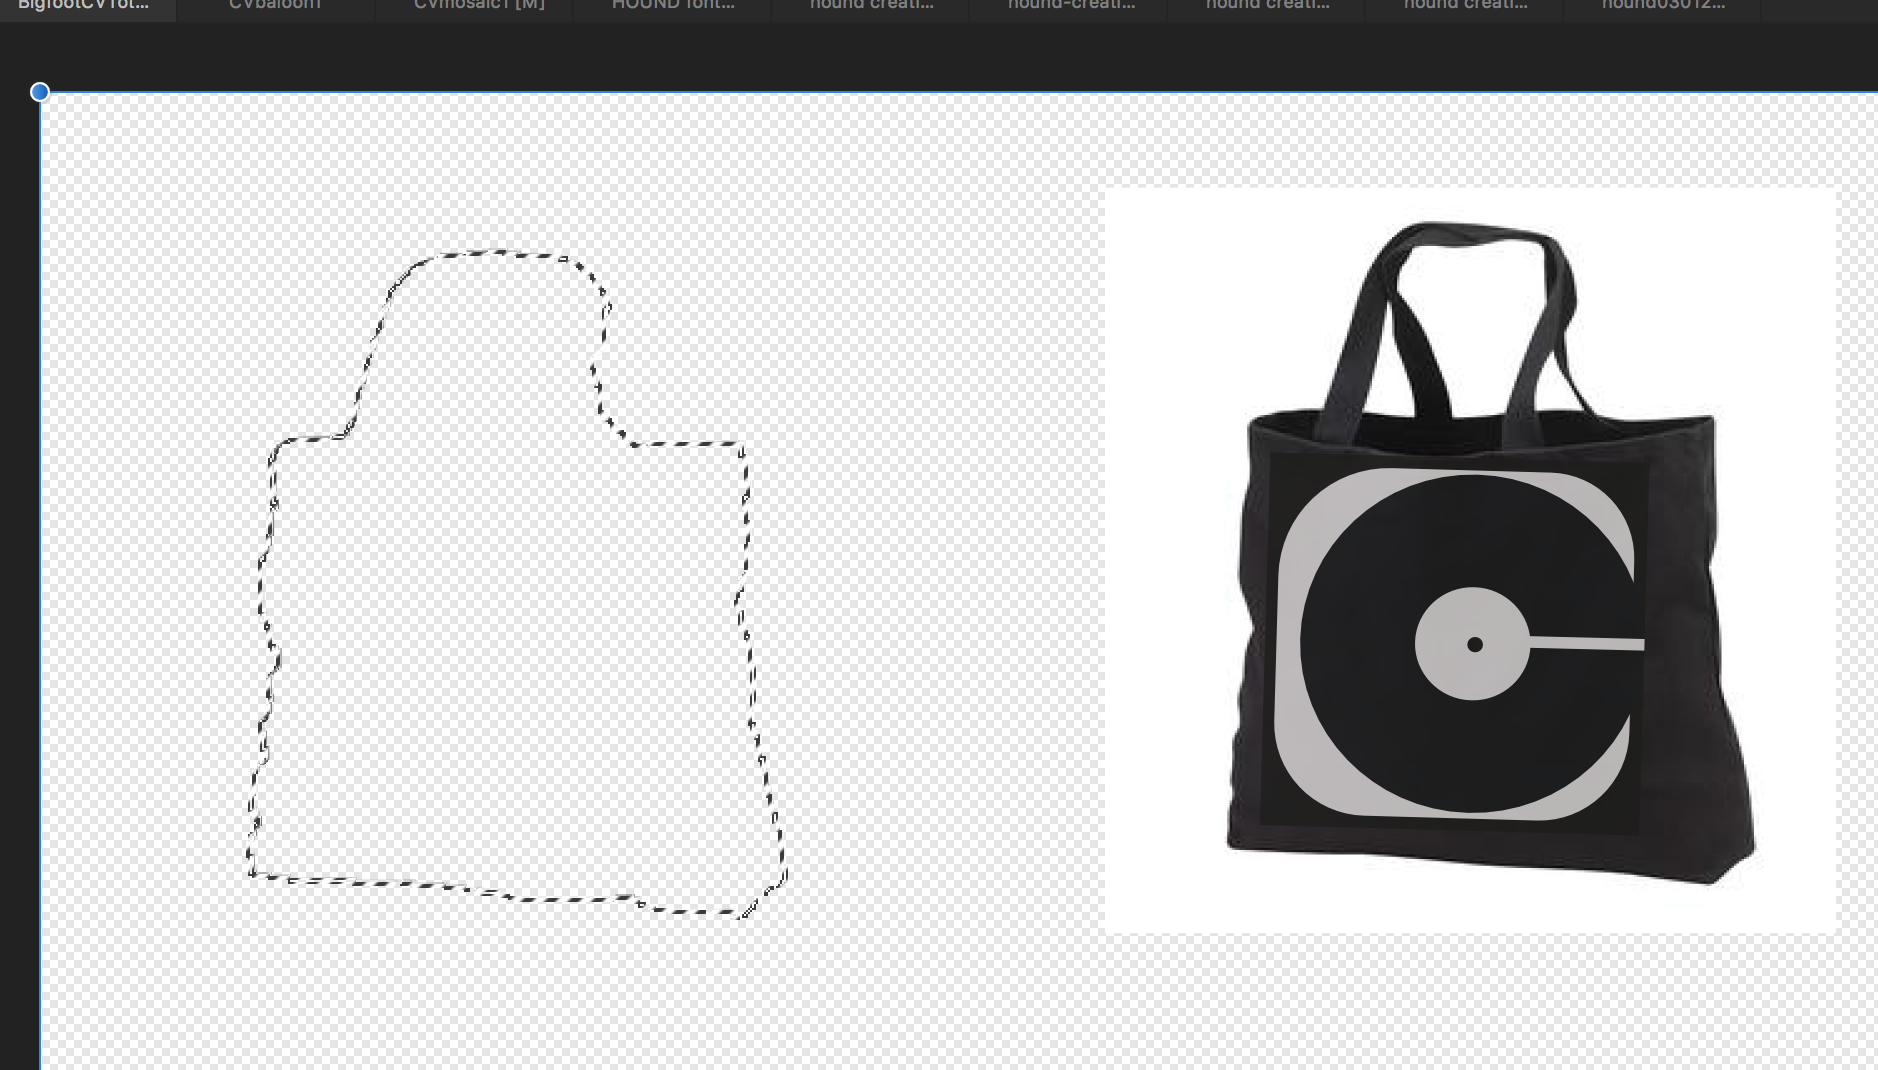
Dudes/Dudettes, a little help please... Missing something obvious and simple again, I'm sure - and I've sincerely tried to research the forums myself, doing my own leg-work but am just stuck on this one. This time I brought along some visual aides. Working on a MacBook Pro with AD 1.5, all I am trying to do is remove the white background behind this black tote back (see images below). After surveying the forums, I understood that in order to accomplish this I needed to do the following (please point out my error): 1) add new Pixel layer over image 2) outline the image wanting to kept using Selection tools (I used the Brush selection tool)...pardon the crudely traced selection line, I'm just practicing 3) Invert the Pixel selection (I used the Ctrl+Shift+I keyboard shortcut)... **this is where I'm stuck - a post in the forum says to now 'paint in the selected area'. Would I not used the In-Fill tool by selecting a color then clicking on the selected area? This is what I tried, yet was unable to paint-in the selection. Feel like a major dork here guys - what am I missing? -Thanks as always AD Fam, --Christo
-
 I am new to Affinity Photo and so far I really enjoy the software. I am using Affinity for Mac, on my Macbook Air. I would like to set the default for my photos to open in AP at 100%. I cannot figure out to set it as the default. Can someone please help me out on this.
 -
 Hi all community !! I'm french, sorry if my question isn't good translated in english ^^' but, well, I would like to know if Affinity Designer can export in real vectoriel ??? (this is important for me before buy it). And if yes, how ??? I never found on BETA / TRIAL. T.T And the second question is, if I buy a license for Windows, can I install the application on Mac OS too with the same license ?? I'm working at home on PC - Windows, and when I travel, or go to working place, I used a Macbook Pro ^^' I think to use the same account / adress mail / etc.. So I hope to install on Two device !! :) thank alot for your answers :) PEACE -
 -
 Hi everyone, Please can implement the feature to export UIBezierPath Swift and Objective C code from the drawed shape as the PaintCode and QuartzCode apps? It will be very helpful for a lot of developers, maybe can create a new 'Persona' section. Thanks
-
 Hi, i Have a question about the license ! i have bought both apps in applestore for my imac. but now i love these apps ;) and want it on my laptop too . The problem is .. on my affinityaccount on web i cant see my license keys becouse i bought it in appstore apple. my first question on how many Computer can i install one license? Can i install one license on both Systems (Mac / Win) ? And if yes ...How can i do this ? And Where are my License-Keys if i bought my app in Appstore apple? Thank you for answere by the way... FXXX ADOBE *lol* Your Apps are Awesome , Great the best Altanative to Adobe
 -
 Hi, I do have Affinity Photo for my Mac and I want to use the programm also on my Windows work station. I don´t have to buy it again, do I? How do I set it up for Windows when I bought AF through the AppStore...is there a key anywhere? Greetings Kai
 -
 Hello there, folks! My iMac has failed me and I can't buy another one. Is it possible to switch licenses? I onw a Mac version of both Affinities; can't they turn to Windows ones? Thank you! All the best.
 -
 its impossible to set in the current versions of Ad & Ap the brackets [ and ] in the keyboard shortcut settings for changing the brush sizes on a German Mac OS. Even the program itself is set to english. Its it a know problem for a long time. Will this be tackled in the coming update?
 -
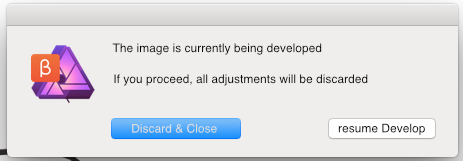
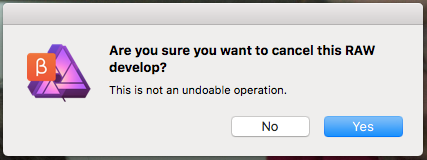
 I'd like to raise awareness to an issue that's bothering me (and apparently a few others) for over a month now. At first I hoped that my muscle-memory would get used to it; but a few hundred raw photos later, it's still as annoying as the first day. I'm referring to the way one can exit/quit/cancel development: it's very counter-intuitive. - It's totally understandable that one cannot proceed editing the image, if it hasn't been developed first. - It's also understandable that the adjustments in the develop persona, cannot be retained, unless the image gets developed. here are the quirks and some workarounds: - If develop persona were implemented as a modal, the Esc key should allow one to... escape. - If develop persona is not a modal and is a window/tab then Cmd+W and Cmd+Q should both allow you to close the document just like pressing the Cancel or X button (of the tab). The current message box when pressing Cmd+Q/W, is not meaningful: it's merely stating that you have to click elsewhere to cancel/close/quit. Why all the hoops and loops? This is particularly inconvenient when having dozens of develop personas open and you decide it's time to quit the application (or close them all). What could had been done with Cmd+Q is now mouse gymnastics! You have to close every develop persona individually, with the mouse, before you can quit the application. - The cancel button, and the X button, shouldn't act differently: As it is, the X button never asks for confirmation, whereas Cancel always does! - when you haven't made any adjustment in the develop persona, canceling should not ask for confirmation. It should be performed silently. - The confirmation should be rephrased. The yes no buttons are not very helpful. Yes, I want to cancel? Yes I understand? Yes I want the file saved? Yes I want it developed? If it were a rare occuring dialog, it would be okay to have and read all the text to know the meaning of Yes/No, but I see this dialog more often than I am asked to save a file, and I guess others too; so the buttons have to be as self-explanatory as possible; or the text as short as possible. eg. "Discard Changes?" Yes/No An example (not the most thought out apparently) follows - it shows two self-explanatory options: "Cancel & Discard" and "resume developing". It could had been "Discard Changes" and "do not discard" or it could even had been 3 buttons such as "Discard Changes", "resume"/"return" and "develop and Save as...", but you get my drift: it needs rephrasing. - Pressing the Esc key while the confirmation is displayed, should work (currently it does nothing). Hope this helps :) -Fotis Now that I got it out of the system,I have to say that I've started to really appreciating the Serif raw engine (and its speed) compared to other raw develop options!!!!
-
 Hi everyone, I have a question, can i transfer Affinity Photo from Mac to Windows, because I purchased Affinity Photo for 50€ on my Mac, but now I'm working on a PC with Windows, so I would transfer the application, is that possible, and how does it work? Thanks! Hannes
 -
 Hey guys, I was able to drag n hold an vector/image onto another vector/image and an purple color indicator will flash once at the bottom object to indicate you can now snap your current selected image/vector base on the bottom vector/image. But now I can't, in not mastered in AD or any other illustrator app, so I not sure where to chance the setting to able it once again. Please help, it's urgently needed!
 -
 Is there such a guide to download. In the store maybe? As a beginner I find my self going screen blind after spending so much time going between the online help menu and my project. It would be nice to have a hard copy and maybe there is one and I'm just missing it. To be able to read through certain sections away from the computer would be beneficial in my case. Obviously I know I could load and shoot the sections in the help menu, just thought I'd inquire. Thanks anyone,,,
 -
 I was working on an Affinity Designer (Mac OSx Yosemite )document for three hours without saving (yes I know!) when AD crashed. So I reopened the working document. I don't remember seeing an option to recover an autosaved file but is possible that it was there and that I missed it. Anyway the resulting opened document is the last saved version of three hours earlier. I haven't closed AD yet because as I understand I will loose the autosaved file. Following answers in this forum I looked for the autosaved files in: ~/Library/Containers/com.seriflabs.affinitydesigner.beta/Data/Library/Application Support/autosave There I found two ".autosave" files. Opening the first it told me that it couldn't open it because the file was already open. So I closed the opened AD document and went back to the autosave folder to find only one ".autosave" file. When trying to open it an AD message window tells me: "The file is a linked file, but the parent file could not be found." According to Finder the autosave file is there in the autosave folder with 323.7mb but according to AD it is just a link. Is there a way to get to the actual file? I would appreciate any help. Thanks
- 1 reply
-
- 1
-
-
- autosave
- affinity designer
- (and 1 more)
-
 I'm reading in three Nikon NEF (raw) files as an HDR stack, tone mapping, with the Assistant set to create a 32-bit result. After this, in the Photo Persona I'm using the Straighten tool in Crop. That leaves some areas at the edges that I then attempt to fill in with the Inpainting tool, which causes a couple of kinds of problems: Once, it filled in with a strange web of black wavy lines. Once it filled in but parts were semi-transparent. Several times, it's gotten up to about 80% Inpainting Brush progress bar and it just gets stuck there. Menus still pull down, etc, but it's frozen. I tries using Color Format to convert to a 16-bit, and I don't get a crash but do end up with odd behavior. Remember that this is transparent area at the edges due to the rotation. In the top right corner, it simply refuses to inpaint. On the left side, it did, but left some partly-transparent parts. On the bottom right, it inpainted perfectly. It's pretty quirky. This is with Beta 1.5 RC4, on a Touchbar MacBook Pro with the 460 GPU, running the latest Sierra Beta (10.12.2 Beta -- 16C53a).
 -
 I have bought Affinity designer on my mac, but I do have another computer with windows, and sometimes I work on it exclusively, the question is, do I need to buy the windows version to use it or can I use my account to download the windows version ?? Thanks, Erick
 -
 In the View > Studio menu in Affinity Designer for Mac there is an always greyed out "Show Left Studio" item. I can't find anything in the help topics about this so I would like to know what it does, how to use it, & why it is greyed out. Thanks in advance for your help!
 -
 Hello I just bought Affinity Designer a month ago for Mac but accidentally my Mac is broken and forced me to get me a new laptop. So I have to buy a new one, which isn't Mac but Windows OS platform instead. So my question is that is there any chance to change Affinity Designer from Mac to Windows? I just saw Affinity has released for Windows version. Best Regards, Buck