Search the Community
Showing results for tags 'Layers'.
-
 In the layers panel, when you disable (not remove) some effects on a certain object it might be worth keeping the "fx" icon in the panel but maybe with a red "X" through it so you know there are some effects applied to it but are just disabled. That way with a click on that "fx" with a red "X" you can toggle the effects on and off right from the layers panel. Currently when I disable the effects, the icon disappears and I don't know which objects I have tried some effects on... This way, at a glance you are reminded which elements have effects applied but are turned off.
 -
 Hi I have a simple form that I'm creating consisting of vertical and horizontal lines and some text. I locked some of the background lines so I could work on the ones that are in the foreground but can't seem to unlock them. I have no idea what I have done. I'm a pretty new user of Affinity Designer so my I'll apologise in advance if this is something stupidly simple. The document has been included as an attachment. Cheers Peter Time management.afdesign
 -
 Hi, do you know how to make the pencil tool occupy a single layer in affinity designer? since I make a new stroke it generates a new layer and the sculpt tool only works when the stroke is continuous
 -
I'm really happy to see that effects aren't in a floating dialog by default. Thank you! I hope that comes to the Window's variant of Designer. I haven't used DrawPlus in awhile..so it's possible it already has. One thing I always wished to see was multiple layer effects on a shape layer. So I could have 3 inner shadows layered on top of each other to create a specific visual effect.
-
 Please somebody help me on this issue. How can I lock a layer which I am treating as a BG in both designer and photo.
-
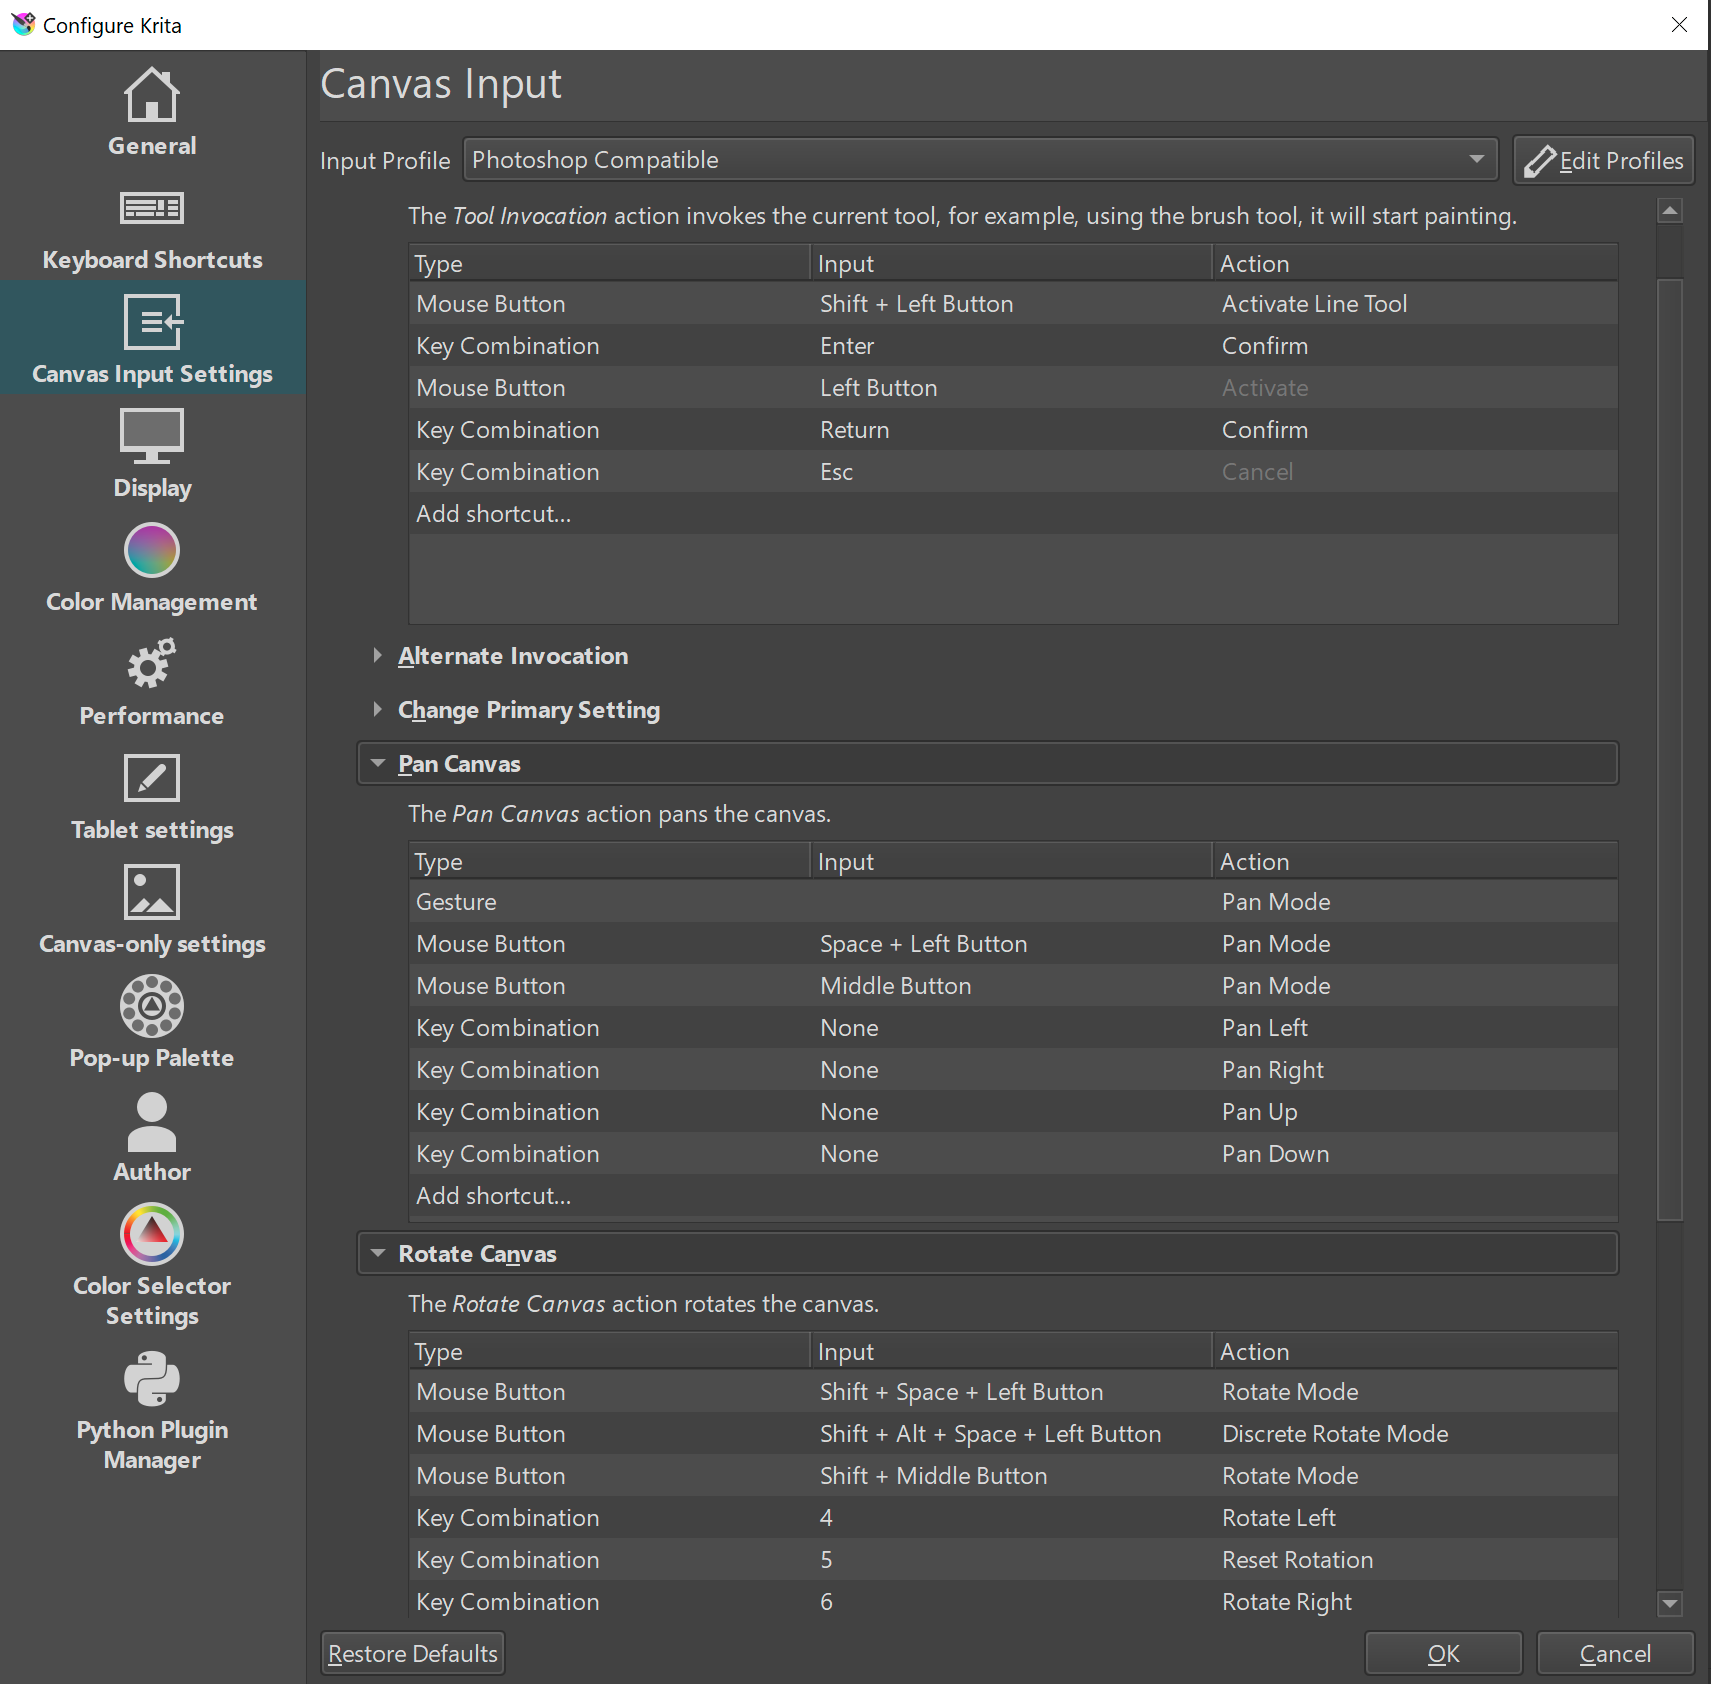
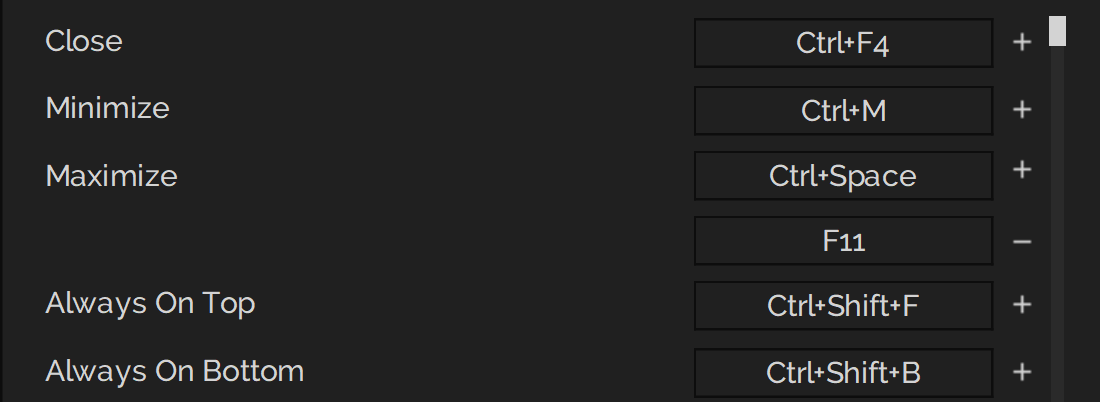
 is topic is all about keyboard shortcuts and the ability to use the software through custom keyboard shortcut functionality. With these suggestions I aim to reduce mouse movement and leverage the keyboard to alleviate muscle tension. Custom Shortcut to delete objects (for vectors), layers (including content and pixel layers. Perhaps, some may prefer there being separate options to delete vector objects, layers and pixel layers, though this proposal this particularly concerns deleting whatever is highlighted in the layers panel. Shortcuts to navigate through the layers panel by selecting the layer or object above or below. Illustration of 1, 2 using Krita, notice that I didn't need to move the mouse for this: F2 to rename layers/ objects (this is as though you clicked to rename the layer). Delete pixel layer content Illustration of 3 & 4 using Krita, notice I first deleted the layer, then undid this to show that you can delete the contents of the layer while keeping its location within the layers panel intact, as well as its name, the clear pixel layer content function circumvents the multi-step procedure of ctrl+a > delete > ctrl+d by enabling this operation with a single button press (e.g. delete, whereas backspace deletes the layer, but this should be user configurable). Delete pixel layer content and rename layer.mp4 Add new layer with a rename dialog pop-up (this is the default ctrl+shift+n command in Photoshop), which resolves the two step process of creating a layer and renaming it. Currently, you can configure shortcuts to switch between studio presets, however, I think it is just as valuable to be able to toggle between two different studio presets using a single keyboard shortcut. I use a one or two column setup and it would be nice if I could toggle between the presets I desire (e.g. to switch between studio preset 1 and 2 and back to 1, just like tab toggles hiding the interface) with a single shortcut. Ideally, you should be able to assign a given studio preset to either end of the toggle in the presets. Additionally, the name of the preset should be represented in the keyboard shortcuts section. So, basically, the name of the first studio preset in the list becomes the new name for "Studio Preset 1" in the keyboard shortcuts section and the second becomes the name for "Studio Preset 2". In other words, a list of studio presets with 1. Lineart, 2. Logo design, is listed similarly in the keyboard shortcuts as opposed to the current generic naming scheme. A change brush size shortcut (as replacement for Ctrl+Alt+LMB drag, pressing down two modifiers is quite demanding, Krita and Blender allow for assigning a alphanumerical key for this reason instead of a modifier key. It works as follows: press and release the shortcut key, then drag to the new settings (position) to confirm or, hover and click to confirm. The latter reduces muscle tension by quite a lot. In this case, it could still be multi-axis (left-right for strength, up-down for hardness or opacity). Also note, showing that showing the previous brush radius helps to indicate whether the new size is appropriate or not. Brush widget.mp4 Krita has a pop-up for the colour selector, which negates the need to the mouse/ pen to a studio panel, it is invoked with a hotkey. Krita also has a colour history pop-up, which shows the colours that were last used and is invoked with a hotkey. Though this could very well be paired with the colour selector pop-up. These two pop-ups are illustrated below: Colour selector and colour history pop-up.mp4 A shortcuts to activate the brush stabiliser (which should remember the last mode and length setting per mode), but perhaps people would also like direct control for either mode through keyboard shortcuts. Similarly, there's no shortcut to activate symmetry shortcut for brush strokes. The numeric shortcuts to set opacity to 10, 20, 30 ... 100% opacity interfere with my ability to set shortcuts to the numeric keys, therefore, these should be listed in the Keyboard shortcuts section so they can be disabled at will in favour for other shortcuts (i.e. changing personas with 1, 2, 3, etc. (also taking Affinity Photo into account where you have more personas). Instead, there could be an option to change settings for opacity and hardness by pressing a shortcut key, after which the cursor moves to the value box for the associated option (much like the F2 rename proposal). See discussion here: A configurable mouse & keyboard shortcut to rotate the canvas non-incrementally. This is different from the alt+mousewheel functionality, since pen tablets don't have access to this. Instead, this funtionality should be a combination of mouse/ pen input and a shortcut or modifier keys (not excluding spacebar) to invoke the command. For instance, spacebar + mmb drag is one of the combinations that comes to mind (or shift/ alt + mmb drag). Illustrator has shortcuts , . / for fill, gradient fill and no fill (or stroke depending on the context), from these I miss the gradient and regular fill shortcut. For cloning objects, I don't understand the reason for using both Ctrl and Alt, I am aware that control enables snapping and alt disables it, but for me personally, I would prefer to use Alt and toggle snapping manually (using a custom shortcut assignment), the reason for this is explained in 16. For the sake of muscle memory and working with various software packages, it would be great if the selection keys could be assigned manually. Currently, Shift is used to toggle selection, while Ctrl cannot be used. Instead, by using just Alt for cloning, Ctrl could be used to add to selections, meaning that if I hover over multiple nodes, the ones that are already selected won't be deselected. Similarly, instead of toggling selection, Shift could be used to remove from selections. The combination of these two creates a very consistent selection workflow. Though some software switch the Ctrl and Shift behaviour around, so therefore it is best to let the user decide which one does what (and maybe they prefer Ctrl constrained cloning in conjunction with Shift toggle, but that's currently not a decision that can be made. See 3. below. For scaling objects, Adobe uses alt to constrain the transform to both directions and shift + alt to scale from the centre. This should also be an option in Affinity to aid muscle memory. There is no scale tool, as in, there is no shortcut to open a pop-up to get to a bunch of value boxes where scale values can be typed and committed to with enter. As it stands, I seem to need to open the transform panel, hover the mouse to the width and height dimensions and type in the size followed by a percentage sign, which could be reduced with a dedicated scale dialog pop-up. Increase potential for keyboard shortcuts Differentiate between numeric keys and the numpad for additional keyboard shortcut options Modifier keys should be allowed to activate a tool Customise keyboard + mouse behaviour as you can other software like Blender and Krita. This would allow for specifying a combination of keypresses and mousekeys (click/ click drag) to invoke a command. Similar to the default fluent zooming with ctrl+spacebar, users should be able to specify the way they want to zoom, access GUIs and rotate the canvas. For canvas rotation, this could entail setting hotkeys of preference from any 3D package to navigate in 3D (e.g. alt+MMB, shift + MMB) to rotate the canvas fluently (non-incrementally).See: Adding multiple keyboard shortcuts to commands would also be welcome (as in having a plus icon to add a second keystring to invoke a command). For instance, ctrl+] moves an object forward and ctrl+shift+] moves it to the front. However, some keyboards have dedicated PgUp, PgDown, Home, End of a numeric portion to which these functions could be assigned. This allows for retaining 'industry standard' shortcuts, while enabling single button shortcuts as well. This is vital for companies where everyone uses the same keyboard shortcut scheme, so everyone can work on every PC or enable collegues to not freak out from different keyboard shortcuts, while it also creates room for certain customisability. This is what I mean, illustrated in PureRef, where you can click on the + sign to add additional entries (once they are there, you can hit the - sign to remove them). Also, feel free to add other missing ones in this thread, so they can be consolidated here.
-
 Hello, I need to export my afdesign file to a layered PDF (for a cutting machine ) I have tried all PDF export settings. And no layers shows in Acrobat reader ! I test all affinty app design, photo and publish all give the same result ! no layer... enseigne_decoupe_3D_125x38.afdesign
-
 Hello, I'm trying out Affinity Photo to see if I'm going to switch from Adobe Photoshop. I was going to try to make some mockups to start with, but I ran into a problem. In photoshop, I could open a layer in a separate tab to edit it there and then go back to the original file with the new changes. I looked around and googled some, but I couldn't find the option for it. Is it only mee who can't find it, or does it not exist in Affinity Photo?
 -
 Hello! I'm currently designing a logo for my friend using AD for iPad but I'm still quite new to the program. Basically, I'm trying to merge the curves together but when I select "merge curves", it merges the curves in such a weird manner. Can anyone please advise me on this? How should I merge it such that it doesn't create those weird fills within the curves? (Please take a look at the video I've attached) FullSizeRender.mov
 -
 Ok, this is my first post here, and I'm quite new to Affinity Photo, so be easy on me. 15+ years of mastering Photoshop certainly helped alot with getting around in Affinity Photo/Designer interface, and I'm already starting to love this software. However, there is this ultra-basic thing that's driving me nuts, as I can't seem to get it done (the way I did that in Ps). So, if I'm designing something, something made out of several layers (logo for example), and I want to position it in center of the frame/background, in Photoshop it's enough to select desired layers in panel, and align them to selection however you want. All selected layers wil stay in locked position in relation to each other and align themselves as a group to background. In Affinity Photo, if I select multiple layers and try to align them to center+middle of the frame, they all individually align themselves to center, making it a mess of layers stacked upon each other in center of the frame. What I mean is even as a selection all layers align themselves separately, and not act as a group. You can solve this by grouping the layers and then align them as a group, in which case they stay locked in relation to each other and acting as a single object. Is there any way to align multiple selected layers together, without additional step of creating group each time you need to do that.
 -
 I am currently testing Photo right now as a viable replacement for Photoshop, after 24 years. Since I do game development, there is a very necessary feature that I need to use and can't find it in AP. In order to do some special texture creation, I would need to be able to turn RGB visibility on and off individually per layer or layer group. In Photoshop, in a layer's properties, you can turn off Green and Blue, for example, and have only the Red channel show for that layer (or layer group). Then, in another channel, only show the Green channel. In this way, texture maps can be created for use in 3D programs like 3ds Max, and in games for things like specular effects and normal maps for bumps. Also, I don't see a way to make adjustments to levels on a specific channel by selecting it and making the changes. I need to be able to see the grayscale of each channel as I'm tweaking it. This is especially important in specular and normal map creation for games. Hopefully, someone here has worked in game dev and knows what I am referring to. If I cannot control the RGB visibility and adjustments in layers and groups, then Affinity Photo will not work for what I am doing. I truly hope it's in there, and I just don't see it, or that maybe it's in the works for the next version. Thanks.
 -
 Sometimes it's useful to be able to apply a certain change to or involving a number of layers that for visual layering reasons one doesn't want to put in the same group (to tie this in with an earlier suggestion of mine, this can be important for snapping); symbols could theoretically do a lot of this, but they're kind of messy and inelegant to work with, especially for certain applications. What I am suggesting is to add another tab similar to the one used for layers, symbols, etc., this one being a list of special "groups" that unlike normal groups do not act as a layer (/influence the layering order) or appear as such in the layers menu. When one clicks on such a grouping's symbol in the tab, it is selected and the tab shows options for "add layer to group from layers menu" and "remove layer from group" (instead of its default option to create a new example of whatever these non-standard groups would be called, or the option when layers have been selected otherwise to create a group from said layers), and while this grouping is selected in this way, while one cannot reorganize any of the shapes involved layer-wise, it limits the context for most operations to just the layers grouped in this way, allowing for easier synchronization of certain effects.
 -
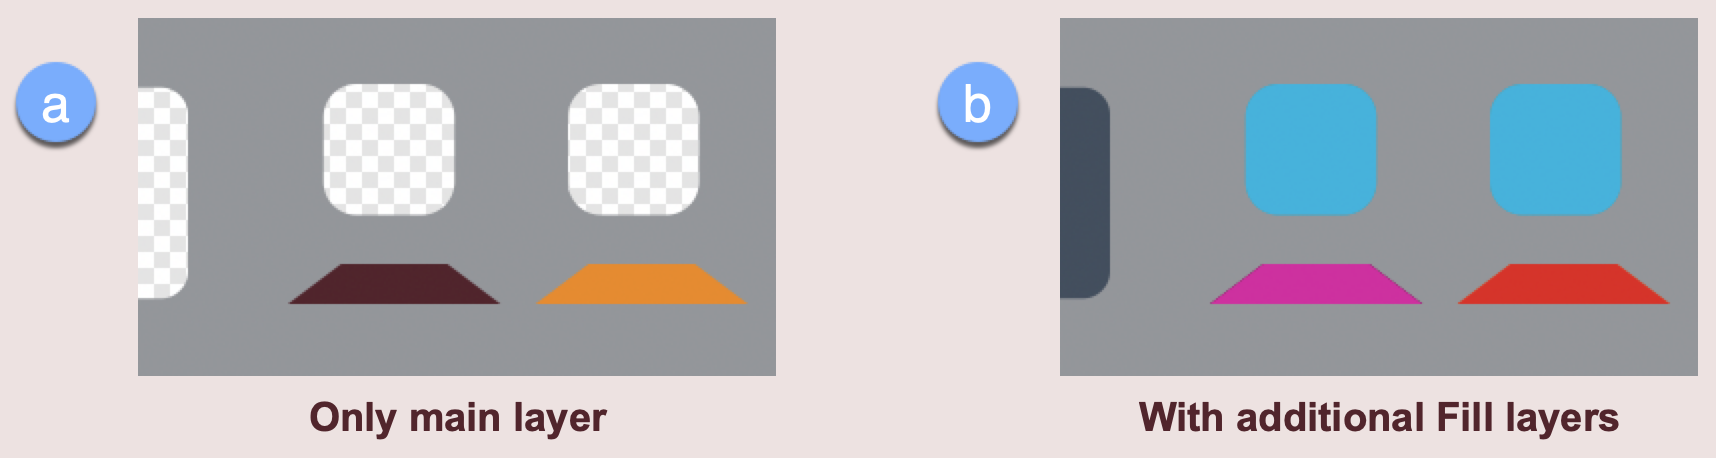
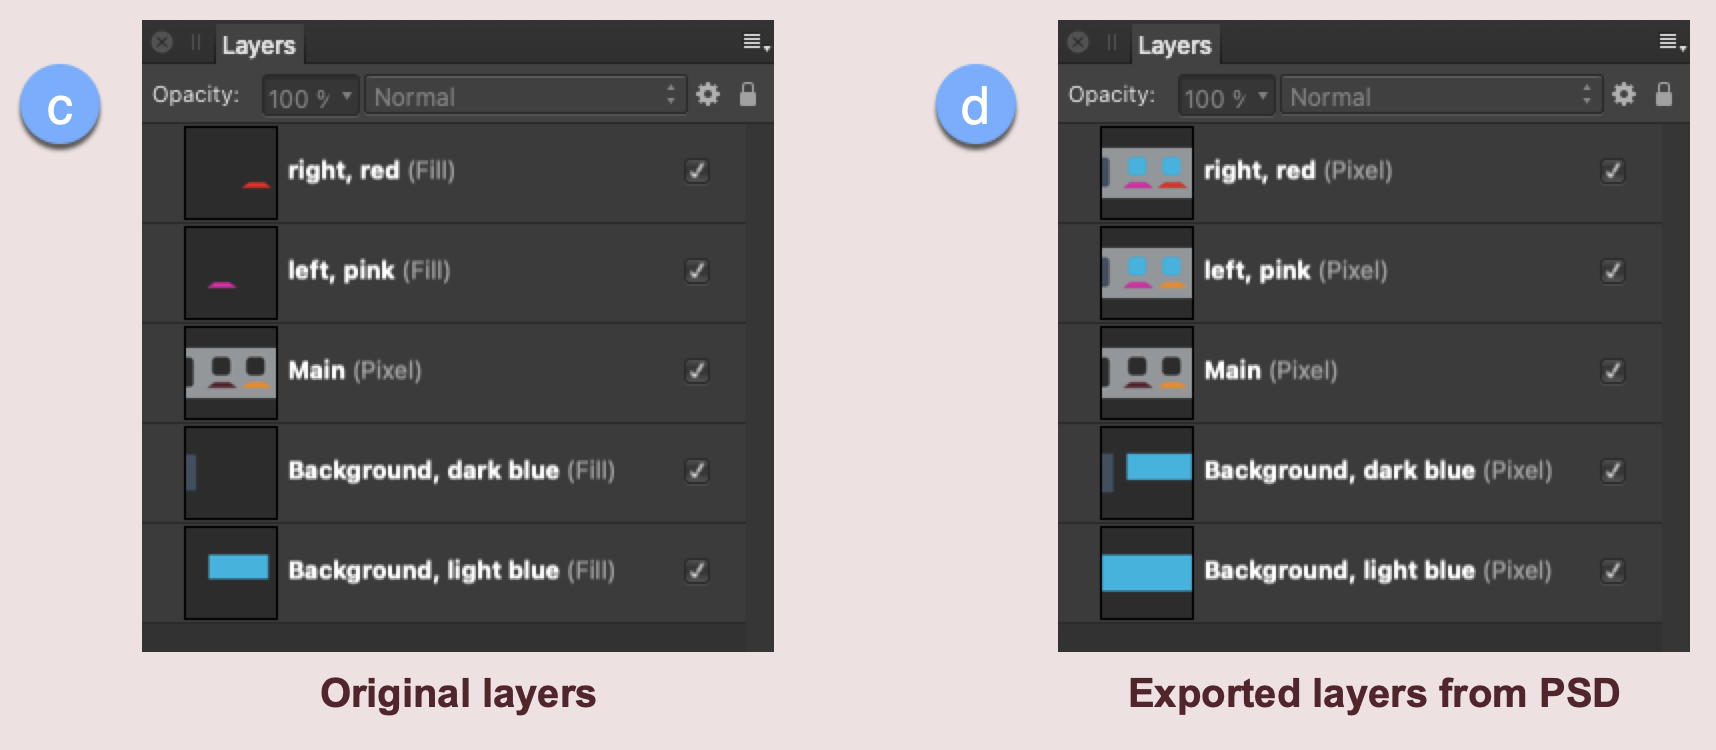
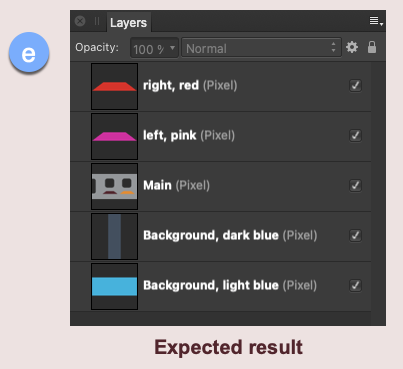
Affinity Photo v1.10.1, Mac App Store macOS Big Sur, v11.6 Mac mini (M1, 2020) I could be misunderstanding the feature, but I don't think so. I think this is a bug. I start with a single, simple pixel layer. The original file I was modifying is commercial, so can't be uploaded here. I have reconstructed the problem for posting – the attached file "1a reconstruction.afphoto" shows the problem with a simplified version. I made simple selections and created new masked Fill layers. These masked Fill layers are layered above and below the original pixel layer. In this simple example, there are no grouped layers, layer effects, or anything else. Screenshot (a) shows the main starting image. A single layer, it has three cutouts and two coloured shapes. Screenshot (b) shows the pink and red overlay layers and the two blue underlays (if that be the appropriate word?). See screenshot (c) for the corresponding layers. All pretty straightforward so far. I then want to export the file as a PSD, using the Rasterise All Layers option so that the resulting PSD has only pixel versions of the previous masked Fill layers. (This is so that the resulting PSD file can be easily imported into another app – Reallusion's Cartoon Animator). The export completes, but not as expected. The previous Fill layers are indeed now pixel layers, but they're been merged with the other lower layers. Screenshot (c) shows the layers from the original image. Screenshot (d) shows the Fill layers have been rasterised but, for example, the red and pink overlays have been merged to produce new version of the main layer. You should be able to see this for yourself with the attached "1a reconstruction.afphoto" example. Export > PSD > More > Rasterise All Layers. None of the other options see m to affect the result. Screenshot (e) shows the expected result for each pixel layer - no merging. I can get what I want/expect if I manually rasterise each layer before exporting the PSD. In this simple example, that's not a big deal, but some of these PSD assets I've purchased come with a substantial number of layers and that approach would be both inconvenient and impractical for them. I could create layer-based slices and use the Export Persona to generate individual PNG files that I could import into Reallusion's Cartoon Animator and this should work. But, again, the significant number of layers in some of these purchases make this a significant issue as each sliced file would have to be individually imported 1a reconstruction.afphoto
-
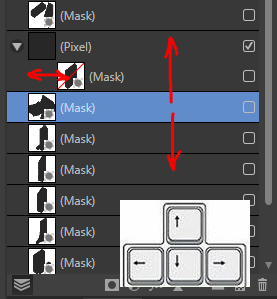
 Hello! The arrow keys and page up/down could be put to better use in the Layer Studio (or am I missing something?). 1 - When you hover the cursor over the layer studio, arrows and page up/down could select the next/previous item in the list. Left/right arrow keys could move up/down a hierarchy. 2 - Holding some modifier key (SHIFT etc.) while pressing up/down arrows could MOVE the selected element(s) in the list (as opposed to SELECTING next/previous). For both, it should not be necessary to click-set focus on the layer studio. Just hovering should do. Thanks! Best regards
-
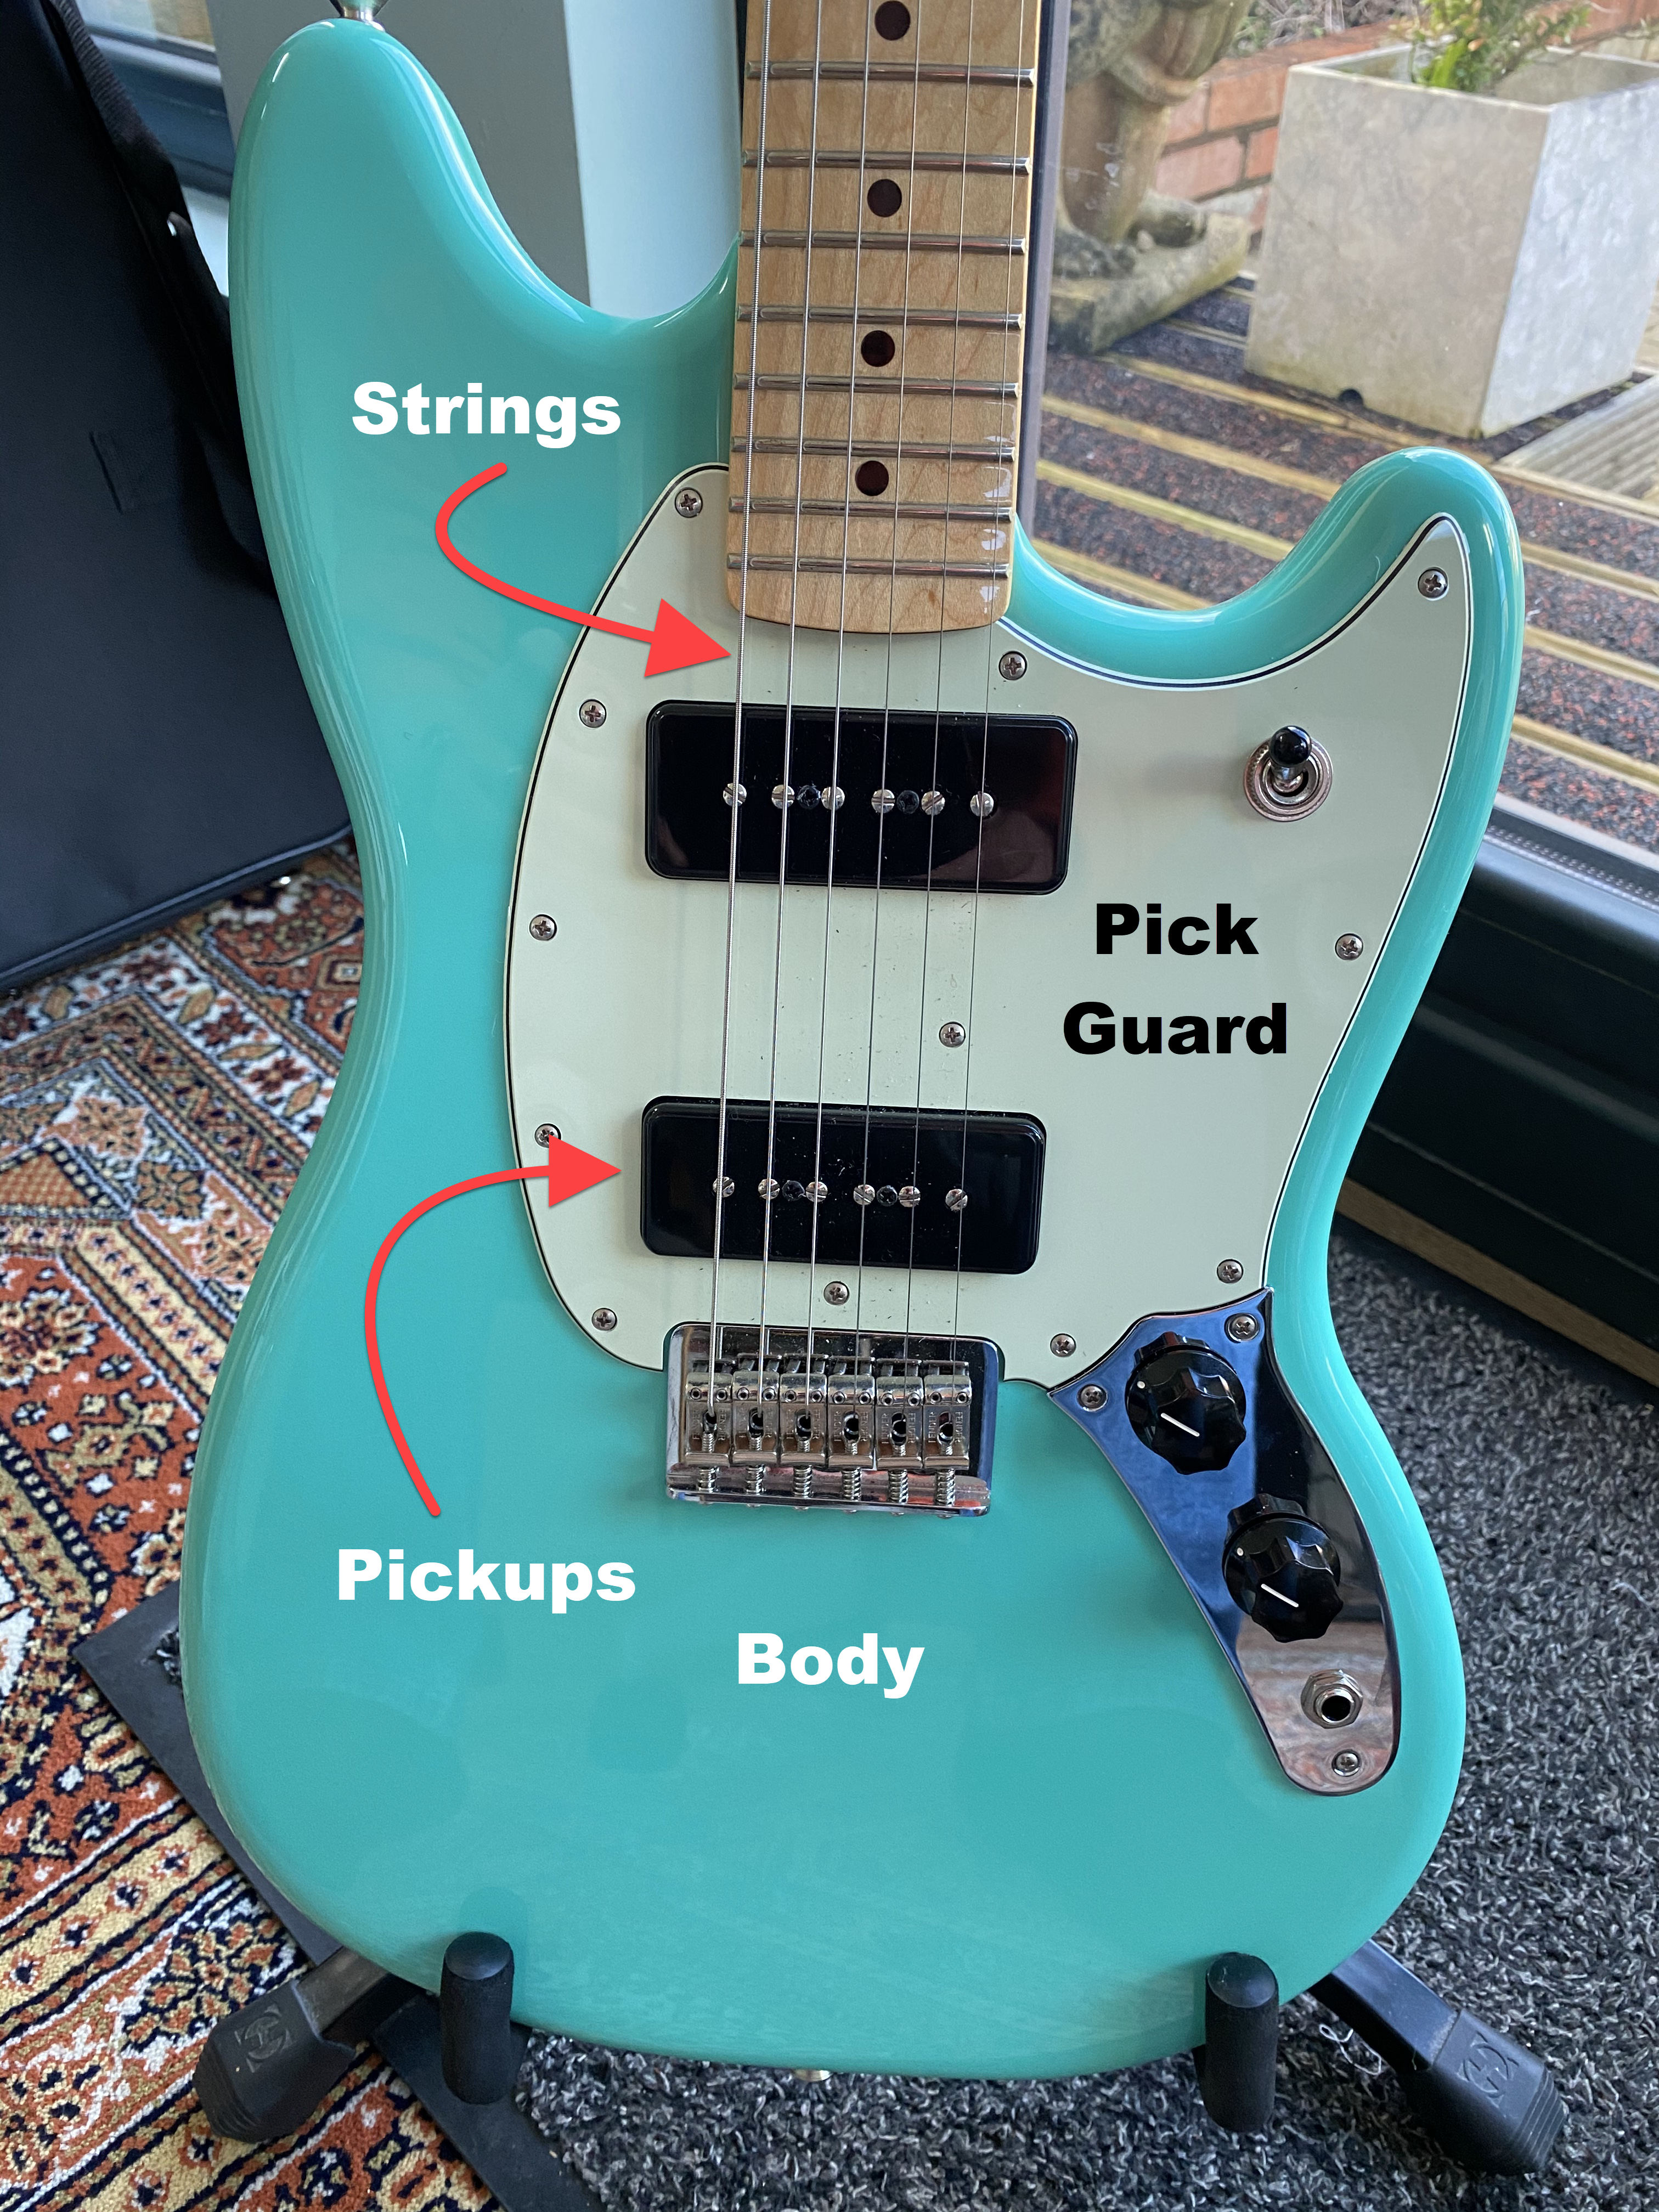
 I want to design the pick guard of this guitar. It sits on the body, surrounds the pickups and is under the strings. Is there anyway I can break this image apart, edit the pickguard (re-colour) and then re-assemble?
-
 Alert: Experienced worker - but AP newbie : ) I want to use AP to edit multi-layer exr exports from a 3D CGI software. The EXR files typically contain up to 15 layers of information. Each of those layers contain full RGB data. When AP imports these files it: Treats the first layer as an RGB layer = 'Layer one (pixel)' Treats all the other layers as though they were individual colour channels, rather than composite RGB layers..., ie: Layer two [blue] (Pixel) Layer two [green] (Pixel) Layer two [red] (Pixel) So I end up with 43 layers, rather than 15... Two questions: 1. Is there a way for AP to interpret all these layers as RGB composite layers on import / open ? or, if not: 2. What is the most efficient way to take: Layer two [blue] (Pixel) Layer two [green] (Pixel) Layer two [red] (Pixel) and make it into: Layer two (Pixel) - ie, a full composite RGB layer. Thanks for any help.
 -
I think the ability to add a pin to a layer to keep it from moving in the layer stack would be a welcomed feature. I often use a reference layer at the top of the layer stack set to multiply at 50% as a guide for my work. I find myself having to move this layer back to the top often and a way to pin it would be ideal. The addition of a small pin icon or the option in the layer panel flyout to lock the layer position in the stack would be a simple way to implement it.
-
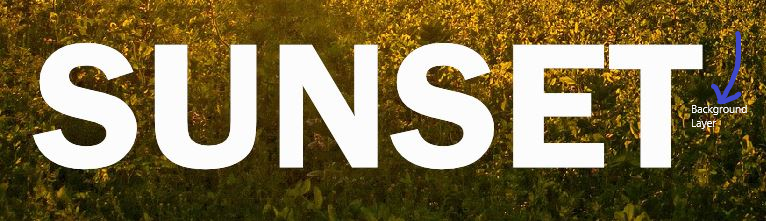
 Is there a way in Designer iPad to ‘pin’ layers to the top of the layers stack, so that any layers created as you draw sit below them? Locking the layers does not do it. —————————————- Background: Why I need this. I’ve scanned a sketch. I now want to draw vector shapes based on the sketch. I’m using the image layer with a 20% opacity setting as a guide. I draw objects (at 100% opacity) below this top image layer. It saves me having to mess about with the opacity of umpteen layers rather than one. Some would call these reference layers. —————————————- . @Jowday’s post starts talking about reference layers in the Desktop app (I’ve not read it all).
 -
 Hi I need help please. I have a photo that I used the pen tool to create several layers of curves on Affinity Photo, when opening the file I ca no longer see the nodes. I had to open on Designer in order to see the nodes I created on Affinity Photo. ISSUE = I need to export to editable layers as PSD. BUT when I export as PSD a single layer is shown when I open the file. What can be done? I did read the other posts and none of that helped. Thanks beforehand, Fra
-
Hi, it would be great if you add CSS export feature like CSS Hat (https://csshat.com). I think that every HTML & CSS coder will buy your Affinity Designer and stop using expensive Photoshop :-) Thanks. Petr
-
 when i make a selection in image and duplicate selection, does work. The complete imagen in the layer is duplicated, not the selection. In osx, ver 1.10.00
 -
 I had already created this topic here a few months ago: https://forum.affinity.serif.com/index.php?/topic/112705-keep-layer-structure-when-copying-to-new-file/&tab=comments#comment-610032 Now I want to start a new attempt. I'm still looking for a way to create smaller sections from a very complex graphic that retains the layer structure. In short: I need the possibility to export or copy/paste an artboard or a slice as a full new Affinity Designer file, with the layer structure preserved. I've had this possibility since FreeHand and Illustrator, unfortunately Affinity does not offer such a feature. Greetings, Claudia
 -
It's always "Is visible" regardless of whether the layer is visible or not.
-
 Hello, is it possible to automatically align layers or photos? For example if I have 3 photos with 3 different exposures which I shot handhold, so the photos differ slightly. Is there a way to align the photos? There doesn't seem to be the possibility to make an HDR, will it be implemented in the future?
 -
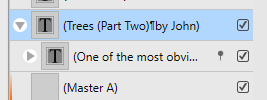
 How do I ungroup layers in Publisher? I have a newsletter and I have a textbox for the article title/author and another for the main article text. I somehow have managed to get the article textbox as a layer within the title textbox. I want to be able to move these two textboxes independently. I have tried the recommended procedures to Ungroup in the Help file but: I cannot see any option to Ungroup in the Context Toolbar. In the Layer menu, the Ungroup option is greyed-out. (I cannot screengrab this.) John