Search the Community
Showing results for tags 'Layer'.
-
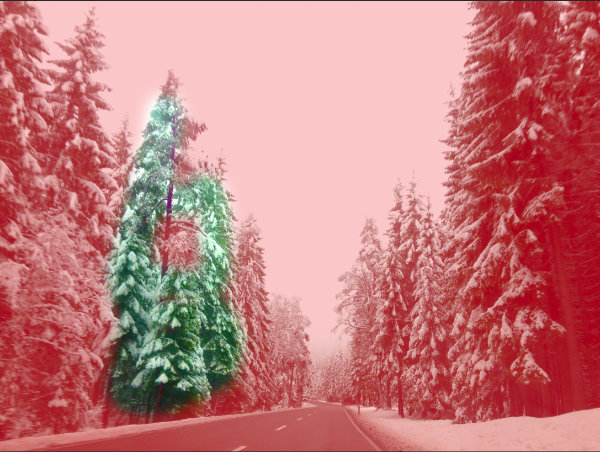
 I feel like I must be missing something basic, but I cannot get a mask onto a layer. The issue may be that a pixel layer and a mask layer are totally different things, and never the twain shall meet. If so--and I think this has to be my ignorance--then that's a terrible design flaw. Background: I have an image where the foreground and sky need very different raw conversion to look good. Years ago in GIMP I painstakingly created a very detailed mask to combine TIFFs from the two different raw conversions. Now I want to use Affinity Photo to do the same thing, so I can work from 16-bit TIFFs in ProPhotoRGB instead (the stable version of GIMP is limited to 8 bits per channel, so ProPhoto RGB is not a good choice). So I exported from GIMP the layer mask as a TIFF. It opens fine in Affinity. I can paste it as a layer into the same file with the two raw conversions, but when I a Mask to Below, although the operation seems to work, it does not have the masking effect. I've also tried New Mask Layer followed by Paste Inside, but I can't seem to get my previously-created layer mask to function as an Affinity layer mask. I have to believe there's a way to paste into a mask a pre-existing layer, and thereby use it to create a mask. So how do I do it? Thanks!
 -
 It seems that the adustement is always working on the entire image instead of what I selected or on the layer I need to adjust, I dont find it very instinctive and it seems to be so logic to make it that way. Also, when I select an area with the selecting tool, I can’t move it around, it only moves the layer and the selection remains where I made it. Also, I read before that the perspective option like warp and all those option doesnt exist, so what is the perspective tool for in the projection section?
 -
 Hi, is there a shortcut or a way to show a layer mask, like the way when i draw the mask in quickmask mode. I need a way to show an already painted mask as an overlay. like the example
-
 hello all, and happy new year! please i need some explanation about refining selections to "new layer and mask". i did the following experiment on the attached image: 1) select the background of the image with the selection brush 2) invert pixel selection 3) refine selection (default values, except for a bigger brush) 4) select "new layer and mask" 5) apply i'm not interested in how the quality of the selection could be enhanced (i.e. applying some feather during the refine process): instead, i can't understand how the new layer (with mask) is generated. I would expect a copy of the original layer, with a mask that describes the selection. the mask appears how expected (by me at least), but the new pixel layer shows something weird (to me). in the attached image, if you hide everything except "layer - created by new layer and mask", strange artifacts are clearly visible. they disappear if the mask is activated again. if i make a copy of the original layer and apply a copy of the mask to it, the result is similar - but not identical: if you alternatively make visible the new layer or the background copy (with their masks), you can notice that something in the image subtly changes. if you make both the layer visible at the same time, the quality of the selection improves. it improves even more if you make a second copy of the background copy and mask. now, the improvement of quality does not surprise me so much: i guess it depends on the fact that the areas that are left erroneously slightly transparent by the mask get more opaque when displayed one above the other. but i really cannot understand why the new layer created by "refine selection" is not a copy of the original layer, and what the artifacts are. i'll be grateful of an explanation or any clue. thanks in advance stefano IMG_1904.afphoto
 -

Inpaint selection from Current and Below
shojtsy posted a topic in Older Feedback & Suggestion Posts
Hi, I have a selection of electric wires which I would like to inpaint on a sky, ideally with inpainting being on a separate layer. However when I choose Edit/Inpaint or Edit/Fill/Inpaint it always samples from the current layer only, which is the empty layer I would like the inpainting to be on. I would like to do Inpaint of a selection with sampling from Current and Below. Adding an option to the Edit/Fill dialog would solve this issue. -
 i got drawings to work with that contain curve layers with more than one curve stored on that specific layer. because this is not how affinity designer works, i would like to have every single line on another layer, so i can group them and change thickness and style. i tried divide. but most of the time it all gets messed up.. is there a way around? thank you :)
 -
Need some advice...help.... I have an image consisting of a number of layers. I wish to use “outer glow effect” on one of the layers. I select that layer and go to fx studio. There I can switch on “outer glow”, and reduce opacity, but I don’t have any controls over the bottom of the page, that i need to adjust aspects of the glow...nothing there. This is the same for all listed effects. I have seen videos where outer shadow has been used...and there are controls across the bottom of the screen governing depth, transparency etc.....i just cant get them. There are no tutorials for iPad that i can find on using effects. Have I missed something here? I have reloaded the images and restarted Affinity a number of times...the fx controls don’t appear. Have I missed something? I could easily manipulate fx on the same image on my MacBook to produce the desired effect...using the controls available. I just cant seem to get them on the iPad. Any suggestions? Affinity Photo 1.6.5.61 ipad Pro 12.9 iOS 11.1
-
 Any ideas how to do this? Of course, there is a shortcut for a new layer, but I would like to skip this step. If not possible, maybe something for feature requests like a checkbox in the new documents dialog. Thx!
 -
 Is there a way to import .asl files into Affinity photo for iPad Pro? It looks like, from the menu, there is room for other styles. Please advise. I’m loving Affinity photo, btw! Thank you.
 -
 In photoshop you can make a new layer via copy. Make selection then hit CMD+J for make a new layer with selected content Is it possible to achieve the same using AD? btw, what do you think about to merge vector and pixel persona in to one? Shading is still more convenient using raster brushes. Thank you.
 -
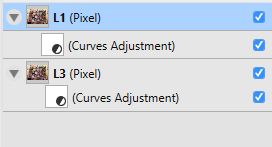
In the layers panel there should be more obvious visual distinction between a layer being in the child layer and the clipping mask position of an other layer. Please see screenshot below. It is hard to spot the difference of a slightly different indentation. Some differentiating icon before the layer icon would help.
-
 Hi I have been experiencing something that I am not quite sure why it is the case. When I have a layer selected and when I want to make an adjustment/change say brighten it, the entire image changes instead of just the layer. How do I do this so only the layer itself changes? If I have a png layer image that has opacity on some areas if I make changes on that image shouldn't it change that image only? Thanks in advance!
 -
 Hey, how can i get a selection from several layers in Affinity Photo for Ipad? I tried select non-transparent areas by selected more than one selected layer and a group. But both doesn't work. Sorry, my english is bad. Tanks in advance
 -
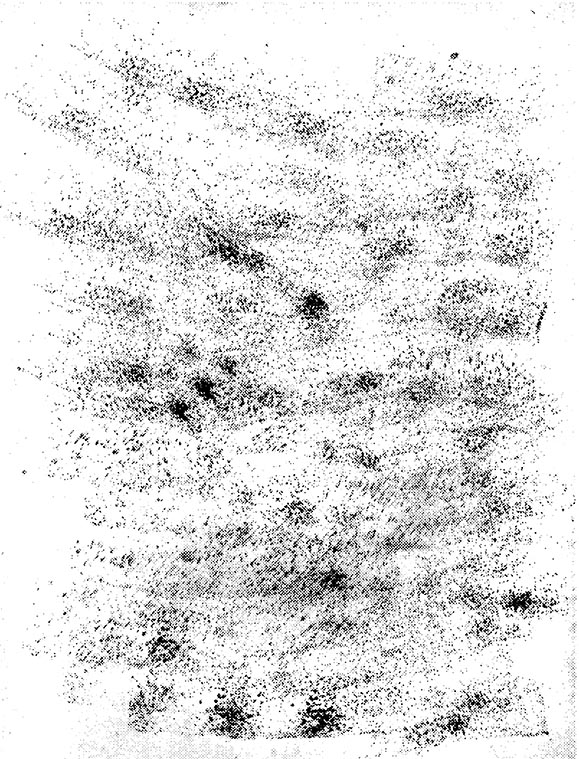
We need a way to use black and white images as a Layer Mask. I am trying to use some grain/noise images as a matte, but my final image needs an alpha channel. Currently, I have to use PS to convert my BW images to an image with an alpha channel to use. The workflow isn't very convenient. I have attached the type of image that I would like to use as a Layer Mask. You can see that creating a selection from the image would be impossible.
-
Hello guys, I was wondering if it is possible to do non desctructive boolean operation and yes it is possible. My only regret is that is very hidden. Wouldn't it be possible to create a "compound" group directly in the "Layers"? Say you select several shapes and you have the option to create compound group with a default boolean operation which you can change for every object afterwards? Other thing, it is really hidden that you have to alt-click a boolean operation to make it non desctructive. Would it be possible at least to add something in the tooltip and even better indicate on the boolean operation there is more that one op? You could fore example popup a menu if you click and hold on the boolean operation. Cheers, DrM0lek
-
Currently in Designer a locked layer that is selected can have objects added. I understand the idea behind this is to prevent objects in the canvas from being selected while allowing the layer itself to be somewhat editable. I think an option to fully lock the layer should be added, this option would prevent any addition, deletion, or any sort of change to the layer. I often have the wrong layer select by mistake and add objects to it, this would reduce the occurence of that situation. Thanks!
-
 Hi, When I want to move a layer into another layer, I can offer it up next to the icon of the target layer, and get a small blue vertical place marker, or, I can offer it under the new layer entry and get a long horizontal blue place marker. What is the difference ? When should I use each one? thanks karl
 -
 Hey everyone! Does anyone know if there is a way in Affinity Photo to lerp from one layer (or layer group) to another using a third (grayscale) layer (or layer group)? As far as I can see, masking will not work, because even at 100% opacity, a mask will only show the white areas. It should work like this: Layer 3: 0% -> Layer 1: 100%, Layer 2: 0% Layer 3: 50% -> Layer 1: 50%, Layer 2: 50% Layer 3: 100% -> Layer 1: 0%, Layer 2: 100% The grayscale information on Layer 3 should be used for the "speed" it shows Layer 2. Bright areas should show Layer 2 first, darker areas should show Layer 2 when approaching 100% of Layer 3. Best wishes, Shu
 -
 I am not sure if this was wished befor, but my colleques asked for this when i gave them a lecture about affinity.. Well when selecting layers in the viewport, by pressing the alt key, and klicking , i can switch through several layer on top of each other... in Photoshop theres also the right click menue, to give you a list of layer, to select from, would this bei possible in the future too ? please.. thanks Tom
 -
 Hi, how can I move a part of the image within the image? I copy the background layer and work on the new layer. I mask a portion of the image, e.g. the lower half and would like to move the left by a few cm to the left and then to the right. - So I make a new masking level and now? I have tried but I can not move anything it moves always view the overall document. Can someone help me? Thank you and Greeting Dieter
 -
I often use geometry layer to mask (clip) other layers. Unfortunately there seems to be no possibility to mask/clip everything inside the geometry. It would be great to be able to invert geometry layers without rasterizing them.
-
 Hi there, I just started with Affinity Photo on PC. I wanted to make a collage; I know how to place the individual images in a new document (canvas) with specific dimensions. When I add the images to the collage (they are screenshots from the desktop), I see the borders of the program I used to open the screen content in the first place, so I recut them already in Photo. When it comes to place these images into the new document (canvas) I created, somehow the borders appear again even though I made the recut. My most important question now is: how can I crop these images inside the document (again), as an image layer or after rasterisation of these? When I use the crop tool in the tool bar left, it would just let me crop the whole canvas, even if I selected the specific layer. And I don't want to use the eraser tool, just crop my selected image after pasting it in the collage-canvas. Thanks for your help!
 -
Hi. I've been experiencing a problem with layers not merging. The file is a mere A4 in size, 300DPI, 2 layers. 1st gen 12.9 iPad Pro, IOS 10.3.3., AP 1.6.4
-
 Is it possible to have a global layer or layer group that could be applied to all artboards in one file? use case: I'm doing a website design and have a header, navigation, and/or footer in use on all artboards, but make a revision to content/copy/dimenions/whatever I'd like it to update across all artboards in the same way that changing a global color does. Is this currently possible? If not where do I make a feature request?
 -
 Hello Apologies if this has been asked before. If so someone could point me in the direction of a tutorial video Attempting to recreate the woman in this shape on the attached image Really not sure how to go about it. Trying to get images behind (or on top) of my pixel layer within a designed shape Cheers! -Cunningham