Search the Community
Showing results for tags 'Layer'.
-
 I took several individual photos of the 2024 solar eclipse. I need assistance combining/layering them so that the progression of the eclipse is shown in one picture. I have attached 6 pictures just to provide sample images.
-
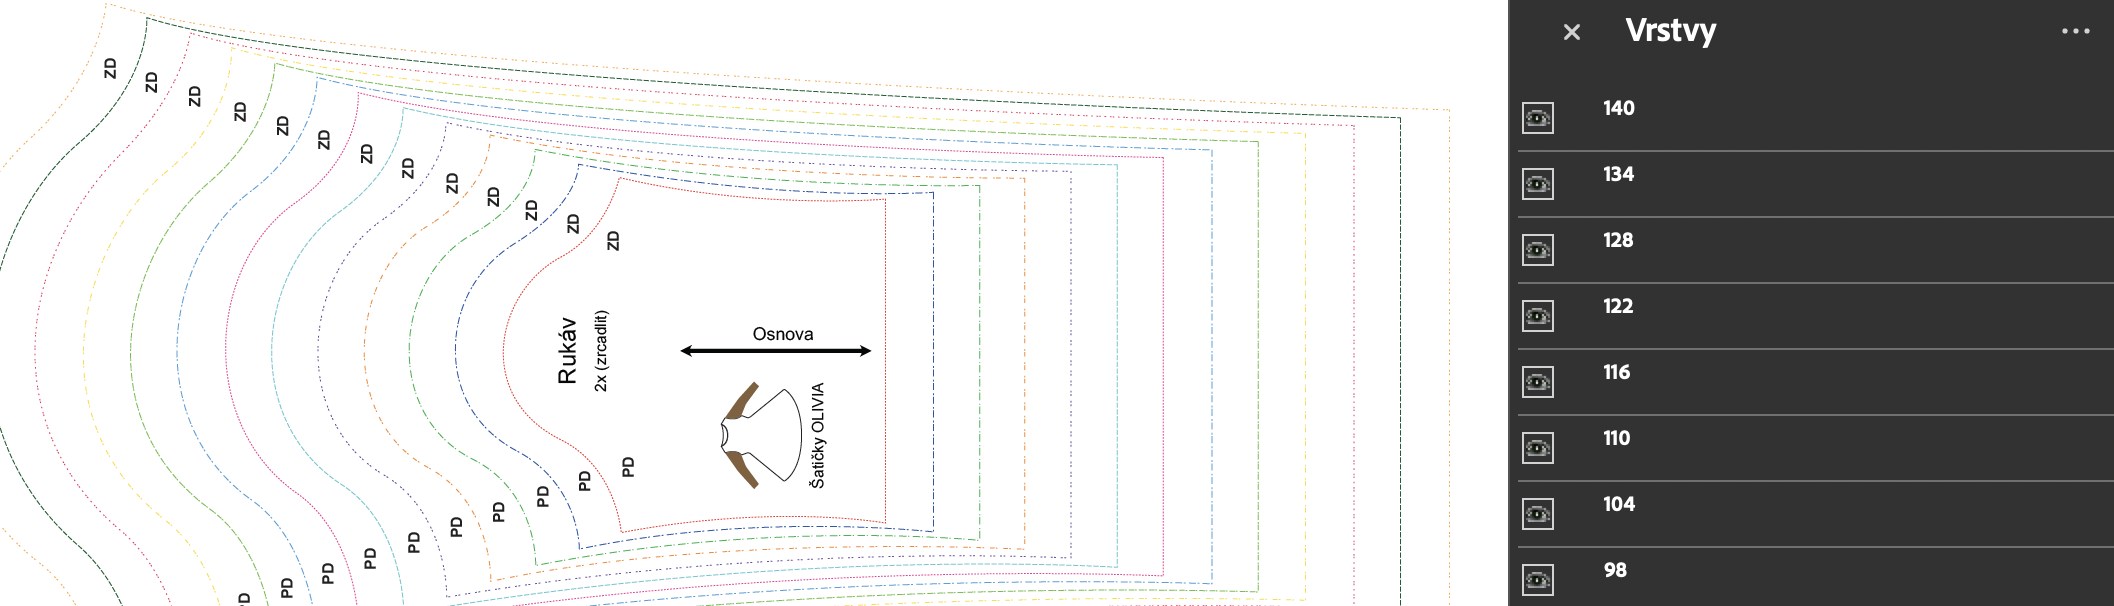
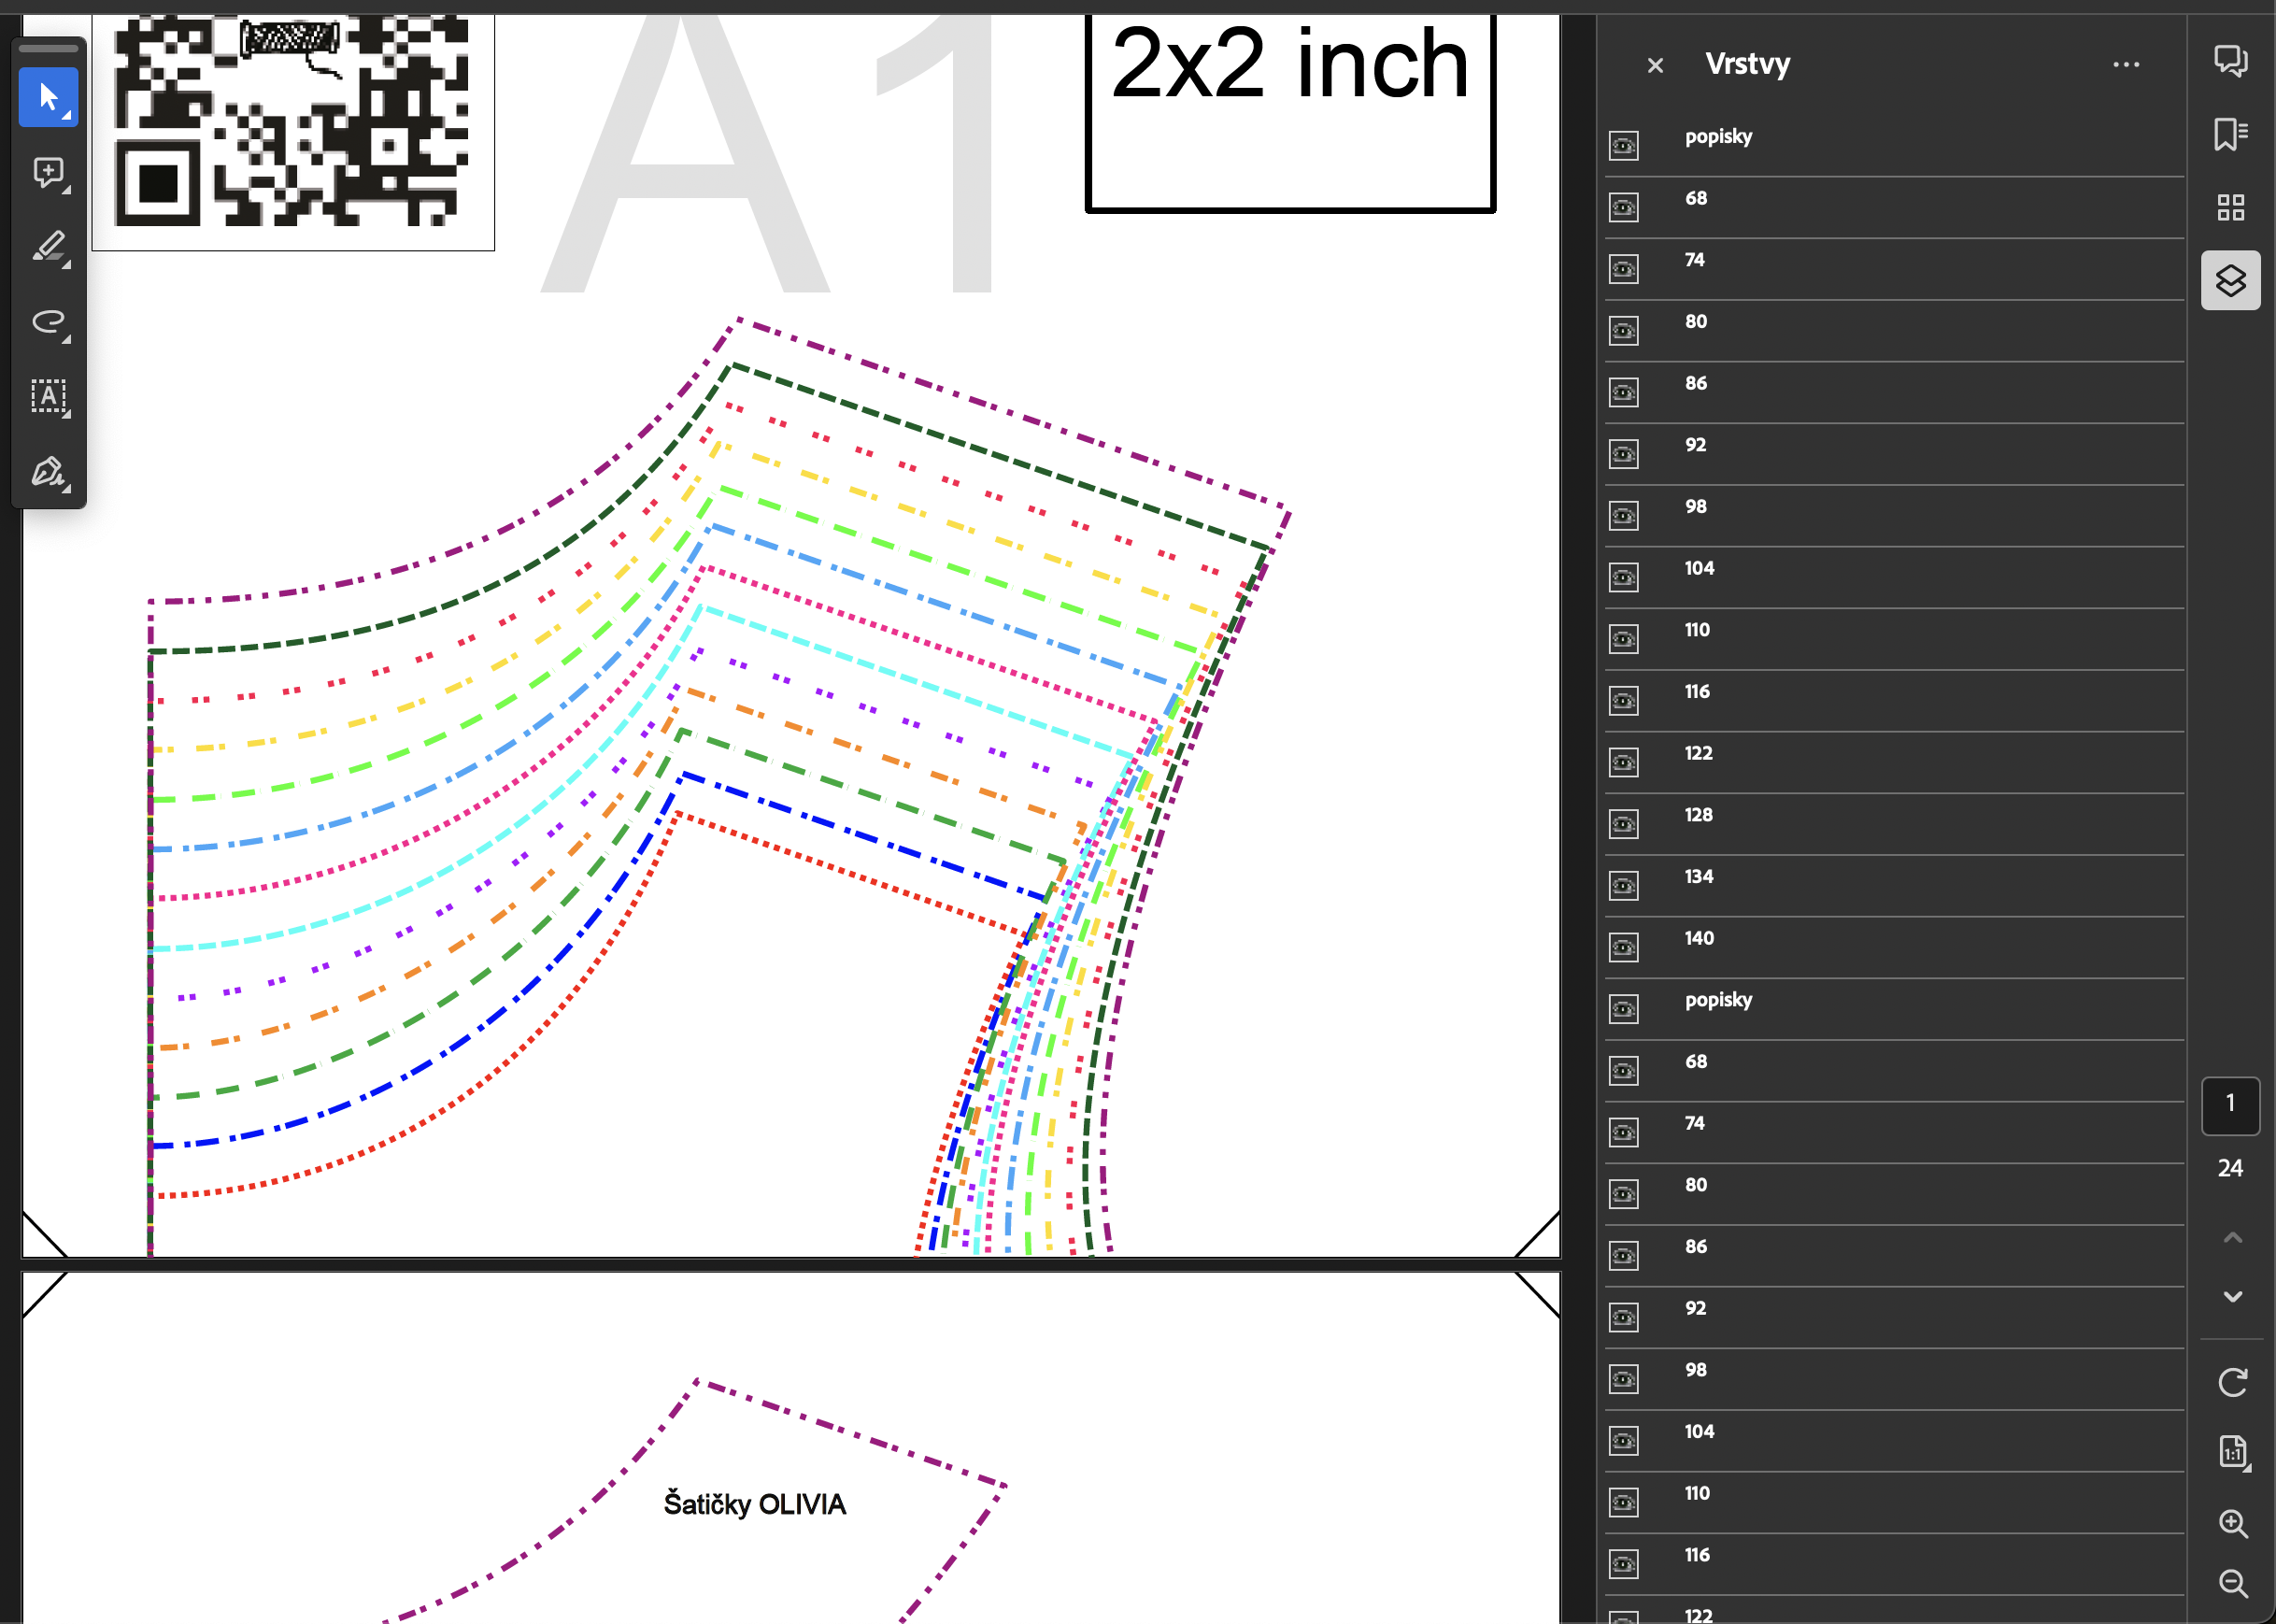
 Hello. I encountered very specific problem I can't find solution to. I am creating sewing cutting patterns. And I wanted to export the file with layers so people can print only the size they are interested in. It should work like this - you have pattern with multiple sizes and in layers you can choose which one you want to see/print. This was created and exported in Illustrator and works as expected. But when I try to export the same thing in AD, the layers on multiple pages are not linked - meaning you'd have to select the visible layer for every page of the document separately. You can see when I am in the middle of two pages I see all the layers of every page but it should be just one layers for all twenty something pages of the document. I also created super simple documents simulating my issue since I am not able to upload the screenshotted document itself. Is there any setting to make the "layers linked" across all the pages or is it something than can not be done in AD? Thank for any kind of help. A4 .pdf A4 Print Template.afdesign
-
 Strange transparency rendering behaviour when adding transparency to individual lines created with arrowheads. This has probably been a forever thing, but have just bumped into it again when fading parts of a flow build. If you create a single line with an arrowhead (curve layer) and change the layer transparency, designer renders the line and arrowhead as individual objects, which given that they are overlayed to prevent gapping creates a more dense area where the line meets the arrowhead. Work around is to group the object… which seems like an odd thing to need to do for a curve line that should behave as a single object. I can't think of an application where I would want/expect the current standard behaviour.
- 3 replies
-
- 1
-

-
- arrowhead
- transparency
- (and 3 more)
-
 Layer Blending Modes and Blur Effect Hi, …I just have a question regarding Layer Blending Modes and a Blur Effect. Is there a trick for applying a Blur, delimited by a vector object (Object A) located in the foreground, on a background (Background B) located behind?… The idea is to be able to move Object A over the entire surface of Background B, always with this quality of Blur which then applies to Background B. The solution, one-off and much less flexible, is to create a new Group (Group C), duplicate Background B in this group, apply a mask to it with Object A and a “Gaussian Blur” layer effect. But, if we move this Group C, it will no longer be aligned with Background B!…
 -
 The video shows 4 layer orders in the layer studio: Unselected set of objects Objects are selected Selected objects are duplicated in the layer hierarchy, in what I'm calling "relative" layer order, where each object is duplicated above its source object on the layer stack What I have to do each time I duplicate an ungrouped set of objects to maintain original order hierarchy. This workflow creates a mess in the Layer studio and I have to manually organize objects into how their previous layer structure. In step 4, it would be great if Affinity suite had a preference to keep duplicated layers in their same "absolute" order hierarchy, so when a set of contiguous objects (in layer studio) are selected and duplicated, they are placed collectively above the entire set of originally selected contiguous objects, instead of placing duplicates objects above their source on a per layer basis. I hope that makes sense. Please consider adding this as a Preference setting. Thanks for all you do! Screen Recording 2023-12-28 at 10.37.43 AM.mov
 -
Hi, it is possible to insert an affinity-photo file as file layer like the workflow in Clip-Studio-Paint?
-
 Would be nice if I could replace multiple objects/layers at once. For example, replacing objects with the clipboard content or a specific selected object (like the key object in alignment.)
 -
 This thread can be closed. I posted a new thread in Suggestions. Has this topic been solved? It's about a simple way of moving an object to another layer, without having to drag it through a long list of objects in the layer's panel. Like so: Right-Click on object Select "Move to layer" in the context menu Choose layer from list See this example from Inkscape: Video.mov
 -
 Hey im wondering why it isn't possible to include the following features in Macro: Record Layer ordering/movement Apply a Tonemapping Persona Preset Is this a hard thing for developers to include? Thanks Phil
 -
 Steps to reproduce: Create a new document Draw 2 or more picture frames Open the Layers panel Try to change the frame's stacking order Expected result is for the frame's stacking order to change, instead the moved frame will nest within the frame immediately below its new stacking order position. See attached video for a visual explanation. Bonus bug: if I actually want to nest the frames, I cannot trigger it intentionally. Trying to place a frame within another in the Layers panel never triggers the "filled layer" visual effect that indicates an object will be nested within another. This bug is, to the best of my knowledge, limited to picture frames, square and round. Other objects are unaffected and behave normally. Temporary workaround, use the layer arrange commands. Either on the application menu at Layer > Arrange (and their respective keyboard shortcuts), or the layer arrange buttons on the application toolbar. Both are imune to this bug. Thanks! Gravação 2023-07-13 112345.mp4
 -
 hello! as a user of clip studio paint, i was hoping to have a similar feature where (for my lack of a better term) there will be multiple "lines" or vector lines per layer. i think it's great that lines are separated every layer so I don't need to look for all the lines nor group them manually/automatically. Huh. come to think of it I don't even know if there's an automatic grouping. But i digress. It also might be because i haven't explored much of affinity designer but what I do is I keep connecting my lines using the node tool after every drawing. But that's exhausting. I enjoy all the apps! But as a comic artist, this feature is helpful for me. My suggestion is perhaps to have a "button" where we can click it to enable multiple lines per layer or do the default one (lines as layers). thank you!
 -
 Hello, I am trying out Affinity for the first time because I'm looking for a new software to edit 360 images with Photoshop phasing that out. Everything I see tells me to a choose Live Projection from the Layers menu but I cannot seem to find that. I don't know if there's a preferences tab or a specific persona I need to have selected. I cannot seem to find an answer.
-
 Hey everyone, the title explains the misbehaviour of the shortcut ⌘D in the Pixel Persona ( Designer, most likely also Publisher). Cheers Dennis
 -
Hey all, Is this behaviour intentional and if so, why is there no difference between the content types? Scenario: I'm working on a design I started in Designer with multiple artboards. I decided to add some pizzazz with a raster brushes on a designated pixel layer – either in Designer's Pixel Persona or via File → Edit in Photo (either works, behaviour is the same). I add a pixel layer and draw something. I realise that I have made a mistake and want to clear the layer and start again. I usually do this with a short succession of shortcuts: ⌘+A (in the History palette this is called »Raster select all«) to marquee the whole (visible) canvas and backspace or delete/⌦. Expected Result: The (visible) content of the pixel layer is removed. Issue: In my case, for some reason, the shortcut ignores the fact that I am currently working on a pixel layer, and instead of creating a marquee selection of its contents and deleting it, it selects the parent pixel layer itself and deletes it. Now this might not be a big deal if it's a single layer, and you might argue »Why don't I just delete the layer and create a new pixel layer (⌘+⇧+N)?« And I'd say »Sure, that might work for single, regular layers.« The real problem is that this also works (or rather doesn't work) for linked pixel layers. If a single linked layer is deleted, it's not so easy to fix afterwards and involves copying, pasting, positioning if you've placed them in several different groups, shapes and so on – a bit of a PIA. I also considered »Invert Pixel Selection« (Select → Invert Pixel Selection or ⌘+⇧+I) as a different approach, as this works with photo documents. But to no avail. But I've noticed that this behaviour works for new documents, so I'm not sure why it doesn't work for my existing document. Any help with this? Am I doing something wrong? Is the document somehow corrupt? I’ve attached my document, feel free to try the scenario, try to select the whole pixel layer content and delete it with the designated shortcuts while maintaining the linked layer/s itself. Cheers Dennis Raster_select_all_bug.afdesign
- 5 replies
-
- 1
-
-
- affinity photo
- affinity designer
- (and 6 more)
-
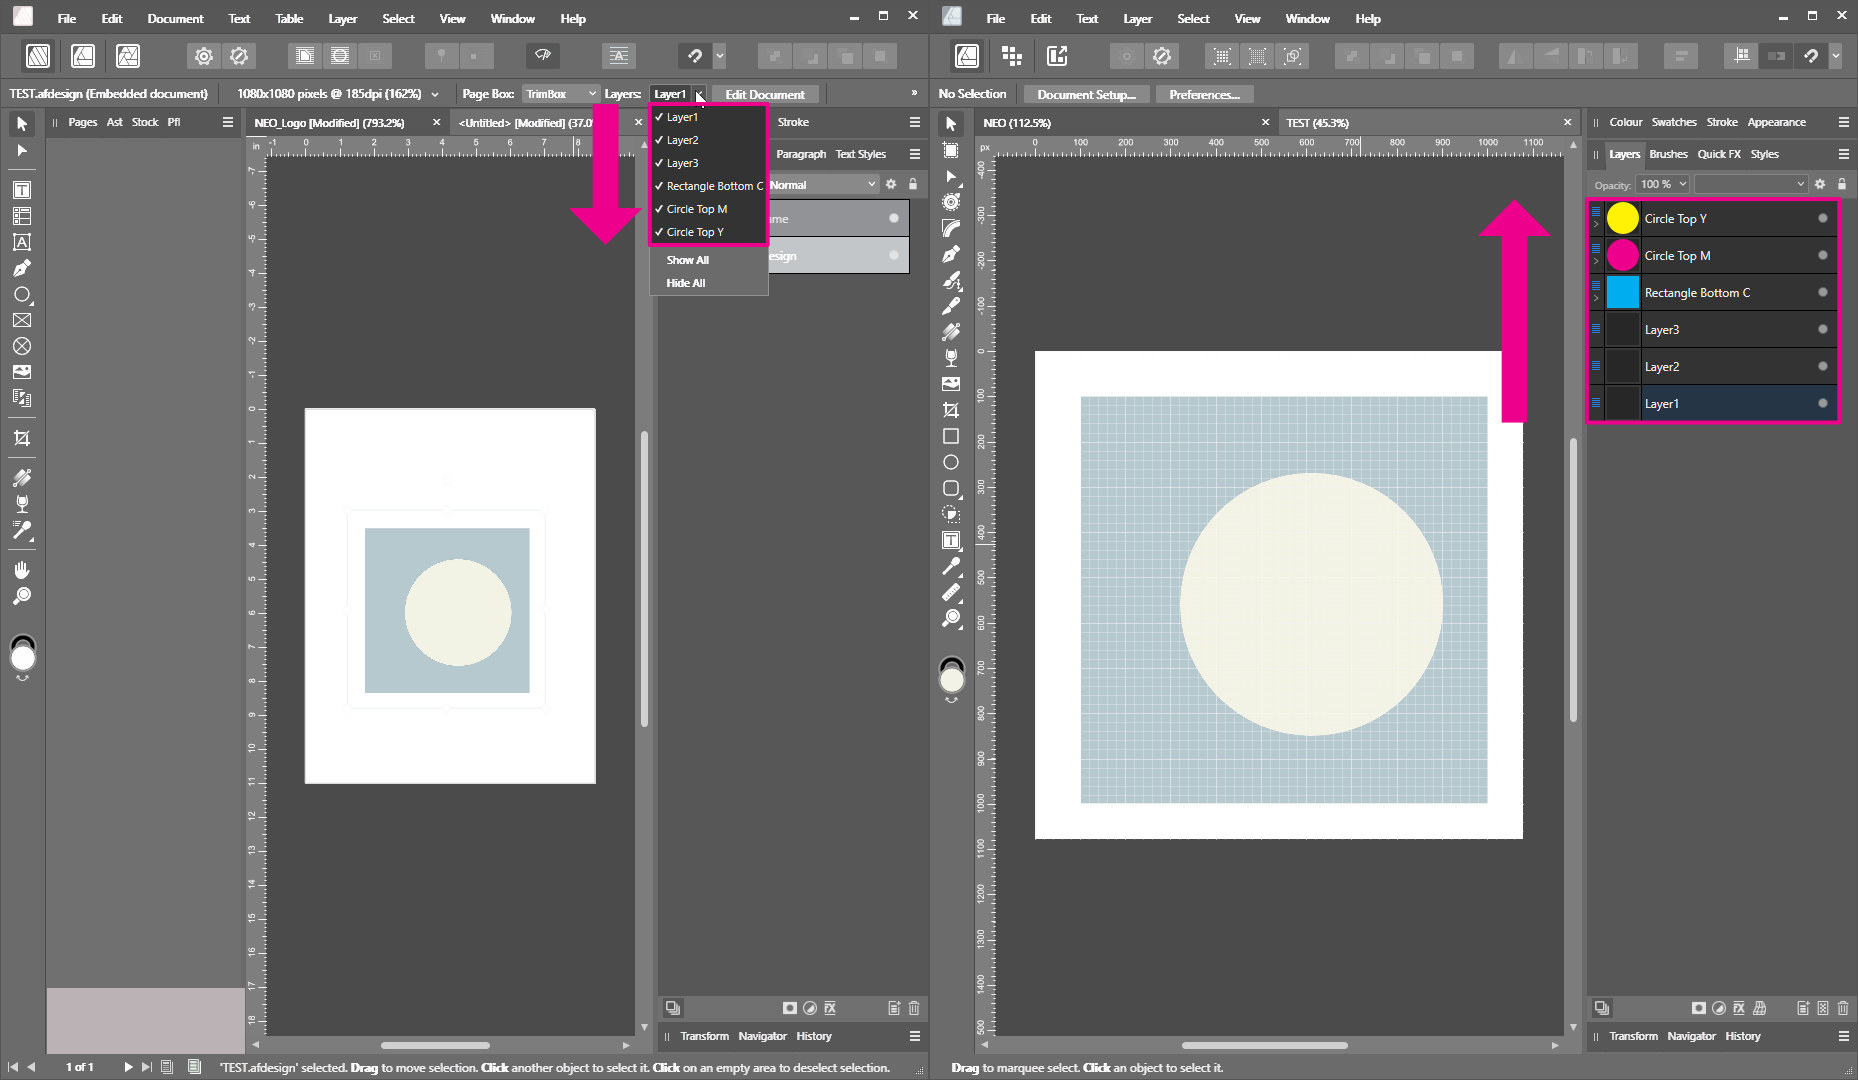
Hey there, I came across the following question and bug while working on a document today. Initial situation: I want to link a Designer document with several differently named artboards, each containing between two or three layers that I want to show or hide separately while the document is linked in Publisher. I'd like to use the long awaited and now available "Layer Visibility Override" in Publisher. I was very excited to finally see it! Question/Possible minor bug: Why is the order of layers in Publisher reverse compared to the order in Designer? The lowest layer in Designer is shown first in Publisher and vice versa, the first layer in Designer is shown last in Publisher. I can't quite follow this logic and it seems a bit backwards in the most literal sense. (Sorry, the screenshot is meant to be read from right to left, because on the right side is the way I set up the layers first in Designer, before linking them second in Publisher on the left side). Bug (?): There is no other way to describe it than that it simply does not work. In my particular case, I'd like to switch between two layers, ticking one off, ticking one on. And it just doesn't work. Instead of switching between these two layers, a third layer is displayed which should remain invisible because I am not even touching it. Also, I'm not so much interested in workarounds for the problem, I know there are other and cleaner ways to set it up, like I could have opted for additional artboards (as I would eventually do once the client narrows down to one version). However, as there should be Layer Visibility Override in Publisher, I'd want to use it. Please see the clip attached. Perhaps someone can confirm this? Or maybe this issue is already known/reported? Cheers Dennis Layer_Visibility_Override_Bug.mp4
-
 Scenario: I am working on creating a tileset for my game. In order to make my tiles seamless, I need to ensure that each side is able to match up with the opposite. So what I have is a single tile created, and I created copies of that tile on all edges that way I can see what needs changing. What I would like to do is have one 'master layer' per say, and have each of those copies just be representative of the original master layer. I think this is something you can do in photoshop but not sure. Anyways, is there any feature or assistance with this type of workflow?
 -
 Hey, so I'm making an image where I need to import a lot of images and have them be on top of each other. But whenever I import an image, it first appears at the top of the layer list. It would save me a lot of time if they first appear at the bottom of the layer list is there a way I can do this?
 -
 Please add a select all objects on a layer. I often group objects together or put them in a layer in which each object has the same appearance. It would be a major help if I could select all objects on a layer or in a group. This also helps when modifying imported DXF files.
- 1 reply
-
- 1
-
-
- affinity designer
- affinity publisher
- (and 5 more)
-
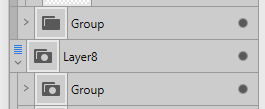
 Some of my Group icons in designer's layers panel have a round dot within them. Some others do not. What is the difference? Thank you!
-
Hi, first of all I don't know if this is a bug or ... a feature... but, reading the help manual in the "Applying adjustments" I read: Merge—merges the current adjustment layer with the layer immediately below it in the layer order. Now, unless I don't know how to use it ... which it could also be..., but on my mac (AD2, bigsur) I have a picture layer (positioned at very bottom) and on top of that three adjustment layers. if I click one of the adjustment layers (for example the first of the three on top), it opens correctly its "property window" where the "merge" button is, but If I click on the "merge" button, absolutely nothing happens in the layers => all of them remain there, while I expected a merge with the adjustment layer below, as the manual says. ... am I doing wrong ? anyone can help ? thx
-
Layer symbols are not displayed correctly, if you hover over the symbol icon (the crossed dot), Designer displays a pop-up that reads: "layer", whereas the layer is in fact a symbol. Also, the name of the symbol in the symbol studio and layers studio still reads "layer", instead of "symbol" as symbols would. Also note that if I delete all the layers, the symbol in the symbol studio will read group, as opposed to "symbol". See video, should be self-explanatory. 2023-01-12 13-01-13.mp4
-
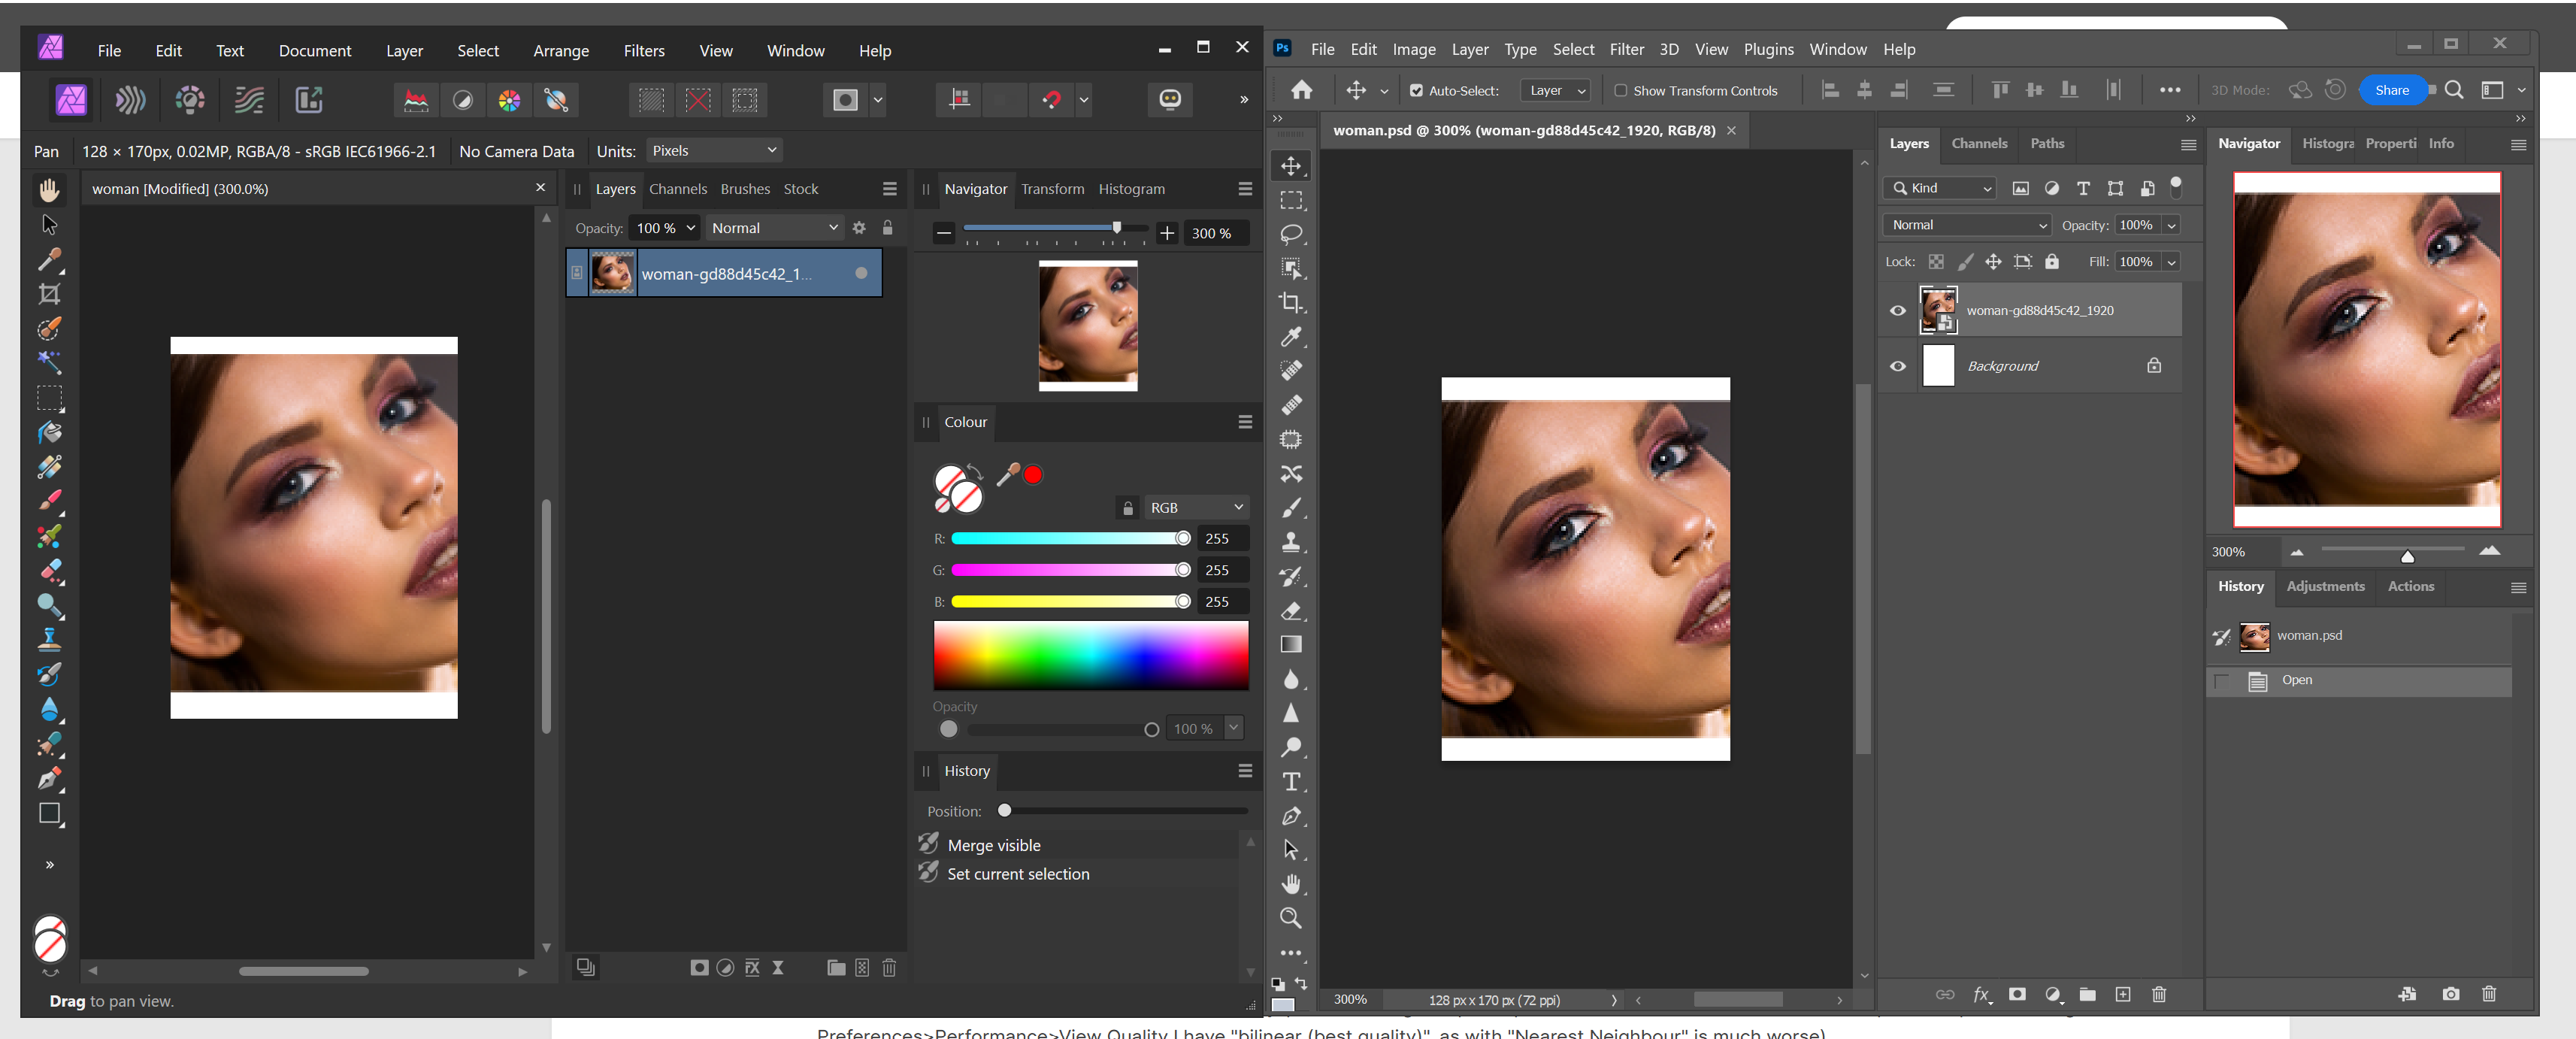
Hi! I am very new to Affinity. I have searched in the forum but didn't find anything similar, so I don't know... maybe it is only happening to me. I created a new file of 127px width, 180 px height, with 72 dpi. My test is small because I found the problem with that one, but it happens with other sizes. Drag the woman image so it is a new layer (linked). I then resize that layer (the layer, not the document) to a 10% width with Transform panel. You can see how the image gets pixelated, or some would say blurry (depending on the zoom level!). This is not happening in Photoshop, which looks fine. This problem is NOT happening in Affinity Designer, nor Publisher. This is a problem, cause you can not work in a blurry-pixelated image in "photo persona". I don't know if there are other options to preview images (in Preferences>Performance>View Quality I have "bilinear (best quality)", as with "Nearest Neighbour" is much worse). Exporting as JPG through "File>Export" Resample: Bicubic Quality 100% gets same blurrines-pixelation. Resample: Lanczos 3 Non-separable, which seems the best Quality 100% gets better. I think is even better than photoshop, at least with this small export size. Ok, then I change to "export persona" and the image in the monitor looks as expected! But exporting it gets same results as before. You can check and try with the attached elements (woman photo is free, on Pixabay: https://pixabay.com/photos/woman-portrait-face-skin-make-up-3096664/ I downloaded the 1920px option). Thank you! Edit: I have uploaded a new image: a screen capture of Affinity Photo vs Photoshop. woman.psd woman.afphoto
-
What I would like is to have new ways of changing the layer of an object. Usually, I select the objects on the canvas, so they can be in multiple nested layers. Currently, I have to do an awful lot of scrolling to move content from one nested layer to another. Or use the Move Outside command, followed by Bring to Front/ Sent to bottom and then drag the objects to the layer I want them in. In CAD software and in Blender you have commands like these, which you can use to pick a layer to nest the objects in. Basically it shows a layer tree without showing the objects themselves (those need to be preselected). Then you pick the layer you want to drop the objects in. It's as simple as that. For Affinity, the button to confirm could even be removed (if you add a button next to a layer so that it is easy to click on and hard to misclick). 2022-12-07 15-29-04.mp4 Another idea is to copy Illustrator's layer panel where you see in which layer the selected objects are (it displays a dot with the layer colour). Then, you can drag and drop this dot to another layer, which effectively moves the content to this layer. 2022-12-07 15-29-04.mp4
-
- 1
-
-
- illustrator
- rhinoceros
- (and 8 more)
-
I would advocate that if you collapse a layer, you do not want to lock the object you have just created. Instead, I often collapse the layer, because I am done working on it and want to lock it to prevent any further changes. But when a layer is collapsed, the last created object remains selected (which is what I expect), however, I think that collapsing should indicate to the lock button that you want it to affect the layer (also because you can no longer see which object you lock). Collapse, select the layer and lock now requires 3 actions, whereas it could take just two (get rid of selecting the layer). If you wanted to lock the object instead, you should lock the object and then collapse the layer. 2022-11-23 08-32-13.mp4
-
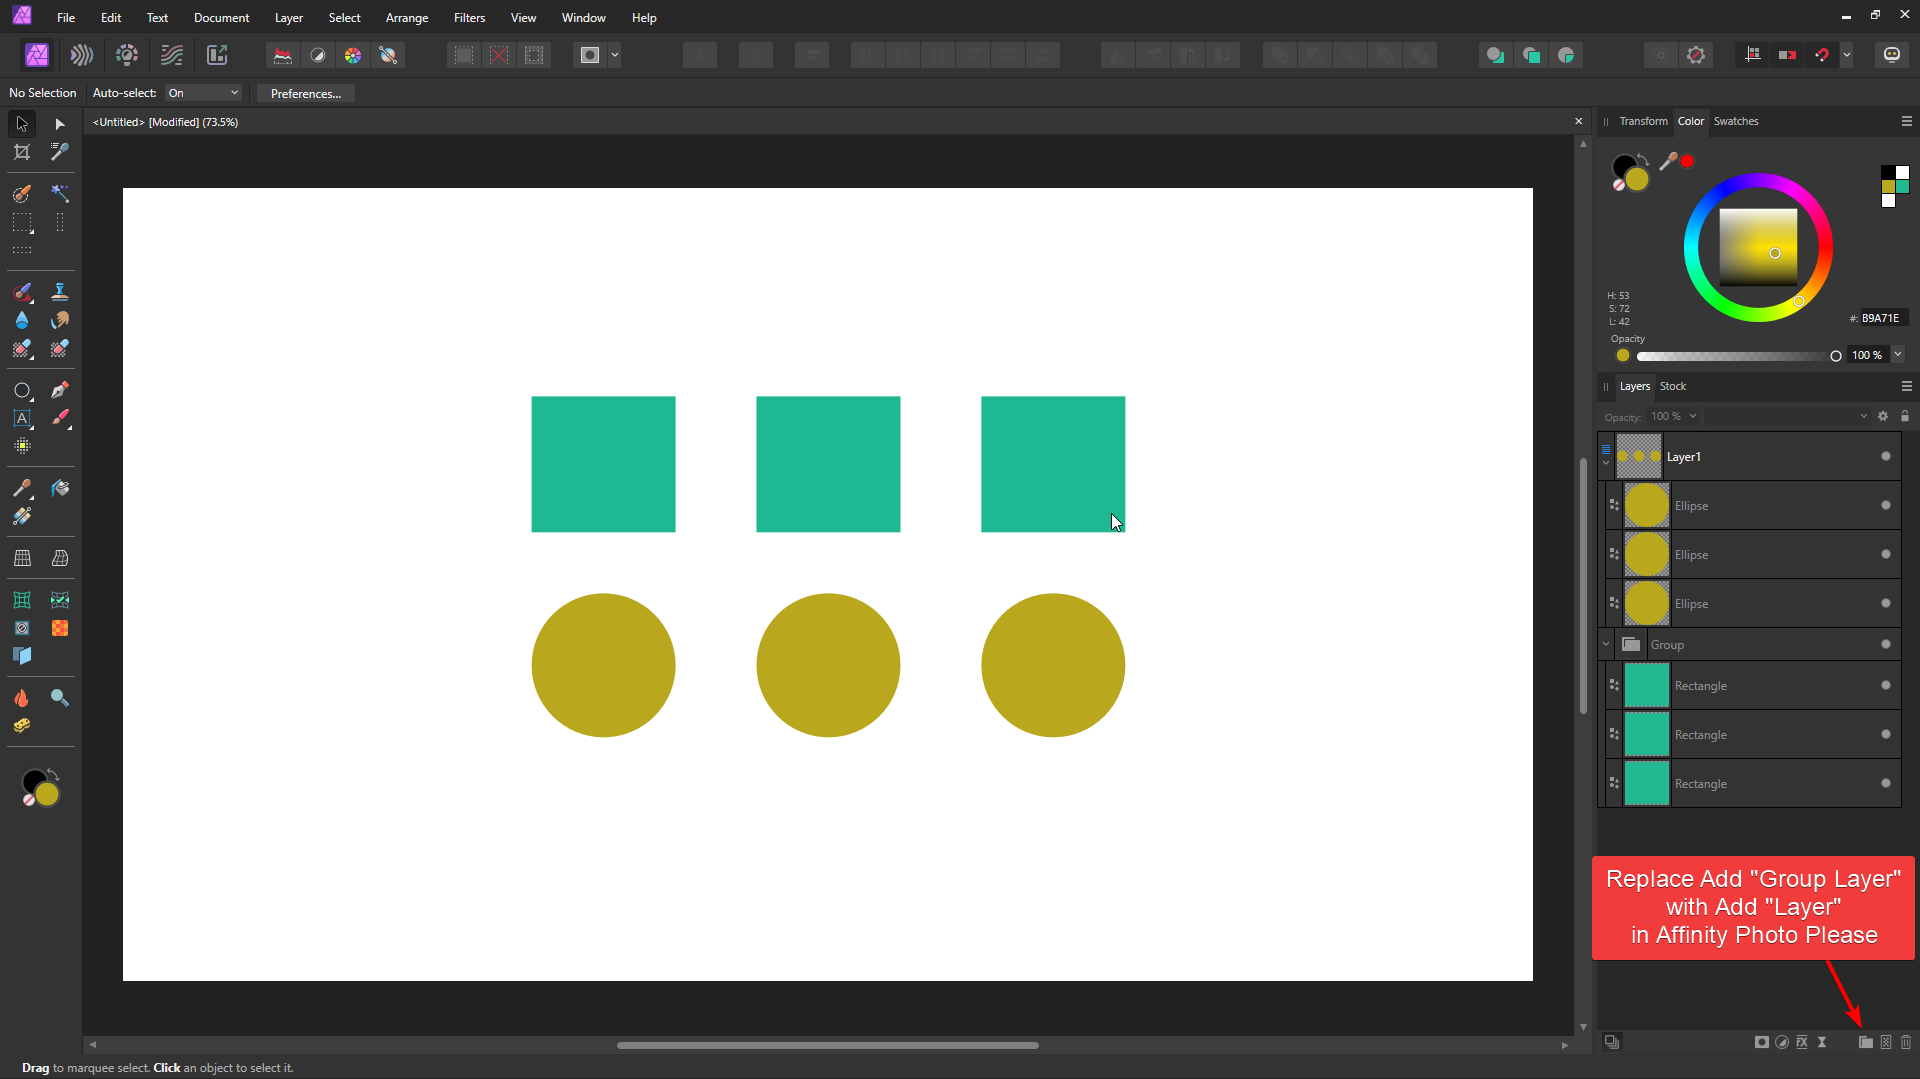
 The Affinity apps have three different types of buttons of add layers in the layer panel: "Add Pixel Layer" In Photo and Designer "Add Layer" in Designer and Publisher "Group Layers" in Photo The Layer from "Add Layer" in Designer and Publisher is very useful for organizing content and preserving separate selection for items inside of it. While the "Group" is useful for adjusting multiple items together. I know that Photo has Auto-select feature now, but it's better to have both types in the same document. T his is also the same type of organizational layer in Photoshop and other raster software, I don't know why Affinity decided to make Photo different. My workflow in Photo now is almost opening the document first in either Designer or Publisher, pressing "Add Layer" a couple of times and then returning to Photo. If you add "Add Layer" like in the other apps, it'll make organization easier and save me 2 minutes of my life each time I create a new Photo document. The Group Layers can be created by just clicking ctrl+g, or can be left alongside it.