Search the Community
Showing results for tags 'JPG'.
-
My latest set of FREEBIES! 300 DPI A4 sized PNG with Transparency JPG Commercial Use POD included All create in Photo only Enjoy! https://affinity.graphics/resources/65

-
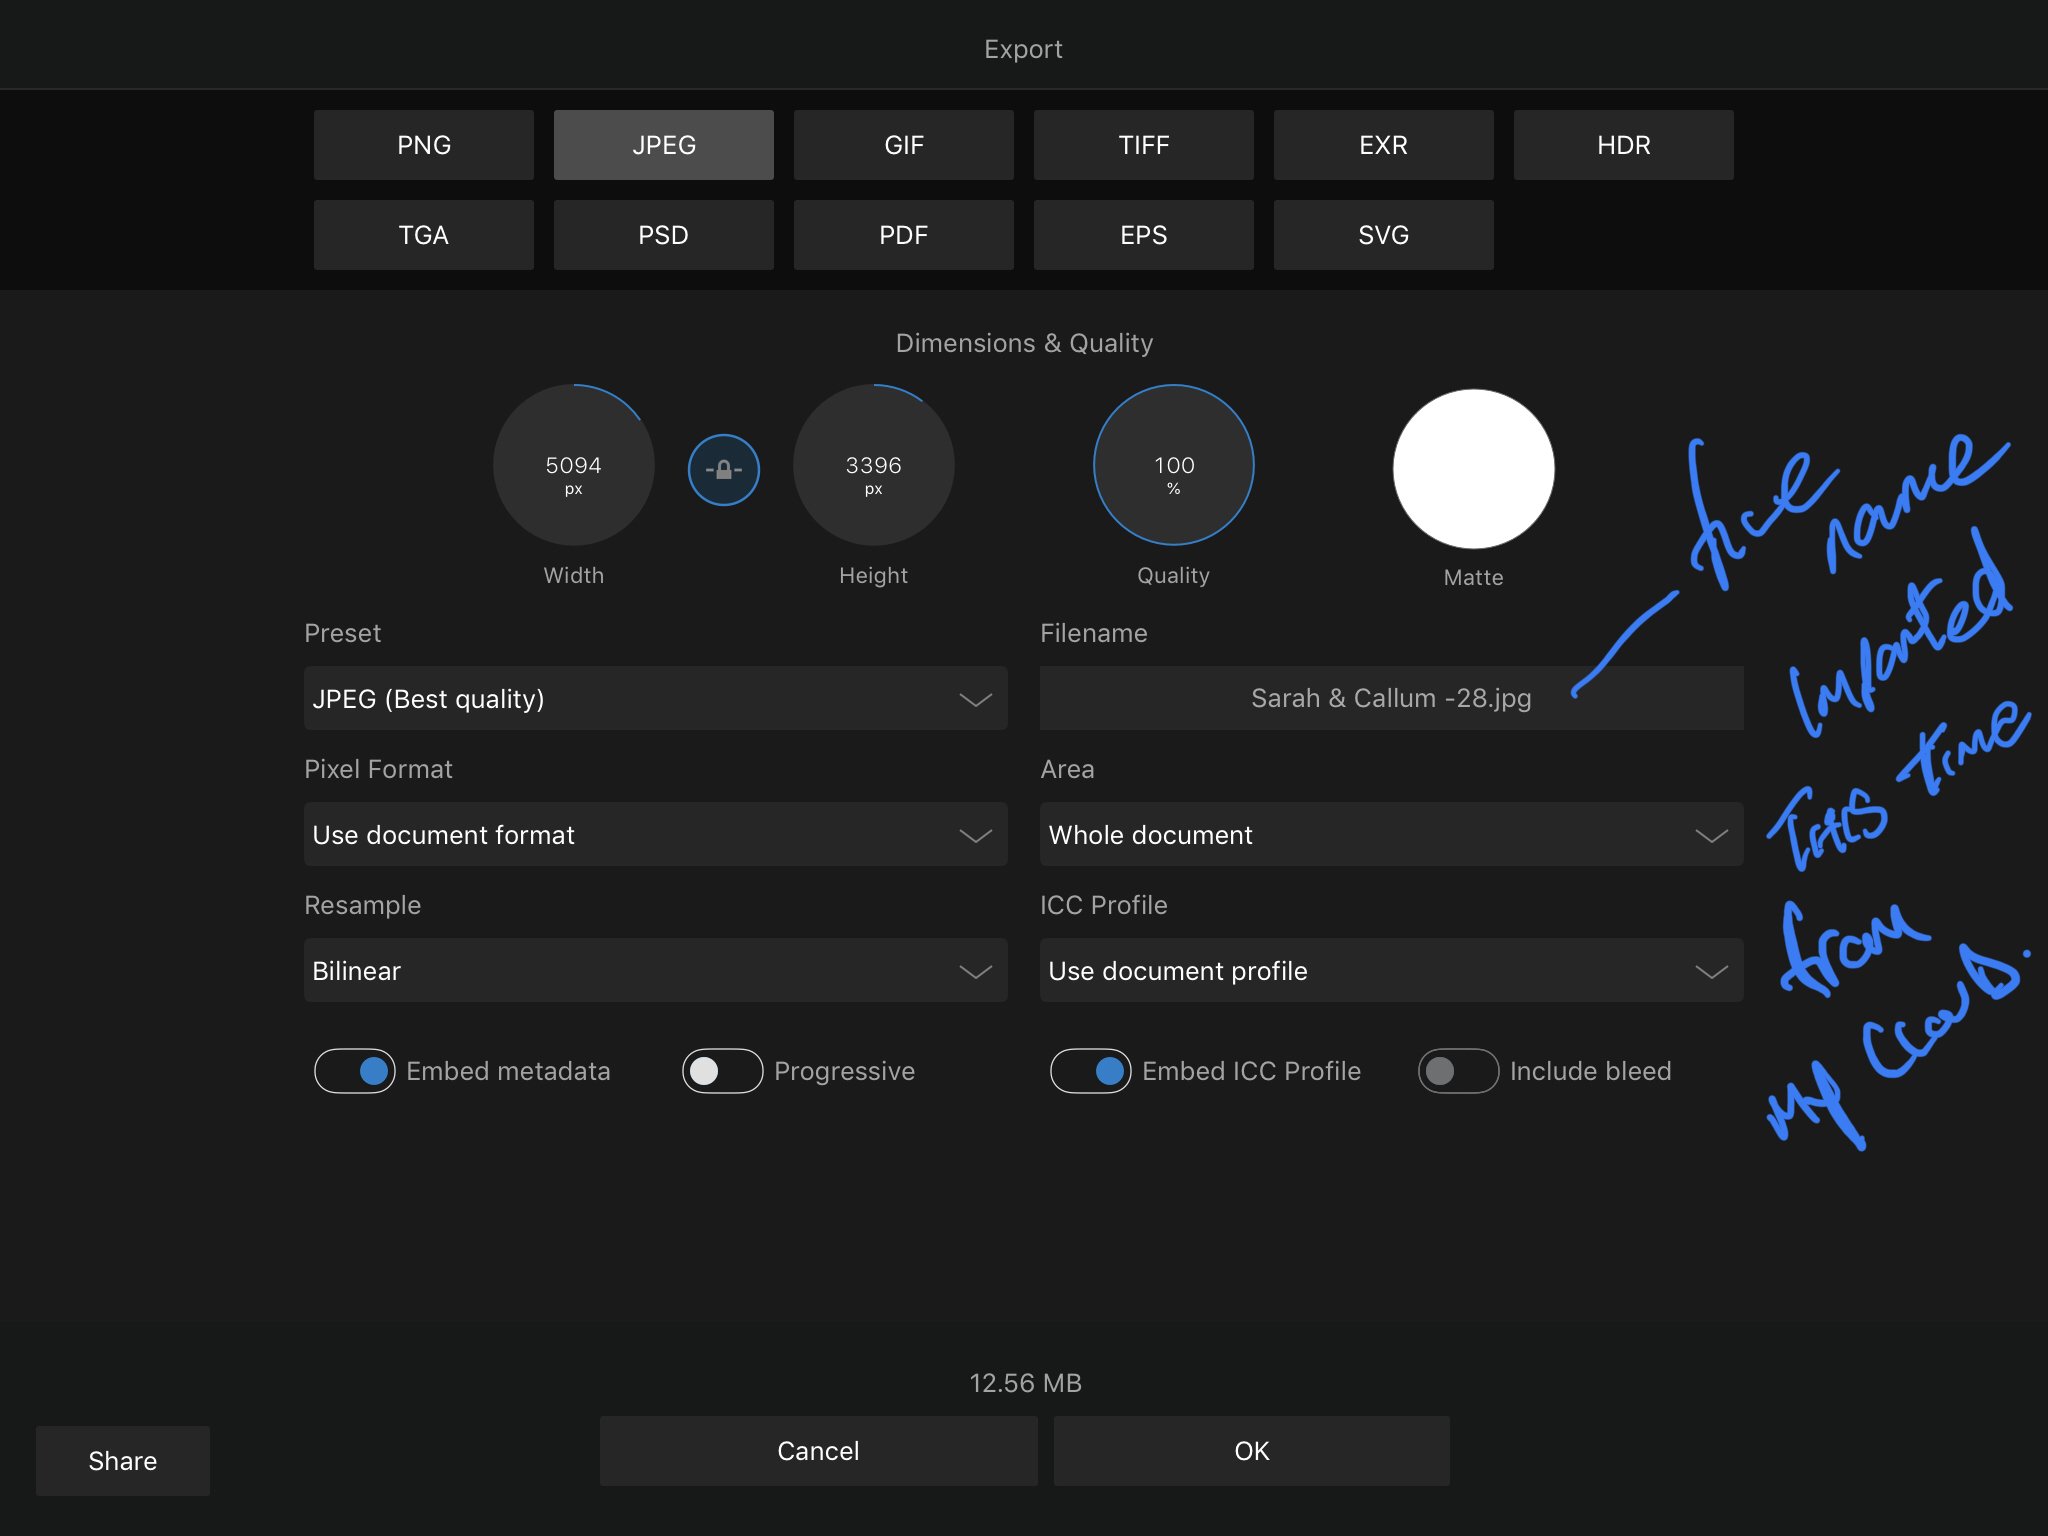
I have found that there is inconsistencies when coming to saving the image that has been edited. Sometimes I find the file name defaults to “untitled” when coming to save image, image is imported from WD My Cloud every time in the same way. Also importing from iCloud has same issues. Please see screen shots for examples.
-
 I have a jpg-picture where I want to change colors, but how do I split the photo into shapes? I.e. how do I convert the jpg to vector-format.
 -
 When using export persona in AffinityPhoto version 1.7.1.404 (german language setting) using variables for slicename to save have no effect. See example in Screenshot. Only "Slice1.jpg" is used in exported image.
-
I’m thinking of getting Affinity for my iPad Pro. I want to edit raw files, save as jpgs and export to a flash drive or the Cloud. How can I find out what size file I would get after editing the raw file and saving as jpg? If I add keywording, etc., in a third-party app, will I lose any image quality? Thank you!
-
 Flickr now requires a photo uploaded from iPad to be a jpg in Photo App. How do I do that?
 -
 I need to export jpg's for an IOS app and need different dimensions for different phones. I was planning to resize the jpg's but then several people suggested to use pdf instead. I am aware that you can scale pdf's when they contain vector and fonts ... but how does the scaling work with images?? Is the algorithm different? I always had the believe that a pdf simply CONTAINS a jpg and that the rendering algorithm are the same?
 -
 My affinity jpegs are exporting are opening in the raw suit in photoshop. This is not good for clients, most of them will still be using photoshop. I need JPEGs to open normally in photoshop and not the raw suit.
 -
 We have used Adobe Fireworks for years for making graphics for our website and social media pages. We have been evaluating software to replace Fireworks and Affinity Designer is a strong candidate because it seems intuitive to use and does the simple things we need to do. We have however run into some snags and the biggest one is exporting images. We commonly export our graphics to web compatible formats and as an example, we are used to seeing a size of 64K or less for a 500x500px image from Fireworks. Something we would use on the web or social media. The size I am seeing on from Affinity Designer is around 1 meg. Now, I admit I have not been through all the tutorials yet but this is a big deal for us. Our website is large and we try hard to keep images as small as possible. Please, someone, tell me I am not going about this the right way or there is a better way! Help appreciated.
 -
 The title already tells most of the problem I have. When I export my file to JPEG or PDF, it's quality get very low. I've already tried to switch the resample option to Bicubic or Lanczos, which didn't give me that much of a better result unfortunately. However, when I export the file to PDF, the quality is stunning. I've also tried to change the document settings from 72dpi to 300dpi, which also didn't give me any other results. Could anyone please help me out here? Below I've added an attachment to show you guys what I end up with. Thanks in advance!
-
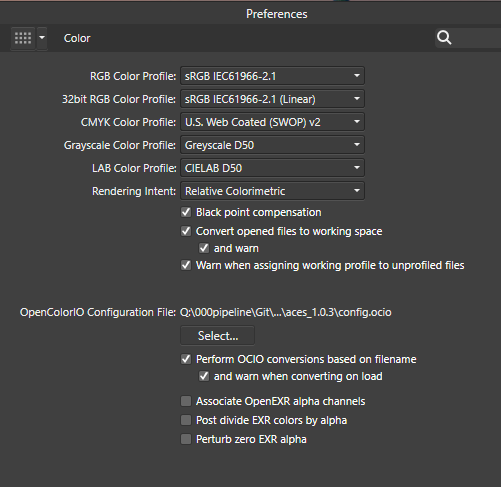
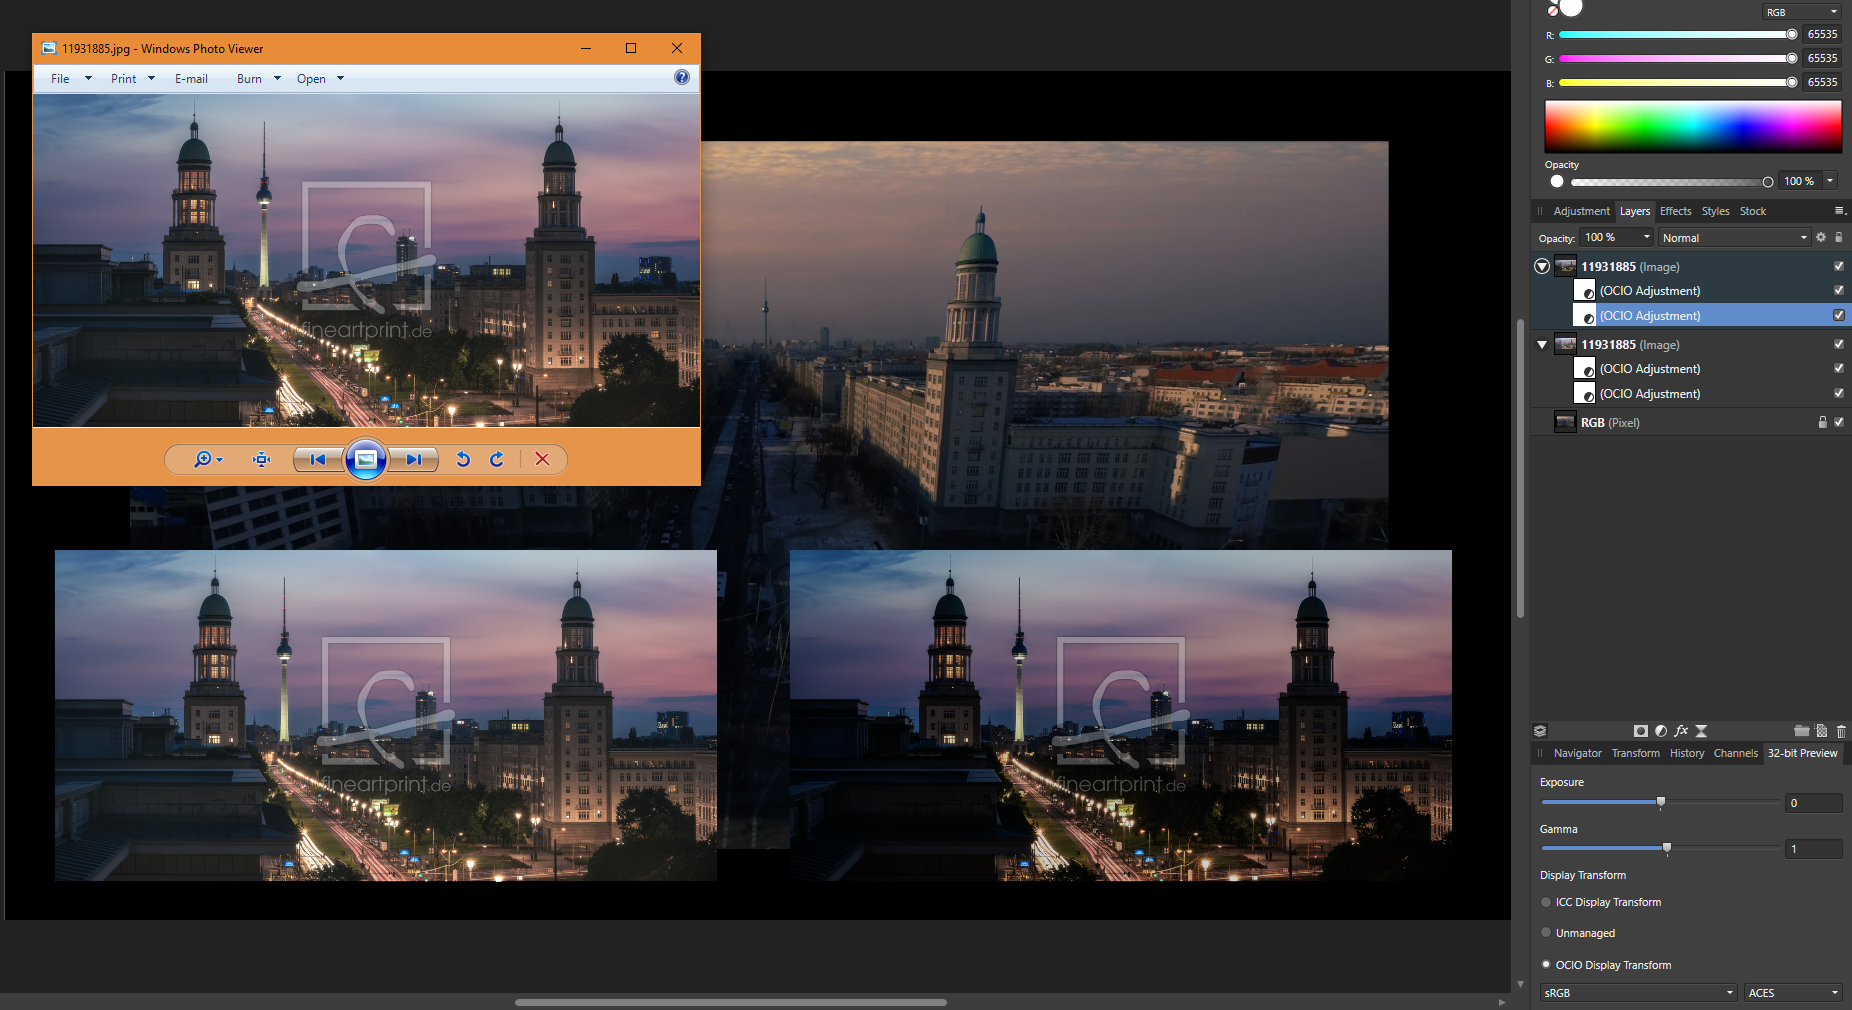
 Dear Serif Team and Affinity Photo users, I'm a VFX Compositor & Matte Painter and I'd like to move from PS to AP. I hope you can help me with some questions regarding the Implementation and proper use of ACES and 32-bit. My background plate is exported from Nuke as an ACES - ACES2065-1 16-bit EXR file. The import into AP (1.6.4.104) works fine - the file get's recognized as an ACES file and I get the same result using OCIO. But there are a few things I can't get my head around yet: How do I pick and paint high color values? Using the exposure slider in the 32-bit Preview I see that there are high values. If I pick and paint them back in, the result is way darker. (Changing the exposure doesn't effect the false picked color) picked in Nuke for comparison I moved from PS because there is a 16Bit limitation and I had to work with ACEScc files (log encoded) and use an ICC profile to check my work. I hoped to get around this using AP. Those threads are dealing with the same issue but the information is contradictory and I can't reproduce the method quoted first. https://forum.affinity.serif.com/index.php?/topic/49815-hdr-raw-pixel-values/ https://forum.affinity.serif.com/index.php?/topic/19787--/ What is the proper workflow of importing and edit JPGs in an ACES setup in AP? Unfortunately there's no way of assigning an IDT during import (as in Nuke) but I can reproduce Nukes behavior with OCIO Adjustment Layers, which seams pretty inconvenient. (Windows Photo Viewer as comparison) Bottom left: Two OCIO nodes in sequence [ACES2056-1 to Utility - Curve - sRGB] followed by [Output - sRGB to ACEScg]. Bottom right: Two OCIO nodes in sequence [ACES2056-1 to Utility - Curve - sRGB] followed by [Utility - sRGB - Texture to ACEScg]. This post deals with the question of the right IDT for JPGs in general. I guess going the Utility - sRGB - Texture way is better, isn't it? My color settings: If you need further information or I haven't made my questions clear enough please don't hesitate to ask. I'm glad about any help or further learning resources! Thanks a lot
-
 I have a badly exposed JPEG photo with some parts correctly exposed and othere drowned out by the sun. I have done some editing of RAW files on similar photos with some success but am very new to Affinity. Are there any ways to repair parts of a jpg photo?
 -
Why can't I just save an image as either TIFF, PSD or even JPG after the Develop Persona. Why this complicated Export Persona? Adobe at least got that right. This is a struggle every time. I'm sorry but I'm giving up on this.
-
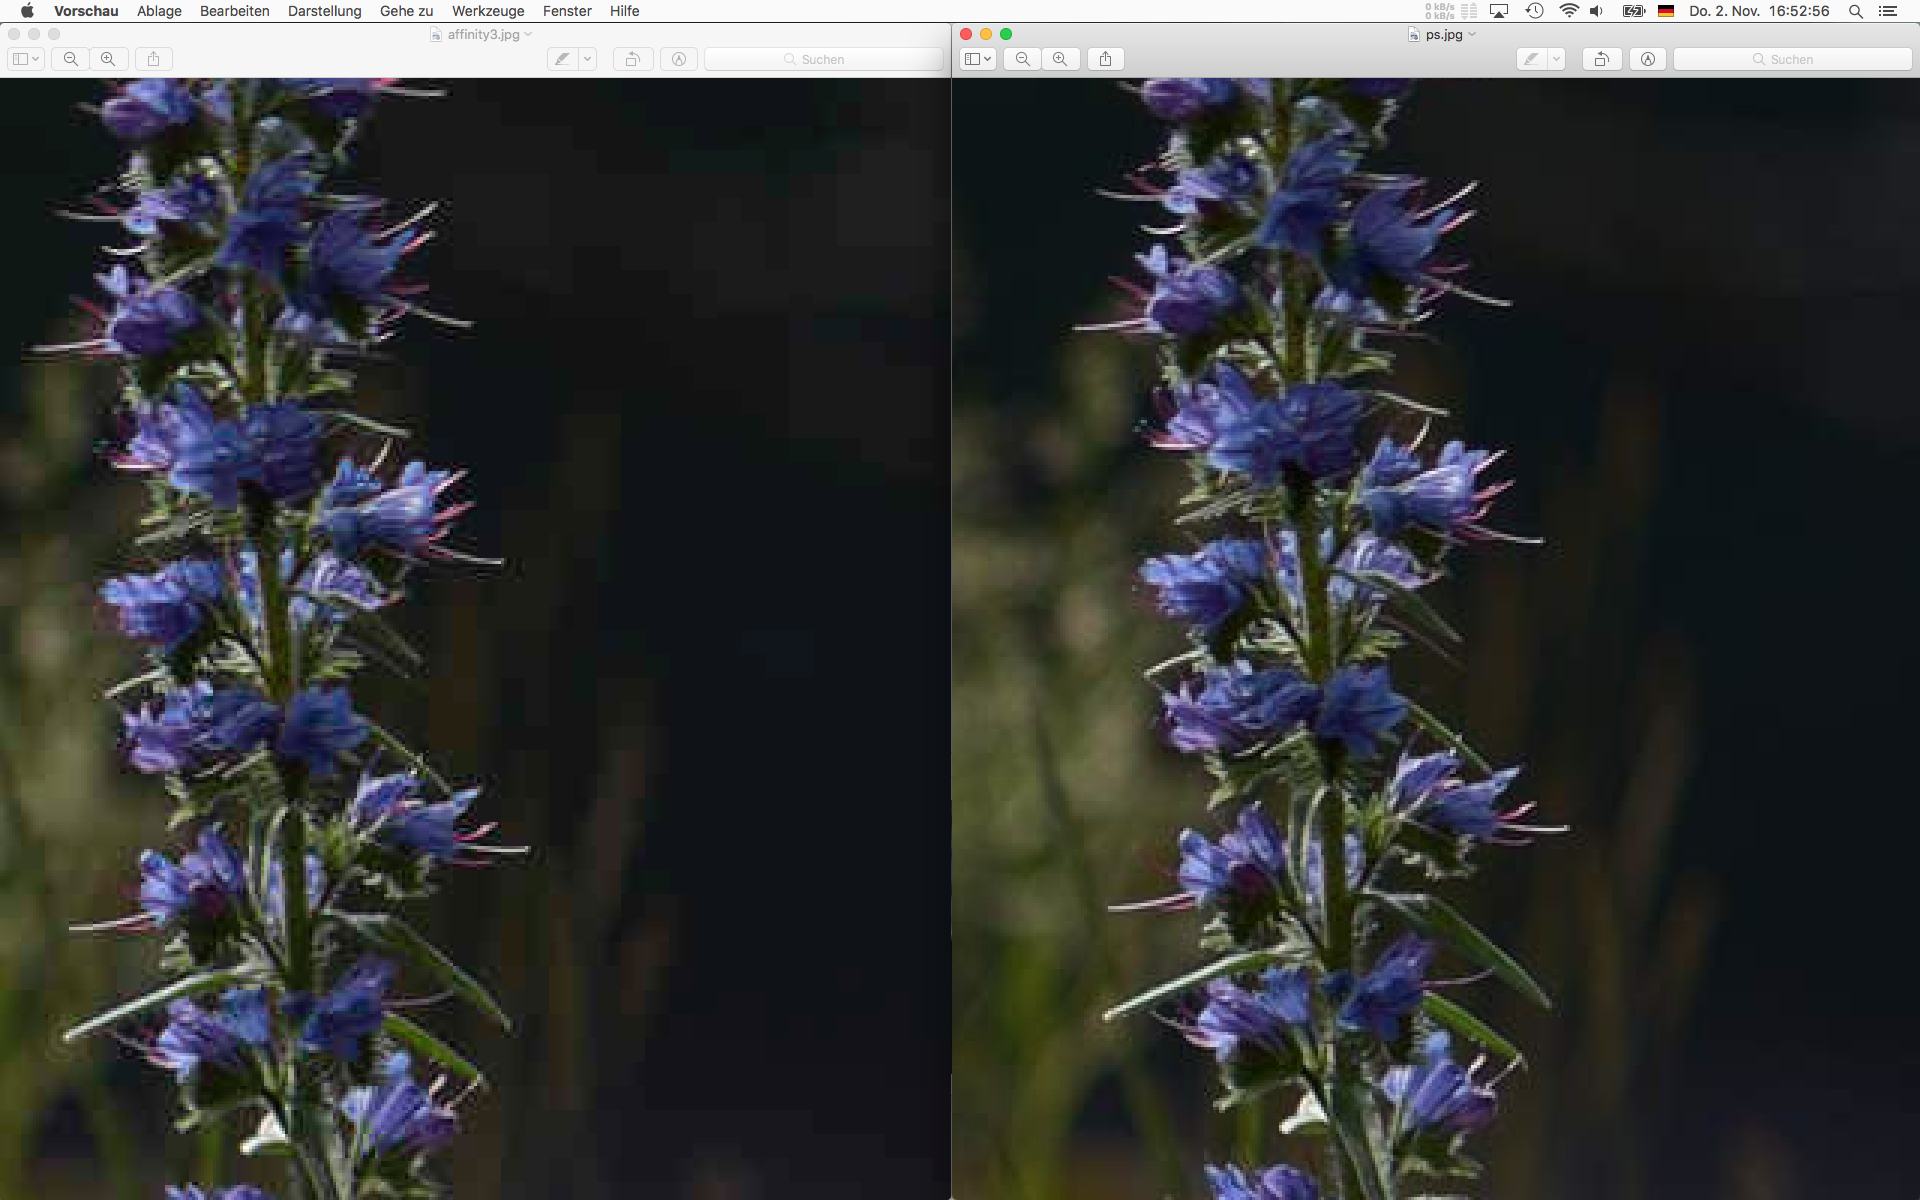
I want to switch from Photoshop to Affinity Photo. I need it for Web Pages. Unfortunately the JPEG Export reproduces very bad quality. After export the pictures seems to be radical sharpened and have enormous artifacts by same file size as with Photoshop. My example demonstrate the same picture in 300% Magnification, left is exported with Affinity Photo, right with Photoshop. The original had 36 MP, both are exported to 2400x1600px with JPEG compression to a file size of 170KB. If I want a comparable quality to Photoshop, I need a file bigger than 250KB. This is not acceptable. I use macOS 10.13.1 and Affinity Photo 1.6.6 – but 1.5 had the same problem. What can I do?
-
 Perhaps, some kind soul might be able to help. I have been uploading much up my work to 2 cloud services, Dropbox and pCloud. This afternoon I attempted to download several photos RAW and Jpg, only to see them download into the ether, never showing up on Affinty. What few images that I have on iCloud, no issues, but these two other sites don’t seem to plat well with Affinity. Am I missing something or screwing something up? Any help would be most appreciated.
 -
 This is a total newb question. Please forgive me in advance for wasting your time with such a question. I have tinkered with Illustrator and Photoshop over the years. I understand the lingo and the differences between pixel and vector based graphics. While I just don't want to fool with Adobe anymore, I'd like to thank Serif for the Affinity applications. If I am working on a logo (see attached) and I use Designer to do the donut, star, letters, but I go to the web and find reasonably high-resolution images to work with for NC state silhouette, the tower (the radio signals are vectors from Designer), and the flags, what's going to happen when I go to expanding this logo and so forth? Are the pixels converted to vectors and therefore they will work appropriately or am I going to have issues with pixelation in the non-vector parts of the logo? I will bite the bullet and create this stuff from scratch if I need to, but good LORD the time savings! Thanks again, Wilson Hines Graphic Beginner.
-
 Hi, Would it be possible to shed some light on this for me. When I load a sequence of files (not Batch Processing) ....e.g. SR_3122, SR_3123, SR_3124, SR_3125, SR_3126 into the interface to Develop,having 5 files open, the files are not displayed in order. Instead of being in numerical order from left to right across the interface, it seems to be random, first file on the left would be say SR_3123, then SR_3126, SR_3124, then SR_3122 and SR_3125. Many Thanks Simon R
 -
 It would be very useful to be able to see the images as they will be saved when adjusting the settings in the export dialog box. So for example if we select JPG and lower the quality to 25% you would see the image update to show the compression artifacts. I find that many times it is important to lower quality setting as much as possible but without losing quality to specific areas and it's hard to really know where to set these setting if we cannot see a real time view of the export settings. There could be a toggle switch to turn the preview on or off. This could also apply to any pixel dimension changes and other compression / export settings but even just showing the JPG compression would be nice. Cheers!
 -
 I have a simple JPG generated by some software, and I'd like to replace one colour (straight black or white) with another, or make it transparent. So far, any attempt to use the colour replacement brush tool have not given any result, and my search on the forum found its use to be an as yet unanswered question. I was hoping this brush would act as pick-and-replace tool (if pixel is <colour set> then replace with the colour set as front) but evidently I have this wrong. As I have both AD and AP, here are my questions: - which is the best to use? - what is the exact process to replace a specific colour x with a colour y? (layer select, any settings that can mess it up, which brush to choose, how to choose the colour to change and set the colour it will be replaced with). - just in case I come across this later, is there also a way I can control the *range* of colours accepted for replacement (the cat example isn't universally the same orange). I'm clearly missing something simple, but I can't seem to identify what.
- 16 replies
-
- 1
-

-
- colour
- replacement
- (and 1 more)
-
Hi guys, tiny problem in the export algorithm: This is what AP shows me (and what it should be like): And this is what IrfanView shows me as the exported JPG (85% Quality) file: Not good ... certainly not something I can work with on a daily base ... Can't always check that every layer is exported properly. Certainly a serious problem, since JPG is one of THE essential export formats ... Please check this .. Cheers, Timo
-
When exporting JPEG files, the default preset is always "JPEG(High quality)". Does anyone know how to change the default present for saving JPEG? It would be great if I could change the default one to the preset I created. Thank you very much. Regards, Sleepy
-
 I presume its possible to save photos as jpg (unless the beta doesn't allow it) but I cant find any way to do that.yet. If I am not allowed to do that why doesnt the program tell me that?
 -
 Hi. After a lot of experimenting I have found the only way to export an original 72 dpi jpg image as a resized 300 dpi jpg is to uncheck 'embed metadata' in Export Persona mode. Otherwise the image reverts to 72 dpi when reopened. Is this the only work-round to do such a fundamental task? I guess I'm missing something obvious, but I just can't find it. I’m using Affinity Photo version 1.4.3. Thanks a lot.
 -
 Sirs, I tried to do Focus Merging (elsewhere known as Focus Stacking) using a set of 12 photos produced using the focus bracketing feature of my Olympus OM-D E-M5 Mark II. It seemed to do a good job and I was able to save in afphoto format but when I tried to export as JPEG it gave the message: An error occurred while exporting to: C:\Users\...\AffinityFocusMergedToyCars.jpg Metadata could not be embedded. I am running Affinity Photo 1.5.0.35 (Beta) under Windows 7, I also tried to de-fisheye a photo from my Samyang 7.5mm f:3.5 Fisheye lens taken on my Panasonic GF3 (micro four-thirds) using Filters - Distort - Lens Distortion but it seemed incapable of fully removing the barrel distortion even at -100%; Also, it would also be nice to have lens correction data.
- 1 reply
-
- 1
-
-
- Focus Merge
- Export
- (and 1 more)
-
 Hello, I can't seem to work out how to do this. I've limited experience with Affinity Photo, using it mostly for simple contrast and exposure adjustments. I'm sure I'm missing something obvious but can't figure out how to apply a simple ND Filter effect to an overexposed sky. Thanks!


.jpg.bc16c25ede1ebc2df9b068ad33e18477.jpg)