Search the Community
Showing results for tags 'How To'.
-
 I would wish to buy a gift card for affinity photo for windows or mac to someone, but I can't see a way to do that? edit: Actually, I wanna create a competition on my youtube channel and the price would be this software.
 -
 In this Affinity Photo Tutorial, You will see, How to create Neon Glow Line around persons in Affinity Photo. In this tutorial, I used the Pen Tool and Node Tool for creating the line. I hope you like the video. Thanks #affinitytuts, #neongloweffect, #affinityphoto
- 2 replies
-
- 2
-

-
- affinity photo
- neon
- (and 3 more)
-
 Dear Friends, The actual reproduction of this design is not important, it more 'how to' tackle something I first thought was very easy but still can not find a good way to reproduce. Basically I can see 4 vector wavy lines each with a gradient falling away on one side that is consistent whether the line is rising or falling. Interaction between the lines can be taken care of by overlays or whatever, its really the process forming a line by either using gradients that follow the line or create a brush that will do the job. The concept can then be used on backgrounds, letterheads etc This is probably something I will kick myself about but at present I am baffled. Thanks for all your help, Graham
-
 https://youtu.be/YqrDl8k8tTg Is their a youbrew code for inserting YouTube video links ? Regards Rob
 -
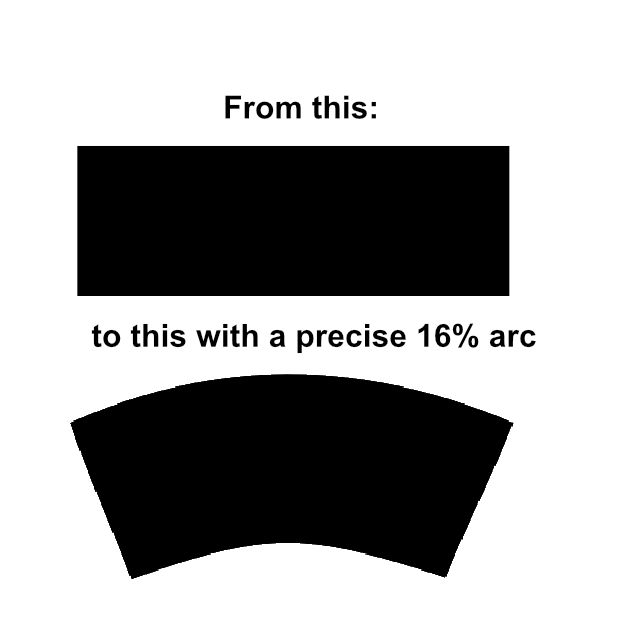
 I have template that I'm working with to create a tumbler wrap. It shows that after designing within the rectangle, that you need to arc the rectangle design 16% to have it correctly wrap. The only thing close to an arc option I've found is in photo with the mesh warp tool. I don't like this option of rasterizing and not having vector elements. I also don't see where it can be precise in creating the arc. Anyone know how to do this? Especially keeping the elements vector?
-
Hey Guys, In this video I am going to show you, how to design a Gradient Professional Logo in Affinity Designer with easy to understand steps. In this video you will also learn, how to use fill tool with linear type gradient color. I hope you enjoy this video, If you like this video, Please subscribe this channel and share this video with your friends.
-
- 2
-

-
- logo ideas
- design
- (and 2 more)
-
 hello I'm wondering if there's a way to add pores like in this YouTube video https://www.youtube.com/watch?v=GUqO2ZQVDp4
 -
 I tried to import a .jpg-file but it did not work.
 -
 This video is an excerpt from my -soon to be launched- "Learn Affinity Designer Fast" e-course. The most complete and comprehensive course on Affinity Designer. In this video I'll show you how to customize the object defaults, which allows you to set the fill color, gradient, opacity and noise values. You can also set all of the variables for the stroke, including color, gradient, opacity, noise, style, width, cap, join, alignment, draw behind, scale with object, and pressure curve values. This includes using a brush stroke! Being able to set the defaults for your objects whether it is just for that document or globally for future documents, is a great time saver. Your workflow will be come more efficient and your creative juices can flow freely without getting bogged down in the details. Setting defaults is a great web design tool for all you app creators out there. Enjoy and happy creating! Jen
 -
.thumb.jpg.dabc15530a2a67d371244c9bef26f8da.jpg) I'm trying to make some sporty text logo and was wondering how best to do the warp effect where the top is straight but the lower edge/baseline of the text is curved. In illustrator you go to Effects > Warp > Arc lower, but was wondering if Designer has something like this?
I'm trying to make some sporty text logo and was wondering how best to do the warp effect where the top is straight but the lower edge/baseline of the text is curved. In illustrator you go to Effects > Warp > Arc lower, but was wondering if Designer has something like this? -
 Hey, I regularly create non-destructive compound path. I then want to use these as masks and clip other layers to them. When I drag a layer onto a compound path, the path gets included into the calculation, rather than being clipped. How can I change this behavior and use the Compound Path as a clipping mask? Thanks!
 -
 I'm a new user to Affinity and I'm looking for a tutorial on how to add text to an image that looks like it was written in sand. I've googled this and can only find tutorials for Photoshop. Anyone have experience with this and can provide instruction?
 -
 In this tutorial I cover how to create a custom filter to extract details from your images. In this tutorial you'll also find the use of Macros and a bonus for you to use as you like... ;) https://www.youtube.com/watch?v=JdaySWNEpY0 The language in the video is portuguese with english subtitles. Hope you enjoy the video :) Pedro
- 11 replies
-
- 1
-
-
- affinity photo
- tutorial
- (and 6 more)
-
 This seems a little too basic to have to ask, but the Help system is not helping. I have an image that I want to rotate a few degrees prior to doing some perspective correction. The Help entry says I can grab "rotation handles" but all I see are a blue outline with blue X's at the corners and midpoints. When I try to "display rotation point" I get nothing. None of the shift type keys have any effect. Is this one of those "can't get there from here" features that I seem to run into on occasion? Thanks!
 -
 Hello to everyone, I'm making a calendar. I need to set every day and number of the week with precise distance and position. So I think to put every table one on one and then set several guides to check the position, and so on. But if I put a guide in a table this is not seen in other table. So there is a way to display same guide in every tables? Sorry for my bad english, I hope that you mean that I write...
 -
 Hey Everyone, I'm back with another video on how to add an Image inside of a Text: https://youtu.be/8Ykv45jox-w Let me know what you think and feel free to use this technique into your own design work. Thanks, Mike
-
Hey Everyone, I'm back with another video on how to add an Image inside of a Text: https://youtu.be/8Ykv45jox-w Let me know what you think and feel free to use this technique into your own design work. Thanks, Mike
-
Hi Everyone, I'm back with another YouTube video tutorial on how to add an image inside a shape: https://youtu.be/s4dGgAMqDp0 Thanks for watching and let me know what you guys think :). Have a good week! -Mike
- 1 reply
-
- 1
-
-
- vector drawing
- graphic design
- (and 4 more)
-
 Hello pixel pushers! Here is my latest effort in four chapters, hope you enjoy. Background edit https://www.youtube.com/watch?v=xvg--Fbjxyw Background -2 edit https://youtu.be/fq0v2yjmb-A Background-3 edit https://youtu.be/V22Tb9agDMc Background-4 edit https://youtu.be/aAZfAFkJDS4
 -
 I am trying to put together a collection of images and transfer them to Blurb BookSmart or Bookwright. The images come from different cameras and are either in jpeg or RAW format. I can only find instructions for doing this using Photoshop (I don't own & have never used photoshop) So, is it possible? and, if so… what are the steps to take to achieve this. Much'o thanks in advance.
 -
 Does anyone have a tutorial on how to achieve this kind of design using AP or AD?
-
 So I have a shape and I am trying to make sure the text I put to the side of it is perfectly centered to the with the shape. I know photoshop has something like this with their grids that show a line when you reach the top portion, bottom portion, or center of an object you are moving the item nearby. Does Affinity do the same? Photo from my website to show what I mean. See how the purple lines appear when I move my text over the bar on the bottom letting me know they are centered against each other? Thanks everyone! loving the program so far.
 -
 Hello All, We use both Affinity Designer and Corel Draw X8. On occasion, we need to create fonts, and need to export them to TTF or other formats. Is there a workflow in Designer to create/modify and export true type fonts (or other fonts)? Corel Draw contains bugs that they have never bothered to fix in their font "features". If Affinity has similar font features, this may cause us to drop Corel Draw altogether. Any info on this would be appreciated. Thanks... Mark
 -
 Thanks in advance friends... ...when flattening into a single pixel layer, do I first need to rasterize the grouped layers? Not sure how to do this, i.e, I'm unclear on the steps involved, and the proper order in which to perform them. A brief walk-thru would be greatly appreciated. FYI - I am wanting to manipulate the Flat image (bend, curve around a cylindrical surface such as a large barrel or a utility pole, alter perspective and/or viewing angle, stretch by pulling/moving nodes independently of each other, etc). greateful for your help, -Christo