Search the Community
Showing results for tags 'HSL'.
-
 Hello, I would find it very useful if I was able to freely position the tool pop ups from for example the curve or hsl tool. Especially on the iPad Pro 11 inch the center placement of the tool often makes it harder to judge the impact adjustments have on the image while using the tool as it takes up a lot of screen real estate in the center. A great addition would be if something like being able to undock tool and drag it with two fingers to a different location in the workspace would be implemented. Thanks for considering, Johannes
 -
 If I make a selection of a dress, it seems logically that I want to contain my changes to the selection. However, if I select a dress, add Adjustment, it will not apply to the selection. If I Invert, then I can adjust within the selection. Is it me or just how it works? Example: on main image layer, I make selection of a dress. Then I select Adjustment, HSL. No changes will be made within the selection. If I invert, the HSL Adjustment will be made within the selection. I know it has a simple explanation that escapes me Thanks for guidelance.
 -
 Hi all, If I try to modify the HSL control points on a 32 bit image in the blue channel for example to green, nothing happens, I have to click on the green channel in order to see the greens affected...(is better a video than words). Everything seems to work fine if I convert the 32 bit image into a 8 bit one. I'm attaching the sample file. Cheers, Juan HSL_32_bit.zip
 -
Interesting new HSL interface. Thanks. Though I am wondering what happened to HSV. Is it just taking a sabbatical or has it been consigned to history? I rather liked it and it would be sad to see it go.
-
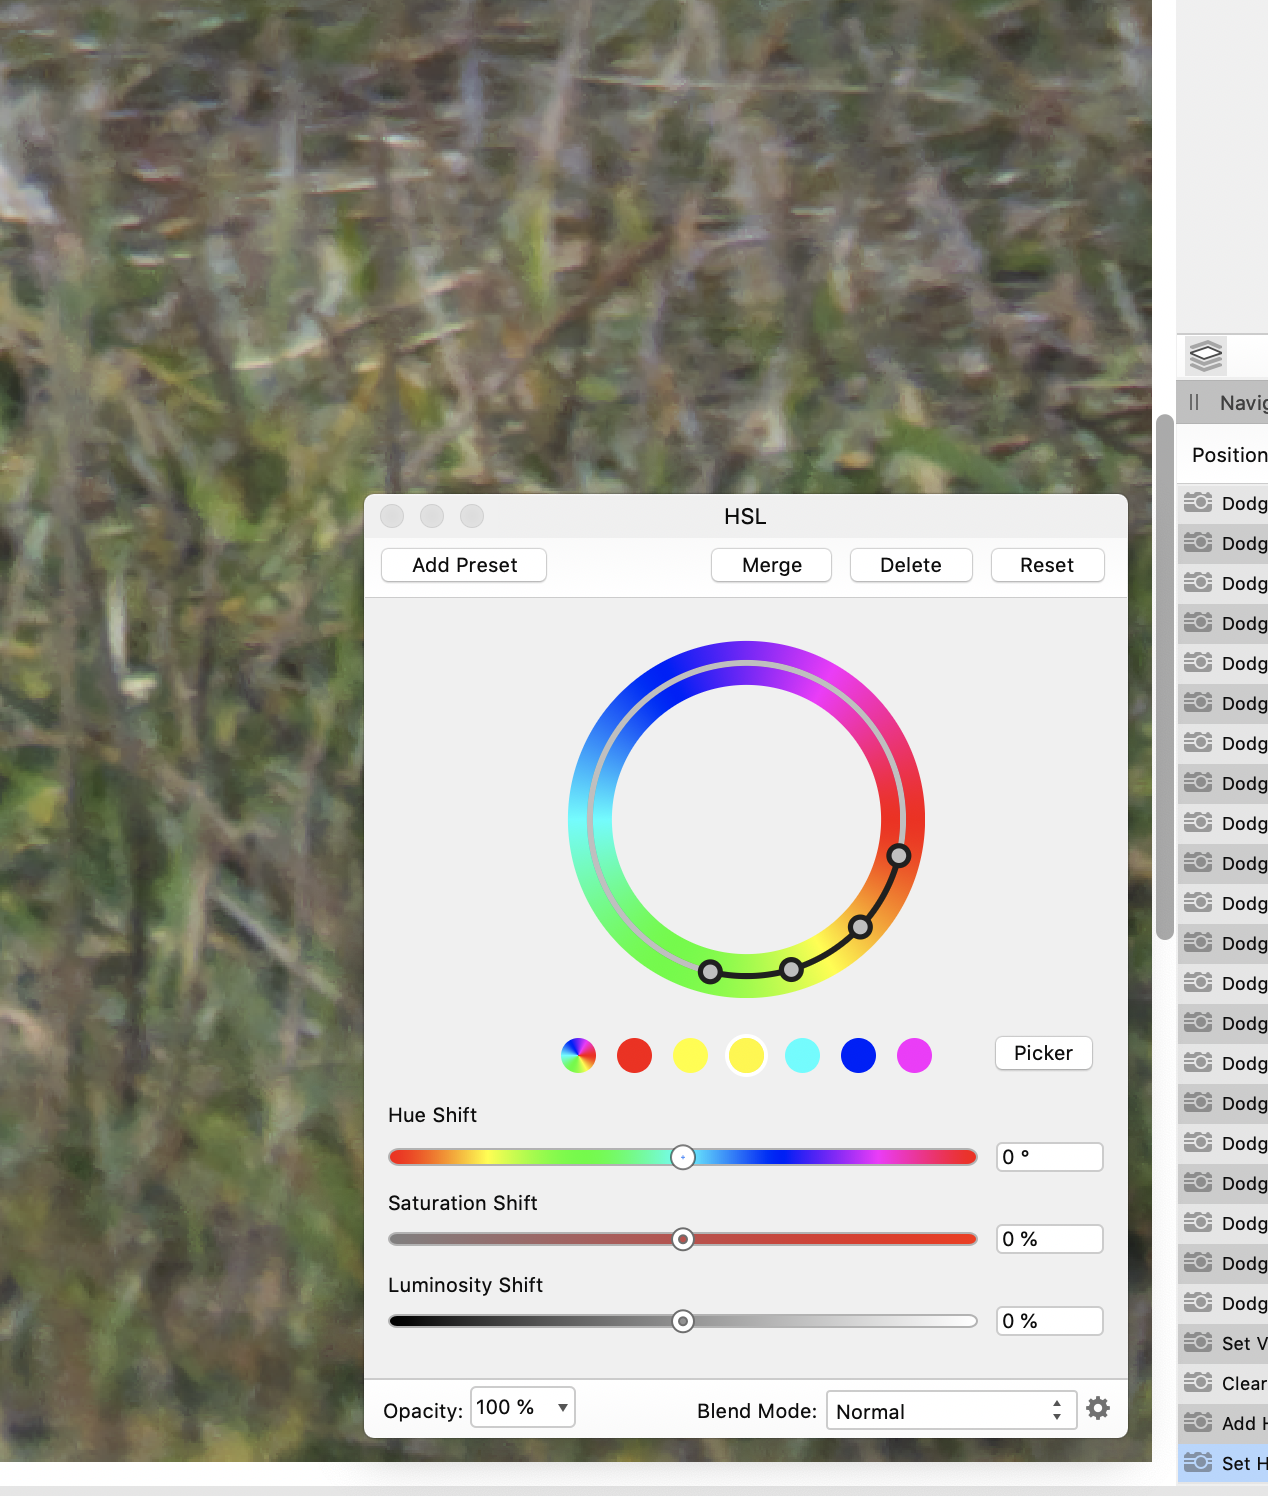
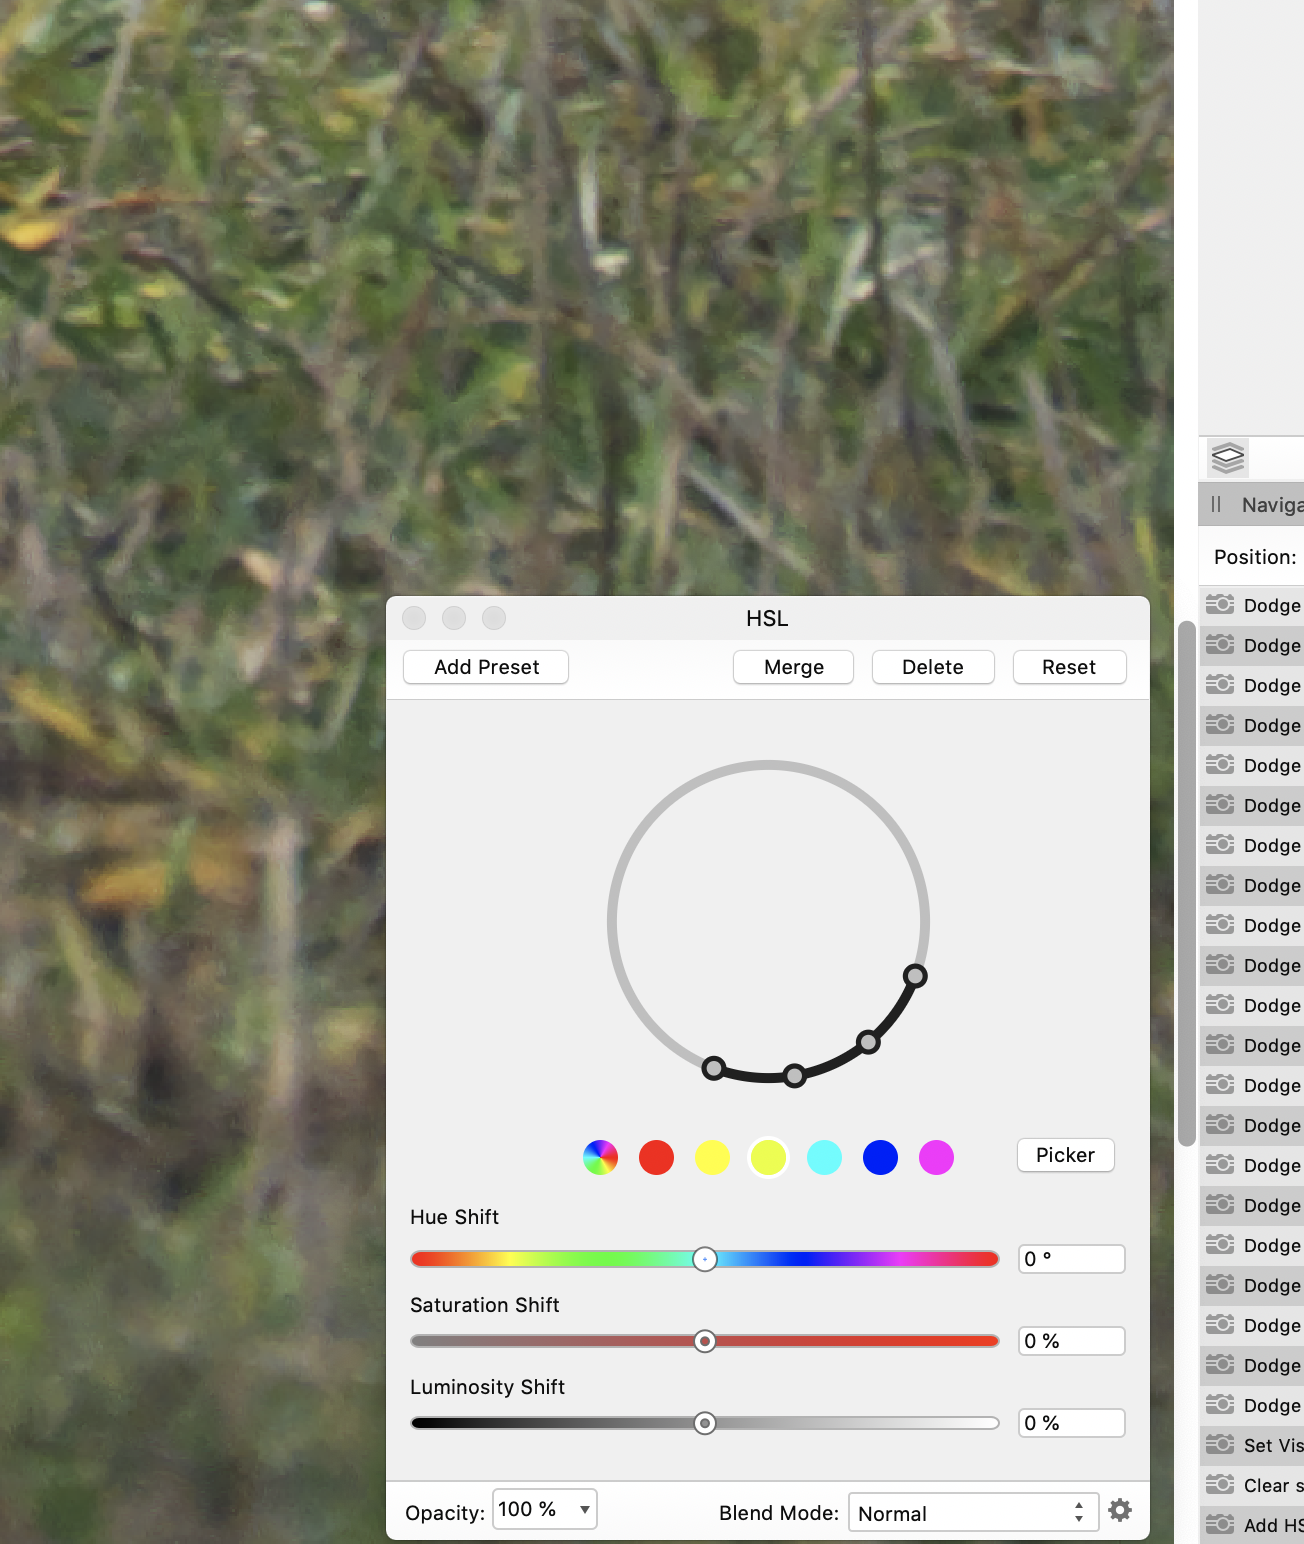
Hello, Often when I use the HSL Tool the colors on the color wheel disappear. I use Affinity Photo in Full Screen on an Imac 5K 27" from late 2015. The colors reappear if I switch to a different App/Screen and than back to Affinity Photo. The Tool still works but you cant see your range. I reported this before in a reply but now I got around to take a screenshot of the behavior. Best regards Johannes after selecting a range with the picker it reappears after switching to a different screen

-
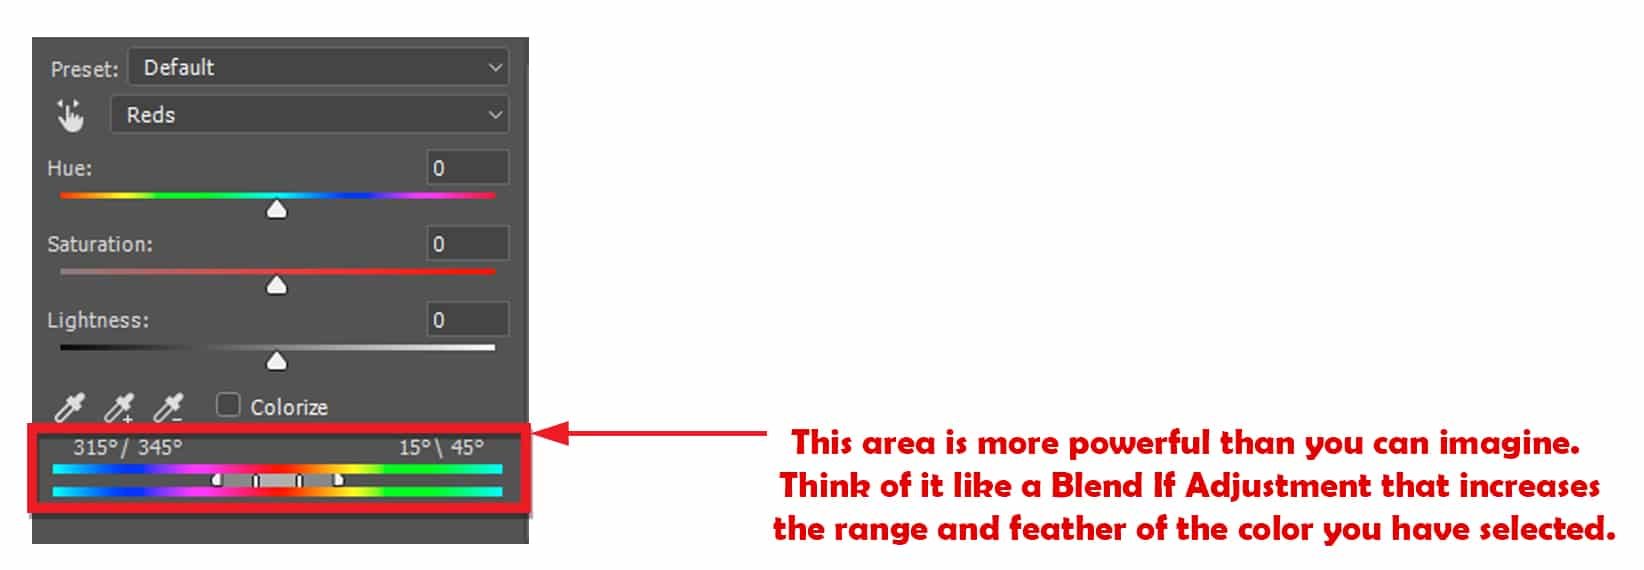
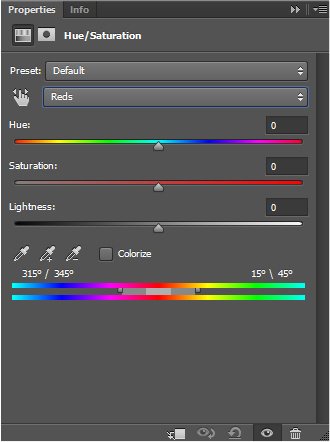
 Yesterday I tried to make some ajustments using affinity but unfortunately I wasn't able to get it right. There are two missing features. There isn't something like an eyedropper for selecting the color. Sometimes PS considers something as yellow when it looks green for instance. But much more importantly, there isn't any way to change the range of the color it's trying to affect. This is crucial for a lot of HSL ajustments. A lot of apps do offer the ability to adjust the HSL range. Now you can adjust only parts of an autumn leave for instance, the red channel doesn't cover everything and the yellow channel covers other things too so it's just not possible. Maybe you can work around this issue by using something like color range, but that limits your options to only one color and it's more work and less flexible. Please refer to the attached screenshot to see what I mean.
- 1 reply
-
- 1
-

-
- hsl
- ajustment layer
- (and 2 more)
-
 Is there a way to selectively do the same kind of adjustment in AP. The HSL control in AP doesn't provide a range the way the PS control does. Youtube Video - Teeth Whitening in PS Note: I tried using the selection brush but unless you outline the teeth perfectly, you end up with white patches on the gums. The PS method is much simpler and more accurate.
 -
I recently switched from Lightroom 6 (which is no longer supported) to Affinity Photo, and I am very happy with my decision. But where is the hsl slider for orange tones? Please add one, the warm tones are in my opinion the most important ones.
-
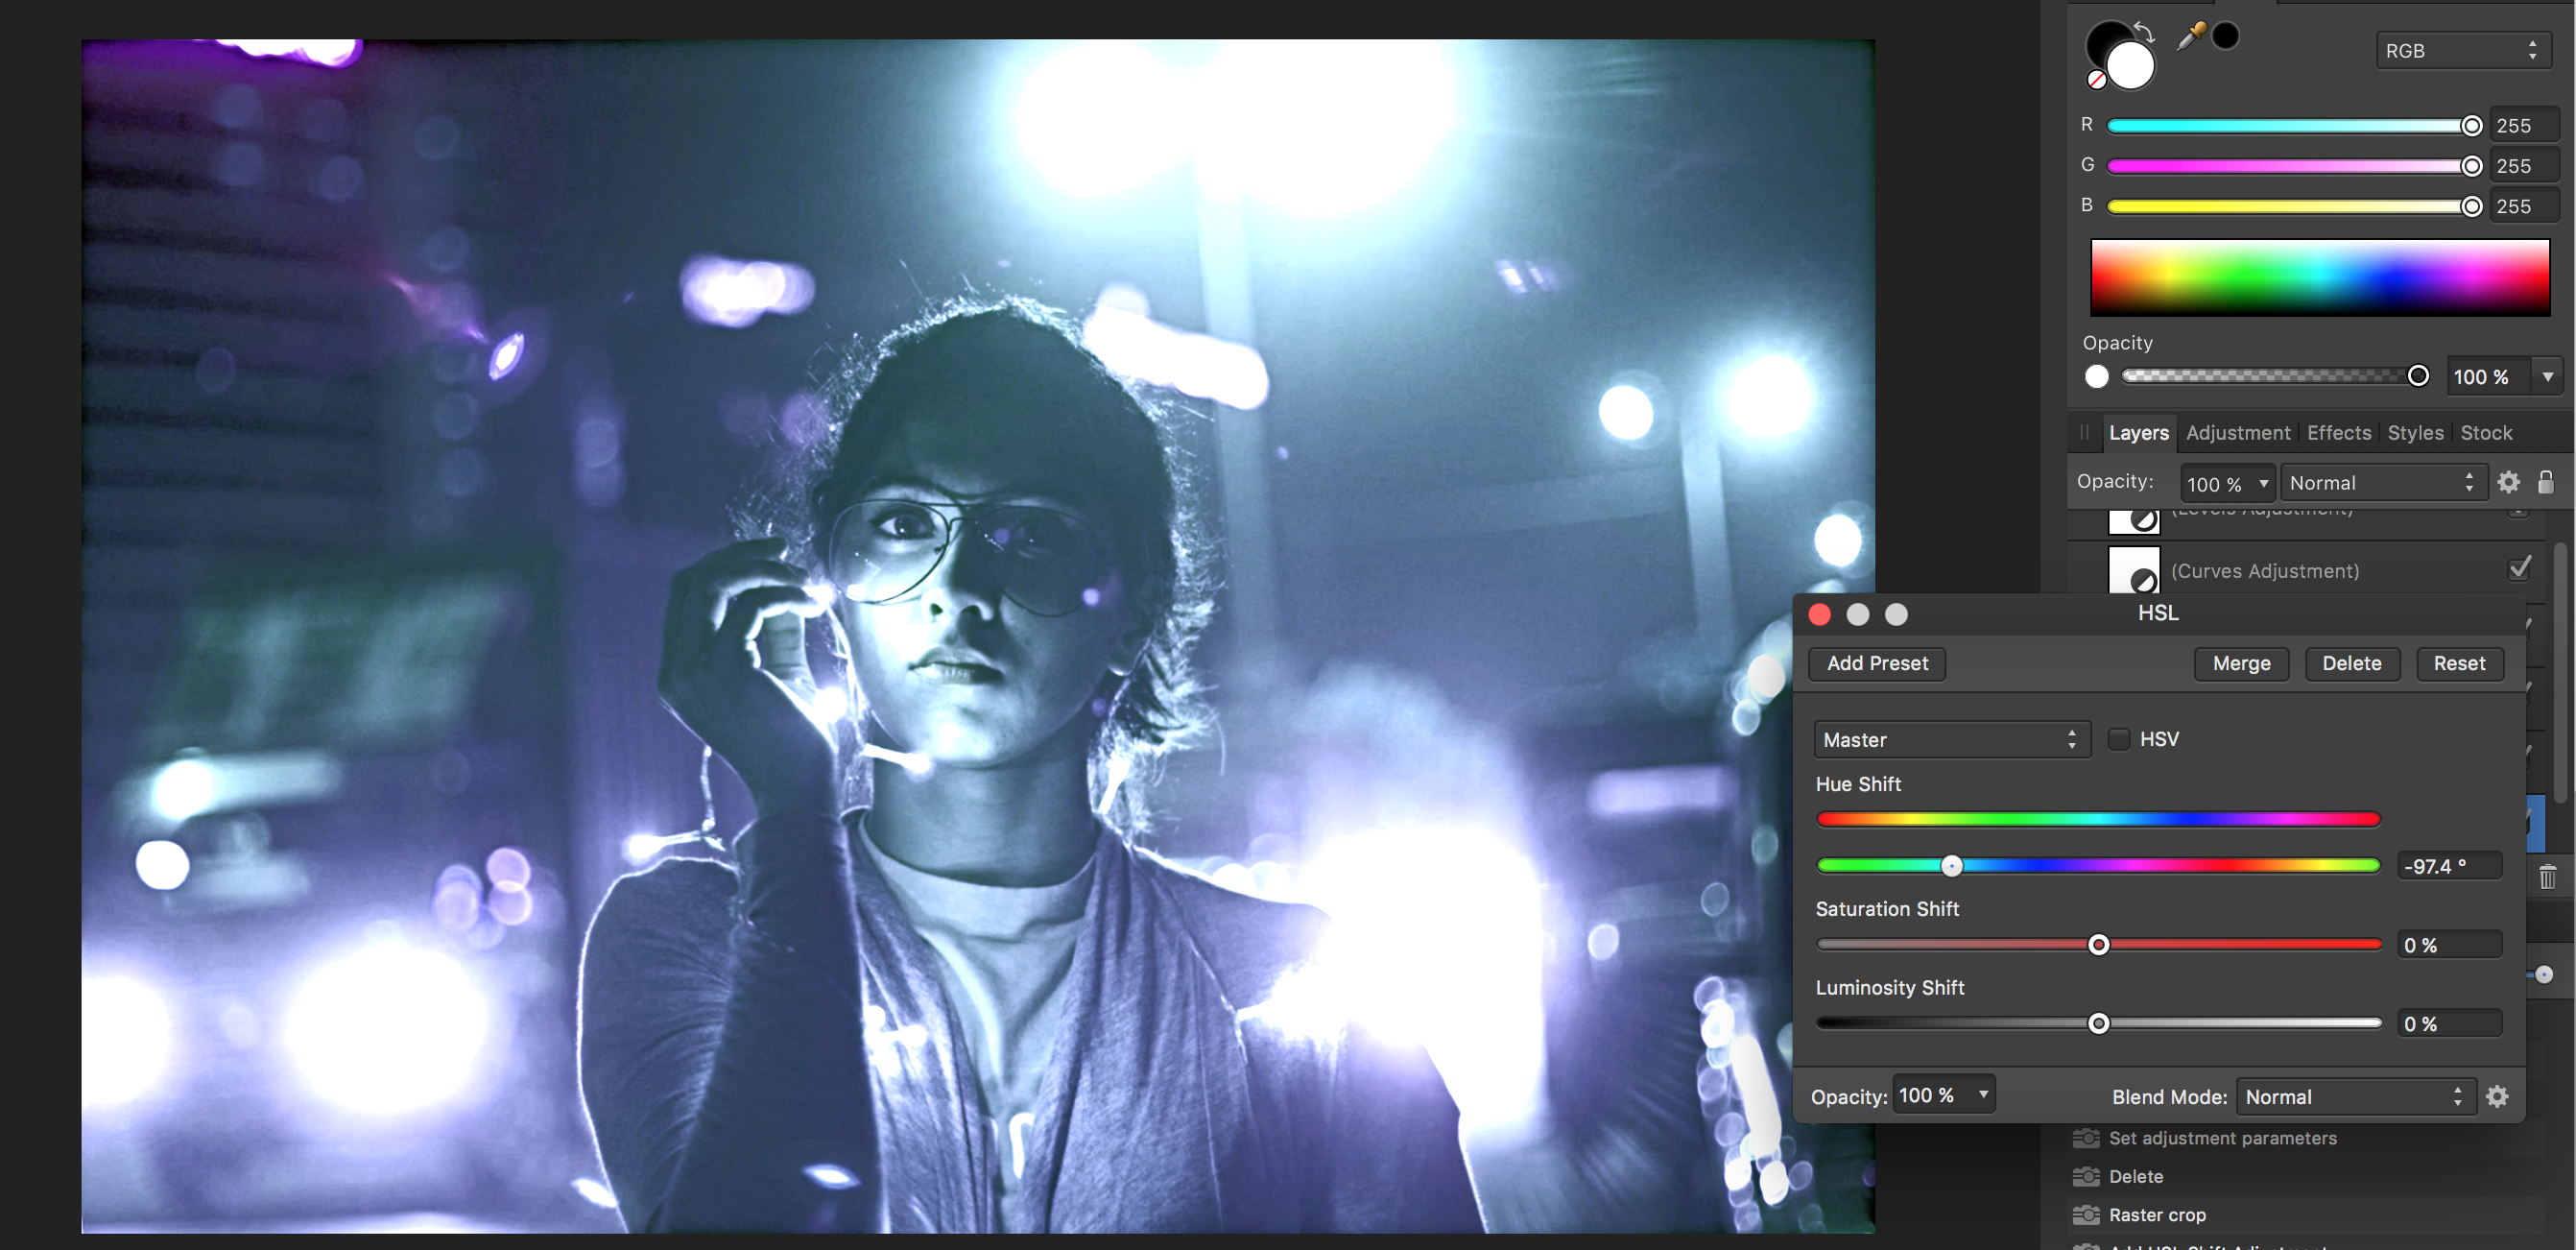
 Hello everyone, Going to keep it short since I can go on forever about the newly released iPad Designer which I absolutely love! I would like to request a feature for the range of Affinity products which is an addition to the HSL adjustment which is the Range sliders for each hue "channel" (ie: red, yellow, green, cyan, blue, magenta; the slider found at the bottom of the attached image which you can isolate and slide the hue range by degrees). I would like to offer the suggestion alongside the idea of actually being able to input the values of degree with keystrokes as well as the sliders themselves. They sliders in photoshop can be a total pain and never understood why they couldn't add something so seemingly easy. Lastly, being able to isolate to a 12 color hue range would be amazing as well! (Red, Orange, Yellow, Yellow/Green, Green, Green/Cyan, Cyan, Cyan/Blue, Blue, Blue/Magenta, Magenta, Magenta/Red) All the best and keep up the amazing work team!
-
- 2
-
-
- hsl
- hue saturation
- (and 1 more)
-
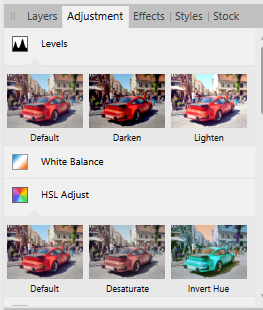
 Hi I am trying to use the adjustments in affinity photo for Windows 1.6 desktop. When I click on the adjustments I seem to get 3 options rather than the panel with the adjustments. For example when I click HSL adjustment I get default, desaturate and invert hue, but not the panel with the sliders. It is the same with Levels-instead of the sliders for levels I get default, darken or lighten. I can't see where to alter this setting. Any help much appreciated. Thanks in advance
-
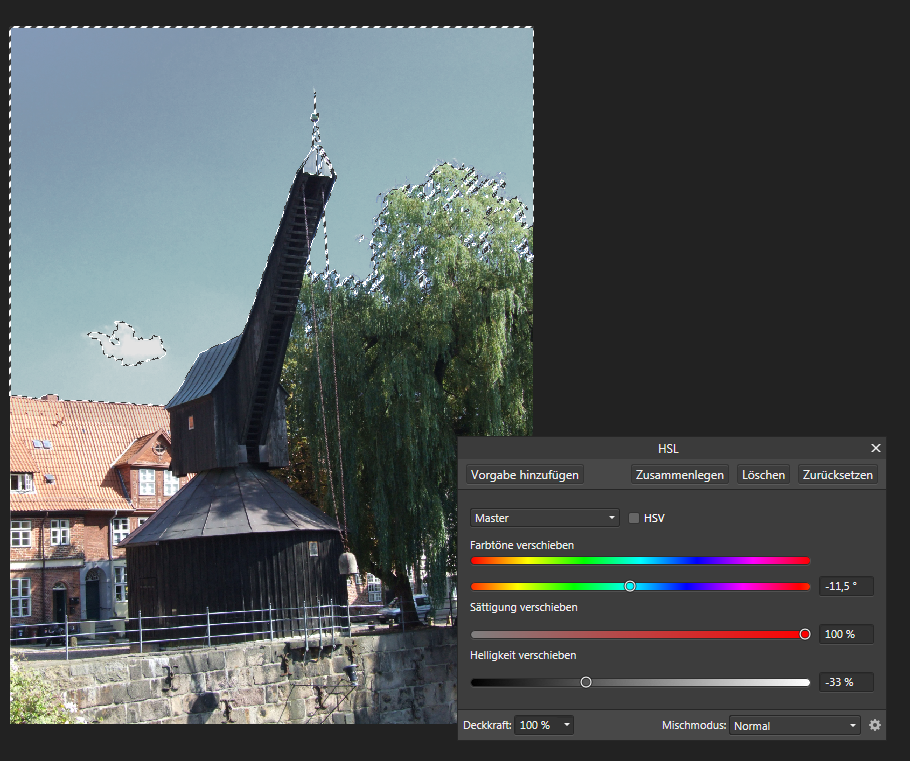
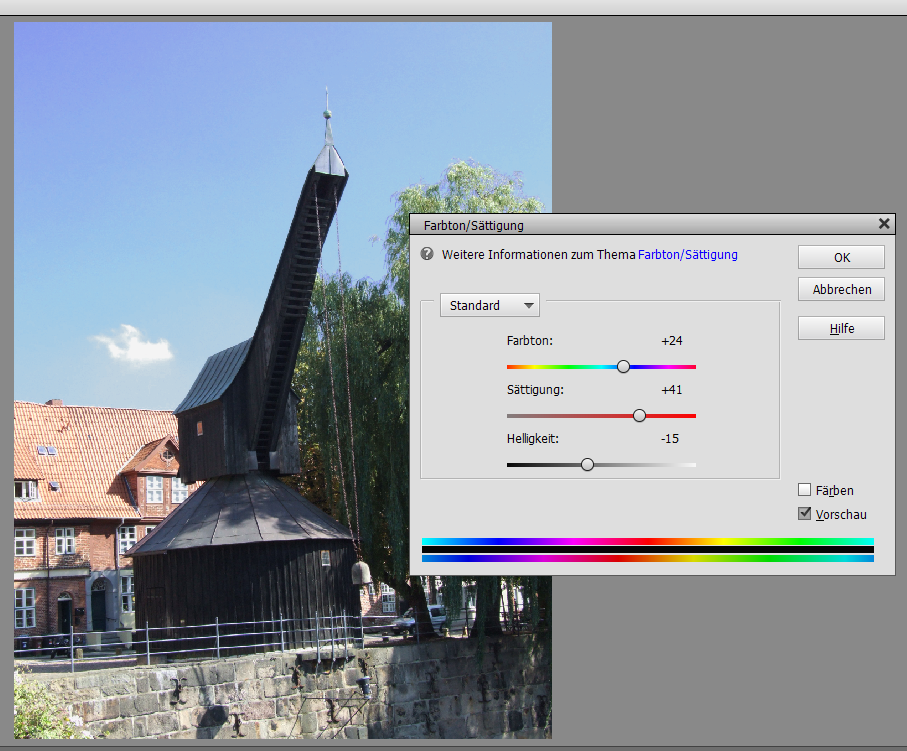
 Hallo, from other software I'm used to enhance the sky when it's overexposed and the color has been shifted to turquoise. Select the sky, use HSL, shift color until it's blue, decrease brightness and increase saturation. This works fine in JPG-Iluminator and Photoshop Elements 14. However when applying the corresponding settings in Affinity Photo, increasing the saturatin has no effect. Enclosed please find two screenshots demonstrating this issue. Best regards - Ulrich
-
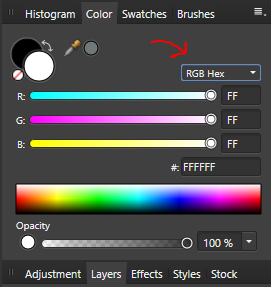
 Greetings Affinity, I was wondering if it would be helpful to have a HEX field available in all color profile palettes/windows. Lately, I've been working in HSL, as I find it easier to target a particular color, and it would be nice to have the HEX code running alongside the sliders (like RGB Hex). Also, I've been using AD to comp web designs and I'm constantly bouncing between RGB Hex and HSL to input HEX colors from a pre-existing brand style guide. Just a thought. :-) Cheers! jB
 -
 On the video it shows select adjustments then HSL, so far so good, the video shows the pop up HSL with 3 selectable dots on the top bar of this pop up, mine doesn't have it so you cannot use them, any help please?? Ian
 -
Hello, I've been poking around and comparing tools between Photoshop and Photo/Designer (mainly Photo for this post). I have noticed what I will refer to as a "performance" issue between the two tools. When using the Hue/Sat tool in Photoshop you can adjust the Hue, Saturation, and Lightness for the independent color channels of Red, Yellow, Green, Cyan, Blue, Magenta, and Master. The issue I find is that in Photoshop when I adjust let's say, the Red channel, and I use the Lightness slider and bump the setting to max Lightness (200%), in Photoshop it results in the Reds of the image being turned white (completely). Whereas in Photo, the image leaves behind remnants of color. Why would this be happening? Is there something I could be overlooking?
-
 In the adjustments>HSL adjust please add a transparent adjust because we may want to make a color transparent... example we may want to make for example just all the purples transparent. (our job can be done ways faster if we choose the purple or if we set the color area in the HSL color range and then turn it transparent) thanks!
 -
Hi, while working with colors (reds,yellows,magentas.... HSL....) I am still missing the possibility to choose a range of colors I want to be working with. Something like a slider on the color line (do not want to describe more as it is a common feature in PS....). It is very useful Please.... Jindra
-
Hi, when creating a new HSL layer (Photo 1.6.0 for Windows) you can choose from the drop down listbox red, blue, yellow, zyan, magenta and green. The slider for the saturation shift is allways red. It should be red, blue, yellow, ... depending on the choosen color it the drop down. Robert
-
Hi Guys, sorry in advance for my bad english I'm trying the trial version about Affinity Photo and that is what I found that doesn't work well: - Editing size and hardness of brush is really annoying: in PS I just need to right-click and fix how I want or Alt+right-click to edit in the fastest way the settings. Can you implement this in the next version? - Studio editing is pretty good but I can't group the tools, for example: if I want that all the tools selection are in a single group I can't do it, in PS I just need to drag them in a tool's icon tool to make them stay together. - The Blemish Removal tool works only with circles and I can't drag that... Under, in the info, there also written DRAG: bug or drag is just to select where Photo have to take the pixels to correct? IMHO Should be a brush... - During the selection work on PS if I press Shift I can add the next drag to my selection, if I use Alt I will delete. Can you implement also that please? - Develop Persona: There's somethings that doens't work good: I can't work simultaneously on more raws image (if I have a sequence I want to edit in the same way all the shots in syncro...) The raw edited can't be closed and worked later: I'll lose all my corrections. Can you fix that? Just like the .xmp files of ACR or in the metadata like LR I can't find the HSL panel that I use really much on PS or LR, can you implement please? Last thing: can you encourage people to create panels also for you? TK Panels and Beauty Retouch is a must for my workflow in landscape and portrait..! However Affinity Photo is a really, really, REALLY good: Smooth, fast, unexpensive, etc. If I think that you are just at 1.5 version... Wow. Keep up to good work! When you'll fix this problems I'll surely buy and incentivate my friends to buy the program. Thanks to have made a good competitor of Photoshop! =D
-
I am trying to stretch my Affinity skills a bit but following along with a Brandon Woelfel photo tutorial. The photo began looking different from the video right off the bat, with the Temperature adjustments. my main issue so far is that when the video changes the color channels to bring out a more teal color my whole photo just looks ugly and blue. it seems PS just has a much better and more specific HSL adjustment tool, is the true? Please help. I have attached the tutorials picture and mine in the same step making adjustments in HSL, Please help!! Here is the video. I just took a screen shot of the original to work along with the video.
-
Hey there! I want to access templates I can save in affinity photo (for example HSL). When I'm in the RAW menu I know how I can access my saved settings, but when I'm working on adjustment layers I can save my settings as well. In the end I'm a little confused, because I do not know how to access the saved settings Already now thanks for your help!
-
 Right now, an Affinity Photo document can only be RGB, Grayscale or LAB at a time. However, there are several workflows where it would be beneficial to work in more than one. Examples are: Black and white conversion – you would like to end up with a grayscale image, but work with RGB data using channel mixers, HSL and so on and be able to edit these after the fact. The final image being saved as Grayscale is so important because it ensure that it ends up being separated into the CMYK black channel, leaving CMY clean. Applying LAB mode corrections like LAB curves inside of an RGB mode retouch (could also be implemented as an implicit conversion as part of the curves adjustment layer like in PhotoLine though) Manually fine-tuning the result of CMYK conversion by manipulating the image in RGB mode (possible through soft-proofing, but requires a manual CMYK-export in the end and you have to re-do any manual adjustments that may have been made on the resulting CMYK file every time) These will be even more relevant once work files can be saved natively as TIFF retaining layers and so on since you can then actually place your working files in third party software and not have to export a bunch of separate files. Especially in the B/W case, you currently have to keep your RGB original retouch, then your BW conversion RGB file, and then a final single-channel BW exported file. Currently, there seems to be no other way than to flatten the image and convert to another mode as far as I can tell (haven't tried placing embedded documents yet though). Photoshop provides a rather clumsy workflow where you can convert your entire document into a smart object and then change the colour mode of the enclosing document. But especially if you just want to quickly apply LAB curves a bunch of times in your retouch, the nesting just becomes unusable. If you had simple adjustment layers along the lines of "Convert to LAB" and "Convert to CMYK", that would make it easy to mix the best of all worlds in one single document.
- 1 reply
-
- 1
-
-
- Adjustment Layers
- RGB
- (and 6 more)
-
I would like to see the HSL color wheel added to affinity photo as a default color picker in the color tab on the right side item bar.
-
I searched the forum and there was no thread about it. I think it would be very helpful to have HSL in the develop mode, just before affinity photo compressed the RAW file to jpg only. I think this should be a standard feature. :)
-
Attached is an AP file containing just a group of adjustments. Copy and paste the group as a child of an image (or above if you like). Then open the Curves, HSL or Vibrance sub-groups and double-click on any of the adjustments to tweak blacks, shadows, mid-tones, highlights or whites. It's quite simple - just a curve in Blend Ranges for each. You can constrain changes further with masking. You can also use it in conjunction with macros from a previous post (https://forum.affinity.serif.com/index.php?/topic/38379-luminosity-mask-selection-macros/), for example to preview area of the image that will be affected. 5-Stage_Adjustments.afphoto
-
- 1
-
-
- luminosity
- curves
- (and 1 more)
-
Photoshop has traditionally had the Select > Color Range command. There is also HSL keying inside the Hue/Saturation adjustment toolset, which, annoyingly cannot be used to create selections for use with other commands without clumsy workarounds (that I know much better than I would care to admit). What I am hoping to see is a non-destructive way to do masking based on luminance, HSL tools, as well as possibly more sophisticated keying algorithms that are found in video software (Primatte, Keylight, etc.). Most video-focussed color correction software (DaVinci Resolve, Speedgrade, Lustre, Baselight, FilmMaster, Assimilate Scratch) allows for non-destructive HSL keying already. The most elegant way I can imagine this working inside Photo is that similar to regular layer masks, a new procedural mask layer type for non-destructive HSL/Select Color Range masks with adjustable parameters would be available. Like an adjustment layer, except that the result would be a mask instead of an RGBA image, to be used just like regular layer masks. That way, it would be easy to adjust the selection parameters interactively after the fact, and, if need be, rasterize destructively to a regular raster mask layer. In additions to the keying in Luma, RGB, HSL, YUV and LAB, parameters for blurring the result, expanding/contracting the mask would be useful. The exact same functionality could then double as a vastly improved "Select Color Range" command as well.
- 12 replies
-
- 3
-
-
- Color Range
- Keyer
- (and 8 more)