Search the Community
Showing results for tags 'Fill'.
-
 Hi guys, I attached a file showing the bug. Basically, if you have a shape, and you apply a stroke to it and align the stroke inside the object, a thin part of the fill will still be visible outside the stroke, on top and bottom. edit: this bug takes place only if the X or Y coordinates are not whole pixels. The whole pixels thingie is a bit annoying, aligning to middle for example does not respect whole pixels, nor does the text (resizing in points for example) Cheers, Chris stroke-inside.afdesign
 -
 Hi, Affinity Designer newbie here, using desktop version on an iMac. I've opened a couple of the sample Designer files to see how they work and everything looks fairly familiar, or at least intuitive. One thing that's puzzled me is the fill colour in the background blue in the sample file 'Prison of Arts'. It's a dark blue colour, but has a slight graininess to it, rather like adding noise in Photoshop. A new rectangle, filled with a colour also takes on this graininess. I quite like the effect, but can't replicate it in a new file - nor can I turn it off in the sample file 'Prison of Arts'. I've explored settings, effects and all sorts, but can't find how to add or turn off the effect - any help gratefully received. Screenshot at 200% scale attached.
-
 Hello and happy holidays, For my current project I've been using the Fill Tool [G] in Designer to edit stroke gradients a lot. The Fill Tool doesn't remember that I'm using the stroke context, though. It's a bit slow to have to click the context dropdown and switch it from Fill (the default) to Stroke every time I switch tools back and forth. Does anyone know a way to either make the Fill Tool remember my context preference, or (preferably) assign a hotkey to toggle between the Fill and Stroke context? This would really help my workflow! I'm on a Mac, Designer 1.6. Thanks!
 -
 It is not possible to add a gradient fill to document palette as global colour. When adding as standard colour and then trying "make global", AD crashes instantly.
 -
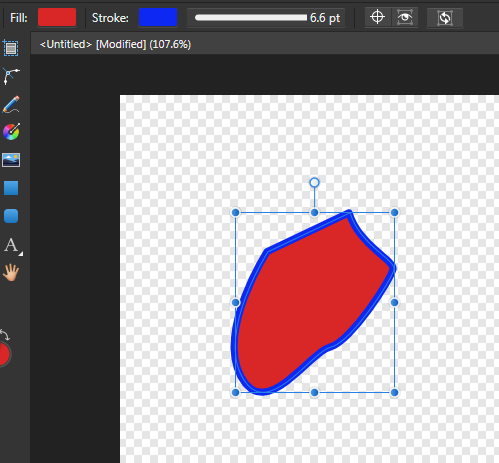
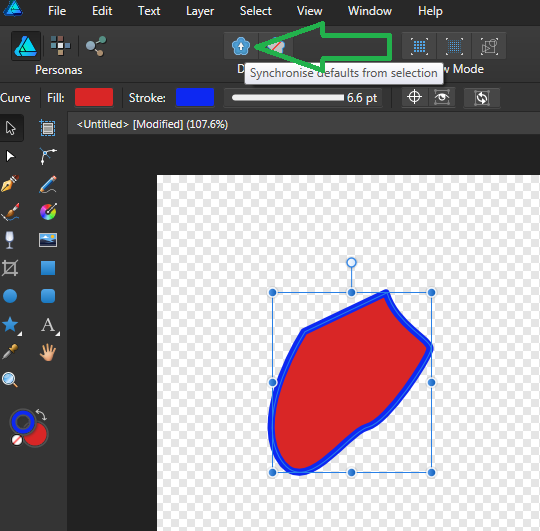
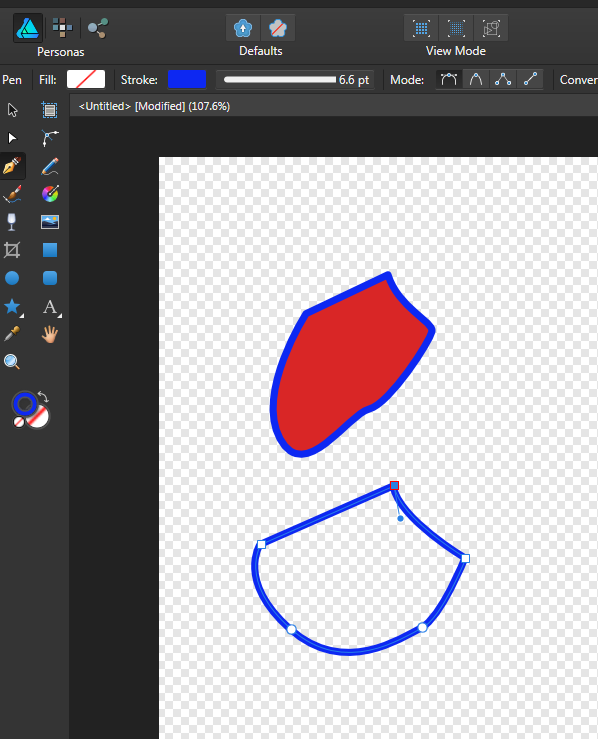
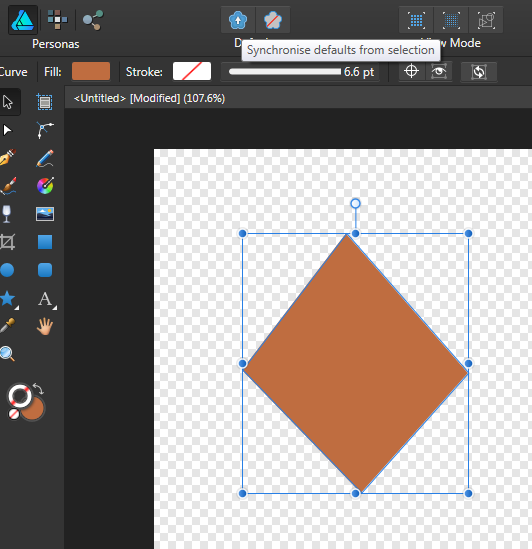
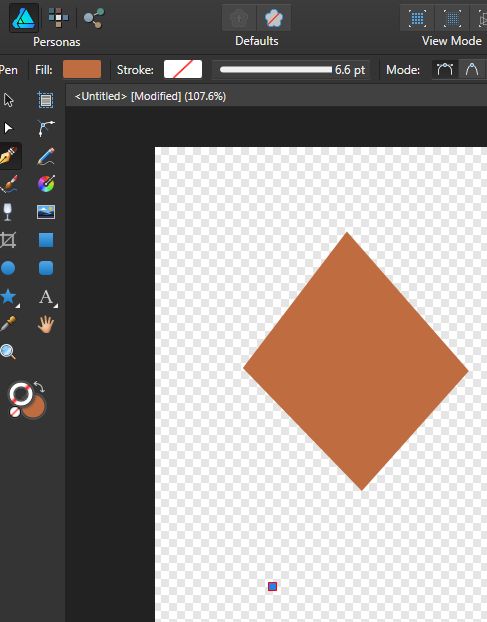
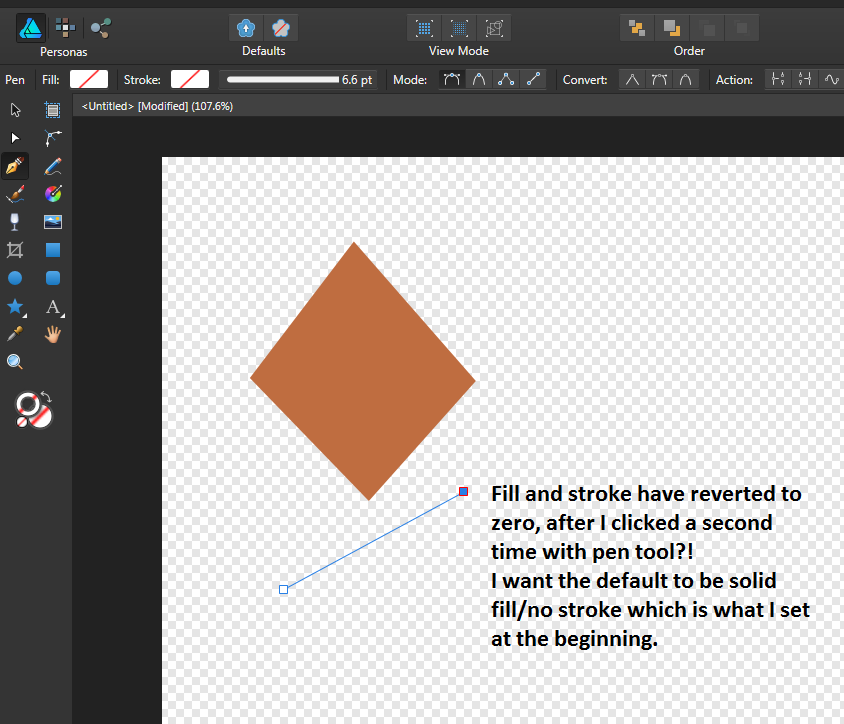
 Hi, Can someone help me with this simple problem? So SHIFT-X toggles between a fill and a stroke. So if I have a solid fill, and no stroke, when I press SHIFT-X I then get a stroke but no fill. I get that. What I don't get is what if I want to set my default mode to be a solid fill with a stroke? I click the 'Synchronise defaults from this selection' button. And all looks fine. But when I then select my pen tool, it's just giving me a stroke with no fill. See example. Likewise, more often than not I want to set a fill with no stroke. So I draw a simple shape, fill it with whatever colour I want, select 'none' for stroke. Click the 'Synchronise defaults from this selection' button. All looks well on screen. I click once with the pen tool, then as soon as I click again, both revert to no stroke/no fill?! What's going on?
-
 Hi, I´m a total beginner and I just can´t combine this 3 lines into an area I could fill with color. They just don´t combine. Why is it?
-
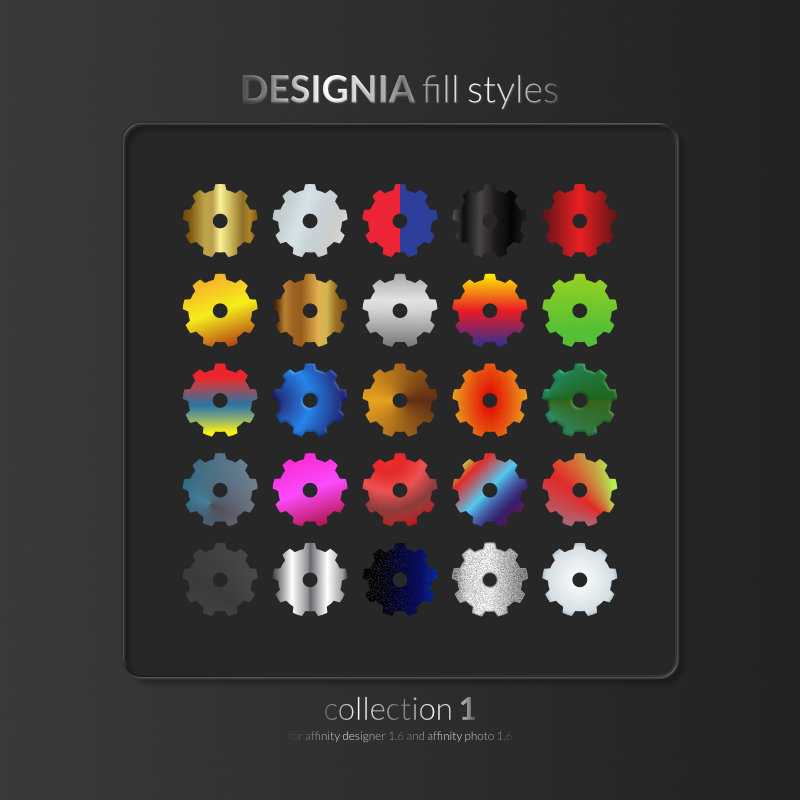
Hello, I created 25 types to fill objects. Designia Styles.afstyles
- 12 replies
-
- 10
-

-

-
- affinity photo
- fill
- (and 6 more)
-
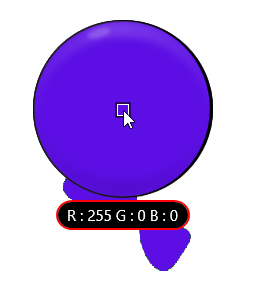
 1. I draw circle with stoke (inside) 2. I fill the circle 3. Result 4. How to fix it ?
-
 In Illustrator you can offset an object to expand and contract it. I want to be able to expand some type that has been converted to cures so that it can be a mask. The only way I figured I could do this is to set a stroke to the expanse I want and then to expand the stroke. The problem is the stroke is still acting as if its part of the type instead of a separate object and there is no way I can figure out how to combined the type and the stroke to make a mask object.
 -
 IU'm converting from Photoshop and struggling to understand something - In the colour panel, there are 2 colour circles which appear to correspond to a 'fill' colour, and a 'stroke' colour - whereas in Photoshop they relate to Foreground and Background colours. Does Affinity Photo have a concept of Foreground and Background colour or not? In Photoshop I can create a gradient from the foreground colour to the background colour - how do I do the equilavent in Affinity Photo? I used the colour dropper tool to select 2 colours in a photo, but as soon as I switch to the gradient tool I don't seem to be able to use the colours I picked, as a white gradient fills the entire layer and I cannot find an option to go from Fill to Stroke colour.
 -
 Well in Affinity theres one very important shortcut missing, which would improve working speed a lot. I Talk about the possibilty in the layers menue to strg+lmb klick on a layer mask and select the mask, but not to be able as in photoshop, to "shift"+"strg"+lmb. klick several masks or layer one after the other to select increadibly fast all the stuff you need and get a additive pixelselection.. of course as already discussed you could save the different masks in the channels tab, and ad them (this is by far slower then the shortcut approach) or, as a workaround, create a new pixellayer on top, strg+lmb klick the layer you want the pixelselection from in the layers tab, the new pixellayer stil selected and just press shift+f5. this would give you a new window to decide how to fill the selection.. Well.. is there a way to just fill in the frontcolor of your colors, or white or black without every time to tell the programm... yes. take the color.. just one shortcut without the need to confirm that realy you need the color.. would improve much the workaround.. thanks
 -
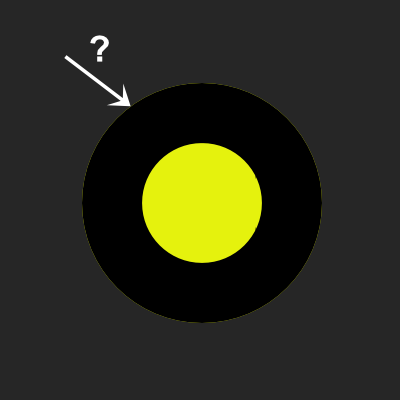
 When two or more shapes are alligned (from anchor to anchor), and these shapes have no stroke, it results in a transparent edge instead of no edge. See Example. Each of the triangles here are perfectly alligned from point to point, which should leave no space between shapes. The stroke is set to no colour, and the weight set to none, so I would imagine that the 'fill' should take up 100% of each shape. However, it seems that the stroke (which shouldnt exist), stil takes up a fraction of the shape, and allows the background to show through ever so slightly. The obvious way to get around this is to slightly overlap each shape - as you can see, there are quite a lot in the above, so this would be impractical. Is there any obvious way to get around this? Apologies, this question has probably been asked before, but I was finding it dificult converting this question to a searchable term.
-
 I'm trying to change the fill and stroke on a vector I drew with a brush. I either can't edit it at all or I can only color in half. I'm totally new and learning as I go. I exported the original drawing as a PSD that preserved editability. rose1.psd rose pink.psd
 -
 I have a photo that I outlined with the pen tool to attempt to clean up the lines. So, now I have my outlined created with the pen tool and I got rid of the background. How do I fill in my outline? I just want it to be filled in black. Attached is the file I am working on. Thanks, T10Pro new deer logo.afdesign
 -
 Hello all, Feeling dumbfounded at the moment, I've been editing this picture for quite a bit now, and i wanted to add a new fill layer after selecting my foreground but to my surprise it didn't work, tried it with a pixel layer then using the fill tool, still doesn't work. Tried with other pictures and it works just fine there I don't understand what's going on Thanks ^^ EDIT: it's not just fill, it's everything that doesn't work on this page anymore, except the previous adjustments i made, nothing seems to affect the image anymore
 -
It would be great to be able differentiate between the fill and stroke selector while using the Color Picker. Quite often I find myself applying a stroke color when I want a fill. Maybe a small cursor overlay or something would do the job.
-
- 2
-
-
- color picker
- fill
- (and 1 more)
-
 Having independent blend modes for stroke and fill would be really handy. For example, I recently discovered the Erase blendmode, which is a godsend for not needing to manually expand and boolean things. Something I like doing is to give stuff padding by expanding the shape, "bulging it" in all directions, and then cutting that out of what's beneath, giving a sort of cell shaded look, but as if the outline is the background color. Being able to have the Stroke have an Erase blendmode would make this extremely handy and powerful, and I can imagine using strokes in "add" or "screen" blendmode for a sort of glowing outline.
 -
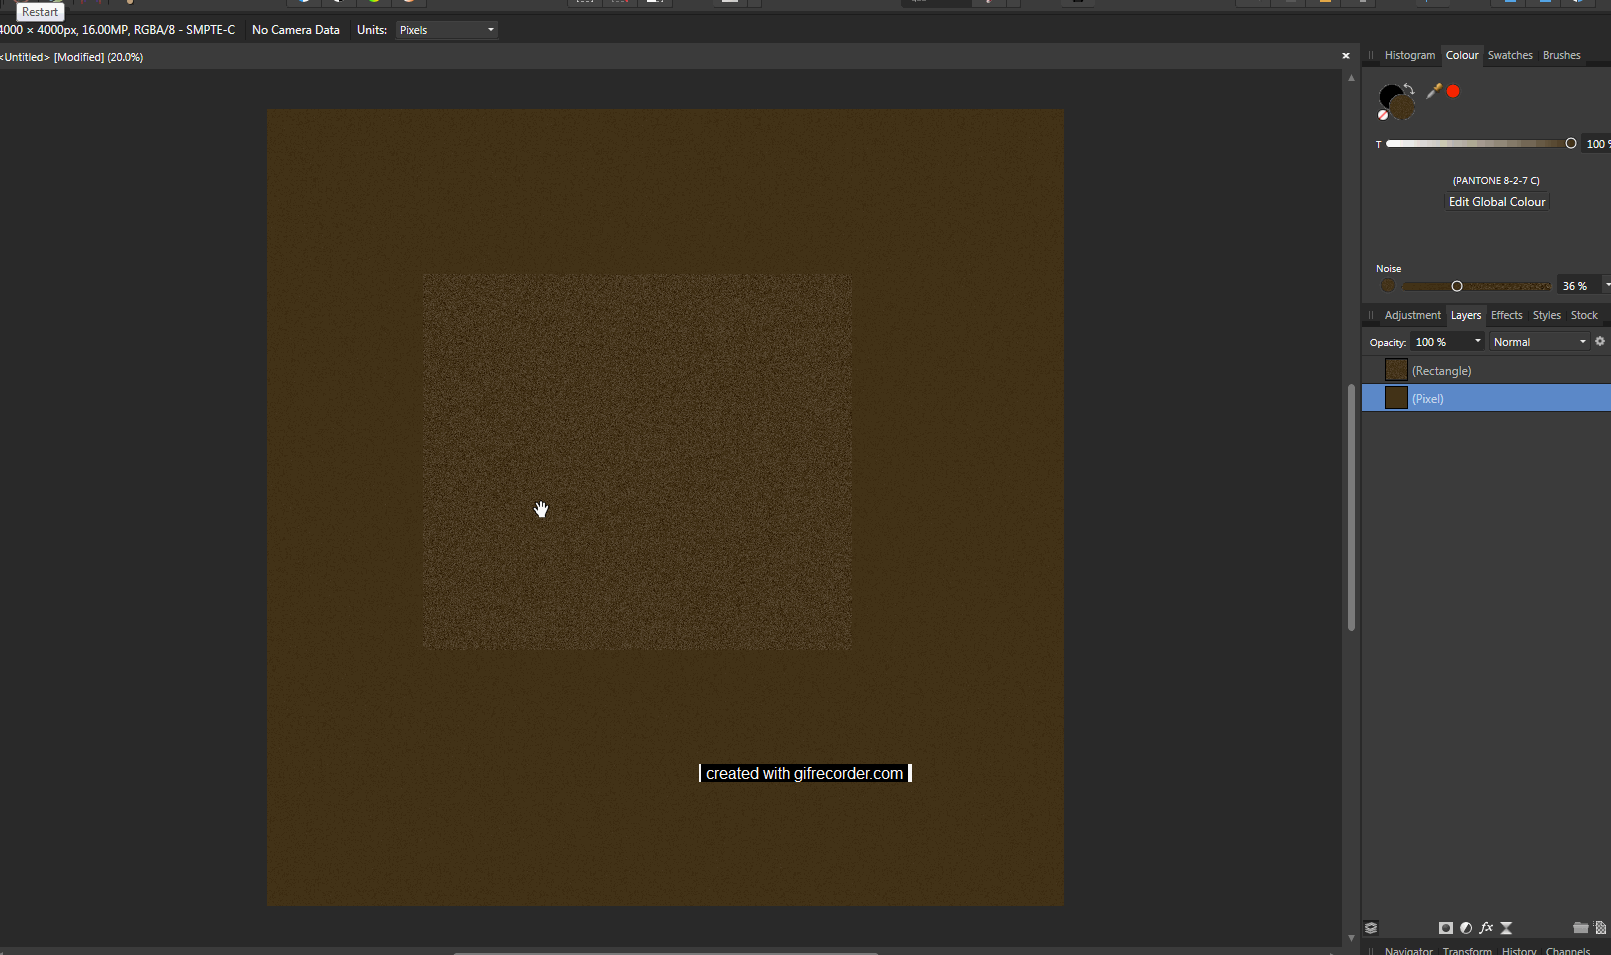
Hi, great program, great work, and I hope you can continue making it even better! I cannot seem to add noise to a pixel layer with a fill My Steps: Create document (I chose Web, custom, 4000x4000 pixels (but same with default web doc size)) Create pixel layer Choose fill tool Pick colour Click opacity/noise toggle Increase noise not possible Slider slides but resets back to zero. Other times it has moved and stayed in place but still does not change noise level. This is on both the top context menu or on the right fill menu tab. This works in the mac version of the released AF ver. 1.5.2, and but NOT in the Windows beta 1.6.0.75, OR released version for Windows 1.5.2.69 I can however, create a rectangle and add noise to the fill colour in this rectangle in Windows versions, just like Mac I hope the Windows version can operate like the mac version :) Further to this it seems that if I switch (Alt+tab) in and out of the program, then a certain level of noise appears. You might be able to see this slight noise on the doc in the animated attached gif, as it is there slightly, but once in the program, I cannot control it.
-
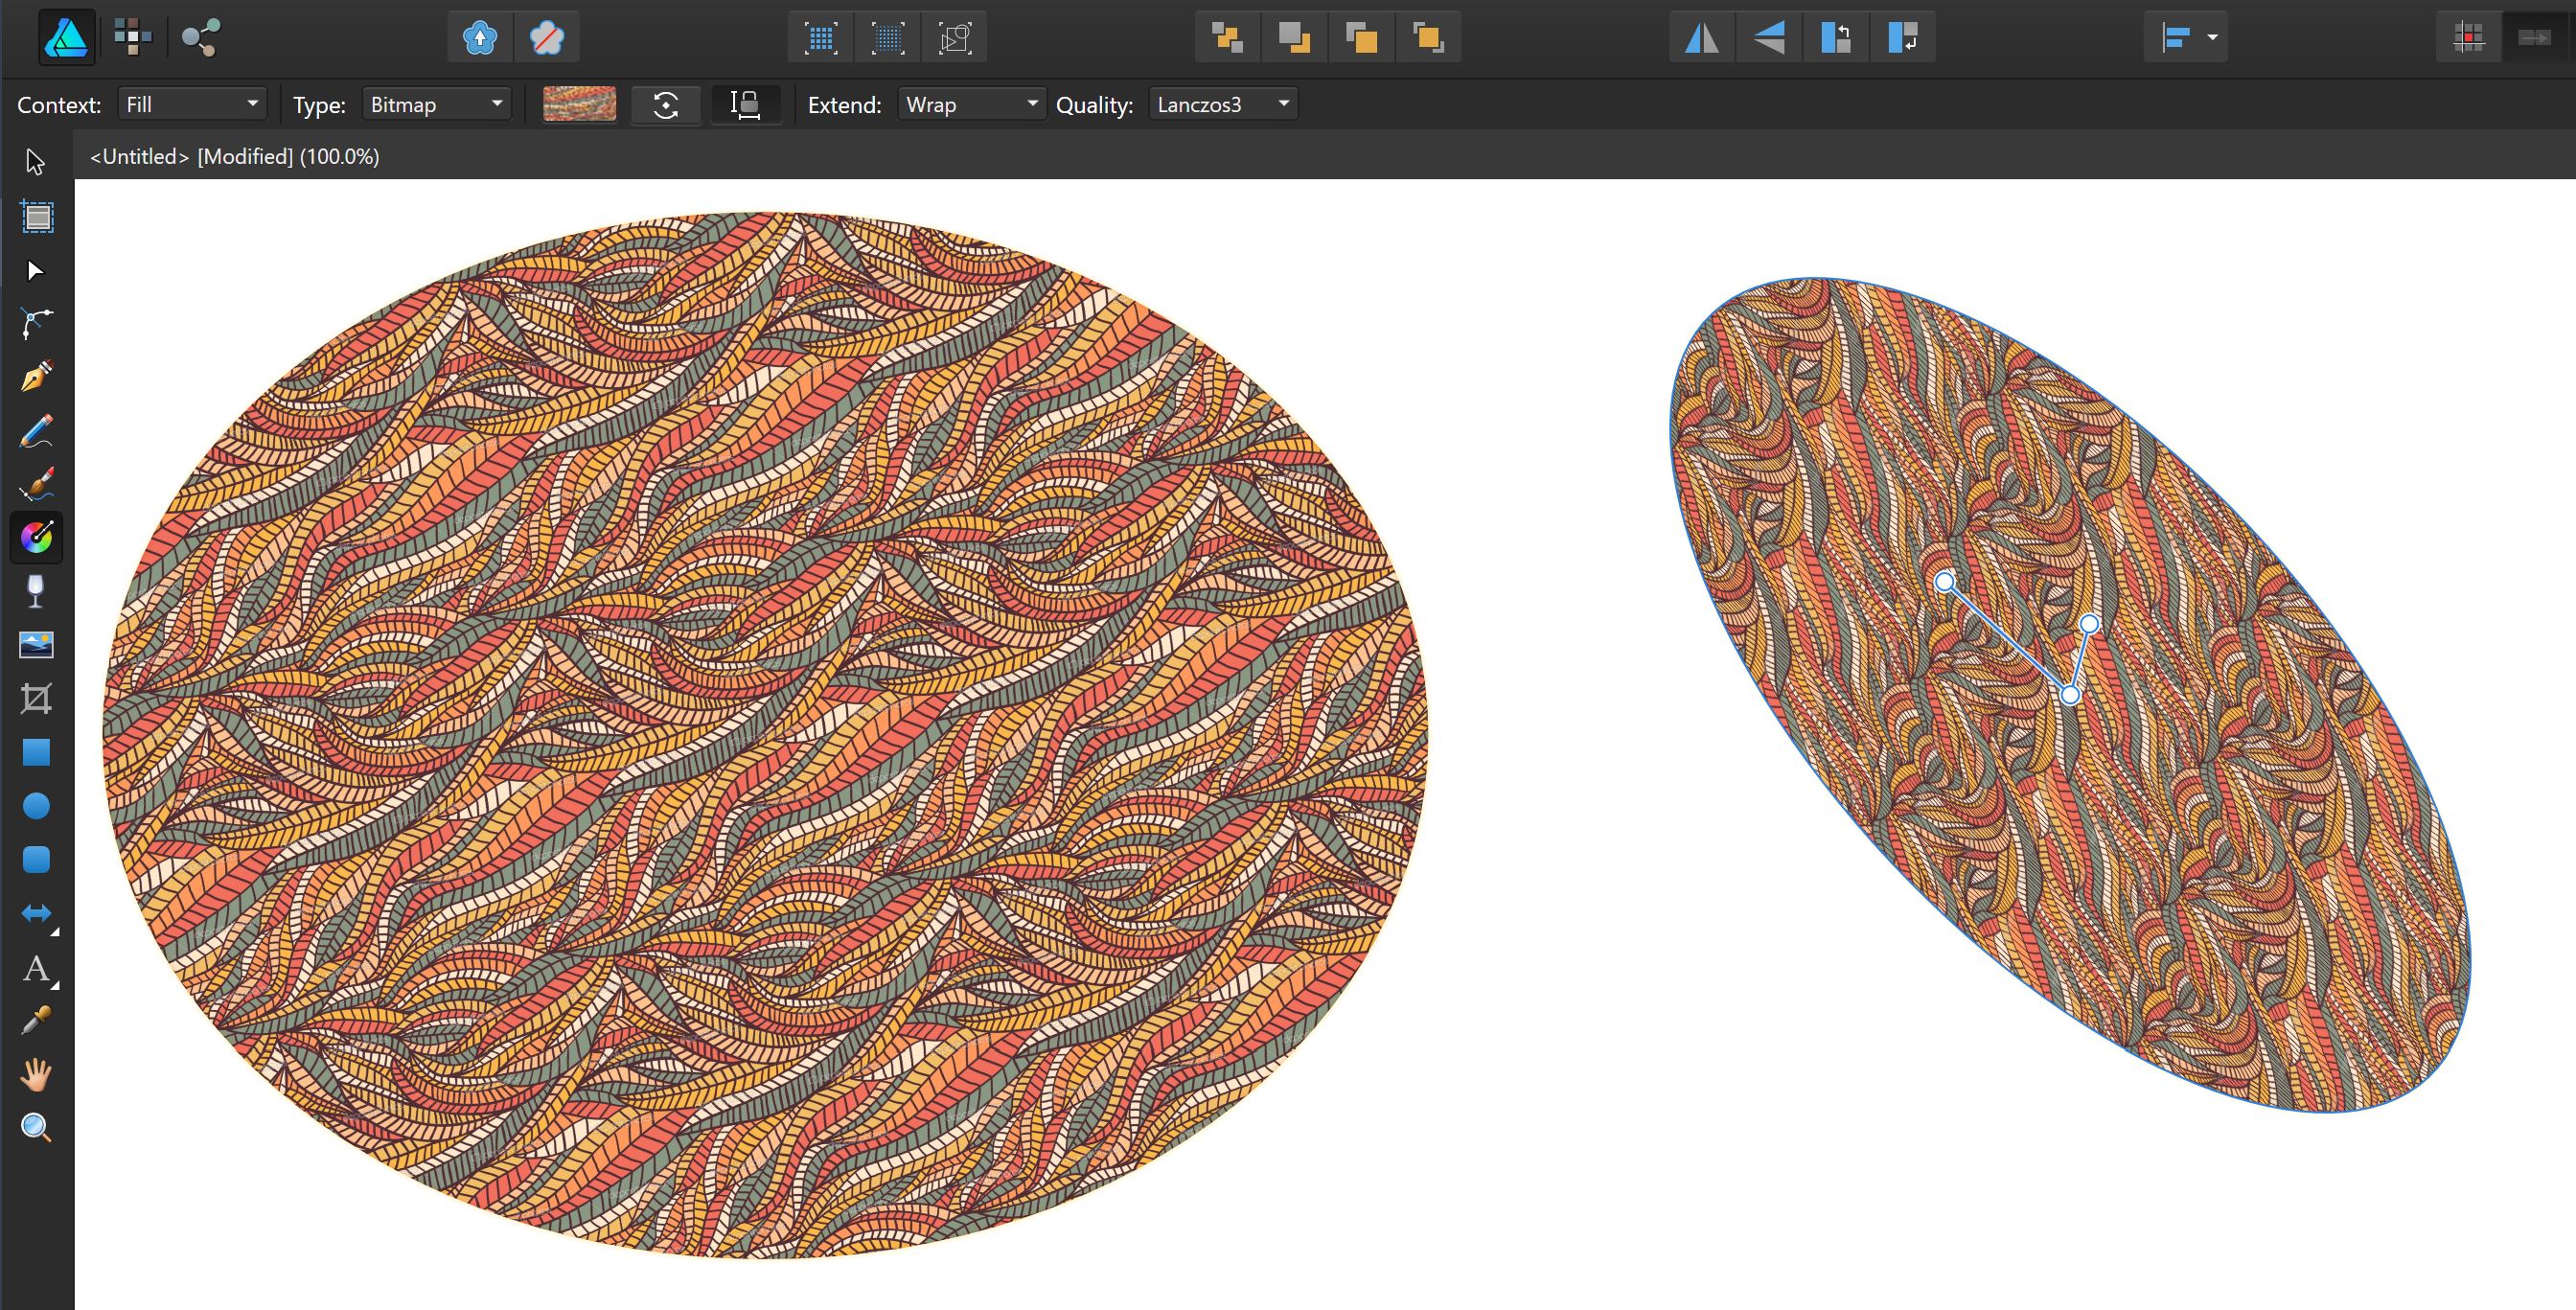
 Hey everyone, I'm quite new to Affinity Designer and have come across the following issue: I'm trying to fill different shapes with patterns. Since I haven't been able to find any preset geometric fill patterns that ship with Affinity, nor a pattern fill feature, I've resorted to: 1. Select the shape 2. Activate the Fill Tool 3. Change Fill Type to Bitmap 4. Use an image texture to fill the shape However, when I CTRL + C on one shape and then CTRL + SHIFT + V on another shape in order to copy that fill, with the same orientation and scale, it seems like the bitmap/texture then gets transformed to the orientation/size of the target shape. I attached a screenshot to demonstrate what happens when I copy the fill from the left shape to the right. How can I get the behaviour that I want, i.e. have the fill get transferred from shape A to shape B without changing the orientation/scale/shear of the fill texture? Also, is there a vector pattern fill in Affinity Designer that I may simply have overlooked? Thanks a lot
-
I launched AD beta build 1.6.0.74 (in Light UI mode) for the first time, drew a closed curve with the Pen Tool and clicked on the Colour Picker colour well in the Swatches panel. The colour displayed in the colour well was the default RGB red (#FF0000) but the fill applied to the shape was purple (#5C0EE4). Closing and relaunching the app has made no difference, nor has switching to Dark UI mode. If I go to the Colour panel and enter #5C0EE4 for the fill, the colour I actually get is #5097AB.
-
I've already posted this in Questions & Feedback but since it doesn't seem to be implemented yet, I'm adding it as a request. For example, I have a square which only has a fill color (no stroke). If I click on another shape, let's say a circle and I'm changing it's stroke color, when I click back on the square, I would like the color panel to auto-select the fill attribute (since it's the only attribute the square has) instead of keeping the stroke attribute selected (from the previous change). My logic is that I would want to change it's color rather than add a stroke to it. This way would eliminate an unnecessary extra click and speed you up when you'd have to repeat the action several times.
-
 Hey, here's another one of my Affinity Designer tutorials. In this one you will learn how to add gradients to objects using the fill tool. If you like this video, give it a thumbs up and don't be scared to leave a comment :)
 -
Edit/Fill is nice. It would be even nicer if you had a '50% grey' option (for use with contrast blend modes, of course). Thanks!
-
 Hello, I seem to be missing how to copy and paste fill and stroke for text exclusively. When I copy and paste style, to text, my text sizing and spacing changes also. I only want to copy the fill colour, and the stroke (colour, weight, mitre, draw behind fill) and paste that onto my art text. I do not want to also copy font, text size, character spacing, and other position and transformations. Is there a quick setting I am missing. thank you very much for you guidance. Mars


.png.7677bfe0d76c9a3296e68a643e98830c.png)