Search the Community
Showing results for tags 'Fill'.
-
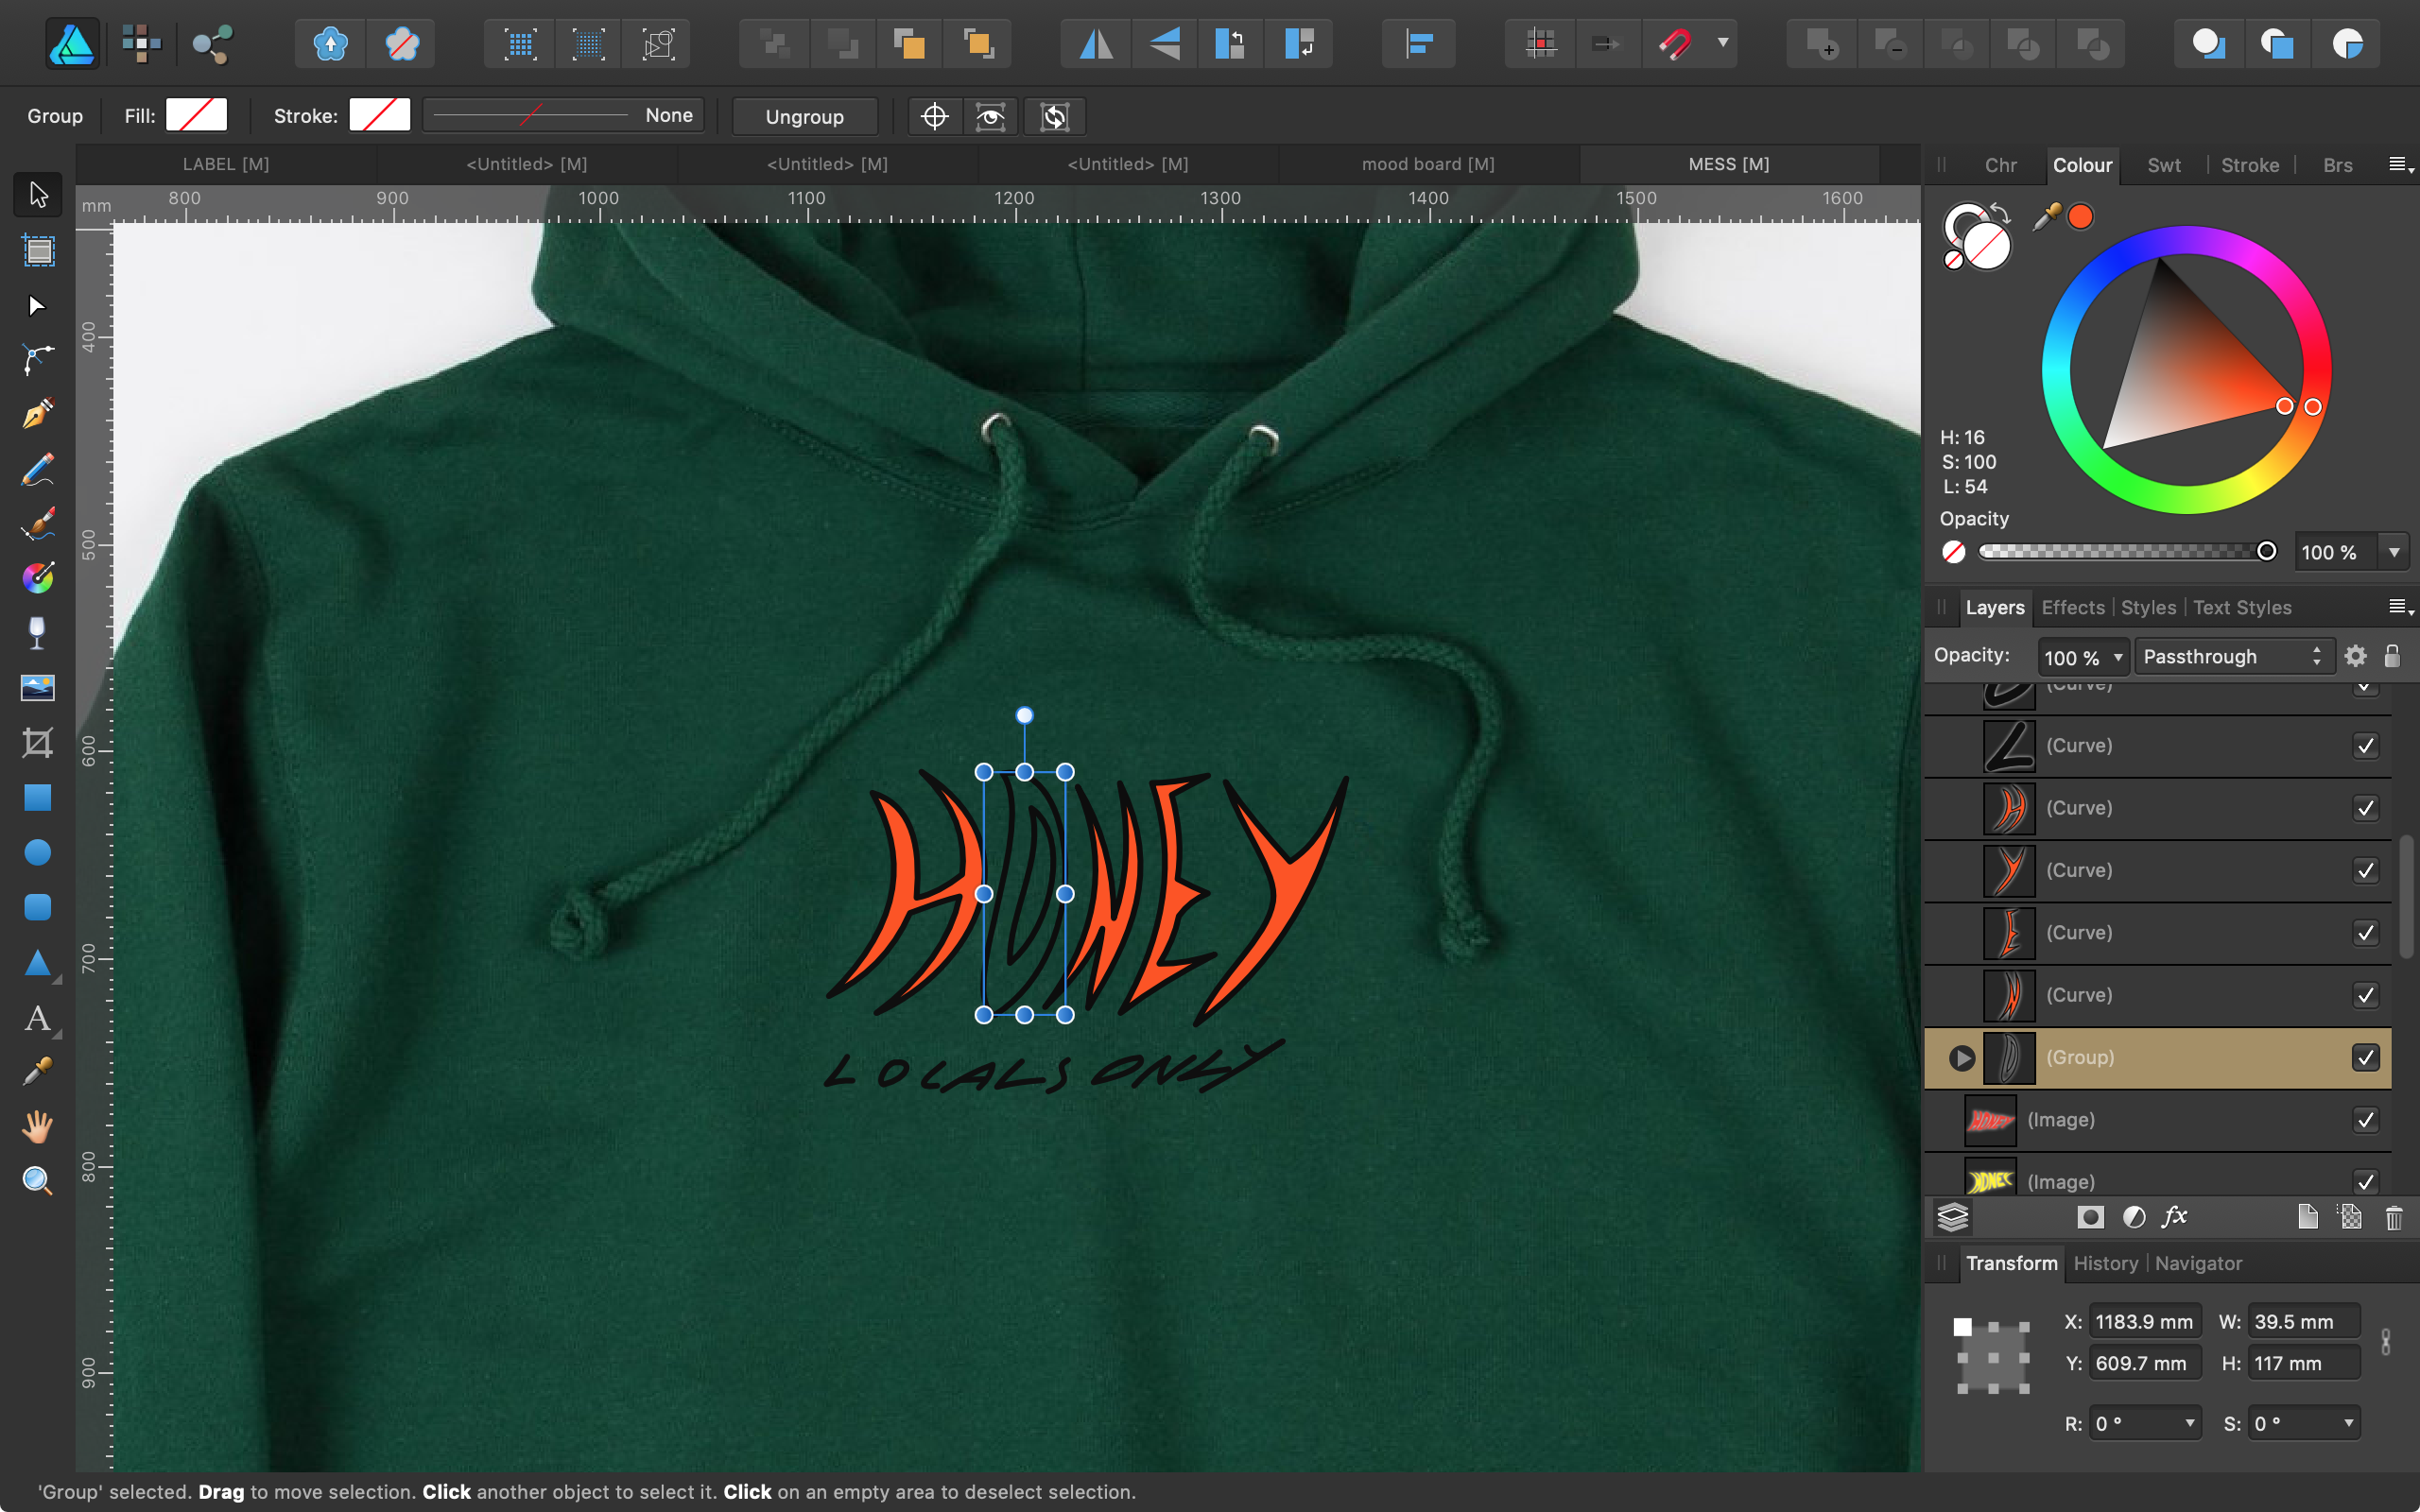
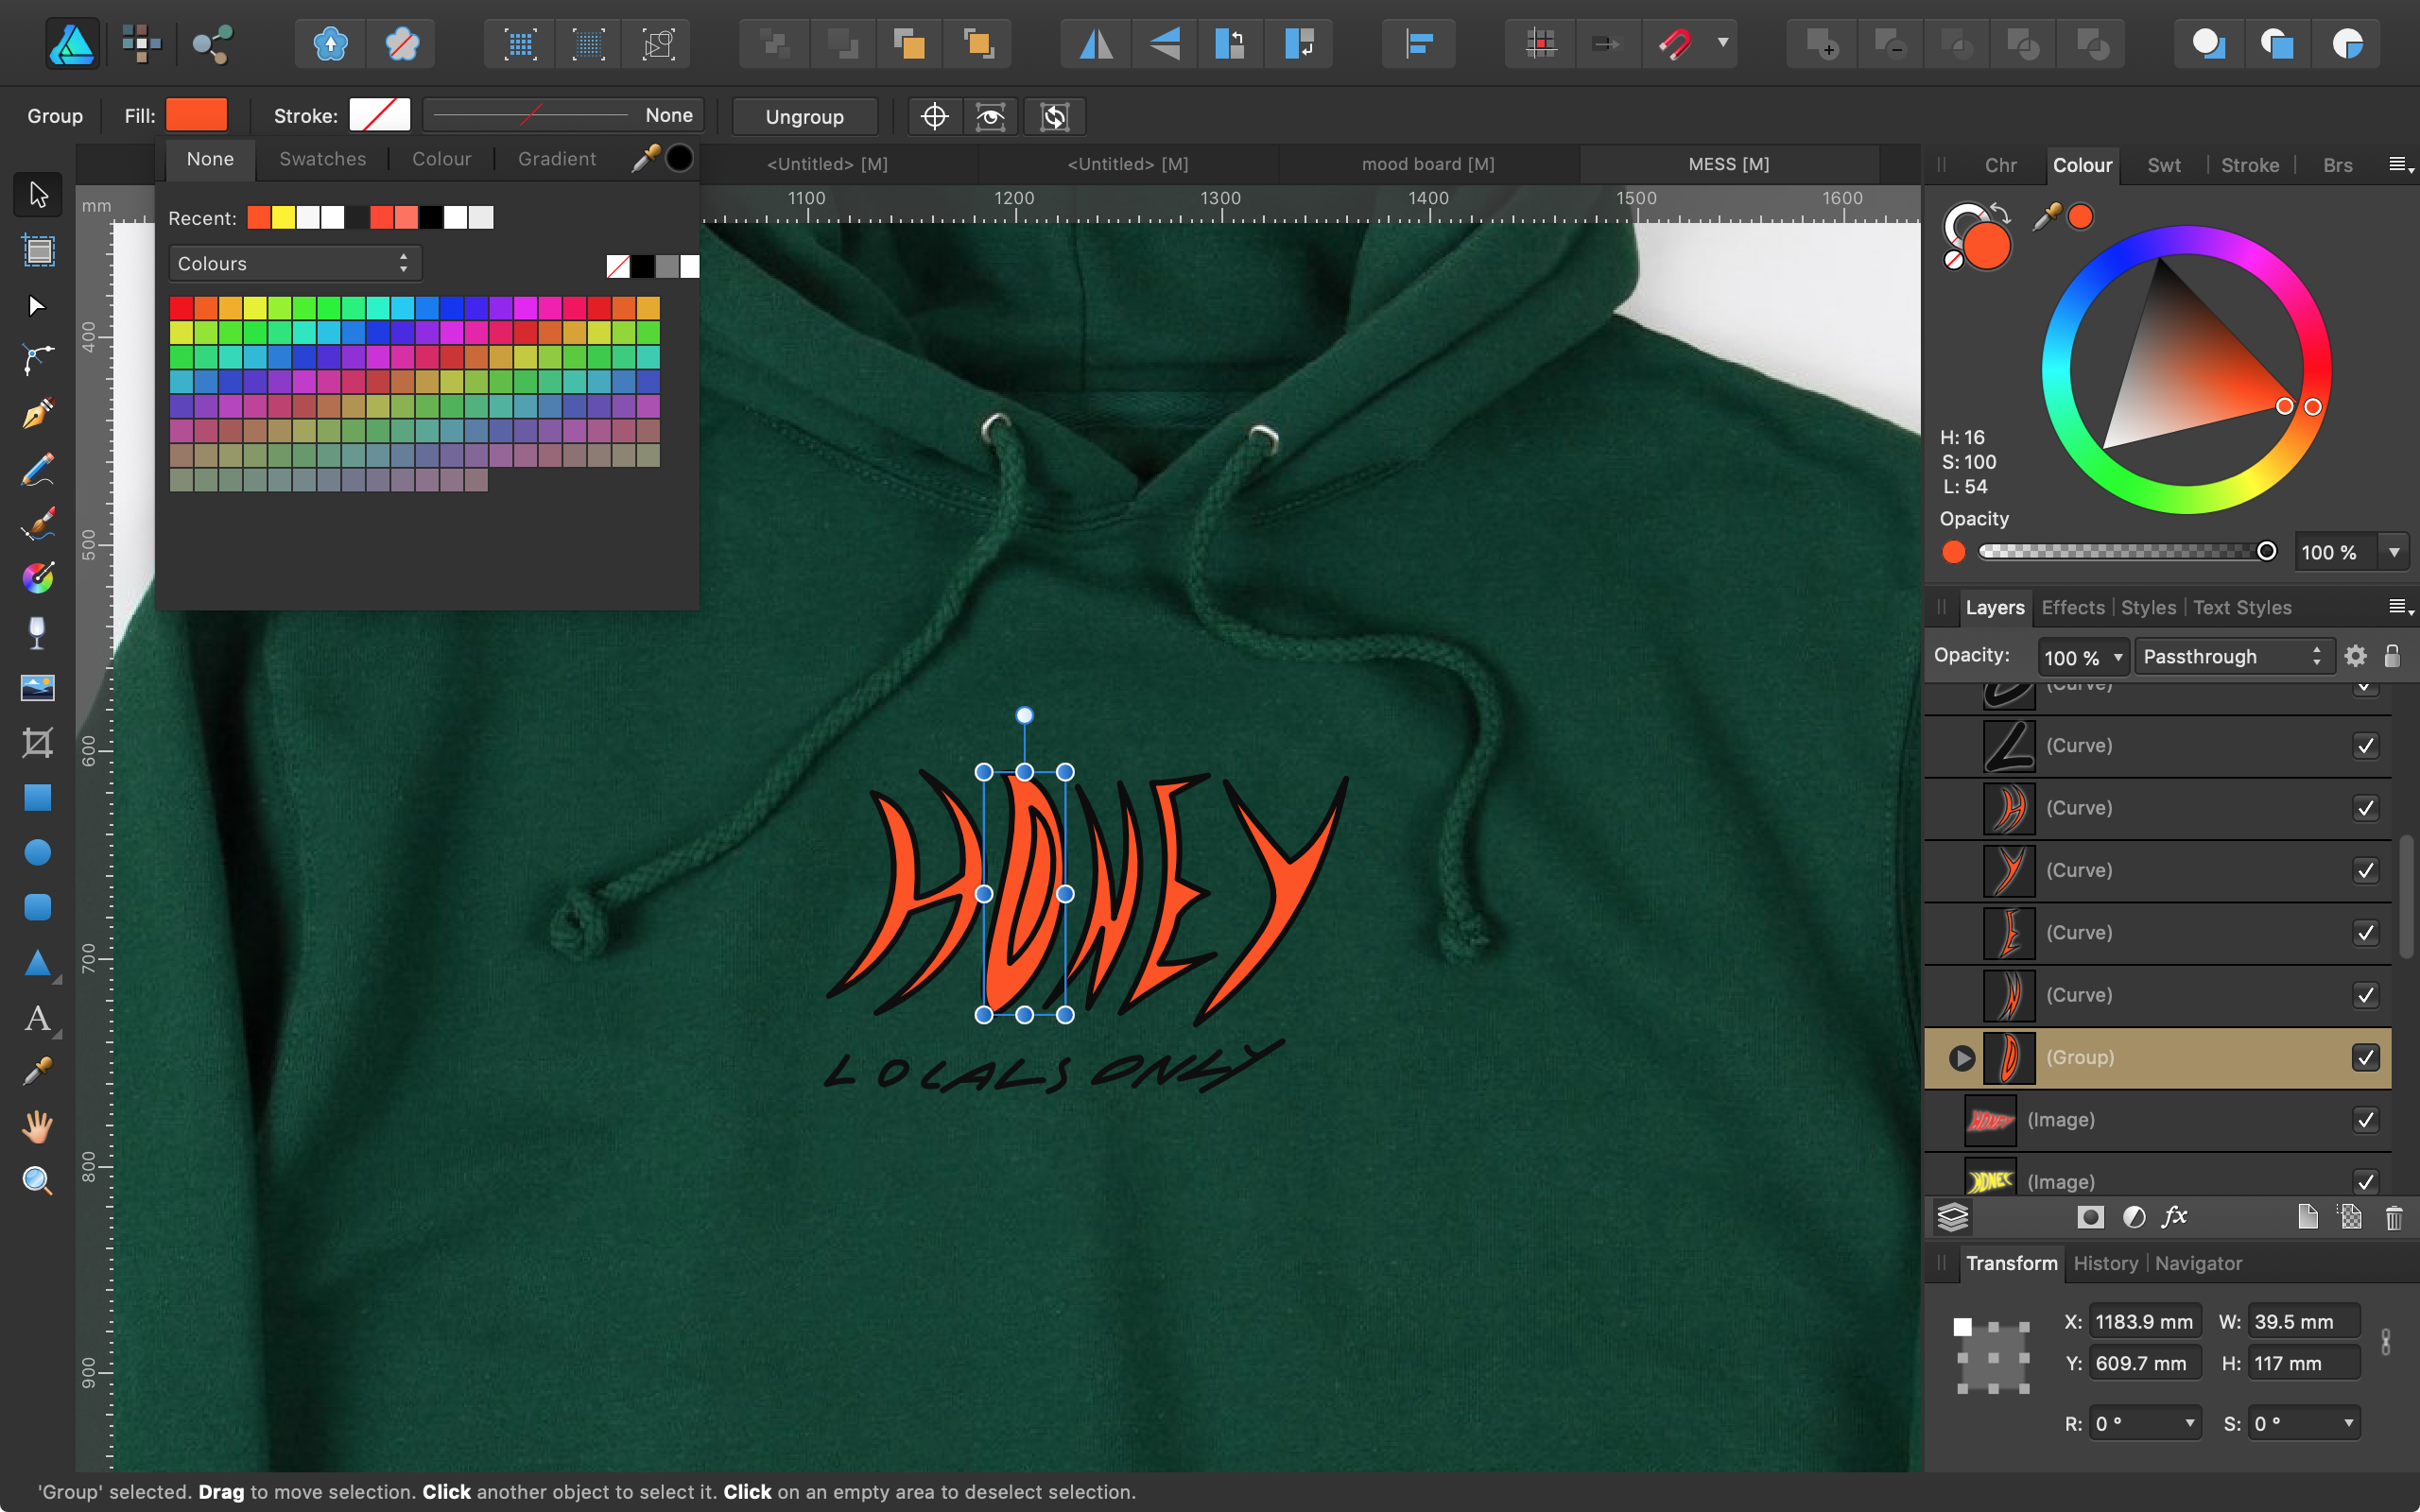
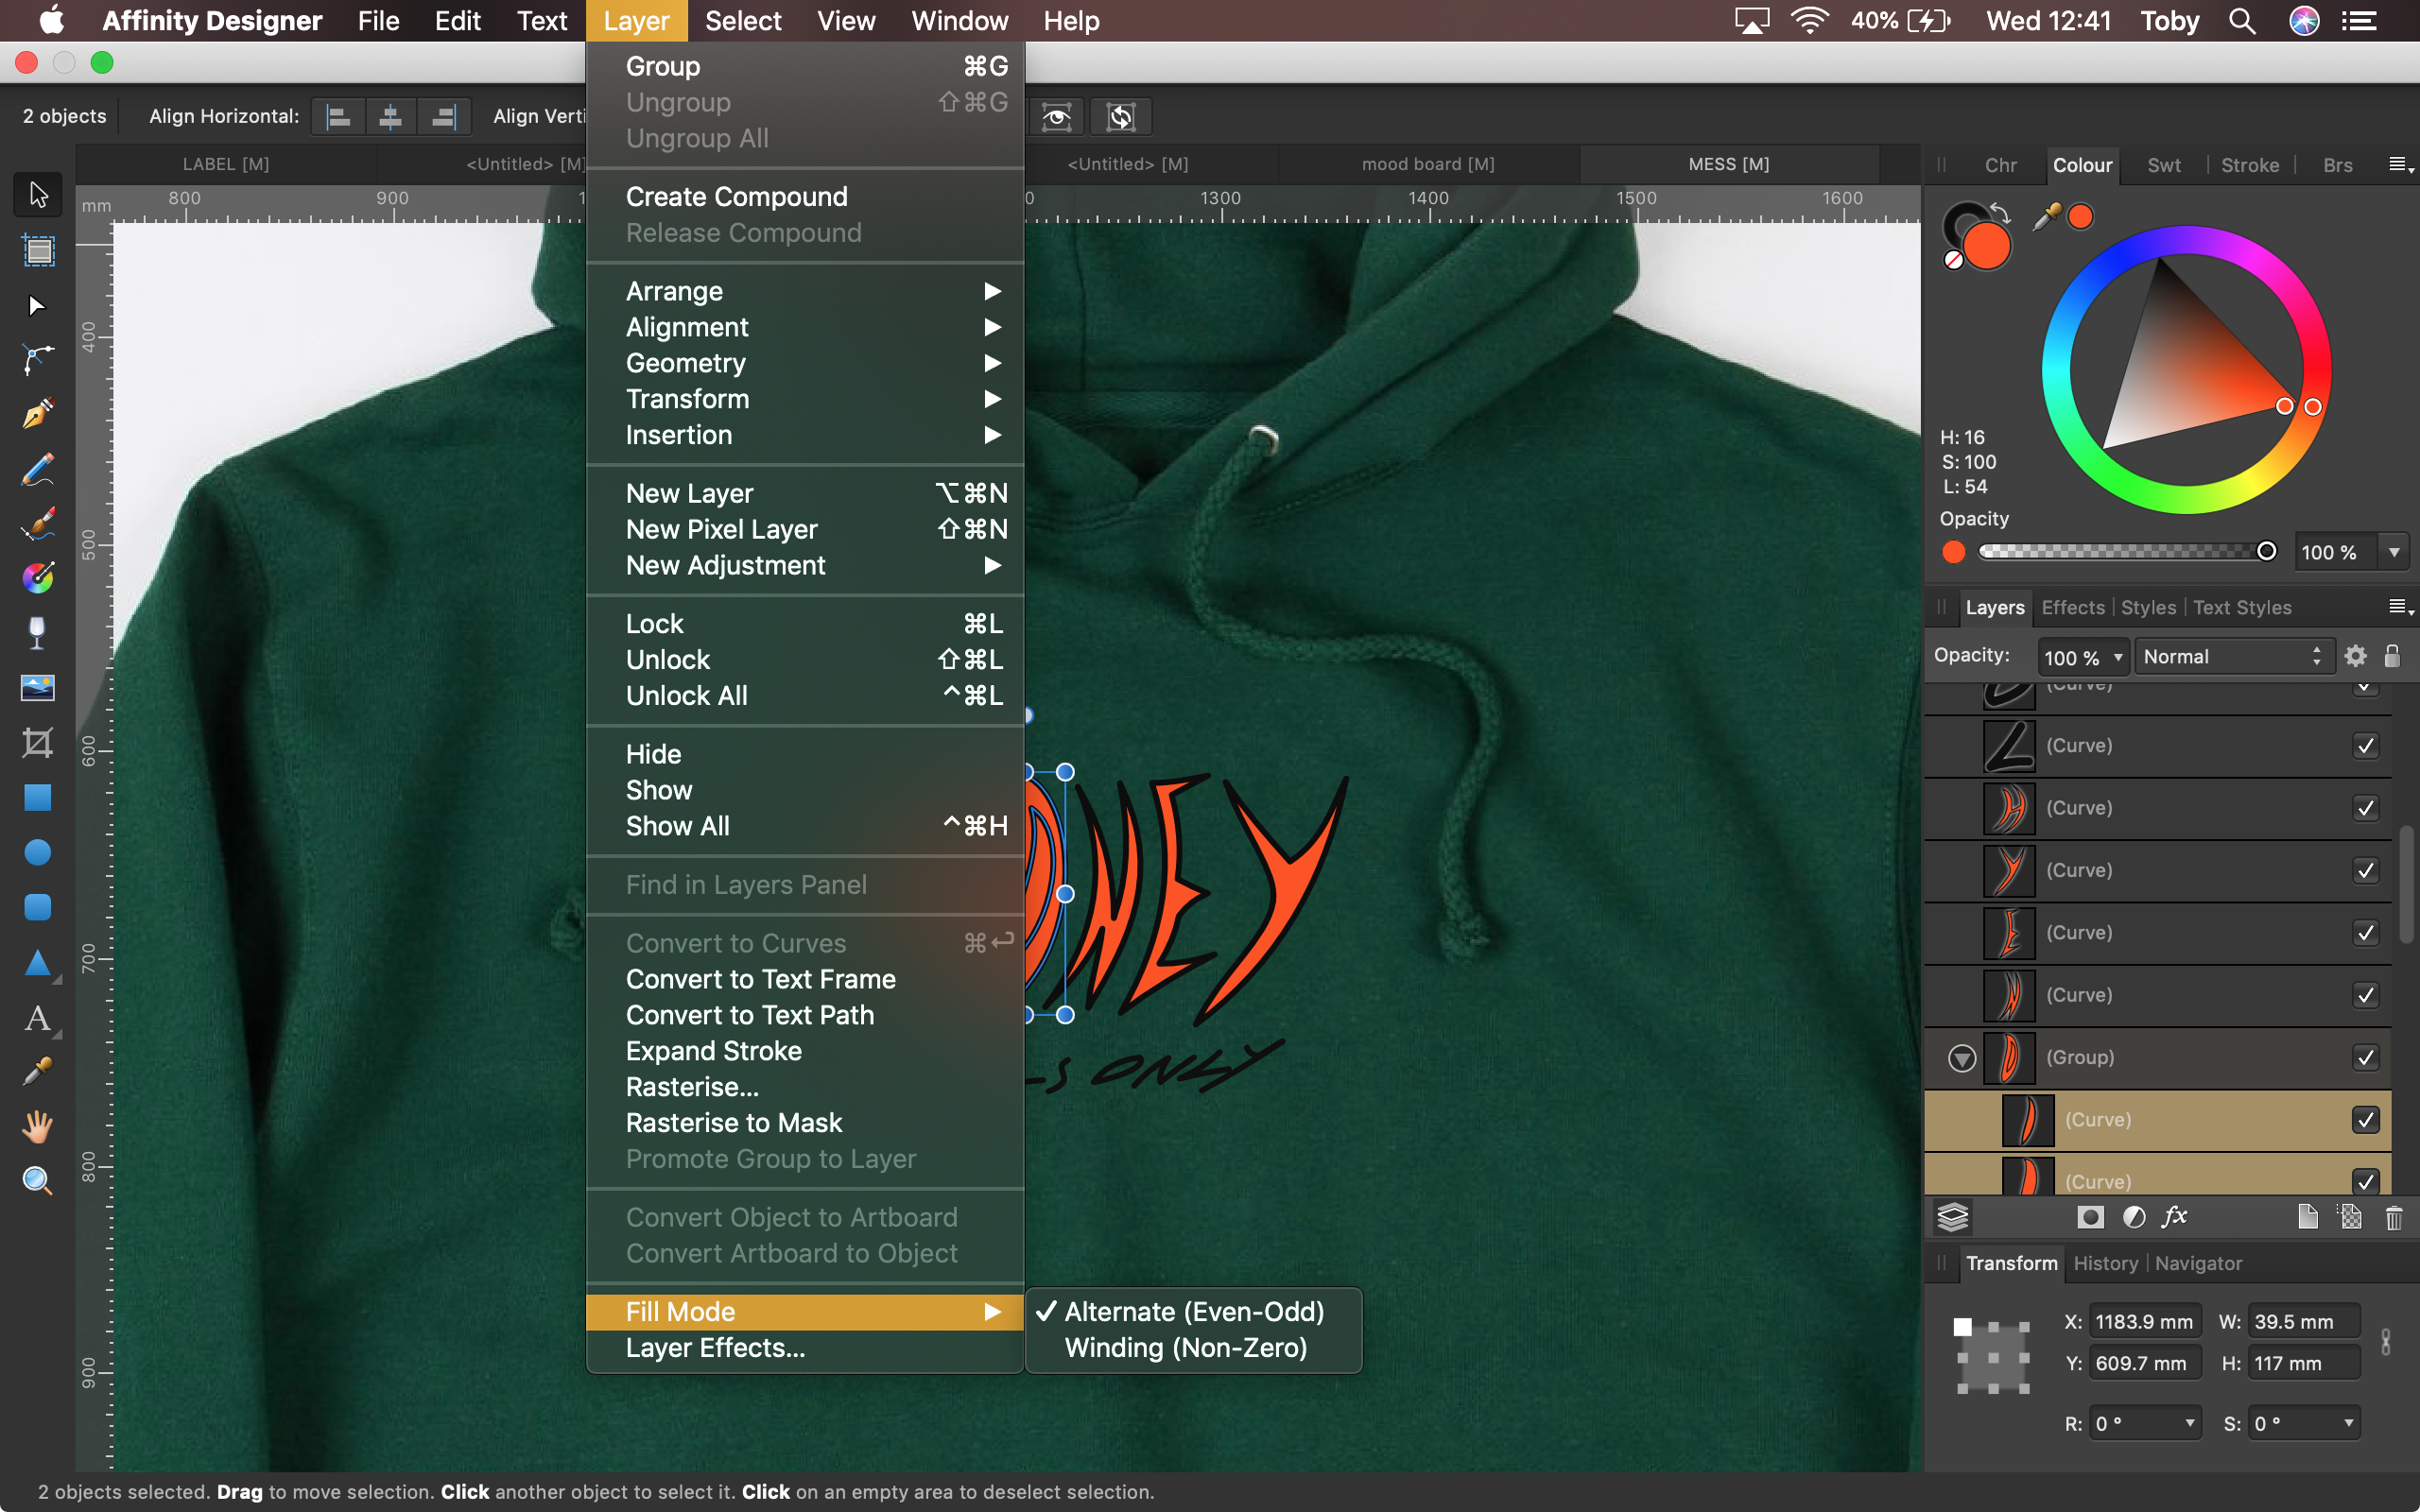
 Hi, I'm trying to fill a capital 'O' without filling in the middle of it. As seen in the attached screenshots. I found a post with the same issue, there they were told to select the individual curve layers rather than the group, and then change the fill mode in the layers menu to "Alternative (Even-Odd)". However, I tried this and it didn't seem to work. Is there something I'm doing wrong or something else that might work? Cheers
-
 After update to 1.7.2, Fill paint with transparent color doesn't work. (It works propery on 1.7.1, and this bug occurs on MacOS also.) I very often use this function, so I'm very discouraged. I degradee software version to 1.7.1 . I strongly want serif company to fix this bug.
-
Four image pano, very long time to create pano, same long time to complete render, cropping, extremely slow, save, long spinning ball, finally saved. Reopen to fill small areas of transparency, crash iPad Pro (3rd gen) 12.5”, 1T, 6GB iOS 12.4 Sony a7r3, 70-200 G lens {%22app_name%22:%22Photo iPad%22,%22timestamp%22:%222019-08-20 21:34:56.67 -0700%22,%22app_version%22:%221.7.2%22,%22slice_uui.zip {%22app_name%22:%22Photo iPad%22,%22timestamp%22:%222019-08-20 21:49:56.31 -0700%22,%22app_version%22:%221.7.2%22,%22slice_uui.zip
-
 Forgive me if this has already been answered. I looked but couldn't find the answer. Is it possible to do a tileable fill with Affinity Photo? I've seen references to doing it in designer but not photo. I did a bitmap fill using the gradient tool but it doesn't tile the bitmap, it just extends the edges which is not very useful (for me anyway). Thanks
 -
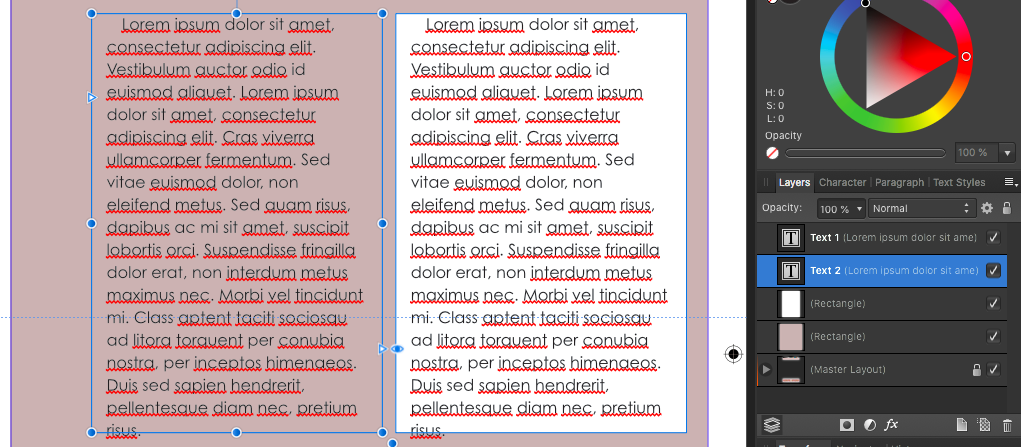
 In Affinity Publisher v1.7.1, cannot remove or change rectangle fill after converting to text frame — there is no UI to do this, and the fill is permanent. Have to delete and recreate the work. Steps: 1) Select rectangle tool and draw a rectangle, 2) In the colour palette, set a noticeable fill colour, 3) Choose Layer > Convert to Text Frame, 4) adjust the same controls that were used in step 2 to choose a fill colour. Result: the fill colour of the box no longer changes (the newly selected colour is applied to text added). 30mins search and experimentation did not yield any place in the UI that would allow the rectangle fill to be changed (if its present but well hidden, then this is also a UI bug). Expected: either a) rectangle fill is removed when converted to text frame, or b) all colour selection palettes allow target for change within text frame to be selected, out of text (selection) or frame itself. (Presumed same for all types of shape, and for stroke as well.)
 -
 Not entirely sure how I activated this, does anyone know how to deactivate it? I’m getting a fill behind my text that blocks other layers
-
 I apologise if I'm missing something obvious, I've searched through the Affinity Photo online manual and the help forum and not found anything. Every graphics app I've used until Affinity has supported using multiple layers to constrain fills from the flood fill (paint bucket) tool - think of scanning in a line drawing, putting it on an upper layer, setting to multiply and using the line art to constrain fills on a layer or layers below. (I'm talking all pixel layers, BTW, no vector stuff). The flood fill tool has a control for tolerance and toggle for non/contiguous but no control to respond to single or multiple layers. Is there another way of doing this or is the feature not yet present?
 -
 I finally give up. How do you stroke something? I drew a rectangle with the marquee tool and want to stroke that line. I do it all the time in Photoshop, but I cannot find a way to do it in Affinity. I also can't find any instructions or tutorials online. There seems to be help for what to do with the stroke after you have it, but I need to create it in the first place. I have the same question for filling the selection. thank you
 -
.thumb.png.c1e412a4e3384d171b58a9b378322141.png) If you align stroke other then to middle while rendering there will be some graphic artifacts. Fill color will show up there it should not. Or there will be transperent gap between stroke and fill. That makes stroke alignment feature unusable for quality export graphic. Is there a way to fix this?
If you align stroke other then to middle while rendering there will be some graphic artifacts. Fill color will show up there it should not. Or there will be transperent gap between stroke and fill. That makes stroke alignment feature unusable for quality export graphic. Is there a way to fix this?
-
Hi all, I'm considering buying Designer but one thing that I can't find is if there is a way to fill an object using vector or patterns. I only find gradients and bitmap. I know we can duplicate an object to create hand made pattern but I can't then edit the repetitions like if is a bitmap fill. Cheers, Juan
- 317 replies
-
- 29
-

-
Sorry if it's duplicate post. It would be nice to have a pattern fill feature with a few patterns to start with instead of gradient tool and bitmap fill. Also quickly create patterns by drawing a square on your shapes and save them to swatch library. Or..at least if you save gradient fill with a bitmap image, and reapply that fill on another shape to get the same size of the pattern. See the image, they all get a different size.
-
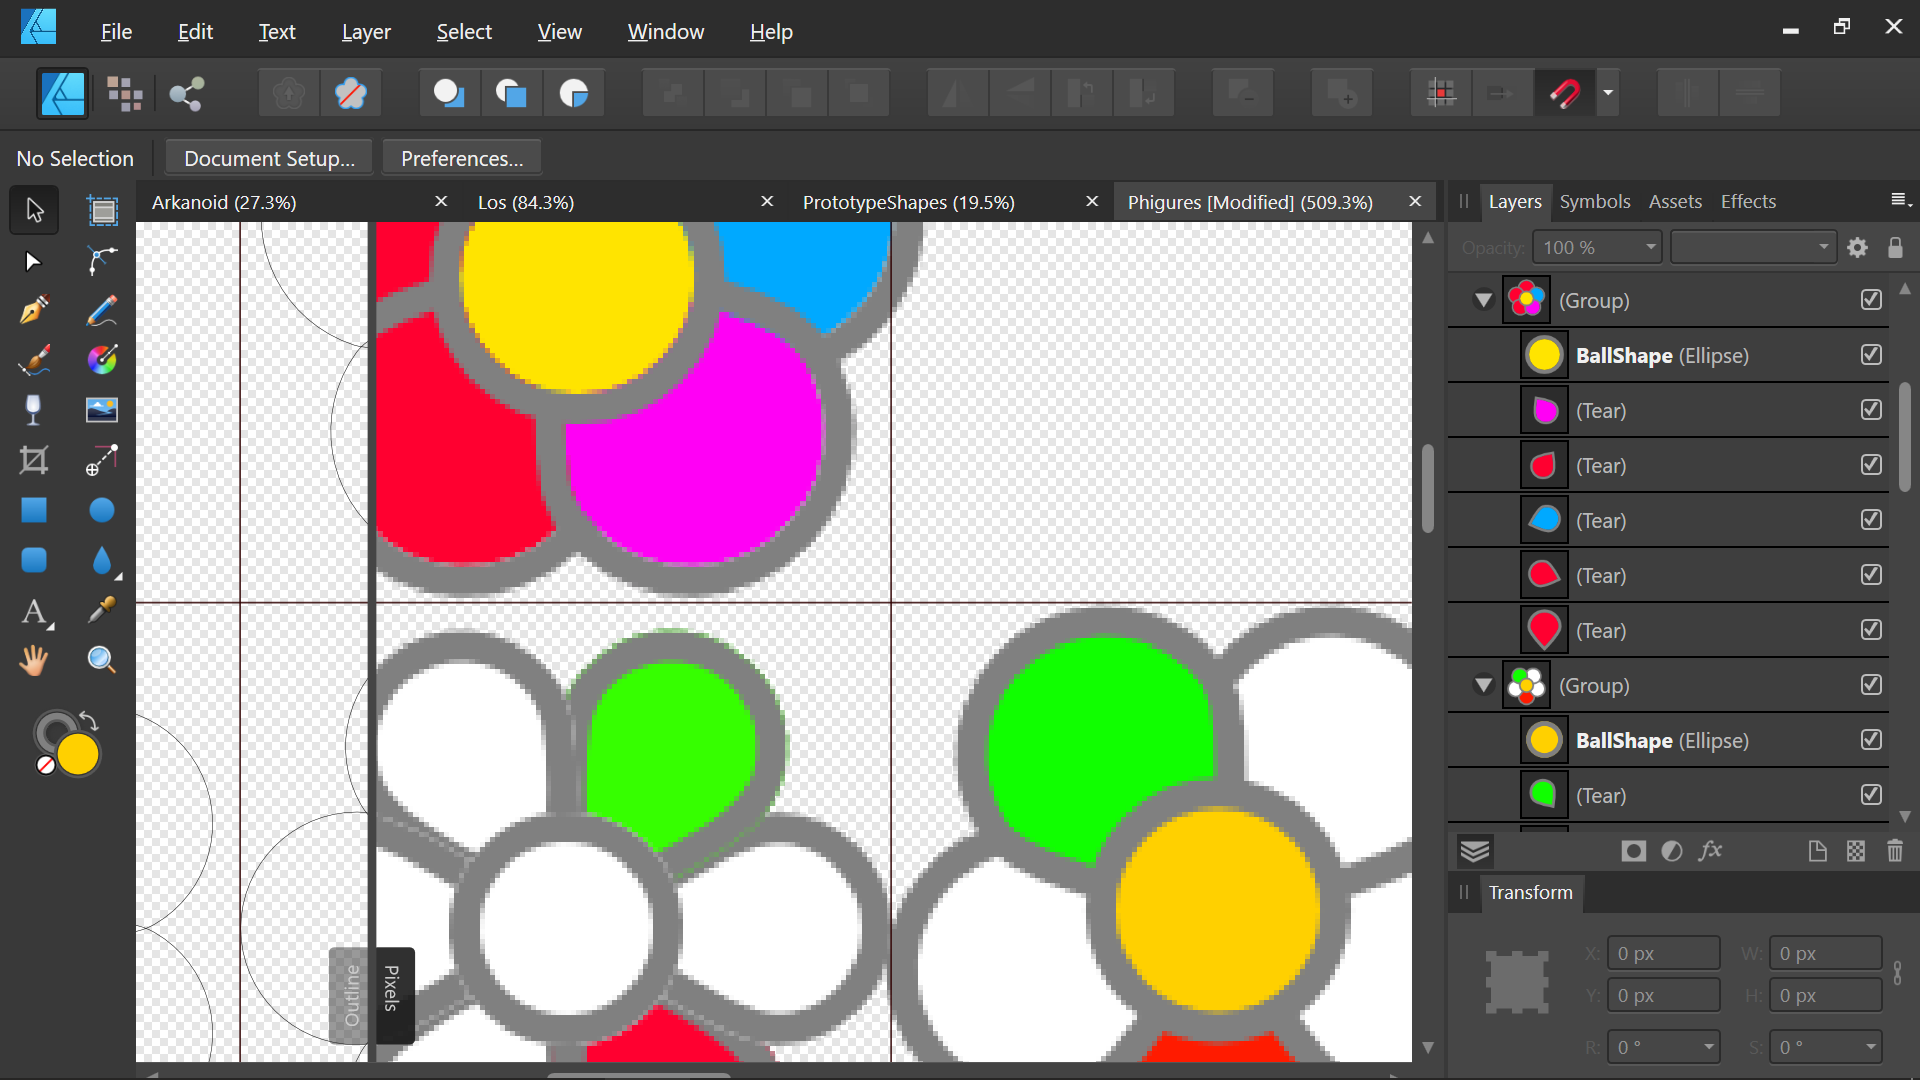
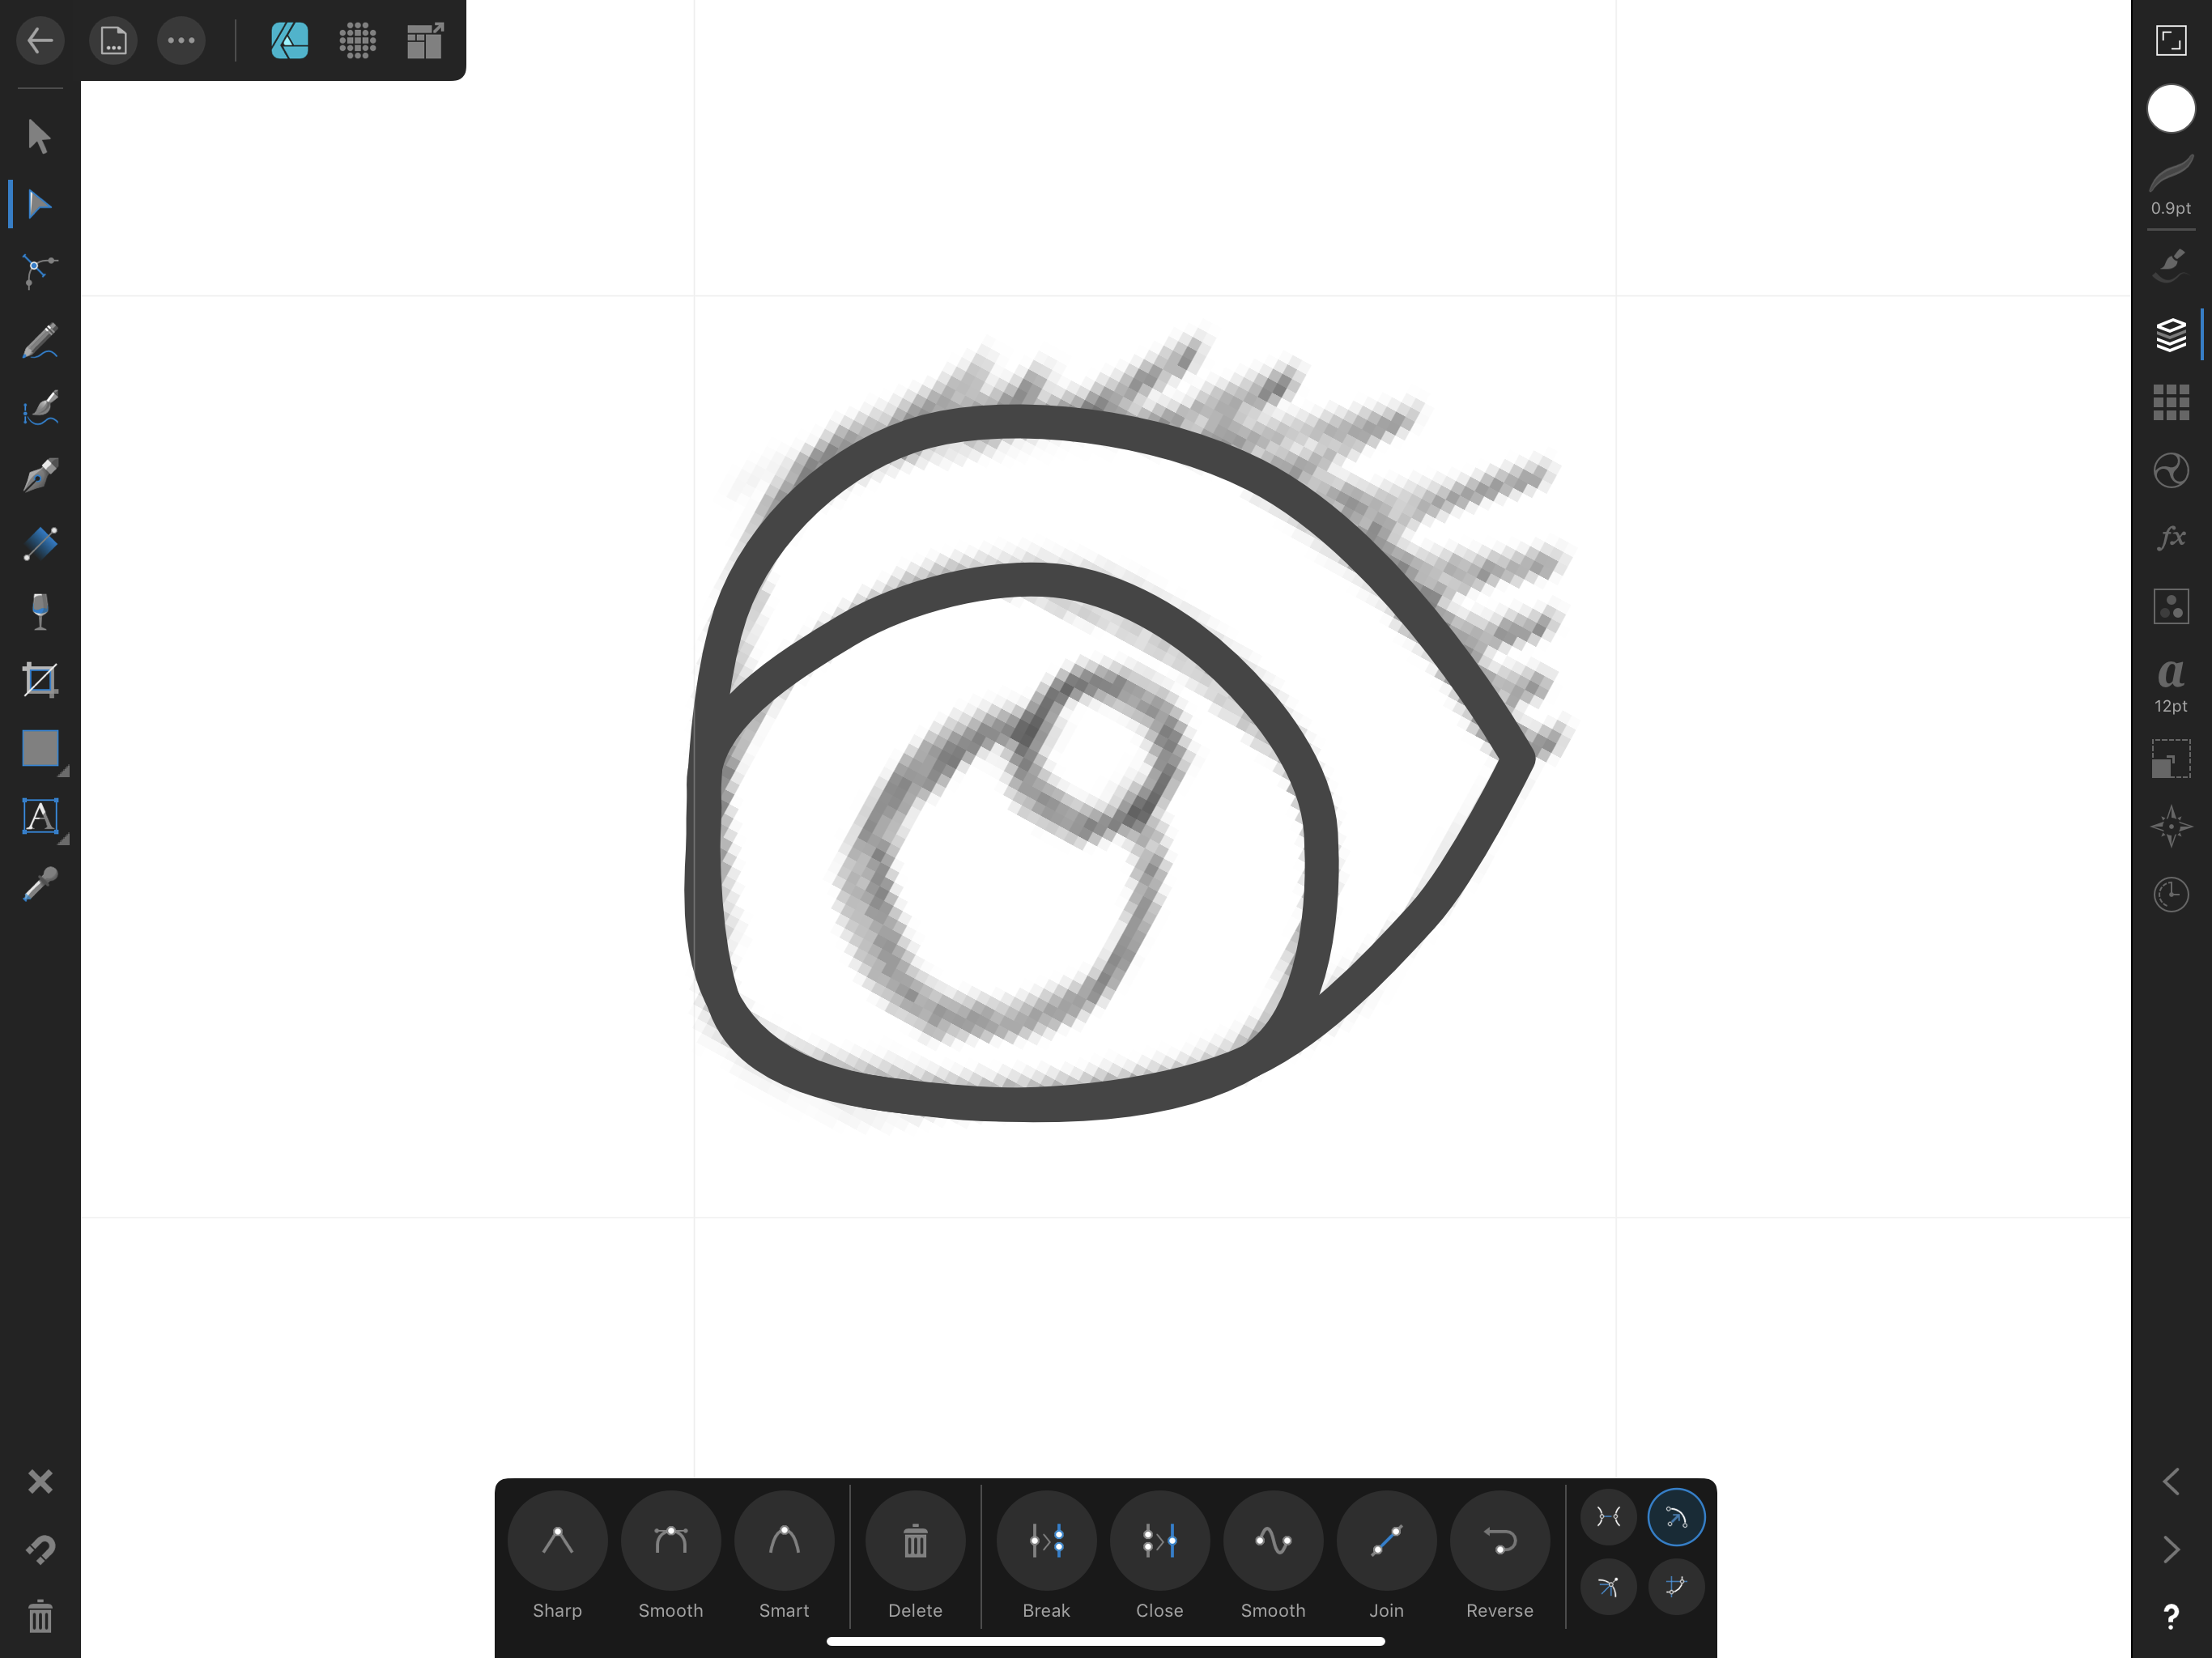
 I'm just starting out in Affinity Designer for iPad, and I'm trying to perform a pretty simple fill operation on this eye that I've drawn (see attached). I come from an Illustrator background and it's incredibly simple to do in there. Basically, I've drawn the outer shape of the eye, and added a line through it. I'd like to fill in below that dividing line with one color, and use white above it (as you'd expect for an eye). The problem is, I can't seem to fill in the eye color without creating another complete shape that overlaps the outer shape along the bottom and left sides of the eye. I can work around it like that, but it's tedious and would definitely end up taking forever on more elaborate illustrations. Surely there's some way to fill in color without completely overlapping lines all the time, right?
-
 https://www.useloom.com/share/05cafbf1cd084a988ffda991f3d8c119 In my document, at first the pencil tool took about a minute to render what it was drawing, I thought it had crashed. Now it seems to have sorted itself and draws in real time but still strips out the fill when drawing. Doesn't matter if a stroke is selected as well or not, it always strips out the fill. I only want to draw with a fill so this seems buggy. As the video shows this also happens in a new document.
 -
 At my current job we use Corel Draw in our graphic design department. I have switched to Affinity Designer and Photo for my personal work and these are my 5 features I use very often in Corel that I would love to see added. 1. Boundary Tool - Have a print/cut Roland printer and this tool is essential when creating a cut line around multiple objects. 2. Envelope Tool - Use this quite often for text effects. Converting to curves and manipulating from there works alright but Corel leaves the enveloped object still as text and can be still edited. 3. Flood Fill Tool - I'm able to replicate this using boolean operations but involves way more steps and occasionally will end up with odd quirks and unwanted results. 4. Blend Tool - I believe I have seen this is coming on the roadmap so hopefully soon 5. Raster to Vector Tracing - Also seen this is coming. Currently using Inkscape for this feature and then exporting/importing into Designer All this being said Designer is still one of the best applications I have used. How great this application already is has me very excited for future updates and enhancements.
 -
 As the thread title implies, the colorpicker behaves strange when trying to pick up a color near it's invokation from a fill color panel. It mostly refuses there then to pick up a color under the loupe, see here ... BTW, AFAI have seen this odd behavior is equally among all tools of the Affinity line!
-
 With the Pen tool, go ahead and create a 5-sided star (see star_empty_center.png). You see the pentagon in the center being empty. What I want is for the center to be filled (see star_filled_center.png). => My current "workaround": duplicate the (star) shape select both shapes and apply boolean "Divide" to segregate the 5 triangles with Node Tool: for each triangle, break and remove the line that belongs to the pentagon select all triangles and apply "Join curves" It's cumbersome, but it works. My question: is there any simple way / an option to tell AD (before or after drawing the curve) to fill any overlapping areas to make it look solid ?
-
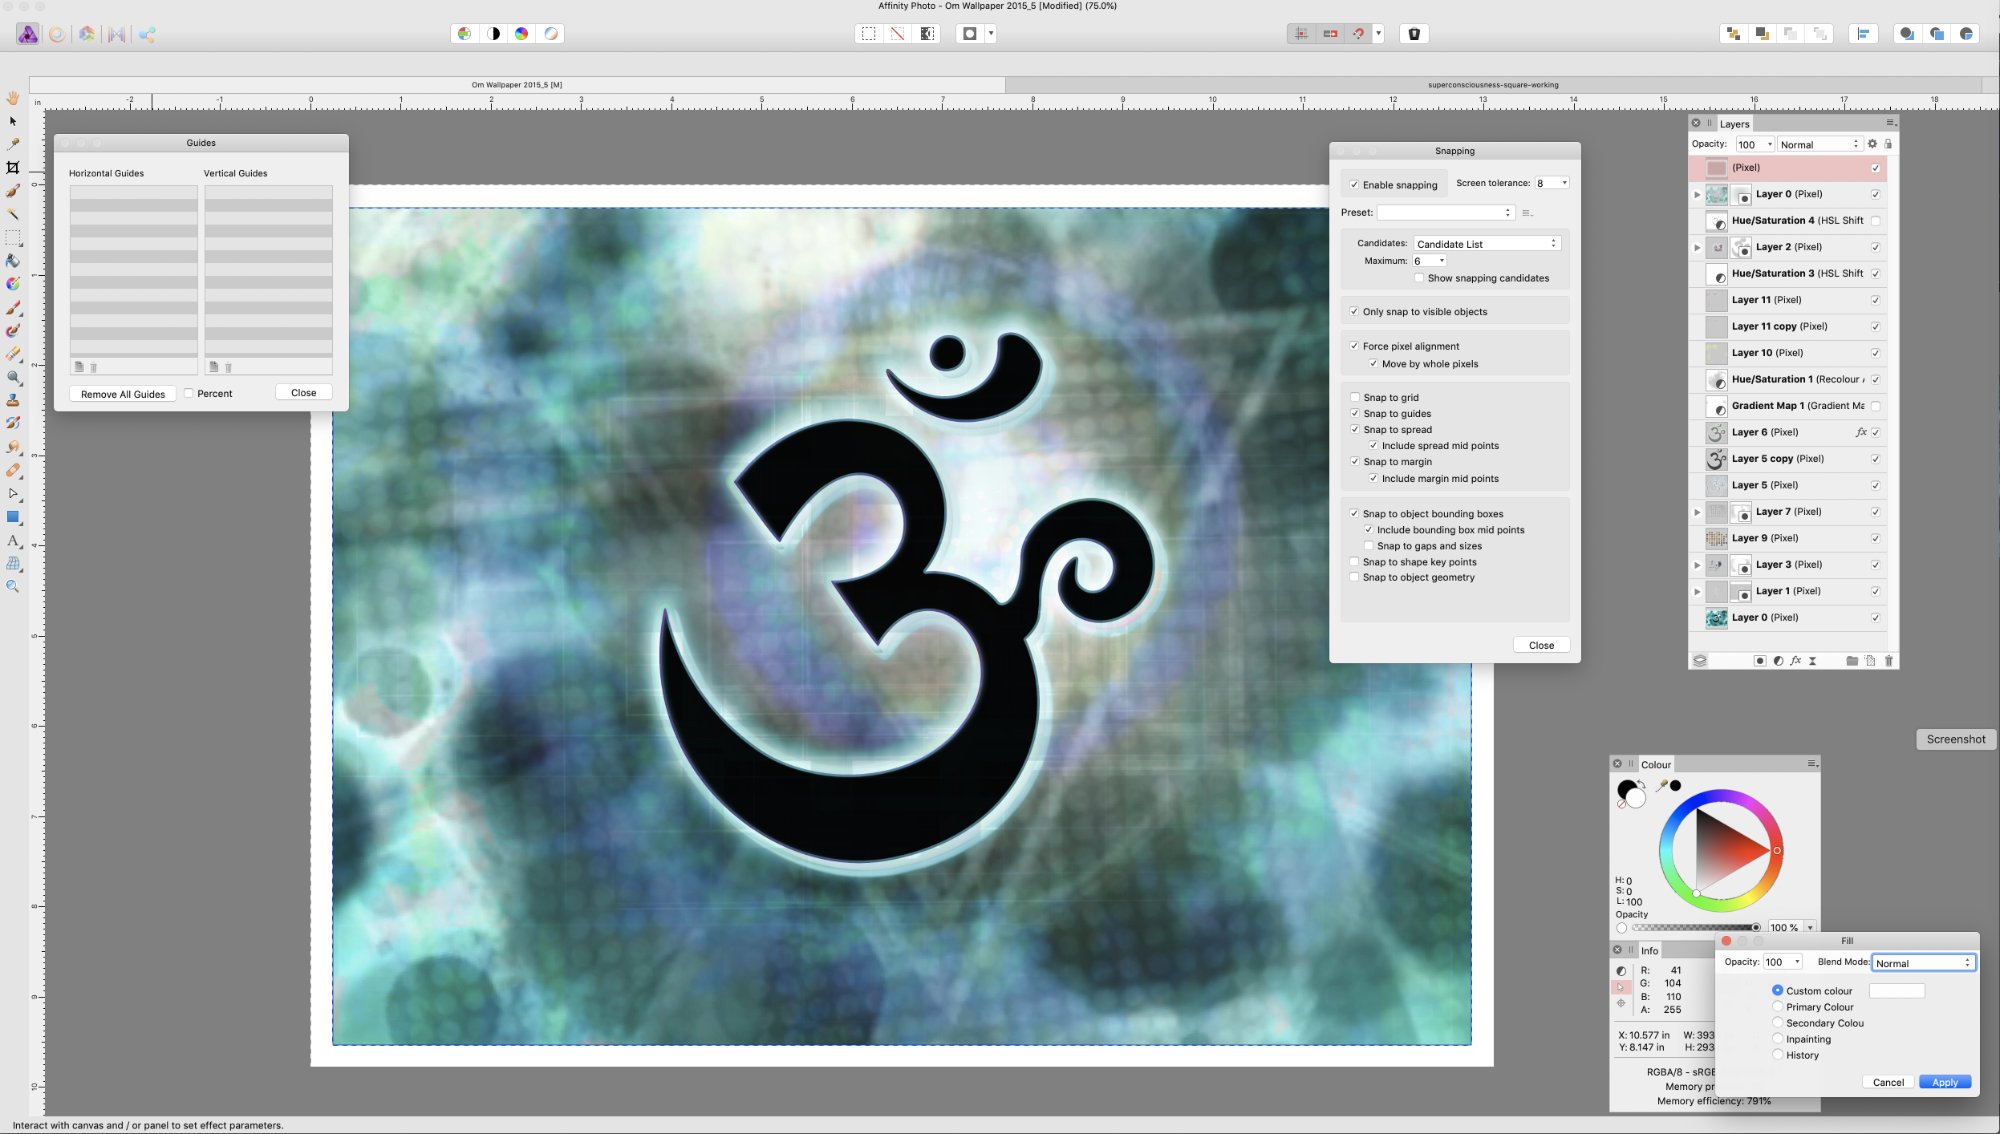
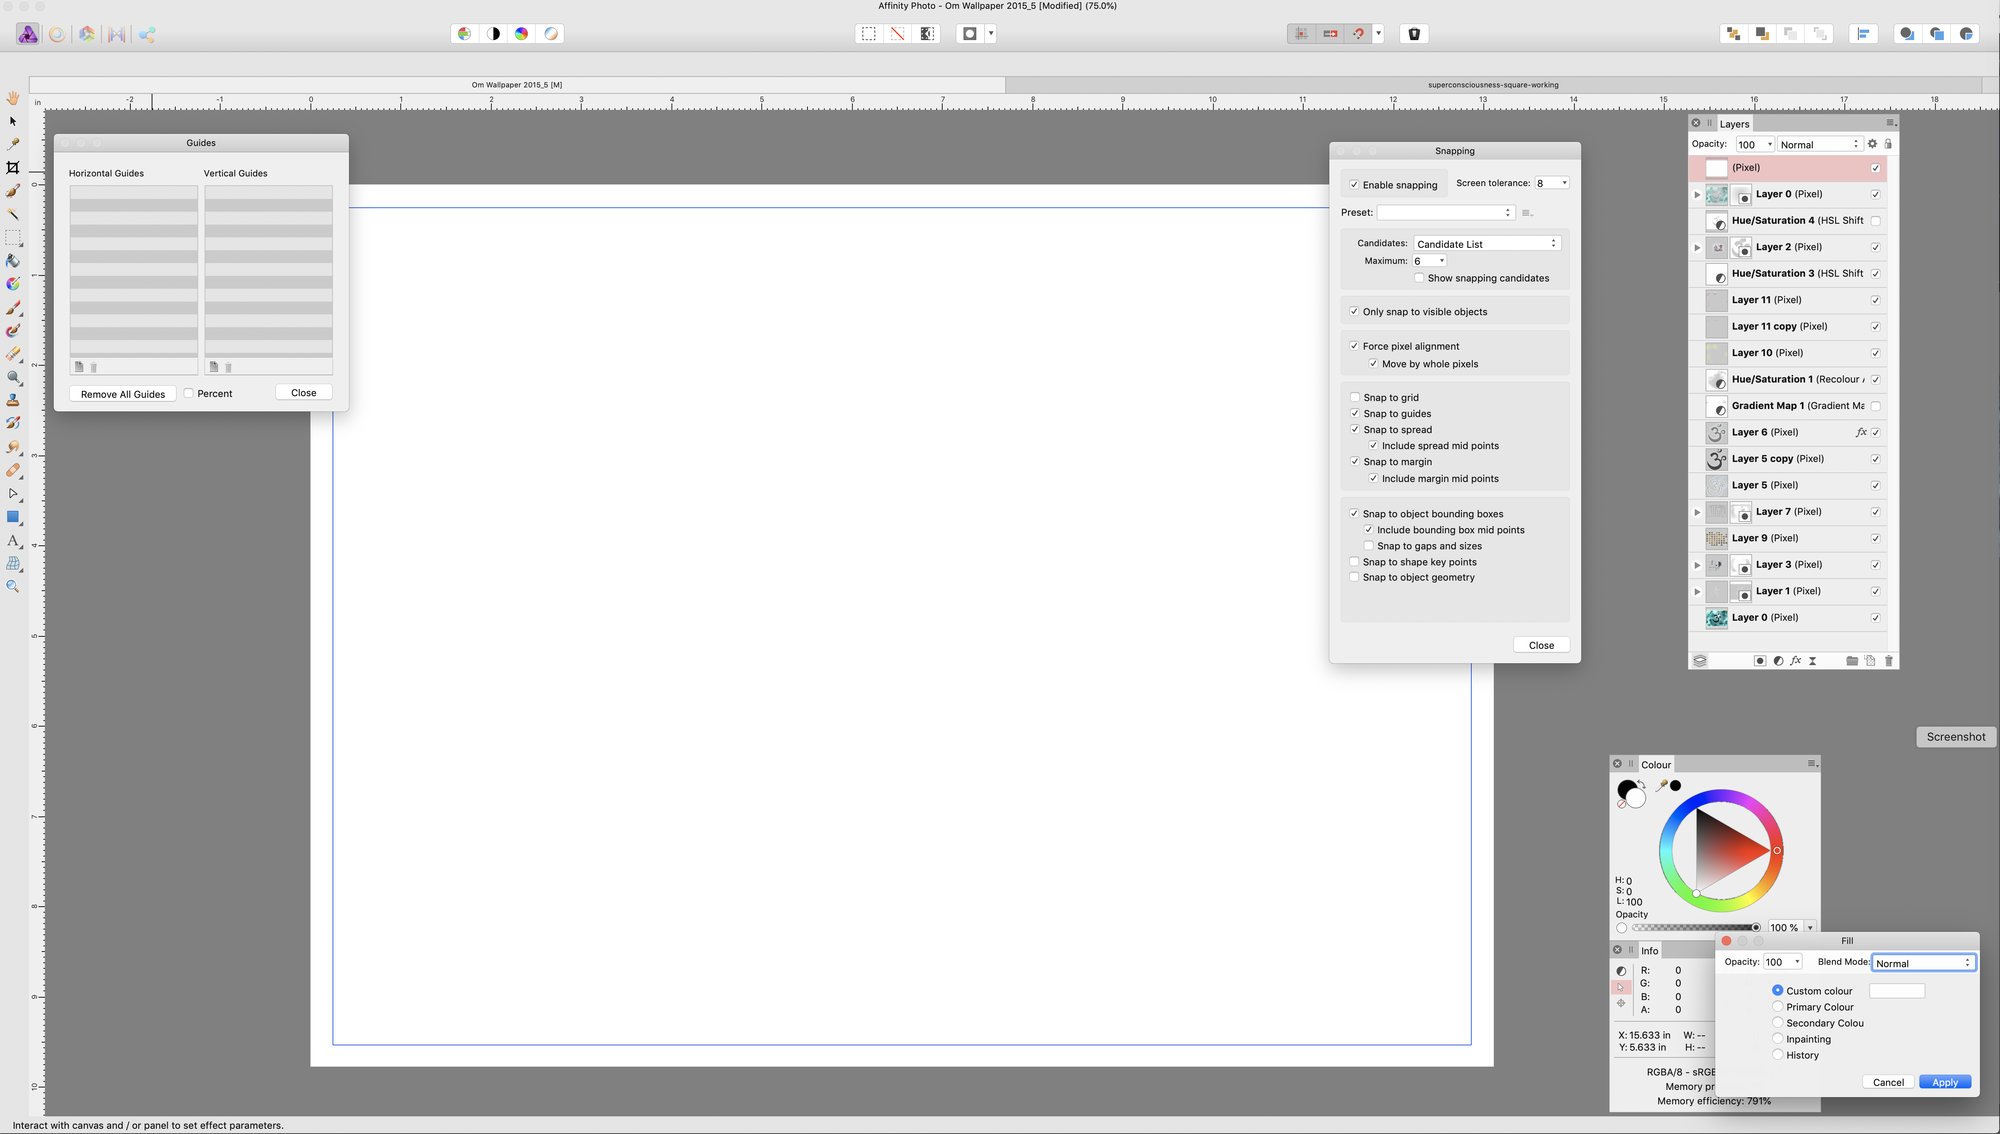
 I'm getting reproducible behavior with this sequence: Make a selection on pixel layer>Edit>Fill>Deselect When I deselect, the unselected part from the original selection also fills, making the whole layer a solid color. See screen captures for the before and after. You can even see the selection is active in the before image. I found that this also happens when I use the keyboard shortcut SHIFT+F5 but it doesn't happen if I fill using the fill tool (paintbucket). I've been experiencing this for a while now. I think I noticed it even before I installed Mojave on my late 2015 iMac, but definitely ever since I installed Mojave.
-
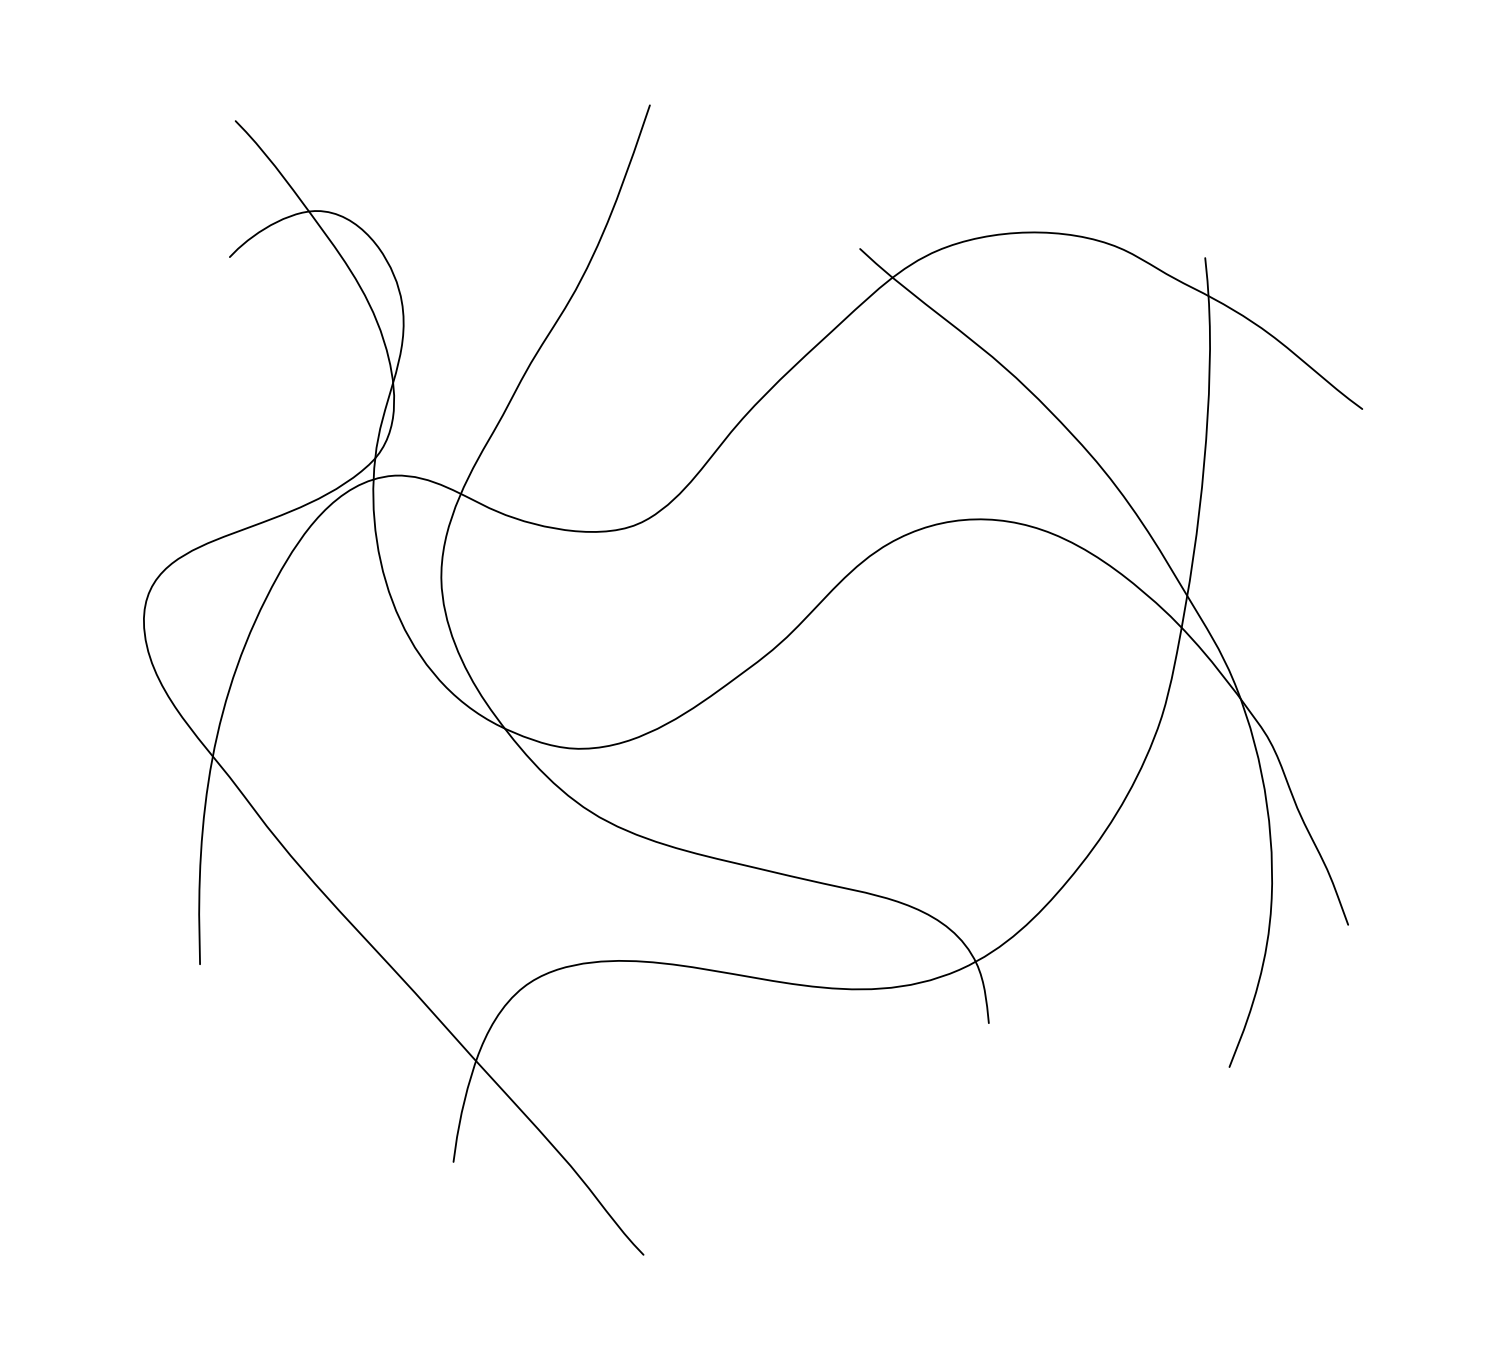
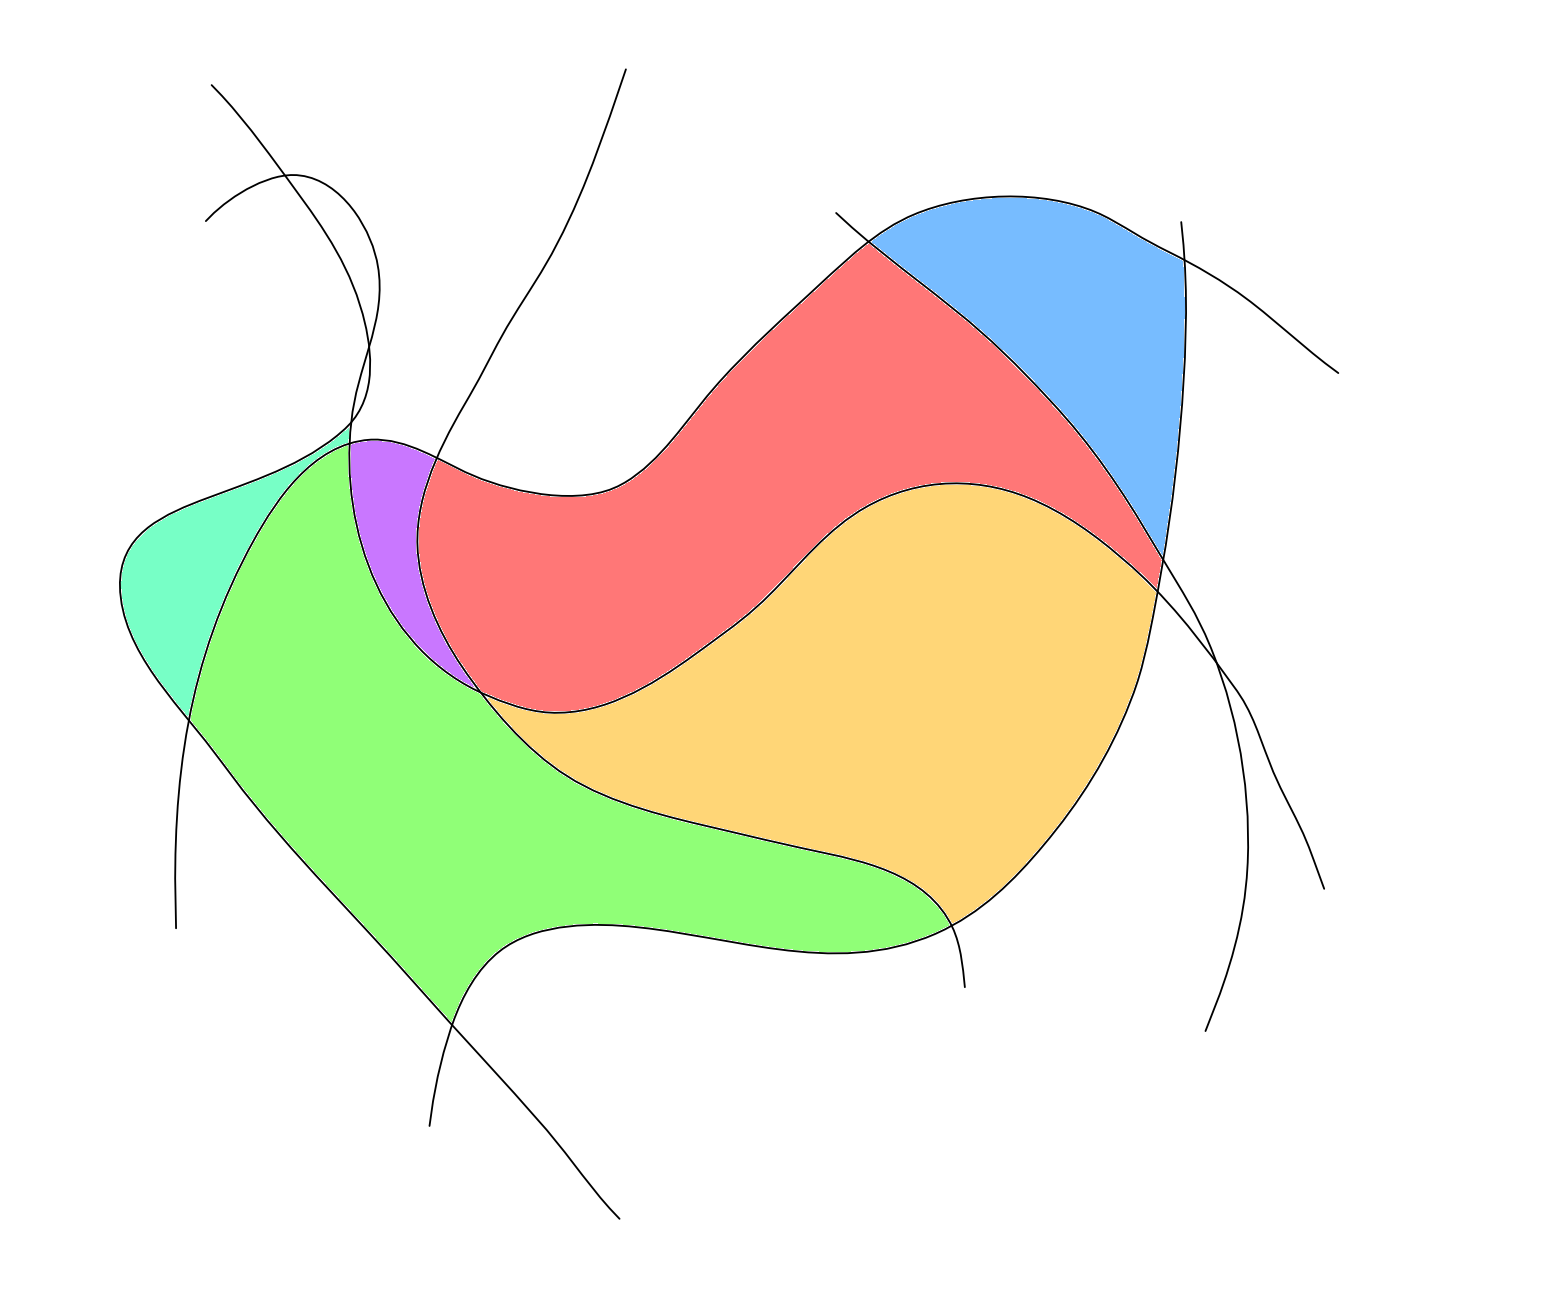
 The image below shows some curves I drew with the pen tool. How would I go about filling in the space in between each curve with a different colour? Here is an example of what I need: All help is appreciated. Thanks, Dan
-
Hello! I prepared new 25 styles for A-Designer, A-Photo and A-Publisher Regards Designia Styles 2.afstyles
-
 The numerical transparency values for the fill in the table are missing...
-
 I had created a text box and I would like to fill it with a color and even change the stroke. If this option already exist it will be great to learn how to do it, otherwise, it can be an interesting implementation because this will avoid an extra layer as a background for the text.
-
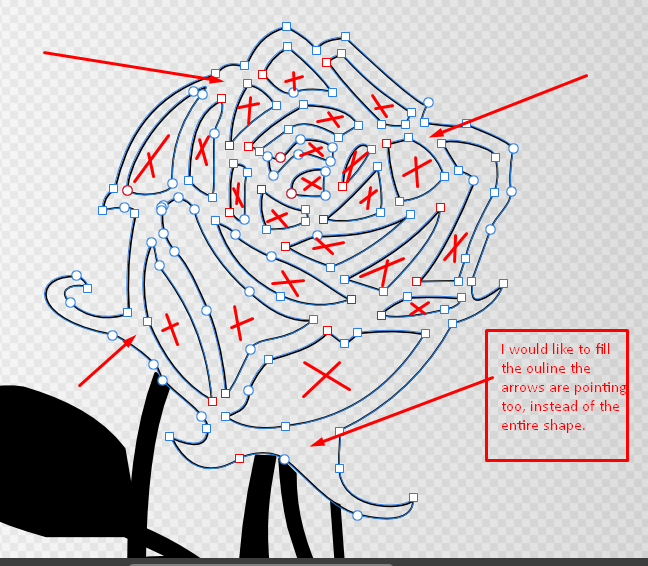
 Being new to affinity designer, I couldn't make the decision on how to fill only parts of this vector. I'd like it to stay a vector instead of rasterizing it for paint mode, some im curious on how I can select only parts of the inside of vector id like to fill, as it is black and white and I would like to keep the middle parts of this rose transparent, well I fill the outline around it. Thank you, N0hva
-
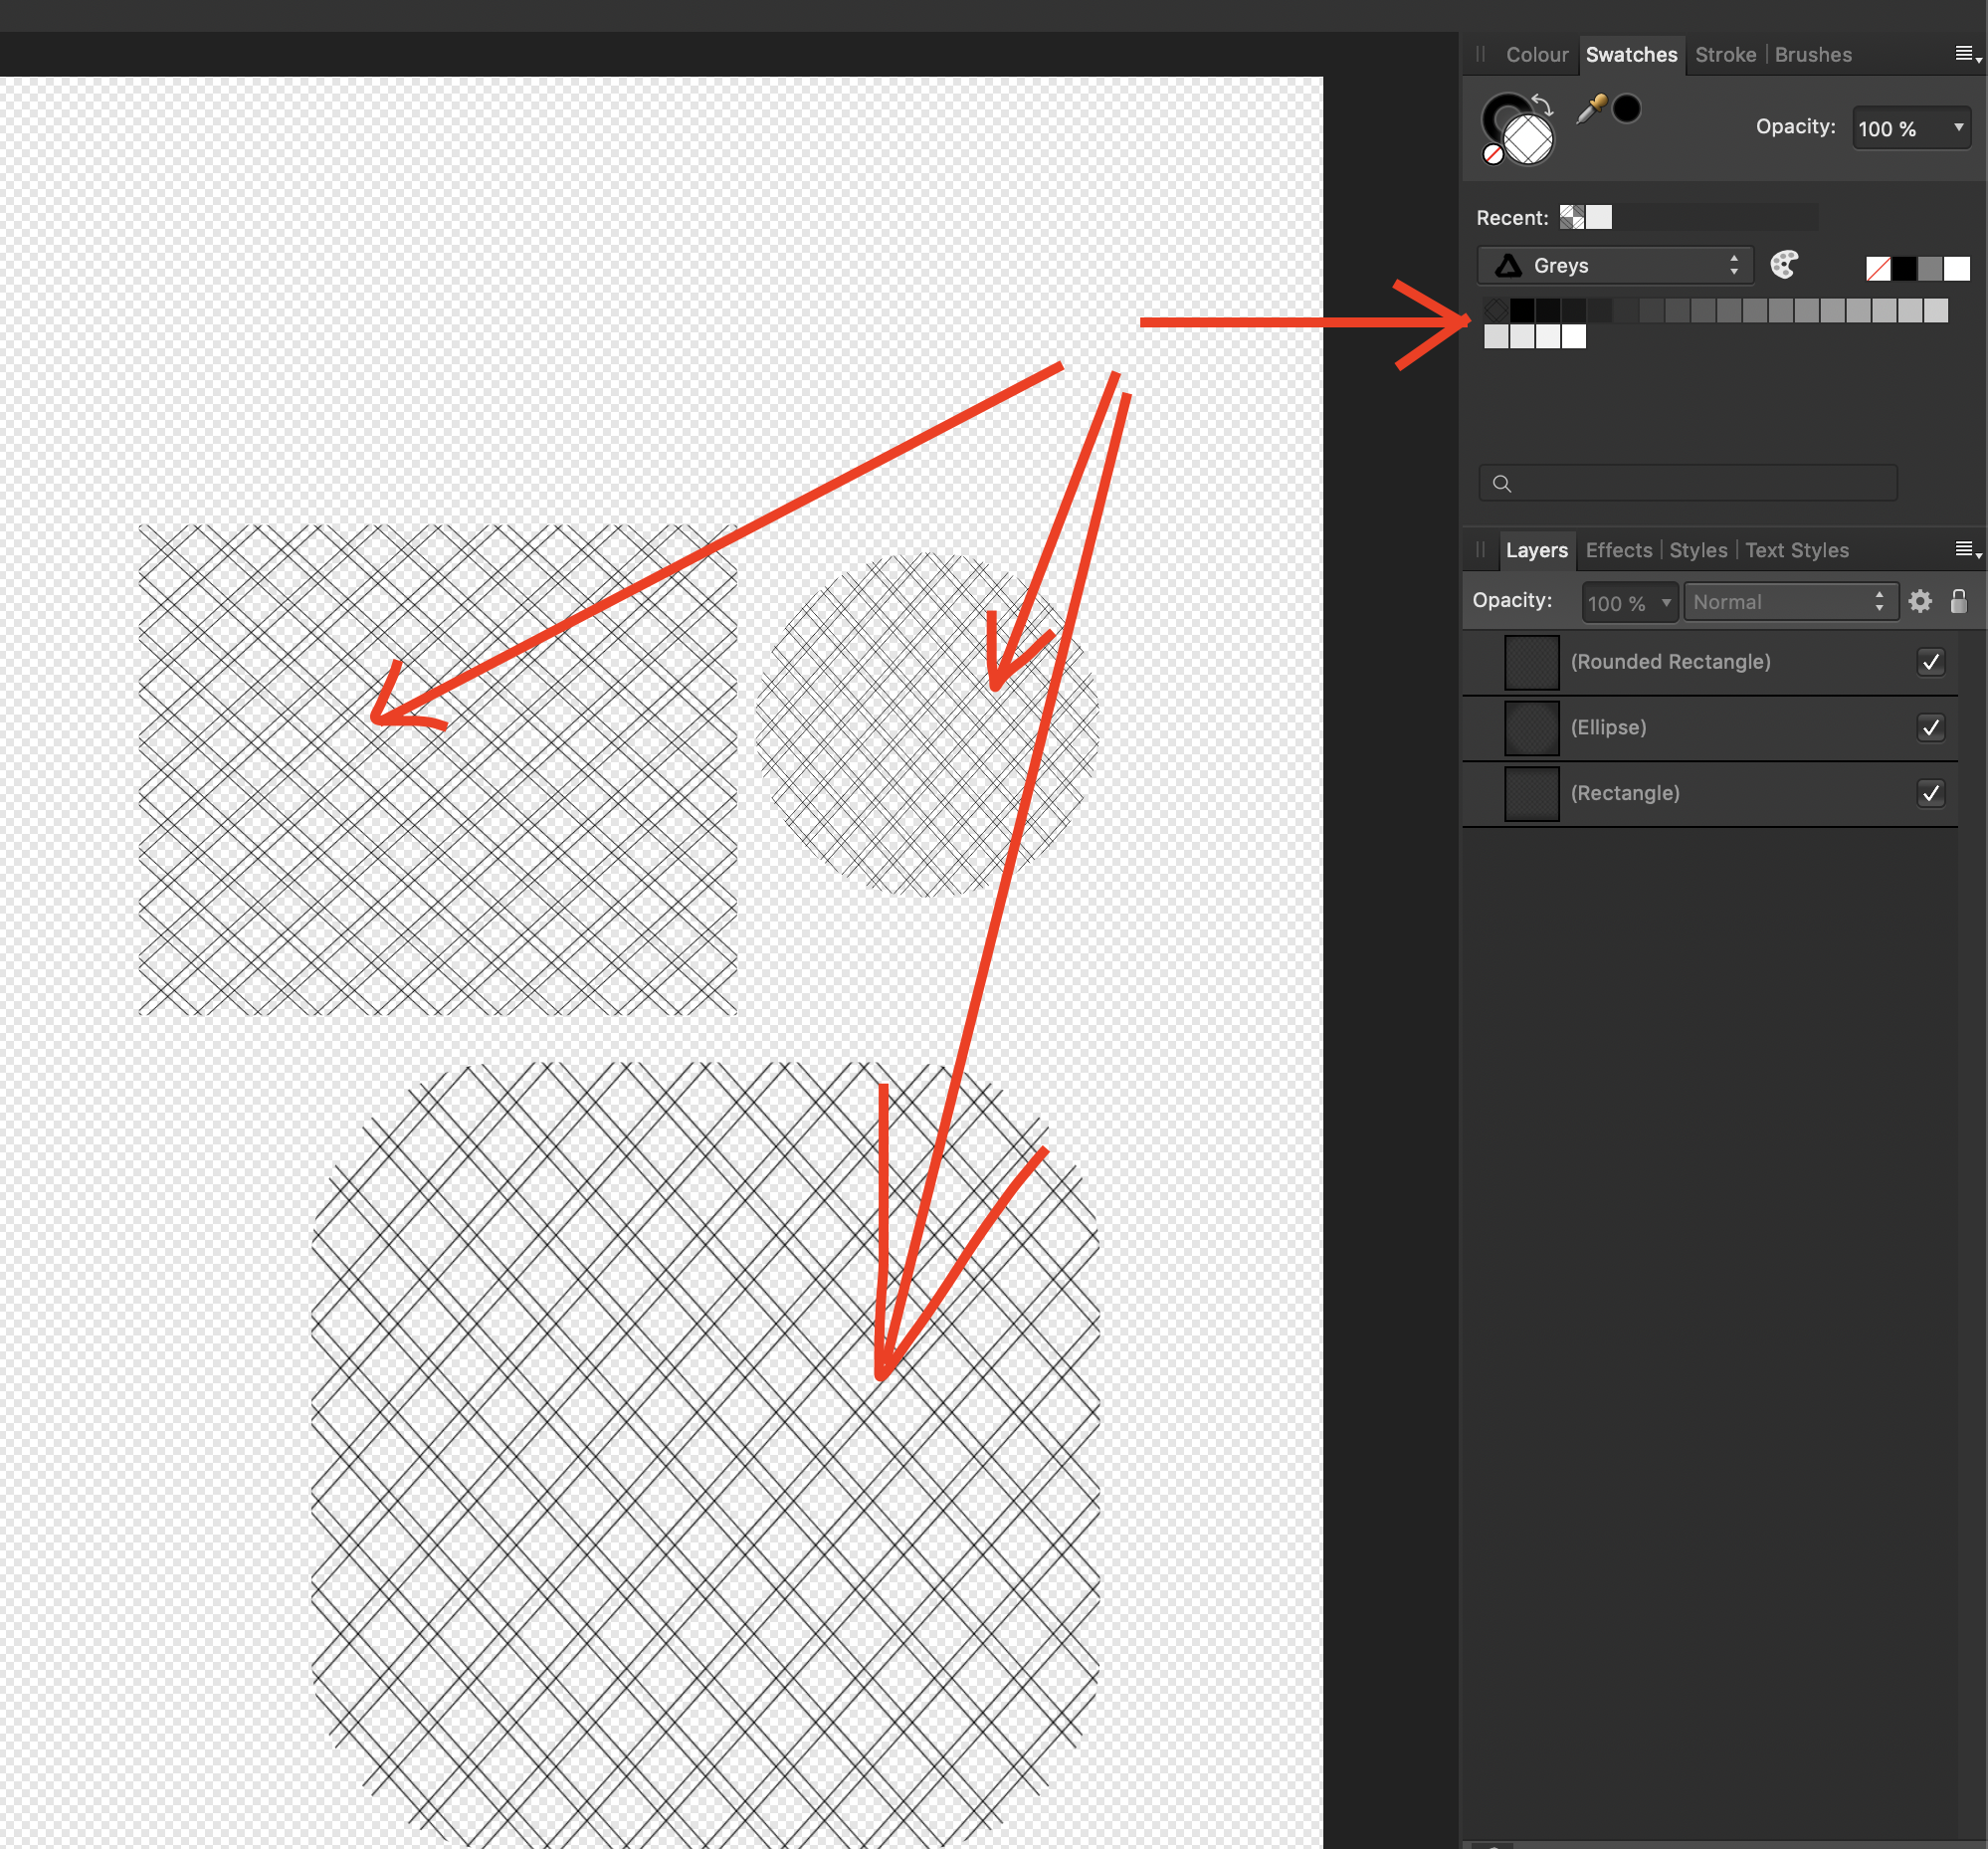
 Hi. I have a simple 10x10 area I want to fill with a 1x1 pattern without stretching or distorting the pattern. I have drawn the initial pattern in AD. I can rasterize it, but the fill tool insists on stretching it to make it fit instead of repeating the raster. I'd prefer to keep the pattern 'live', like a symbol, so I can still edit it after setting up the file. Should I aim to work with the source pattern as an asset? a source? a bitmap fill (which seems like the worst option)? Thanks folks. Dying here.
 -
 Affinity, Do you guys have a video showcasing how to fill aky of a drone 360 Pano? I came across a video on YouTube that showcased this, but cannot find it, nor can I remember if it was an "Affinity" showcased Video Workflow or someone else. Due to the Zenith constraints of Drone 360 image capture, I need to fill the sky. Thank you.
 -
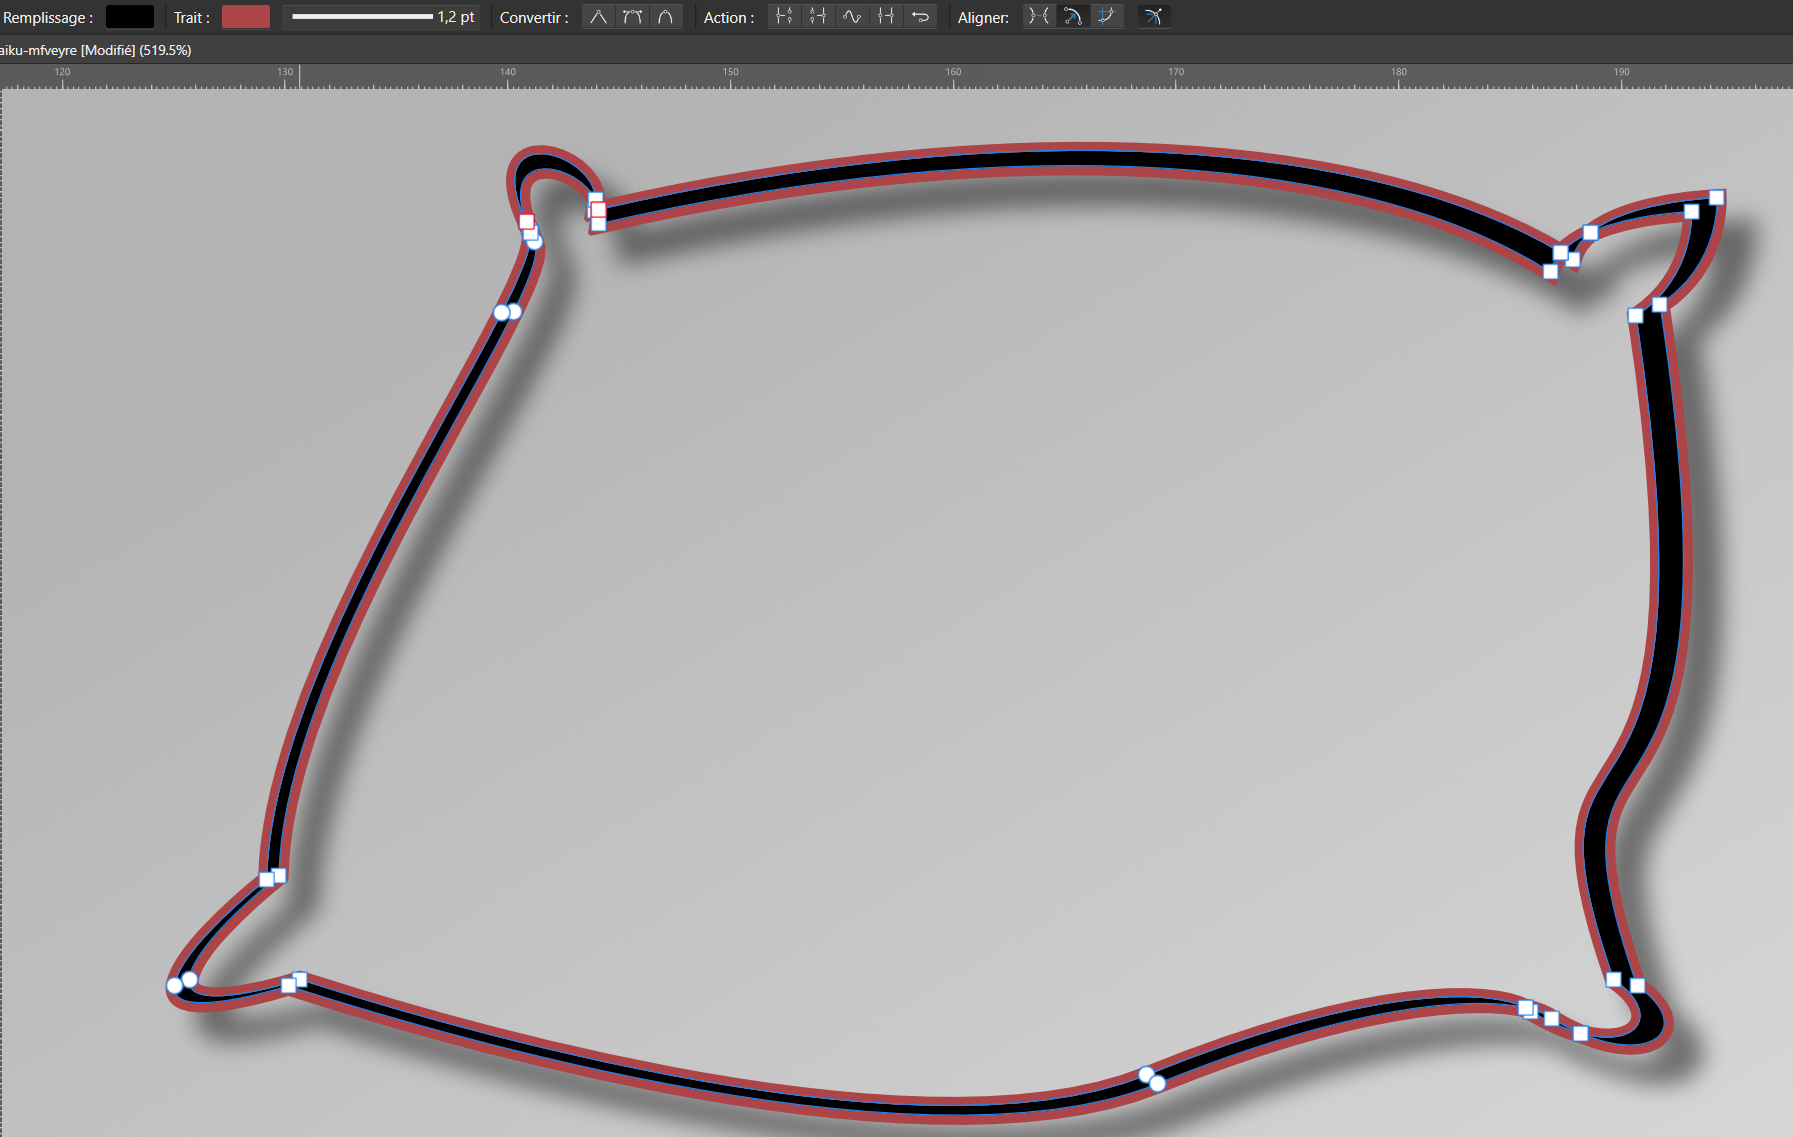
 Hi, I have a shape that is closed and contains a hole. On the picture joined : - This shape is a result of a boolean combination of 2 identical shapes slightly shifted. - The stroke is red - The fill is black. I want to fill the hole in the center of this shape. 1 - I tried all the boolean operations (including divide) with no success, it doesn't "restore" the 2 original shapes as some vertices have been merged. 2 - I tried removing vertices to restore a "filled" shape, but it is too hard as some vertices are overlapping other ones (is there a way to "hide" vertices like in Blender ?) 3 - I could redraw a shape on top of the original, but It's too hard because of the complexity of the bezier curves. 4 - I tried to make a square nested in this shape's layer, but it make the square appears only in the "fill" part of this shape (the black part). How can I fill the center of this shape ? Thank you, Cédric.


.png.73fd1d8efefe1d16063d2112b409ac01.png)