Search the Community
Showing results for tags 'Curves'.
-
 See the image attached. I think it would be awesome if there was a color preview to show how dragging the curves handles will affect your photo. For example I would know that dragging the highs in the red channel down would tint the photo cyan, or dragging the lows in green to the right will tint the photo magenta. This could work for RGB and CMYK as well. Thanks!
-
I miss the ability to numerically edit the coordinates of control points on curves (adjustment layers). In PS, the input/output values of a control point are displayed and can be entered numerically, or - even better - precisely adjusted with the scroll wheel. Especially when working in LAB for detailed color correction, this precision is a must, as manipulations of the a/b-curves allow for great control of subtle color shifts but also wreck havoc on a picture if only slightly misadjusted.
-
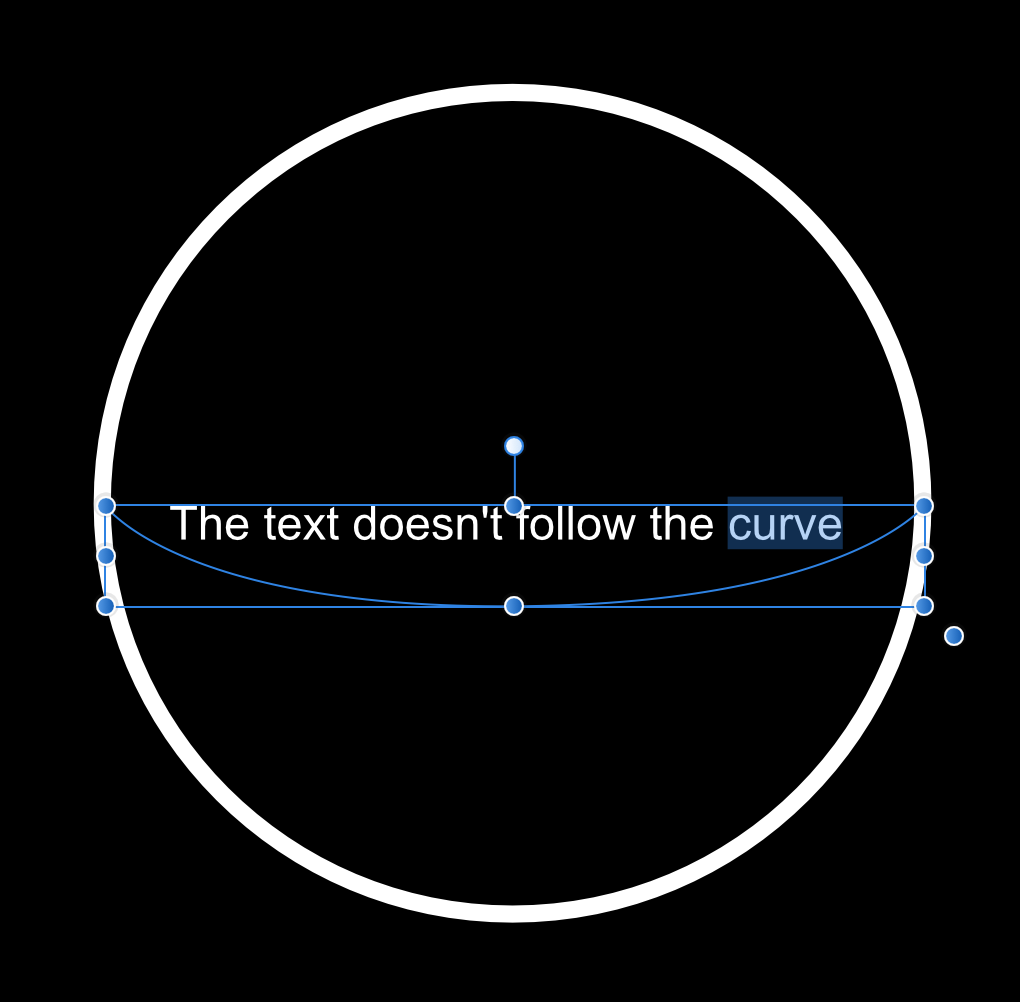
 Hi everyone, I'm new on Affinity Designer and I got a problem concerning the path type. ( I've already checked the instructions in the helped menu but that doesn't work for me ). I hope you'll understand me because I work on the french version so that the traduction of the tools may not be exact. Well here's my problem: First I create the curve that will define the curve of my text, then I use the text box tool and I click on the curve I've juste created in order to insert a text that follows the curve. The text insertion zone is in the rectangular zone that defines the curve but the text doesn't follow the curve !! The photo attached shows where my text insertion zone is and how my text appears when I try the make a path type Thank you so much if someone here can help me, I've tried everything and I'd be very grateful ! :) Antonin
-
Hi, there's a Plugin for PS (Windows only) called Curvemeister which allows to Curve in different colorspaces. E.g. the document is RGB, the Curves dialog shows the usual RGB Composite + R, G, B channels and L, a, b, and C, M, Y, K (which channels are calculated on the fly). In PrePress it's quite usual to switch carelessly from one colorspace to another to exploit each colorspace peculiar features. The multi-colorspace Curving could be implemented, say, only when the document is converted to Lab (so that you're already in a device-independend space, which saves you a conversion). Thank you, Davide Barranca
-
 In the Develop Persona>Tones>Curves, unless I'm missing something, there isn't a way to reset only my Red curve without resetting the blue and green as well. That would be a nice feature. It's easy enough to drag it back to its default position, but a reset button would be nice.
 -
So most (all) gradients are even transitions along a 1d line. AD does 2d, so why not 2d gradients. This is in two parts. One) every gradient would have a "Distort Mode", distort mode brings up a grid of handles, rotated to the direction of the gradient and radial etc. for the respective gradient. These can be moved, distorting the gradient. This would be basically a special implementation of the second part; 2D gradients) each 2d gradient would be a assortment of points, each with controllable spread, hsl, and shape. Spread is the distance, think a gaussian function, squished or squashed. HSL is obvious, color controllable with any of the already implemented options. Shape is the shape (no duh), by default a circle, but a star (long points extending from a circle), square, ellipse, or custom could be chosen. Inspired by Logoist 2's lightmap feature (also a good idea to implement), blurred stuff, low-poly stuff.
-
 Sorry if this is a basic question or has been answered before, but I really couldn't figure it out. How do you fill a space between three or more concurrent curves? Say you have three lines which form a triangle, how can you fill the formed triangle with a colour? See my example: I drew the circle, joined the respective opposite marks and I have obtained those polygons that I filled. My approach was to redraw the formed polygons using the pen tool and then filling them, but there must be some other way. Or if I want to fill the curvilinear triangles that are formed with the circle - how do I do that? Thank you. desen_modular.svg
 -
It is great that we can convert fonts to curves (or outlines for those coming from Illustrator) but when viewing fonts in outline mode both regular editable fonts (not converted to curves) and fonts that have been converted to curves both appear the same. In Illustrator when you view a document in outline mode, fonts that are no longer editable appear as outlines or curves but fonts that are still editable appear as solid black. I'm not saying that Affinity should do it the same way as Illustrator but I do think it would be beneficial to have someway to convey to the user that the fonts are either editable or not (when using the outline view). As it is, the only way to see if a font is editable or not is to click on it. If there is a way to distinguish between editable and non-editable fonts in outline view now, could someone please let me know, thanks!
-
 It would be wonderful if you could select individual curve adjustments points, and adjust them accordingly to the keyboard arrow keys.
 -
 I'm trying to break down the character 道 (dao, as in Dao De Jing) into its component pieces to illustrate how characters are formed. I can convert it to curves, no problem: result is 5 closed paths. But I can't find any way to ungroup those paths. I've tried clicking with the Move and the Node tools plus every combination of Shift / Ctrl / Option / Cmd I can think of, and either all five paths are selected, or none. The Ungroup item in the Layers menu is grey, unavailable. At the moment, it looks as if I'm going to have to delete paths one node at a time—and there are well over 100 of them. Aiyaaah! Am I going to have to rasterize and erase pixels? Anybody who knows an easy way to do what I want—select the 首 only, for example—please help! Thanks! 道.afdesign
 -
Russell Brown here — no, not the one from Adobe but I *am* the author of Paths to Artistic imaging in Photoshop (ISBN 978-0-987574-60-2 ) Nevertheless, I for one would be delighted to see a viable, professional alternative to Photoshop and will be happy to make suggestions, should they be helpful. I have installed Affinity Photo today and have only had time for a brief look, but I already have some observations and will add more here, as I find them. I have noticed some others already making similar suggestions, however I felt that it would be better if I start my own thread to keep all my ideas in the one place. The main issue I have so far in that raw (NEF) files opened in Develop Persona are doing some strange things. It would be good if the default processing on opening could be switched off permanently as an option and where is the white balance adjustment for Tini? As it is, this module is a bit clunky and could do with some refinement. Ajustments to the sliders are difficult and can't be adjusted finely, as one can with the arrow keys in Photoshop. ACR is quick and intuitive but so far, Develop Persona is not. In the main program, can you add an option to have finer grid squares in the Curve dialog box? In PS, one can Option-click in the dialog to get the extra grid lines, making fine adjustments easier. Double clicking in the workspace in PS is a quick was to open a file. Can this be incorporated into AP? Do you have plans for a Bridge style image viewer to make selecting files easier and quicker? In the Channels palette, could you add the composite image, so that after working on individual channels, I can easily return to the composite image? At the moment, it seems that I have to click on each of the other channels, including Alpha, before I can see the composite image again. Do we have an Info palette and can we add sample points to an image for precise colour adjustment? This is essential and I can't see anything in the Help section about it. While we're on the subject, some diagrams and info are missing from Help. More to come....! Thanks.
-
When I click on Tones>Curves in Develop after loading a RAW image, only the top 1/4 to 1/3 of the adjustment area is visible. Closed the program and restarted several times to make sure it was not just a one-off. Opens the same way every time. I can move the white node but anything not showing is frozen.
-
Adobe recently introduced a very interesting App for iPad called Adobe Photoshop Sketch, which is optimized for their digital stylus and ruler. However, the software has a software-only version as well. The functionality is amazing. I would love to do this with using a combination of my tablet and touchpad/trackpad... Concepts is an iPad app with similar tools:
-
It would be nice to see same curve options as in Rhino (3-, 5-, 7 degree) for more accurate work. Very helpful in maps, schemes and plans.
-
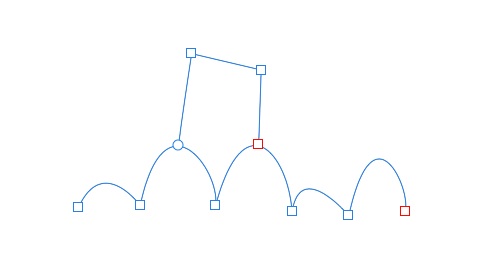
 Can I connect curves or lines as in attached example so that moving or adjusting the lower one, the higher curves connecting points would follow?! I mean that curves would have "shared" nodes or similar.
-
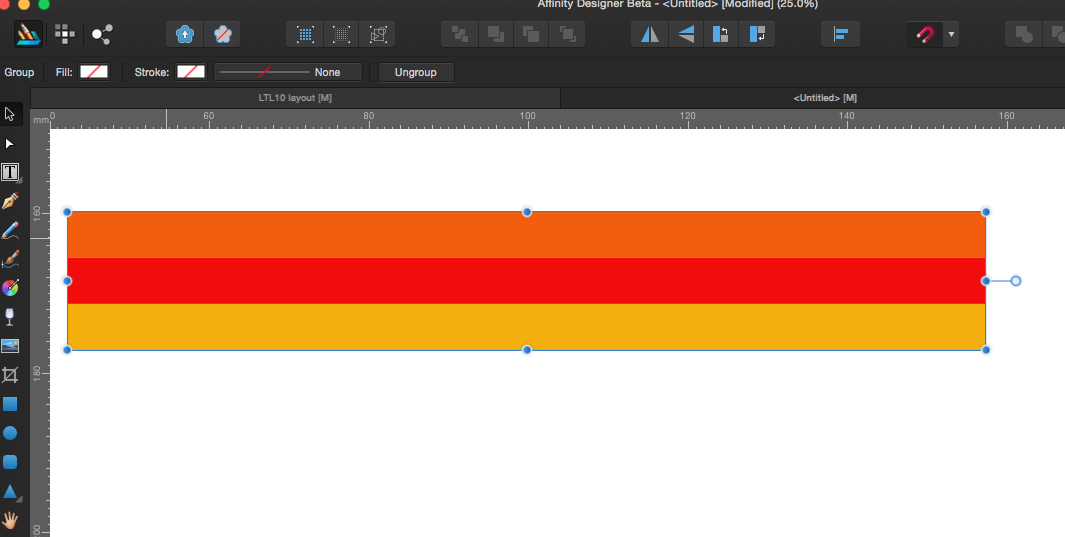
 Hi, I want to use these 3 parallel lines to create curves and shapes - and remain parallel at all times. Is it possible in AD yet? Illustrator lets you do it by creating a custom brush. Freehand let you add multiple strokes to a vector to create the same effect. Can't see to figure this out in AD. S
-
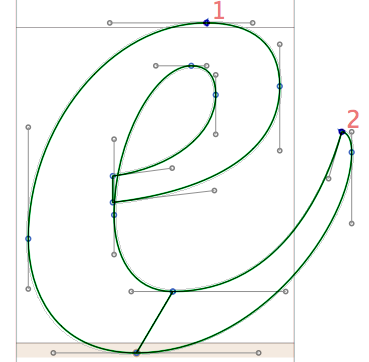
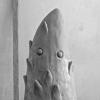
Hello Affinity, first I want to say, that I am waiting for a Adobe competitor for a long time now. I am very glad you started the Affinity project and I am also looking forward to the publishing tool. This morning I bought a license for the app and I already did some testing. I have to say. I am a professional type designer and I work a lot with curves in Fontlab and Glyphs. The outline tools you get in Illustrator are very poor, I think. Due to those problems I would say, that I can achieve a good outline in the font apps in half the time. Still the font apps could be even better. Maybe I cannot expect you to really implement what I would like to have because you might say it is not important for most of the users. But still I want to share with you. Maybe it is even better to speak on the phone about that. I am working with curves in 2 different ways. With open and with closed outlines. In Glyphes and Fontlab I can easily copy and paste parts of a form. It is also very simple to open and close a form. The reason, why I copy and past a section is to maintain that part when I want to scale it. In other cases it is better to have separate closed forms and work on them separately and remove the overlap later. For typefaces one thing is very important. The so called extrem points. I have uploaded a picture to show you what I mean. A very helpful feature would be a way to create those extremes automatically. Fontlab and Glyphs have that feature. But in Glyhes the extremes are just added and the other wrong points stay there and you have to delete them. Deleting points in Illustrator means that the curve changes drastically. Glyphs and Fontlab try to keep the curve as good as possible. I would love an option that creates extremes and deletes the unnecessary points. Extremes are very important for interpolating and not only in type tools. Oh, Kerning is not supported in Affinity Designer, is it? Is there an Open Type panel? I think that should be fine for now. I would love to discuss that stuff with you. Hubert
-
 Hi all! When re-re-re-reading all the stuff I wrote on the other thread, I came to a sudden realization: I won't be able to easily do incremental, exponential duplication of objects and *many* other procedures because AD doesn't (yet?) support an extremely important function: snapping to ghost objects and curves while dragging. This seems to be a common thread with AD; It's not that I don't want to give it fair a chance; it's just that *every* seemingly basic and expectable timesaver from my regular workflows under Ai seem to have gotten “lost in translation”. And it really frustrates me, because I do recognize just how much of a leap in functionality and attention to UX AD really is… except for my workflows. I really, honestly, can't even begin to [re-]make some of my favorite projects in AD. Sure, drawing logos, dabbling in digital illustration, etc., are all nice and dandy, but that is definitely the core of what I do these days. :\ But I digress… I love how AD renders objects while dragging and, in fact, believe that WYSIWYG approach is probably the most intuitive, as opposed to Ai's “outline when dragging”. However, not having a “ghost”, meaning, a representation of the starting point (be it in a drag, resize, or distort operation), breaks transience and doesn't allow for quick before/after comparisons. Also, it doesn't allow “snapping to itself”, or snapping, mid-drag, to the former positions of nodes and curves. This, in and of itself and depending on what exactly you are trying to achieve (geometric/rigorous drawing with modules being a poster example), can be a severe usability hindrance that should be addressed either through a modifier (which would be very unlikely, as you have probably run out of them already) or a *very* visible toggle (much like basic stuff that you may or may not wish to do on a per-document or per-operation basis, like snapping or “scale strokes and effects” – which, incidentally, doesn't have a visible toggle in Ai, AFAIK). So, what do you think? Is it in the cards? Pretty please? ;)