Search the Community
Showing results for tags 'Curves'.
-
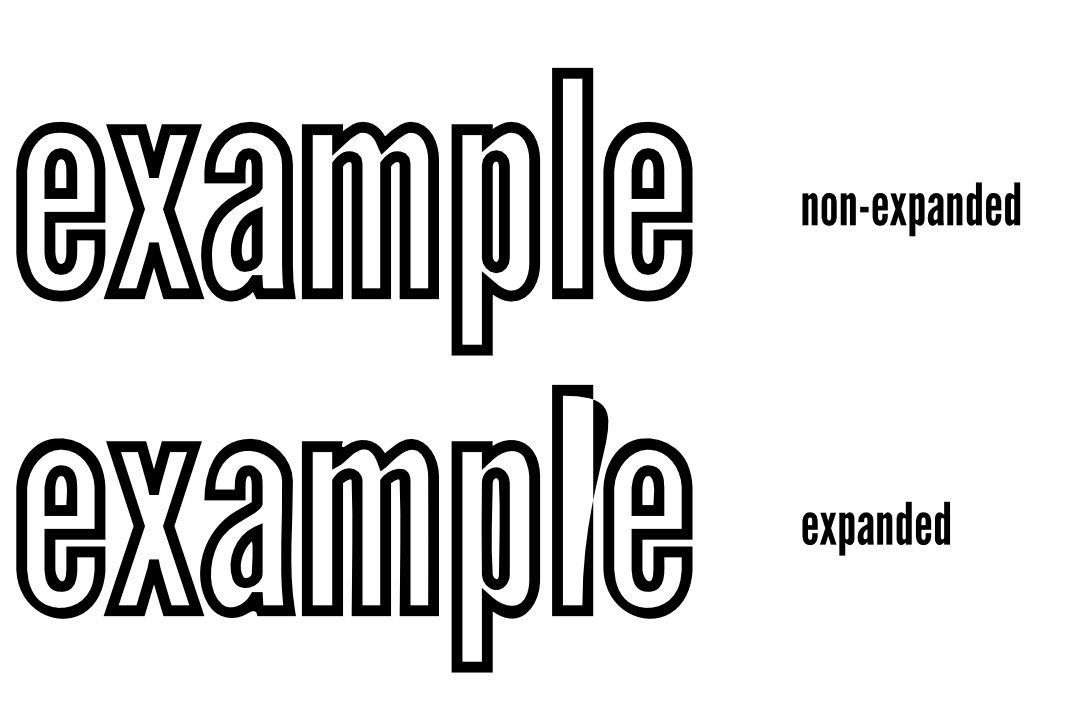
 In the attached image, the top 'example' word is Artistic Text. the bottom 'example' word is text that has been converted to curves and then had the strokes expanded with the menu item under 'Layer.' The L is very off, but other letters are also visibly (although slightly) distorted as well. If there is a setting that bumps up the accuracy of this, then please let me know. Otherwise, the one trick I know to reduce this is to expand the stroke when the shape/text is really, really big (multiply the size by a huge factor) and then size it back down by the same factor afterwards. I do not remember this happening back when I was using Illustrator. Note: This is as of v. 1.7.1 and haven't tried this in 1.7.2 yet. If this has been fixed in 1.7.2, then great.
-
 Don’t know if it’s just me, or if it’s just this file, or if I’ve had the app open too long, or what. All I know is that whenever I try to select the “Curves” adjustment on its own in the Adjustments studio, I get nothing. The only way I actually get the option to adjust anything is by swimming through the long version of the menu. Take a look... F03DE051-AAFC-44D4-8807-021EFC2BF928.MOV
 -
Hi folks, I’m new to AF for iPad having used AF desktop for a while now. I'm having some issues with certain adjustments. I wanted to make a curves adjustment on an image today but when I went to the adjustments menu and selected curves it didn’t give me any further options. There is no context menu or anything ?! Cheers Mark
-
Moving Curve onto the image layer is a 100% repeatable crash. I've tried different files and different documents with the same result. PubCrash.mp4
-

Open or close curve tool
andmocychmen posted a topic in Pre-V2 Archive of Affinity on iPad Questions
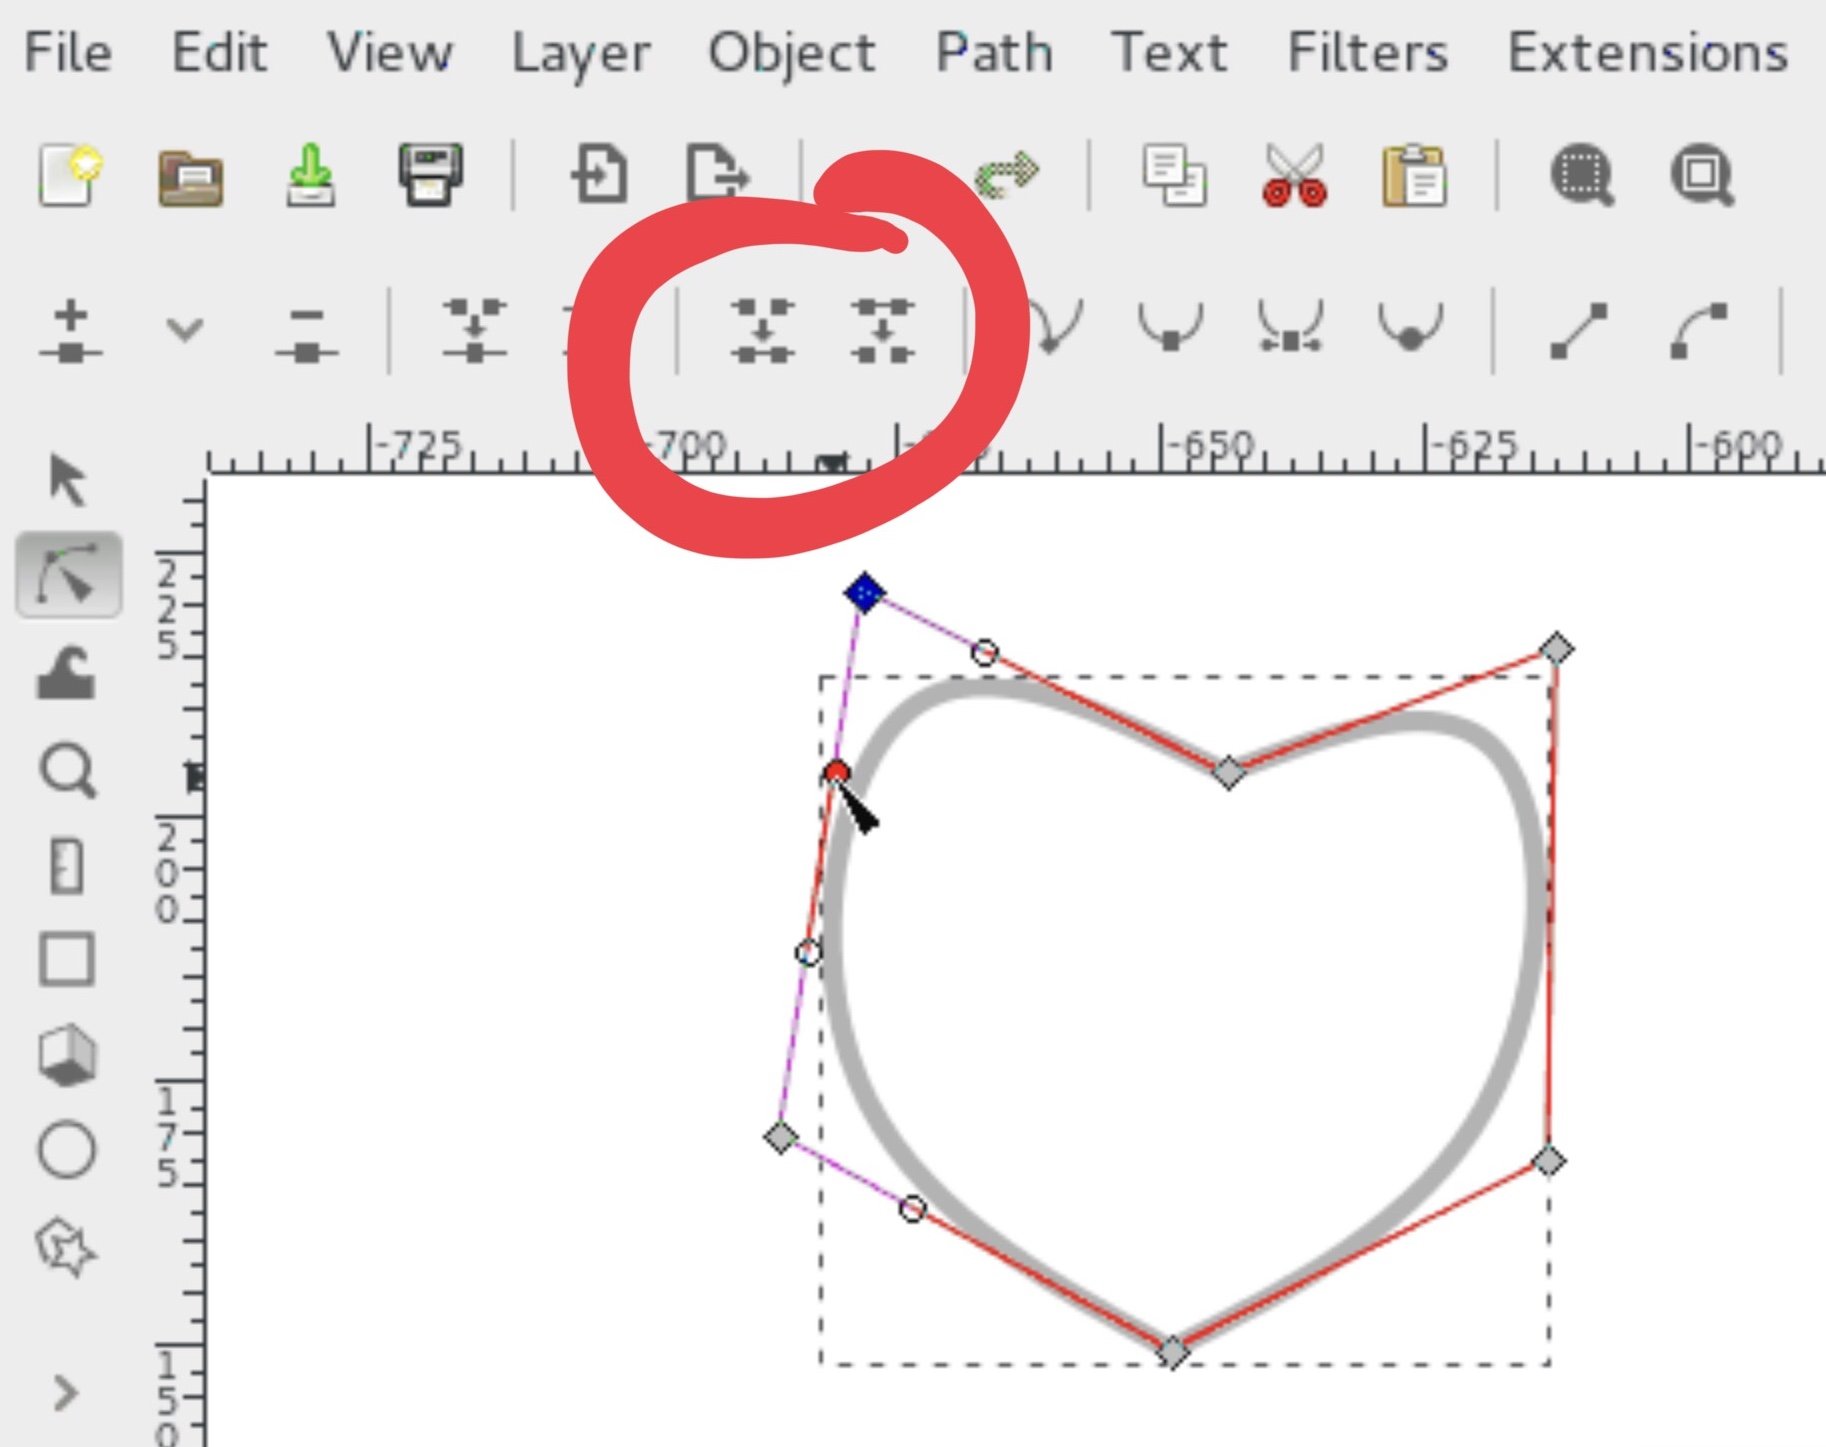
I’m new to Affinity Designer and used to working with Inkscape. Concerning notes and curves, there is a tool in Inkscape to open or close a curve which I cannot find on Affinity Designer. Where can I find it? Or are there different ways of achieving the same result? Specifically I’m trying to merge the three nodes highlighted in blue here and get rid of the loop that I crossed out in red:
-
Hello I am used to being able to check the black point and the white point per color in the diagram when I change the tonal value per color channel in RGB mode. Is this also possible in the iPad? On the desktop this is perfectly possible with the tonal value correction! Thanks for a tip
-
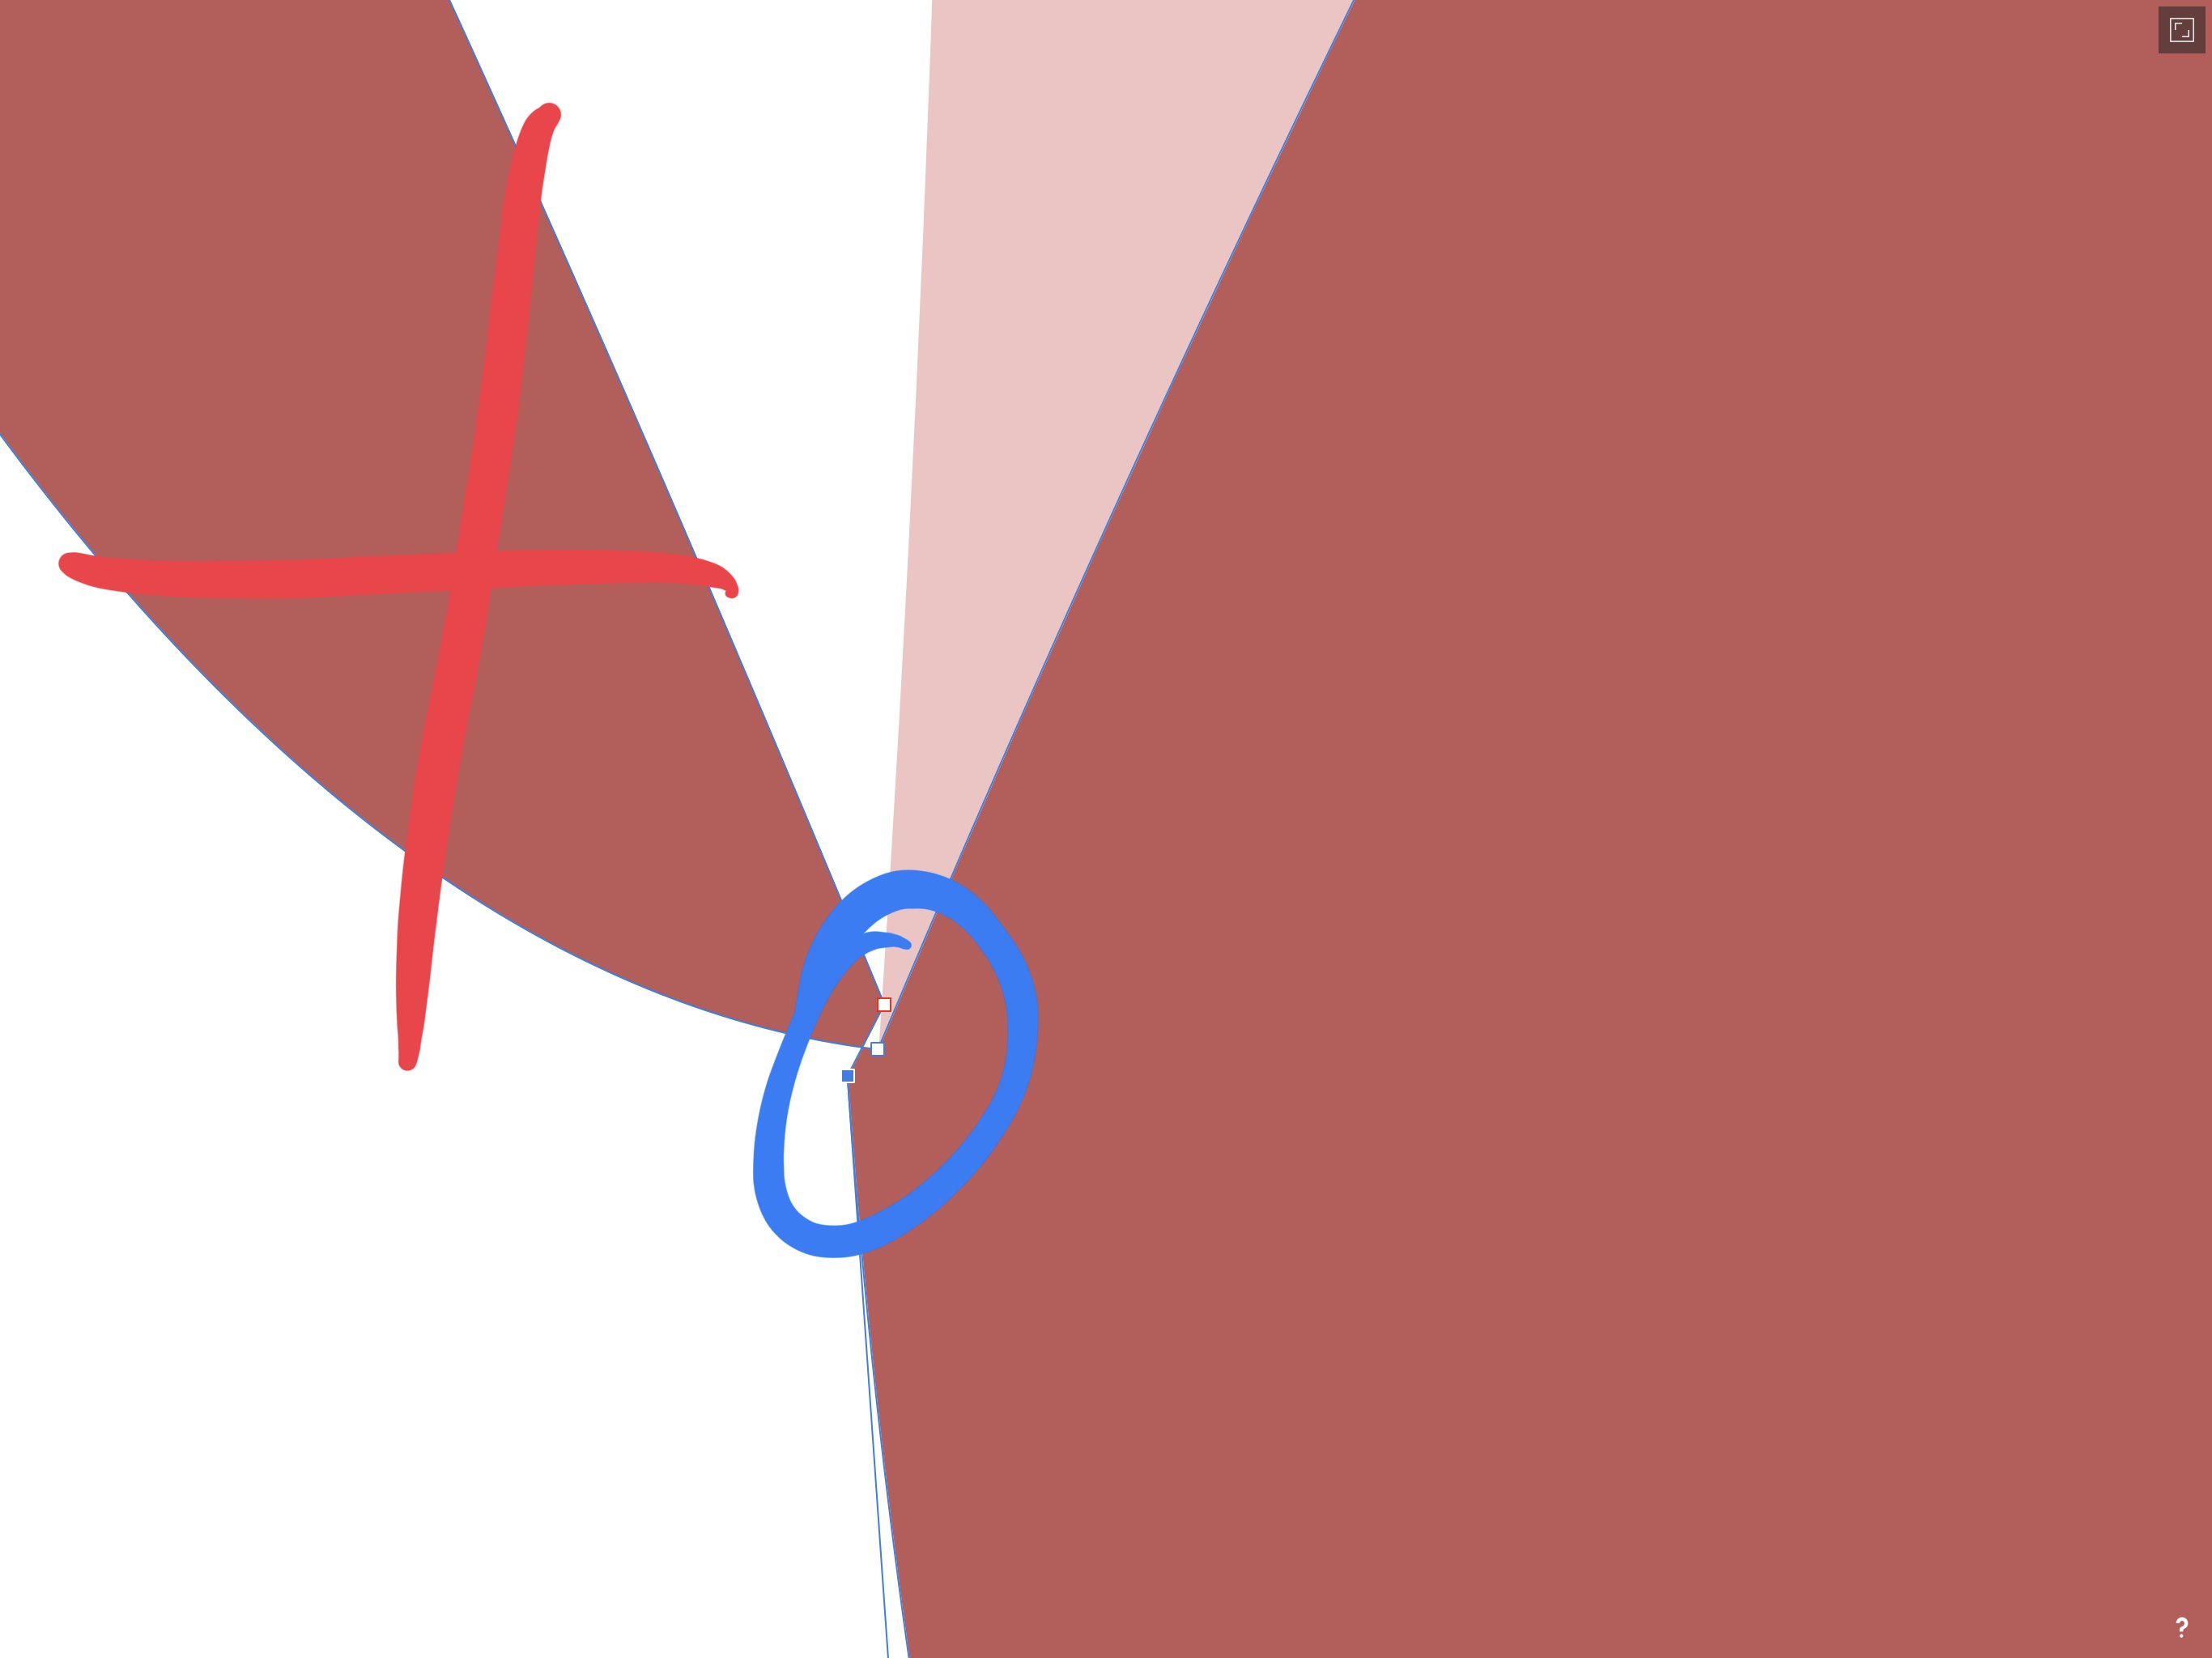
 So, this is something I can't get used to and what I believe is some kind of bug - because it makes simple task apparently imposible to do (at least in straightforward way). Let's say we want to draw shape like this: Now, what is trivial in Corel... corel.mp4 is impossible in Designer: designer.mp4 I've worked with Corel for past 12 years and IMO it's curve calculations and node shaping feels more natural and logical than those in Designer. Convice me otherwise. And if this is intentional, then can you explain what advantages this have over Corel's implementation? Why it's this way? For now - wtf Affinity? wtf.mp4
-
 As a longtime Photoshop user coming into Affinity Photo for pro work I wanted to suggest improvement for Photo's curve adjustment tool. Curves works great but I think the picker tool needs to be able to instantly pick on the curves graph as I click on areas in the picture. Right now I can add points but I have to wiggle left or right in order for the point to be added, and then I might accidentally pull the curve up or down slightly when all I wanted to do was to select a point. Use case for this is that I might want to select all the color areas in a face and protect those ranges. Or select a few area in a landscape and pull all those areas up and down. I mention this because I can easily and quickly do this in Photoshop but this is one of those things where I really struggle with in Photo. However I have an idea for making curves better in Photo than Photoshop. What if I could lasso or shift-select a given range of points I have made in curves? How amazing would that be. Then I can pull a select group of points up or down and this becomes quite powerful. Think of this like the ability to move a selected group of vector points in Designer. You can't do this in Photoshop. Perhaps you can just pull up the points or stretch the selection - I'm referring to all that you can do in Designer with selected vector points.
-
- 1
-

-
- affinity photo
- feature request
- (and 3 more)
-
I posted the following thread 3 years ago but not a single person until today advised me to post that topic in this thread, claiming that no one from Serif diligently reads this forum such that my post was sure to have been overlooked these 3 years. Seems odd to me, but fine. Here it is: I would advise Serif to just move that thread into this thread. I would prefer that since I don't want to lose all the supportive posts in that thread. For truly, it is more than just me who wants that dropper tool added to Affinity Photo. Thanks.
- 35 replies
-
- 5
-

-
-
- photoshop
- white point
- (and 4 more)
-
 Hello, very new to the program. I am trying to apply a curves adjustment layer. When I choose curves from the adjustment studio under the photo persona nothing happens. I don’t get a context menu with the curves graph or the option to create a preset. In the picture attached, I have “clicked” the curves option top right but I don’t get the expected menu at the bottom center. Any help appreciated Thanks in advance
-
 Hi there! when exporting text with a gradual transparency to *.eps or *.pdf, the export fails and only exports blocks, no text. I tried converting the text to curves, having single text lines (not a big block), ..., but none works. Can someone tell me what's wrong? (using Designer 1.7.1) Thanks a lot! fabius_ original before export: after export to *.eps: it's rasterized and when going to "outline", only blocks are shown: and the image is rasterized (though it shouldn't be):
-
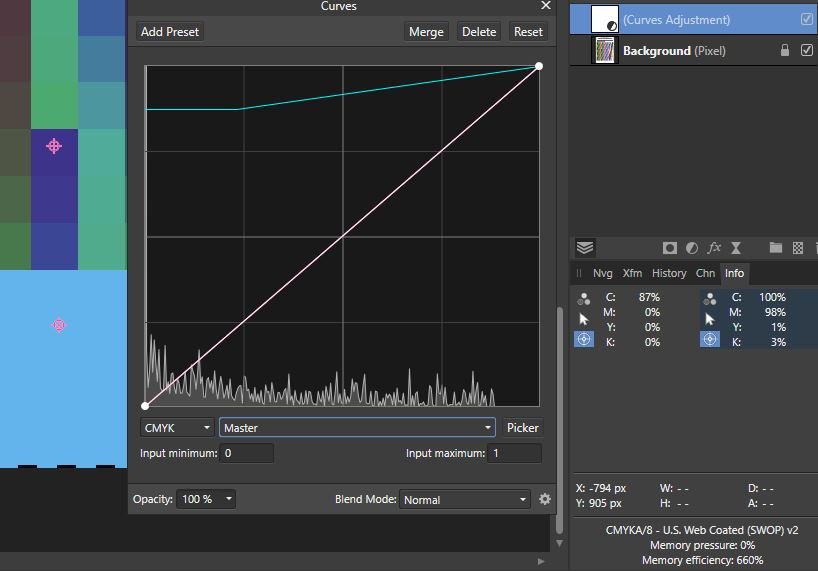
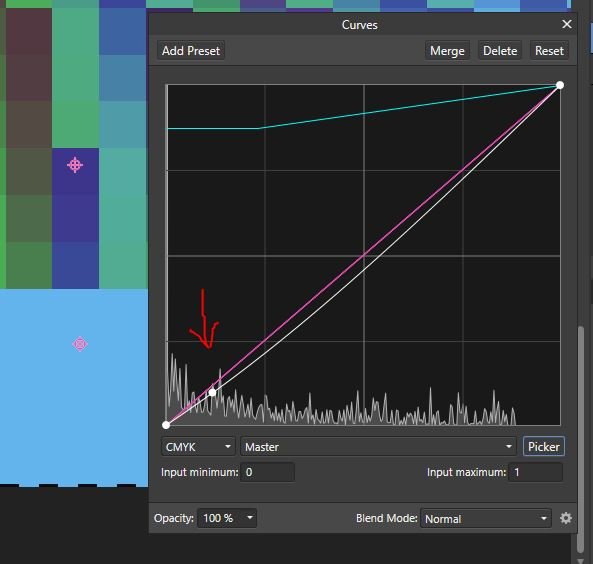
Bug: The pickers do not pick the correct point in the Curves dialogue The graphs in the Affinity Curves dialogues input at the bottom and output at the left Input (bottom) has zero left and 100 right Output (left) has zero bottom and 100 top This can be seen in the following: On a CMYK version of a colour chart I have set two Samplers on the Info panel - the left sampler in the white paper, showing 0,0,0,0; and the right sampler in the pure cyan square showing 100,98,1,3 The curve in diagram 1 shows: a huge spike on the left at zero, from the white of the paper zero transformed to 87 (from the flat of the line on the left 100 being unchanged by the point top right of the graph These are confirmed by the new sampler values, the blue tinge to the white paper, and the unchanged solid cyan square If I now use the picker and place it in the cyan square, the node created on the graph is bottom left, somewhere around (12,12) in coordinates (second screenshot). First it should clearly be at one end of the line (as the blue square is 100% cyan) and it should be at the right-hand end of the line. Similarly if I reset and use the picker to choose from the white area (with zero cyan) it gives me a node top-right, rather than bottom left. This error can go unnoticed when selecting a single node because the curve will be symmetrical, so, if, say, the point chosen was 80, then the node would be 20, and the resulting curve when dragged down would be down equally at 80 and 20. However when trying to create an S curve, it falls apart (and wastes a lot of time!) Software version: Affinity Photo 1.7.0.367, Win 10 Home version 1803 OS build 17134.829, 64bit, Intel Core i7-7700HQ installed RAM 16Gb
-
 Here's another thing that's keeping me stuck using PS for the near future, as I haven't found a suitable replacement in another application... I require precise adjustments of curves for when I create calibrated contrast correction for alt process photo printing. I regularly print using gum pigment (aka, gum bichromate), kallitype, gumoil and cyanotype techniques. The overwhelming majority of my fine art prints are done this way. To get the best results, it is necessary create compensation curves to correct for the deficiencies of the print process. They are all different, and ideally one would create individual curves for each kind of paper used, as well as for the different processes. I feel confident saying this is the common practice amongst alt process photo printers these days, so I'm certainly not the only one who would benefit. A full description of the process I use can be found here: https://www.freestylephoto.biz/alternative-process/making-digital-negatives Please take special note of Figures H and I in the article because these illustrate exactly what I'm needing to do with curves. What I need is the ability to precisely input the required I/O numbers into the curves dialog. Not only do I not see any way to do this in AP's curves, I don't even see any sort of scale that would clue me in to where I am on the curve. I am able to read gray values the way I need with the eyedropper, but without being able accurately translate those numbers to a curve, I'm stuck with only half the tools I need to do this.
- 7 replies
-
- 4
-
-
- curves
- digital negatives
- (and 1 more)
-
 I'm new to Affinity. Apologize if this has already been covered but I couldn't find with a search. My .tiff files do not retrain the curves saved on the file when opening in Affinity. When opening the file in Photoshop, works like a champ--i.e. there's the appropriate curve. When opening in Affinity, there's the curve layer but no curve--seems like all the other layer elements like masks, vibrance, yadayaday are perfect. When opening with Affinity the exact same image saved as a .psd, opens perfectly--i.e. there's the appropriate curve. Any thoughts? Tom
 -
 We are going to through the process of figuring out how to transition from PS to AP. We are a catalog company that have a few thousand images that ave clipping paths saved inside the PSD or tiff files that we use in Indesign as silhouettes images. Basically the path is used as a mask that Indesign recognizes. These curves remain live so they are editable for edge refinement and repositioning. Am I clear in the understanding there is no way for curves to make the leap from PS to AP? The forum thread I found that talked about this issue was from 2016. I didn't know if the status of this has changed. I did try the shape layer approach, but this still does not leave me with curves. They PS shape layer comes in as a color fill. Maybe my approach was wrong. The color fill would work if I was able to turn my selection into curves, but I know that is not currently possible. As a side note: Affinity photo is able to turn curves into selections, but can not turn a selection into a curve. I always thought that was strange. I know auto trace...its on the roadmap.... Recreating all of those paths in all those files is not a real viable or cost effective solution for us. I am open to any workflow suggestions anyone can offer.
 -
 Hello people; me again I'm exporting this file to PDF via Affinity Designer and some of the objects (which are grouped together) end up being converted as image, not as objects with curves. When I leave them separate before exporting the PDF, however, they are read correctly as curves. In the other software I use, when I export the PDF, even to the grouped object, the file is generated with it in objects in curves. Are there any Affinity settings I did not get or will I have to separate everything before exporting to PDF? Attached the original file and the two versions of PDF CANCELAS BEROLA_ FINAIS-afnfile-test1-with-grouped-objects.pdf CANCELAS BEROLA_ FINAIS-afnfile-test1-with-separeted-objects.pdf CANCELAS_BEROLA__FINAIS-afnfile.afdesign
 -
 Hi, I am new to Affinity Photo but have used Photoshop for a few years. Is there some way of stroking or rendering a curve? regards Beckett
 -
 I need to connect a node to make curve to make a shape that I can fill-in. Going crazy trying to figure it out. See video... help! 3240A334-EFD3-4B56-B30C-74DCA483A5F6.MOV
 -
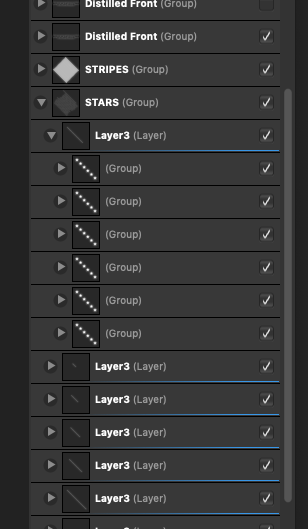
 Hi, I'm completely new to vectors/ Affinity Designer and enjoying using it but really struggling with one thing, subtracting text from multiple shapes. I want the black text in the first image to be clear, so need to subtract it from the white stripes, grey stripes, and white stars beneath. They are all in different layers/groups, and as you can see from the second picture multiple groups within layers. When I select the layers and text the subtract tool is greyed out. I've read a few other posts about similar subjects and it seems I have to convert to curves? But can't get my head around it or work out how to apply it all to my file. Been driving me mad all week so any help would be much appreciated, thanks!
-
 Hey guys, please check this out and let me know what I'm doing wrong or simply not doing; https://screencast-o-matic.com/watch/cqfYbjZuYp I can never get this trick to work in AD, but I'm sure others can, so I'm asking for help.
 -
Is that one new? I never noticed it before. THATS a thing i've been waiting for since my first use of AP. Thanks for implementing this!
-
 Sometimes it’s hard for me to make a curve from detailed pictures and i think that the curves tool can turn png to curves, but that’s only allowed for shape layer. Is there any possible to add this tool ? A tool for auto create curves from PNG layer, i mean it’s gonna very helpfull for decreasing our working time. Thank you.
-
 Hi, I'm new to affinity designer although I have been using affinity photo for a while. I'm needing to convert some type to outlines. Bit confused- is converting to 'curves' the same as converting to outlines and how do I do it? Thanks!
 -
 Just keeping up with Photoshop. Hold down Alt key when dragging nodes to see clipping on image (as already exists in Levels). Show vertical and horizontal lines from selected node (or maybe just while moving) help align with axes. Show percentage X and Y values for selected node (and allow input this way). And... Have an 'auto levels' button to stretch (and unstretch) the histogram to remove dead space at ends. Allow presets to be loaded here. [Edit additions] When using picker and when moving mouse around image, show point on curve with moving node to reflect lightness of underlying pixels at mouse. Thanking ye kindly sirrah/modom!
 -
I've suggested this before and some staff members have said they plan to add this feature, but looking at 1.7's features I thought this would be a good time to bring it up again. Smooth curves are great most of the time, but when you want something to look hand-drawn, you usually need it to be a bit rough. I think many illustrators would benefit from a roughening tool; it would allow illustrators to make non-uniform curves more easily than having to draw each node individually. As it is, it's really hard to produce a line that doesn't look uniform, and a roughening tool to add pseudorandom midpoint displacement would make illustrating much less time-consuming. Last I heard, the plan was to have a brush-type tool that would allow the roughening effect to be "rubbed over" a curve. I think that's is a great idea, but even something as simple as Inkscape's Fractalize feature would be sufficient for many illustrators' purposes.