Search the Community
Showing results for tags 'Curves'.
-
 Transparent glass in minutes. Digitally Fearless Affinity Photo beginner video tutorial on how easy it is to use blend options (blend-if) to make transparent glass. This tutorial also uses curves and liquify. https://youtu.be/PI4pz5RqrWQ
-
- 2
-

-
- affinity photo
- beginner tutorial
- (and 8 more)
-
Hi all I am fairly new to affinity designer and this kind of software on general. I drew a shape using the pencil tool and without realizing what expand stroke does I selected it. Is there a way to undo this? I tried selecting all and converting to curves and I tried using the divide option but so far nothing. Thanks!
-
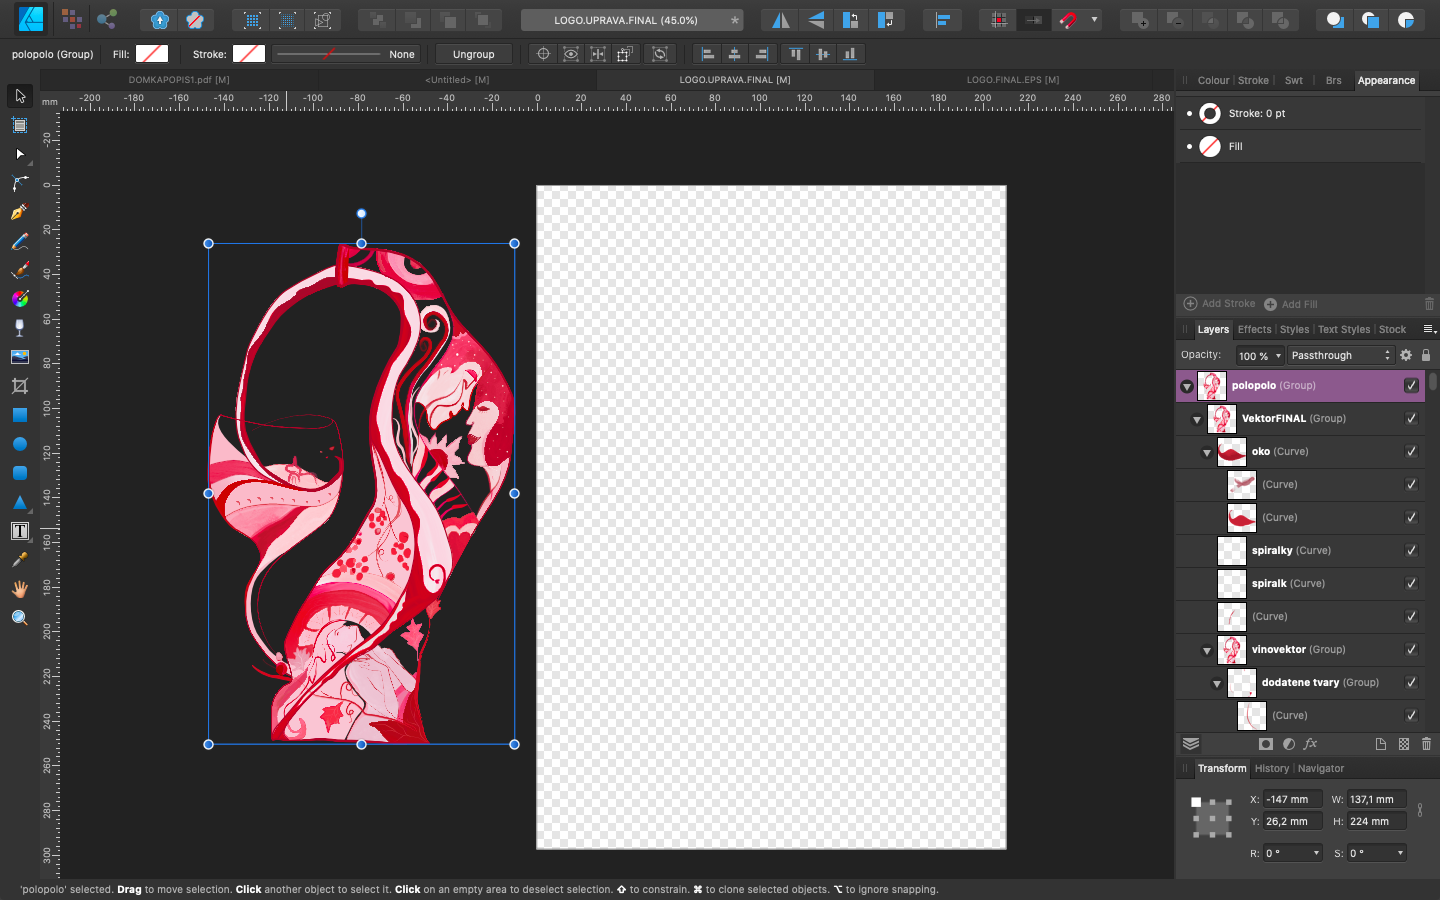
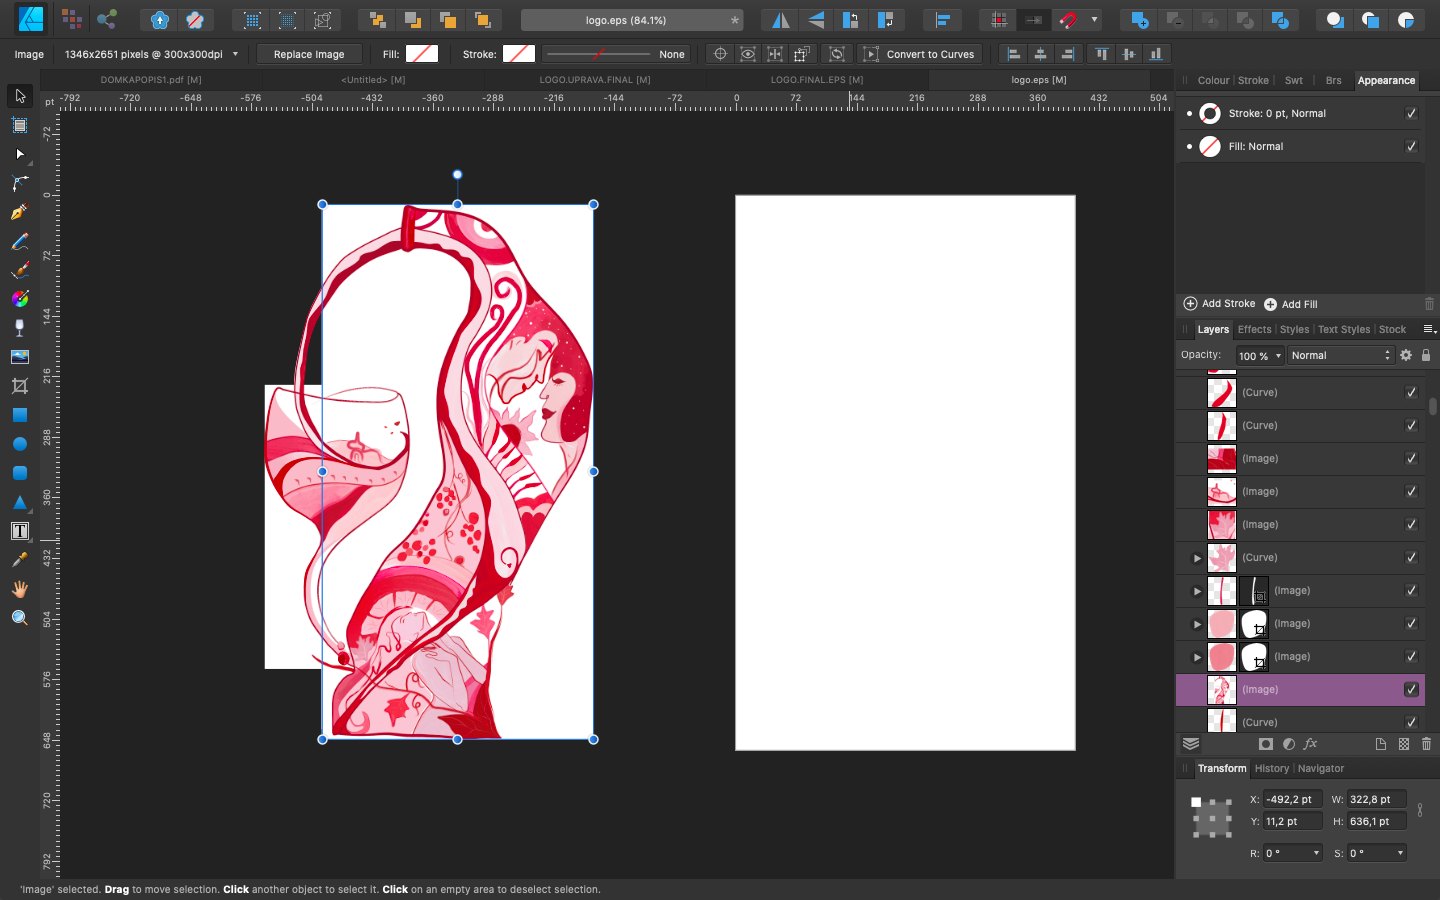
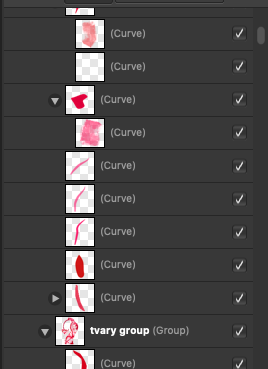
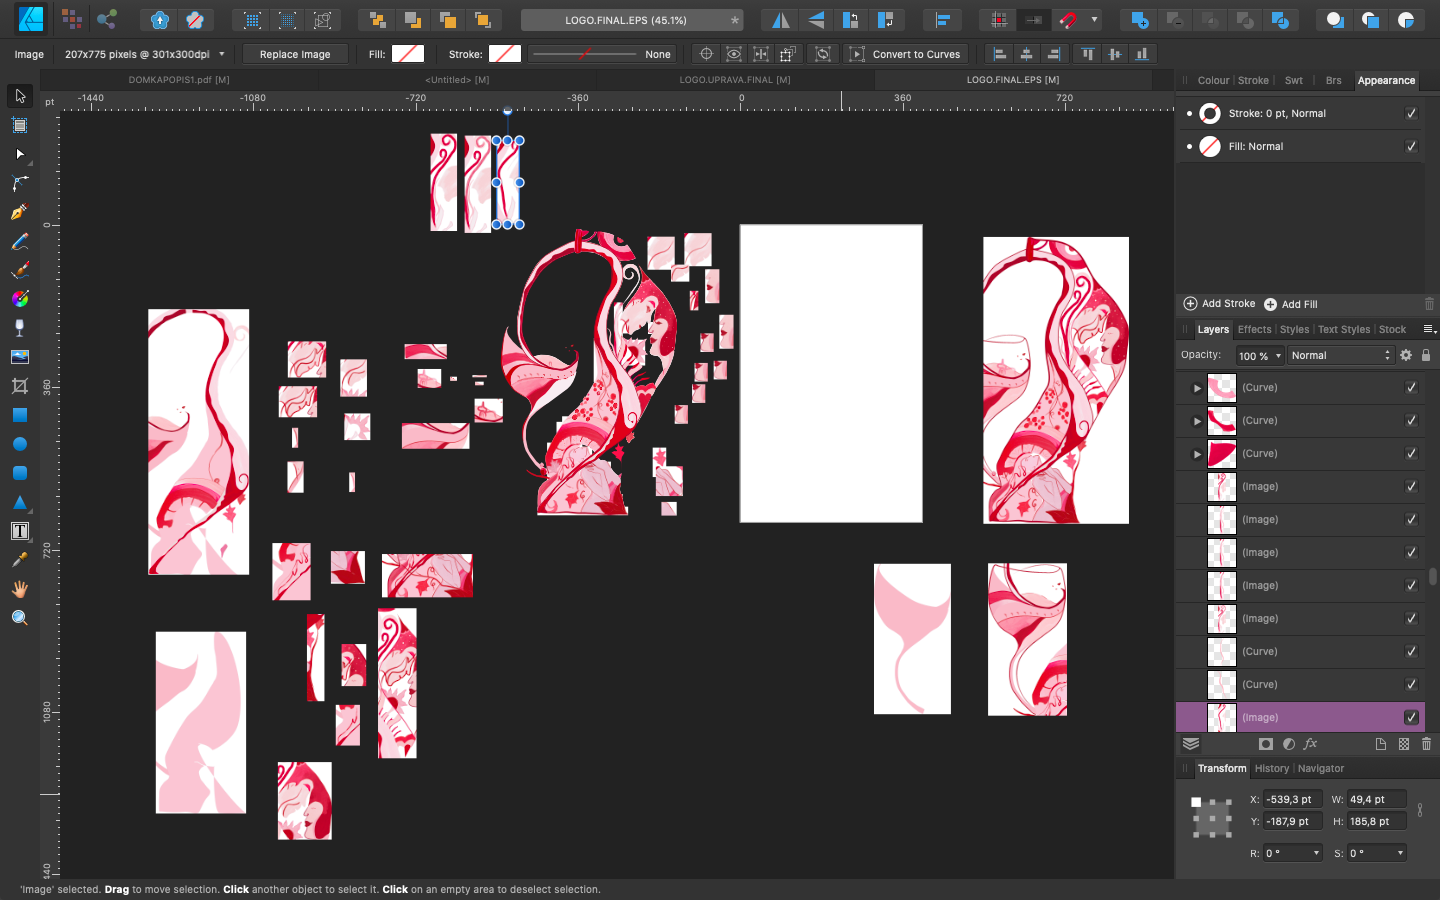
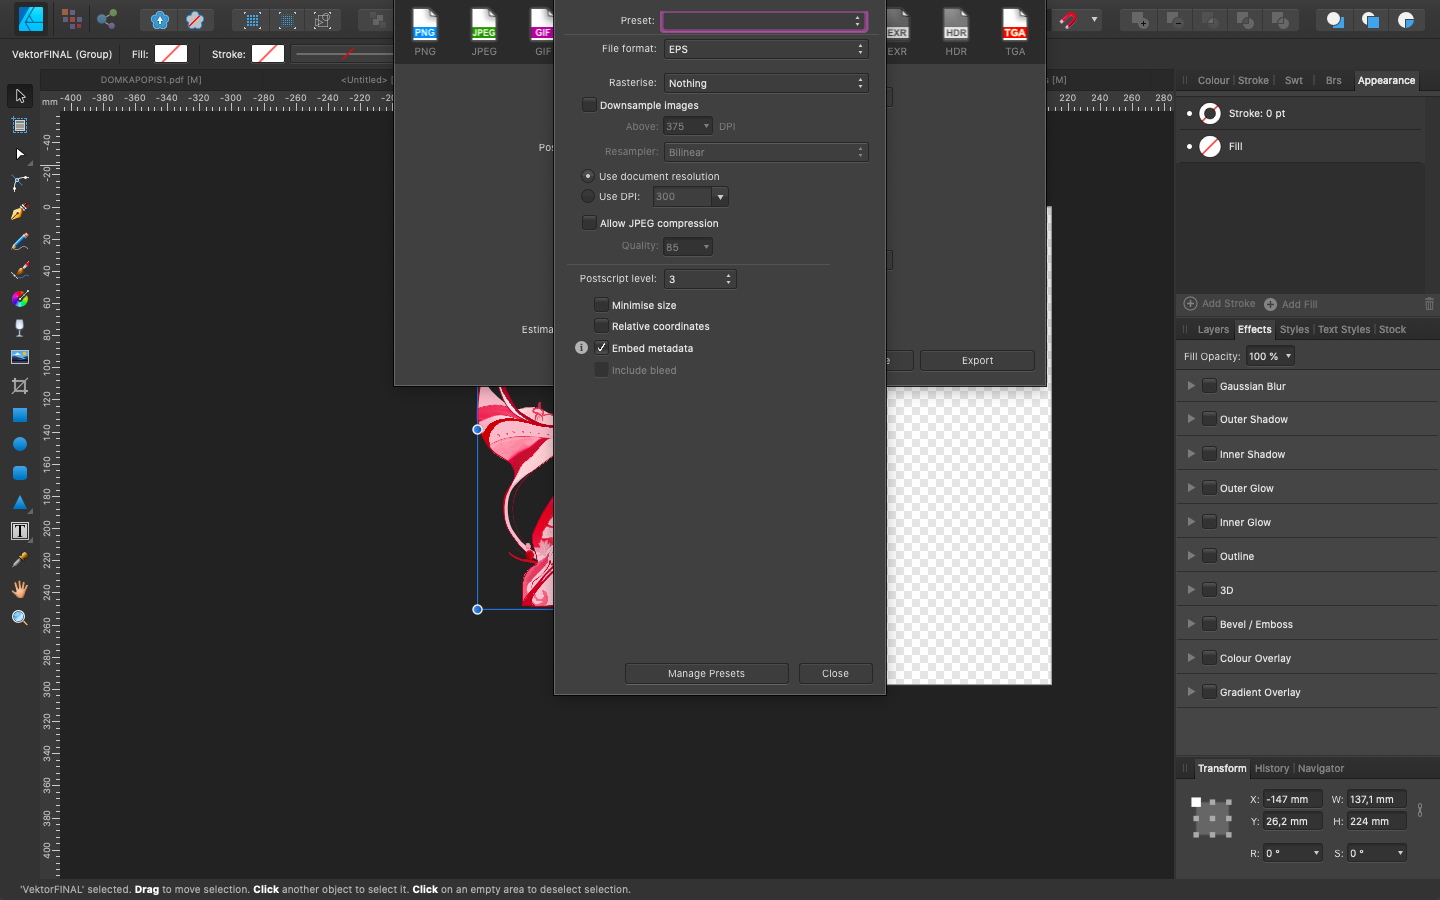
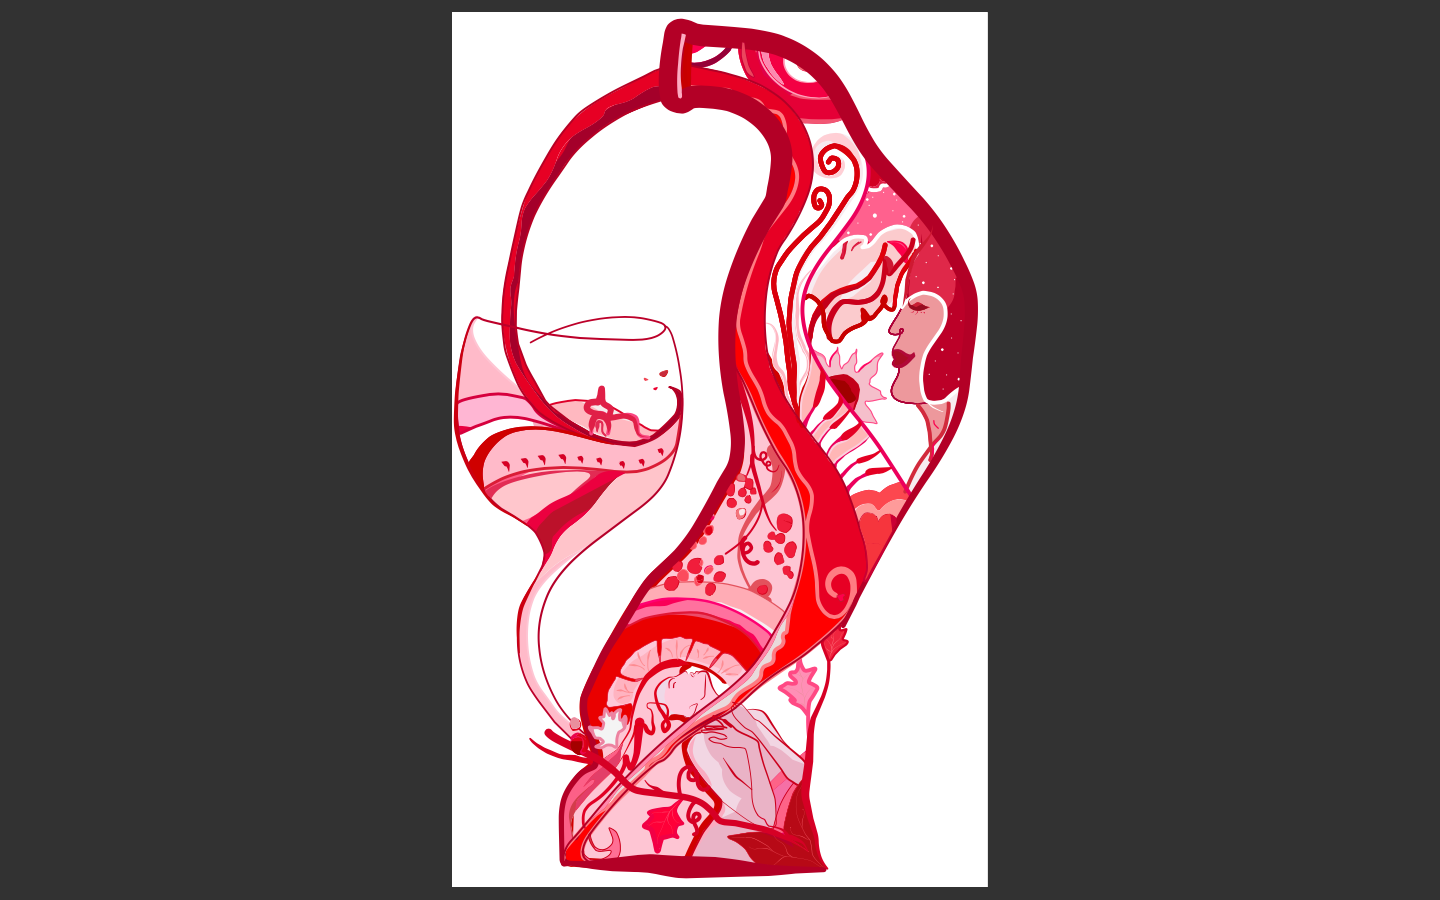
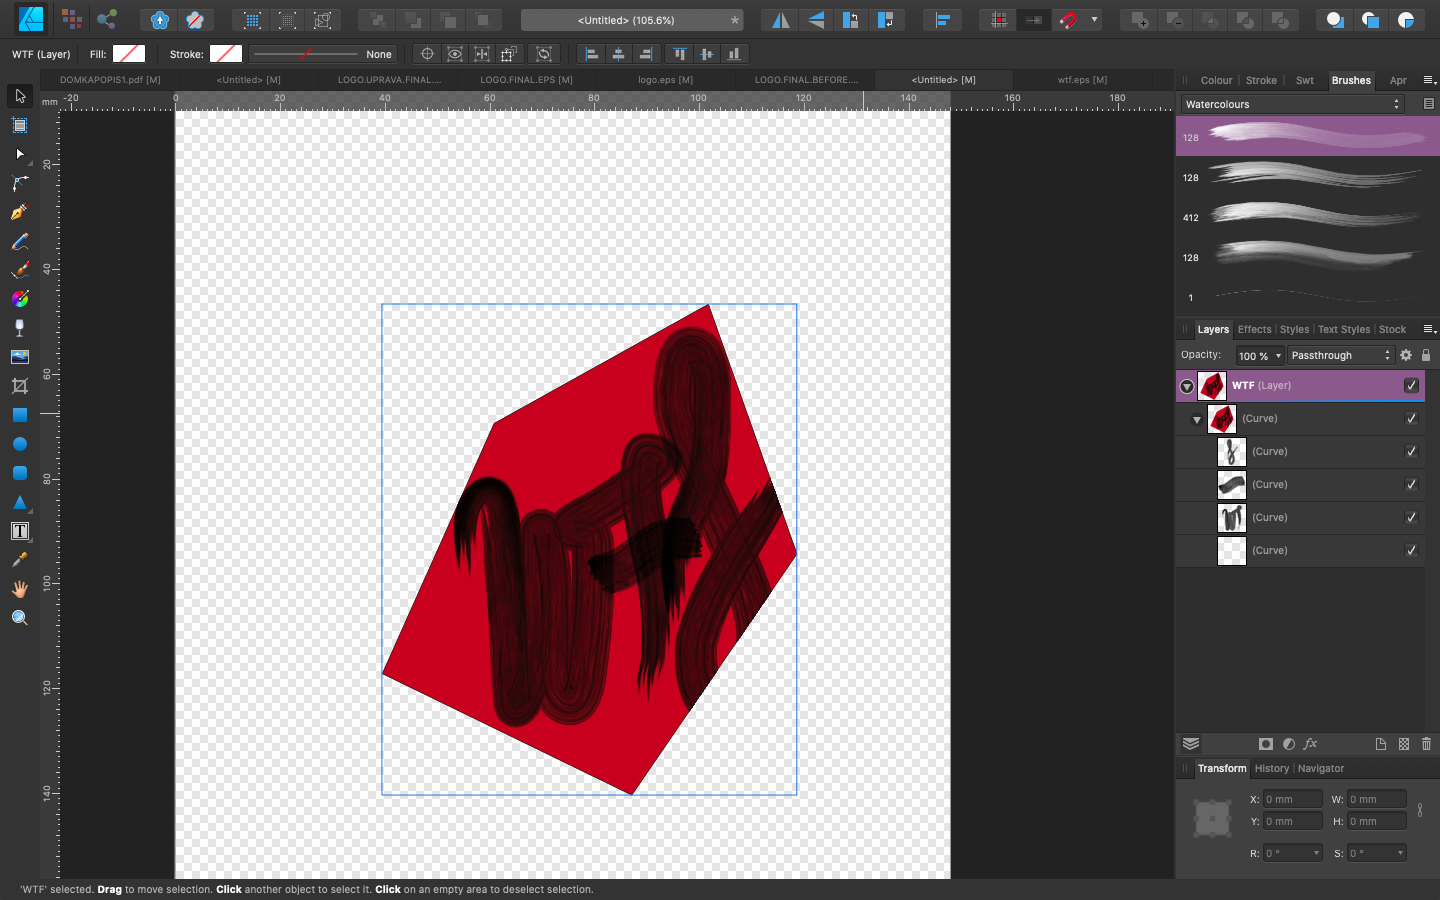
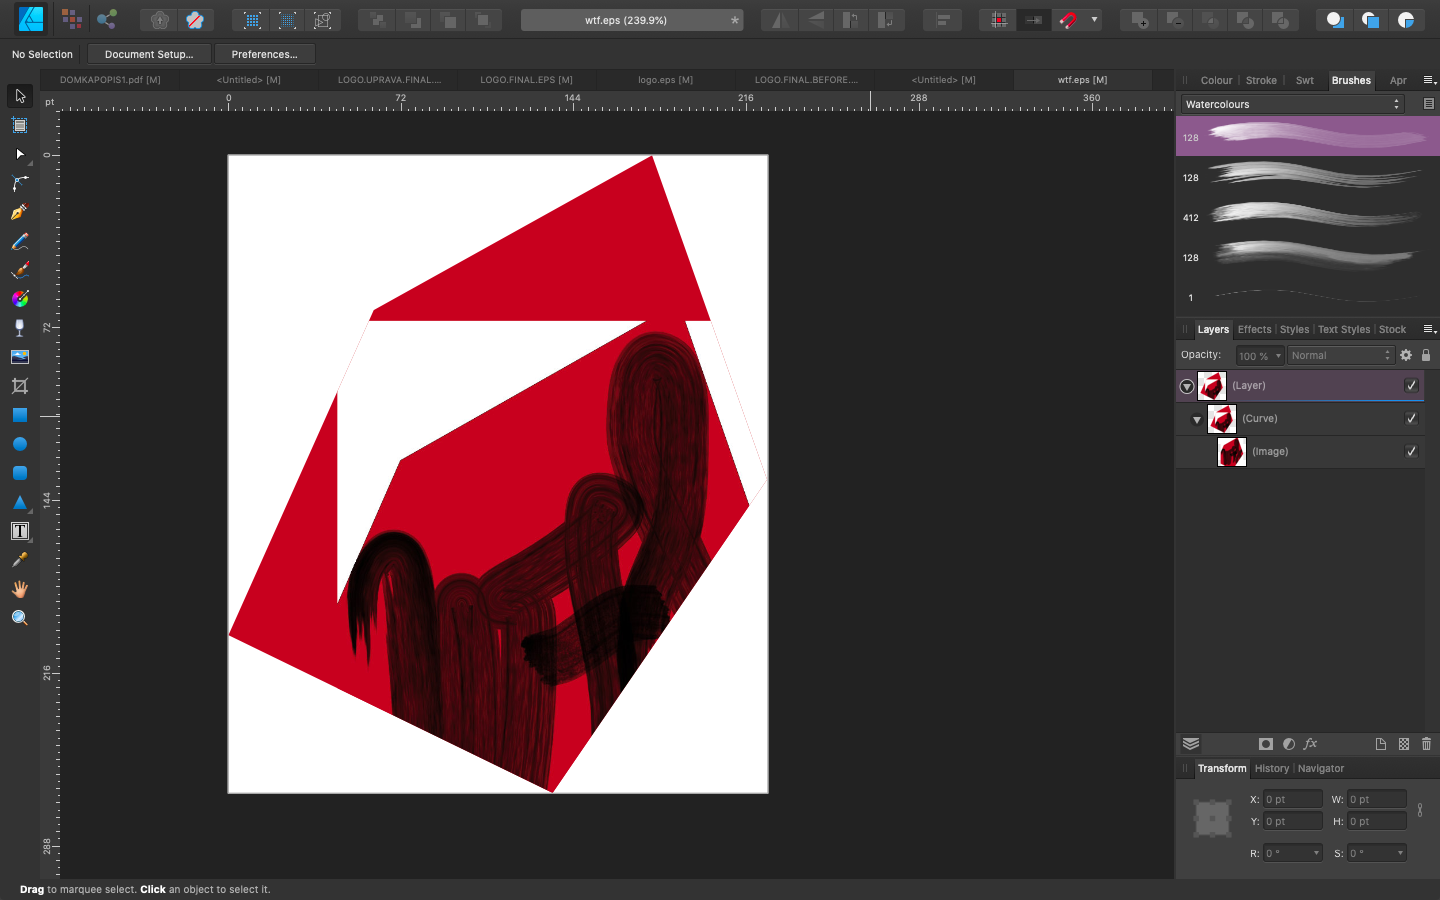
 Hi, so I have quite a strange issue. I was making a logo for my friends winery. I painted it and then digitalized it so she would get vector to use right. I was just in Designer persona for vectors using brushes from this library. The issue is that when I am in the affinity designer the logo itself looks ready, with transparent background etc. but when I export it to eps, white backgrounds behind the shapes appear. I was doing a little research, ticked all the boxes which was supposed to be ticked nothing helped. Then I tried to put the bad eps file back to Affinity and see what is the problem. What I found out is that some of the curves changed to images. When I tried to delete the "white squares" it will automatically delete part of the logo and it is just such a mess. I was wondering if that is because I though I used vector brushes but it somehow transferred to pixel brushes? The thing is it took me a lots of time to find out how to digitalize the painting itself and it was painted with watercolors which was hard to imitate. I was so happy when I finally found out that I can make it in affinity with the vector brushes but now I cant export it. My friend will use the logo in a big size to be printed on a wood. To understand how it was made maybe it will be clear why this is happening for somebody else. I used curves to make the outlines of all the shapes than filled them with color and then I used a mask layer for the filled ones, where I was using vector brushes to imitate the "texture" so It would not be so flat just with a plain color and look like it was painted. I tried to change the option as well for the eps but it resulted in loosing the strokes sizes. i tried to put it in Illustrator as well but the same thing appearing. If somebody knows what to do with it that would be awesome. UPDATE: I tried to just basic shape and the same mask with brush as I used in the logo and it has the same problem. When I export it and put it back it has the white background and it is rasterized. Second option to export it without rasterizing at all results in that the used watercolor vector brush is just black.. So that means it has problem export the vector brushes like vector and it rasterizes them - which i do not get, when it is a VECTOR brush. Or maybe I am idiot and understand the base of vector brushes badly? Here some pictures so you can see what I meant. This is finished logo for export All the layers are curves in this EPS version put back in Aff - curves became images This is to show you how was it made - basic shape filled with basic color and then mask with just brush stroke to make the texture This is the last option I tried but it resulted in the image below - all the stroke sizes, option, brushes deleted. LOGO.FINAL.BEFORE.EX.afdesign
-
 Hello, I've created an object using multiple curves and added them in one using the Geometry tool. Now, I would like to transform the shape (for example bend it in the middle), what would be the best way to achieve this? Thanks,
-
 Hi! I wan't to suggest a feature for the Curves adjustment tool. Long story short I've started to shoot color film photography and use affinity to convert the negative film into positive ones for then further process, but in the guide i'm following for converting negatives, the guy uses Photoshop. you drag the diffrent RGB channels before they start clipping, but in affinity its hard to know/see when it starts clipping.. you can eyeball it but you wont get the best results. I plan on doing this process with my film for finer control over the negative converstion alot.. So this little detail to the curves tool would help a ton!! so my suggestion is to add a clip warning in the curves tool ( in RGB mode, clipping for the Master, red, green, and blue channels), much like the clip warning holding down alt in the levels tool Cheers // Peter 😄 (here is the guide im following if anyone is curious, great one! https://www.alexburkephoto.com/blog/2019/10/16/manual-inversion-of-color-negative-film )
 -
 Проблема с кривыми. Как избавиться? oCam_20200827_003529_track1.mp4
-
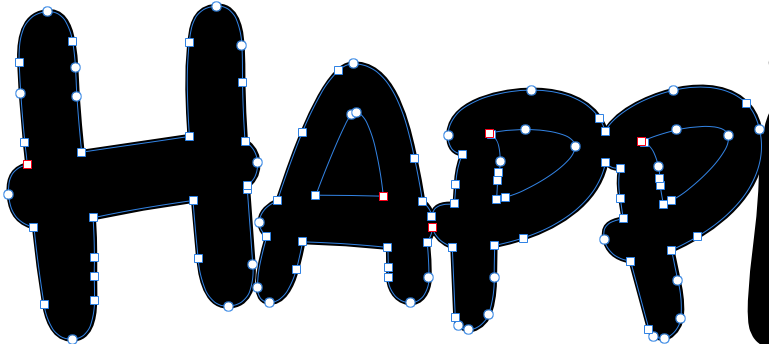
 How do I combine these text letters into one shape/object and keep the stroke size intact? I converted the text to curves, I then "add" the shapes. And what happens is that I loose the stroke size, and the inner white areas are filled in. Thank you to anyone for helping solve this issue.
-
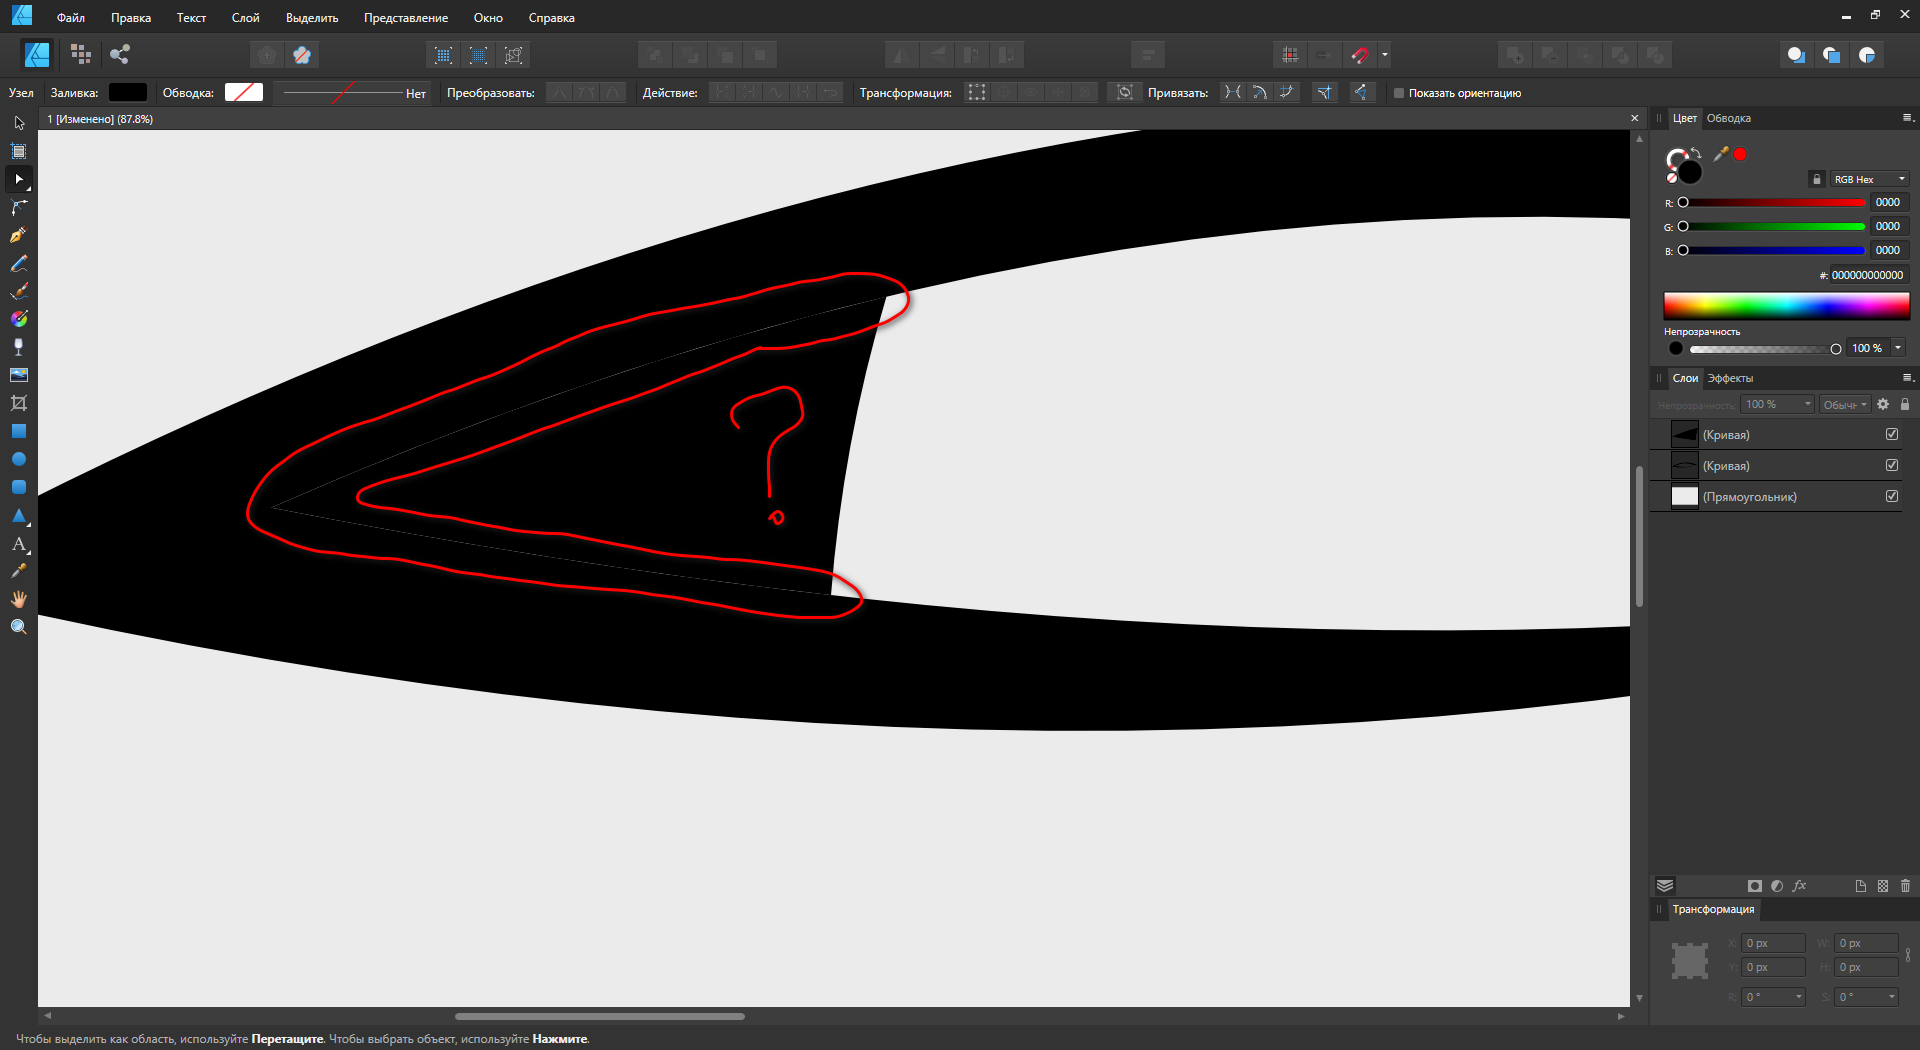
 Hi, I have a simple shape (attached) I'm trying to fill, but despite all the curves being joined it still fills as though they're individual curves. When I joined the last joint it all lit up as yellow, which I assume means it's one joined profile. I also tried several other methods, like drawing each as individual shaped and using 'Join Curves' but not matter what I do I cant get this shape to fill. I'm trying to make the transition from Illustrator to Affinity Designer but problems like this make the transition very difficult. I ended up using my old MAC version of illustrator to do it. Am I missing something? it shouldn't be this difficult. Test.afdesign
-
 Hello all I could not find anything about my problem so I started a new thread I am new a designer and my problem is as follows when using the vector brush to design a shape I combine 2 so called curves to make a closed shape. I want to fill this shape with a solid color I select the two curves, use merge curves from the menu And done, but not really with 3 shapes this works perfectly , but with the 3th I am left with a white line through the shape or a colored line outside the shape please advice this Beginner , thanks
-
 In photoshop when applying a curves layer there is a hand tool that allows the user to select a point in the image and that point will be represented on the curve so you can adjust based on a particular area of the photo. Does this function exist in Affinity for iPad? I searched and don’t see in the app that I do anything other then creating points on the curve and adjusting.
 -
 Hi, I have a curves layer, I click the select button and my layer disappears? What am I doing wrong?
-
 Hi there I want to match the color of a subjet to background using curves adjustment layer. I wanna know if it is possible to sample three pixels (darkness pixel, midd tone pixel and lightess pixel) and apply those exactly values to subject layer so I can fix the colors, but using curves adjustment layer
 -
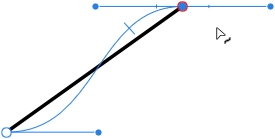
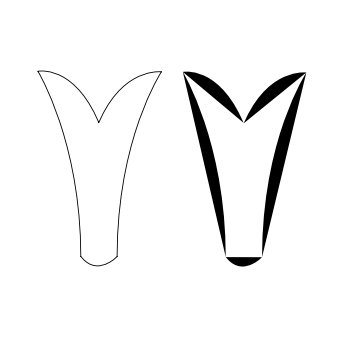
 hello designers , anyone knows how to curve angle (from inside ) like the picture ? thanks
-
My dad just downloaded the newest version of Photo for Windows. When he tries to add a curves adjustment, the histogram is greyed out and doesn't match the curves in the main histogram panel. Individual color channels show the correct graph (albeit greyed out), but when he chooses the master channel, the graph is wrong. This happens on all new documents. I've attached a screenshot of the curves adjustment panel next to the histogram panel to show the difference.
-
 Ok, I get it, each line or curve drawn gets it's own layer. Sometimes this is more of a pain when I am trying to edit. I know you can group the layers, however it still isn't convenient when going from one curve to another. Is there any way at all to put these lines or curves on one layer to make it easier to edit them, like other apps do? I am working in vector here.Forgive me if this question is in FAQs, but I do not have time to go through them all.
 -
 Greetings, I have been using Affinity for quite some time now and have never had an issue with this before - it suddenly showed up with the most recent update and persists in all affinity programs - photo, designer and publisher. The issue is that when I export text as curves into PDF, letters like "I" and "l" (L) become thicker than they should be. As far as I know this doesn't mean that it'll be like that when printed, it is simply shown like this in the PDF. Some suggest to disable certain options within their PDF viewers, but this isn't a real solution as certain PDF's are shared among clients and various other people and having to let them know every time "hey, you should disable/enable option X" isn't efficient. The solution to this issue was finally presented in this very old article : https://www.underconsideration.com/speakup/archives/004301.html Adding additional anchor points made everything work and show correctly. I have been using the same method all the time within Affinity software as well and it worked perfectly - since the last patch that is. Now, I always get thick lines no matter how many anchor points I add and now matter what option I enable or disable in my viewer. I have even tried adding a very small rounded stroke around the letter i (I) and L (l) to avoid this idea of it being a simply thin rectangle with only 4 anchor points : But it didn't help. Even worse, the letter was even more thick than before! 😱 Since this issue didn't exist prior to the latest patch and it suddenly appeared, I posted it here on the forum in hopes that someone might know what option perhaps needs to be enabled in the new version, or if it actually truly is a bug. I repeat, this isn't just a PDF viewer issue anymore, adding anchor points is completely ignored during export and the resulted exported PDF even loses all added anchor points, which means the following is happening now : You can open a brand new document in designer Type anything consisting of letters I, for example "I need this to work" Convert the text to curves Add additional anchor points to "I" Export for print PDF with no rasterization of any type. Check up, just in case, convert text to curves Open exported PDF in designer again The letter "I" is not a curve anymore, while everything else is This could potentially cause problems with printers who deliberately ask for text in curves This should mean that there seems to exist a new bug during export to PDF. 😭
 -
 Hey folks! Here's the case: I am currently working on a logo in Affinity Designer. It is the second iteration and I would like to present him the first vectorized draft of the logo in an appealing layout and with written documentation. I have created the layout in Affinity Publisher and linked the Affinity Designer file in it, so that any changes to the logo are directly reflected in the Publisher document. Thereby I encounter the following problem/s: The Designer file contains text that uses a licensed font that should remain editable until the final version of the logo – but in the Designer file ONLY. If I now export the Publisher document as a PDF for web to keep hyperlinks to references and good readability for example, the text of the linked logo gets exported editable/selectable via Adobe Acrobat – which I don't want at all! If I export the document as flattened and all elements are rasterized, it becomes (even if only slightly) blurred and consequently pixelated – which I don't want either. A possible solution for a feature could be the option to convert any text ONLY in linked/embedded files instead of converting all text to curves during export. I'd be happy to learn if there's another, more convenient way to do this, since it's a bite impractical while the logo's not final. 😀 However, I' m not quite sure if I described the problem in an easy to understand way. 😅 Greetings MrDoodlezz
 -
Windows 10, Affinity Designer 1.8.0.585 I tried editing the nodes of a curve that I had previously scaled to 0 on the y-axis using the move tool. instead of smoothly following the bezier curve, the stroke jumped between seemingly random points on it instead and the pointer position for editing was only evaluated on the y-axis. Steps to reproduce: Draw a curve Use the Move Tool to scale it to 0 height Pull one of the nodes back into two dimensions using the Pen Tool. The stroke doesn't follow the curve and the cursor is being projected along the x-axis (holding Ctrl in the second screenshot). Edit the curve further. Multiple points may actually match the curve. The same thing happens when scaling to 0 width; the cursor position is then projected along the y-axis.
-
 would it be possible to allow a smaller grid on curves? I am creating new curves for Cyanotypes, Van Dykes, and Platinum prints and need a more concise points on the curve. also the ability to import existing curves would be very helpful.
 -
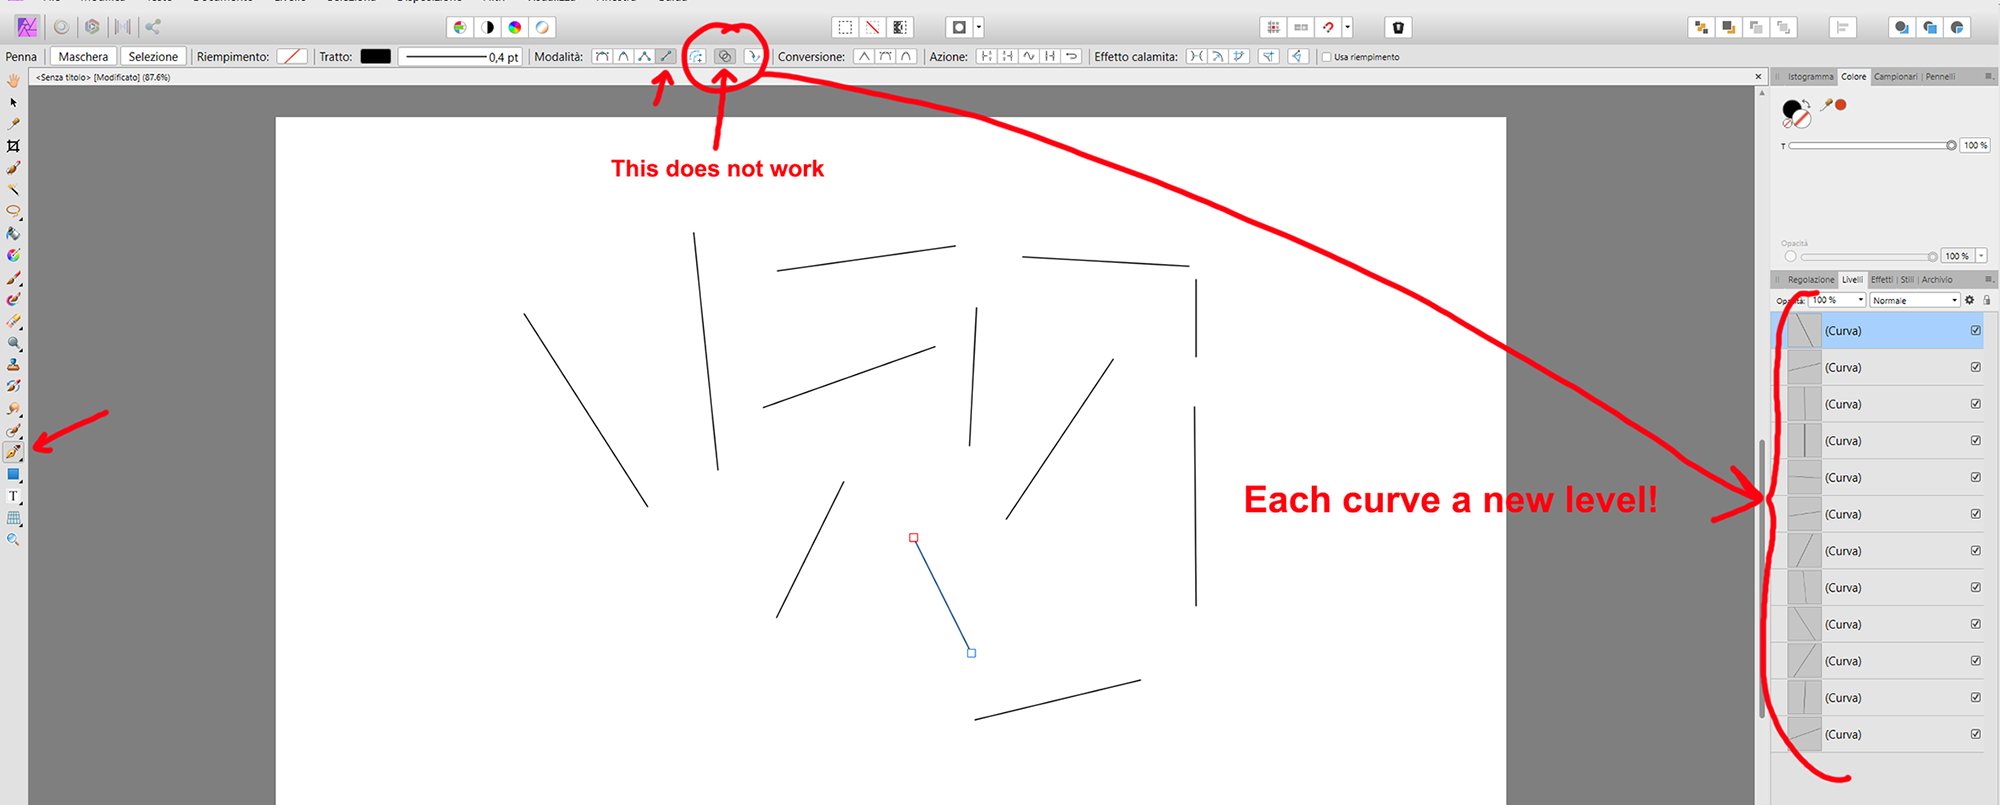
 Affinity Photo. Windows 10 - 64 bit I have to draw many lines to make a drawing. I selected the "pen" tool with the "lines" modality and the "Add new curve to the selected object" option, which should cause all curves drawn after to end on one level. Does not work. Each curve I draw creates a new level, and I find myself having to manually "compact" all the layers one by one. Any suggestions? Thanks! I enclose an example screen.
-
edited - I'm using ver. 1.7.3.481 -open image (tried 4 or 5 different images), or create new document (created a blank document then paint bucket fill) -add curves adjustment - crash, every time, tried many (10+) times I opened an image and added a curves adjustment and it crashed. It looks like I can't make a curves adjustment layer at all without crashing Photo. Created a blank image and got the same result. I tried every type of adjustment layer and only the curves adj. failed. specs Win 7 Home Premium x64 MSI B540 Tomahawk Ryzen 7 2700x Radeon RX 590 (software version 19.8.2)
-
Try the attached. On the face of it, it looks like a simple image with Curves adjustment. But when you play with the Curves it doesn't behave as it should (I've tried it with beta and 1.7 release). For example pulling Curves up to the top left does not result in a whiteout (as happens when the original jpg is used). History: I'd just been playing with masks via the spare channel. Duplicate, Threshold to create b/w. In Channels, right-click and create spare channel. Then load to curves. Then load from blank channel to remove mask. I've tried repeating this to no avail. The bug however seems captured in the .afphoto. Maybe you can figure it... before.afphoto
-
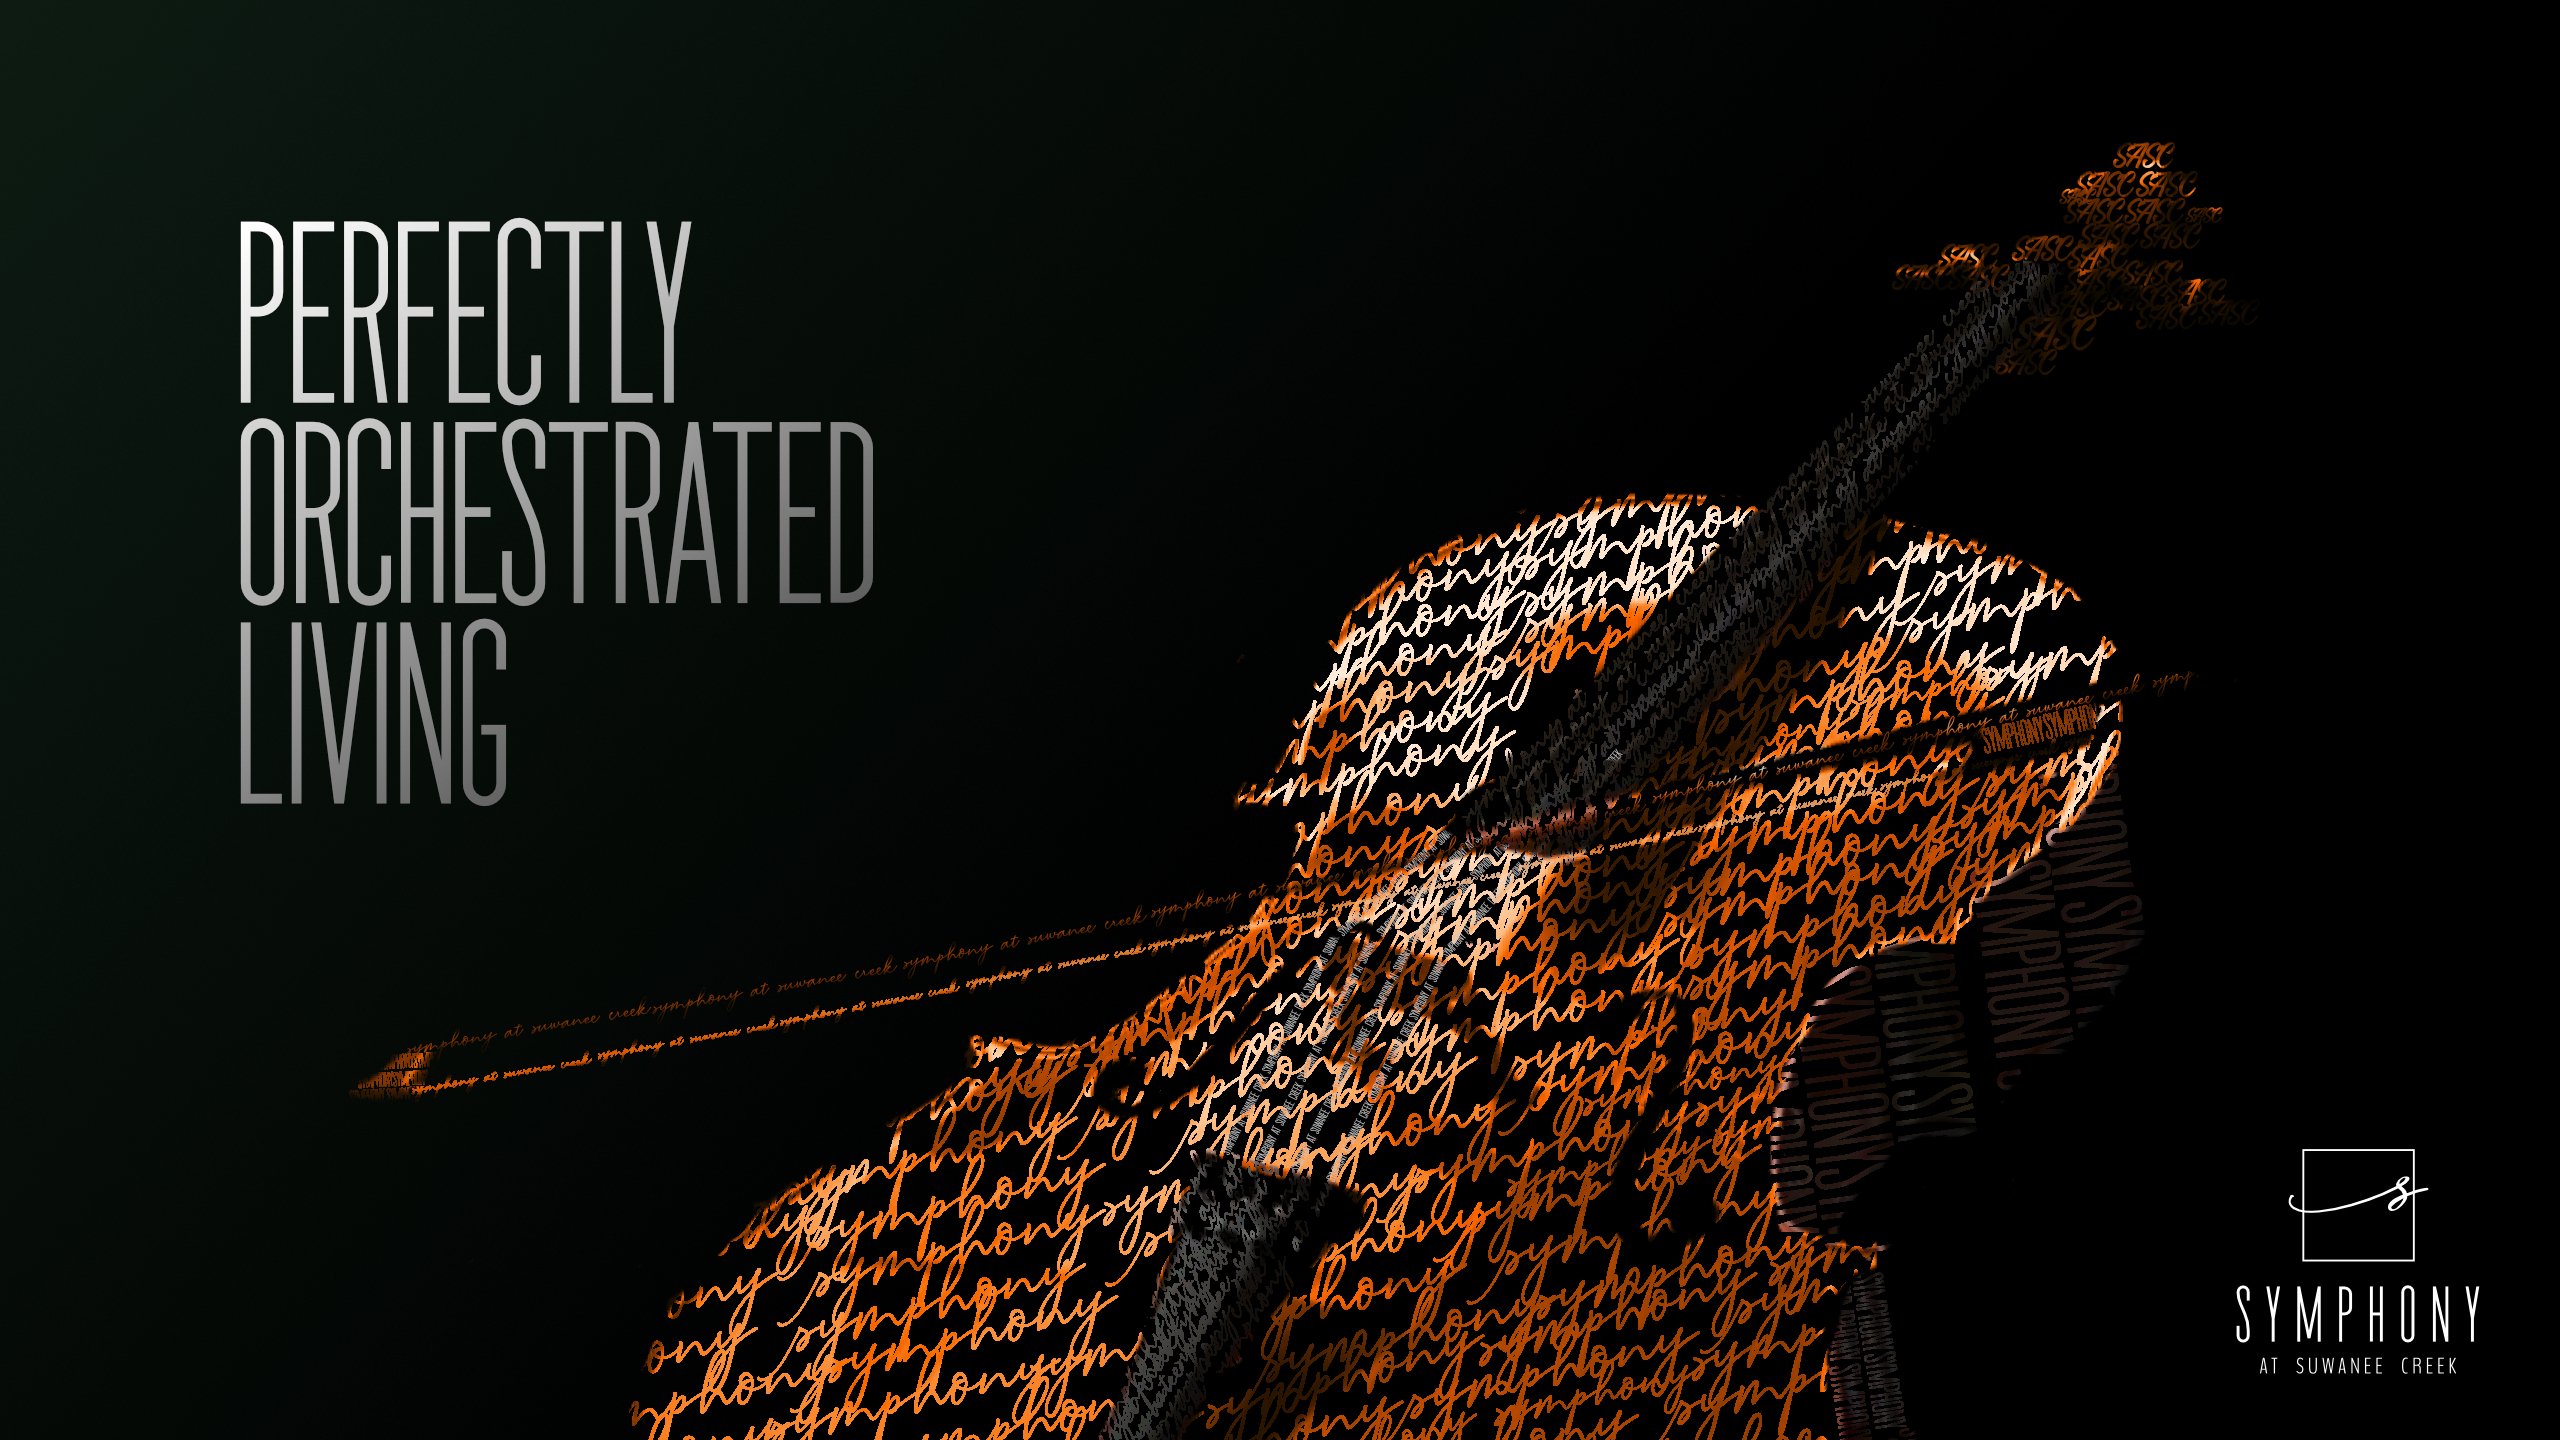
 Hello, can someone take a look at these files and let me know what would be the best way to export the file. The exported image detail is not as crisp when exporting and I'm not sure if there are any other settings that I can use to export. When viewing through Affinity Designer, it is showing the detail without any issues (see the bow in the .jpg file and compare to the screenshot directly from my screen). The curves are not showing crisp lines and blow out when exporting. Any ideas? Symphony_Campaign4b.afdesign
-
I'm requesting that the histogram is part of the curves adjustment display in the Develop persona, as it is in the Photo persona. I've started shooting film for fun and will "scan" the negatives with my digital camera. I'd like to do the scan in RAW even though I suppose it probably isn't necessary. Negative Lab Pro is apparently the best way to invert the negatives but apparently it only works with Lightroom. The other way, after a white balance, is to invert each colour separately with the curves adjustment and move the limit sliders to match the beginning and end of the histogram for each colour. In order to do this properly, the histogram has to be part of the curves display. I apologize if there is some obvious reason why the Photo persona works this way but Develop doesn't.
-
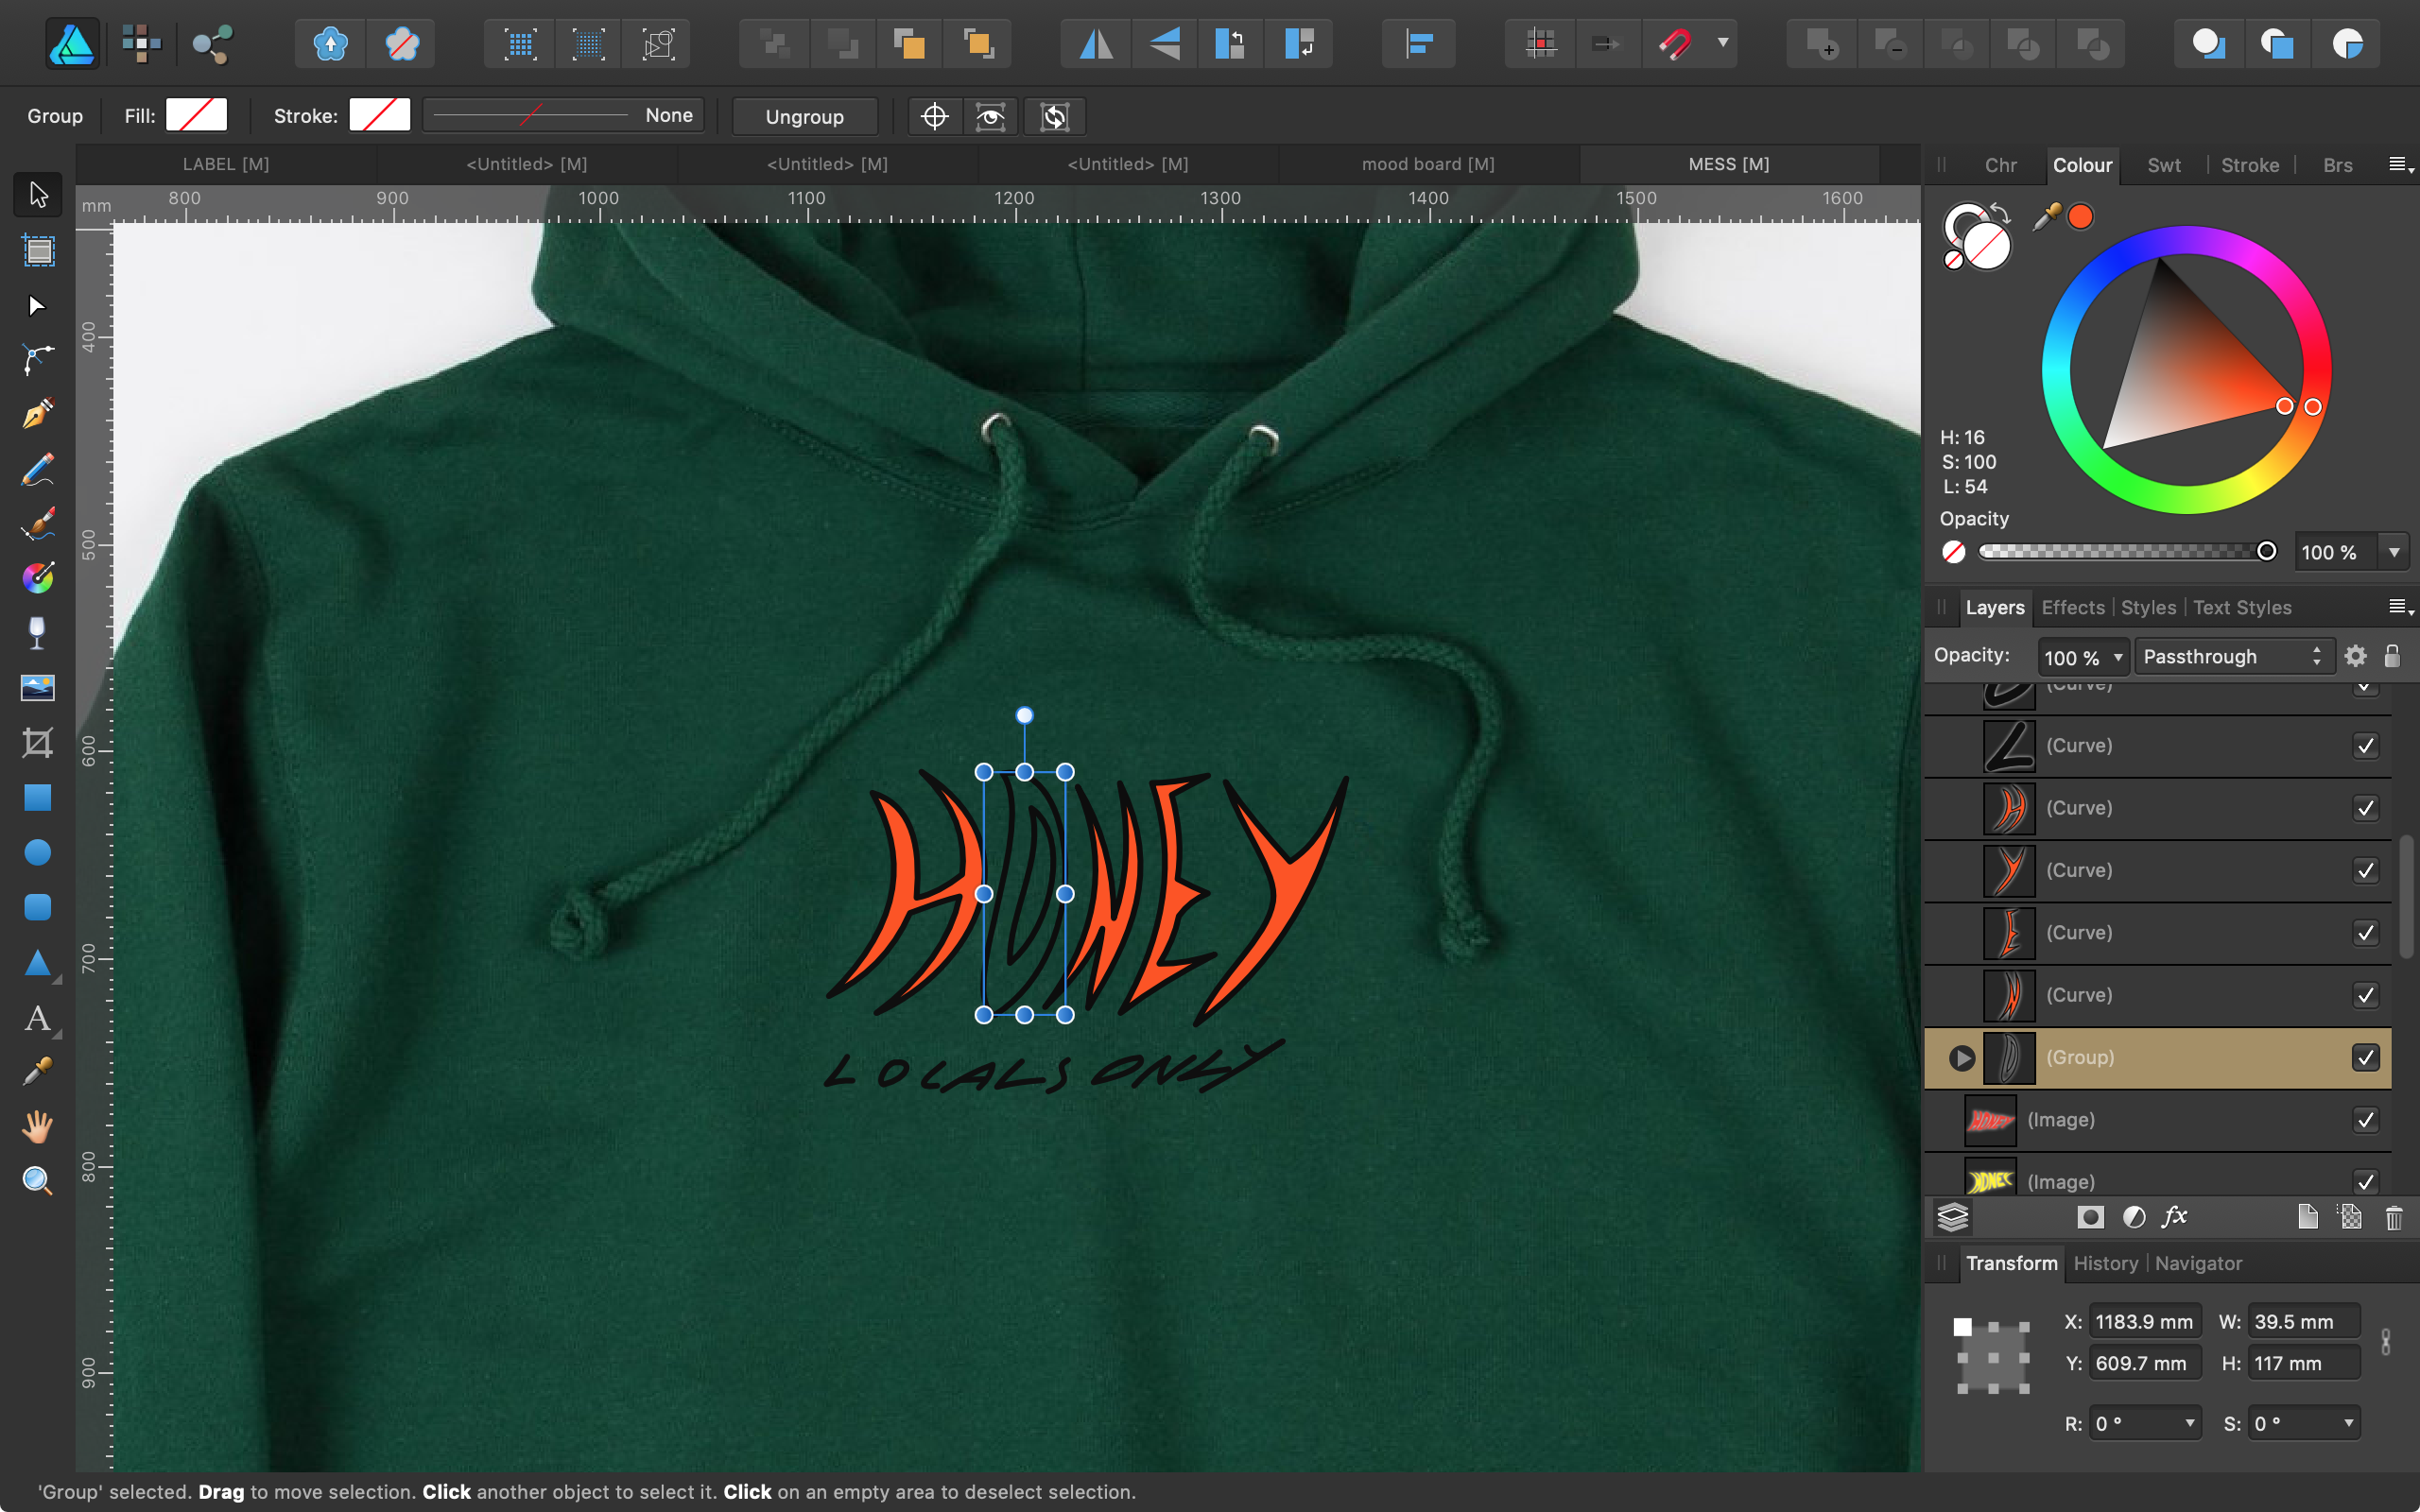
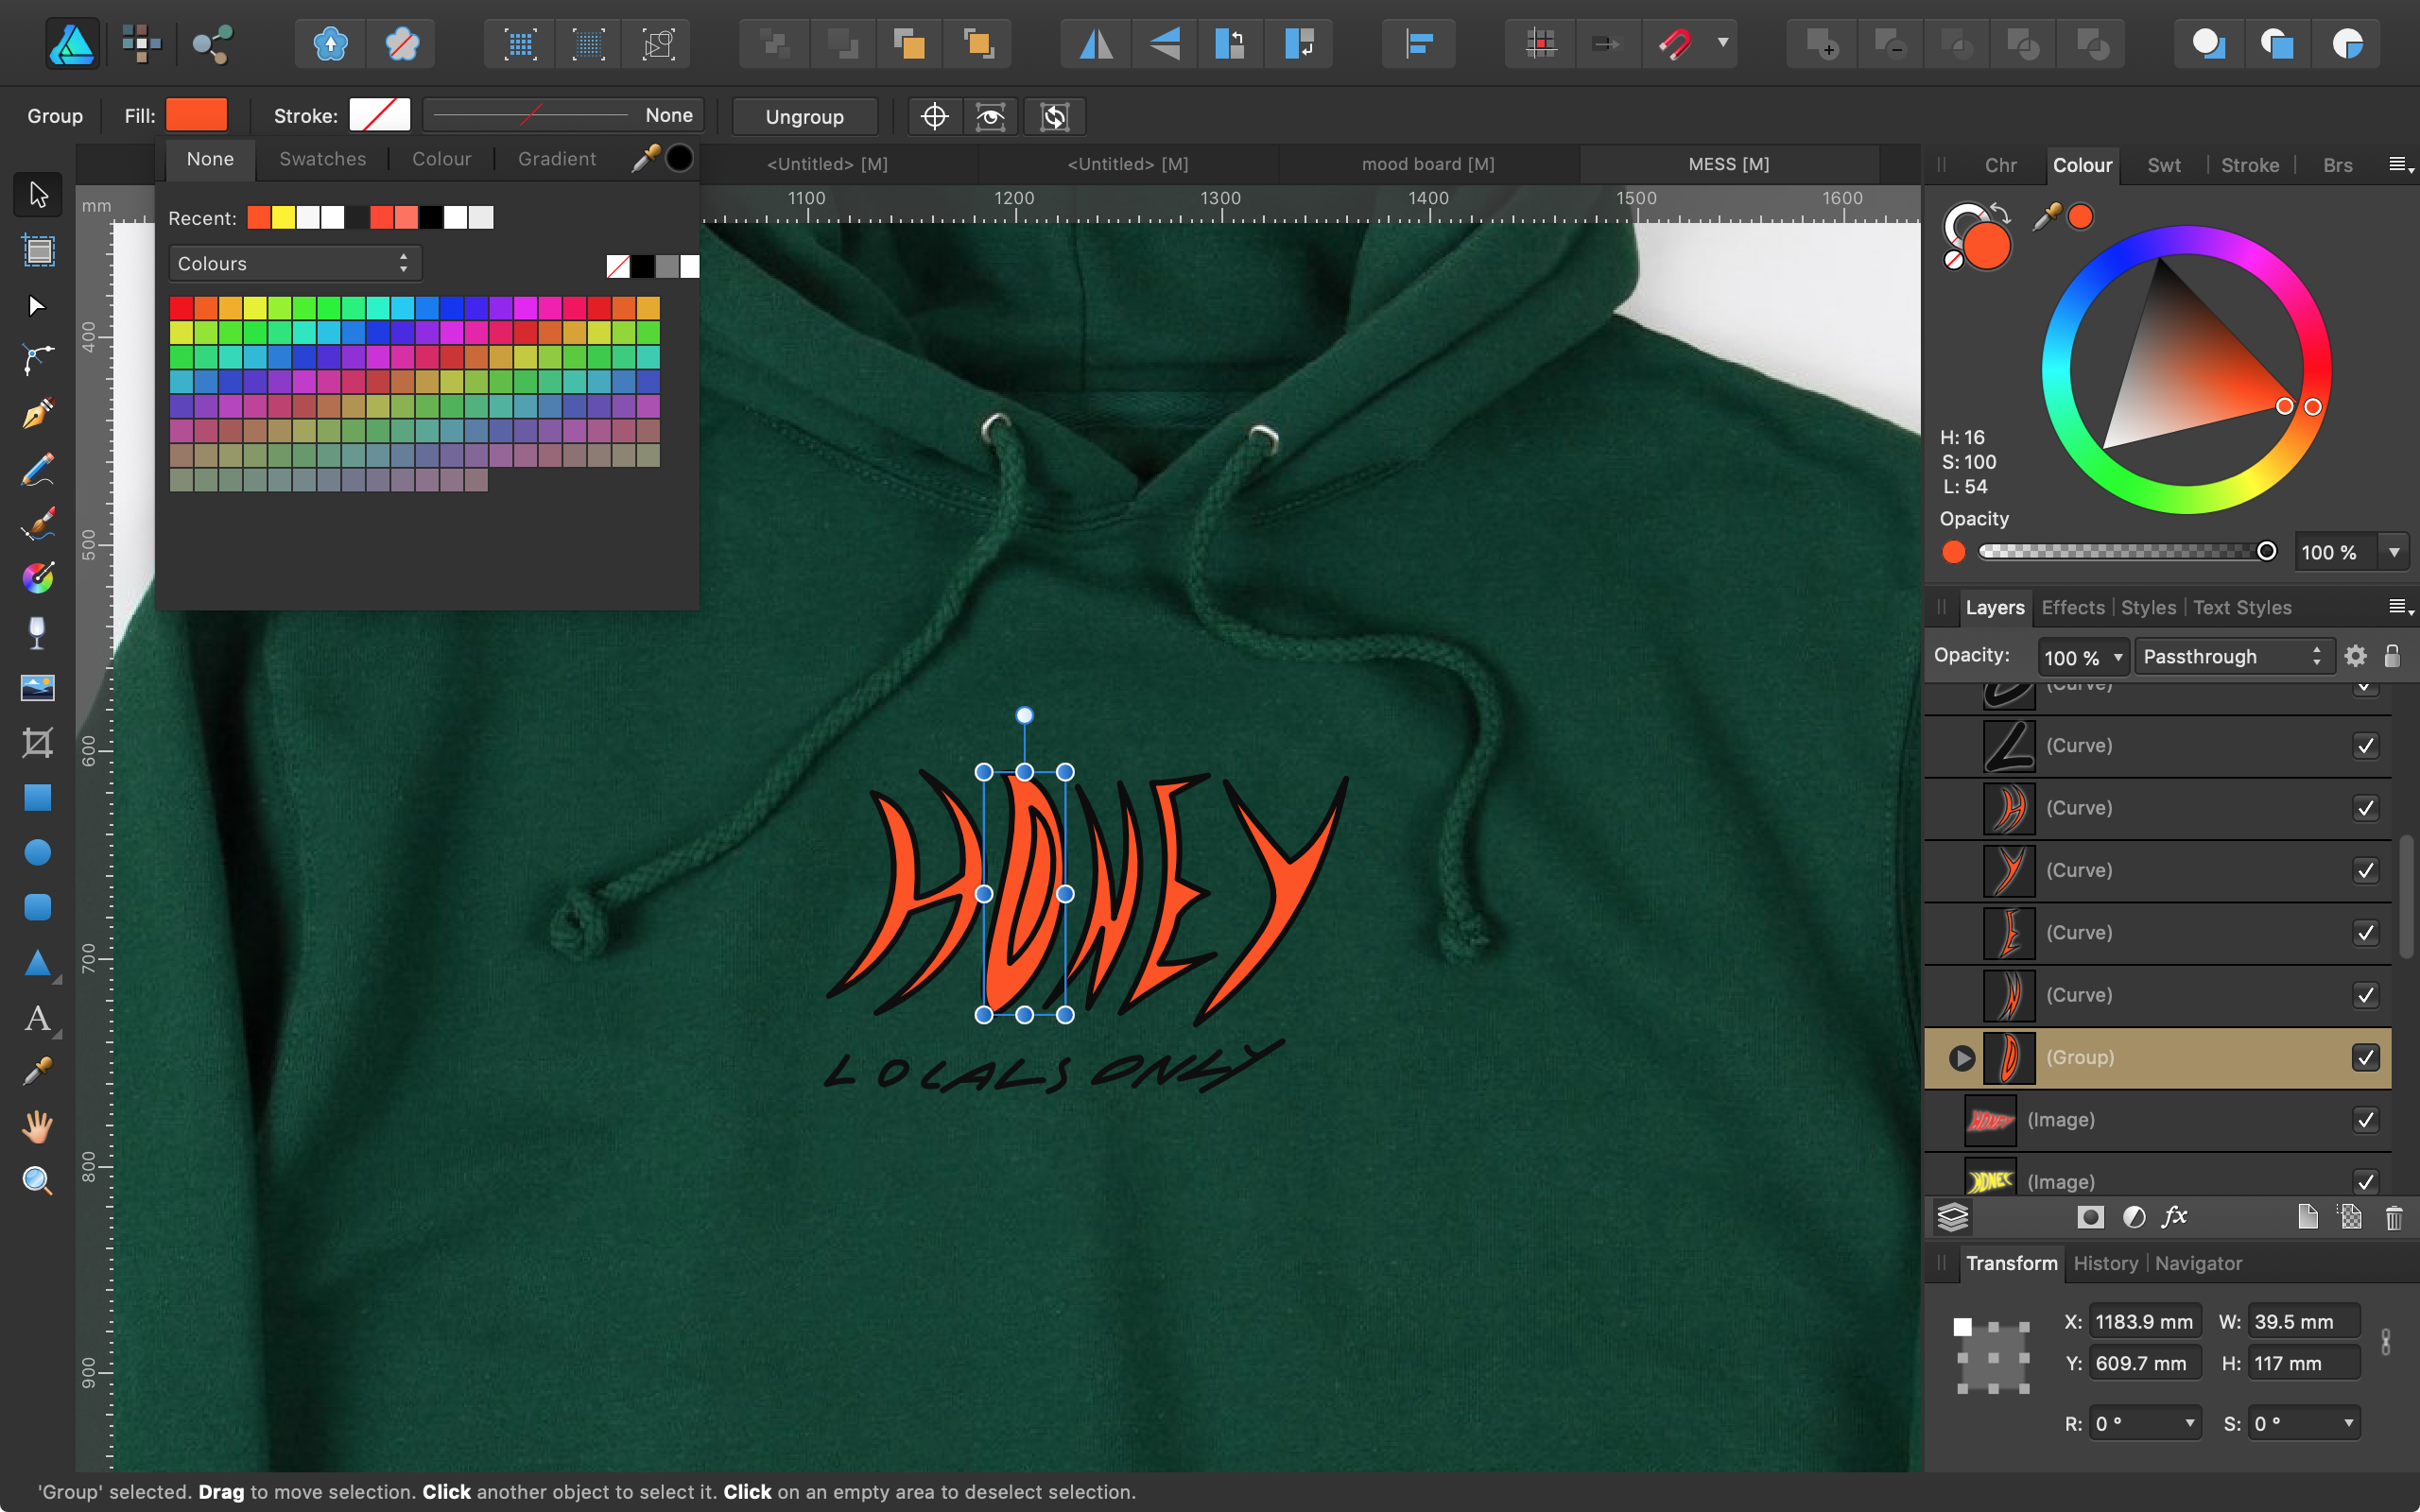
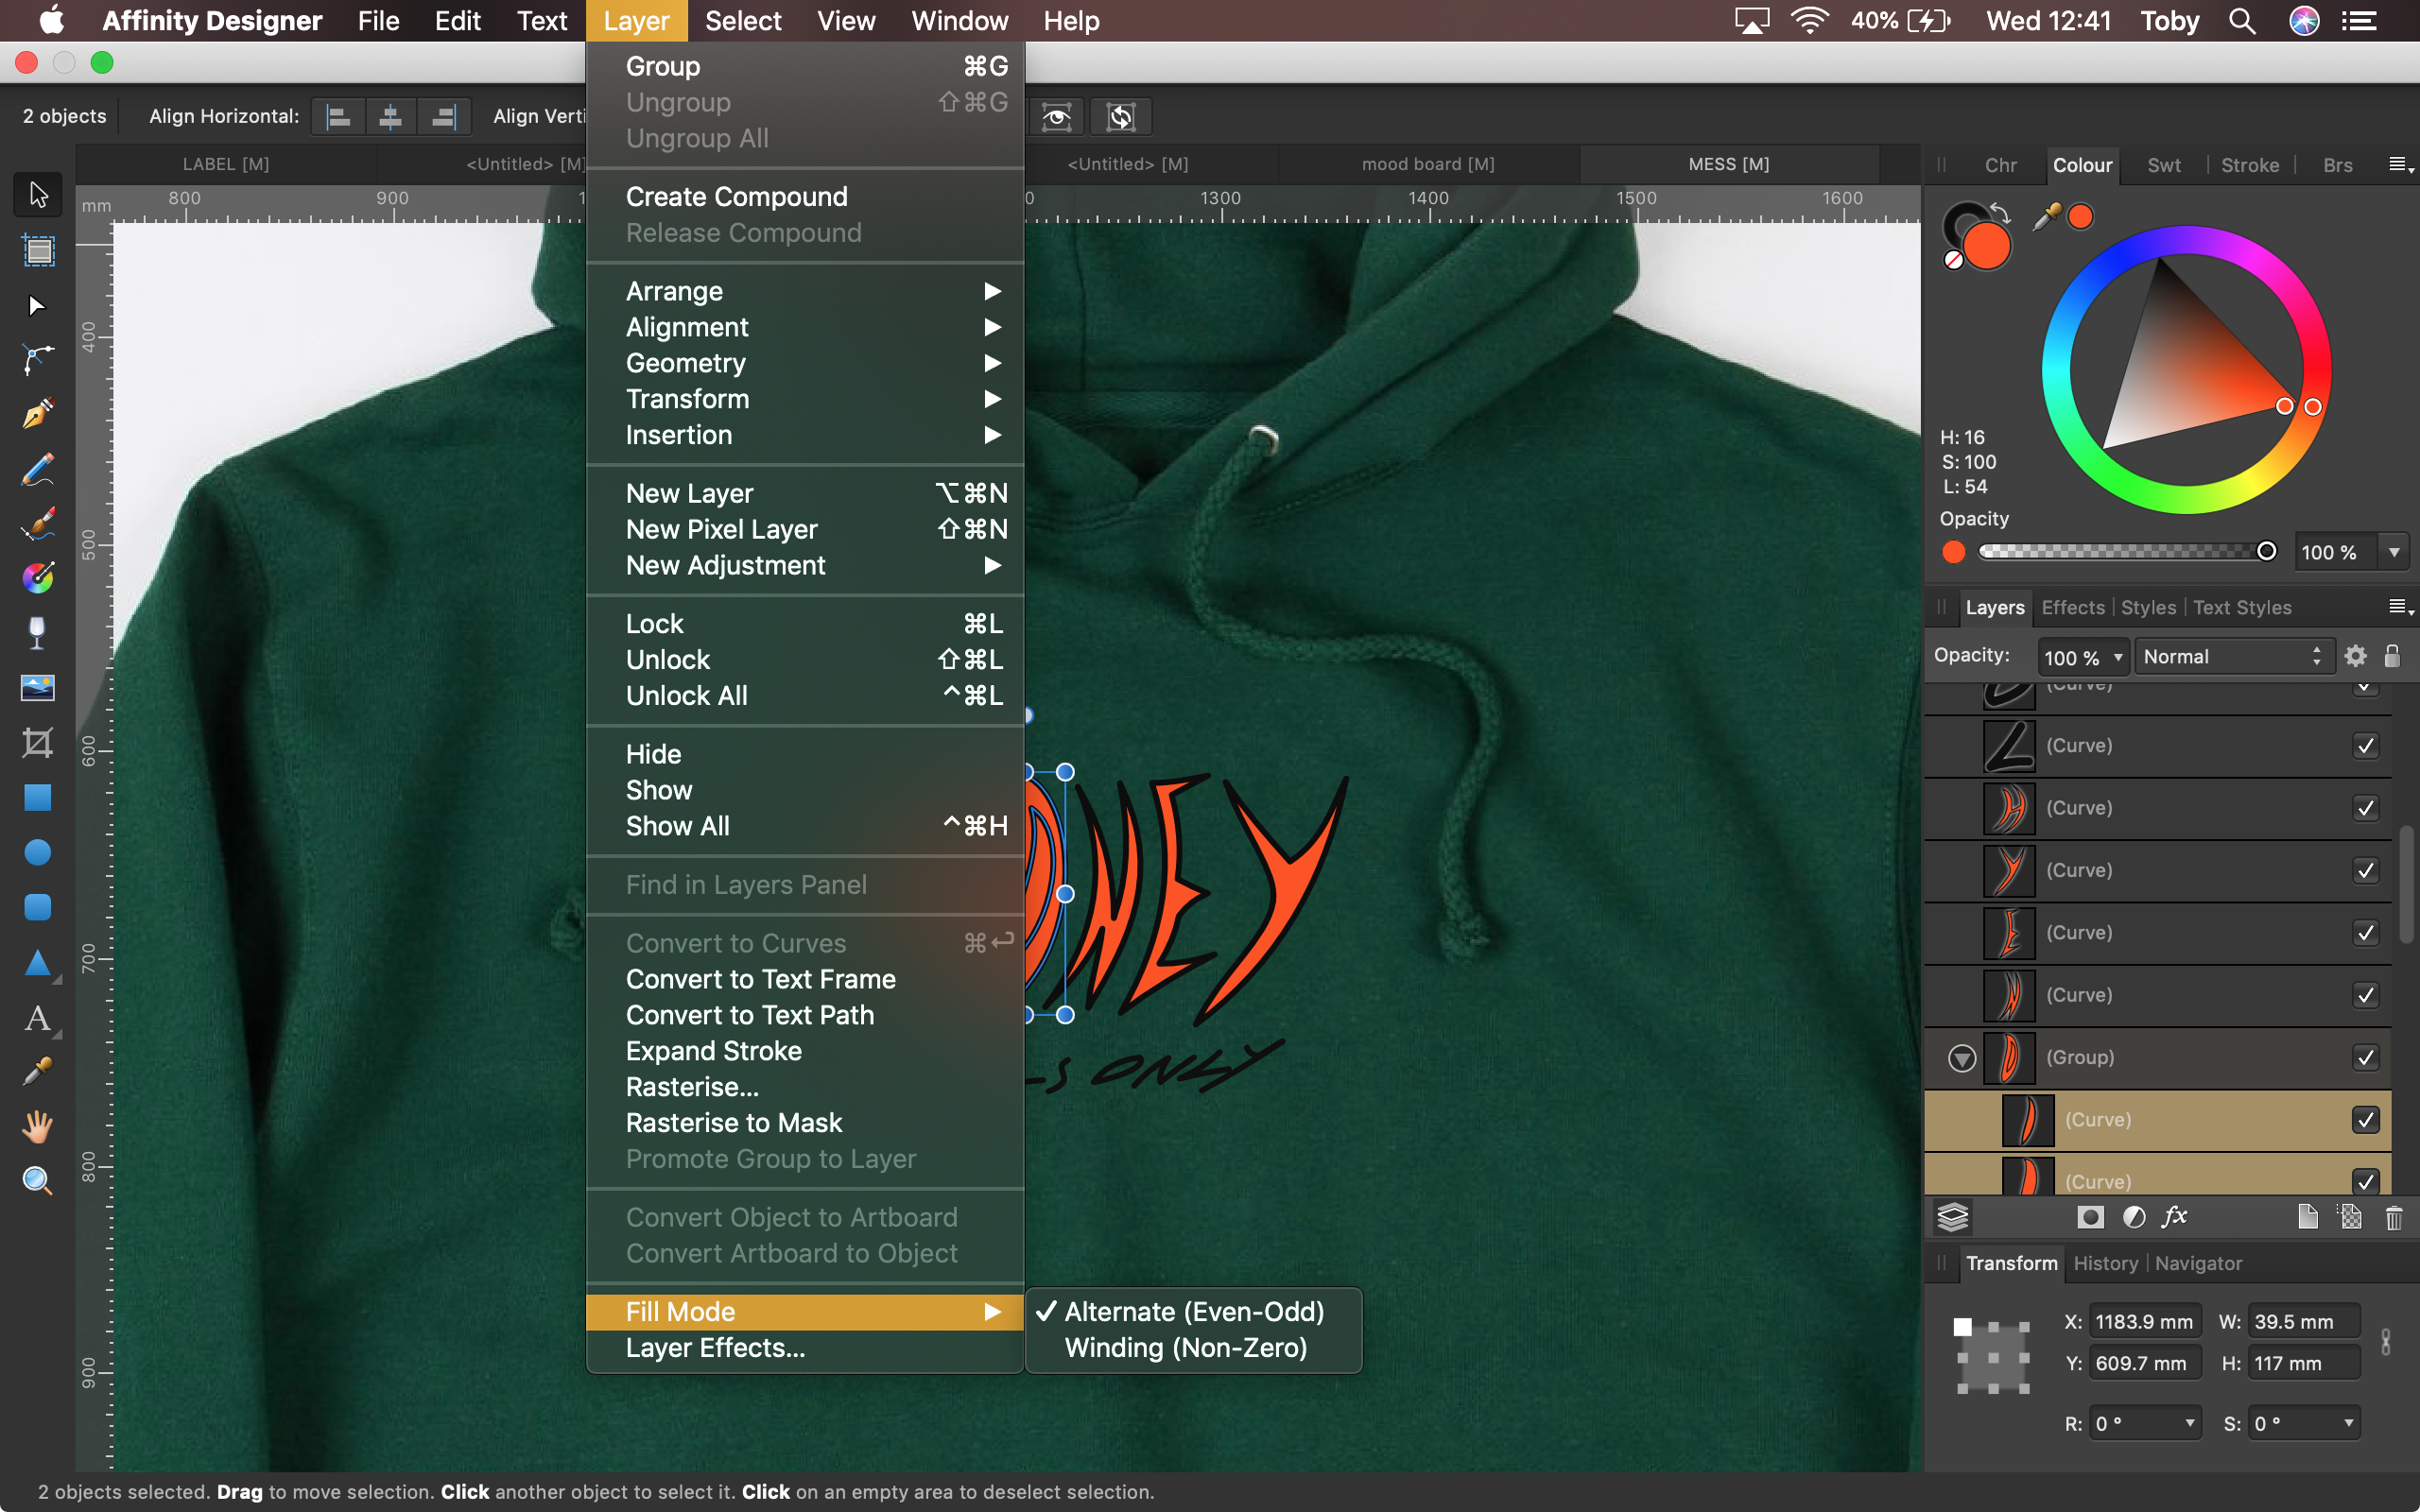
 Hi, I'm trying to fill a capital 'O' without filling in the middle of it. As seen in the attached screenshots. I found a post with the same issue, there they were told to select the individual curve layers rather than the group, and then change the fill mode in the layers menu to "Alternative (Even-Odd)". However, I tried this and it didn't seem to work. Is there something I'm doing wrong or something else that might work? Cheers


.png.957a67a1346a45a488cbc0c5555291dd.png)