Search the Community
Showing results for tags 'Brushes'.
-
I am not very into vector and AD was like a magic wand to me. All of a sudden I knew how to create vectorised artwork on the fly, so to speak. I thought. Then I was asked to work on a project which would have to be vector. I imported a logo I had made earlier and exported as an eps-file. All vector. I made an elegant brush which I thought was vector. And when it all looked as I wanted it to in AD, I exported it as .eps and sent it to the print shop - and was asked why I sent them a bitmap when they wanted vector. After lots of tearing my hair out accompanied by swearing in multiple languages, I finally learnt what was wrong. If you import an image into your artwork, using the tool for that, it is being transformed into a bitmap image, no matter what it was earlier. You need to open up the vector-file in AD as an individual file and then copy it and then paste it into your artwork. Then it remains a vector-file with all layers and info intact. And the brushes you create in AD are not vector, not even when you create it in Vector Persona. It is bitmap. The solution here was to export it and having it traced, something a very kind user helped me out with, since I don't have programmes with such a feature - a feature I hope will be added to AD soon. So, my question is whether it shouldn't come up a warning to us vector-dummies? I know, it might be annoying for the true pros to see pop ups notifying about such as they consider self-evident, but there are solutions to that. Either being able to turn that off or on in the preferences or having an option in the message: Don't show this message again. Just a thought. It would have saved me for a lot of frustration. And probably helped a lot of others as well.
-
 Now when importing brushes it creates the category name based in the file but dont show up in the dropdown menu
 -
Looks that when I try to import new ABR brush files its goes to a "" category and I cant see them in the tab in any category. Anyway where the brushes are saved in the HD?

-
I was browsing the forum outside the Beta section and noticed someone offering free AD brushes. So, I downloaded them, just to see if they would install and install they did. Then I just did some scribbles to see how they work. I saved the result, then exported it it to JPG, which worked as expected: Then I exported to SVG, but that only showed the strokes without the brushes: Brushes.svg Brushes.afdesign
-
So I found myself wanting to come up with a basic stipple brush, of a more vector-style and less painterly variety. Going for that more retro-modern shading look inside of vectors that's quite popular these days. Pretty basic, but I think this is what I was going for! Works best sticking to applying with straight paths, no vector handles. The nice thing shading this way is you can vary the opacity and get quite a nice buildup on top of gradients. I threw together this trippy abstract to give them a go. :) Edit: Sorry, this post seems to have gotten mysteriously duplicated, and the attachment isn't showing up here consistently. Basic-Stipple-Brushes.afbrushes.zip
-
 Can we make our own brushes somehow?? Im working on a project and it would be so much easier if I could make my own brush of what I need. Thanks!
 -
I have just started playing with the beta. I notice that the brushes available are numbered: how do I access the full collection?
-
 Is there a way to re-order the stored brushes. As I make/import brushes they are placed at the end of the list. Can they be ordered say aphabetically?
 -
 Trying to understand the brush settings panel a little more, and I can't find any brush that changes when I use the Shape slider in the General settings. What is it supposed to do? Is it like the Roundness slider in PS?
 -
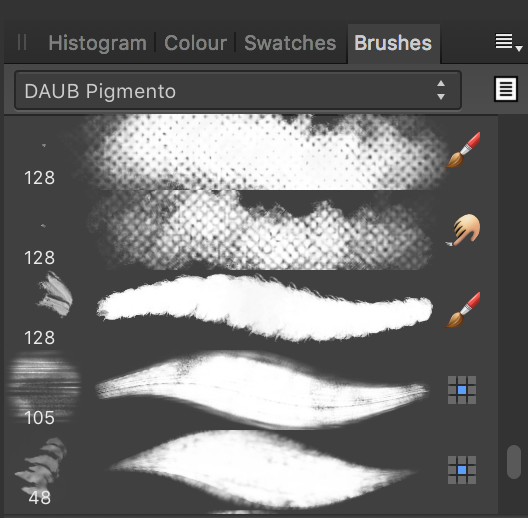
 So I purchased Daub Pigmento (a set of 72 brushes) and noticed after installing them that there were little icons on the right of each brush, I have no clue as to what they mean... I need enlightment :huh:
-
Sorry, duplicate post somehow—not sure how that happened. :rolleyes: :blink: Admins may delete. :) Search by same title for the other post. :)
-
 Good morning everyone! It is Tuesday and I have another video tutorial for you! Since so many of you asked for it I decided I needed to show you how to do it yourself. Today, I will be sharing with you my technique for creating your very own smoke brush. Also I have a big announcement that I am super excited about. Make sure you watch the video all the way until the end! I have thought about doing this for along time and I hope these videos help! I would love to see how you use the information I give you in your own work! Please post your work in this thread so I can see how my videos have helped you! Thank you all for your really inspiring comments, works and Ideas! Those of you who have taken the time to reached out to me I like to say thankyou, I really appreciate your kind words and support it proves to me that it worth it! Click here to view the course Smoke brush 3 demo.afbrushes.zip
 -
 Hi, New to affinity photo here. Very frustrating when the brushes won't work and i think i'm doing something wrong, when i've watched the tutorials over and over and it is just the program that is not working. I've selected the layer. actually only have one layer. and 1 out of 5 times it works. should i redownload the app? very frustrated at this point.
 -
Can you import AD brushes into AP, if you can will they work ok.
-
 Hello! My names Matt and I work for retail company that designs fashion products. ( I work in It please excuse my poor design lingo) We have recently been looking at Affinity designer as an alternative to Photoshop. It looks like a great product and we are hoping to roll it out to about 20 users. Background info: We currently use Photoshop an Illustrator CS5 We do not use much of the adobe suite Some users do very basic tasks - changing colours, resizing minor editing. During testing we had a few of the designers come down to try out the trial. The more experienced users got to grips with most of the basics but they had some issues with the following: Creating brushes was very difficult for them - Before they would make a small drawing using the brush tool in illustrator (a stitch pattern for instance) and then they would turn that into a brush.I have attached an example of the pages that they would use as brushes. The issue is when opened Affinity creates layers of every single little line (or stitch) this makes it very difficult to select them as a whole - is there an easy way in affinity to take these patterns and turn them into a brush? I tried basic dragging and dropping into the brush window but that didn't work very well! Another issue that the users faced was filling an area with colour, They would select a line by clicking on it or selecting a few lines that create a whole shape - how would they fill this? in Photoshop they found this a lot easier - is there a particular way in affinity to fill an area that has been outlined by lines? I do apologies in advance for anything that's unclear and please let me know if you'd like some more information and I will explain it as best I can. I can also try and find some example files that may help to explain. Matt. knitwear brushes.eps
 -
 I am using the DAUB Watercolours paint brushes in Affinity Photo on a 36inx24in at 300dpi document and the brushes lag bad. I did reset all settings in Affinity Photo back to default. Same results. See my computer specs below. Any help on this issue would be great. I am trying to make the switch to the Affinity applications for all my work. I also attached the kind of work I am trying to do in Affinity Photo. My Computer Specs: Mac Pro (Early 2009) 2 x 2.26 GHz Quad-Core Intel Xeon 16 GB 1066 MHz DDR3 ECC RAM ATI Radeon HD 4870 512 MB
-
I am struggling with the just being able to ink in vector with Designer. I have viewed all available videos here and on YouTube. And its still clear as mud. Although I enjoy the raster brushes in pixel persona, I am just after good vector inking that I can expand the strokes at the end of my work. Here are my issues with the app: 1. I don't think it should be called a vector brush unless the strokes made with it will be true vector and therefore can be expanded. Using the vector brush in Draw persona and choosing a textured image brush from the Texture category should allow you to expand the stroke but it does not, why? Because this is really a png file that a "vector" brush is used to draw that stroke. This brush that creates these sorts of image based strokes should be called an Image or Pixel stroke brush. A differentiation in these two types of brushed would clear confusion rather than just having a one brush fits all types of brushes styles. 2. The Vector Brush tool and the Pencil tool share too many characteristics when it comes to what each tool can create and what makes it different than the other. The way it is now I can draw the same stroke with either the pencil tool or the vector brush tool and apply a basic, textured, or image brush and either one can have pressure applied so what's the difference? 3. The only way I can create a predefined tapered basic vector stroke and not have to apply the stroke style after the line has been drawn is with the mouse only. I cannot use my tablet to create this same stroke with my stylus. To reference what I am referring to open Autodesk Graphic, their brushes keep their taper as they are drawn automatically, or you can choose pressure to create your own. I like the auto taper strokes like they have, would like to be able to this in AD. 4. Where do I begin my inking process, all the tools seem to be here, but when you try to draw, the tools do not respond initially the way we expect them to unless you turn something on or off. 5. There are really no in-depth tutorial discussing the possibilities in the painting tools, I have found 2 in Designer's tutorials. 6. Why can't we create our own taper brushes with its profile pressure settings be saved locally inside the edit brushes window? Would be great to create a taper brush drag and drop into the brush library and DONE. SAVED and READY to go- no more dealing with the pressure profile graph. I know I am missing some things and it may sound like I'm rambling about this but as I said, I just want to ink in vector without many setting to have to adjust. Point #6 would solve probably most of my issues, especially when just I want to draw and go.
-
 Just started with first tutorial and my Affinity does not have the same brushes as the one on the tutorial--why not?
 -
Just bought Designer 1.4.1 on 4/6 and watched tutorial from 1/6 of this year and the brush drop-down menus aren't the same--which is right? Tried to add screen shots but not sure if I did that right! Tutorial showed grunge but not an option on the version I just bought.
-
 I am using it to implement Ming Thein's workflow, who often uses selective dodging of highlights / burning shadows to increase local contrast. This works very well in Photoshop CS5: when applying dodge/burn brushes to highlights or shadows, they nearly do not affect midtones - ok. However in AP, when either highlights or shadows are selected also the midtones are affected heavily. This can only be worked around by reducing brush opacity to 10%, but then the intended effect is mostly gone. So IMHO a steeper separation between highlights, midtones and shadows would be needed. Secondly, it is annoying that the brushes change to their defaults for every newly opened image. I am pretty sure most users would prefer to keep the last used settings. Not sure if these are feature requests or bug reports ... Anyway, congratulations to this otherwise great application! Thanks, Georg
 -
 From the link in the How to rotate the tip of a (Arrow) Brush question I downloaded Ronnies Arrow Brush set. Not realizing it was a vector brush set, I foolishly tried to import into Affinity Photo ... 4 times. Each time, I got a notice saying two brushes were added to a new numbered 'Ronnies' set, 1 through 4, but of course as I now understand those sets did not show up in the AP brush panel because they are vector brushes. I tried resetting brushes after the third attempt, but on the forth one I got the same notice with the #4 suffix in the set name, which I guess means the app is somehow remembering the previous import attempts & maybe has imported the brushes somewhere. So my question is how do I get AP to forget all about these vector brush sets & remove them if they have been saved in the app?
 -
 Hi, I'm using 'Ronnies Arrow Brush set'. How can I rotate the arrowhead? Regards Gerd Ronnies Arrow Brush set.afbrushes.zip
 -
 So I just want to draw out some lines with the pen tool and have them taper at the ends. It seems the only way I can do this is to draw the line, select my profile for pressure, and then click one of the brush presets. I have to do this for each line- but would like to just have these settings "on" and be able to keep drawing similar lines in the same layer. It looks like it's supposed to work the way I want, as all the required functions stay selected (pressure curve, brush style), but still I have to repeat the steps. Any ideas as to what I could be doing wrong or is this a bug?
 -
What if one could create a fast single digit numbered favorite to the tool we are using to access them, each with their own separate properties? Let me explain. If we are sketching, and we start with a standard brush we can assign that one a "1", then we want to switch to maybe a shader pencil with its own settings, we assign it a "2" and so forth. Then when we are sketching we can alternatively hit 1 and 2 to quickly switch back and forth. This may already be possible. Not sure. Same could be could be done with other tools I suppose-thinking if we were using an eraser tool in the sketch described before, and easily access a "1" for hard eraser and "2" for a soft edge eraser. Thanks for listening.