Search the Community
Showing results for tags 'Brush'.
-
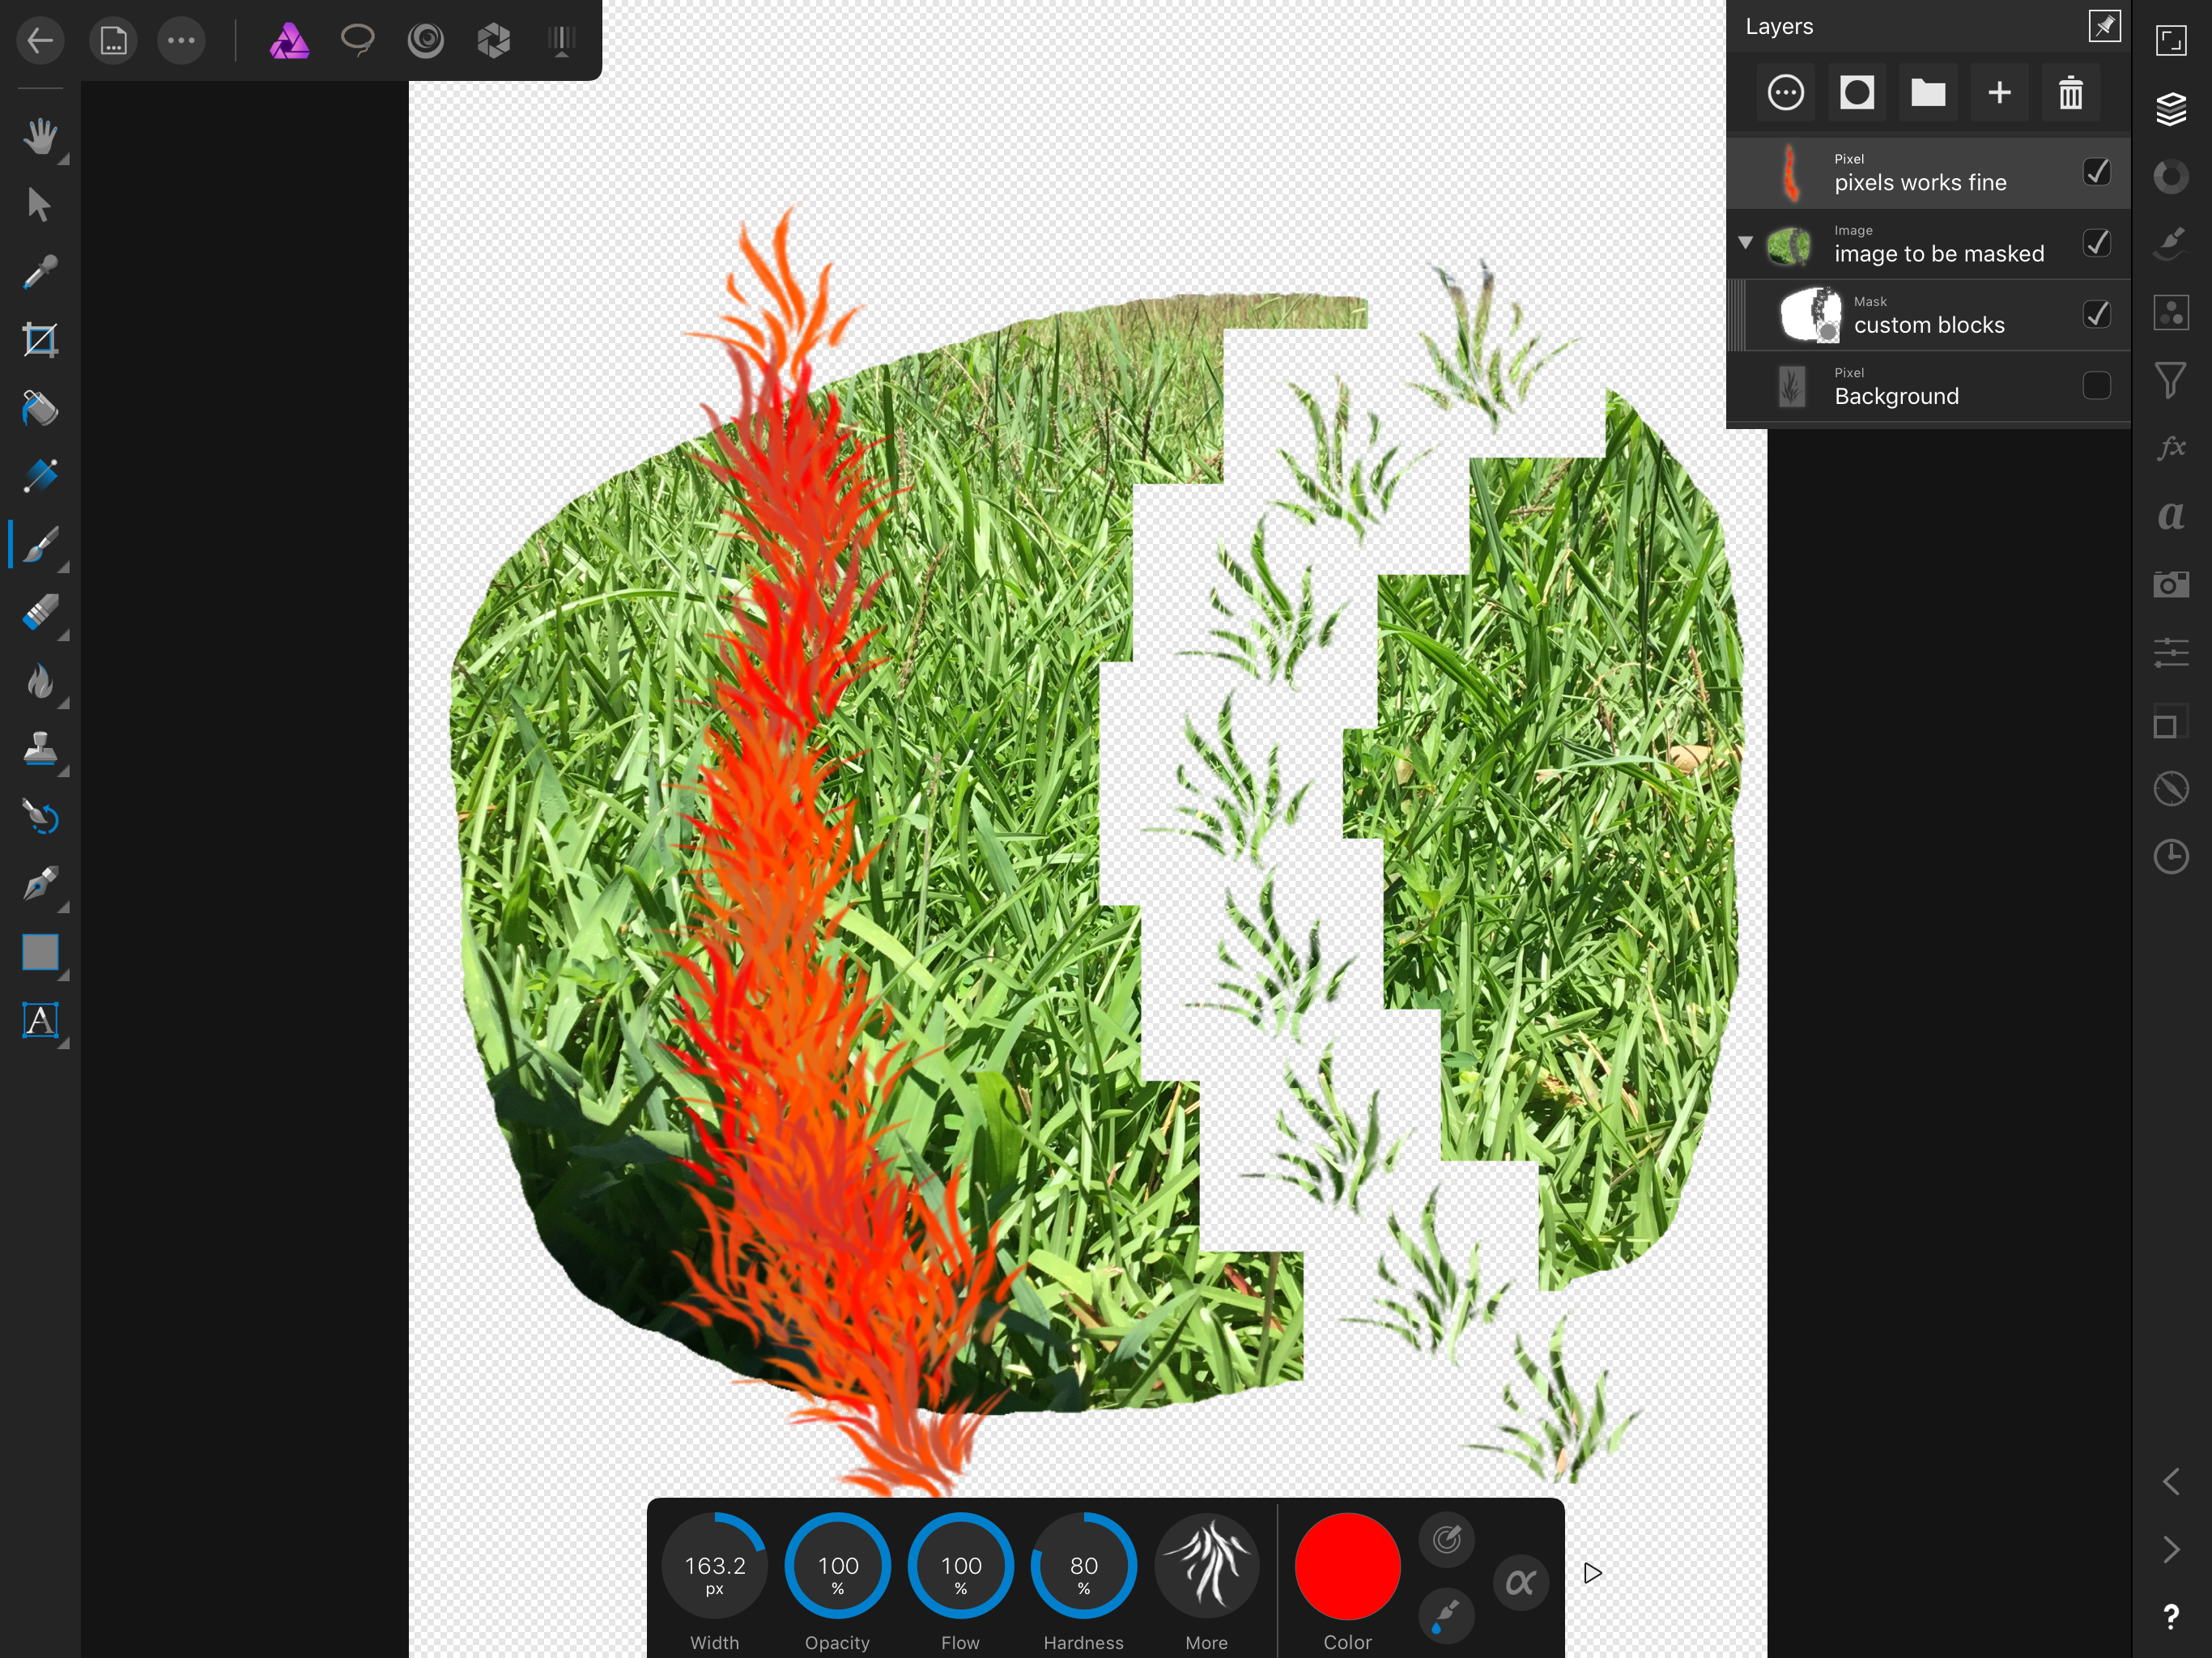
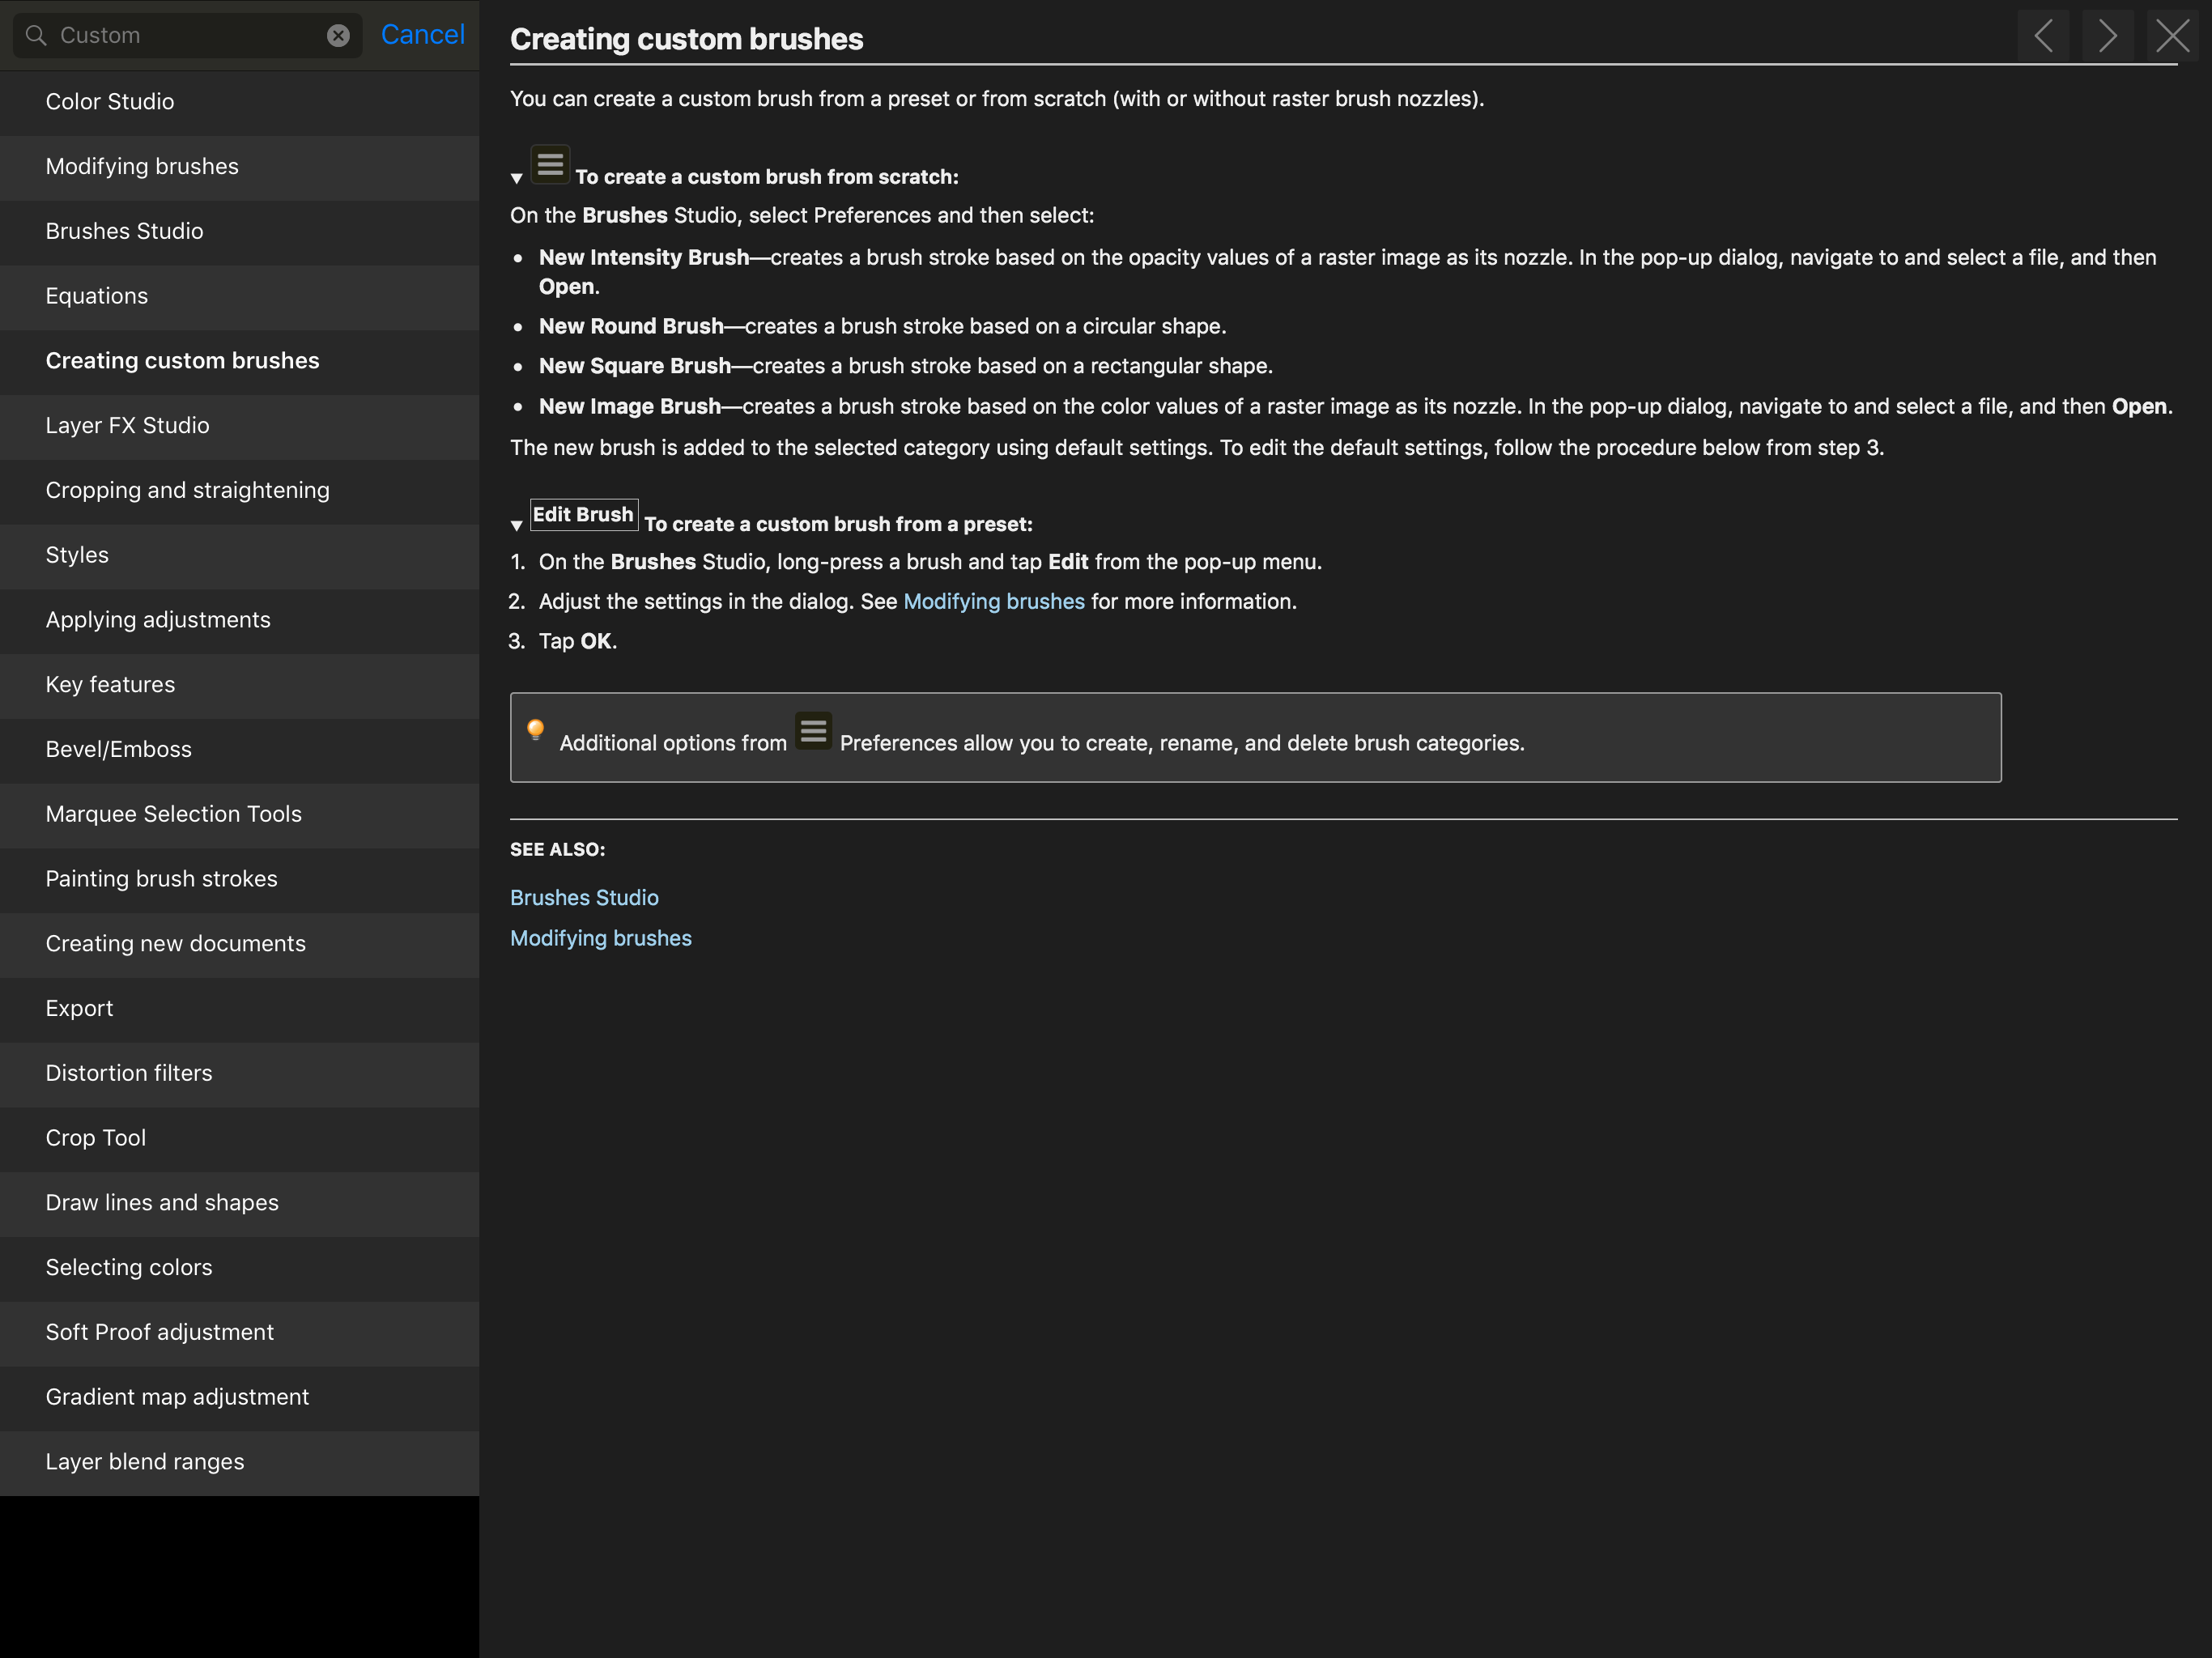
 When using my self-created brushes on mask layers, each intensity brush image dab (or whatever the proper technical term is) is surrounded by a square shape. The attached image is an example of my problem. This does not occur with any of the default intensity (I assume) brushes that came with the application, only custom/downloaded brushes. I followed the instructions for custom brush creation found in the help files. Then I followed all of the recommendations I discovered here in the forums and on YouTube: square image, PNG file type, 300dpi, both black on white and transparent backgrounds. Each attempt resulted in block-surrounded image dabs. Affinity Photo has shown iPad Pro users the way forward, as well as the way around the Company of the Big Red "A". Hopefully we have returned the favor via the App Store. It's time to help us further by updating the documentation and tutorial videos concerning the creation and use of custom brushes. Thanks!
-
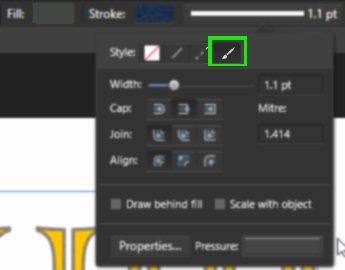
 Hi, I want to use an artistic Brush to outline my text. Lines work Dashed lines work The next option - "Texture" - doesn't do anything. If I click on "Properties", it opens up the Brush editing panel, but with no brush shown. If I select a Brush then open the panel, still nothing. What am I doing wrong? Regards, Steve
-
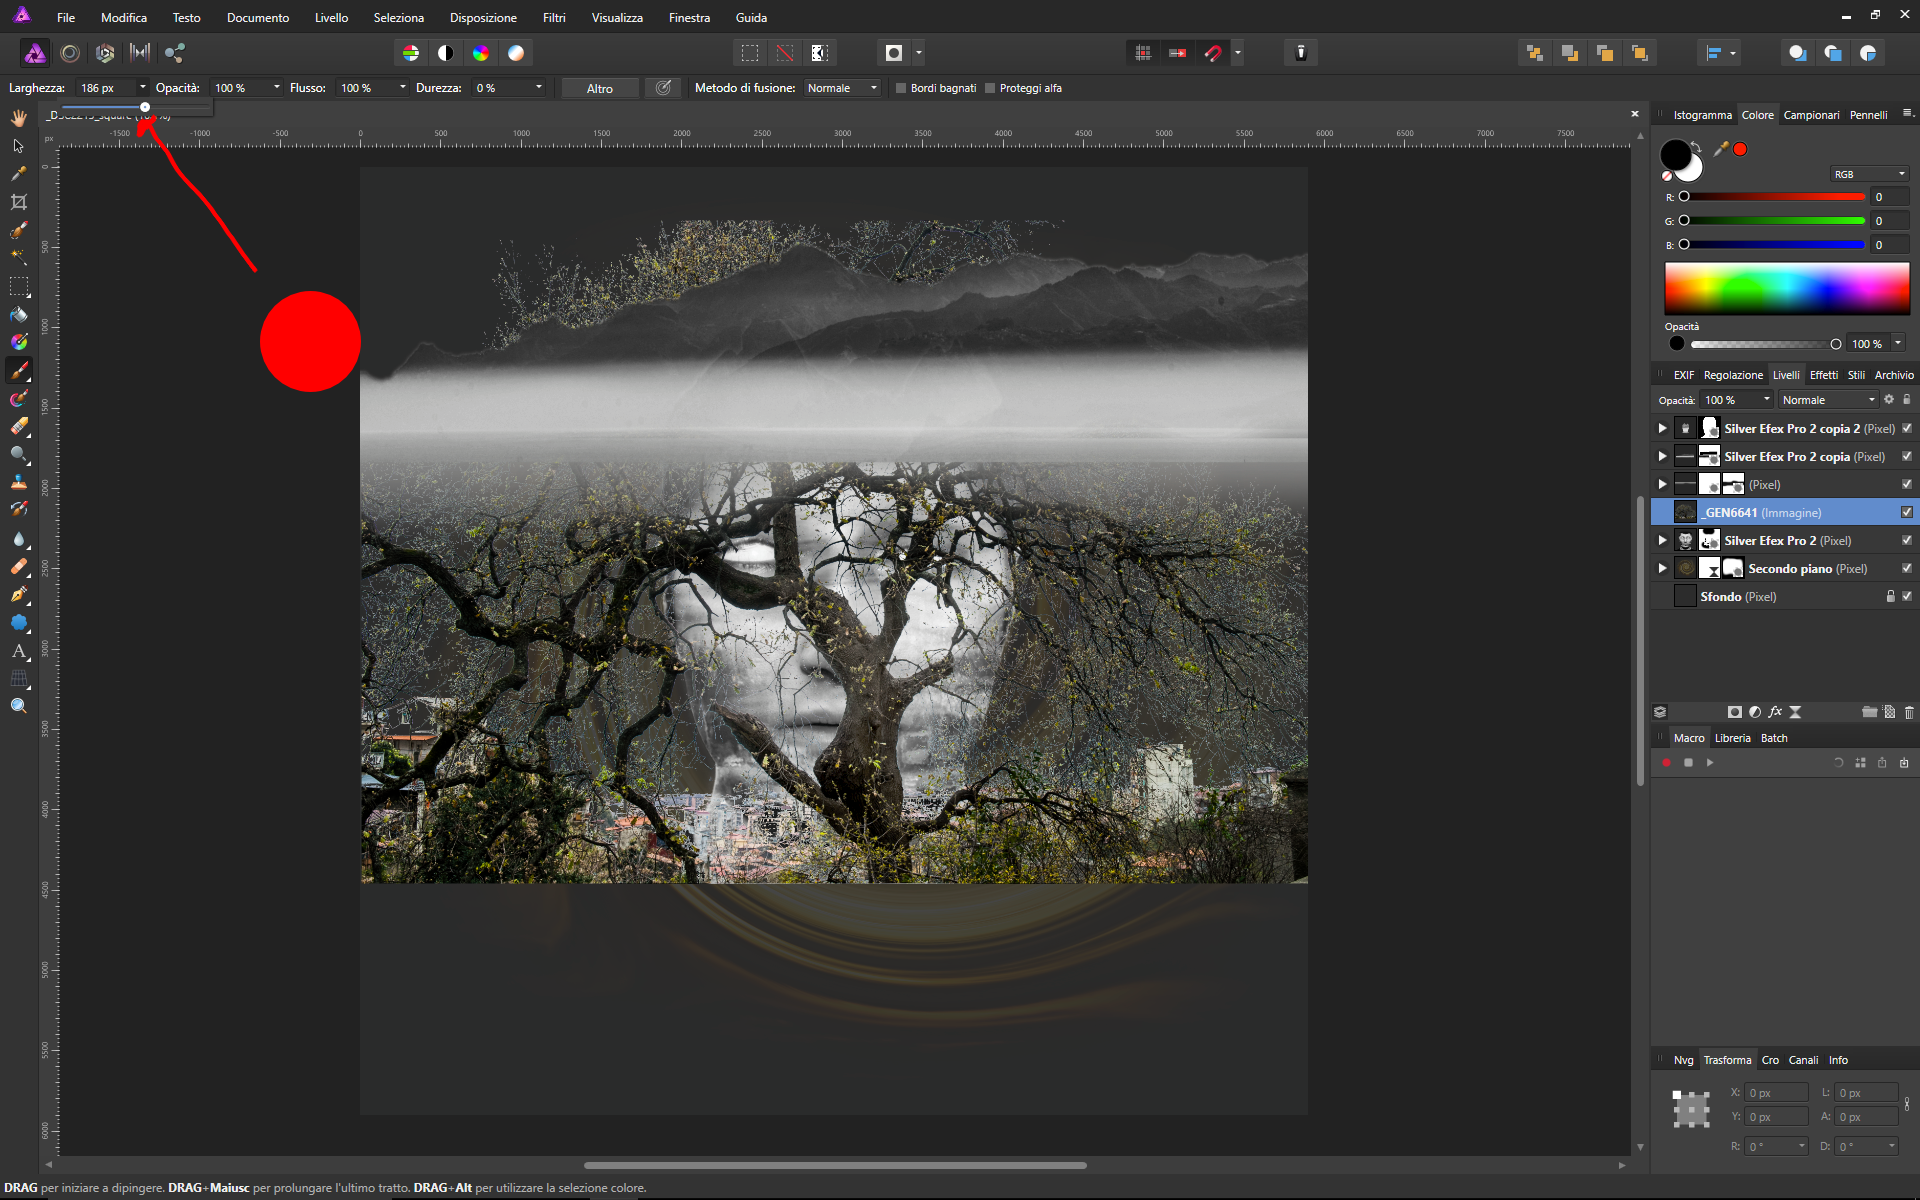
 Hi, can you see in real time the selected brush size when you move the mouse pointer to the work area? To see the actual width, I must first click on the workspace each time you set a measure. Thanks so much.
-
 Hi, I know how to resize brushes and change hardness/opacity using keyboard shortcuts but is there a way to alter the rotation of the brush by either holding down a modifier or step by step using keys? The clone tool is crying out for this ability - I can't believe its not there… Please tell me it is Regards, M
 -
Can someone please explain simply what the stabilizer option does, and the difference between rope and window stabilizer?? I cannot understand the help documentation about it....can someone explain it in simple terms? Thank you very much!
-
 Hello This is my first post here. I just bought Affinity Photo for iPad and the first thing I tried to do I can't seem to do. I want to use a brush and select a color from the photo. I have the brush tool and see the color picker but cannot see a way of getting the color from the photo. Also I have no idea what the little circular tools are next to the color picker. Is there a manual? Cheers. Martin
 -
 Hey Guys! Im just getting into Affinity Photo and editing in general and have a couple of questions: 1- is there a quick way to rotate a brush head in Affinity photo? - I know you can dbl click the brush type and drag the rotation slider but wondered if there is a short cut? 2- Does anyone know if the Social Kit Pro plug-in works with Affinity photo? Many thanks!
 -
Hello! So I bought Affinity Photo just the other day and I am really liking this program. However, since there have been reported issues of jagged lines when drawing, especially with tablets, I tried out the Beta for 1.6 to see if the issue was fixed. First things first, the new stabilizer feature is an improvement over the live version, which I have an example of with this first attempt at doing some lineart with the software (I used Lazy Nezumi Pro, but there are still artifacts of jagged lines in there when zooming in). As I said before, the jagged lines are improved upon in 1.6, but there is still one problem that really hampers my ability to create quick, smooth lines. The new version can handle straight lines pretty well, but when it comes to curved lines, there seems to be some form of input lag going on when I first begin the stroke (I am not using a regular brush, so the edges are rough on purpose). As can be clearly seen here, the brush strokes start off by not being able to recognize when I begin to sweep my pen in one direction, instead creating this edged curve that then practically disappears once a certain period of time has gone by (this also affects brush size based on pen pressure to an extent). However, the brush still creates a little bit of jagged lines in curves when it appears that it can't keep up with the speed that I draw in. While not as bad as in the live version, this makes me have to slow down my drawing/painting to the point where I have to wait every time for the program to properly respond to the input I am giving it through my Wacom Cintiq 13 inch HD tablet. If there is some solution to this, I will be able to drop Photoshop as my go to program fairly quickly.
-
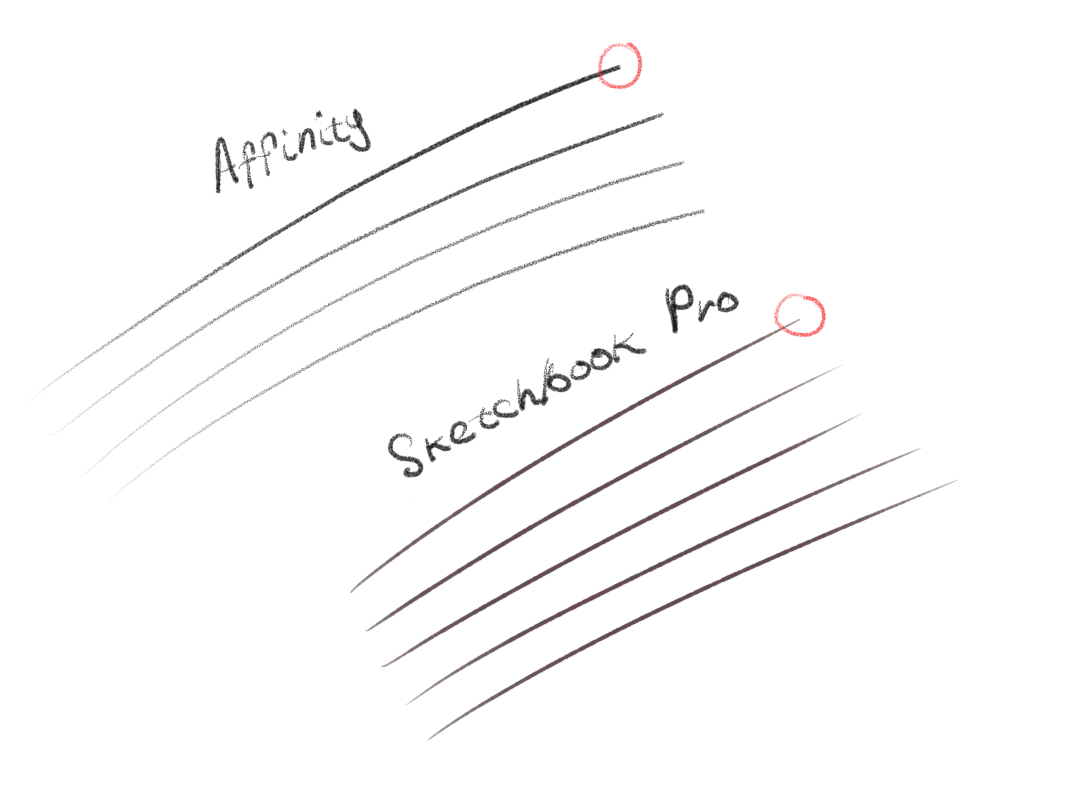
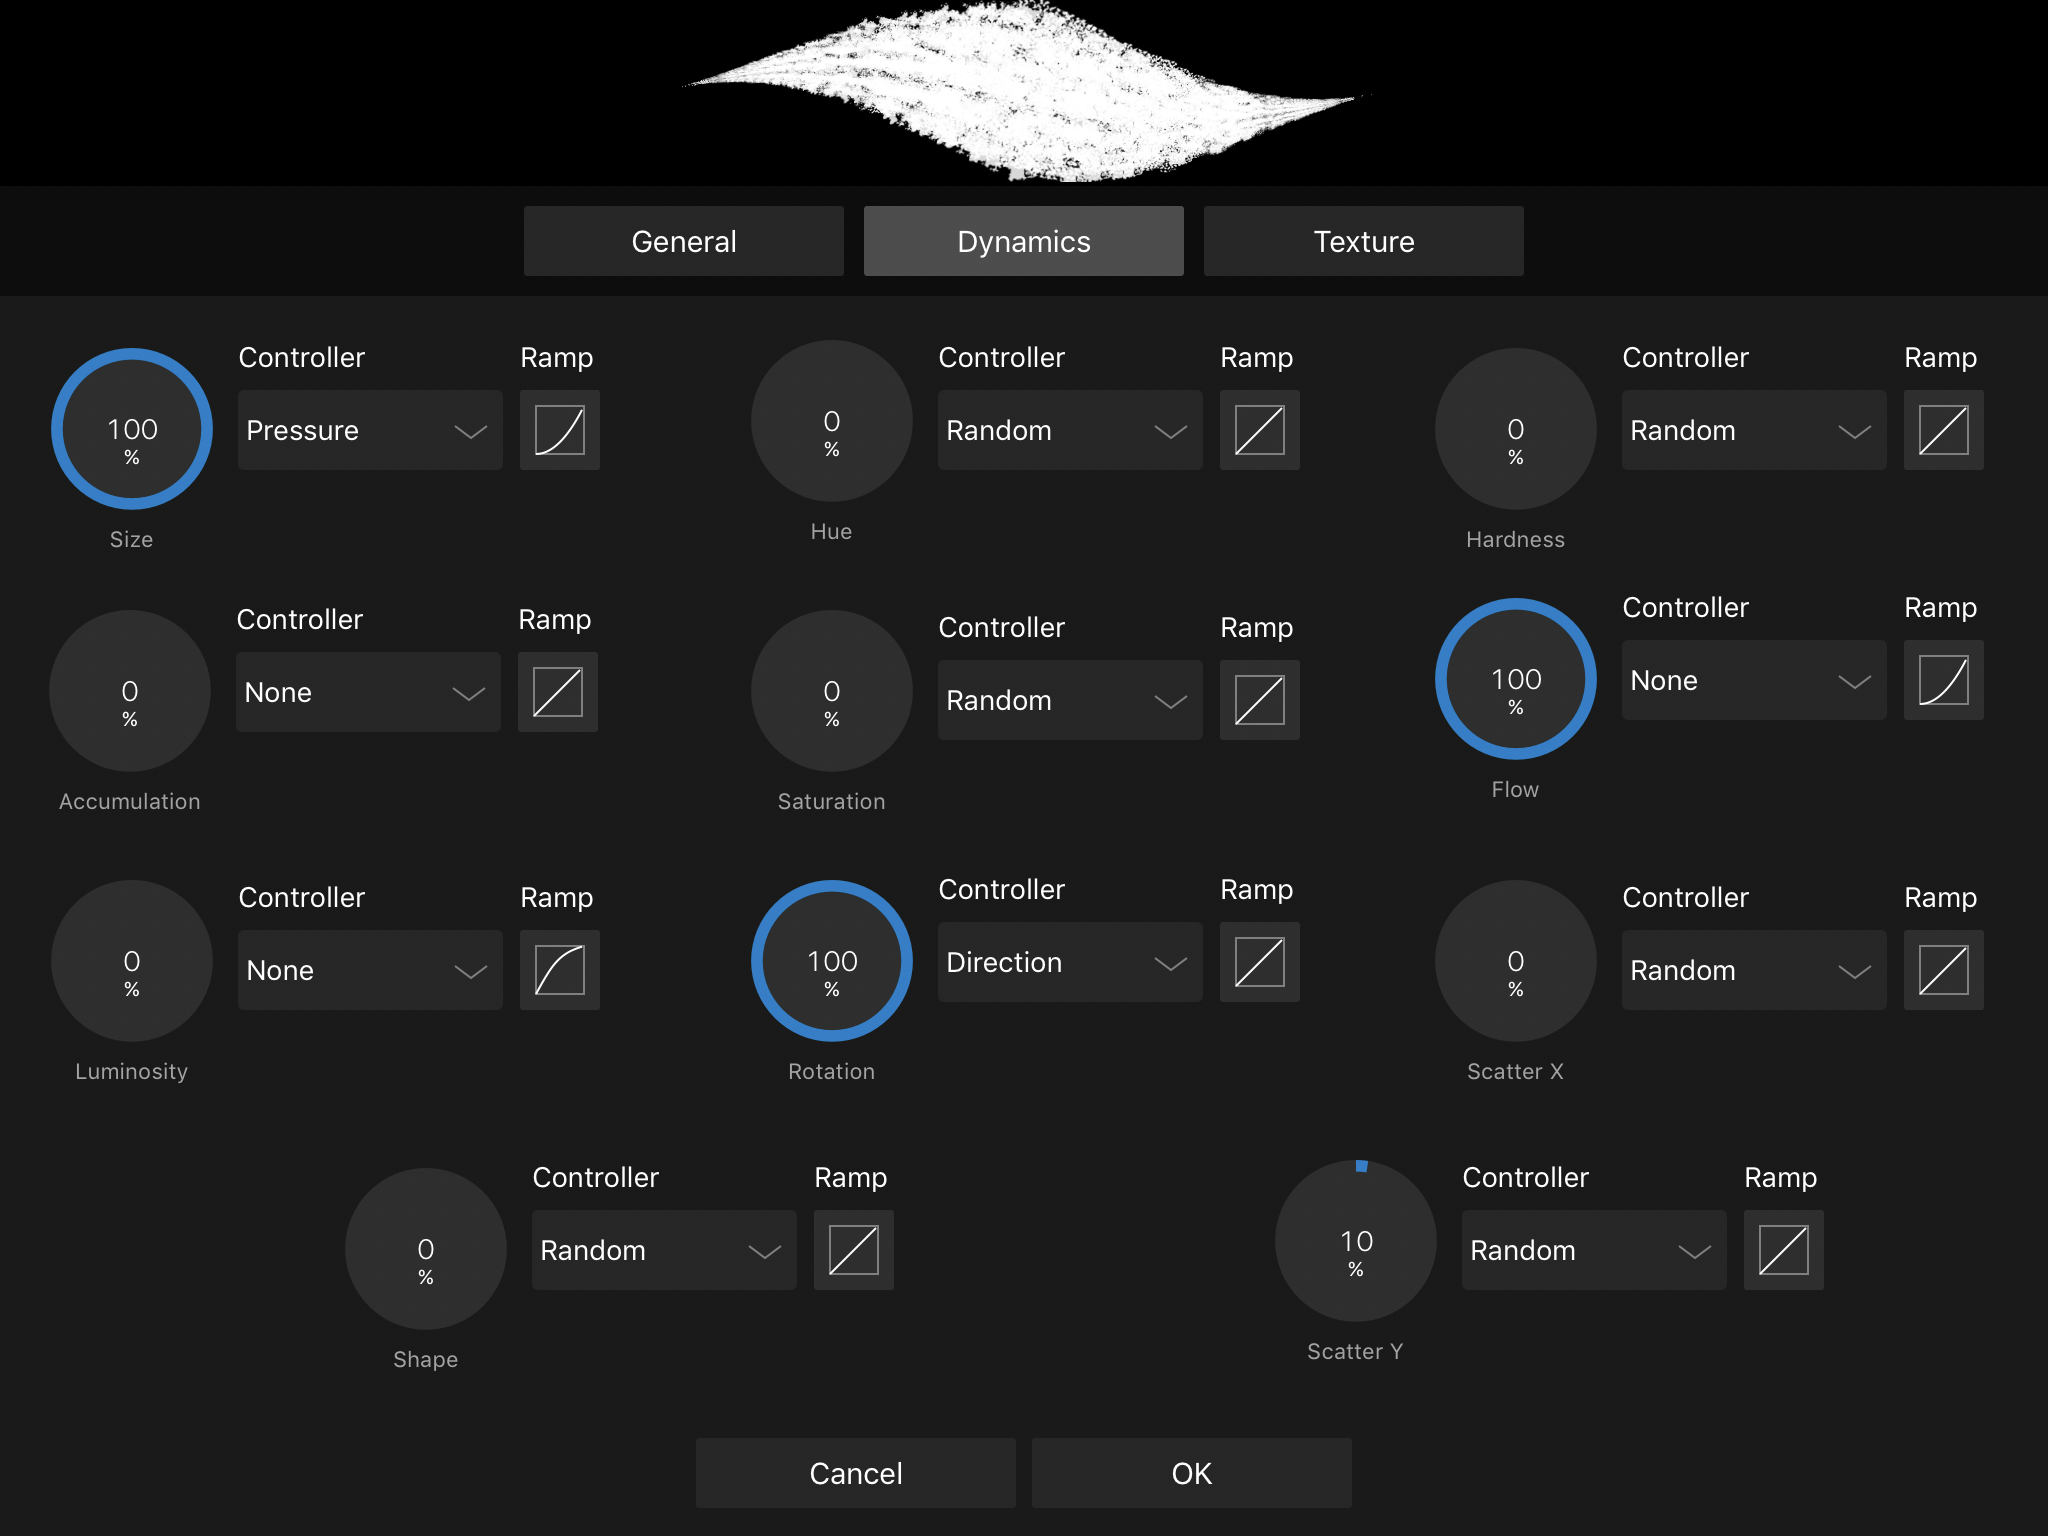
Hello everyone! I've noticed one thing about brush stroke in Affinity Photo, and I'm wondering if it's possible to achieve a certain brush stroke ending at all. So, here is the thing. If you look at the attached screenshot, you will notice that brush ending in AP is thick (Size Jitter is set to Pressure 70%, see another screenshot), whereas brush stroke f.e. in Sketchbook Pro is thin and smooth. I'm using a Wacom pressure sensitive tablet, of course. I've been playing with all the brush settings but I've not managed to get the same result as I can get in many other programs (may be even in PS?). I always get thin stroke beginning and thick ending. Is there a way to adjust any brush settings to get the same type of line as f.e. Sketchbook Pro and many other programs allow? UPD: It looks that in those programs which can provide this kind of brush stroke, brush size jitter is not only controlled by Pressure but also by Velocity at the same time. I mean, to achieve this smooth brush stroke ending hand should "take off" quite quickly.
-
 Greetings, Is there a way to make the Liquify Persona BRUSH SIZE bigger than 1024px ??? Thanks!
 -
 Hi I make vector brushes for Illustrator and am thinking of branching out to make some for Affinity Designer. I followed a video tutorial on how to make Affinity brushes and it seems to be that they have to made from PNG file source material. I'm a little confused by this as a PNG does not contain vectors. Does Affinity Designer somehow convert them to vectors or am I missing something/doing something wrong? Any help would be gratefully received! Thanks, Jeremy
 -
The brush stroke is really terrible. Although the stabilizer function was implemented in the beta version, it will not be a beautiful line unless you enter a high number. Also, you can see that the stroke is distorted at the beginning and the end. The stabilizer mode is the same as Lazy Nezumi Pro, but if you increase the value, it will be a beautiful stroke, but it will impair the drawing comfort. The first image is an image with lines drawn by Affinity Photo. The stroke is really terrible. The second piece is the line drawn in Photoshop. The strokes are very beautiful, but this does not use Lazy Nezumi Pro etc .. I'd like Affinity Photo to be able to draw beautiful lines in the same way without a stabilizer. Affinity Photo is truly amazing except for strokes. Just because the stroke is so bad it's in a state I can not use very much. Could you tell me if there is a way to solve this problem? My PC environment is as follows. Windows version : 10.0 Build:15063 (x64) CPU : Core i7 2600K 3.40GHz Physical memory : 16351 MB Direct3D11 Driver: NVIDIA GeForce GTX 970 Pentablet: intuous4 PTH-840
-
 Hi! Affinity newbie here. What I'd like to do is this: An infographic with text, images and a map of a whole country that shows things as simple colored areas (one area of the country in one color, inside that area a smaller area with a darker shade etc.). The colors on the map need to be recreated up to several times a day, so user-friendly solution necessary. My problem:The coloring itself seems to be easy to do using a brush. But how to prevent spillovers? Possible solutions in my mind: - The map as a separate object. Draw on map, then superimpose the map on the rest of the image. Tried this, but the color wouldn't stick to my map. Maybe it is of a wrong type? Can I change it to an "artboard" which seemed to take the color just fine? - A map-shaped hole in the rest of the image, that reveals the map layer below. With that one could use the brush, spill over to their hearts content, yet the spillover would be hidden by the image on top. Any suggestions? Or am I thinking too Photoshop here? Thanks for helping out!
 -
 Either I am overlooking an obvious step (as I've been known to do) or Overlays in the Develop persona are not working on the AirPad 2. Bring in a RAW image, click on Overlays, select Brush Overlay, and in the context toolbar select Show Overlay. When I brush on an area of the canvas with the paintbrush, I expected to paint in a red overlay like in the RAW: Overlays on Vimeo video but I don't see any change whatsoever. No red glow where I've brushed. No indication that I have marked the canvas at all. If I go to the next step in the Help instructions and select an adjustment, there is no change in the image. What am I doing wrong?
 -
 I'm fairly new to Affinity Photo (I've been playing with it for little over a week) and I gotta say, it is probably the best impulse buy I ever made on the AppStore and I expect to be using this app for a long time. I came in from Procreate, so I wanted to recreate my favorite brushes. I saved the brush shape and texture and created a new brush in Affinity with them. I test the brush out and I noticed that the color of the brush is not affected by the color I choose in the color picker but instead it's always the color of the brush image I use. Is there a setting I'm missing that will make image brushes be affected by the color picker, or is the image brush meant to be like a stamp and can't be affected by color? If it's the latter, how do I make a brush similar to the ones in the "Painting" category?
 -
 I've noticed that the Color Picker Tool does not seem to impact other tools as i would expect, for example the Color Replacement Brush. Am i doing something wrong?
 -
 I am using Affinity photo trial to do some post-processing on stitched panoramas. To get rid of the occasional stich fault I am using the clone or healing brush quite a bit. To use them - because of the perspective you need to quite often rotate the brush which works well for positive numbers but if you need to rotate a brush slightly in the other direction you need to enter 358 or 359 - a negative number like -1 or -2 is not accepted. It would be very helpful if that could be introduced at some point - it would make work with the clone and healing brush easier. Cheers.
 -
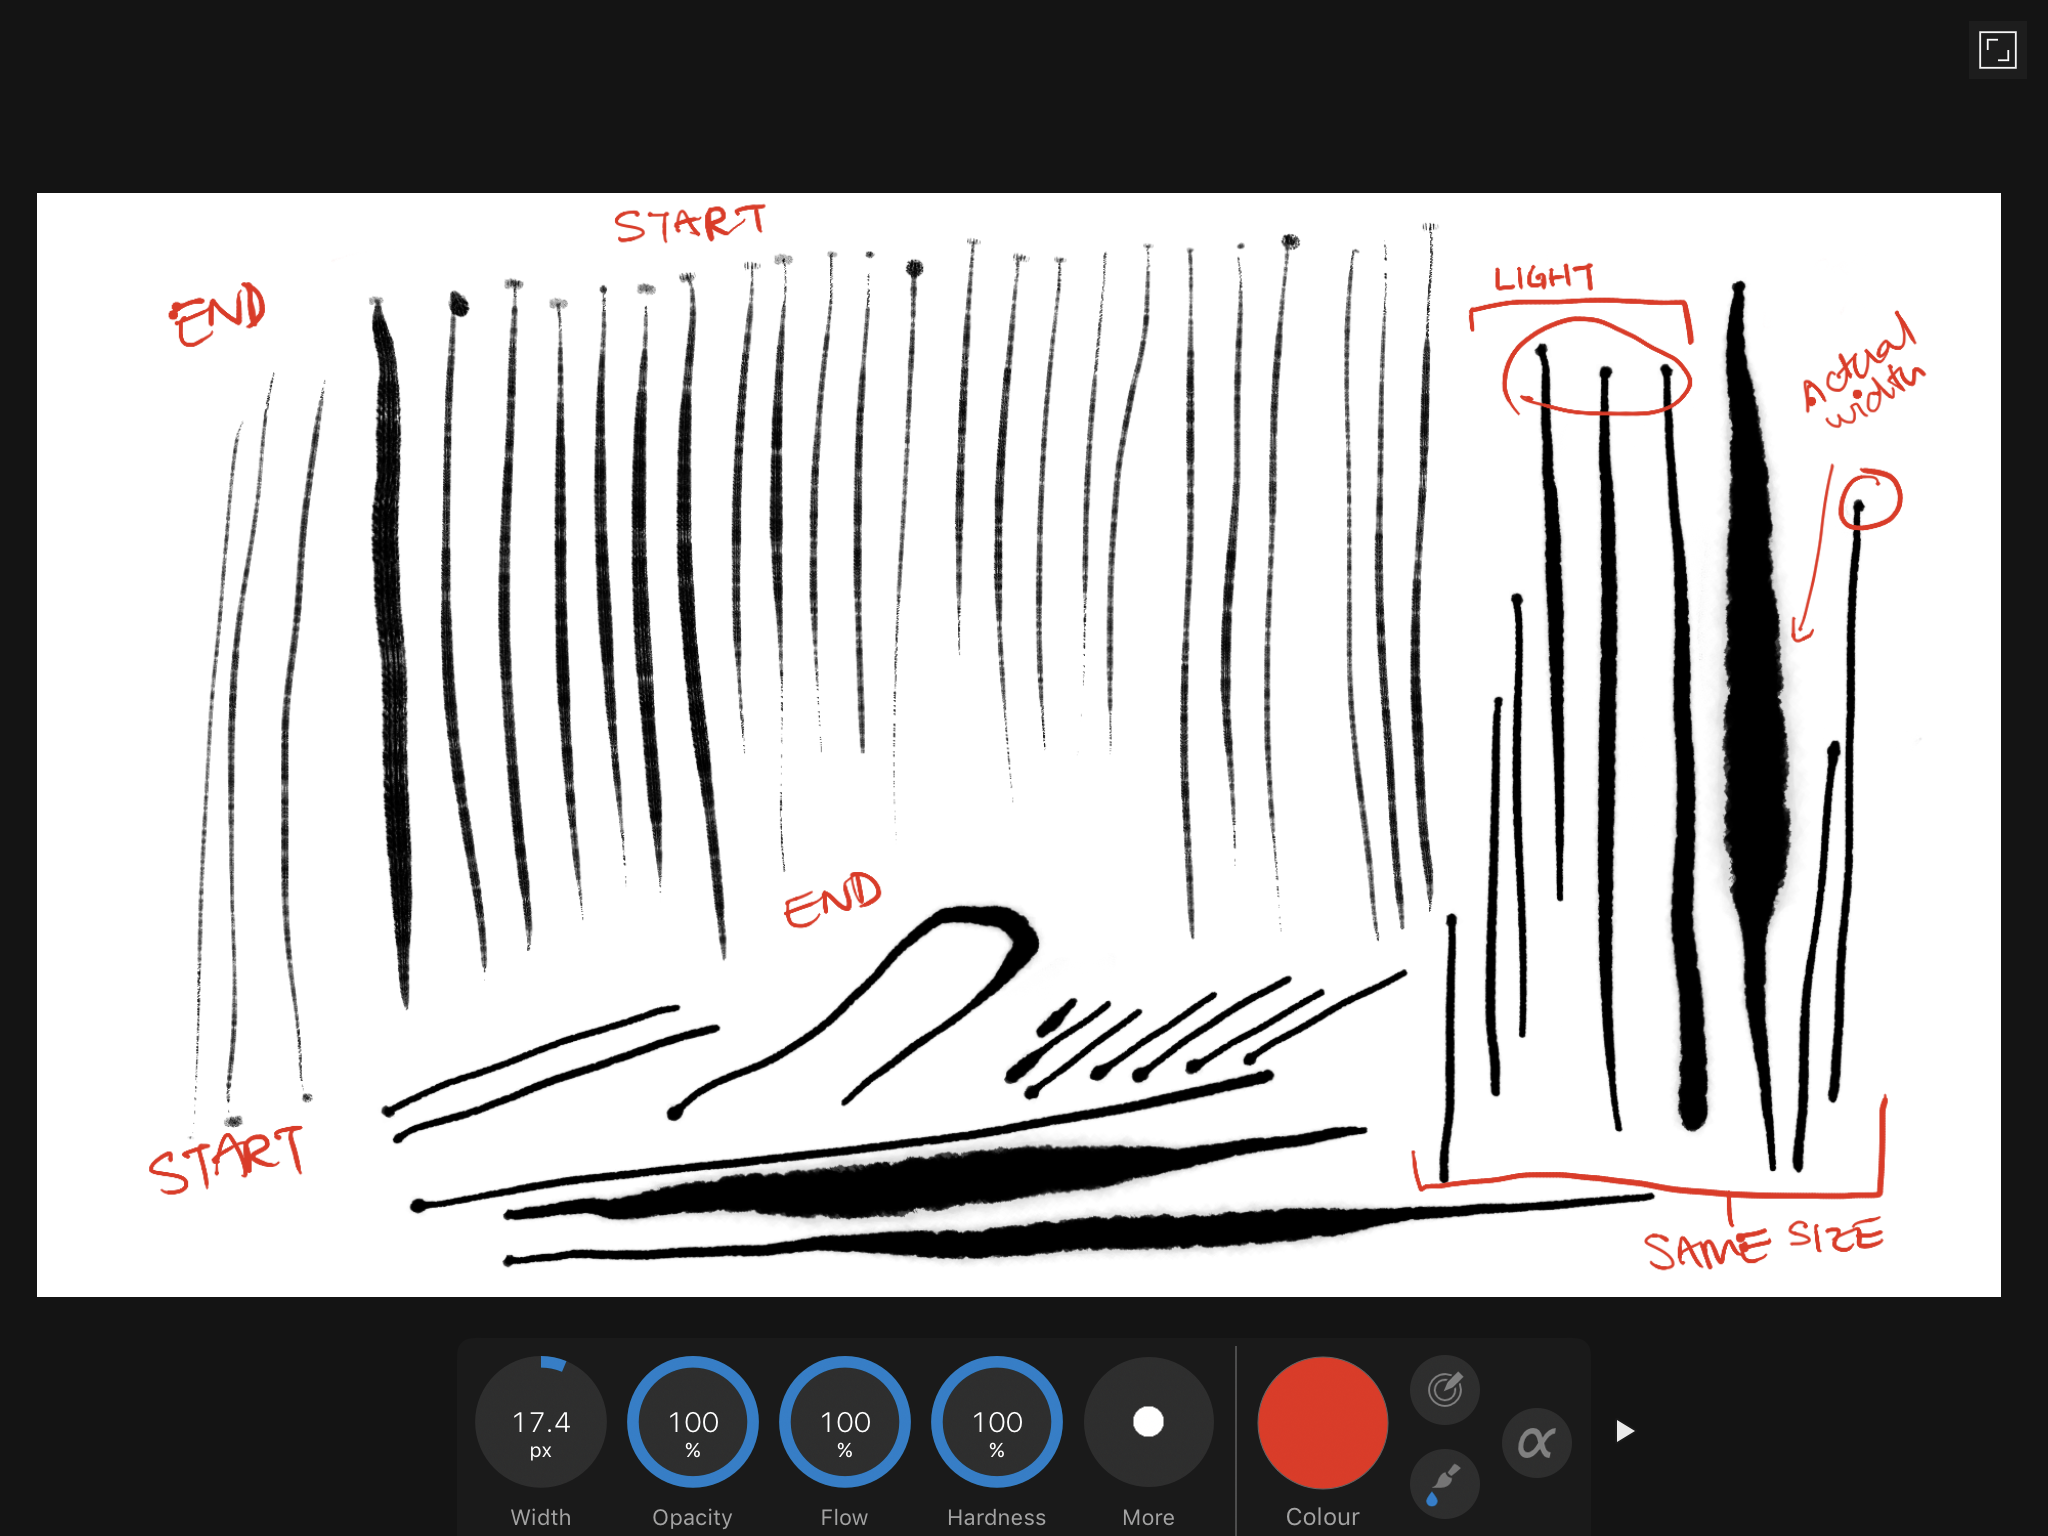
 Hi all, a new affinity photo user here. I just got the app on the ipad, and have not used this at all, so it's all still a tad foreign. I tired looking up some information on my issues, but found it slightly difficult to locate answers to my questions. So hoping some people can help me out here/ direct me towards the right place. 1. First issue regarding importing photoshop .abr files, I've tried with an .abr file with just one brush, and that seem to work. However when I tried to import a larger .abr file containing multiple brushes (around 700mb) the app would crash. The brushes are from photoshop cs5- cs6 so I'm not entirely sure if it's just a really large .abr file or it can only be one brush at a time? 2. Brush group adjustments, by default, there are multiple brush groups, with different kinds of brushes eg dry brush, drawing...etc. However it doesn't seem like you can edit / move / duplicate the brushes around between these groups? Or I just haven't figured it out. If anyone can clarify that, it would be great. The only thing you seemed to be able to do is edit settings, rename the brush, and delete the brush. 3. Having then tried to adjust some setting on the brushes, I've noticed that when I set brush size to 100% regardless of curve adjusts there is always this initial spot from the brush at a larger size as if I was apply a lot of pressure, however I would only be pressing extremely lightly, it was then jump to presumably what the size should be for that pressure, and then the rest of the stroke is fine. Attached are some images of some of the strokes, and settings which I've adjusted it to, again I'm not entirely familiar with how all the settings work, but I cannot figure out how to change the setting to have just a nice smooth line tapering properly. Hopefully someone will be able to enlighten me on my current situation. Thanks!
-
This is what I have experiment in Affinity Photo - The mix brush behave more like a smudge brush I would like to see a mixing functionality like "Paint tool sai" as a slider, mixing factor etc... in all brush check paint tool sai for reference is the best. - Add a clear layer option in layer persona every time I have to delete a layer and create a new one - Add clip layer option useful for painting under an specific shape or color block I will post more feedback while testing the app
-
Hey, This sounds strange but I'm having a problem with drawing with the brush in the pixel persona set. (I use the pixel layer too since drawing doesn't seem to show up on a non-pixel layer) When I draw the lines show up fine but when I stop drawing the lines will "twitch/move". By this I mean they'll either pixelate slightly then go back to how it was repeatedly creating this twitching effect or it will just move slightly back and forth. It's horrible on the eyes and makes drawing on the program terribly difficult. What is this? Is it happening to anyone else? How do I make it stop? Thanks
-
 Hi all, On iPad Pro, how can I tell where I’m drawing. Normally I’d expect a circle or other shape to identify where my brush is in relation to an object? Is there a setting for this somewhere? Cheers. Harrison
 -
 Hello, In an effort to transition from Photoshop to Photo, I thought I'd try to at least establish a freehand sketch for a design I'm working on in Photo rather than Photoshop. I tend to use a simple hard round brush with shape dynamics enabled in PS and Jitter determined by Pen Pressure. With Photo, I've selected an equivalent brush under the Basics and set Size Jitter to Pressure under Dynamics. So far so good. The problem I'm experiencing is that when I sketch a freehand curved line in Photo, the precision isn't quite there. The curve I draw is often made up of a series of small (and sometimes not so small) straight lines rather than following the pen exactly. It's as if the software is unable to keep up with the pen and interpolates between two points along the movement of the pen. Photoshop doesn't do this. Has anyone experienced this? Is it a known issue and if so, will it be addressed? Having the line follow the pen exactly is critical Thanks, -grant
 -
Hello, I've performed a search for this to see if someone may have a solution but couldn't find anything so I'll post my question. Apologies if this has already been answered. I'm beginning my gradual migration from Photoshop to Photo and I thought I've begin to sketch out an interior space for a client using Photo instead of Photoshop. In sketching out the space I would like to draw simple straight lines as is possible in Photoshop - hold Shift click with the pen where you'd like line to begin and where you'd like it to end. In Photo it always works from the last drawn line or seemingly where the tablet has last detected the stylus leading to undesired results. Is there a way to configure it so that it performs like Photoshop or an alternative that permits the freehand drawing of straight lines without having the line begin from the last point of contact. As it stands the straight line option via the Shift key is unusable. I've adjusted the sensitivity of my Cintiq but to no avail. Is there perhaps something I'm missing? Thanks -grant
-
In the Brush Context Bar at the bottom of the screen, there is a Color section with 3 small icons to the right. I can see the changes in the brush when I select either of the two small icons but what does the one on the far right do? If I select it, then nothing happens when I try to paint with the brush. What am I overlooking?
-
Would like to see ANGLE jitter and ROUNDNESS jitter added to the brush engine. It would make photoshop brushes import identically.
- 1 reply
-
- 1
-

-
- brush settings
- brushes
- (and 4 more)