Search the Community
Showing results for tags 'Border'.
-
 Hi guys, Can Affinity create wave like borders, or other styles of borders automatically? I attached an example, the bottom border is what I'm talking about. Thanks
-
 I'm having a problem with Photo adding a white border when I batch-process converting Affinity files to JPG. This doesn't happen when I export individual files using the file menu. Am I missing a setting in the batch job dialogue that would stop this happening?
 -
 Hello I use A.Designer Trial. I like the artboard, but I have problem with it when exporting. I have created UI in Inkscape, then I open the document in Designer and create artboard for export. This is how my ab(artboard) are organized: - main ab for whole document - inside main ab I have for each icon, button or graphic element individual ab for example - main document (artboard) |- layer1 |- - ab1 (artboard) |- layer2 |- - ab2 (artboard) etc.. problem is, when I switch to ExportPersona I can see the some frames have bigger size then ab. For example I have ab with 40x40 but frame have 41x40. I discover every this problem appear only when ab have position xx,45 or xx,98 in px. In ExportPersona the xx,xx is changed in to xx for example from 122,45 is changed to 123 or 122. Same for the size, if some ab have 80,45x80,61 then frame is rounded in to 81,81 size. It is looks like frames have own coordinate system which are connect to pixels? I want export svg graphics and I think exporting icon with size 45,499x48,788 is ok, there is no need to have frames tied in to pixels. Another strange problem is, when I switch document units from pixel to points with 2precision, frames coordinates are exact as ab, but it still create "one pixel" bigger frames as ab. Exported graphics have same size as frames. Is it bug or I am doing something wrong? Is there some option to have frames exact coordinates and size as artboard?
 -
 In Photoshop, Ctrl-Alt-C brings up the Canvas Size dialog box. It works the same way in Photo. However, in PS, first there is a "Relative" check box that you can check (it remains checked) and second the program remembers from which point you want to change the Canvas size: I set it so that it will be changed from the center point, and it doesn't move. In Photo, it moves back to top left whenever you open the Canvas Size dialog box. Furthermore, in PS, there is a drop-down local menu to choose the color of the Canvas extension area: I set this to black and the software also remembers it. Therefore, when I call up this dialog box using Ctrl-Alt-C, I find all my settings again and only have to type in the size (thickness) of my black border, and hit Return. In Photo, first there is no "Relative" check box, there is no menu to select the color of the Canvas extension area, and then the program does not remember from which point I want to extend the size of the Canvas and moves back to its own default. I was wondering whether there is something I'm not doing right, or if it is also feasible in Photo but just not the same way... It is quite important for me as I usually do a thin black border around my photos... therefore, many thanks in advance for any tips!
 -
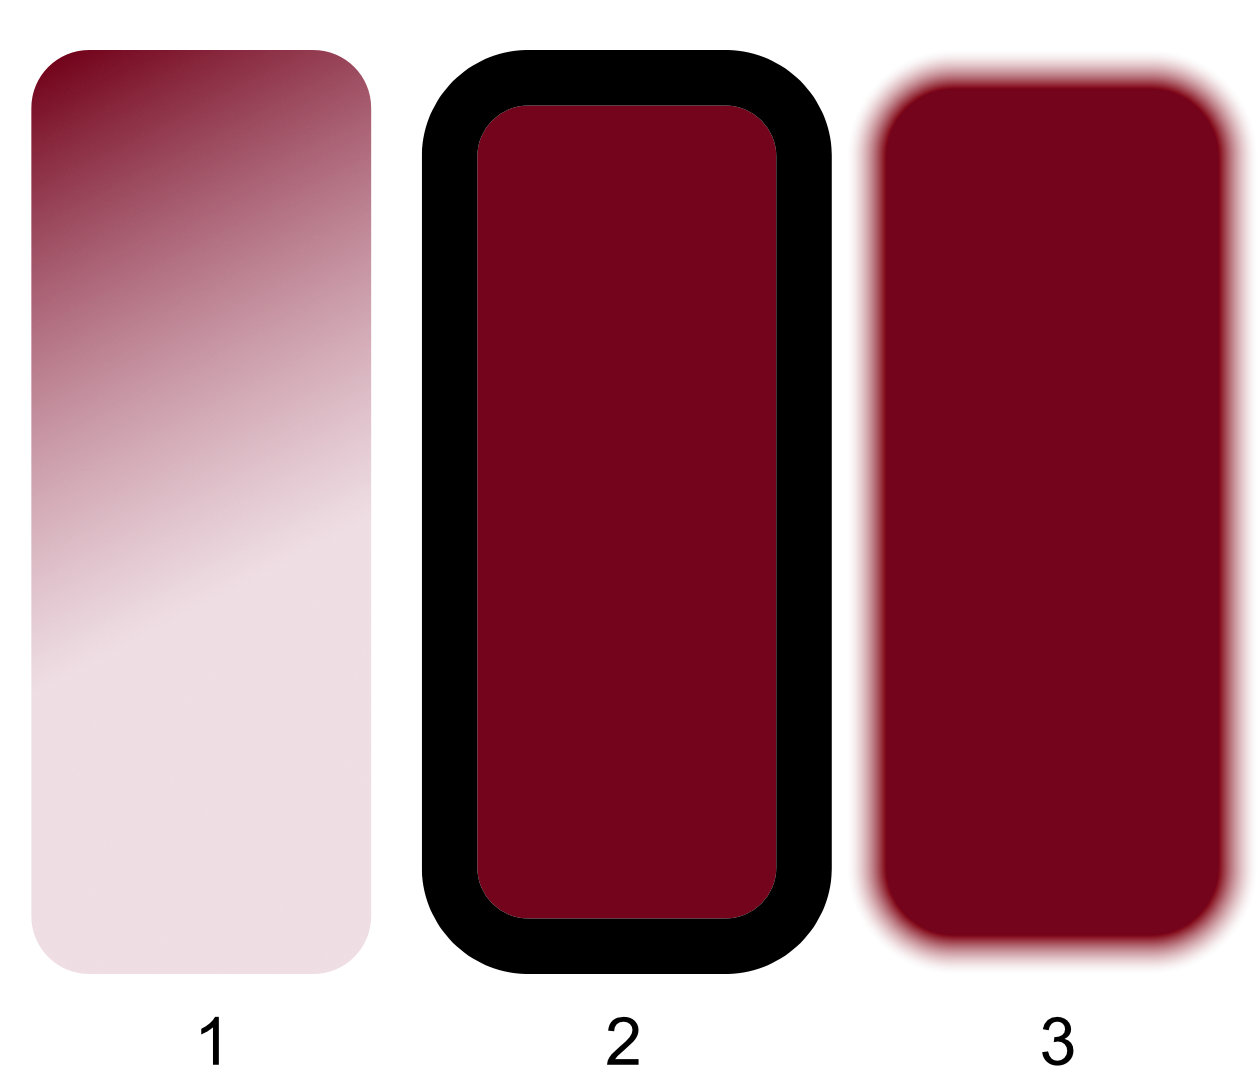
Using Designer 1.6, I have a rectangular shape with a non-uniform (gradient) fill and some text inside, represented by shape #1 above (without the text, of course). I would like to apply a transparency effect where the edges of the shape fade off into being completely transparent. In order to try and describe what I am trying to do here, I made shape #2. I want the inner edge of the black border to be completely opaque with whatever is directly under it, the outer edge be completely transparent, and a gradient transition fill in between. In shape #3, I tried to use the Outline layer effect, as shown here: ...and kind of got what I am trying to do, but not quite. Maybe I need to use a duplicate layer and use it to mask out the border of the original shape? I have a feeling I am really close with this, but missing some step somewhere.
-
 Hi guys. I create a shape by Pen tool. Is there a way to make a dotted /dashed line around it? Thanks
 -
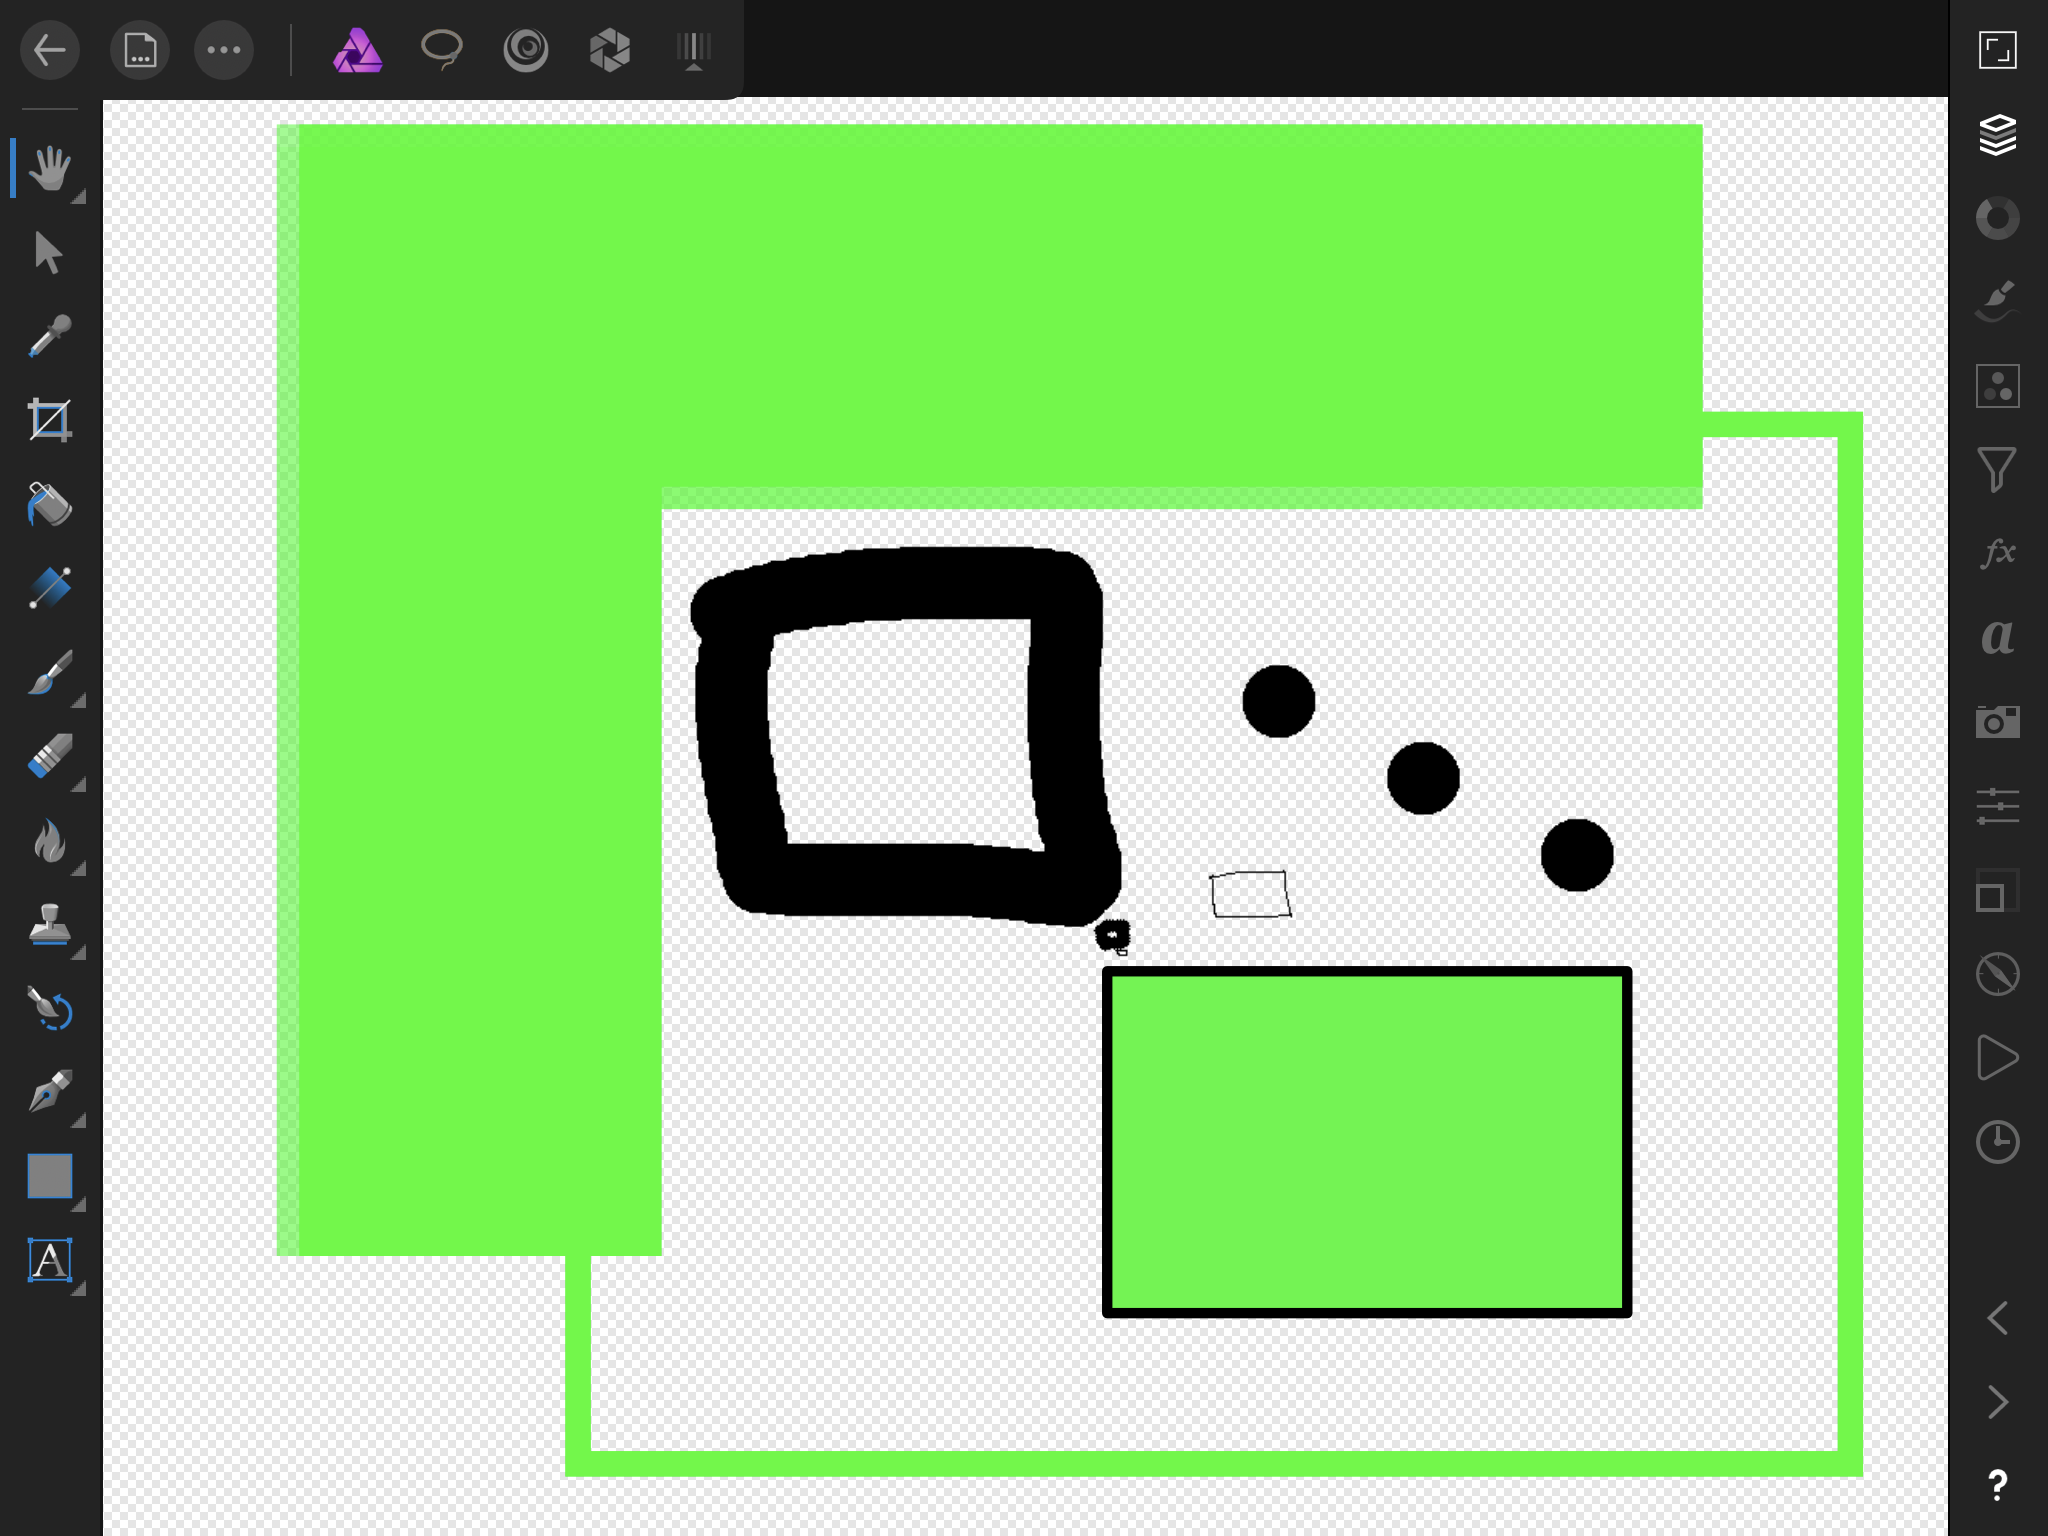
 Hi all, I need help making a proper square or any shape with perfect sharp corners/strokes. I can’t find out how to do so - am I missing something or is this a limitation of Photo’s engine? Please see the attached screenshot. Anything drawn has round corners, even the Pen tool and the Pixel brush! The only way I can get sharp corners is to import a vector object but even then it’s borders lose opacity and it doesn’t look right.
-
 Hi There, Is there a way to remove a border or stroke of a shape in a selected location? For example, I want to remove the stroke on top or top border of a rectangle. If not removed change the color. Thanks!
 -
Hi There, Is there a way to remove a border or stroke of a shape in a selected location? For example, I want to remove the stroke on top or top border of a rectangle. If not removed change the color. Thanks!
-
 If you hit the pulldown switch of the rubber size, you need to be quit left of the downarrow-sign. If you are more than the middle on the right, the pulldown size select closes immediately. If you reach the borders at the right and at the bottom of a picture by using the rubber, the rubbercircle disappears behind the border of the picture and become an arrow, but if you try to touch the scrollarea, the rubbercircle appears again. Best Regards
 -
 I am new to AD. I have been using DrawPlus for some time. I need to create a circular border design within a donut. I can find no forum or info that addresses "border or borders". I need something like an X with a top and bottom. I need this for a circular logo. Thanks
 -
 Hello Mask was created from black and white image I want to erase white edges by adjusting mask boundaries I want you to tell me a good way Thank you 4691.afphoto
 -
 Maybe I am blind and I totally missed it somehow, but I'm not able to set the width of the stroke (of a rectangle for example) to 1px. Or is this not (yet, hopefully) implemented? Thanks in advance guys! :)
 -
 Hello, is it possible to change the border line width format to px instead of pt in the AD Settings (globally)? It can be really annoying to move the slider only in pt format, for now i have to type in the px units manually every time. I wont ever need pt in Webdesign, at least not in my case. The other problem is the font size, I've changed the AD Font-Size Setting to px (globally), but the incremental font size shown in px (font window) is really bad for webdesign, e.g. at the moment the AD Standards are: 20.8px, 25px, 29.2px, 33.3px, etc. That's just wrong, espacially because you don't have any px decimals in Webdesign (they kind of work, but still aren't correctly / fully supported on all devices down to the present day). The only acceptable formats on the web are px, percentages, em (and optionally rem) units. P.S. Love AD with every day more and more, just missing a few functions here and there as the one mentioned above.
 -
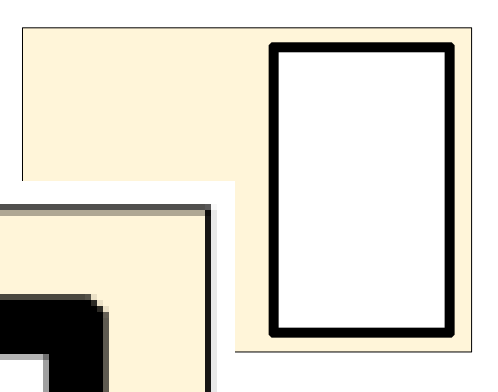
 Hi Guys, first post here... Currently trialling new options as alternatives to existing software at the minute. Personally I've used Fireworks for the last few years mainly for digital based designs. However going forward we need something new. Having looked at a few options Affinity seems to tick more boxes than the other options and looks great so keep up the good work :) Anyways on to the question. I'm guessing this may have been asked a lot but cant find a definitive answer. So simply when creating a shape and adding a border (Stroke) you get the fuzzy antialiasing edge. One side of the shape has a solid 1px border and other sides you get the extra faint line. Small issue but also very off putting. Am I doing something wrong here or is there a way to stop this so a 1pt / 1px stroke or whatever value stroke is solid with no fuzzy edges? The zoom is 100% here and I've made sure the shape was a realistic size like 500 x 200 px. Bottom left is zoomed in to show the aliasing. Thanks in advance Michael
-
 Hi everyone, is there a possibility to set the starting point of a grid to the border of the document? In my specific case I need to have a grid with 4mm spacing and a border of 10mm at all sites of the sheet. Can I move the gird in that direction that the grid lines are lined up with the left a top border? thank you
-
 Let’s say I have an object with a fill and border, both have the same color but the border’s lightness is 10 points lower than the fill’s. I would like to change the color/hue/lightness of the fill and have the border color/hue/lightness change with it while keeping the lightness at the same distance from each other. Sounds complicated, I hope you understand what I mean. Is there a way to achieve this?
 -
 Hi, how can i dissable the red thin border when drawing circles or rectangles in AD? Contour is set to none.
 -
Firstly a big thank you to the Affinity Photo for Windows team for this software. I am learning more and more about it and liking it the more I use it. I would like to see a simple but accurate and consistent of adding a border to an image. In Photoshop it is done by going through "canvas size" and in Paintshop Pro (a program that I have been using lately because of problems with PS) it is even more simple, you go to "add borders". In both you can select what colour you want. I like to add a 4 pixel white border, then a 4 pixel black border to images that will be projected or posted on Flickr. The two methods do not remove any pixels from the image, whereas in the tutorials for Affinity it appears that pixels may be lost. Also it does not seem to be as accurate, or as easy, as I would like. Many Thanks John.
-
 Apologies if this has been answered, I looked but could not find. Is there a way to add a border automatically when exporting or printing the artboard? in Inkscape, this is done simply by checking "Border on top of drawing" in the Document Preferences - Page Set-up. Thanks.
 -
 How can i remove the gray border on all artboards Are the following options available? - enable / disable border - change color Thanks BR George
 -
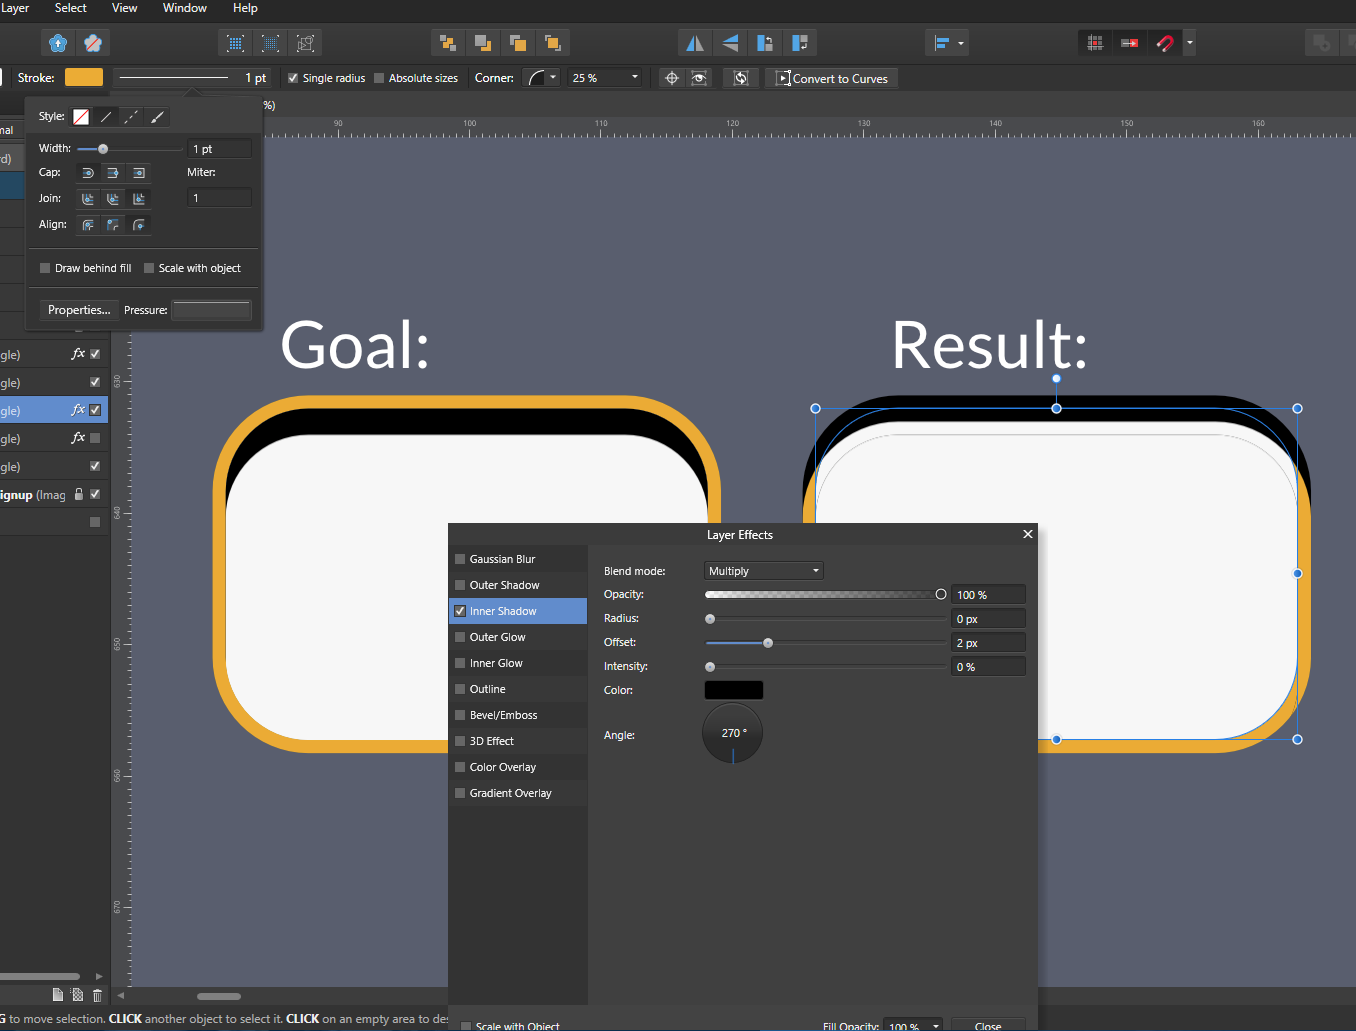
 Hello! I'm trying to apply an inner shadow effect to my rounded rectangle. I don't want the inner shadow to apply to the border, only to the fill. This is how it works in Photoshop, for better or worse. I've fiddled around with the stroke and effect settings, but I cannot seem to achieve the goal, except by creating two objects and having one be the border, and the other be the fill. Is there a way of having the effect only apply to the fill, so I don't need to manage two distinct objects? Using 1.5.0.26 RC2 on Windows 10. Cheers Alex
-
 Hi guys, I do not manage to change any of the attributes of the surrounding frame of any Frame text. I would like to have a background color and some more padding towards the border. The only way I managed to do so, is to use a formatted square and align artistic text over it. Is there a way to apply formatting to the frame of a fame text? Thanks Lars
 -
 I've only just started using Affinity, and want to know if there is a simple way of adding a border (black or white) to an image. In Photoshop it was fairly straightforward, using the resize canvas and selecting a colour. If there similar functionality in Affinity?
 -
 Hello, today I´m wondering how to insert graphic text with an automatic frame. I have to label some places and would like to differ some of the labels by bordering them with a frame. I guess that a manual bordering would cause inaccuracies, so I´m looking for an automatic solution. It would be great if someone could tell me something about this. And if so it would be very helpful if this would be possible very detailed as I´m not used to design and affinity :) . Thanks in advance und my best regards, sandfraeulein