Search the Community
Showing results for tags 'Blend'.
-
I've brought this up a few times on the forums, but (and I'm getting desperate here) pleeeease add Dissolve to the Blend Modes list for layers and brushes - pretty pretty please! The tedious workarounds to achieve this effect simply aren't the same, and not nearly as effective. Dissolve is the easiest way to turn any, otherwise normal, brush into an amazing textural experience, and was one of the most used features for me in Photoshop. Dissolve played such a big role in my work that I've had to adapt my style completely after switching to Affinity, and I miss it dearly. I even took the time to record this little screen recording I'm working on to show why it works so well in Photoshop (just watch at 2x speed to save time): https://youtu.be/pywfxxuXaCc All I used in the video was a plain old, run-of-the-mill soft/feathered brush, but with Dissolve set as the blend mode. As you can see, it instantly becomes a magnificent texturing machine which has SO many practical applications, especially in creating digital illustrations. I've also seen it used excessively by some really big names in the creative industry, such as Matt Taylor (http://www.matttaylor.co.uk) and Studio Muti (https://studiomuti.co.za), just to name two heavy-hitters. I can't imagine it being very difficult to add another blend mode to the list, and I've been checking for new beta's daily hoping that dissolve made the list of added features. Please add it, for me, for others, and even for this poor, misunderstood zombie dude who would have been lacking a lot of gritty shading if I had painted him in Affinity without dissolve.

- 1 reply
-
- 5
-

-

-
- blend mode
- affinity
- (and 6 more)
-
 When using a raster brush that has 'wet edges' enabled, it often automatically disables the wet edges when you switch to another tool (like the eraser) and then back to the brush again. It's not a big issue, but it would be really great if the brushes retained the wet edges setting to save the hassle of manually checking it again after using another tool. For some reason this doesn't always happen, but I thought it might be worth mentioning as a lot of the more 'intricate' custom brushes use wet edges for textures and effects. Similarly, and I appologise as I've mentioned this before, it would be awesome to have a dissolve blend mode for brushes and layers as it's incredibly useful for creating gritty textures and bitmap effects - it's also especially useful for setting work up for screen printing as the dissolve blend mode removes all anti-aliasing. I know there are workarounds for this, but the dissolve blend mode is a small addition to the blend modes list that would completely remove the need to spend time finding different ways of achieving a similar effect. I've seen it mentioned a few times in the forums, so hopefully it will be considered.
 -
Blend Tool is a must have!!!
-
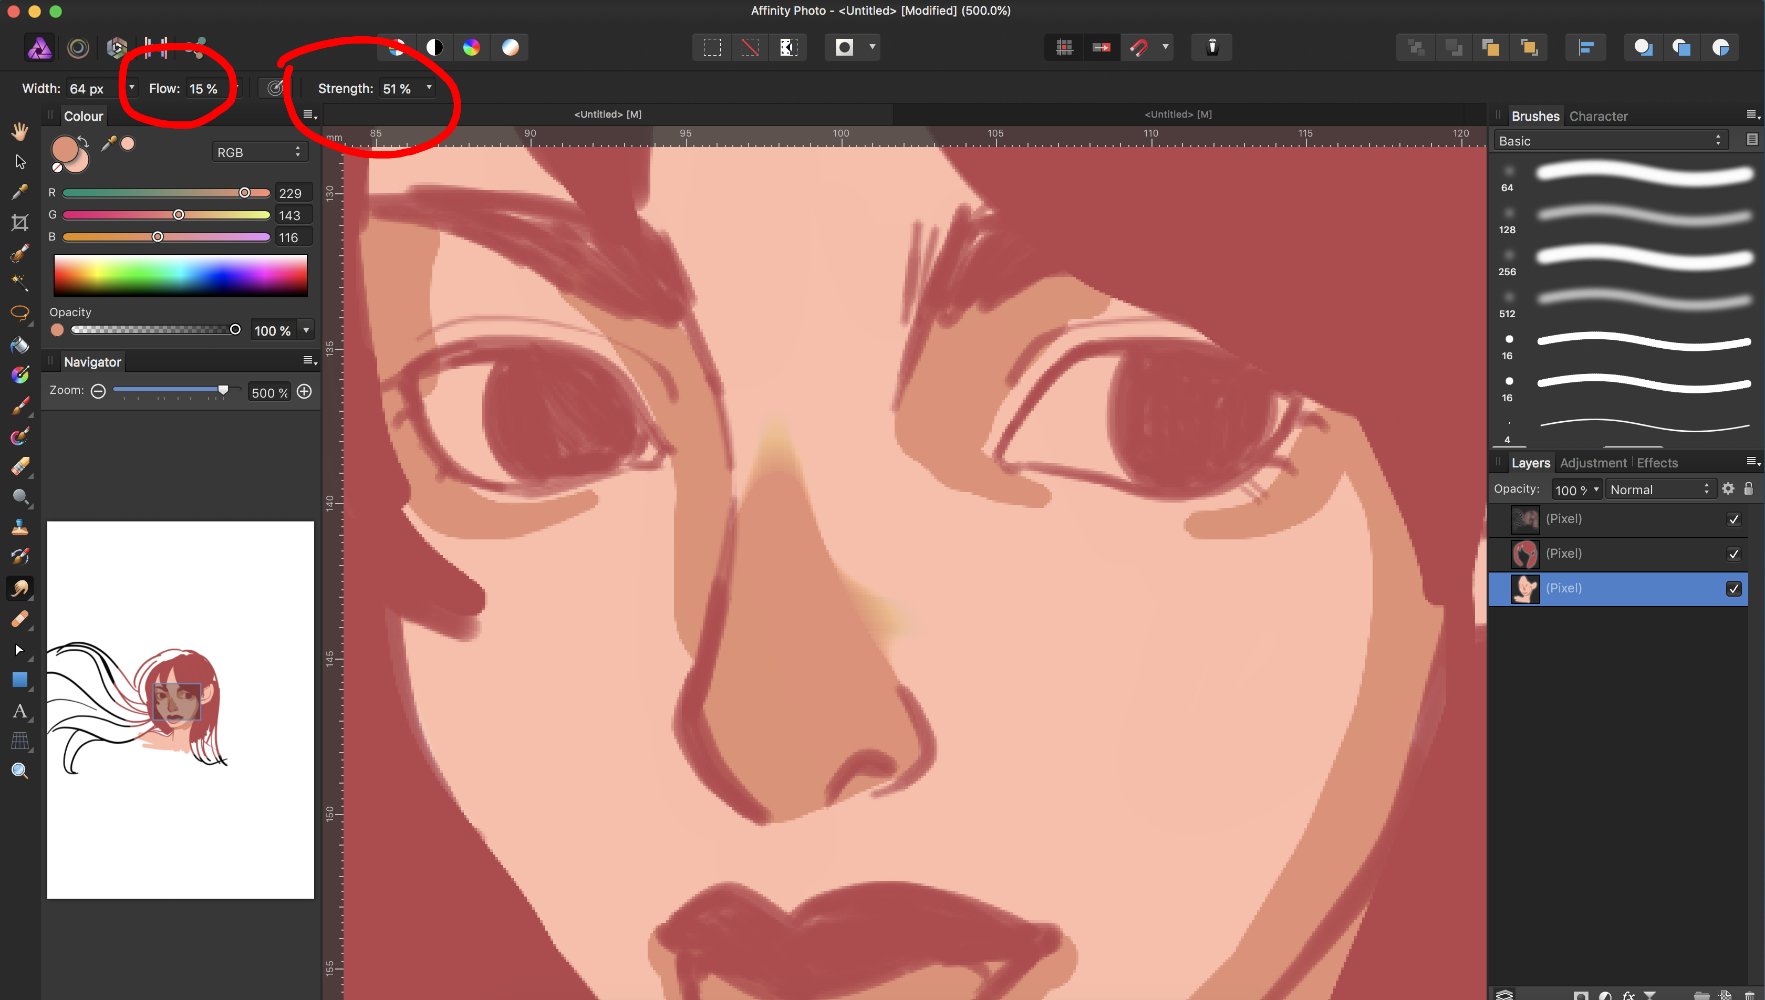
 Hello everyone, I have a huge issue with the Smudge brush tool in Affinity Photo (Mac). When I use it to blend between two colours, it messes them up completely. I tried a lot of settings, even tried the smudge pre-set from DAUB brushes library but they all do the same. Please see below screenshots of the setting used and some tweaks with flow and strength. Can anyone help me out??
-
 At my current job we use Corel Draw in our graphic design department. I have switched to Affinity Designer and Photo for my personal work and these are my 5 features I use very often in Corel that I would love to see added. 1. Boundary Tool - Have a print/cut Roland printer and this tool is essential when creating a cut line around multiple objects. 2. Envelope Tool - Use this quite often for text effects. Converting to curves and manipulating from there works alright but Corel leaves the enveloped object still as text and can be still edited. 3. Flood Fill Tool - I'm able to replicate this using boolean operations but involves way more steps and occasionally will end up with odd quirks and unwanted results. 4. Blend Tool - I believe I have seen this is coming on the roadmap so hopefully soon 5. Raster to Vector Tracing - Also seen this is coming. Currently using Inkscape for this feature and then exporting/importing into Designer All this being said Designer is still one of the best applications I have used. How great this application already is has me very excited for future updates and enhancements.
 -
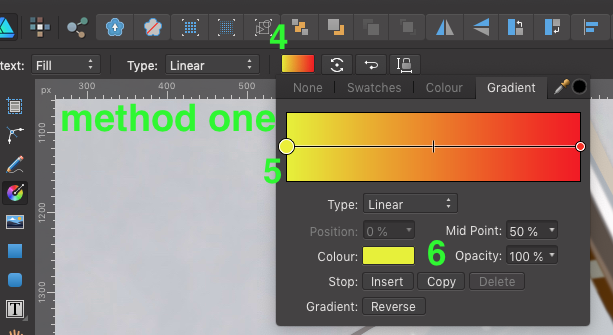
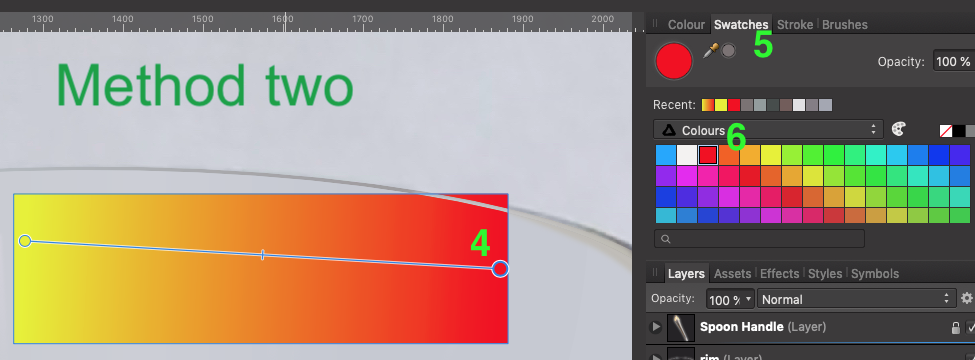
 I struggle to create gradient fills easily and efficiently. Here are the two methods that I use, and perhaps the only way. I'd be curious if someone out there has another method. Method one: Create object select "G" on the keyboard draw gradient Select the Gradient color box at the top toolbar make active a node on the gradient line select color from colour box Repeat steps 6 -7 for each node in the gradient line. Method two: Create object select "G" on the keyboard draw gradient Select the node in gradient bar Select Swatches tab in the docker on the right Select color in the Swatches pallet. Repeat steps 5 -6 for each node in the gradient line. Suggested Improvements: A) What I would like to see is the ability to double click on the color node on the object itself, not the node from the methods above, and by double click the node a swatches pallet opens for you to make your color selection. B) Another option would be to select color node, select the eyedropper in the tool bar and while holding the Shift key down select the color you want applied to that node. This method is great for sampling color from other drawings or reference images. I appoligize if there is another method alreay in place, I just haven't come across it yet. Thanks in advance. -Bill
-
 In various other graphics editors it is possible to blend to shapes. For example you want to blend a red circle with a blue rectangle. I imagine this function would look like this in this imaginary function in Affinity Designer: You place the red circle and the blue rectangle on opposite sides of the document. You want the blend to rotate 360° and you want the blend to arc through a specific point on the document. You select the red circle and blue rectangle. You drag the "rotation center" to the side were you want the blend to arc. You type in 360 degrees in the blend tool dialogue box. You type in number of iterations, let's say 20. Then you hit the "Blend" button. Between the red circle and the blue rectangle there are now 20 shapes arcing between the two original shapes. Each shape - moving from the circle to the rectangle - becomes more like a rectangle, and vice versa. The color changes with each shape in the entire spectrum between red and blue, and the shapes in the arc rotates from the circle to the rectangle 360 degrees (negative values would rotate the shapes the opposite way). Maybe it would also be possible to outdo the competition by making it possible to do more color combination along the arc/path. Maybe it would also be possible to place more "rotation centers" - points through which the blending would take place.
 -
 I’ve used a guide for creating a diary when I was using DrawPlus but now I’m trying to do the same thing in Affinity Designer but I don’t know where I can find this adjustment. I’m using it to create a chalkboard, with a glare and a couple darker and lighter areas to reflect the different coloration in a chalkboard. Any help is appreciated.
-
 I just love power of Blend options tool, but think that it can be boosted even further. Adding an option to select not only luminosity as the argument and not only R, G or B will be a major boost. Ideally it should be defined on HSL space (or, even better, on a wide range of color spaces like LAB, CMYK, WRGB etc) - a combination of all three parameters. It would let the user to apply adjustments very selectively... like adding vibrance to not saturated yellow objects in given brightness range, for instance. I am sure everyone would love to be able to add a point to the curve with some sort of picker tool Saving blending curves as presets is a must as well. It is often need to apply identical adjustments to a large set of images and now it turns into sort of guessing game - some variations are just inevitable with current approach.
 -
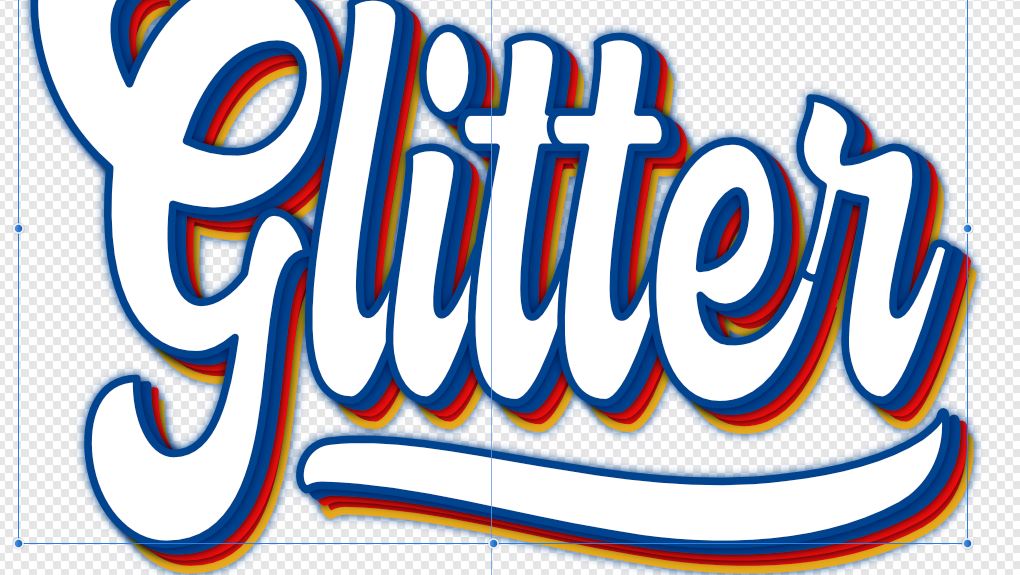
 How can i make this text effect in Designer? I've had some suggestions from an Illustrator user but I don't know how to replicate what they've done. I've tried the Effects-Outer Shadow but can't get this crisp edge or the layers to "blend". "Glitter test" shows what I was able to do so far just using the Effects-Outer Shadow... help!
-
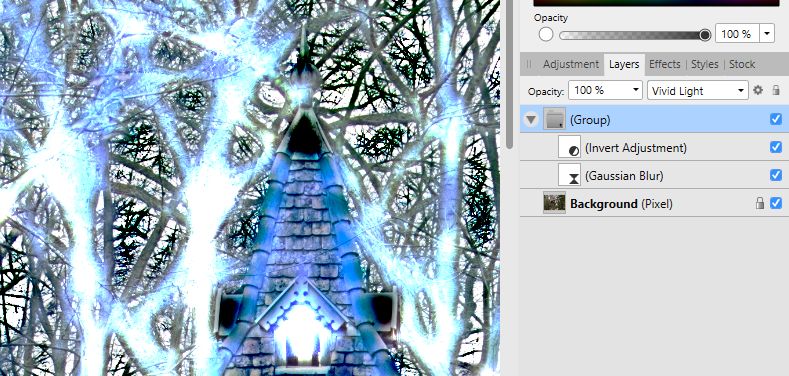
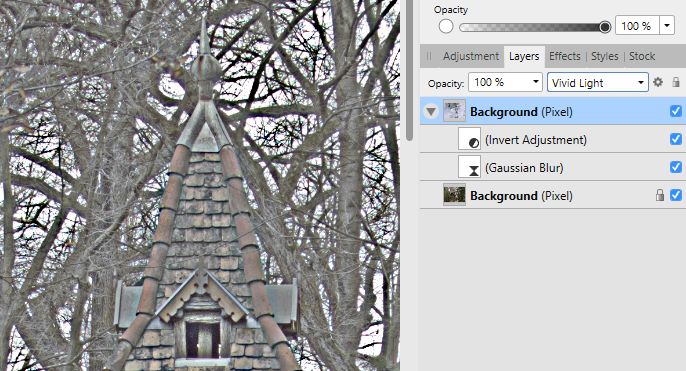
 One can set the blend mode on an adjustment layer to for example Darken, and this results in the original layer and the live adjustment of it being blend together with Darken. Same for live filter layers. However I would like to take a series of adjustments and live filters, do all of them in a sequence on a pixel layer and then take the resulting adjusted image and blend with the original using some blend mode like Darken. Or for example take a blur layer, an invert layer and then apply the composition of these two with Vivid light blending to the original. The only way I can achieve visually what I am looking for is to duplicate the pixel layer, put the adjustments & filters on it and set a blend mode on it. However the layer duplication step makes the result a static filter, which no longer reflects changes in the original pixel layer. I was expecting that putting just the live filter and the adjustment layer into a layer group and then setting blend mode on the layer group achieves this non-destructively, but layer groups doesn't seem to work like this. Look at the screenshots, my expectation is to see the same image in the two cases. Is there some way to achieve this non-destructively?
-
It would be very useful to apply dodge and burn as a gradient, not just as a brush. Also, Also, it is a nuisance that the box of the blend range opens always in the center of the image with which you are working. And having to move it aside, each and every time you open it, so that it does not hinder the vision of the changes you make. Thanks and regards.
-
Trying to paste face of one person onto someone else body. What's the best way to blend skin tones to make as seamless as possible? I've tried many different methods but feel there must be a more logical way. Thanks
-
 Hi people. I ever use adobe illustrator for my job, but the affinity designer showed a incredible software and a great promise. But unfortunately i've been missing some tools I did not find in the Affinity Designer. Could they help me know if these tools exist in Affinity? Tool 1: Blend Tool. In the adobe illustrato exist the possibility to blend forms and linde, creating interpolation between the forms. Is there something similar in the Affinity Designer ? Tool 2: Aling to Key Object Tool 3: Width Tool In the Illustrator existe the possibility to thicken and taper the lines in the drawing. On the Affinity Designer, the only option I found for this would be the pressure panel. Is there the possibility to control this effect straight in line? At first these are my main doubts. Thank you to anyone who can help me! Fernando Constant
- 10 replies
-
- 1
-
-
- illustrator
- blend
- (and 2 more)
-
 Hi all, I was trying to find some way to colorize parts of a text without changing its properties (I need that frequently for UI design). I found out that using another object with the Lighten blend mode seems to do what I want, but text is rendered quite poorly. Thyer is a rectangle with a Lighten blend over the text as a mask, but AD creates lots of intermediate colors which I don't want. The rightmost result is what I want. I've included the .afdesign file too. Is this the expected behavior? If yes, is there another way to accomplish this other than changing the text color itself? Lighten mask bug.afdesign
-
 Hey, Can Affinity Designer blend an image into a solid background color (thereby extending the image) as you can see done in the attachment? If so, how? If not, can affinity photo do this? Also, what is this actually called?
-
 Hello, I have a question regarding the "Apply Image" function. I saw a tutorial where Apply Image was used in Photoshop to change the mask of an image to become the source image but as a mask (so just the dark and bright information). It was used to blend multiple exposures together. Is it also possible with the Apply Image feature in AP, or is there any other option? I hope it is clear what I mean, because I find it hard to explain. Thanks in advance :)
 -
It would be nice a feature like AutoCAD POLAR ARRAY, so you can place object/selections around a specified point, or along a specified path. The essential options are : number of objects, angle between objects, radius of array, rotate objects ON/OFF. Thank you :)
-
.thumb.jpg.dabc15530a2a67d371244c9bef26f8da.jpg) I'm currently learning Affinity Designer and saw a tutorial for making some icons in Adobe Illustrator. I decided to try making some to use and learn different tools and processes. In the tutorial they show how to make a shadow of the icon by moving to the side and using 'Blend Options' to create many steps so that it looks like a continuous shadow and not a duplicate shape behind (In the hyperlinked tutorial on Icon 1, Step 5). Just a shape behind, not continuous. Continuous. What I'm trying to achieve. So basically, I am asking to see what is the best way to achieve this in Affinity designer? Is there a similar feature available to that in Illustrator?
I'm currently learning Affinity Designer and saw a tutorial for making some icons in Adobe Illustrator. I decided to try making some to use and learn different tools and processes. In the tutorial they show how to make a shadow of the icon by moving to the side and using 'Blend Options' to create many steps so that it looks like a continuous shadow and not a duplicate shape behind (In the hyperlinked tutorial on Icon 1, Step 5). Just a shape behind, not continuous. Continuous. What I'm trying to achieve. So basically, I am asking to see what is the best way to achieve this in Affinity designer? Is there a similar feature available to that in Illustrator? -
 Hello, We are avid Illustrator users where we take customers Pantone or custom swatch and match them on our digital printers. We love the price of your product, but there's one feature missing for us. When we change a color in Illustrator, we can change the last swatch in the direction the colors need to go, then marquee over the blocks and select "Blend Horizontally" or Vertically etc. There are probably more features I will be looking for, but this can potentially be a great replacement. Thanks!
-
 Hi there, I noticed that the brush blending mode, despite being available even when painting on an alpha channel, it seems doesn't produce any effect. Simple case: I want to quickly correct a luma matte, painting over some gray values with a brush using black color in overlay mode, in order to affect only the gray areas without compromising the white matte.
 -
 I often blend layers , for some reason the blend indication in the Layers and the Live mask are different. As you can se it says 'Darker Colour' & 'Normal' at the same time. See image Is this 'normal' ?
-
 Hello Affinity pros, what is the best technique to blend the edges of an (irregular shaped) object, which is copied into a photo? Thanks in advance! Chris
 -
 I have these two photos. On the bottom is a notebook and on top is an image of a painting. How do I make the edge of the painting blend to the notebook page? In other words how do I make it seem as if it's not a straight line. I'm a complete newbie and still trying to get used to this software.