Search the Community
Showing results for tags 'Affinity photo'.
-
 Hi! I have a problem best described by an example: I dragged an Afphoto picture of a car into the Publisher. I'd like to use the cutout car layer and another layer with a shadow underneath. But every time I switch the shadow on/off (in the photo persona) it (dis)appears on both inserted instances of the picture. Is there an uncomplicated way how to separate those two instances other than making two different images – one with the car and one with the shadow? Thank you, Stepaan
 -
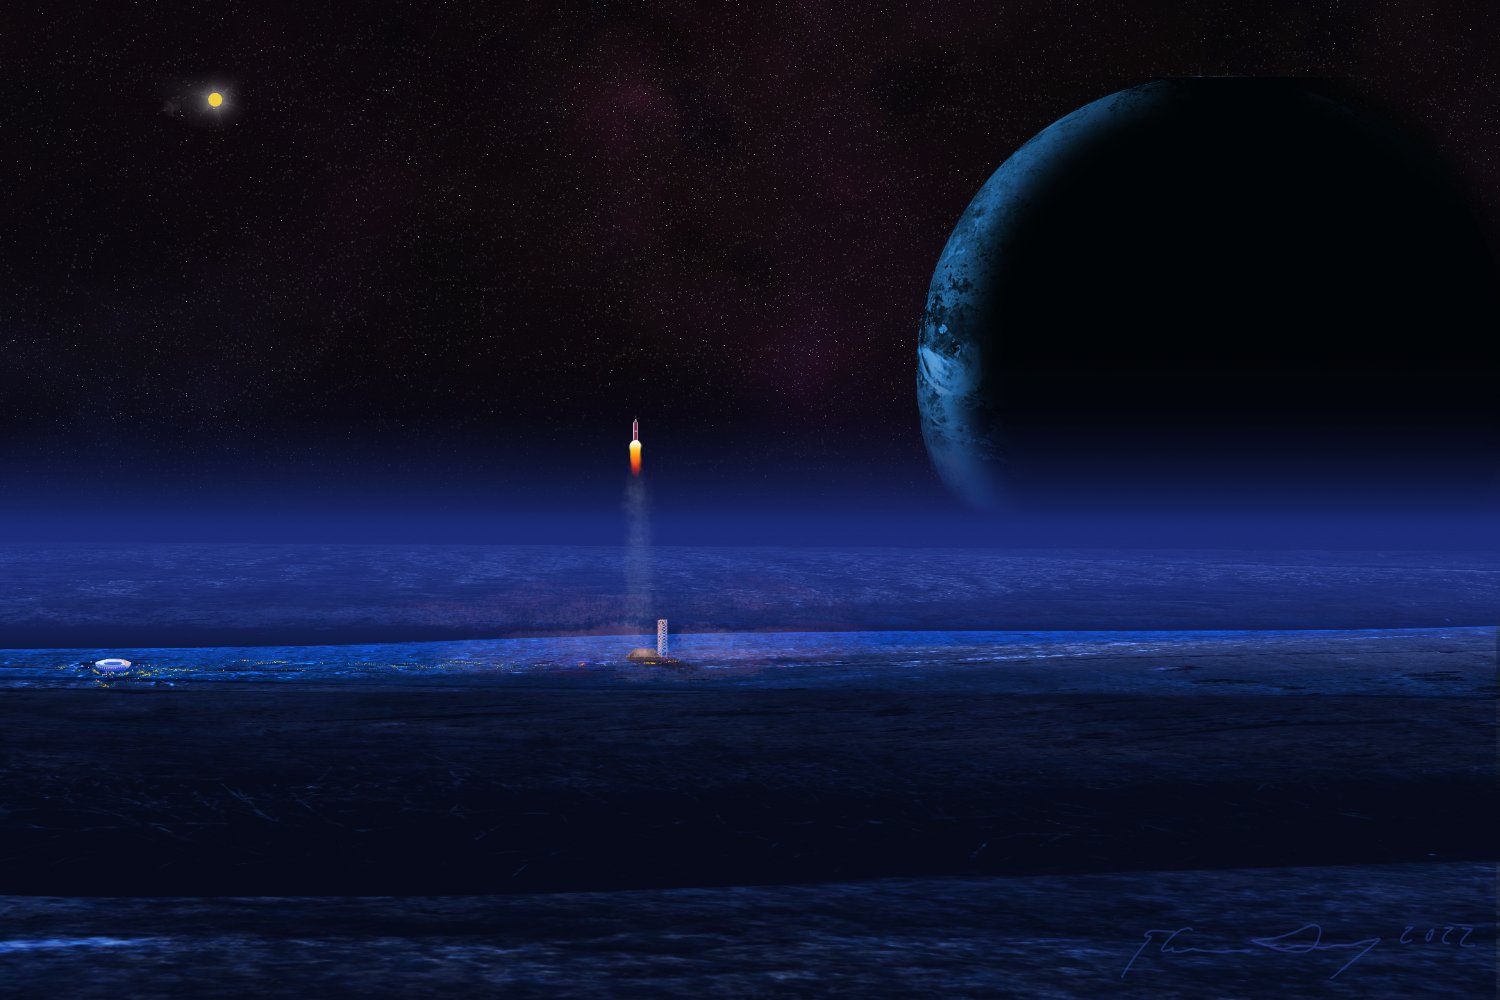
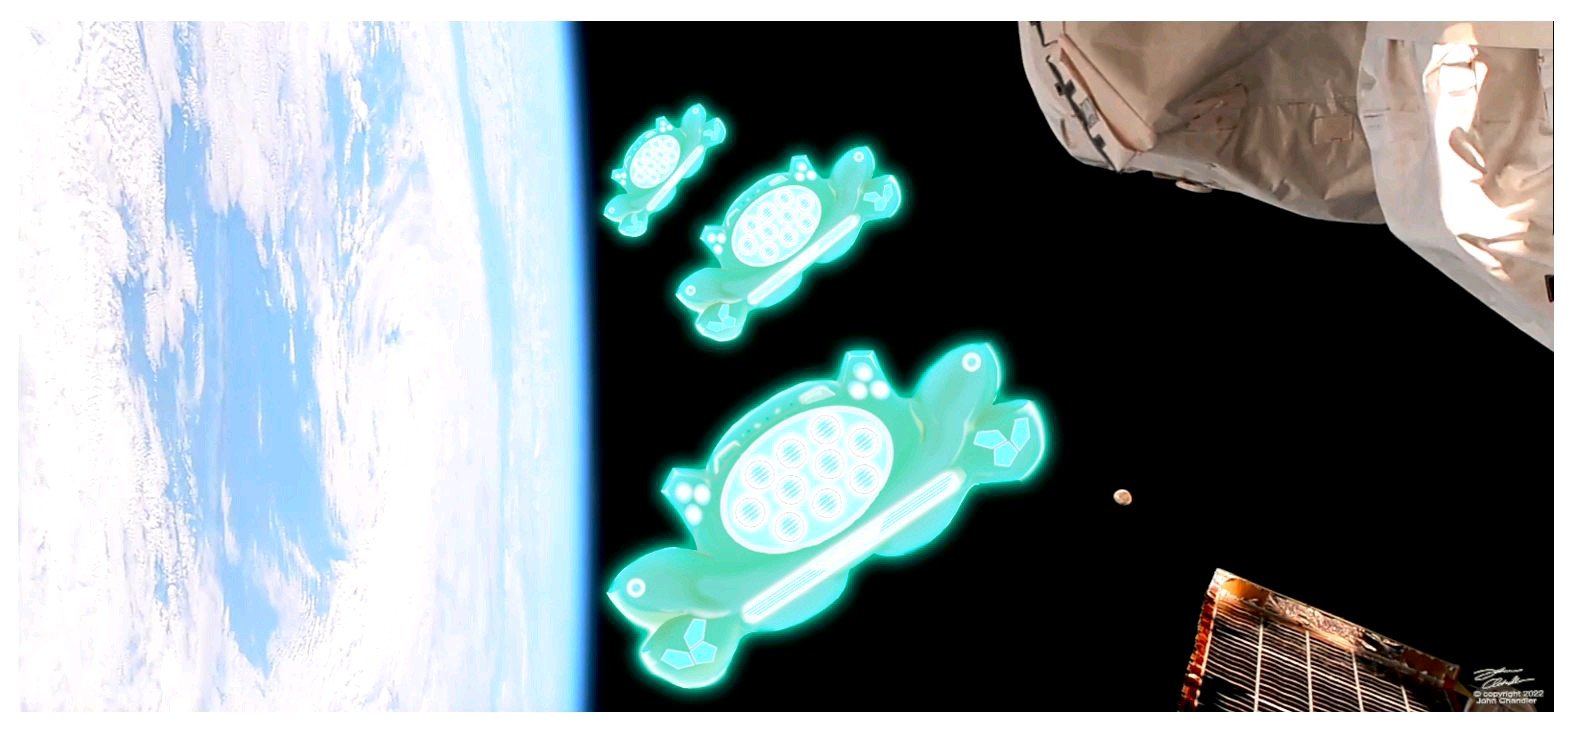
In a galaxy far, far away... oh wait, that's been used already. Ok, never mind (but it is! 😁). Anyway, my iMac died last week and I'm stuck temporarily on my MacBook Air until my Studio arrives (probably in a month 🤞). I can't go that long without producing *something* so I made do with the MBA's 13" screen and my Intuos Pro, and just started playing. This is a composite/painting done in Affinity Photo and Designer. The rocket was made in Designer then brought into Photo. The planet we're on is actually a 2 x 3 foot section of granite I photographed a bunch of years ago for a client plus there's another rock outcrop in there from the same shoot; the moon is a moon I got from Universe Creator picked up from Design Cuts, as is the flare around the sun and the gas clouds. Everything else is coloured/designed/placed using Affinity Photo. It's not much really, but I had fun (and I'm now blind from squinting at a 13" screen 😆). Enjoy.

-
- 3
-

-
- affinity designer
- fantasy
- (and 1 more)
-
A recent artwork on the Affinity Photo iPad
-
 Direct delete and position feedback while editing (the proposal would be of interest to Affinity Photo and Affinity Publisher alike). A. You right-click on a guide and a new context menu appears. There you can select delete or edit. An alternative to a right-click could be a double click. B. The editor that opens would be the same as currently, BUT three new features would exist: If you have opened the editor via the context menu of a guide, then the corresponding guide is highlighted in the editor list. At the same time, the guide would also be highlighted in the workspace. E.g. it could be pink instead of blue. Great feedback when there are many guides. As soon as you select another guide in the editor guide lists, the same thing would happen, the corresponding guide would also be highlighted in your workspace. So you always know exactly what you are doing.
-
- 1
-
-
- affinity designer
- affinity photo
- (and 6 more)
-

affinity photo Affinity Photo Manipulation - Mystery Circle Gate
minuir posted a topic in Share your work
Maybe because I like sci-fi or fantasy movies, I always think about it when I see or hear something new. That was the case when I traveled Blue Mountain in Australia. Looking down at the endless mountains and forests from the top, I thought there would be something happen we didn't know. So this time, I worked one of the most vivid image in my memory that I imagined while looking at Blue Mountain. "Mystery Circle Gate" speed art : https://www.youtube.com/watch?v=0YsAqNtJZ6g
-
- 1
-
-
- minuir
- digital art
- (and 2 more)
-
 In the past couple of weeks I've had a really bizarre issue with Designer and sometimes Photo too. When I try to save a file the progress bar appears but never moves. It seems to be creating an empty file but that's it. Activity Monitor shows it taking up 100% of the cpu and I have to force quit although it doesn't register as not responding. It doesn't crash and I don't get any error message it just sits there sucking up all the CPU power. I thought maybe it was because iCloud was syncing or I didn't have enough space on my HD but I made space and icloud was not syncing. This doesn't happen on any other app so it's not a permissions issue. Please help as I obviously can't do any work until this stops happening.
 -
- 1 reply
-
- 1
-
-
 I have a feeling it might not be possible.
 -
 Hey Guys, There is this Video that I watched where this person was showing a Trick (Actually a Gimmicky stunt I would say) to make your Photo have a kind of Halo Light coming out of the subject where in he used a Curves adjustment layers brighten it up by bringing up the curve and then inverted it and then used a gradient mask to make it look kind of emitting light from the behind of the subject all this was in Photoshop. My question is how do you do it in Affinity Photo. Here is the Video for your reference the trick he shows starts at 3:29
 -
I wanted to create something abstract influenced by the colours of Autumn...
-
 I use Adobe Bridge as my DAM. I have just noticed that when I open an image in AP it is slightly cropped. See images attached and note the edges. Any ideas why this should be?
-
Original Photo > https://www.instagram.com/p/Ciag32BJBcj/
- 1 reply
-
- 5
-
-
- anime
- digital art
- (and 2 more)
-
Hi, Last weeks I've been back on drawing on paper and digital inking. And recently I started animating one frame-by-frame. This time, although not painted in Affinity, I used Affinity Photo extensively to edit, process and clean lots of frames and happily used the Export Persona to export. For these types of things there's definitely nothing easier and faster than Affinity! 😀 It's an endless loop! Hope you like it! And don't forget to turn on the sound!
-
Hi Guys, Looking at this video starting at 20:50 I want to ask something about the requirement that I faced in retouching the portrait photo that I was working on the other day, Since I wanted to correct the skin irregularities on the subject’s face I applied frequency separation and using healing tool when I cleaned up the skin, the skin tone on the forehead and the skin colour on the cheeks kind of turned out to be way different looking than other part of the face as in it had different skin tones. My question you guys is in this attached Video this guy is using HSL adjustment layer to correct the Red leaning towards more yellow, and the yellow more towards Red. Can I in the same way, how can I target specific colour in my portrait’s face to make it look even. What I am saying is, if i want the skin tone in the forehead to look like skin tone on the cheeks how can I use the HSL Adjustment layer to correct that ? In the attached video the person is working only on Red and Yellow Colour. But in my Portrait the Subject’s face has kind of Creamish and Reddish Tone, so even then I should be applying the same logic as in this video, and only work with Yellow and Red Colour in the Colour Wheel ? How can I reduce the Creamish tone in the skin and make it look more reddish ?
-
 Hi, I'd like to draw directly into the Alpha channel of a layer. I did this in the past in Photoshop and I'm positive this must be possible in Affinity too as there are switchable channels per layer with an edit button behind each channel. But for some reason it's not painting inside the channel with a paint brush tool (it seems to paint in the R/G/B channels still. How can we paint black/white/grayscale directly into the Alpha channel (not in the r/g/b channels) in Photo?
-
 Hi, I have affinity photo beta for windows and i wanted to know, how can i add keyboard shortcuts in Macros? Thanks in advance.
 -
 Photo 1.10.5.1342, Windows 11, Intuos S tablet, Wacom driver 6.3.45-1 Long before I bought Photo, I got this tablet and briefly dabbled with it but haven't invested the time to build any real skill in using it. Right now I'm knee-deep in coming up to speed with Photo itself so the issues with the tablet aren't a show-stopper, but they're concerning. I realize there are a lot of places where things could go wrong, between the drivers, Windows and whatnot. Between Photo and the Wacom utility I've been able to (more or less) get it configured to work acceptably well in Photo. But after a while the pen seems to lose it's mouse mojo, as it were. It functions as a Photo tool (marquee, Crop, etc.) but cannot be used to change / select a tool, nor drop a menu, check a layer, etc., etc. It only functions as a tool (chosen by another method). When that happens, the mouse also misbehaves in the same manner, so I have to close Photo with Alt+F4. Upon restarting it works again. For a while. Anyone ever run into this? So far I've run into this only with Photo. All drivers and Windows Updates are current as far as I can tell. I realize the Intuos S isn't an expensive tablet, but I'd like to (learn to) use if I can. Thanks.
 -
made with AP
-

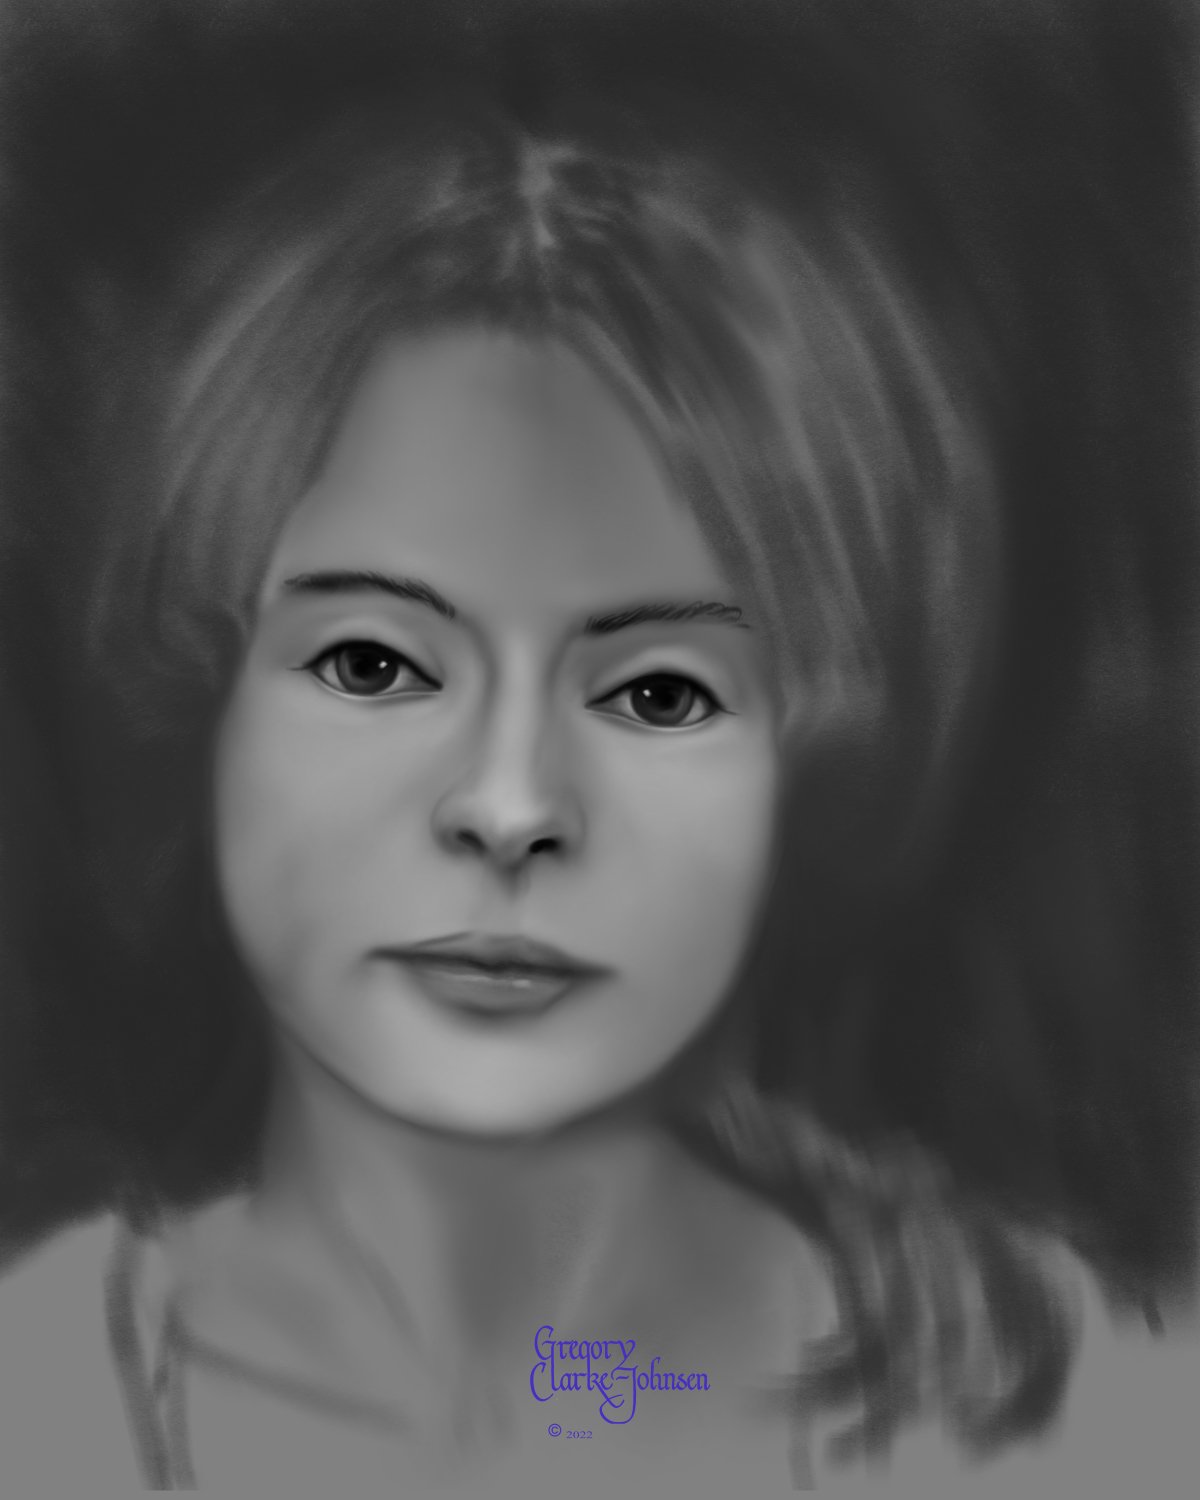
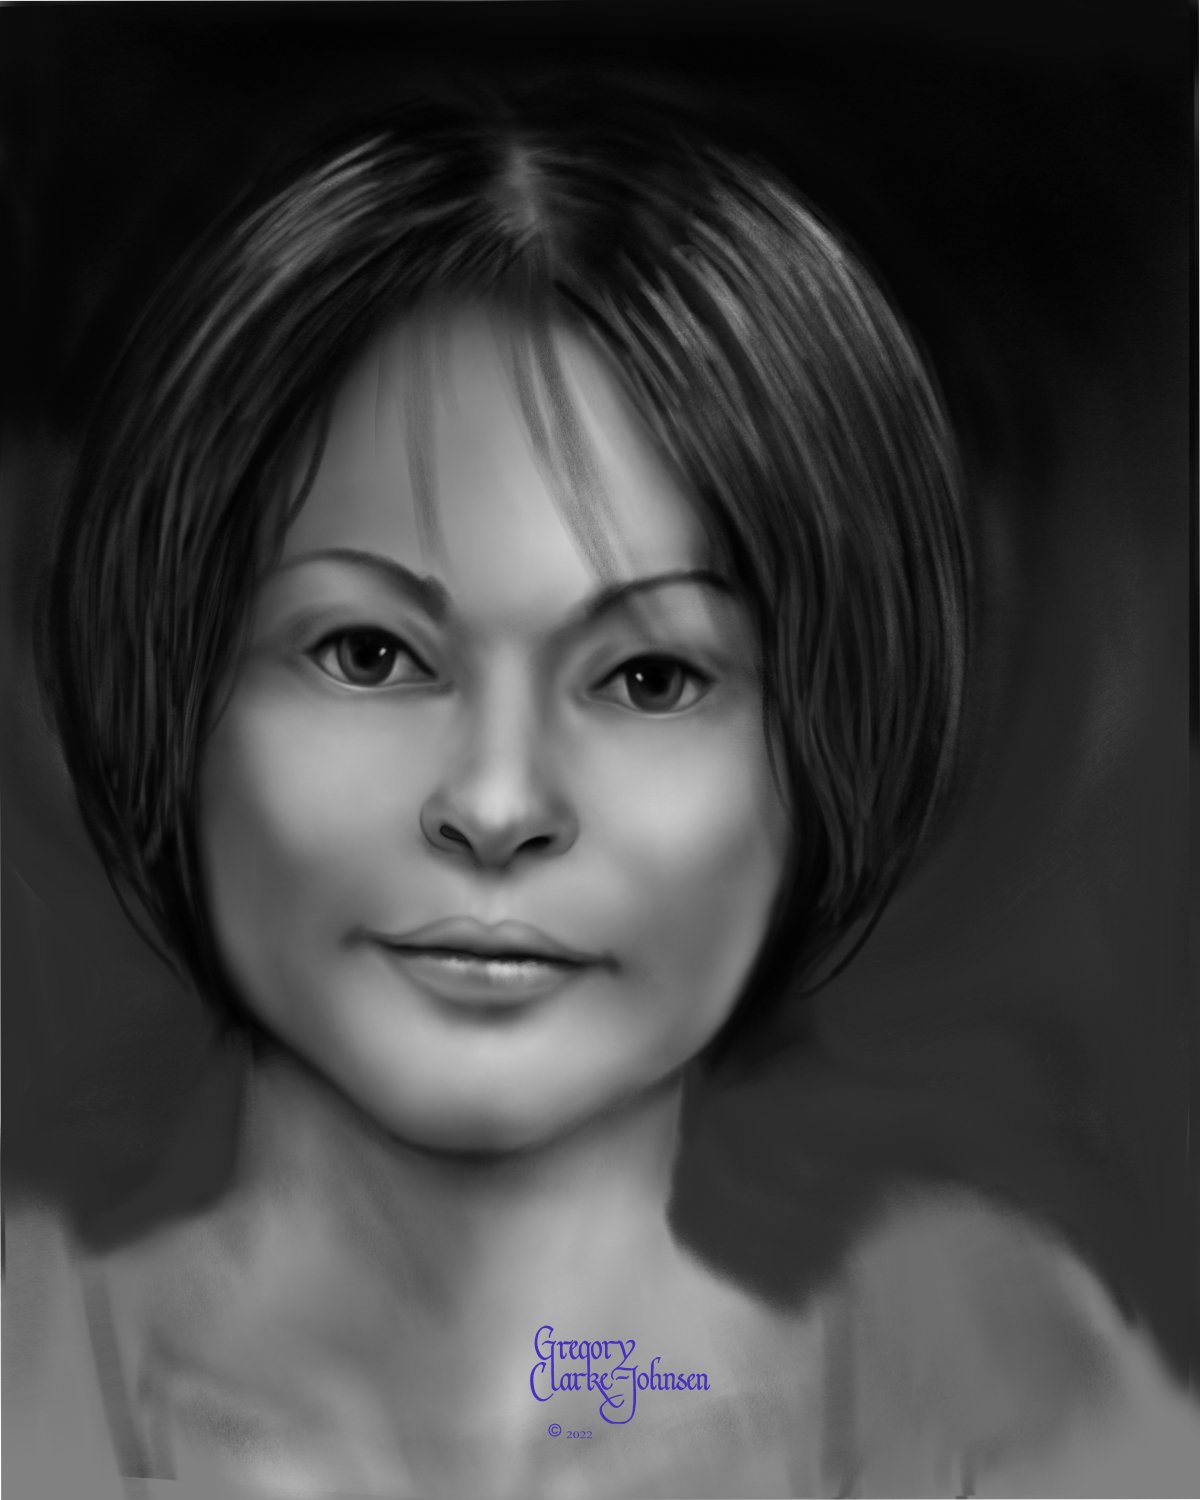
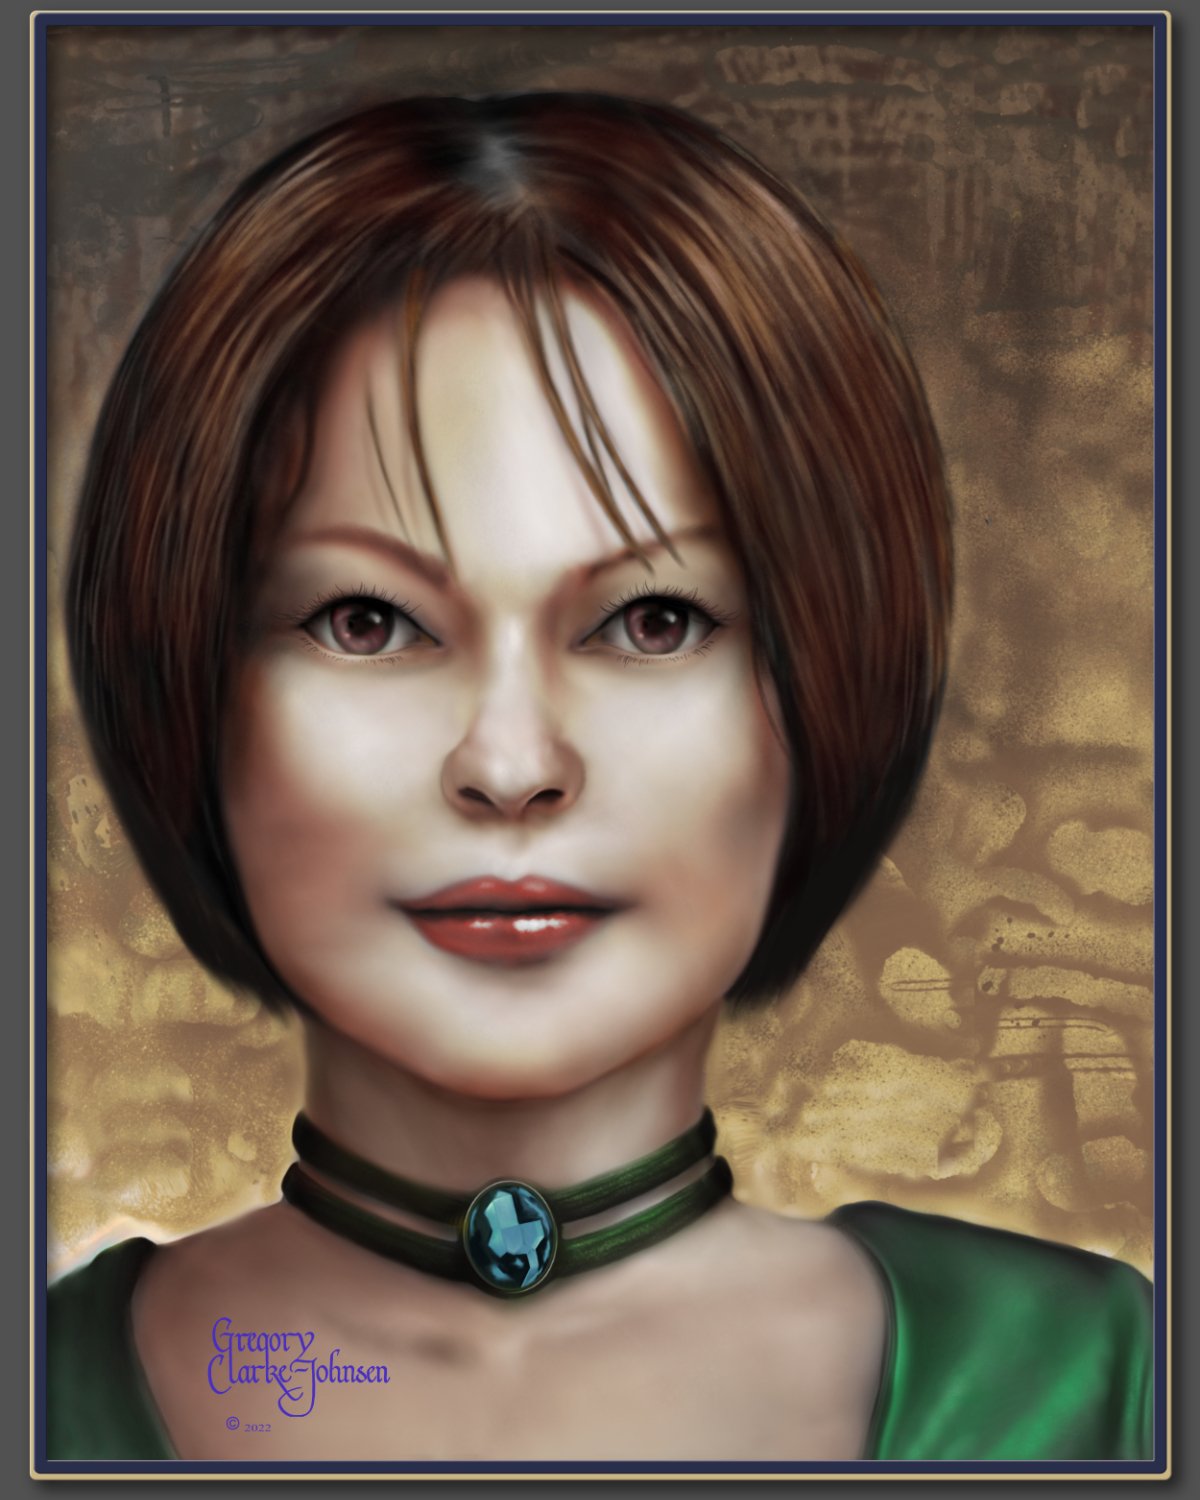
affinity photo Digital oil painting with Affinity Photo
Gregory-CJ posted a topic in Share your work
Hi Digital Painters!, I have been using Affinity photo for the last ~ 7 years and have tried a variety of approaches to digital painting with this software. My latest approach which I find successful, involves three main steps. 1. Define the flat shape of the head ( in this example) using grayscale and the default digital pencils... I especially like the 4B natural pencil and the Carpenter's pencil and a few blending brushes I created by reducing the strength of the default painting brush. 2 Create the form of the head by introducing light and dark to create volume and light and shade to create the lighting/luminosity across the surface of face, again using grayscale. 3. Add color- use gradient maps as a non destructive approach to adding colour. 3b. final tweaks. Hope you find this helpful. All the best Gregory Follow me on instagram @clarkejohnsen
-
- 5
-
-
- digital oil painting
- digital painting
- (and 1 more)
-
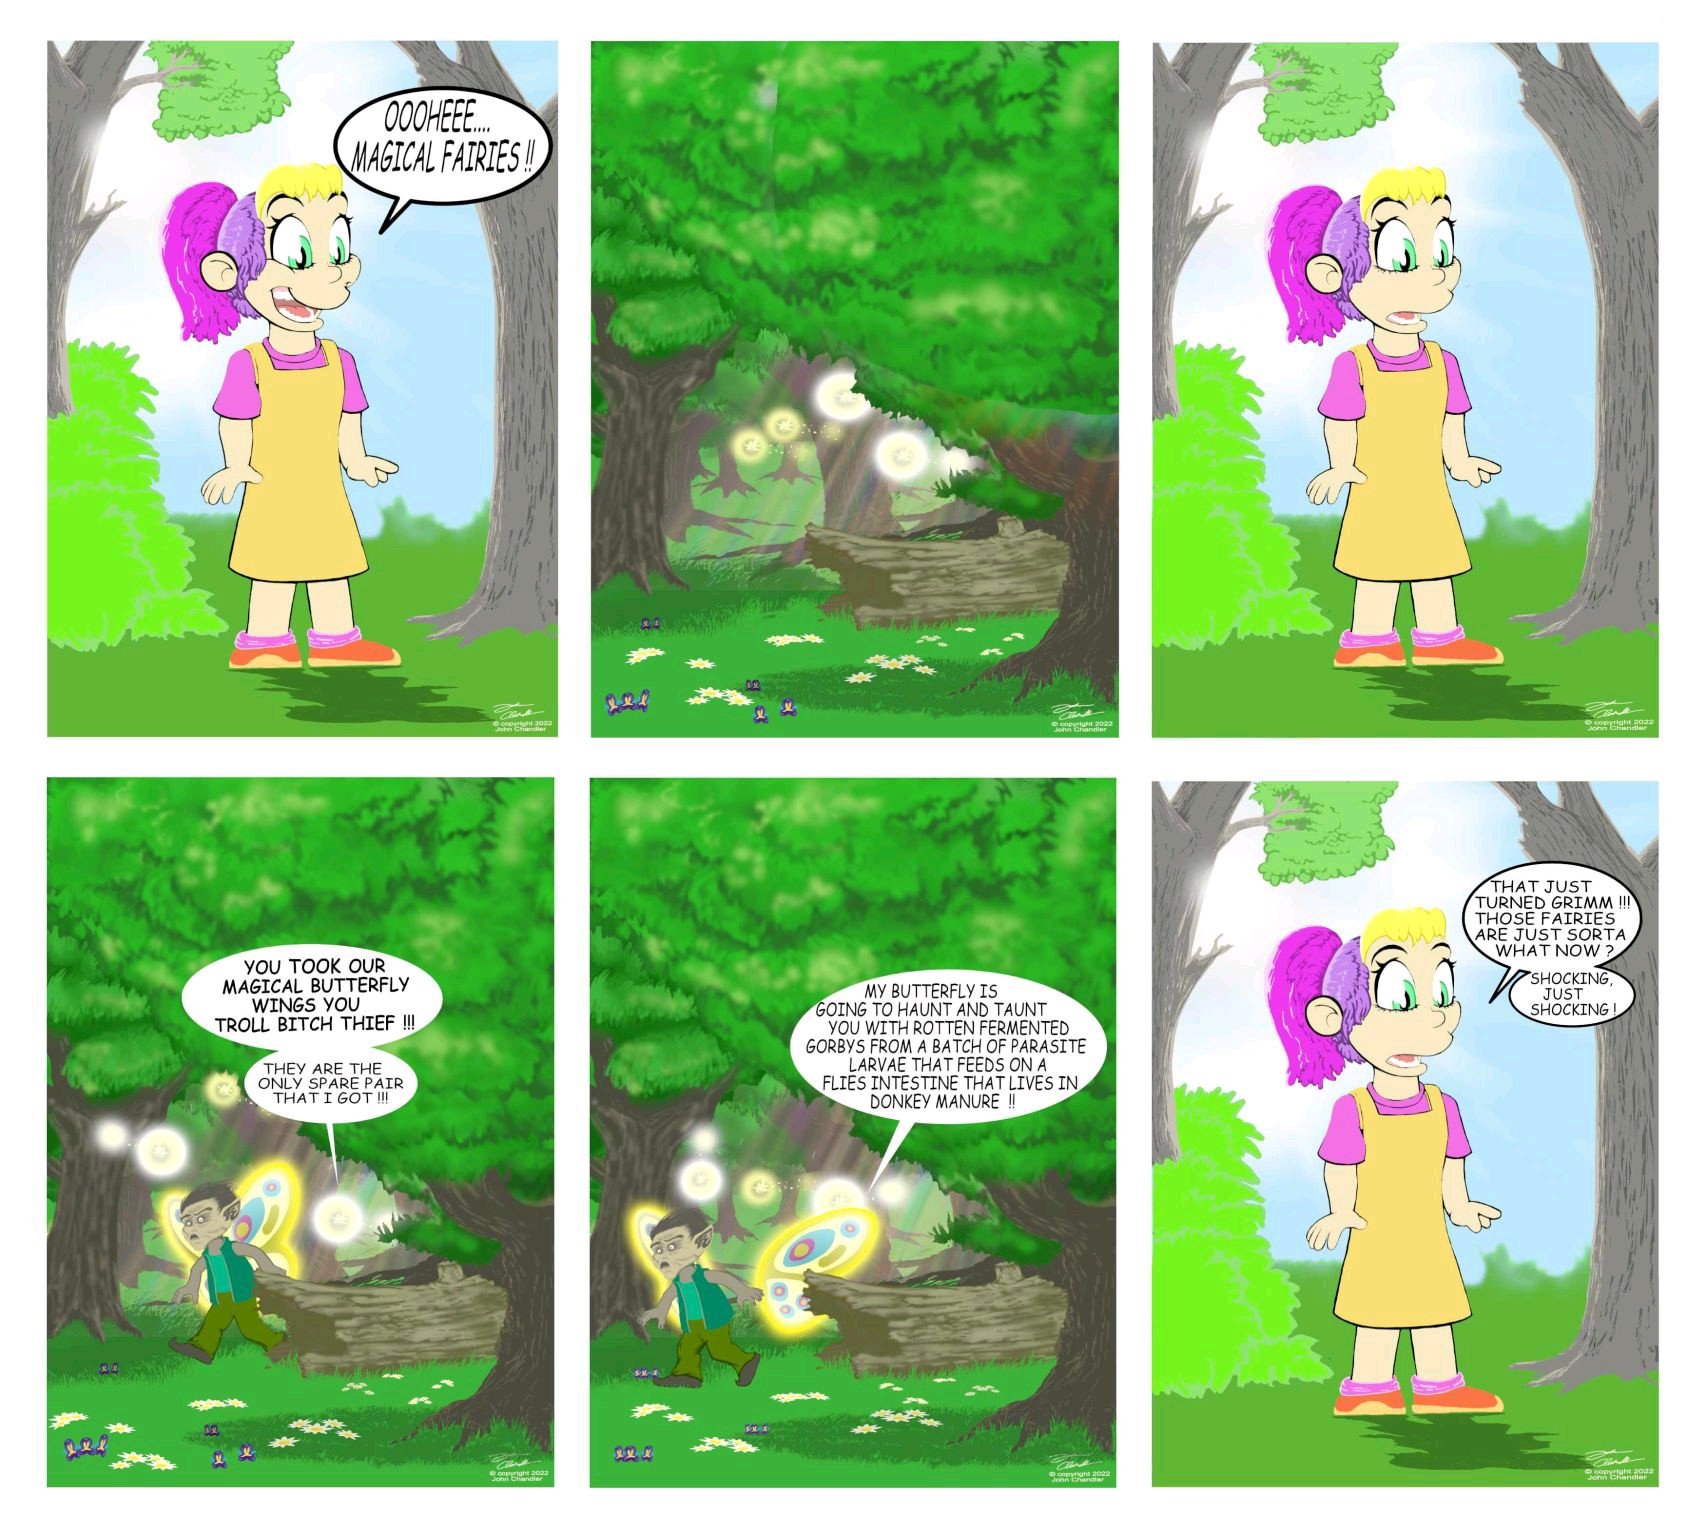
 These images are available to view on my website:- https://www.johnchandlerart.com/ there are more artworks and animations to view there, I'm working on various more to do with animations that I also created working with affinity software. I'm happy with the results of these. Just click on the link. Please do check out these artworks and comment also. Always happy for some constructive feedback from some constructive critiques.
-
When I was young, I remember vividly the first day I got on the plane. Especially when the plane was flying over white clouds, it was so amazing and fun. Although I found out that there was nothing on the clouds, the landscape on the clouds is still one of my imaginative memories. So I went back to that emotion and made an image of "on the cloud" that I had drawn when I was young. "On The Cloud" speed art : https://www.youtube.com/watch?v=L6xVHl8tdiQ
-
- 2
-
-
- minuir
- digital art
- (and 2 more)
-
Many people who work photo manipulation try at least once to make animals bigger in their artworks. I also did "Meet The Giant Sleepyhead" with a small "Koala" but this time I worked on a really big "Giraffe". When I was a kid, I saw the giraffe in zoo and it was really surprised about their size. So maybe that's why I saw it in my dream a few days later. However, it was not a nightmare. It was a pleasant dream so I was able to work happily while reminiscing about the blurring memory. "The Giraffe in Dream" speed art : https://www.youtube.com/watch?v=9yOzibMweKI
- 6 replies
-
- 4
-
-
- minuir
- digital art
- (and 2 more)
-
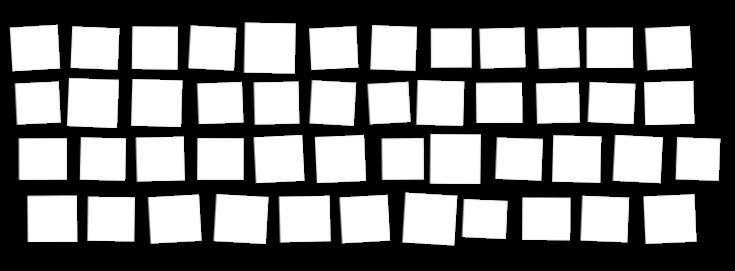
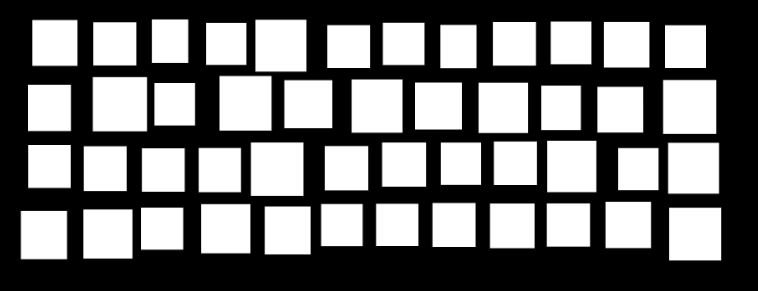
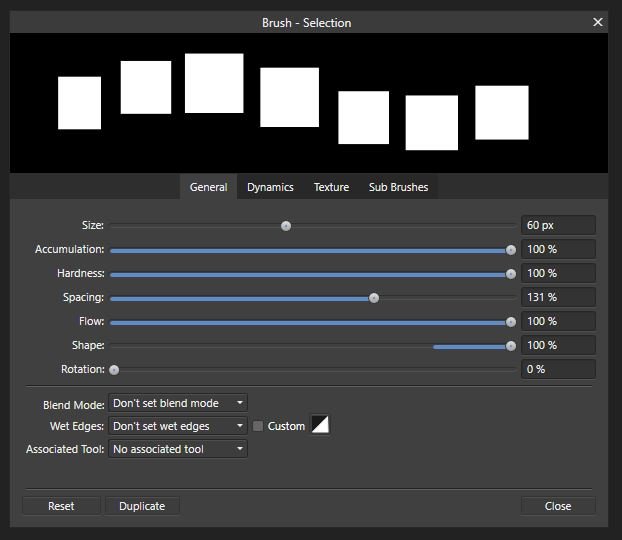
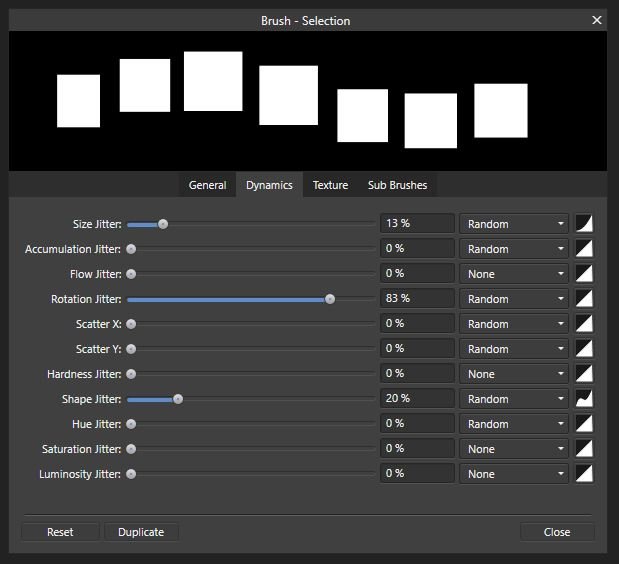
 I'm trying to create this in AP: I made this in PS with four parallel, horizontal lines, using a basic, square brush with minimal angle jitter and moderate shape and size jitter. Very basic. The goal is to create subtle variations that will make the arrangement of the rectangles appear handmade and not mechanic. This is the closest I could get to it in AP: Obviously, this is unusable for my purposes. I'm wondering if I just don't know how to adjust the brush settings to achieve the desired effect. Here are the brush settings I used: The problems I've encountered: 1. The 'Rotation Jitter' setting doesn't seem to do anything on its own. It looks like it has to be combined with 'Rotation'; however, when combined with 'Rotation' everything is either rotated in only one direction or the angle variation is too great. 2. I'm either using it wrong or the shift modifier is glitching when used in combination with the brush tool for straight vertical and horizontal lines. I've tried: click>shift+drag, shift+click+drag, shift>click+drag. None of the key combinations work correctly and the closest result is this: For some reason Affinity insist on connecting the end of the fist line with the beginning of the subsequent one. I don't see a shift key modifier option under the 'Brush Tool' in the 'Keyboard Shortcuts' menu, so it's possible that, technically, this function isn't available in AP. Any suggestions and workarounds are welcome. I'm on Windows and using a mouse but have access to a drawing tablet.