Search the Community
Showing results for tags 'Affinity '.
-
 Here's a afthumbs.py Python3 script which can be used to extract PNG thumbnail images out of Affinity files. The afthumbs.py script can be called either by passing over a Affinity file as argument directly ... ... or in an interacting mode just like this ... If the script does find a PNG thumb image it will extract it and write it into a pngs/ directory! Here's the afthumbs.py Python3 script for download: afthumbs.py Have fun!
-
- 4
-

-

-
- affinity
- thumbnails
- (and 3 more)
-
 Is there a way to convert a Pen Tool path you make into a selection. There is a selection from layer I can do, but I would like to just convert the path into a selection, without having to create extra layers.
 -
Here's a little Xmas cutout assets & sample vector design for the Affinity forum community. Here are the assets & sample files: Xmas_cutout.afassets xmas_cutout_sample.afdesign You can of course customize these to your own individual needs. You will also find some other Xmas related assets to place onto your Xmas designs under some of my other resources contributions, see therefor: Retrospective of resources contributions Have a good time over Xmas!

-
In order to get ready and prepared for Xmas, I share this time one of my XMas card & envelope vector designs for the Affinity forum community. The Xmas envelope which already contains a mounted in Xmas card design looks like this ... The Xmas card design used looks like this ... You can of course customize these to your own individual needs. You will find a bunch of Xmas related assets to place onto Xmas cards and the envelope for example under some of my other resources contributions, see therefor: Retrospective of resources contributions Here are the Affinity Designer related files for download (which can also be (re)used in the other Affinity apps): xmas_envelope_card_merry_christmas.afdesign xmas_greeting_card.afdesign Have a good time over Xmas!
-
 It would be great if the Affinity Suite had access to a thesaurus and a grammar checker included in all the apps. Just for final checks and proofreading. And maybe access to a story / article editor as well. Thanks for the very good software set at a reasonable price.
- 10 replies
-
- 2
-
-
- affinity
- grammar checker
- (and 3 more)
-
 I bought Affinity Photo from Microsoft Store and now want to buy Affinity Designer. Should I buy this also from Microsoft Store or can I purchase from Affinity Store? I note, from reading this forum, that I cannot launch Affinity Photo from Lightroom because I bought from Microsoft Store. Is there any other issues I need to be aware of for Designer and where I purchase it from? thanks for any advice
 -
 Great software overall. Thank you for the amazing one-shot pricing. That said... Separated mode is a basic, and for a lot of people, essential feature. If I had known this was dropped from V2 it would have made me hesitate a long time before buying as quickly as I did. I'm kind of feeling like there should have been a conspicuous warning somewhere that it was not included in V2, nobody expects features to go backwards in new versions. Way back in the day, the fact that Mac could run Adobe with just floating toolbars, and no awkward "application window" around them, was a godsend for designers. Those of us who used Windows instead/as well had to contend with the primitive OS requirements of Microsoft which signalled clearly that Windows was not an ideal design/graphics environment. Removing the separated mode option is just stunning to me, and signals a return to an awkward, older sort of unpolished era in graphics software. Even tablets are moving towards floating app windows, and ultimately floating file windows. The ability to provide this will affect whether Affinity is seen as a clunky older software, or a forward-looking app that intends to compete in the future. Crossing my fingers in hope this huge shortcoming will be addressed in the next update. Seriously, this app window things is just really awkward and annoying, like something that's just always getting in your way as you try to work.
- 15 replies
-
- 5
-
-
- separated mode
- separated
- (and 3 more)
-
Does v2 support rtl? If not teher is any chance to get it in future updates??
-
 Look up for vector flat tip brush for calligraphy and font creation.
 -
 I have a Macbook Pro 16 with lots of Ram. I updated to Big Sur and then latest Affinity for Big Sur. Now I sometimes have trouble selecting layers. I have to tap them several times. Also Affinity photo is much slower. Help!
 -
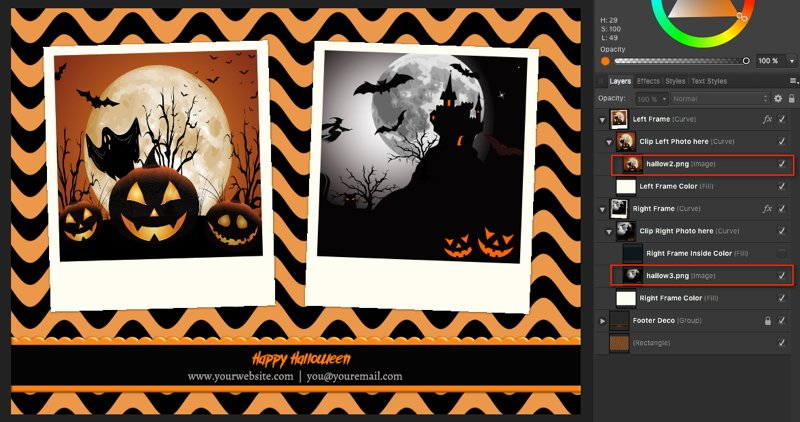
Here is a Polaroid photo storyboard example as a Halloween theme, you can reuse or modify/customize it to your individual needs ... ... in it's actual state this is setup for placing 2 photos inside. You can place your photos easily as child layers into the indicated left and right sides as shown here ... ... and here is the storyboard: halloween_polaroid_storyboard.afdesign
-
- 1
-
-
- photo storyboard
- halloween
- (and 1 more)
-
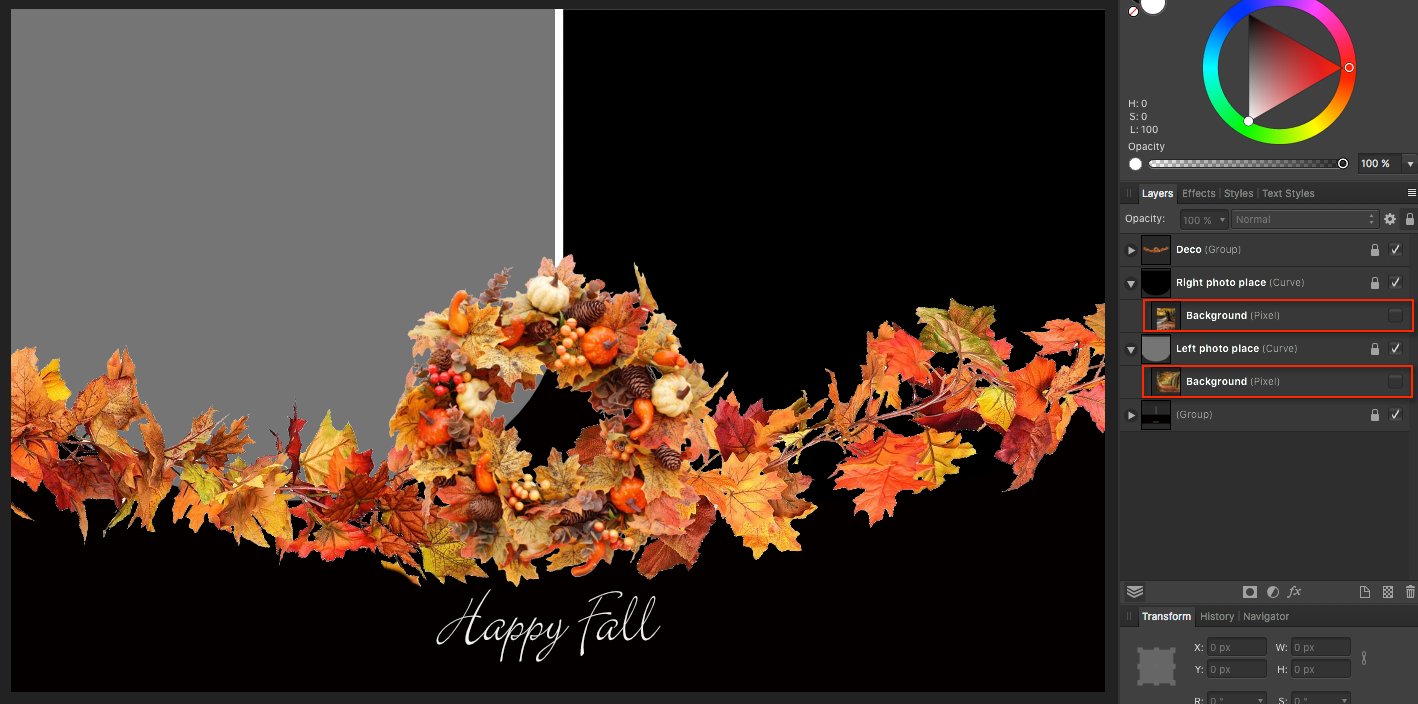
Here is a Affinity fall photo storyboard template you can reuse or modify for your own needs ... ... in it's actual state this is setup for placing 2 photos inside. You can place your photos easily as clipped child layers into the indicated left and right sides as shown here ... .. and here is the storyboard: fall_photo_storyboard.afdesign Have a nice fall time!
-
- 4
-
-
-
- photo storyboard
- fall
- (and 1 more)
-
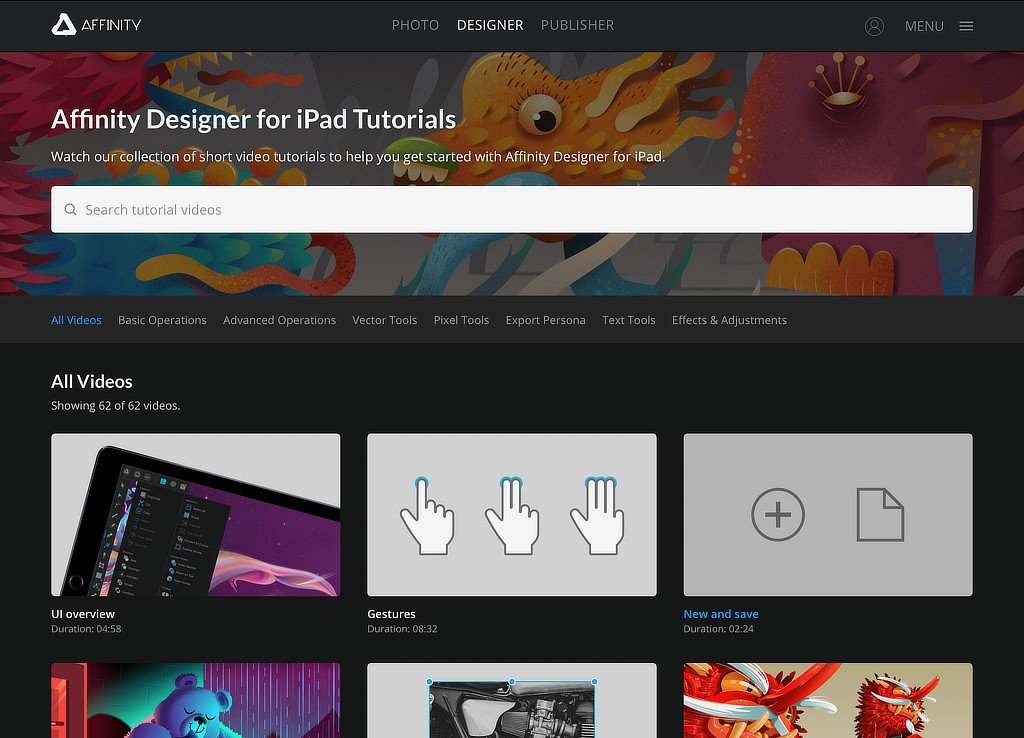
 We’re really happy to provide a brand new set of tutorials to accompany the newly launched Affinity Designer for iPad app. The tutorials are all available from the app’s Home screen via the Tutorials option at bottom left. You can also access them here: https://affinity.serif.com/tutorials/designer/ipad/ Some tutorial facts.. 62 video in total Seven tutorial categories Shot in 4k resolution Subtitling for eight languages (DE, FR, ES, IT, PT-BR, RU, JA, zh-Hans) Different tutors for specialist areas Here’s the full tutorial list.. Basic operations UI overview Gestures New and save Open and import Placing images Pan, zoom and rotate canvas Selecting Moving, resizing and rotating Grouping Ordering Layers Studio Align and distribute Copy, paste and power duplicate Undo, redo and history Quick export Advanced operations Art-boards Symbols Assets Studio Snapping Constraints View modes for pixel preview Vector Tools Pen Tool Node Tool Advanced curve drawing Editing strokes Pencil Tool Shape tools Corner Tool Boolean operations Colour Picker Tool Fill Tool Advanced colour Gradients Transparency Tool Vector Brush Tool Managing vector brushes Pixel Tools Pixel Tool Paint Brush Tool Advanced brush options Managing raster brushes Smudge tools Erase Brush Tool Flood Fill Tool Flood selections Drawn selections Selection modification tools Smart Selection Brush Tool Refine Selection Tool Export Persona Slice Tool Export Persona - Slices Studio Export Persona - Layers Studio Text Tools Frame Text Tool Art Text Tool Advanced typography Text on a path Importing fonts Effects & Adjustments Applying adjustments Masking adjustments Layer effects Advanced layer effects Blend modes Styles If you have any feedback, please comment on this thread. Best wishes Affinity documentation
-
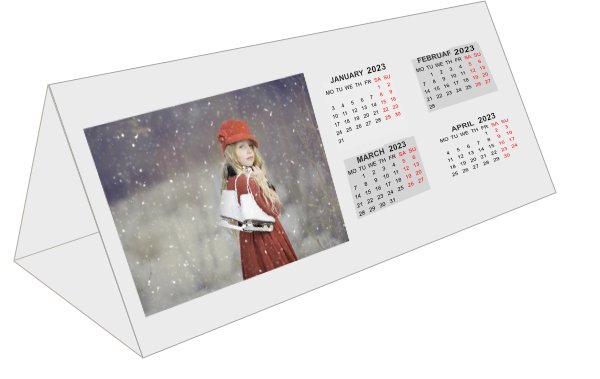
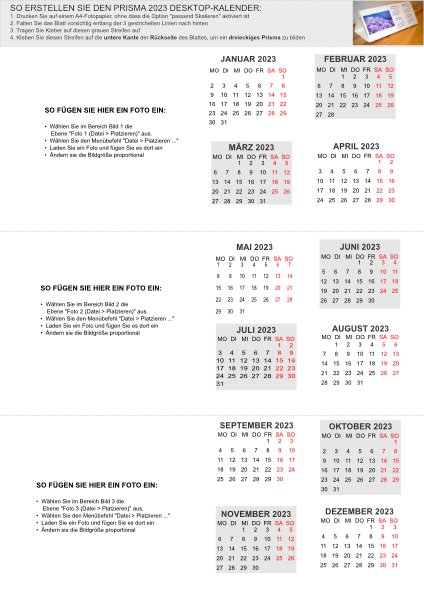
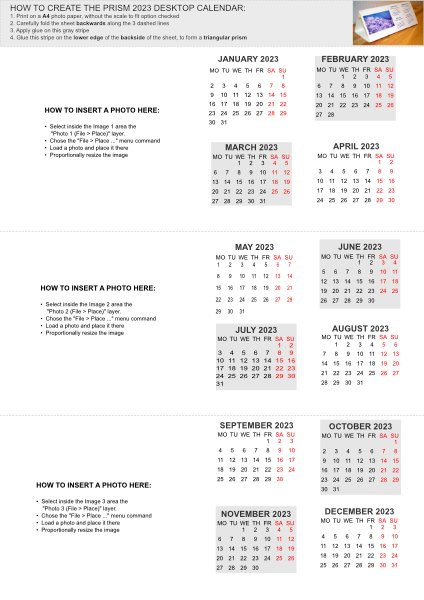
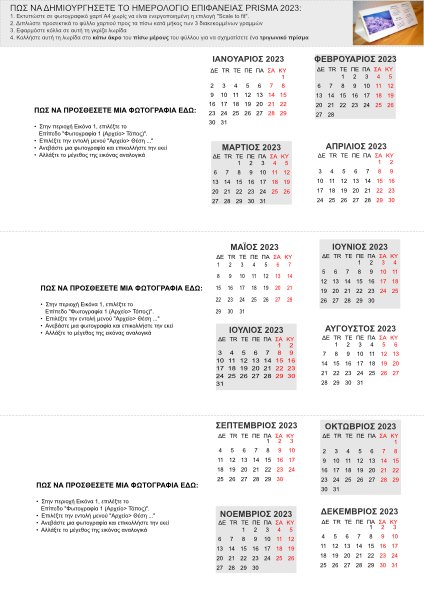
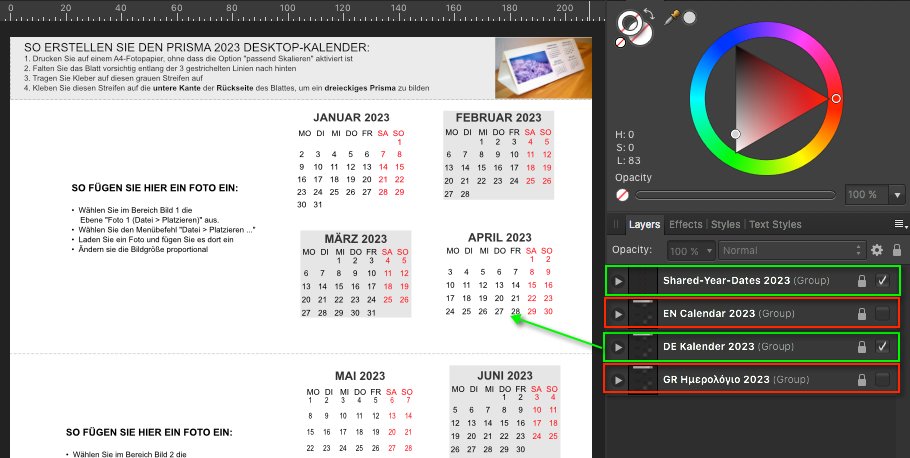
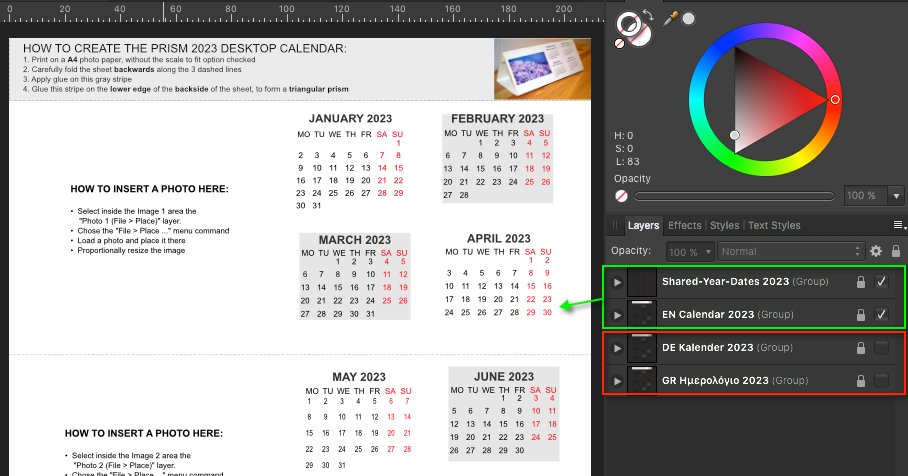
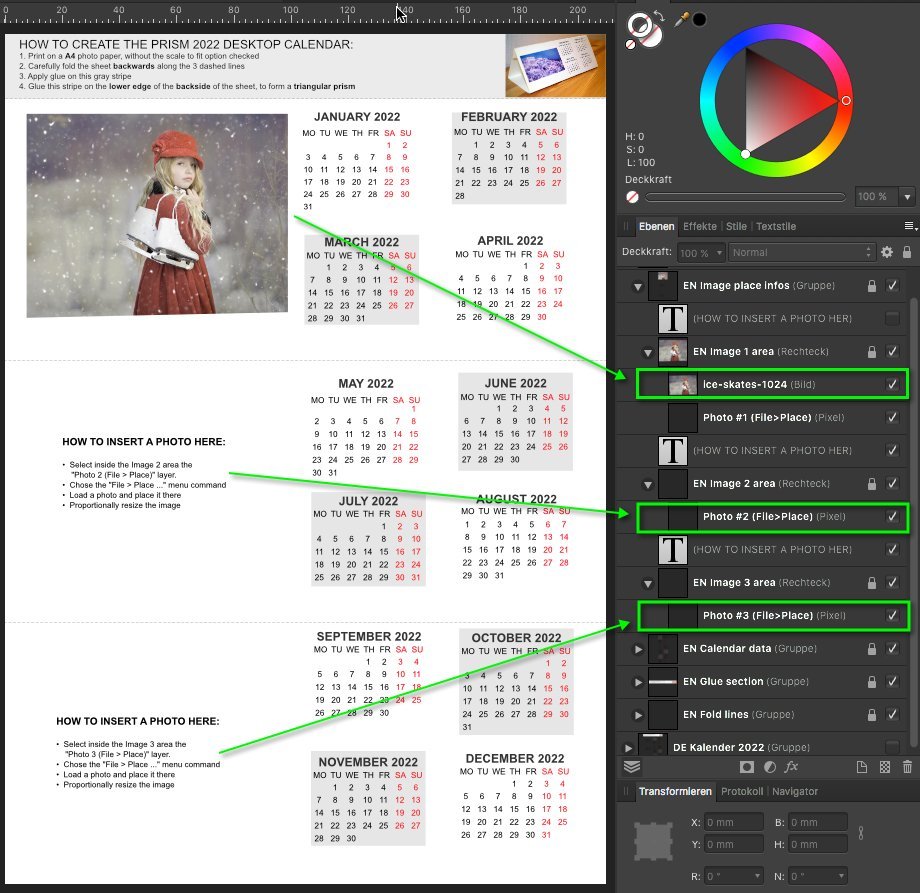
Here is a template for an A4 sized prism desk 2023 calendar created in AD. This template can be (re)used in all Affinity apps! This 2023 calendar is localized in german, english and greek (DE/EN/GR) and thus allows to switch the calendar languages and print for either language. The calendar dates used in this template do stem from Mensch Mesch. - The ready glued together calendar looks like the following ... ... the A4 Affinity Designer template looks like this, dependent on the language (DE/EN/GR) switch ... You set and switch the corresponding language like this for the german (DE) calendar part ... .. or like this for english (EN) calendar part ... To add your images into the calendar follow the localized instructions like written onto this shown 2022 calendar variation ... ... here is the corresponding AD template file ... prism_A4_calendar_en_de_gr_2023.afdesign Let's have better times then in 2023!
-
 Picking a color for Gradient strokes and fills, only works from the gradient menu. In the gradient menu there is the option for color. However from this color panel I do not have access to my swatches. Further more, if I navigate to my swatches and select a color, that color overrides the gradient on the object as one solid color. Same goes for the color panel. Note -- For fills I can work around this by using the Fill tool to create the adjustable line for gradients, selecting the nodes on the adjustable gradient line and then selecting colors from my swatches or the color panel with out the swatches overriding the gradient to a solid fill. I should be able to select a color for gradients from swatches and the color panel while I have the gradient panel open with nodes selected. I should not be limited to the single "color selector" button that is within the gradient panel. I feel like it could almost be done away with, as I'm sure most people have their color panel or swatch panel located somewhere on their screen. Edit : I have found that within the gradient color selection there is a drop down which allows me to access my swatch colors. This provides me with a useable work around for coloring stroke gradients. However my point still remains that this color selection button could be done away with. I already have my color panel, and swatch panel, open in my work space, I use them very frequently and habitually. It is very frustrating to have these extra steps/clicks to navigate to and color gradients. When the color and swatch panel are used so frequently, it is very anti intuitive that they both do not work for gradients.
 -
 I would love it if you would create a Video Editing Software like premier (but better obviously) As a college student I have two choices pay the expensive price of £16 a month for Adobe's okay software or get it offline illegally and unsafe. I have already Purchased Affinity Photo, am about to Purchase Affinity Designer but would absolutely love it if there was a affinity video editor for my media. I know this might not be your kinda thing but it would be so great and I know so many people would rather use this than adobe. You're ahead of them, keep it up.
 -
 Hi, I have been experiencing some issues with Affinity Photo while using it for digital art. I am running Affinity Photo version 1.10.5.1342 on Windows 11 I have a ryzen 7 3700x CPU and an NVIDIA RTX 2080 GPU I am using a drawing tablet (XP-Pen Star 03 V2) and am drawing using it on your software. The crash happens no matter the selected mode (low, high or windows ink). In all cases using the undo shortcut just after drawing with the tablet can make the entire software suddenly close. Attached to this post are three recent crash logs to help troubleshoot the issue 8ca3abf4-24f5-429f-a028-ac8fe9d85d1c.dmp eeeaff53-e2e0-402b-b815-e47005da756b.dmp 3efcbf17-d328-49bb-870c-d7a8a05743c7.dmp
 -
 Hello. I would like to ask why affinity photo's develop persona is still has very limited features? I hope they would at least add color correction features that would allow you to change hue by hue, hue by luminosity, hue by saturation, saturation by hue and etc. A lot of useful color editing tool are only available outside develop persona, making it harder to edit the image without degrading it easily. The masking in develop mode is also still very limited. I hope affinity will soon add it to their updates. Thanks.
 -
 Greetings, I have been using Affinity for quite some time now and have never had an issue with this before - it suddenly showed up with the most recent update and persists in all affinity programs - photo, designer and publisher. The issue is that when I export text as curves into PDF, letters like "I" and "l" (L) become thicker than they should be. As far as I know this doesn't mean that it'll be like that when printed, it is simply shown like this in the PDF. Some suggest to disable certain options within their PDF viewers, but this isn't a real solution as certain PDF's are shared among clients and various other people and having to let them know every time "hey, you should disable/enable option X" isn't efficient. The solution to this issue was finally presented in this very old article : https://www.underconsideration.com/speakup/archives/004301.html Adding additional anchor points made everything work and show correctly. I have been using the same method all the time within Affinity software as well and it worked perfectly - since the last patch that is. Now, I always get thick lines no matter how many anchor points I add and now matter what option I enable or disable in my viewer. I have even tried adding a very small rounded stroke around the letter i (I) and L (l) to avoid this idea of it being a simply thin rectangle with only 4 anchor points : But it didn't help. Even worse, the letter was even more thick than before! 😱 Since this issue didn't exist prior to the latest patch and it suddenly appeared, I posted it here on the forum in hopes that someone might know what option perhaps needs to be enabled in the new version, or if it actually truly is a bug. I repeat, this isn't just a PDF viewer issue anymore, adding anchor points is completely ignored during export and the resulted exported PDF even loses all added anchor points, which means the following is happening now : You can open a brand new document in designer Type anything consisting of letters I, for example "I need this to work" Convert the text to curves Add additional anchor points to "I" Export for print PDF with no rasterization of any type. Check up, just in case, convert text to curves Open exported PDF in designer again The letter "I" is not a curve anymore, while everything else is This could potentially cause problems with printers who deliberately ask for text in curves This should mean that there seems to exist a new bug during export to PDF. 😭
 -
A bit of a weird one. When I create a new layer and double click the title to rename it, if I type the new layer name too quickly the app seems to commit to the new name before I've even finished typing it. This seems to be especially prevalent when I try and rename it with anything starting with the letter "S". For instance, if I make a new layer and I want to rename it "Skyline", I double click the default name "(Pixel)" and quickly start typing "Skyline" I only get as far as "Sky" before it commits to the renaming. So I end up with a layer prematurely called "Sky" and accidentally proceed to toggle all of the keyboard shortcuts for the remaining characters in the word "L I N E" while thinking I'm still busy typing out the layer name. Hopefully this makes some kind of sense! Please let me know if you need more info.
-
 Hi, I'm new to use Affinity Photo and Affinity Design. Till now I used Photoshop. I'm missing some function in Affinity. Can someone tell me how to rotate the canvas in Affinity Photo and how to change the Brush size with the mouse like Photoshop.
 -
 I just got the a7iv recently and for every single photo I uploaded was distorted, cropped and just blown out looking when importing to Affinity photo. I have been looking heavily on the internet and have not found similar problems. I have my camera set to RAW. .ARW is Sonys format. All help would be appreciated. On my camera the photos look fine and in photos it looks fine as long as I don't import them. If I import the photos they just turn out grey as shown in the pictures.
-
 MODERATORS Just posting this to inform you about some annoying features of infinity designer which should be removed. 1) Art board Layer working with art board is very difficult due to its art board layer . I think affinity layers working ways should be same as adobe illustrator. When we remove art board layers no shapes shows outside of art board area . 2) EPS File One of main source file which clients demands and also most of stock sites used this as source file , but affinity EPS is very different from other . ( No layer ) ( Text conversation into curves ) ( No grouping ) 3) No Snapping While Cursor tool I feel no snapping while adding nodes to a shape. Difficult when putting nodes with perfect distance. 4) Pen Tool No strokes showing when using pen tool , I storokes should be visible when working with pen tool. 5) empty Gap Issue While working or in exported files , we see a gap between perfectly snapped shape , this is one of big issue I think . I will some more Annoying Features of designer very soon , so affinity should adjust these
- 6 replies
-
- 1
-
-
- affinity
- affinity issues
- (and 5 more)
-
After desgining some mugs and mousemats on VistaPrint using Affinity software. I decided to download the blank templates and save them as Affinity templates for ease of use. I share them here with you all. Michael. Vistaprint Mousemat blank.zip Vistaprintmugblanktemplate.zip
-
When using the brush tool in Affinity apps I always get very odd brush size increments when using the square bracket ( [ ] ) keys to change the brush size. If I use a 10px brush and use "]" to size it up one increment, it doesn't go to the expected 15px, but rather to 11,5 px. And then, if I press the "[" key to size the brush back down to 10px from 11,5px, it randomly ends up at 9,8px (?). Pressing "]" three times from 9px results in 9px, 10,4px, 11,9px, and 13,7px, instead of the expected 9px, 10px, 15px, and 20px values. I find this a bit strange, as I feel that decimal pixel values for brush sizes make little to no difference, and it's just generally odd that using the square brackets to change brush sizes doesn't just use rounded increments - I hate mentioning Photoshop as a reference example, but if if ain't broke... For instance, using the brackets between the values 1px and 10px should only change the brush size in increments of 1px (1,2,3,4,5px...), anything between 10px and 50px should change in increments of 5px (10, 15, 20, 25, 30px...), anything between 50px and 100px should change in increments of 10px (50, 60, 70, 80, 90px...), anything between 100px and 200px should change in increments of 25px (100, 125, 150, 200px), then 50px, and anything above 300px should change in increments of 100px every time you press the square bracket(s). Is there a significance to these weird, decimal pixel increment values? If so, is there a way to change it back to something more normal/user friendly?