Search the Community
Showing results for tags 'Affinity photo'.
-
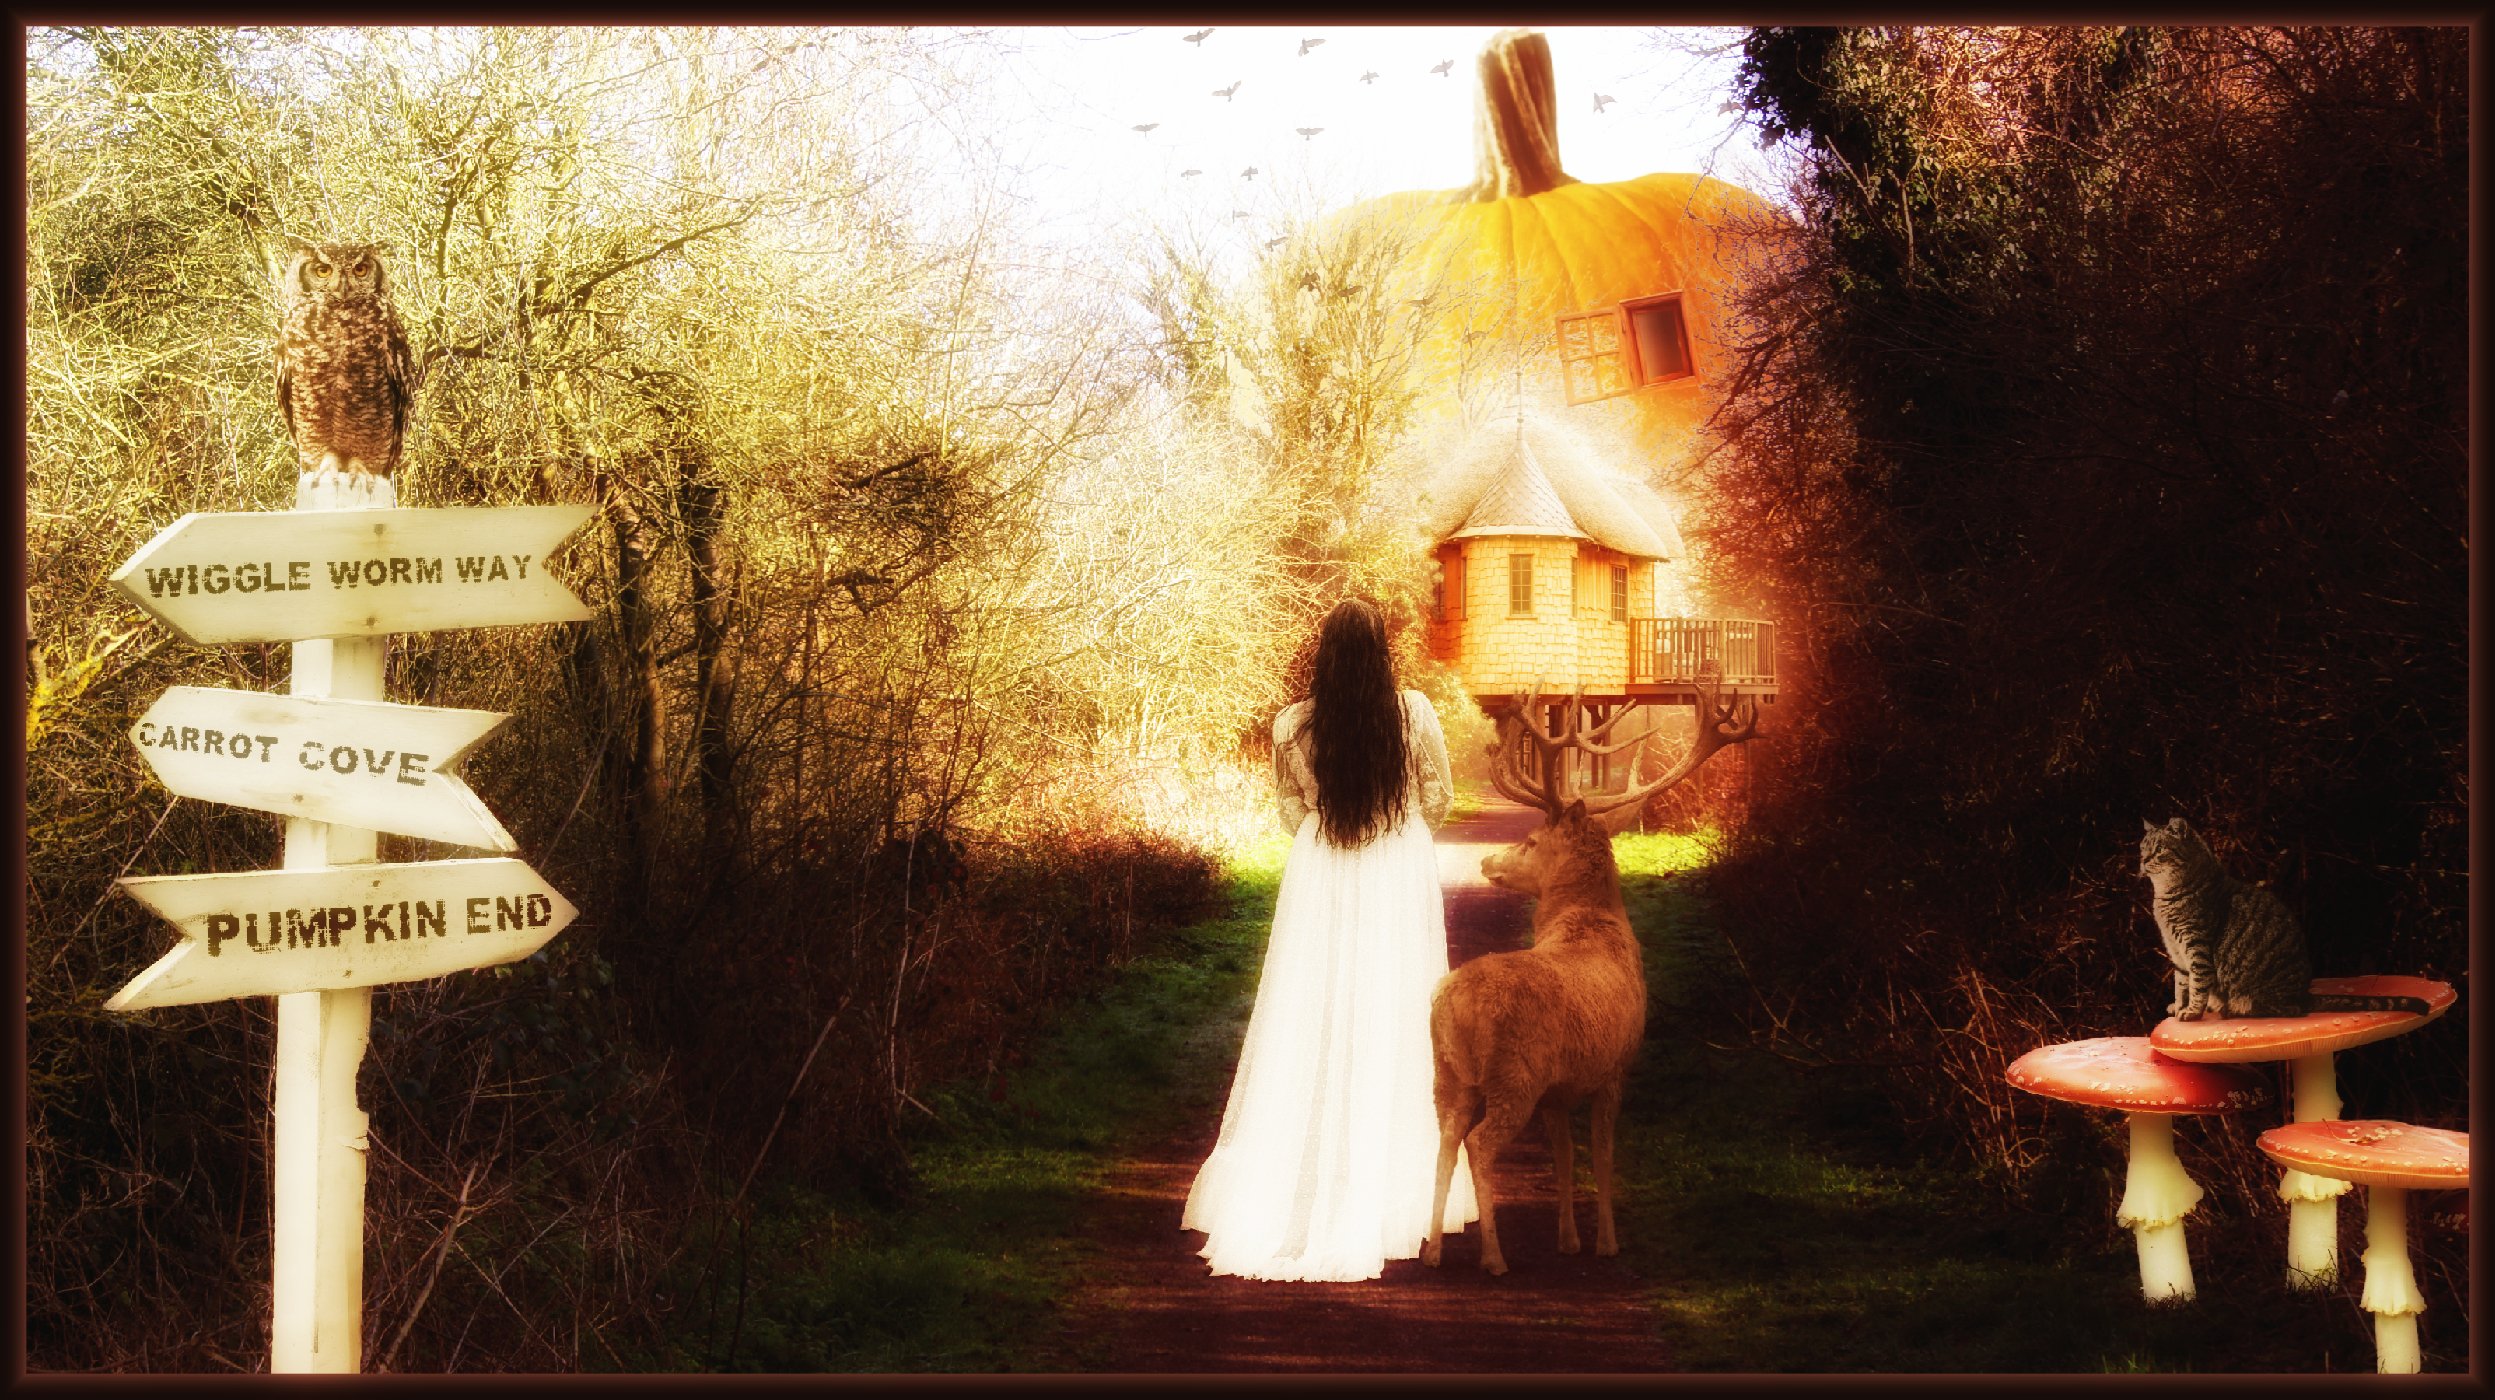
The base picture came from one of my many nature walks, and with a bit of imagination I tried to create a fairy tale type picture. Yes I know. . .I'm out there! 😀

-
Way back in the good old 30s, 40s & 50s, before real science had begun to catch up with pulp fiction, there was a penchant among sci-fi magazines for mad scientists to experiment on scantily-clad ladies in glass vessels. I've seen quite a few on FaceBook pages lately, so I thought I'd have a go at making a realistic-looking one of my own, mostly in Affinity Photo.As far as possible I've used my own photos, but the unfortunate female is from Pixabay, the Mad Scientist is Doc Brown from Back to the Future with William Herschel's head (photo: Julia Margaret Cameron), the glass thingy is from off the internet; the tubing is some Affinity Designer image brushes I made for the purpose. The whole thing was largely inspired by Richard Hamilton's Pop Art collage Just what is it that makes today's homes so different, so appealing?. It grew organically, which means I had a half-formed plan in my head and mostly added stuff willy-nilly and moved it around till I was happy. Oh, and I had to paint everything electric-shock blue. I made this A2 size, which is a bit bigger than it needed to be really: the while thing is nearly 300MB, even after I'd flattened quite a few of the layers and groups. This is Hamilton's iconic work, which kicked off the Pop Art movement in 1956. In those days, cut and paste meant a pair of scissors and a bottle of Gloy!
- 1 reply
-
- 6
-

-
- science fiction
- mad scientist
- (and 5 more)
-
Affinity Photo Final Image Stock Photos arbinsidik.com
-
 Making found brush easier please give numbers in preview or names ? i tried found and finally founded smooth edge brush what is full colour what i selec5red in its "strongest areas". in previews is hard found and expect all brushes do finally (when they used amount x) this but looks is not. i mean in Affinity Photo. and why not Designer also if idea is suitable. and these brushes dont have name even help what shows when pointer stays top of them. and i feel these should be first choice not these very opague but not fully opague brushes.
 -
for example painting is not fully opague ? looks like this: i painted this black and when i pick color is 63,63,63. and in border areas there is darker values than middle. this happens other brushes as well. and used red does same. i feel this bug. i want for example airbrush stuff what is rounded edges but darkest area is black when i select black. in other program i can do what i want (and i feel there should be also happen same) but is so silly use program what is very old (is i think 1993 or 1996 or something like it) and change stuff to it and back and even more worse this other tool dont support modern wacom and multiply mixing mode for example,
-
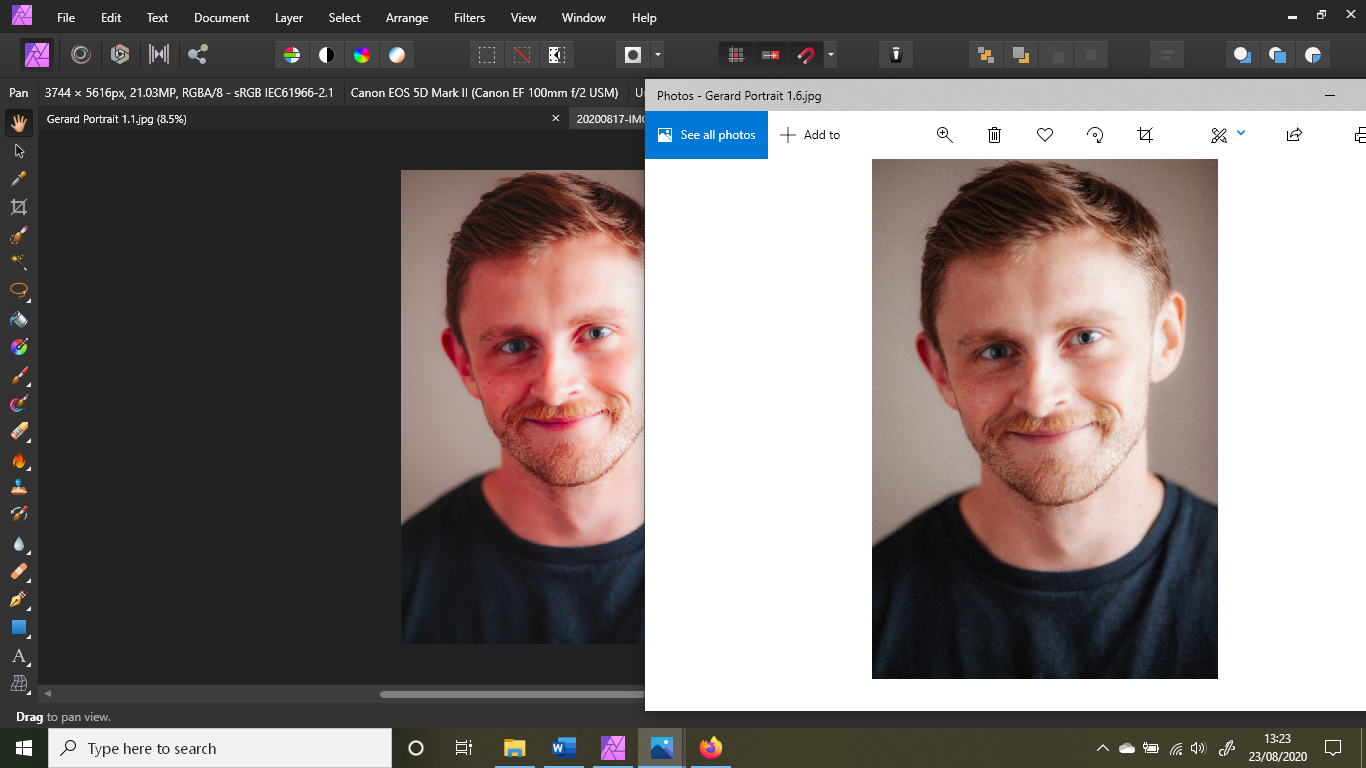
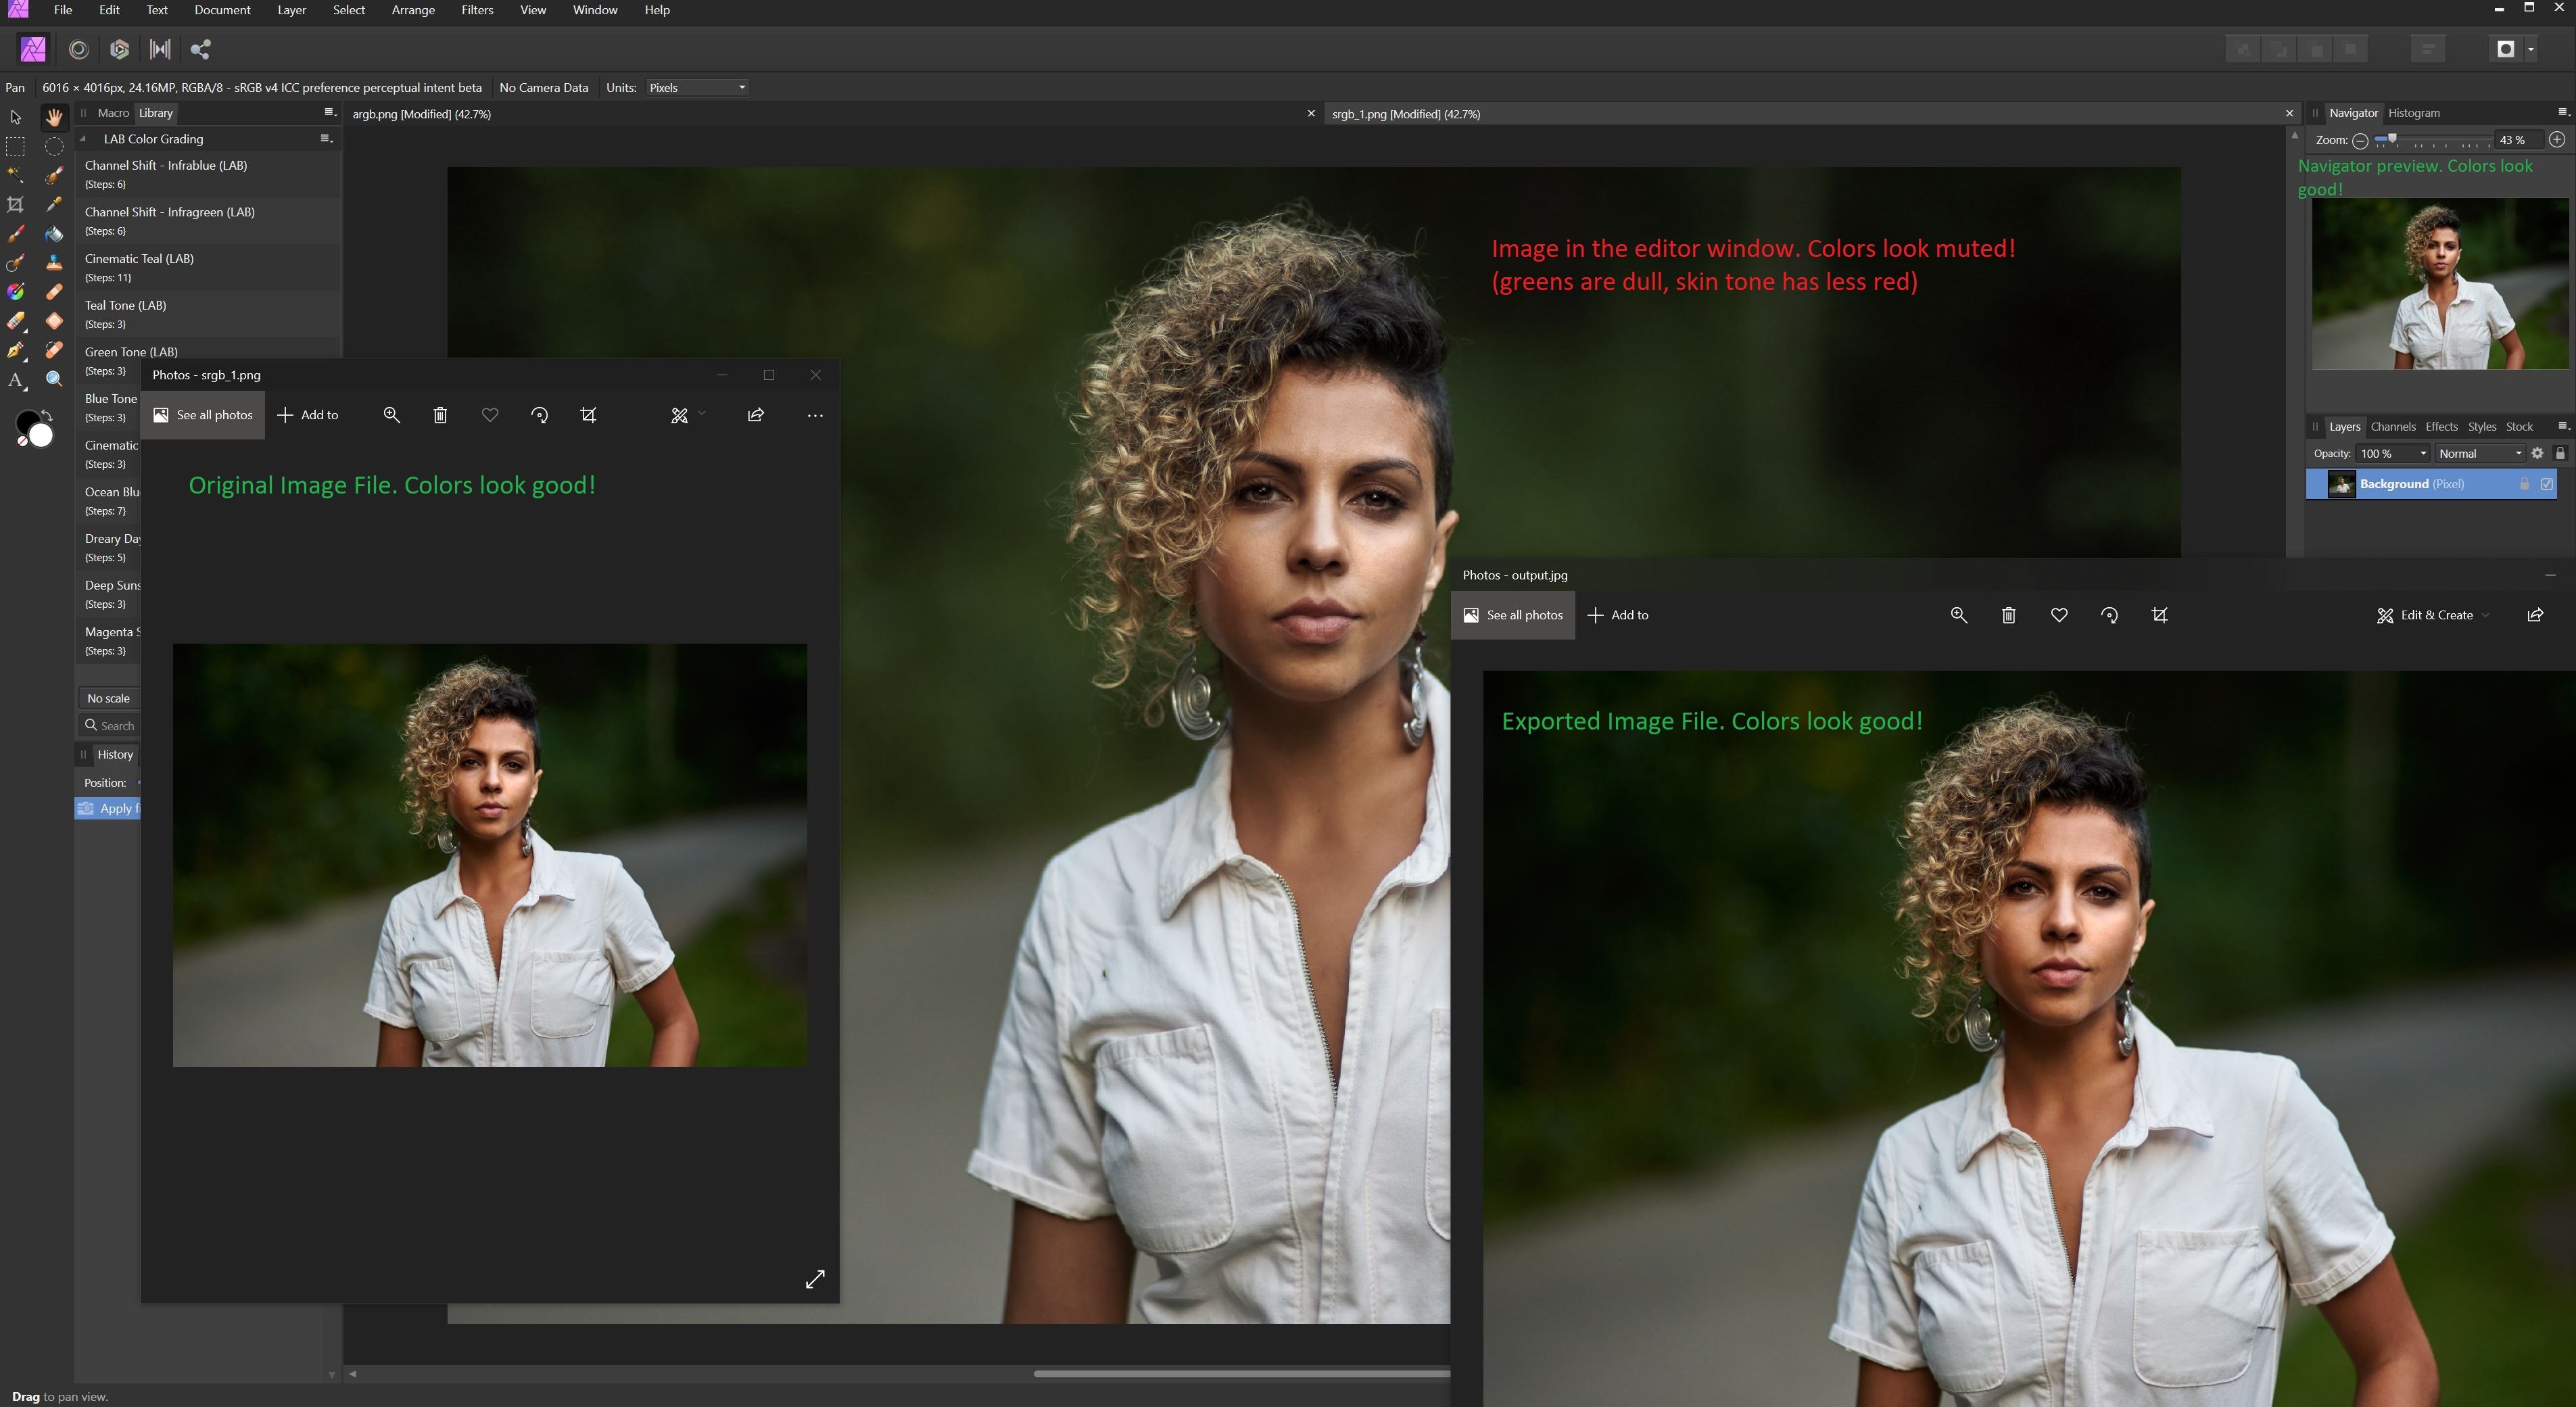
 Hey there, I am having an issue that is driving me insane and I was wondering if anyone had any ideas. The colors in the affinity editor window for an image I am working with are wrong. I know it isn't a display calibration issue because the colors are ONLY wrong in the main Affinity Photo editor window. (Also I am working using a calibrated monitor) - They are correct when I open the source image file in Windows Pictures - They are even correct in the tiny little navigator window in Affinity Photo - They are correct if I export the image file and then open it in Window Pictures again. The only area where they are incorrect is in the main editor window itself. Colors look dull. Its as if saturation has been lowered. I have tried all sorts of things to fix it from working with different color profiles to different bit depths or even different file formats. Nothing has any impact. Whenever I open an image in affinity, it just looks "dull" This obviously presents a huge problem when working with photos as I can't make accurate color grading decisions. I've included a screenshot below showing an image at various steps of the workflow. You can very clearly see that the main large image is duller than all the others and if I sample say the center of the green highlight in the top left hand blur what I am seeing is also affirmed: - Source File: 15,27,3 - Editor Window: 28, 36, 13 - Output: 16, 28, 4 - Navigator: 16, 30, 5 You expect a bit of variance because I can't sample the exact same spot but the Editor Window is clearly very difference than the others. I have also included a screenshot of a new document just filled with red to rule out it being an issue with the photo itself. In that screen you can clearly see that the red in the navigator preview is richer and more vibrant than the red in the editor window itself. (The navigator is accurate to the color I selected) Any help would be really appreciated. I am running AP 1.8.5.703 on Windows 10. I am hoping maybe there is some setting that may be wrong in my preferences?
-

affinity photo MEIN BUCHCOVER-TUTORIAL IM AFFINITY WORKBOOK
bodobe posted a topic in Share your work
MY BOOKCOVER TUTORIAL IN THE AFFINITY WORKBOOK My work in book cover design caught the attention of Serif (Nottingham) and one day I got mail. Whether I wanted to do a tutorial on book cover design for the new Affinity Photo Workbook, and of course, I was happy to be there. As an example, I have contributed a tutorial for the design of the book cover of a fictional novel (Search The Woods): From setting up the document to the actual design and exporting the print edition, all work steps are carefully described. https://www.bodobe.de/mein-tutorial-zur-buchcovergestaltung/-
- 2
-
-
- buchcover
- book cover design
- (and 2 more)
-
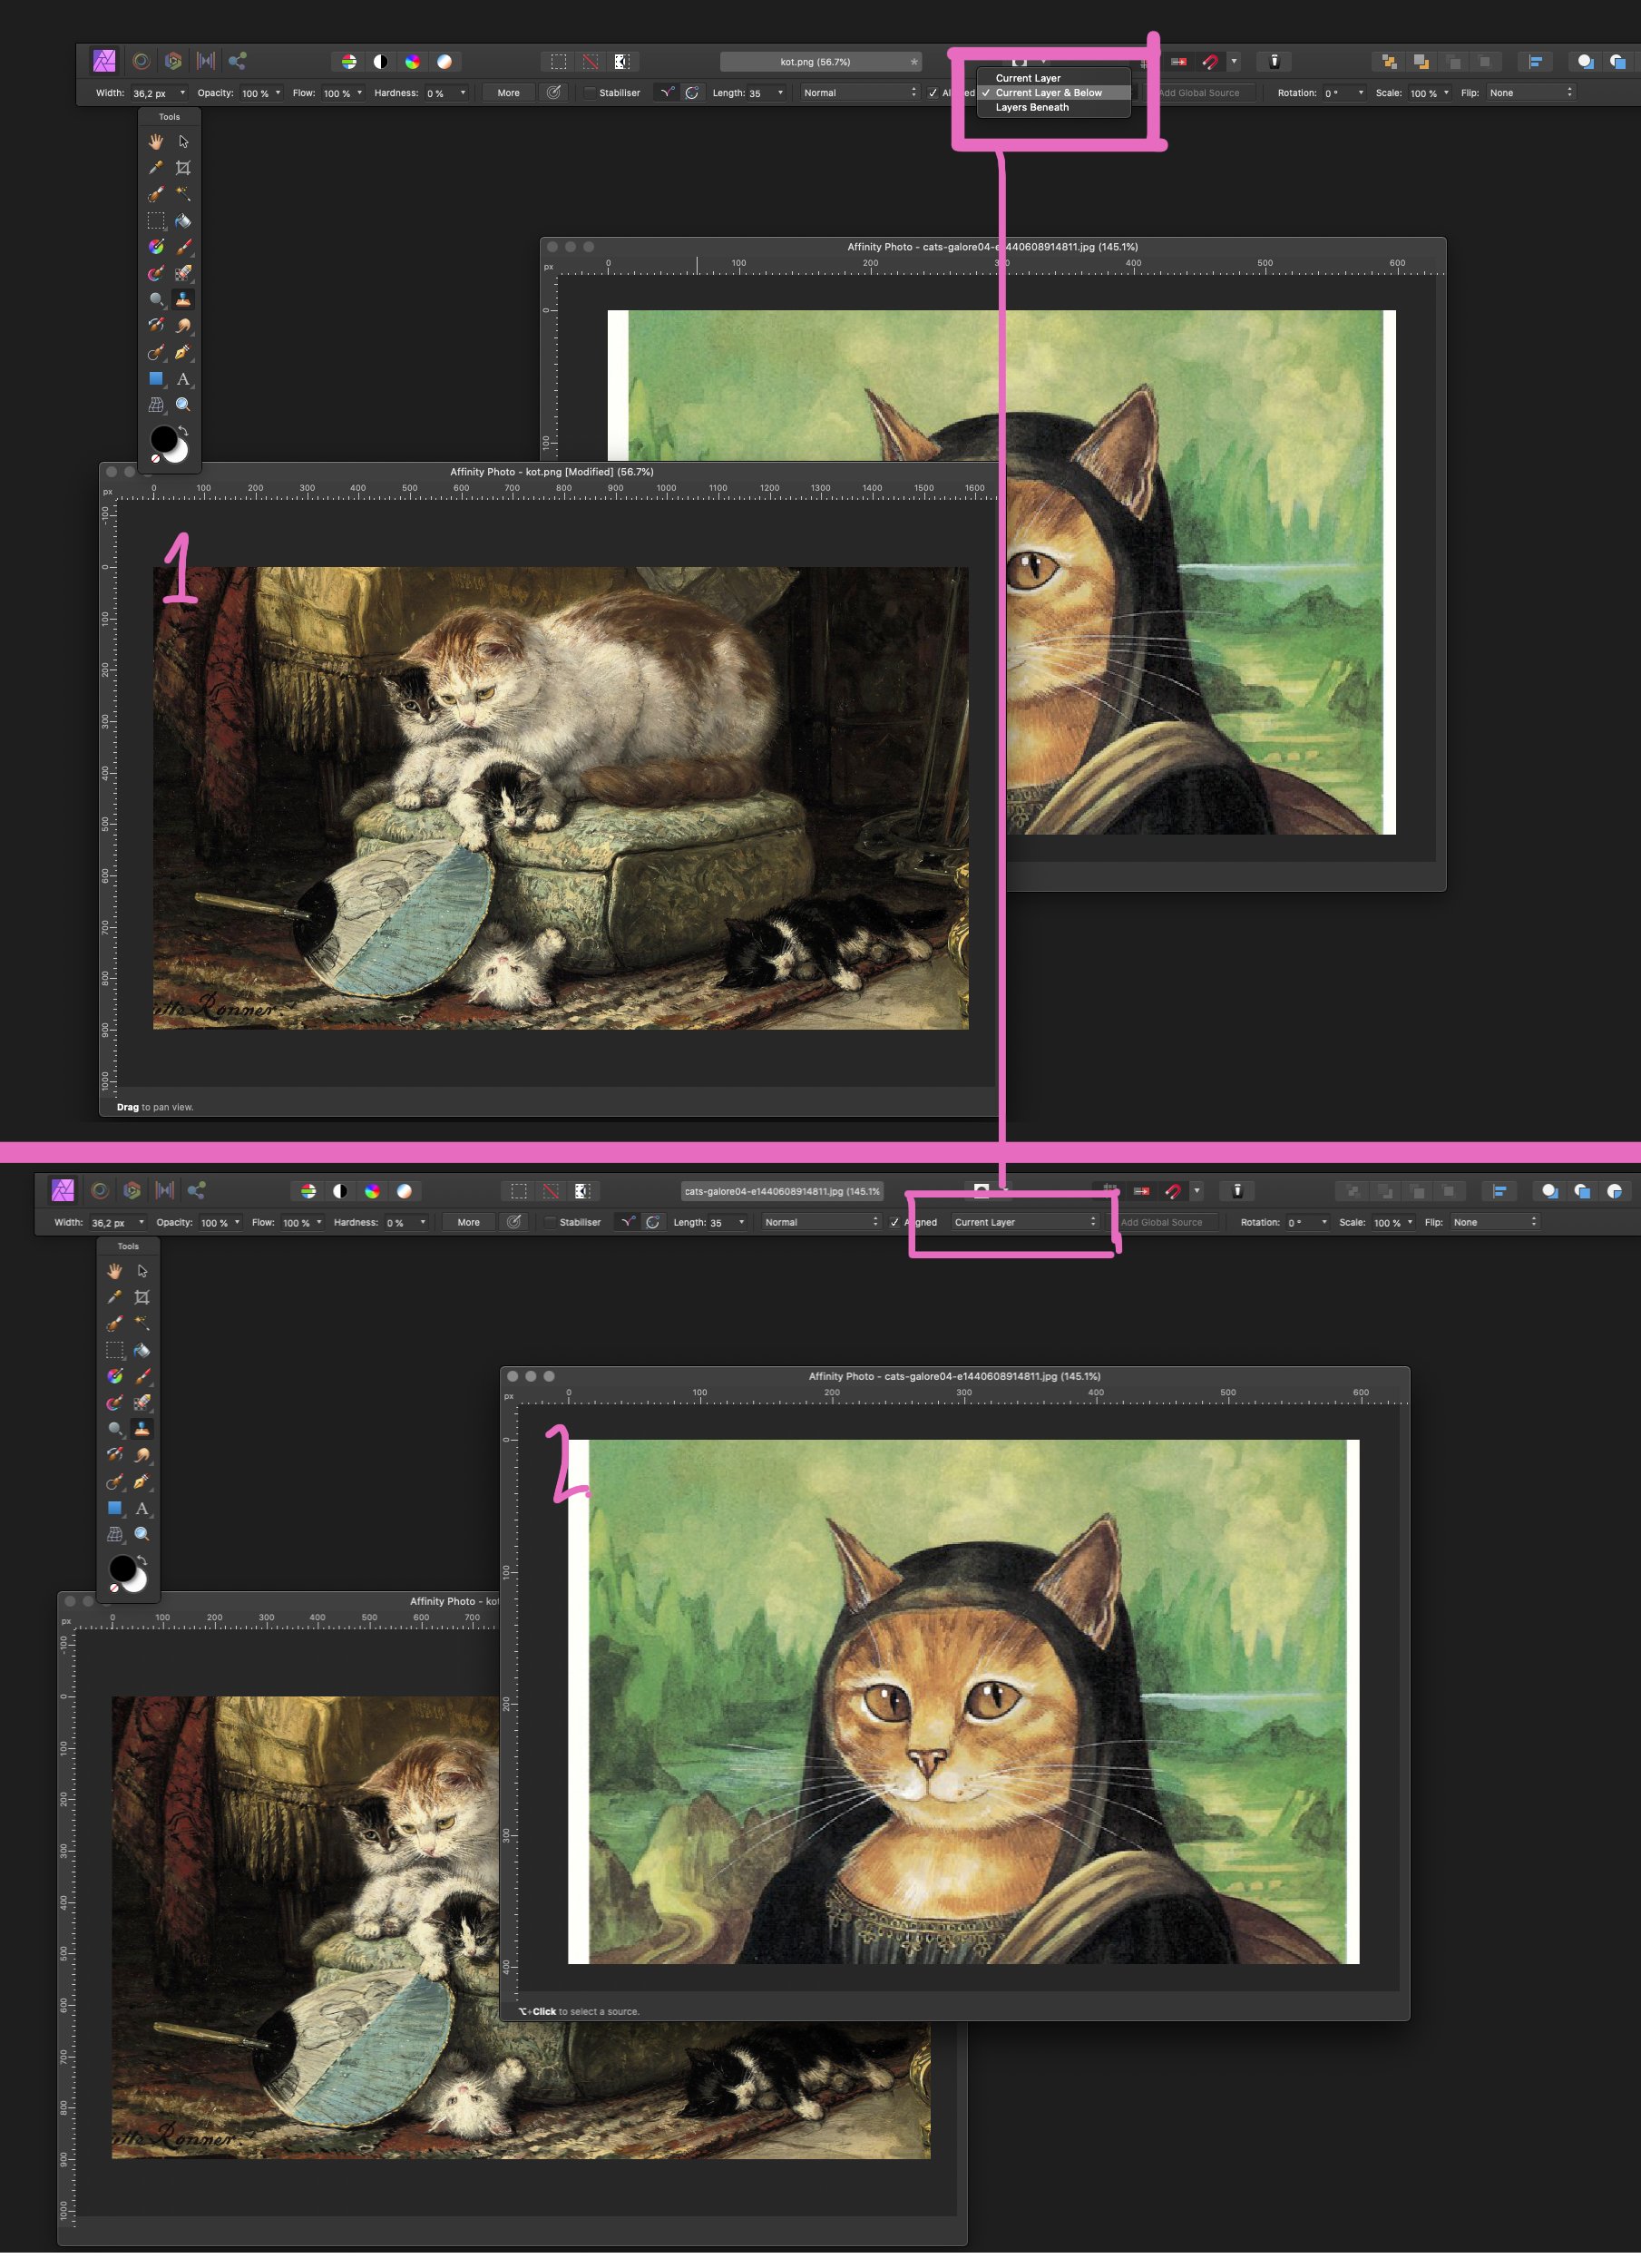
 Issue/situation: In Affinity Photo I would like the tools ( Cloning, Inpaint etc ) to remember the last settings such as Source: Current Layer & Below, but it only seems to 'remember' settings such as opacity etc. Question: How do I get the last settings to be the default for the tools? Screenshots: See attached screenshot. Operating system: OSX Catalina 10.15.6 Affinity Photo: Version 1.8.4 Unusual hardware: Wacom tablet Intuos pro Any help or input on this matter is much appreciated. Thank you in advance. PS: if this post is in the wrong forum, then please let me know, and I will submit it in another.
-
 Hi all, Is there a way to hide temporary the Liquify Freeze Tool mask? Just like the Hide mesh checkbox. Cheers, Juan
 -
https://www.artstation.com/artwork/WKdLQv Was practicing different mediums by mixing 3D sculpting and Greasepencil in Blender and then finally finishing it with a 2D paintover inside Affinity Photo. Was a lot fun! Here is the original Blender version before the paintover for those who are curious.
-
Feature request: It would be super neat of Affinity Photo's tools would remember last used settings. Specifically the source target option ( Current Layer & Below ) on the Clone and Inpaint tools. More info: I did post a question about this on a different affinity forum where you can see more info:
-
 hi everyone, when i try to focus merge 7 photos, it took 100% charge of my C hardrive. i've up the swap on windows, move it to the L drive. i've make a symbolic link from c:\users\profile\appdata\affinity to L:\ (have more place) and it sill put the c:\ on 100% charge do some one have a tip for me ??
-
 In the Develop Persona in the Overlay area: 1. Click on the gradient tool icon. 2. Create a gradient by dragging from top to bottom. Result: Gradient appears as coming across from the right edge of the image. Re-tested and this time drew a gradient from the left edge into the image and the result was a gradient was created from top to bottom. Windows 10 Version 2004 OS Build 19041.450
 -
In the UK English version of the Help on ‘Vector content defaults’ (or ‘Object defaults’ in Designer and Publisher) the word ‘synchronise’ and other words with the same root are variously spelled with ‘-is-’ or ‘-iz-’. Photo: https://affinity.help/photo/English.lproj/pages/DesignAids/objectDefaults.html Designer: https://affinity.help/designer/English.lproj/pages/ObjectControl/objectDefaults.html Publisher: https://affinity.help/publisher/English.lproj/pages/ObjectControl/objectDefaults.html
- 4 replies
-
- 1
-

-
- affinity publisher
- affinity photo
- (and 3 more)
-
Picture was taken with a Nikon DF using a 20mm F4.0 AI lens with a B+W 093 IR 830 filter settings: 20mm f8.0 ISO 800 shutter 15 seconds on a tripod A nice sunny afternoon walking through the park. Playing with my cameras. Photo converted in Affinity Photo
-
First of all, I love to use my graphic tablet with windows ink enabled.... it gives a really nice user experience for me. Also on my experience of using the latest beta, Affinity is considered as Pen app (correct me, if i am wrong) So, when I use Affinity Photo with this graphic tablet, in my work area, mouse location is different from my pen pointer... It only displays the pen pointer. it is really annoying as I can't really do middle click drag as well as any right click functionality... Also, Affinity Photo is really hanging a lot with windows ink enabled, even a simple zooming to image takes time... Also, if I were to draw something, I am getting jagged lines. There is no option for me to disable windows ink in Affinity Photo. The tablet I use is Veikk A15 Pro. it will be great if someone can provide option to disable Affinity as Pen App.
-
 Hi guys, I'm at a loss. To confirm I run Spyder to colour manage my display and I have read the display calibration spotlight before writing this. However, when I export images from Affinity the colours come out wrong. See the attachement. I have included my export settings.
-
 I need to make a banner with sort of frayed edges - what might be a good approach for doing this?
 -
 Hello, I was messing around with Affinity Photo the other night and accidentally found a feature that I cannot find now. I was in the Color window and I believe I double clicked on the selected color and a window popped up PREVIEWING color chords. It could have just been showing me near shades to the selected color, but i definitely remember seeing "+1" and "+2" labeling corresponding shades with the actual color displayed. I was able to replicate popping this window up a couple of times before I shut down for the night, but since then have not been able to get this to happen again. I have no problem making color chords the normal way, populating in the swatch panel, but Id rather being able to see the colors before committing swatch space. So did I stumble across a little know feature, or did I fall into the matrix somehow? Thank you for your time, Dustin
 -
Good day, I’ve just recently purchased Photo largely to use Distress Press by True Grit to rough up some of my images created in Designer. Is there a way I can import what I’ve done in there back into designer as vector files or do I need to use a third party to convert/trace the images as vectors? Thanks.
-
 I recently downloaded the "Fineliner brushes" pack for Affinity photo. When I install the brushes they say "vector brushes installed" How can I access the vector brushes on Affinity photo? I don't see them show up in the brushes panel
 -
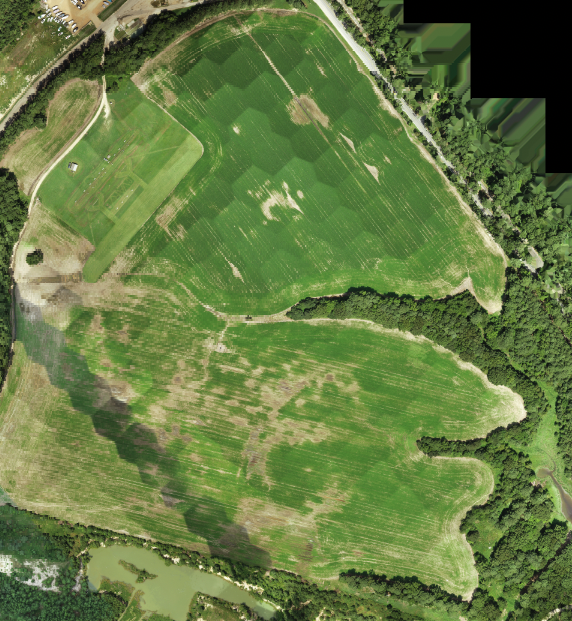
 I am trying to smooth out the honeycomb pattern from this aerial photo and am at a loss as to how to fix it. Is this even possible? I've tried Smudge Tool, Blur Tool, etc. Please let me know what you all think and what tools/processes would be best to use. Thanks!
-
 Hi guys, just want to share my work here. I did the lining and coloring in MediBang, and added a light and some adjustments in Affinity Photo. Here's is the link if you want to see the process. Thank you!
-
Hey! I wanted to know if affinity woorkbooks are delivered in turkey also, because i was about to pay the two books but im not sure if it the sheeping is available. Have a nice day.


.png.c74b1e2a1f6c29fd82b57b89ac622994.png)