Search the Community
Showing results for tags 'Affinity photo'.
-
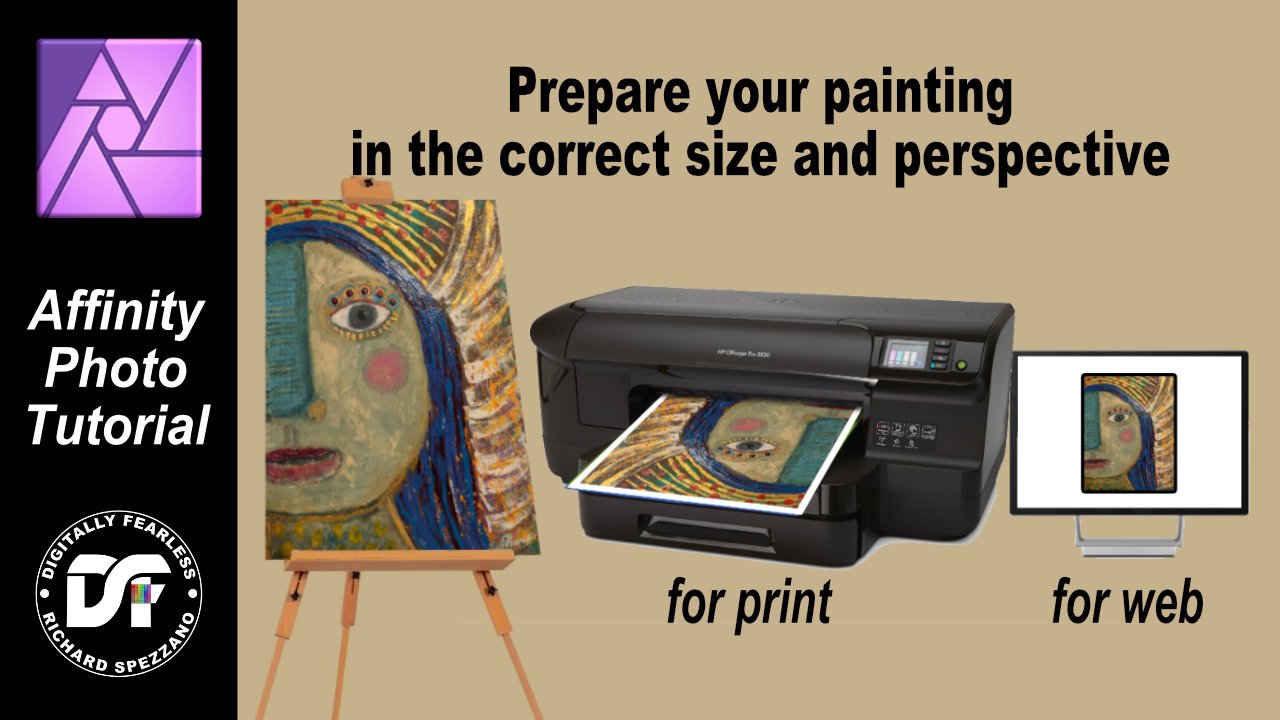
 How to print non-digital paintings. How to prepare your painting for print in the correct size, and for web. This Affinity Photo tutorial video shows how to put the photo back into correct perspective and size it for print. Imagine you just finished an oil painting and you want to digitize it so you can sell prints, place on the web, or submit your work to a gallery. Taking a photo of it on the wall or on an easel distorts the image. This video shows how to correct the distortion and size it correctly. https://youtu.be/BEMNW8PewIs
- 4 replies
-
- 4
-

-

-
- affinity photo
- tutorial
- (and 5 more)
-
 Hello everyone, I cannot launch affinity photo because of the theme I am using. Is this a way to bypass this and launch affinity photo anyway while keeping the theme I am using ? Thank you.
-
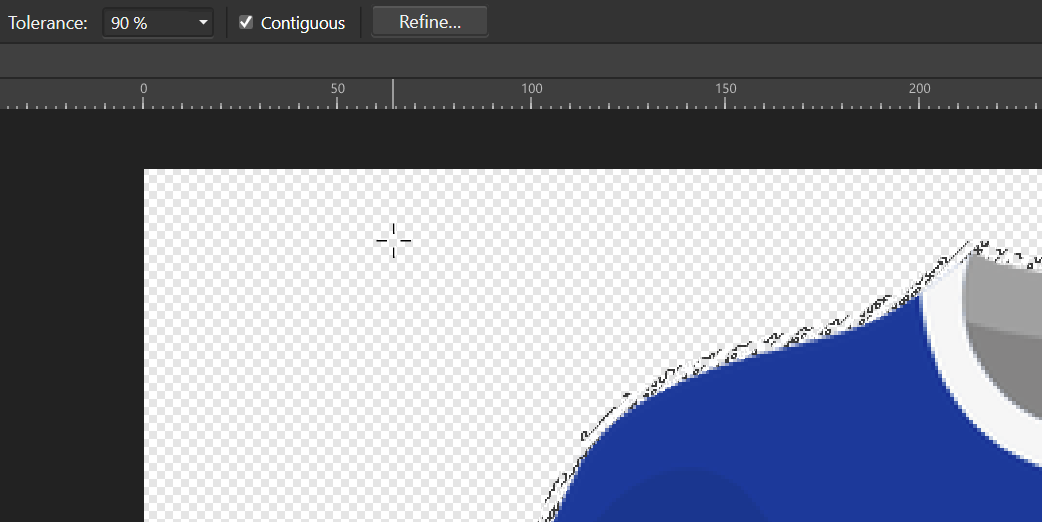
 I'm trying to select just the shirt, but no amount of tolerance will let me select it. (I select the whitespace/transparency and then invert selection) There's always a fuzz around it. I should not need to use refine for this. Photoshop does this without issue Example at 90% Tolerance File AF Version 1.8.5.703 Selection Tolerance Test.afphoto
-
 I noticed a fairly annoying UI issue with Affinity Photo on Mac. Like many, I am coming from Photoshop to Affinity Photo and am trying to organize things like the tools to match my previous workflow, and I've set up keyboard shortcuts to help me work more quickly. Since I dislike any keyboard shortcut that toggles through tools (I just one one tool per keyboard shortcut), I have B for brush, V for move, L for Lasso and so on. What I find very strange is that, if I select a tool that's already selected, I get system error message, as you can see in the video below. I am selecting the Move tool (V) while it's already selected, resulting in an error beep, as if I've done something wrong. I believe this behavior should be removed as it's not useful to the user. Screen_Recording_2021-01-21_at_3_41.58_PM.mov
 -
Hi there. After seeing a video with Nick Page using Lumenzia in Photoshop, I was inspired to do luminosity masks in a new and much more customizable way than the much used 5 levels of brigths, midtones, and darks. With these macros, when you create a light, midtones, or dark mask, it doesn't create the mask immediately, but applies 3 adjustments: a B&W, a Curves, and a Levels adjustment. Now you can adjust the three fine tune whatwhat you want in your selection. And using B&W adjustment you can more easily target specific colors. The only difference between the 3 that the curves layer is inverted in the darks, and peaks at the halfway point in the midtones mask. When you are happy with the selection, select the "Complete" macro, which will create a selection, and a new spare channel from the selection. Hope you find this useful. Stroiman's Luminosity Masks.afmacros
-
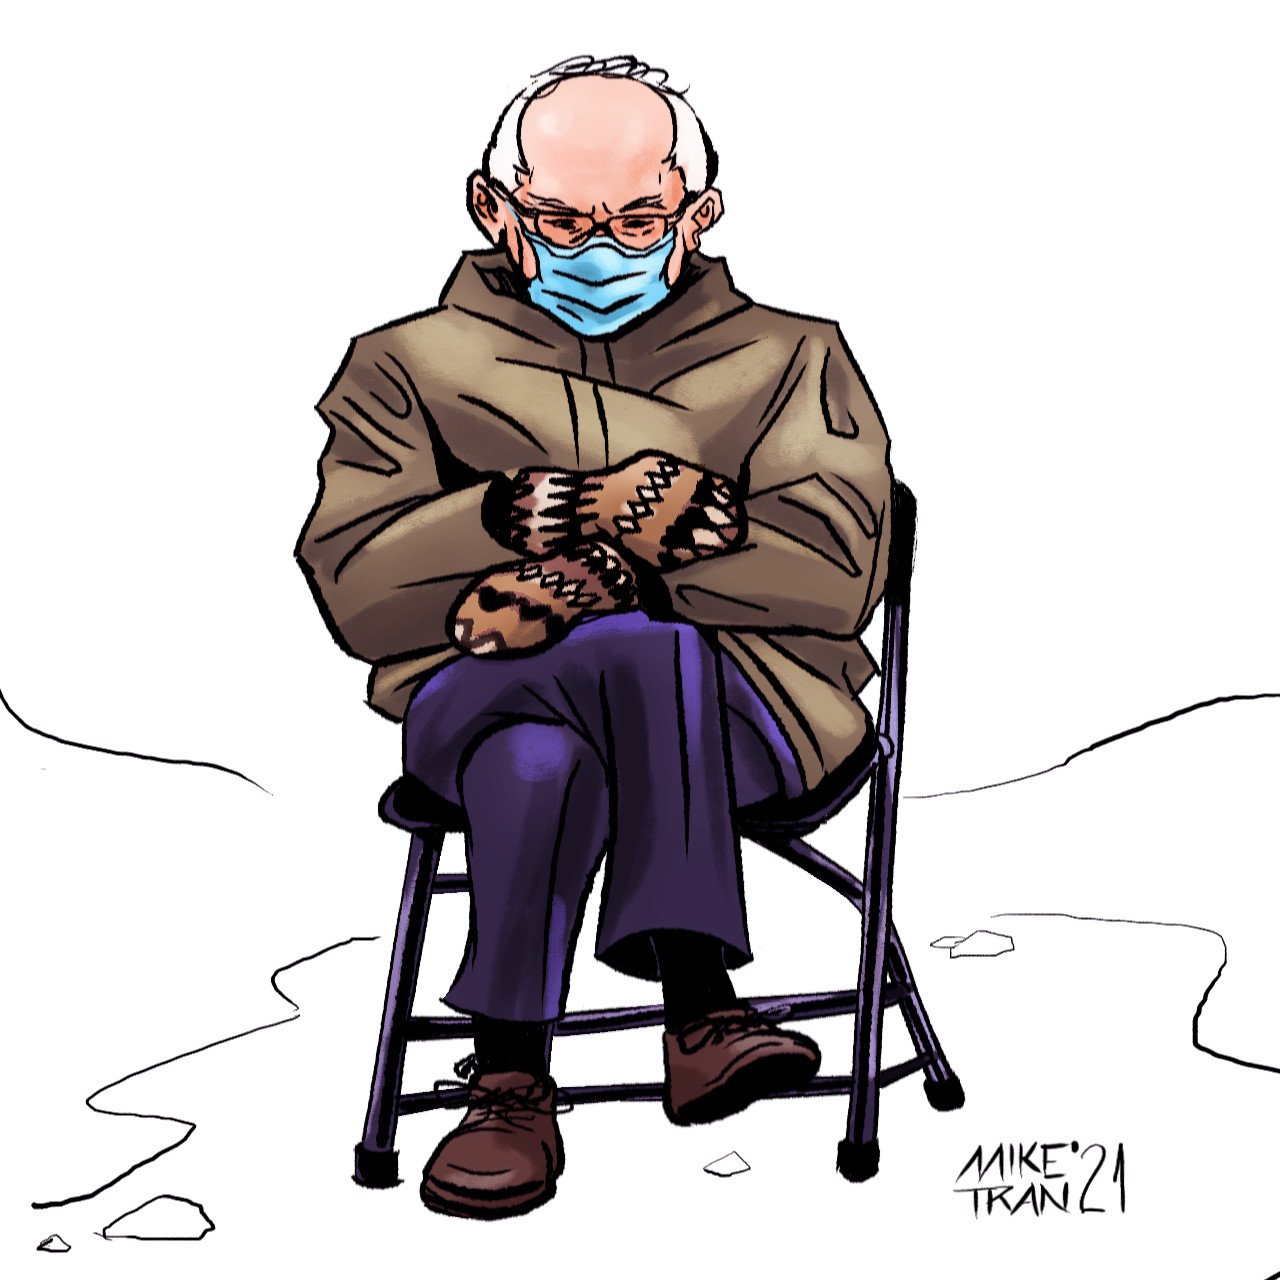
Decided to have a little fun and made this digital sketch of Bernie Sanders 😁
- 1 reply
-
- 5
-

-
-
- illustrator
- illustration
- (and 1 more)
-
 Hi, Just want to clarify if what I've read in other posts is still current. Do guides, the ones you drag out of the rulers, not work as snapping targets for the brushes? I've created a brush, it's an image brush, which stamps out a little image, it has a rotation jitter of 100% so as I draw with it, the image spins around, and it has both a size jitter, and is pressure sensitive for scale with my tablet. I want to draw a square (or indeed a rectangle), whose proportions are exact, but whose edge has all the randomness generated by freehanding the brush pressure. In Photoshop, all the way back to CS5, all I'd have to do is pull out the guides for the rectangle or square shape, and then draw roughly over them, the brush would track true to the guide, and I could concentrate on using pressure to work the brush size. What's the solution to achieve this in AP? Thanks.
 -
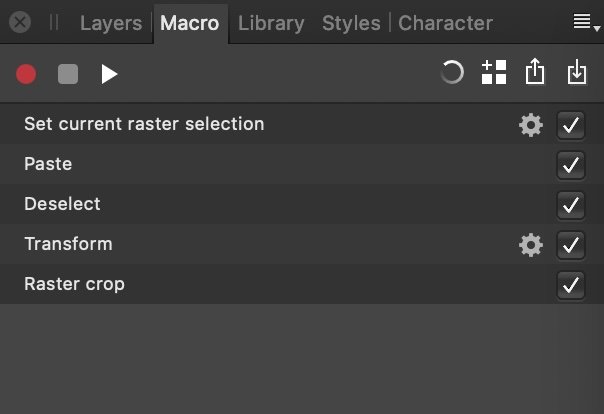
I am trying to get my old Photoshop efficiency in Affinity Photo, and things are going well. But since there's no functionality for Applescript or Javascript automation, the Macro feature becomes super important. Sadly, it just doesn't record what I need to record. I need to set a selection, copy it, paste that copied bitmap, move it over and then crop...but "copy" is not something the Macro can do. Is there any help for me? For Mac users, you can get around a lot of these limitations with Keyboard Maestro. For example I can get around the limitation of not being able to record Export by setting the filename I need in the clipboard via an Applescript then using UI scripting to export, then paste the filename then hit return. But I don't think I can get around not being able to copy parts of an image. ^_^;; Does anyone have any advice for me?
-
Found a frustrating limitation of the "command F" to repeat the last filter I just did: it works as expected (again, as it does in Photoshop) allowing me to perform some filter, then repeat the filter I just did by making a new selection and hitting command F. However, it only "remembers" this inside the file I'm working on. If I've got a bunch of files, for example a bunch of faces I want to apply a mosaic to, I have to manually re-select the setting again, slowing me down. It'd be super great if, whatever filter I applied last to any file were available in the "command F repeat" no matter what file I had opened, which is the expected behaivour.
-
I am an aspiring drone photographer, the most I do really do with Affinity Photo is color/contrast correction.
- 1 reply
-
- 3
-
-
 Hi all, I am exploring various colour grading methods in Photo. What I want to do is to take a particular precise colour—either chosen via the ink dropper or input as a specific (hex etc.) code—and to dial that into the shadows or the highlights as part of a very controlled colour palette when toning a photograph. I have been using Selective Colour, Colour Balance, Split Toning and Gradient Maps. The only one that seems to give me access to precise coded colours is Gradient Maps, but that is the most awkward to use for applying to just one part of the tonal range, eg. shadows. It's also very slow and cumbersome compared to the other tools. The other tools offer far easier selection of high/mid/shadow target areas but they seem to be limited to simple colour sliders which cannot interact with the ink dropper and nor can I input a colour code for precise setting. Anyone have an answer to this one please? Thanks!
 -
I've drawn an illustration of a crocodile for no reason except too much time. 🙂 I'am working with Designer and Photo on a windows pc with a wacom tablet attached. The original photo was taken by vaun0815 at unsplash.
-
Hi All, As announced in a recent blog post we have launched the Affinity Photo Workbook to accompany the desktop versions of Affinity Photo Affinity Photo Workbook Launch Announcement November 23, 2017 We are proud to announce the launch of the official Affinity Photo Workbook, our first ever guide to Affinity Photo on macOS and Windows. Painstakingly put together over many months, the long-awaited Workbook teaches you everything there is to know about Affinity Photo and mastering its powerful tools and capabilities. . This is a big book - 488 pages, in hardback - and it includes fantastic projects created by some top photographers, as well as a comprehensive reference to all our tools and panels, and a set of core skills tutorials. For those who are interested, there is a further blog post describing the creation process Behind the Scenes: Creating the Affinity Photo Workbook November 27, 2017 As we released our glossy full-colour Affinity Photo Workbook last week, we thought you might like to take a look into how it was created… You can find more information about it here. Usual price is $49.99 / £37.99 (+ shipping and handling). It's available in English and German. Hope you like it!
-
 This afternoon my Affinity Photo (on Windows pc) 1.8.5.703 crashed upon loading a recent upload of brushes. After restarting the program all brush categories were removed except the default brushes. I reloaded the downloaded brush set to find that I could not paint with brushes on a pixel layer, but, I could paint on an image pixel layer(photo). My updated Beta has no issues nor does Designer. Not looking to reinstall as I have not finished backing up all of my settings. This one is my first crash loss of any major kind and non functioning brush pixel layer.
 -
Hi all, I have the above version of Photo installed on my Windows 10 laptop but I still cannot open the CR3 file. Am I missing anything here? Cheers, Tung
-
 Hi guys, I just uploaded a n ew video, so I'm creating a photo composite of a person holding the moon, check out the video to see the process. I hope you enjoy this video, thank you! (I use 2 software in this video, Capture One Express for photo retouching & Affinity Photo for photo composite)
 -
Hi, I required Affinity Designer in november, so please bare with me. I saw Wonderwomen, a car and a plane made by really, really great artists. I have no intention to get that good, but to get better I need to share my work for getting suggestion and tips. I am at kindergarten level. Starting out with 2 courses at Udemy, watched dozens of youtube tutorials, and glad I got it so far. The fur on the head is kind of okay, the body does not really fit. thearms stick out too much, shadowing is pretty hard. THe eye is jpg, I was unsuccesfull in following 'art with Flo' . I can not get the mouth blend better, like the illustration from Deema Egerov. (I need other artists work trying to recreate to develop myself.) So if anyone has some time to get me some tips, I love to hear from you. Many thanks, Yolanda monster1F.afdesign
-
Vários testes com uma afinidade beta, atá aconclusão da foto montagem tudo funcionou perfeito.
-
This is my first proper edit with Affinity Photo I know it is a simple picture but i'm uploading it to show other people that it is that easy to use with a little help from the online tutorials. The photo was taken at Ryton pools country park just outside Coventry and looks like it could be anywhere in the world.
-
 Is there a flat colour comic book effect please? Some years ago, with the version of DrawPlus or PhotoPlus that I had there was a comic book effect that could be used to process a photograph into a number of flat colour areas. I remember trying it out with a print screen image from Google street view of the town square of Chalons-en-Champagne, France. The number of flat colour areas used was a user choice. It worked well. I have in mind using such a process so as to produce flat area colour artwork from a photograph and to then use that artwork to produce a glyph for a colour font, so flat areas of colour are what I need. I suspect that if it is available it will be somewhere within Affinity Designer or Affinity Photo. I have bought licences for both but have, thus far, only used Designer a little and Photo almost not at all. William
 -
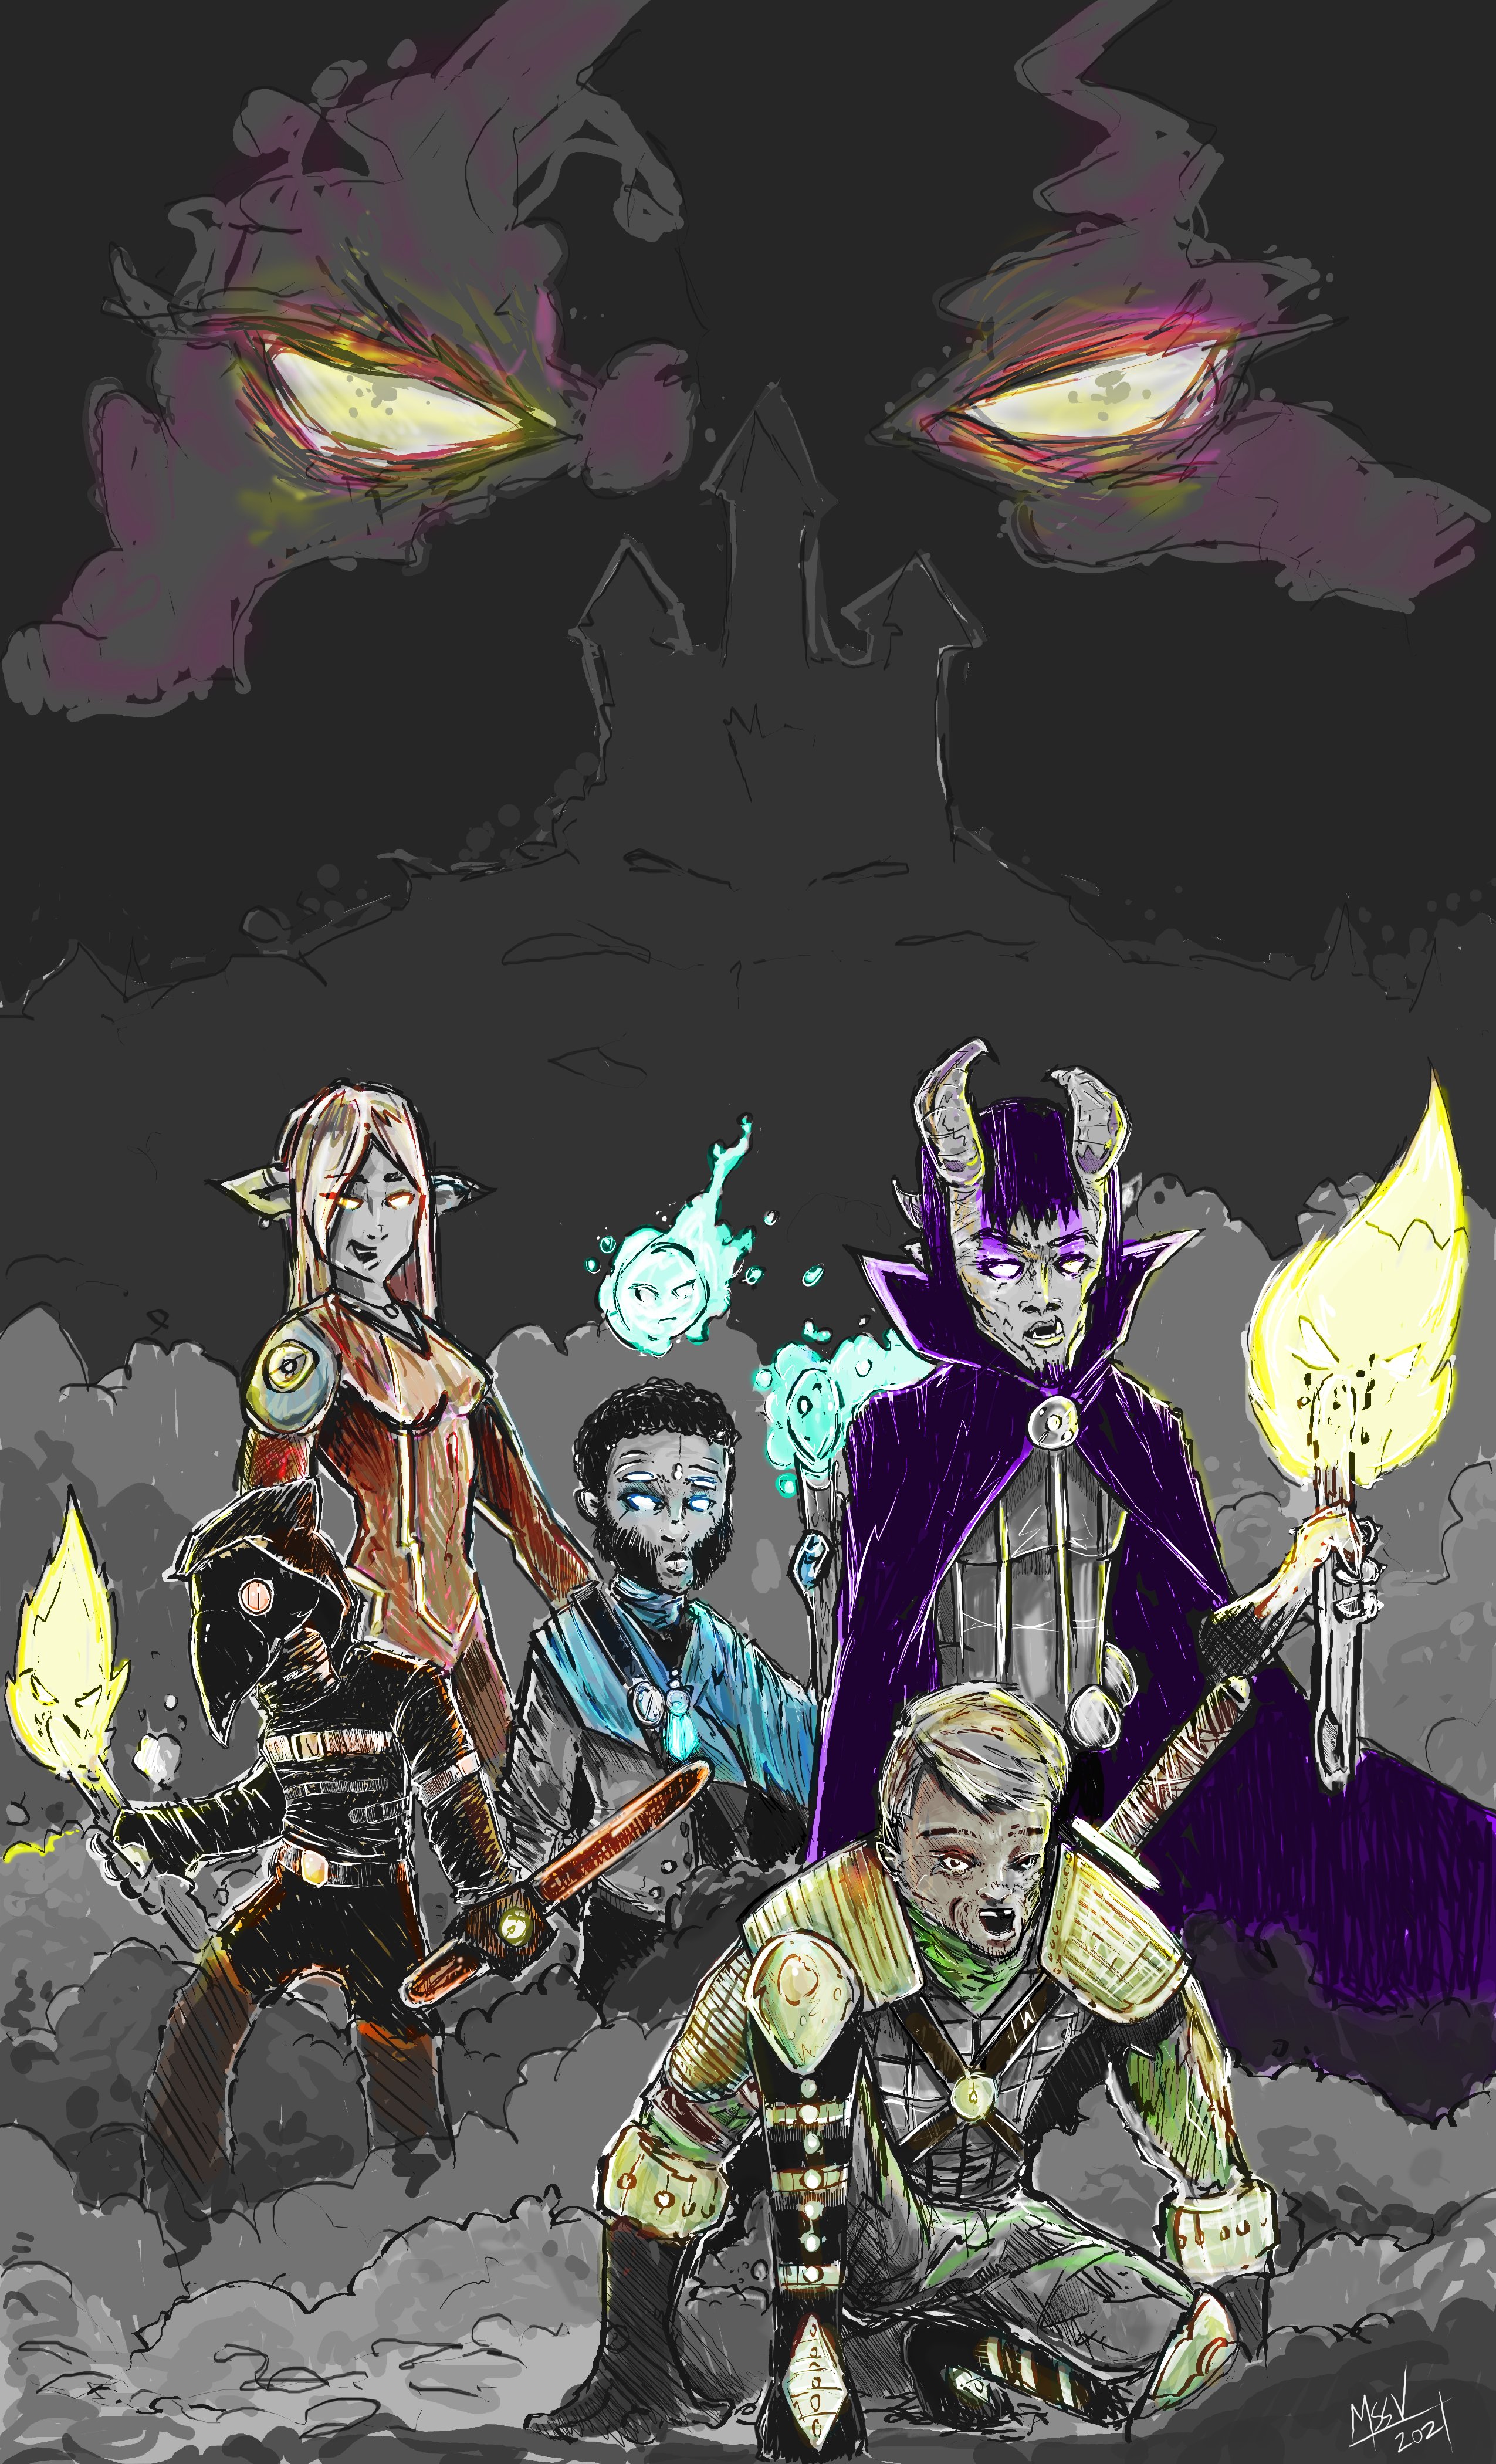
A 5 person DnD group wanted a illustration of their party. This was fun to work on using character descriptions.
-
 Hello gang If i open an image in "Photo" and try to use the Marquee tools, they all work fine except for the circle tool. Sometimes (like today) when I draw a circle with it & release the left mouse button the circle just disappears! Any ideas?
 -
 my Documentes A3 size. Affinity Photo crash some times when i have ellipse with graident (radial i think) and i want use brush tools in area when i select brush sometimes crash. brush are big but reason their size is 2500pixels.(they are imported Photoshop brushes). I use latest version i think and WIndows 10 pro. and i have 32gigabytes memory and run same time some other programs but should be not problem. i bet is related brush size what i cannot be smaller saddly these brushes cannot be bigger. i want use add texture such object. i show if iget someday result what i like. i bet is related big brushes.
 -
The program closes without warning when, in layers panel: I try to nest one layer into another and/or I click to expand the layer to show its contents.
- 10 replies
-
- 1
-
-
- layers panel
- layering
- (and 5 more)
-
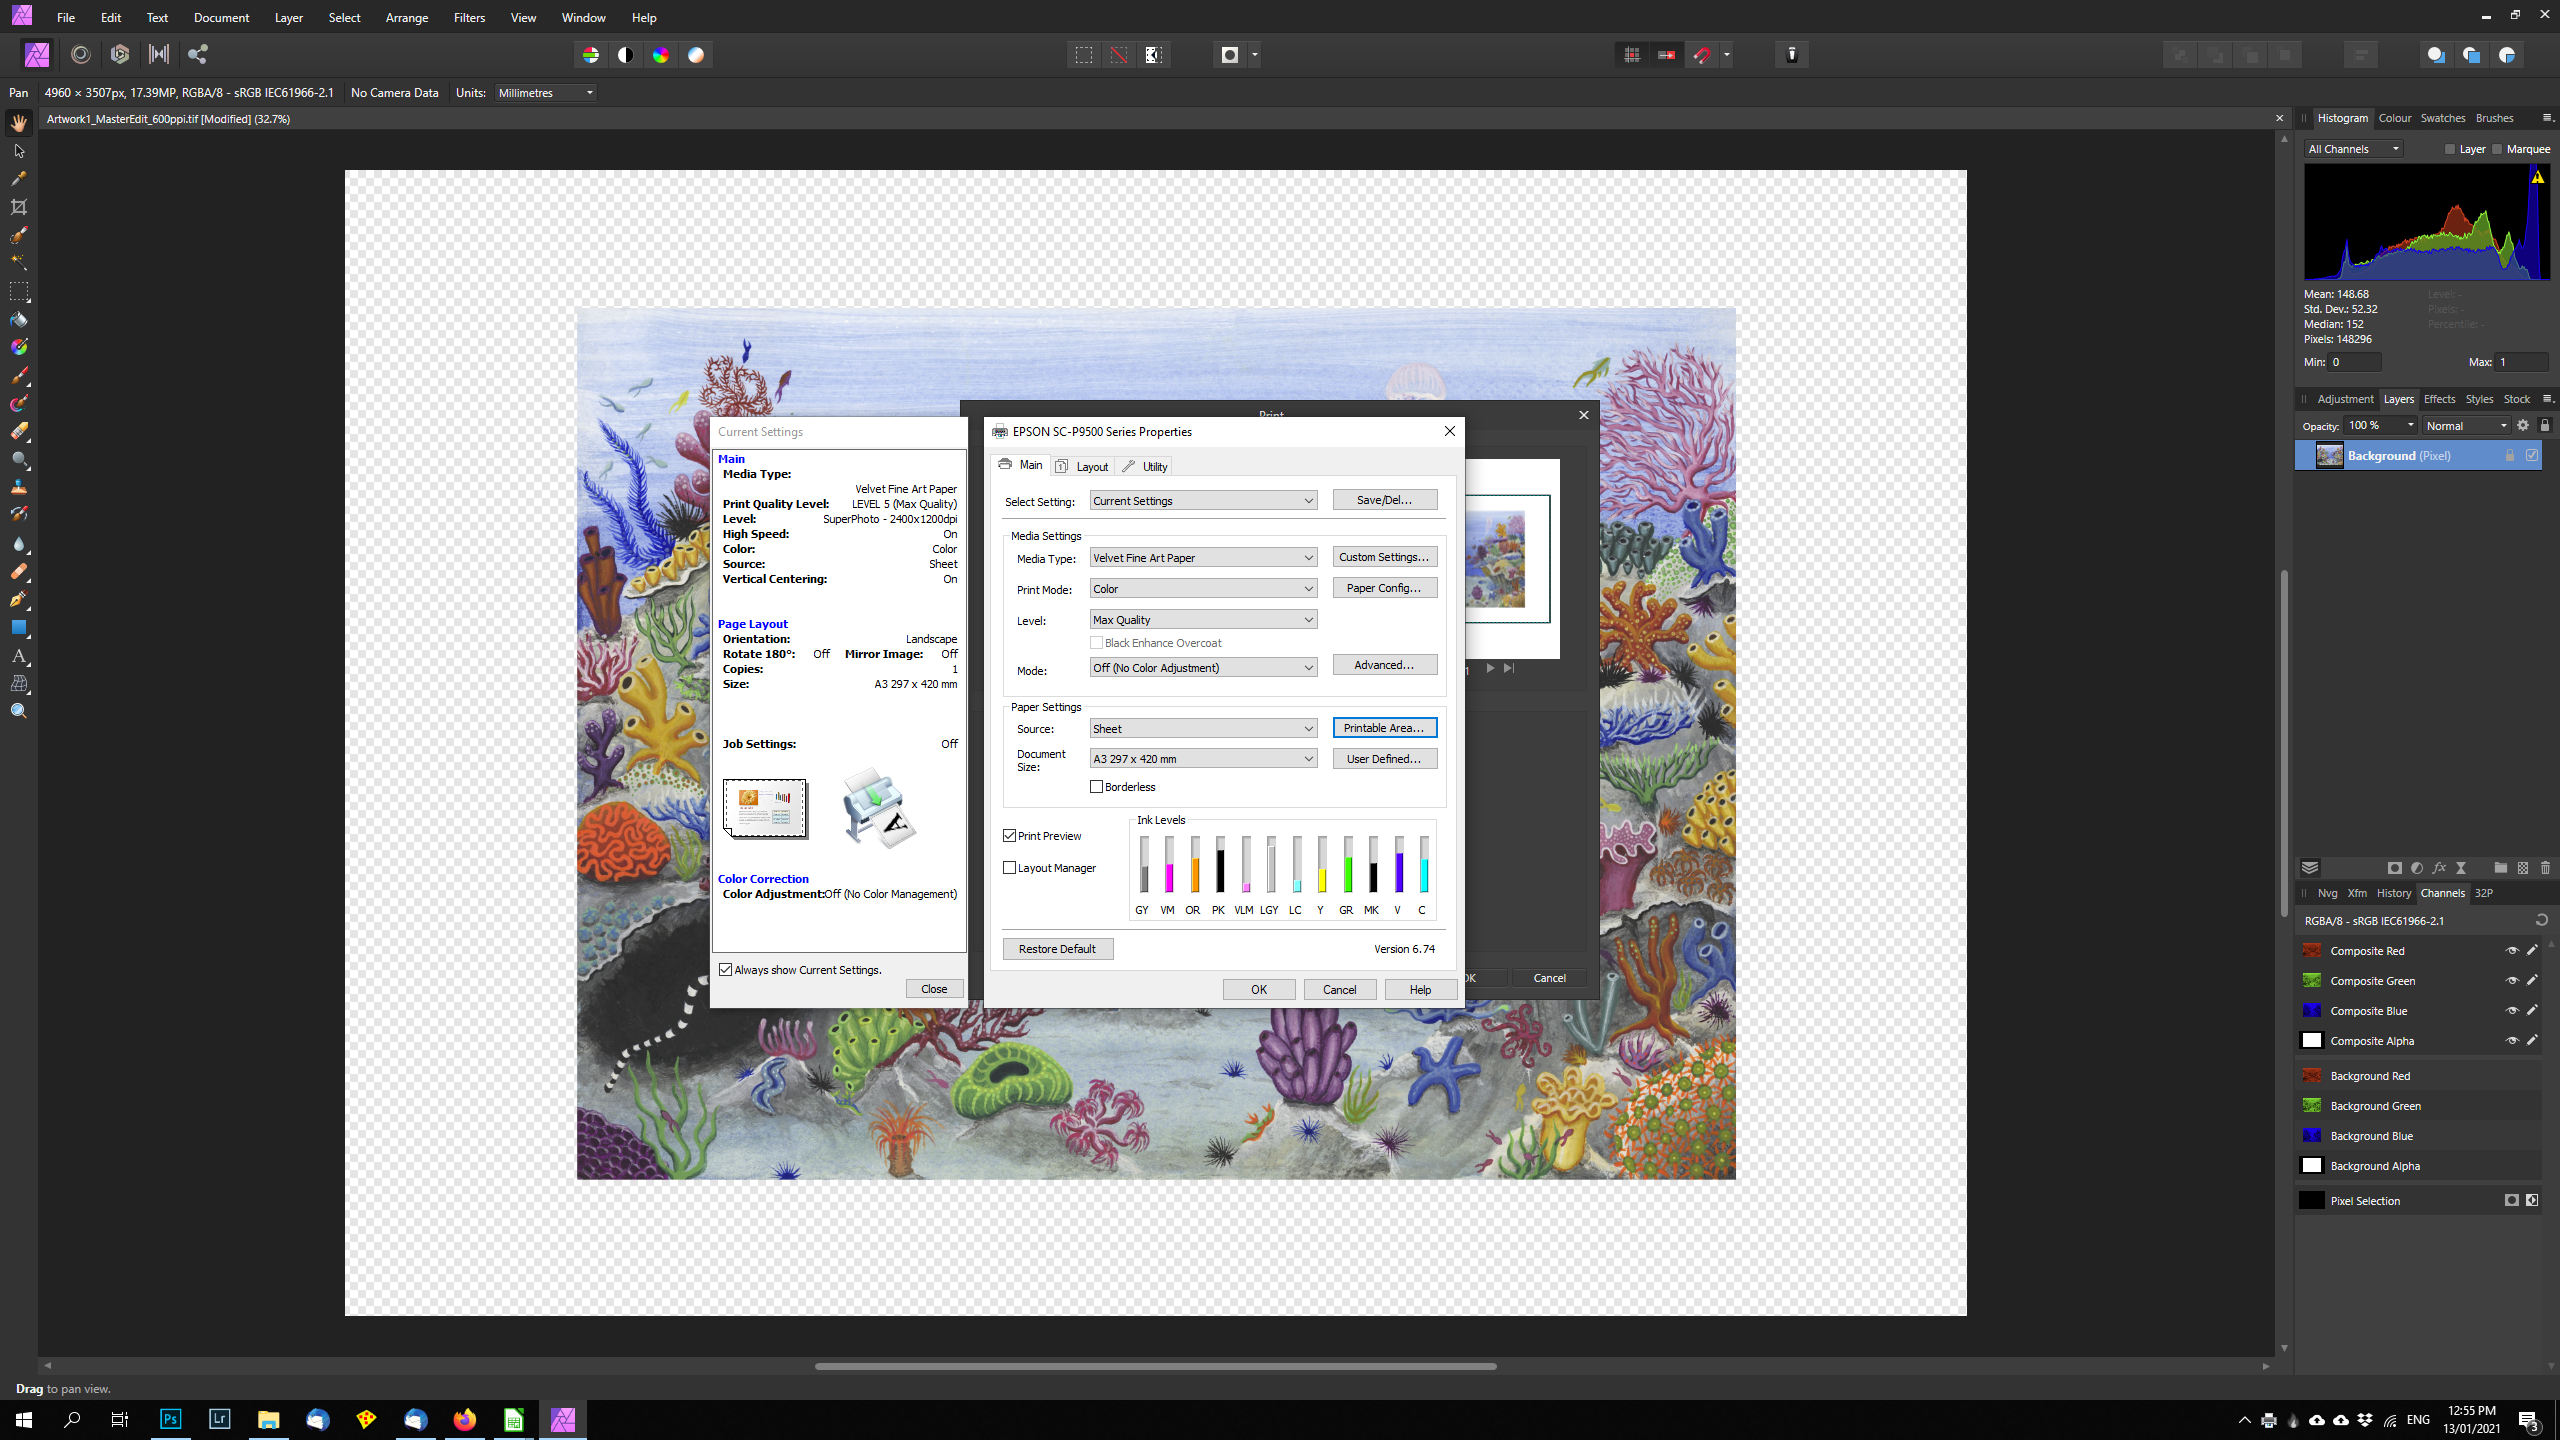
I found several posts over the last 3 or 4 years describing similar behaviour, but haven't found a solution. Posting here to hopefully nail whatever is causing this issue. Setup: Windows 10 Affinity Photo 1.8.5.703 Epson surecolor P-9560 (aka 9500 9570 in other regions) Printing from driver I'm trying to print images that are set up to the exact dimension of the physical media (cut sheets). The source image is a TIFF file, which is opened in AP, resized with margins added and resampled to 300ppi. After going through the driver and print dialog, the image is printed off centre (preview attached). It looks like the image is also smaller than it should be, as there's about an additional 10-15mm being added on the right. I print frequently from photoshop and am confident that the settings are correct, and confirmed that the driver is functioning properly using other software. Things that do not change the result: - working from different source files - rasterisation. There are no pixels 'hidden' behind the workspace. There is just a single pixel layer set up to the exact dimension required. - any settings in the Epson driver, including margin centering option, enlargement optimisation etc - changing the size in Affinity print dialog between 'defined by driver' and the exact print size - changing media type - different media sizes between A4, A3, A2 - changing media end margins (this would potentially push the print along the opposite axis to the shift that's occurring anyway) - setting up a file the same way in Photoshop, then opening in AP to print. Tried multiple file formats, all produce the same result What does work: I tried creating a new document in AP and drawing a rectangle shape. When reproducing the above settings, it prints just fine. Exactly centred. Saving the rasterised file and re-opening it works fine.