Search the Community
Showing results for tags 'Affinity photo'.
-
 I make quick rough concept sketches. The emphasis is on speed using keyboard shortcuts, quickly switching between patterns, and working in a single layer. Here is an extremely simplified example of what this might entail. It took me approximately 30 seconds to do this in a single Photoshop layer. I'd like to know if this workflow is possible in Affinity Photo? The only way I know how to do this in Affinity Photo takes a lot longer and it requires several layers involving multiple steps per pattern: 1. select areas to be filled 2. create a fill layer 3. navigate through the menu to the file with the desired pattern 4. apply the pattern 5. deselect 6. merge down 7. repeat 1-6 for each pattern Another problem that adds a lot of unnecessary steps is a glitch that swaps foreground and background colors every time I switch tools. Having to constantly undo the resulting mistakes and fight to use the selected color is frustrating and time consuming. Is there a way to fix this?
-
 I'm very new to Affinity Photo so am getting to know where it really shines and where it falls short. By no means was I adept at Photoshop, but I found it essential for recording Actions. Unfortunately I've run into some issues using Affinity Photo's Macros in Batch jobs. The main one being that if I have a folder full of images that are in different aspect ratios (3:2, 4:3) it seems I am unable to record a Macro that resizes to a specific width or height ONLY. When I record a Macro and resize a 4:3 file to say 800px wide, with the size locked the height of course becomes 600px. If I run that Macro as a Batch on the folder of mixed aspect ratio images, the images that are in 3:2 ratio are resized to 800px x 600px, so they're badly distorted. So the Macro records the dimensions of BOTH edges when the resizing takes place, rather than only the edge you actually edit (as is the case in Photoshop). Is there an obvious solution to this that I am missing?
 -
 Hi Guys, There is this Photo that I have to which, I want to first give a Bokeh Effect then I want to make other changes to the skin texture, brightness and over all sharpness to the image. So my question is, When I give the Bokeh effect to the image using Gaussian Blur, is it possible to add other adjustment layers also to the same project ? or will I have to do the rest of adjustments as a separate layer after I give the Bokeh effect using Gaussian Blur ?
 -
 Hi, I have discovered a PDF file that crashes Publisher, Designer and Photo (1.10.5) on macOS every time I try to open or import it. The file originates from PowerPoint and contains one background image and a couple text boxes, nothing else. May I have an upload link, please to provide both files (PPTX and PDF) confidentially?
 -
 Hi I've just moved from photoshop to Affinity Photo and would like to keep it this way. How ever i am getting some huge performance issues. I have a brand new Mac Studio with M1 Max & 64GB RAM. I was expecting the app to fly buy it just lags and stutters. So much so im on the verge of signing up for Photoshop again. If i have a 16bit Tiff file open and i try to crop it, it seriously lags and takes me almost 1min to even position the crop frame. Even on other smaller files i get the spinning beach ball while the software thinks about something. It could be Document resizing, filters etc. Is there anything i can do to solve this? Or is this a series of bug issues that will be fixed?
 -
Where are the beautiful days? Where are the sleigh rides till dawn? Where are the tender moments of splendor, where have they gone? Because I had to move due to a fire making our building uninhabitable, I am actually finding many things I forgot I had (and cannot find things I know I have). One of them was a photograph of me and of a friend from our visit to a TV station. That was in 1993, when I was 43. I scanned a small part of the picture at 2400 ppi and 48 bpp to an uncompressed TIFF using my Epson V750 Pro scanner. The result had many blemishes, so I cleaned the scanner glass with compressed air (the scanner had been inside a storage place ever since the fire until now) and took several other scans. That helped, but there was still a dust hole in the scan, plus two scratches. I opened the result in Affinity Photo and applied Filters/Noise/Dust & Scratches... That removed the dust very nicely, but there still were two scratches. They were on the shirt, so it would not be the end of the world if I could not remove them. But I noticed AP has a Blemish Removal Tool. I used it on the two scratches. At first it just broke the scratches into smaller pieces and moved those around, but eventually it removed the scratches altogether. The result looks pretty good, especially considering it is a scan of a small region of a photo print for which I do not have the negative. I exported it to another TIFF, and also to JPG with both, the height and the width, reduced to 50%: But yes, where are the beautiful days? Why do we have to get old?
-
Animatior in Affinity Photo, and or Timeline?? I think that it would be super cool if Affinity Photo like Photoshop added frame by frame animation, this is a huge downside to using Affinity Photo for me, I don't think it should become a seperate product since, well, I already have Affinity Photo, I do not need a full fledged animator and they already have their hands busy. The idea would be you could makes frames and export them as .gifs and maybe .mp4's? that would be cool! all the features would pretty much be a copy of photoshop (maybe some cool feature aswell.), then cartoonists could animate, photo editors could do some sick things and designers could make sick banners and internet .gifs, If affinity added this, I would completely forget about photoshop and leave it in the dust, affinity is amazing and with animation it would be great! Thanks for reading this post! please consider this :D - Segovo
- 15 replies
-
- 2
-

-
- animation
- affinity photo
- (and 8 more)
-
A tangle of pipes, steel girders and ladders around the decommissioned blast furnaces, with nature resurgent in between. Duisburg Landscape Park around a disused ironworks in Duisburg-Meiderich, popularly known as LaPaDu. Developed from Raw with DxO Photolab and Postprocessing done with Affinity Photo 1.10.5 PS: On Monday morning, filming of the Hollywood production "The Tributes of Panem - The Song of the Bird and the Serpent" started in Duisburg's Landschaftspark.
-
 So im trying to individually control rgba channels for a project and im running into an issue where if the alpha channel is fully transparent (0) then the pixels loose their rgb colour values, ideally id like them to maintain that colour information so I can still access it later on Running a few searching through google and the forums I am unable to find any information on this, any help would be greatly appreciated
 -
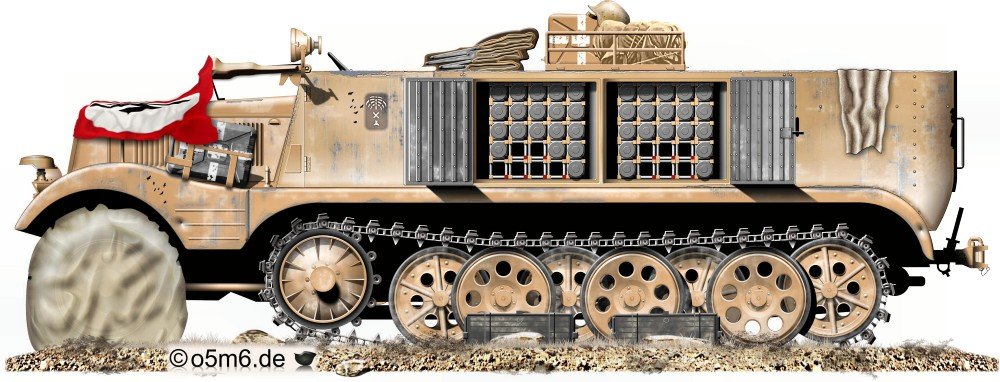
...one of Rommel's artillery tractors in Egypt. Again original vector drawing made in XARA Xtreme 5.1, heavily post-processed with the wonderful AP Front flag, Frontwheel cover and rear canvas all done in Liquify Persona and "dodge"d and "burn"ed later... Look here for a similar drawing.
-
 Hello. I would like to ask why affinity photo's develop persona is still has very limited features? I hope they would at least add color correction features that would allow you to change hue by hue, hue by luminosity, hue by saturation, saturation by hue and etc. A lot of useful color editing tool are only available outside develop persona, making it harder to edit the image without degrading it easily. The masking in develop mode is also still very limited. I hope affinity will soon add it to their updates. Thanks.
 -
 After and before screenshot from a .TIFF scan sent to me from a photo dated 1917. Made a B&W adjustment, much Inpainting. Used the Patch Tool for a missing ear, missing shoe, part of a missing chin, and a coat button. Dodge Tool eliminated much dark stuff in the background and on the white rectangle at the right of the image. Burn Tool darkened some parts of the uniforms so they didn't look dusty. Merge Visible with a Blend Mode of Colour (I think, unfortunately didn't write it down), to turn the still grungy greyish stuff to almost white. Exported as a .TIFF. Placed the new .TIFF as a new document. Then I used the JR Sharpening macro, Enhance Depth and Contrast, repeated that macro. Then made a Brightness/Contrast Adjustment. Much more Inpainting to get rid of about 75-100 tiny white specs of about 1-2 px each which were still on the dark uniforms. Then used the JR macro, Edge Detect Sharpening. Merge Visible. Export as a new .TIFF. Suggestions to improve this?
-
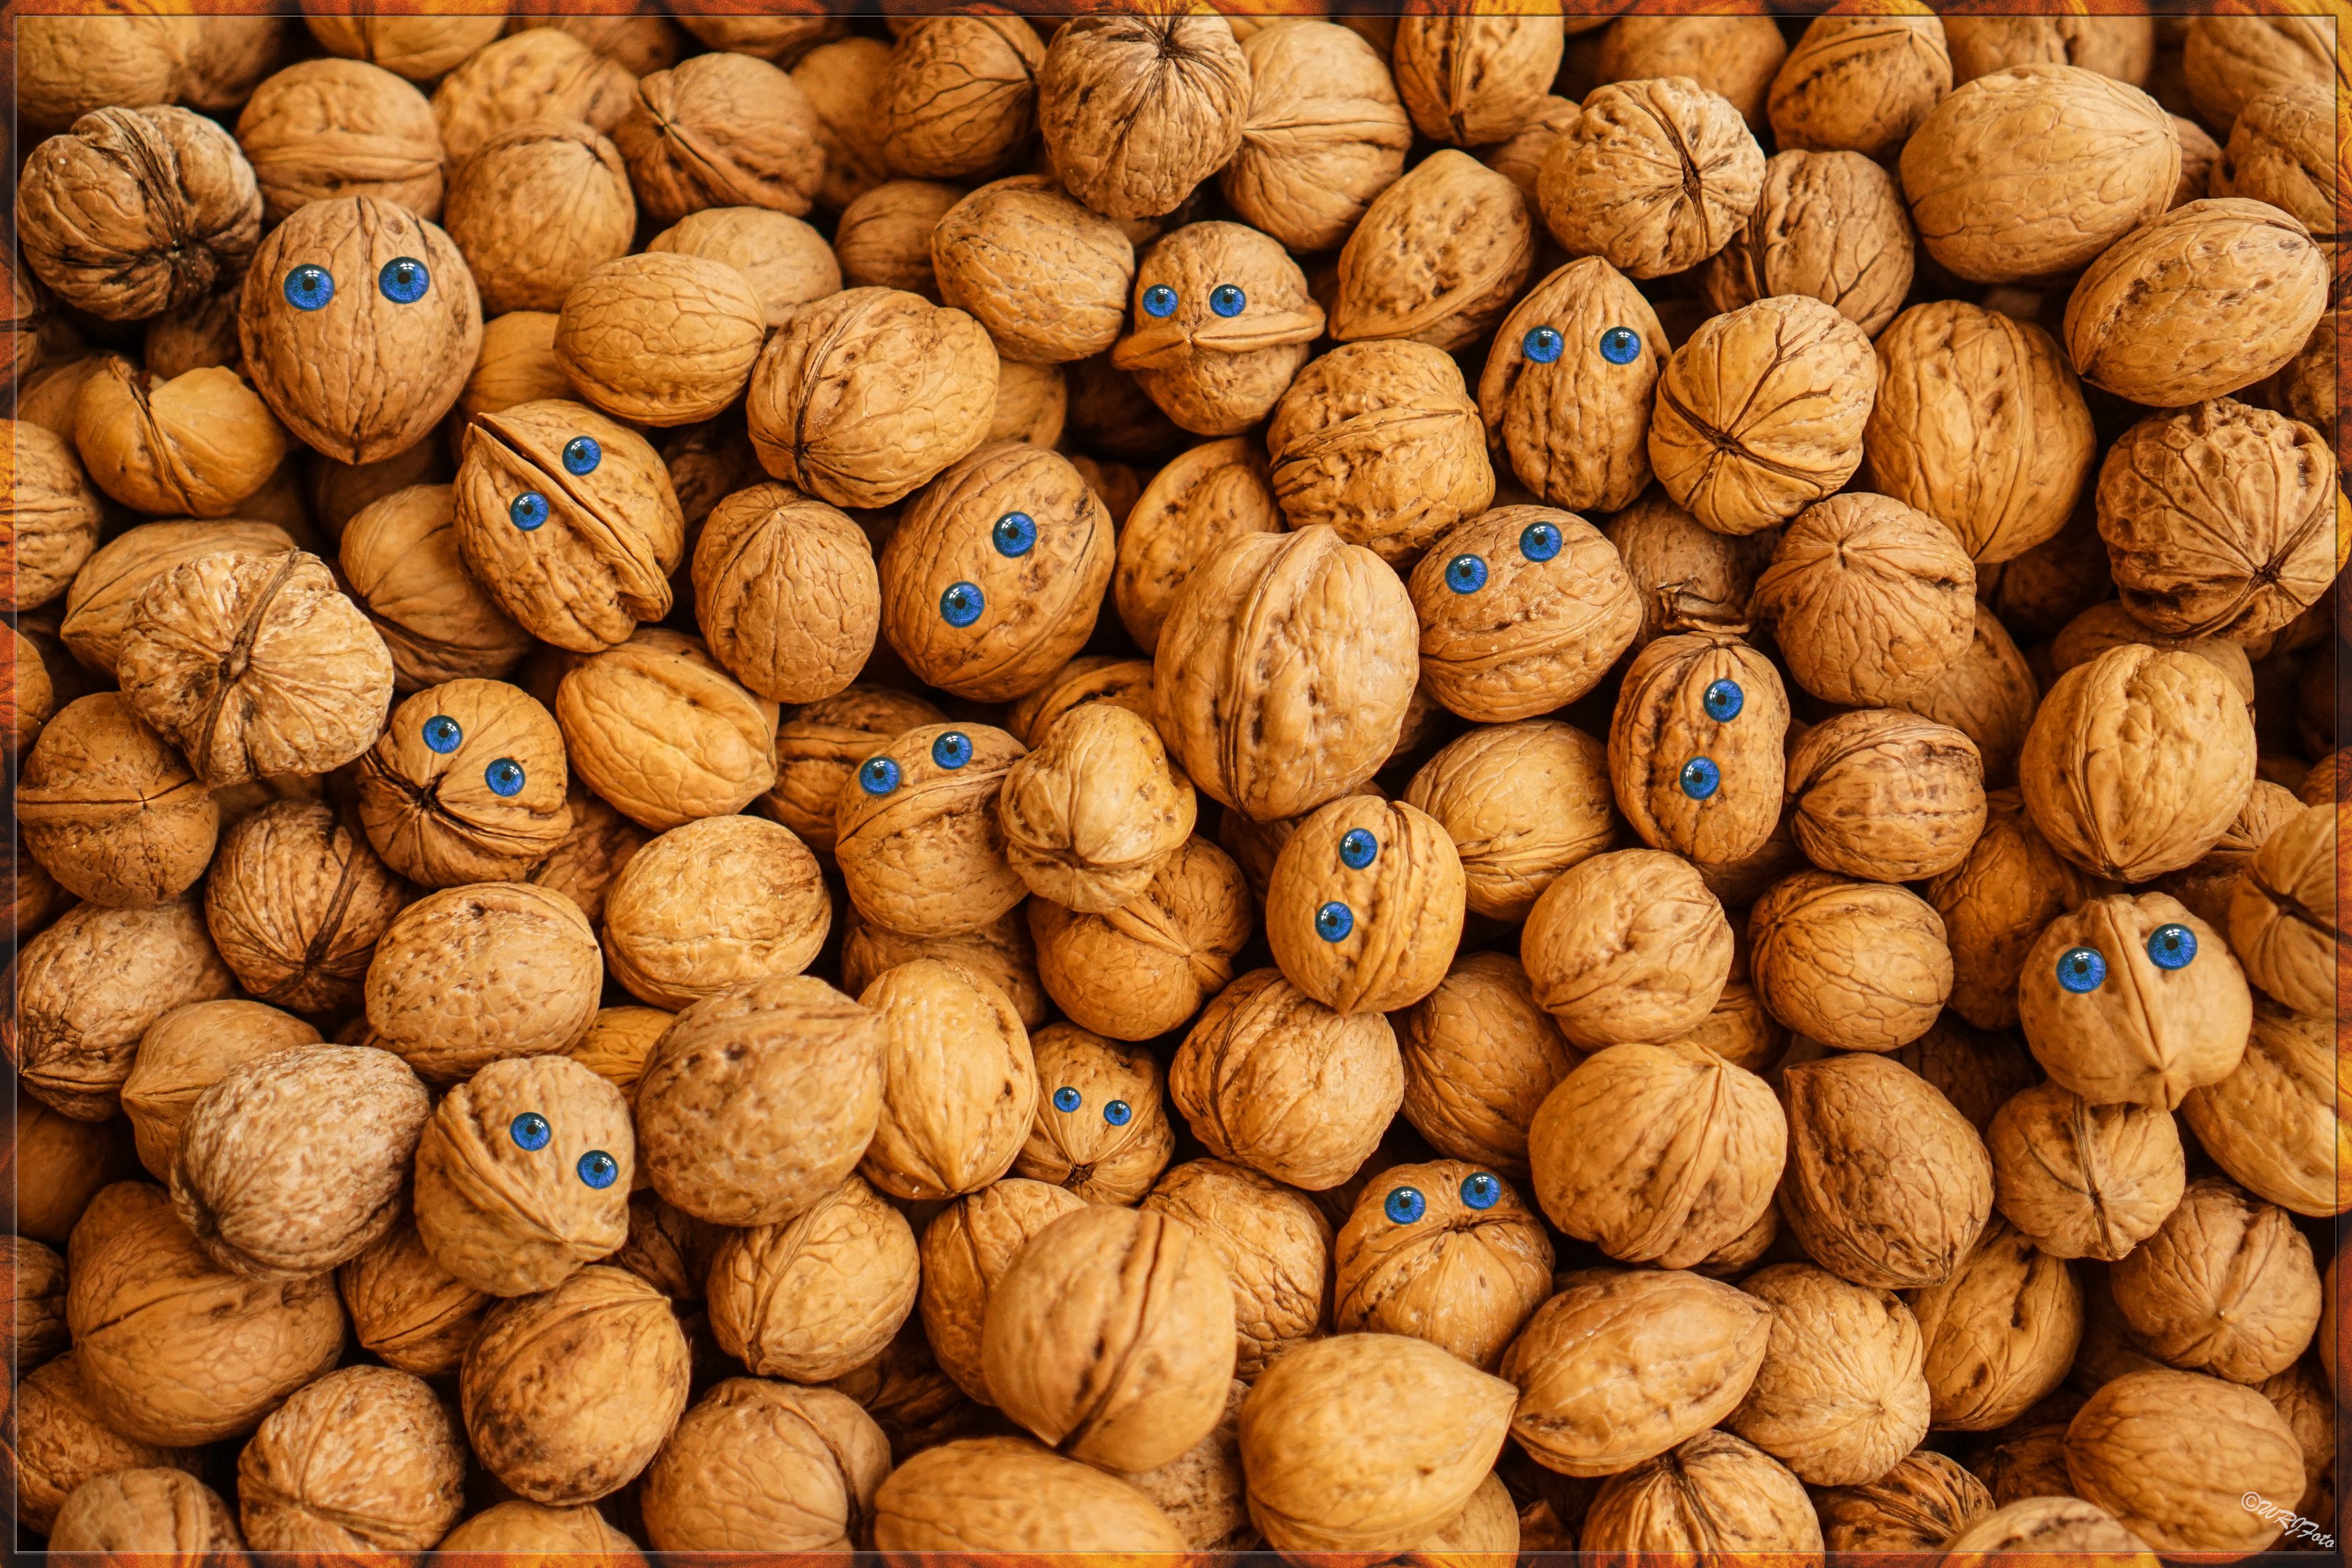
A bit a surreal work with affinity photo. The Nuts are from unsplash.com.
-
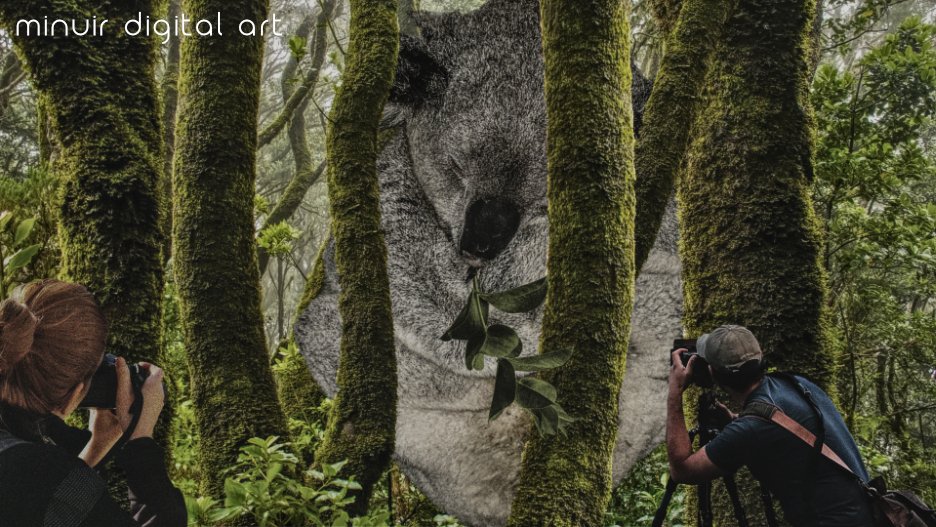
 The most memorable thing when I traveled to Australia is the moment I met the sleepyhead Koala. The Koala was sleeping in a very cute pose stuck in a branch, and it was loved by many visitors. I really wanted to bring the Koala to Korea where I live. So with good memory about Koala, I started working on this photo manipulation with affinity photo. When we meet Koalas in nature, I don't think they are threatening at all. Even if it is very huge size, I think we will be able to watch it comfortably because it sleeps all day. I have that kind of good feeling about Koalas and I want to share this feeling from my photo manipulation artwork. "Meet The Giant Sleepyhead" speed art : https://www.youtube.com/watch?v=85SS1gE_DR0
- 6 replies
-
- 10
-
-

-
- minuir
- digital art
- (and 2 more)
-
A normal pic, duplicated layer, soft blend, added selective colors and curves adjustments, plus a fine sharpening macros.
-
 I made this drawing 24 Years (!) ago. And it recently started begging to animate it. And so I did! 🤠 This took quite a lot of cutting, slicing and editing in Photo (around 200 parts)! Long live the Affinity Photo Clone Stamp, non-destructive vector masking and the always great exporter (thank god it's also there in Photo!) which directly exports to Spine, which is just wonderful! 😀 BTW Not only the animation on paper is endless, but the whole video is also a seamless loop! 🚶♂️👍 Hope you like it!
- 11 replies
-
- 15
-
-
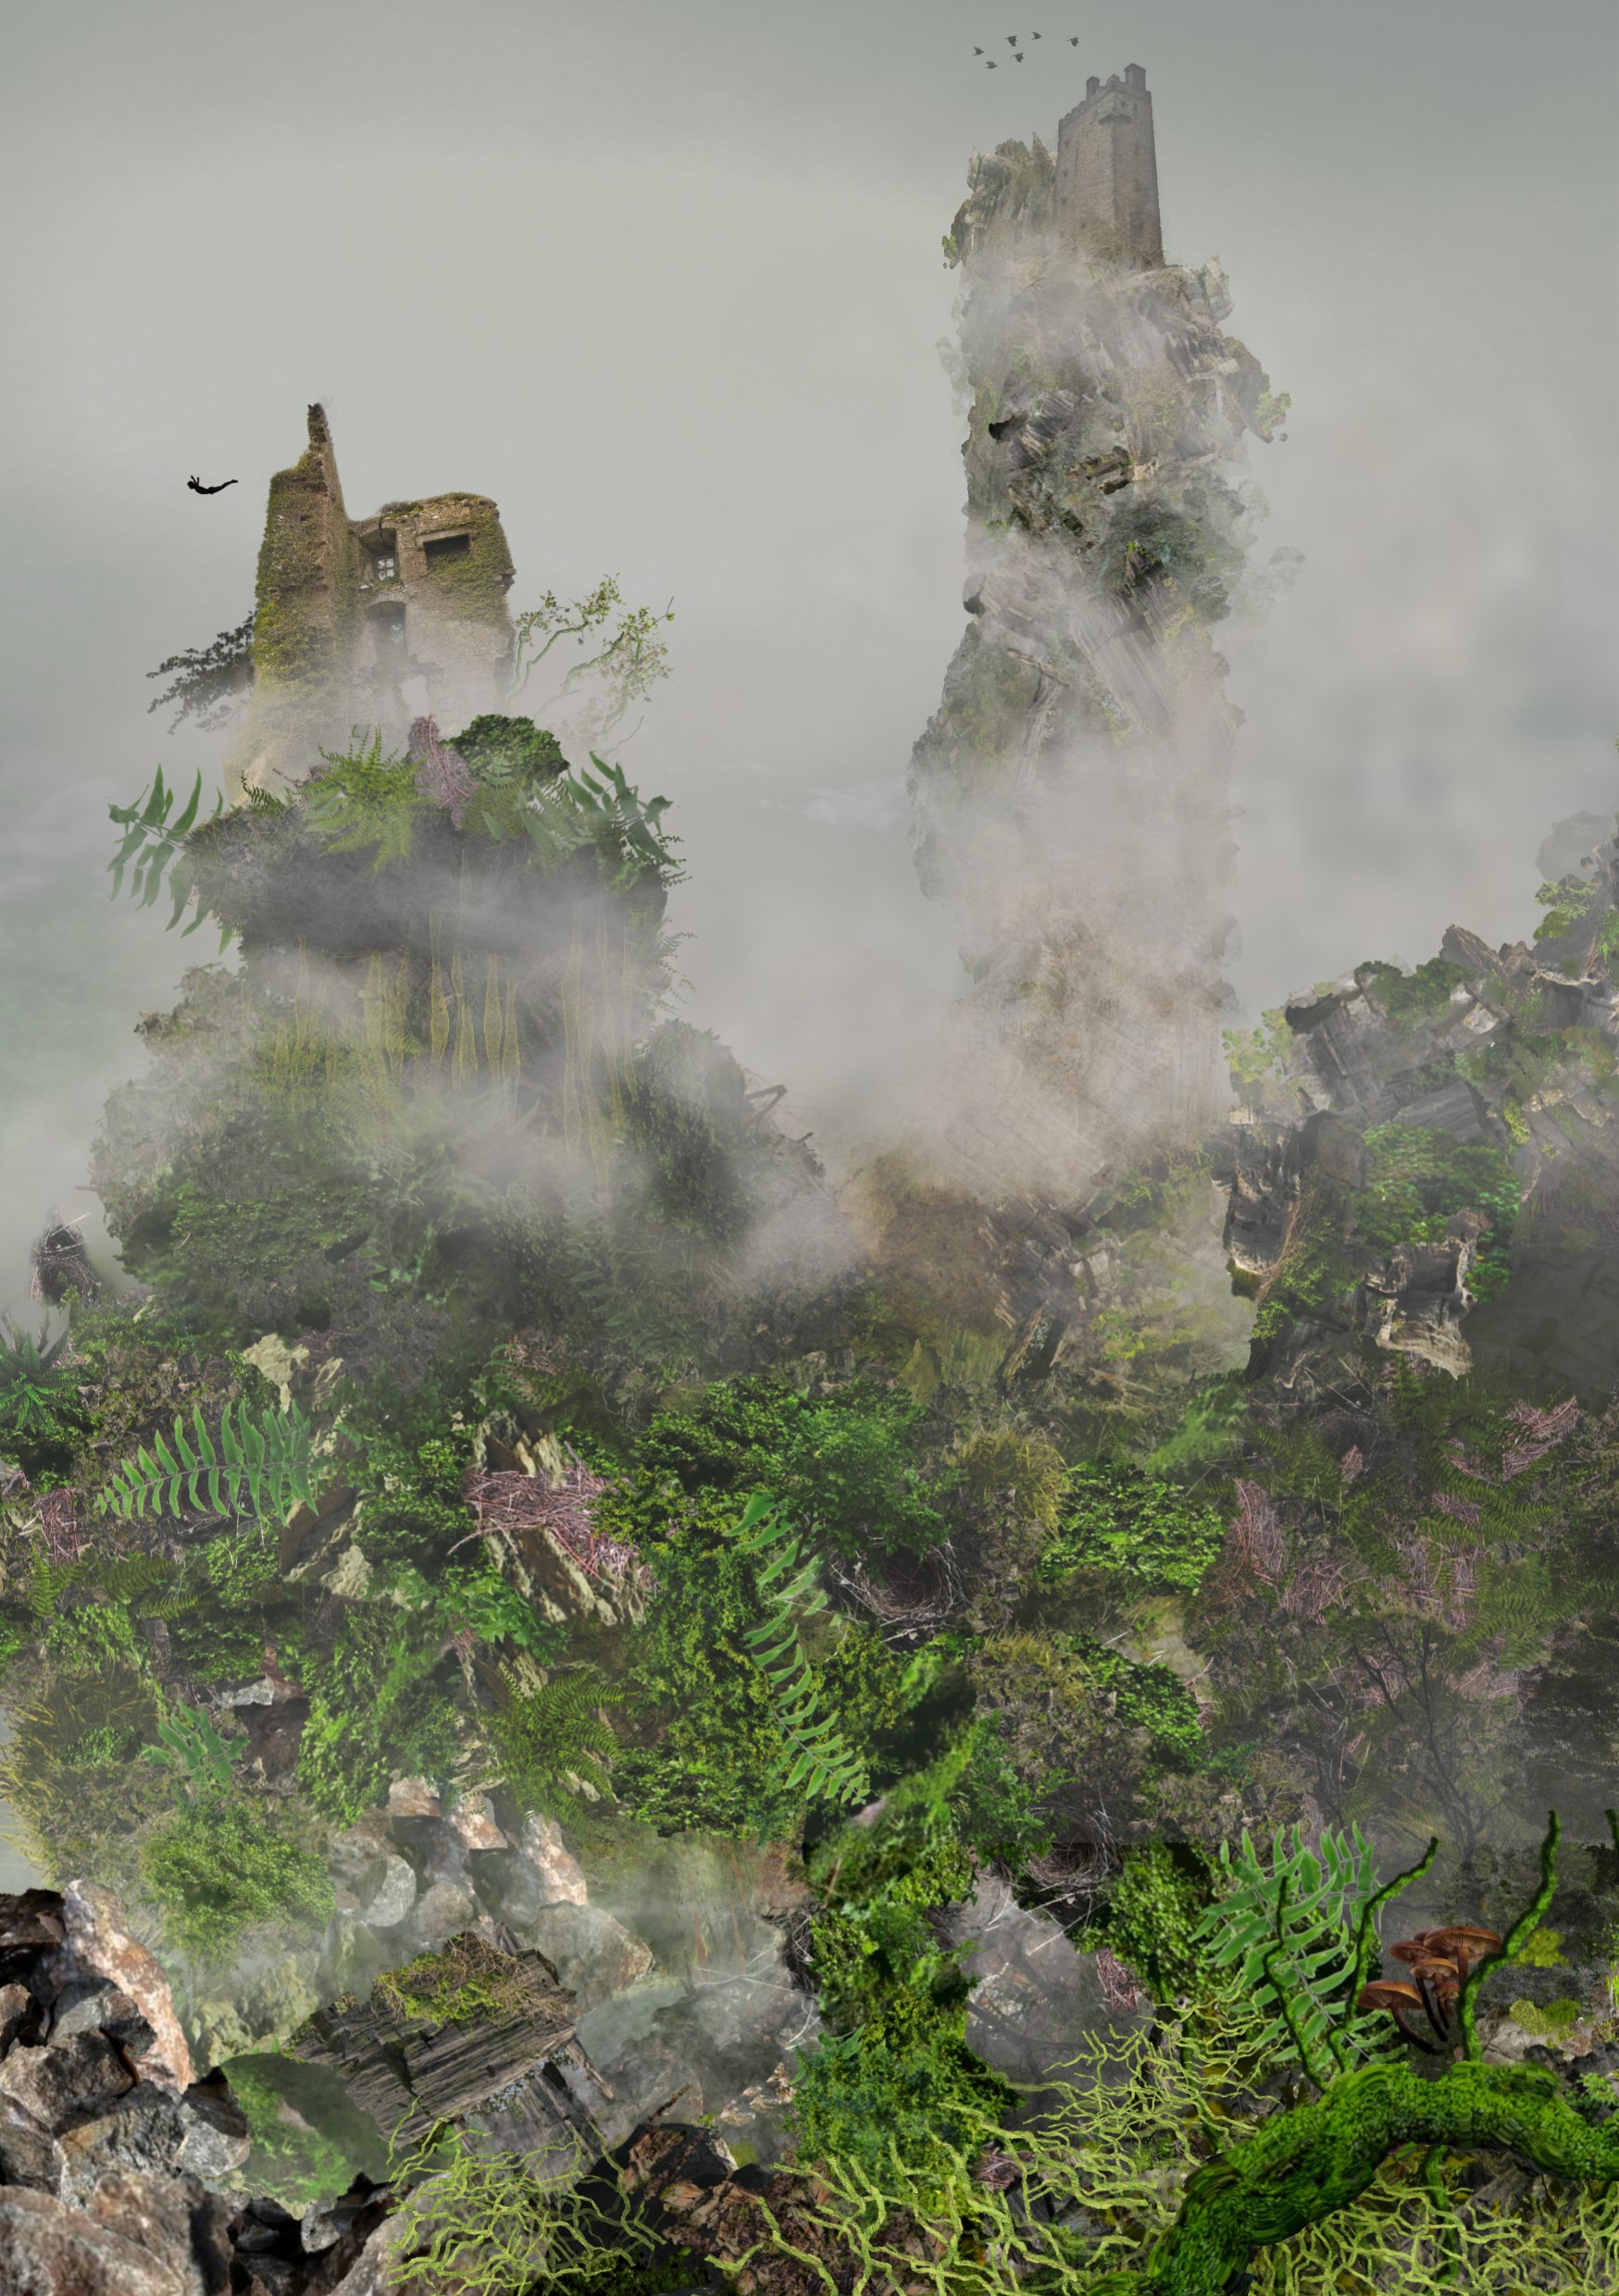
Hi, I have been trying to create some atmosphere in a concept art piece of two towers rising up out of the mist in a valley filled with lush vegetation. I used Affinity Photo to create it, painting much of it with the free 'Atmosphere' and 'Nature' brushes I uploaded on the Affinity Forum (plus some other brushes) to create it (links below). I am fascinated by the matte painting technique used by digital artists for all the main film studios to create a visualisation of important scenes that will go into the finished film. Films and series like Vikings, Alien, Dune, Mary Poppins, Ghostbusters, Titanic, Raiders of the Lost Ark, King Kong, the Jurassic Park series of films... and the new 'Rendezvous with Rama' that is (hopefully) in production. All of 'em, really... This is from Wikipedia: "A matte painting is a painted representation of a landscape, set, or distant location that allows filmmakers to create the illusion of an environment that is not present at the filming location." If you are interested in matte painting or concept art check out the following links. There are lots of tutorials too: https://conceptartempire.com/concept-art-tutorials/ https://conceptartworld.com/category/training/ Introduction to Matte Painting Free 'Nature' brushes link (also includes a Word document on how to create your own brushes): Free 'Atmosphere' brushes link:
-
 I like Affinity Photo but it is an absolute hell using it on a touch-only basis. I use a Surface Pro 7 and there are glaring problems with touch screen usability that bring me to a boiling frustration every time I use Photo for more than a few minutes. We need touch controls in the Toolbar for common functions. Undo/redo, deselect, incremental rotation, etc. need Toolbar controls, whether added by default or as an option under the Customize Toolbar window. The fact that I have to sit and repeatedly do Edit > Undo using a pen or my finger, because the simplest thing like an undo button is missing from the UI, is insane. Especially when I make a sketch and then decide to change something, and need to hit undo about 40 times. Immense oversight. The option to disable and hide the canvas viewport's scrollbars would be invaluable. Touch misfires are bad enough when they cause the canvas to jitter or cause a tool change unexpectedly, but when the slightest "tap" of a nonexistent finger hits the scrollbars, your entire canvas gets thrown to the side instantaneously. Very disorienting, and happens at least once a day in my experience. I never ever use them since I have both a touch screen and a gesture capable trackpad, so they ONLY mess things up. An off button would be very nice. It would also be nice to be able to tell Photo to interpret a single-finger drag (assuming you have touch for gestures only turned on) as a pan canvas command, and a two finger gesture then could always be considered zooming. The gesture interpretation between two finger pinch and two finger drag seems to be really finicky and ends up being very clunky. Finally, though it might be a very niche thing, having a Canvas Lock toggle you could add to the Toolbar would be nice. That way one could lock the canvas while doing intensive inking, to prevent possible jitter due to a palm rejection misfire, and manually unlock it when intending to pan and zoom around the canvas.
- 5 replies
-
- 2
-
-
- touch
- surfacepro
- (and 4 more)
-
Duplicated layer, soft light blend then Levels and Curves adjustemnts, plus a fine sharpening macros.
-
Jus a normal pic, duplicated layer, soft light and a fine sharpening macros.
-
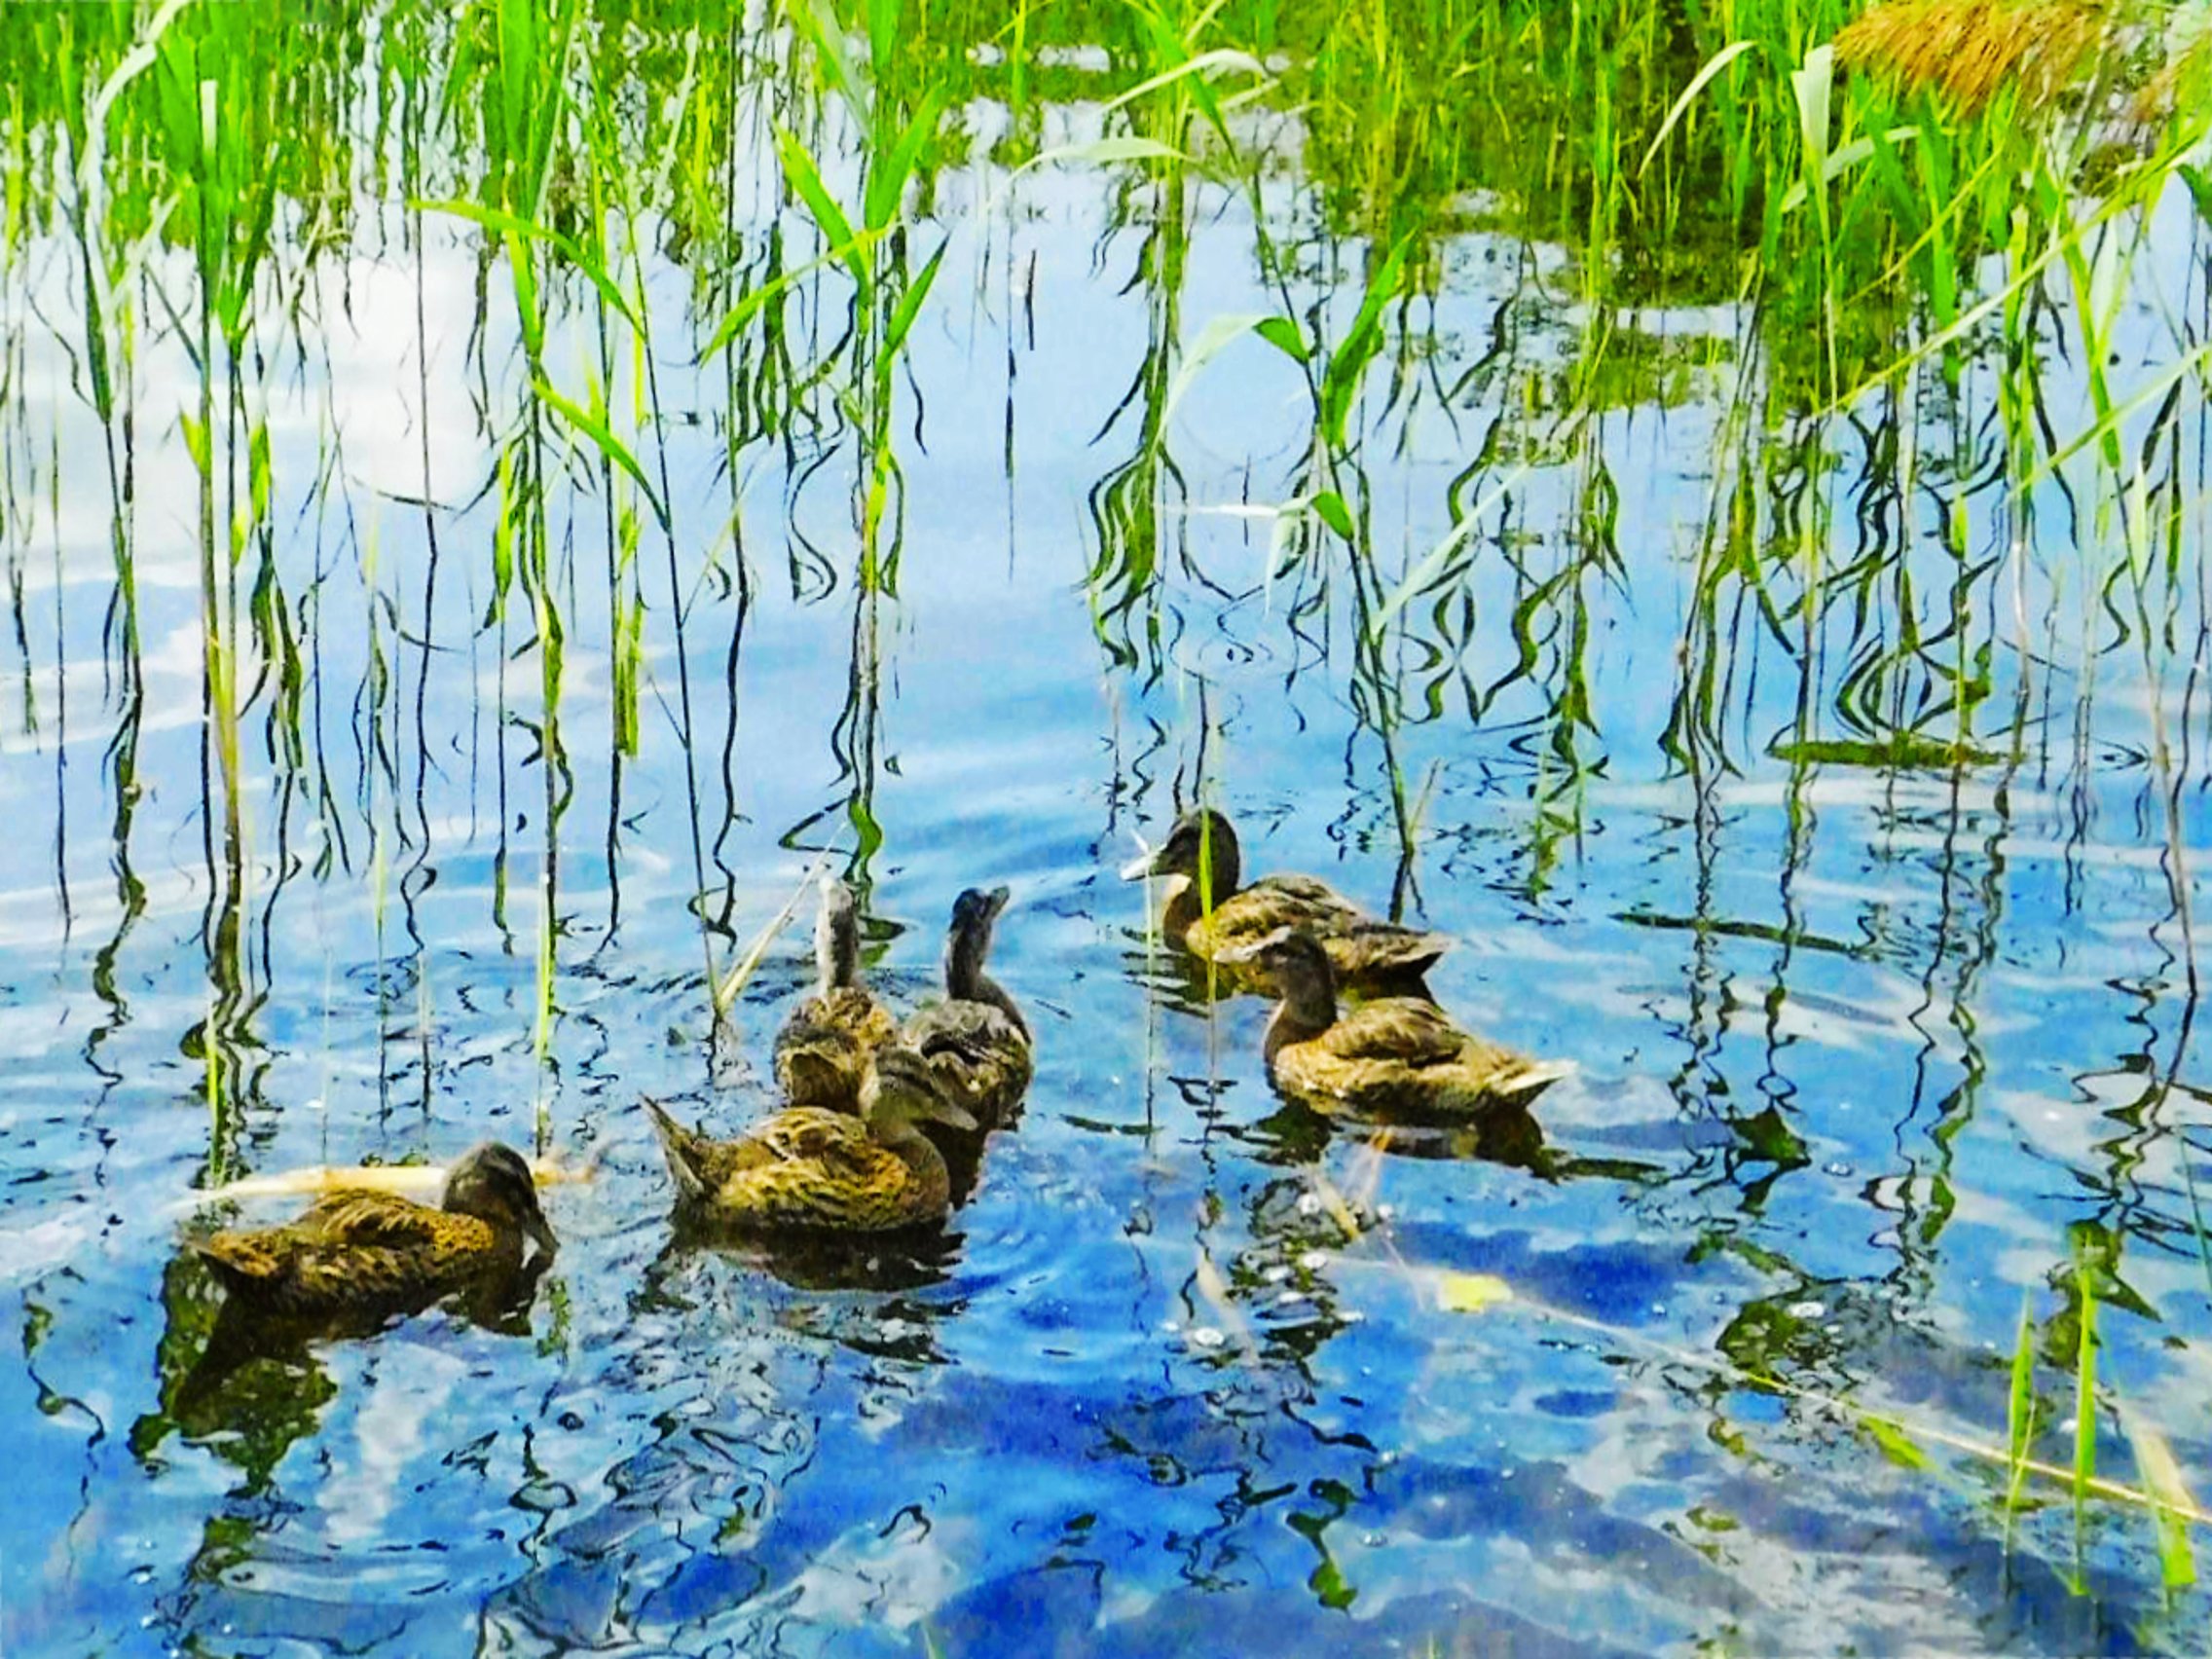
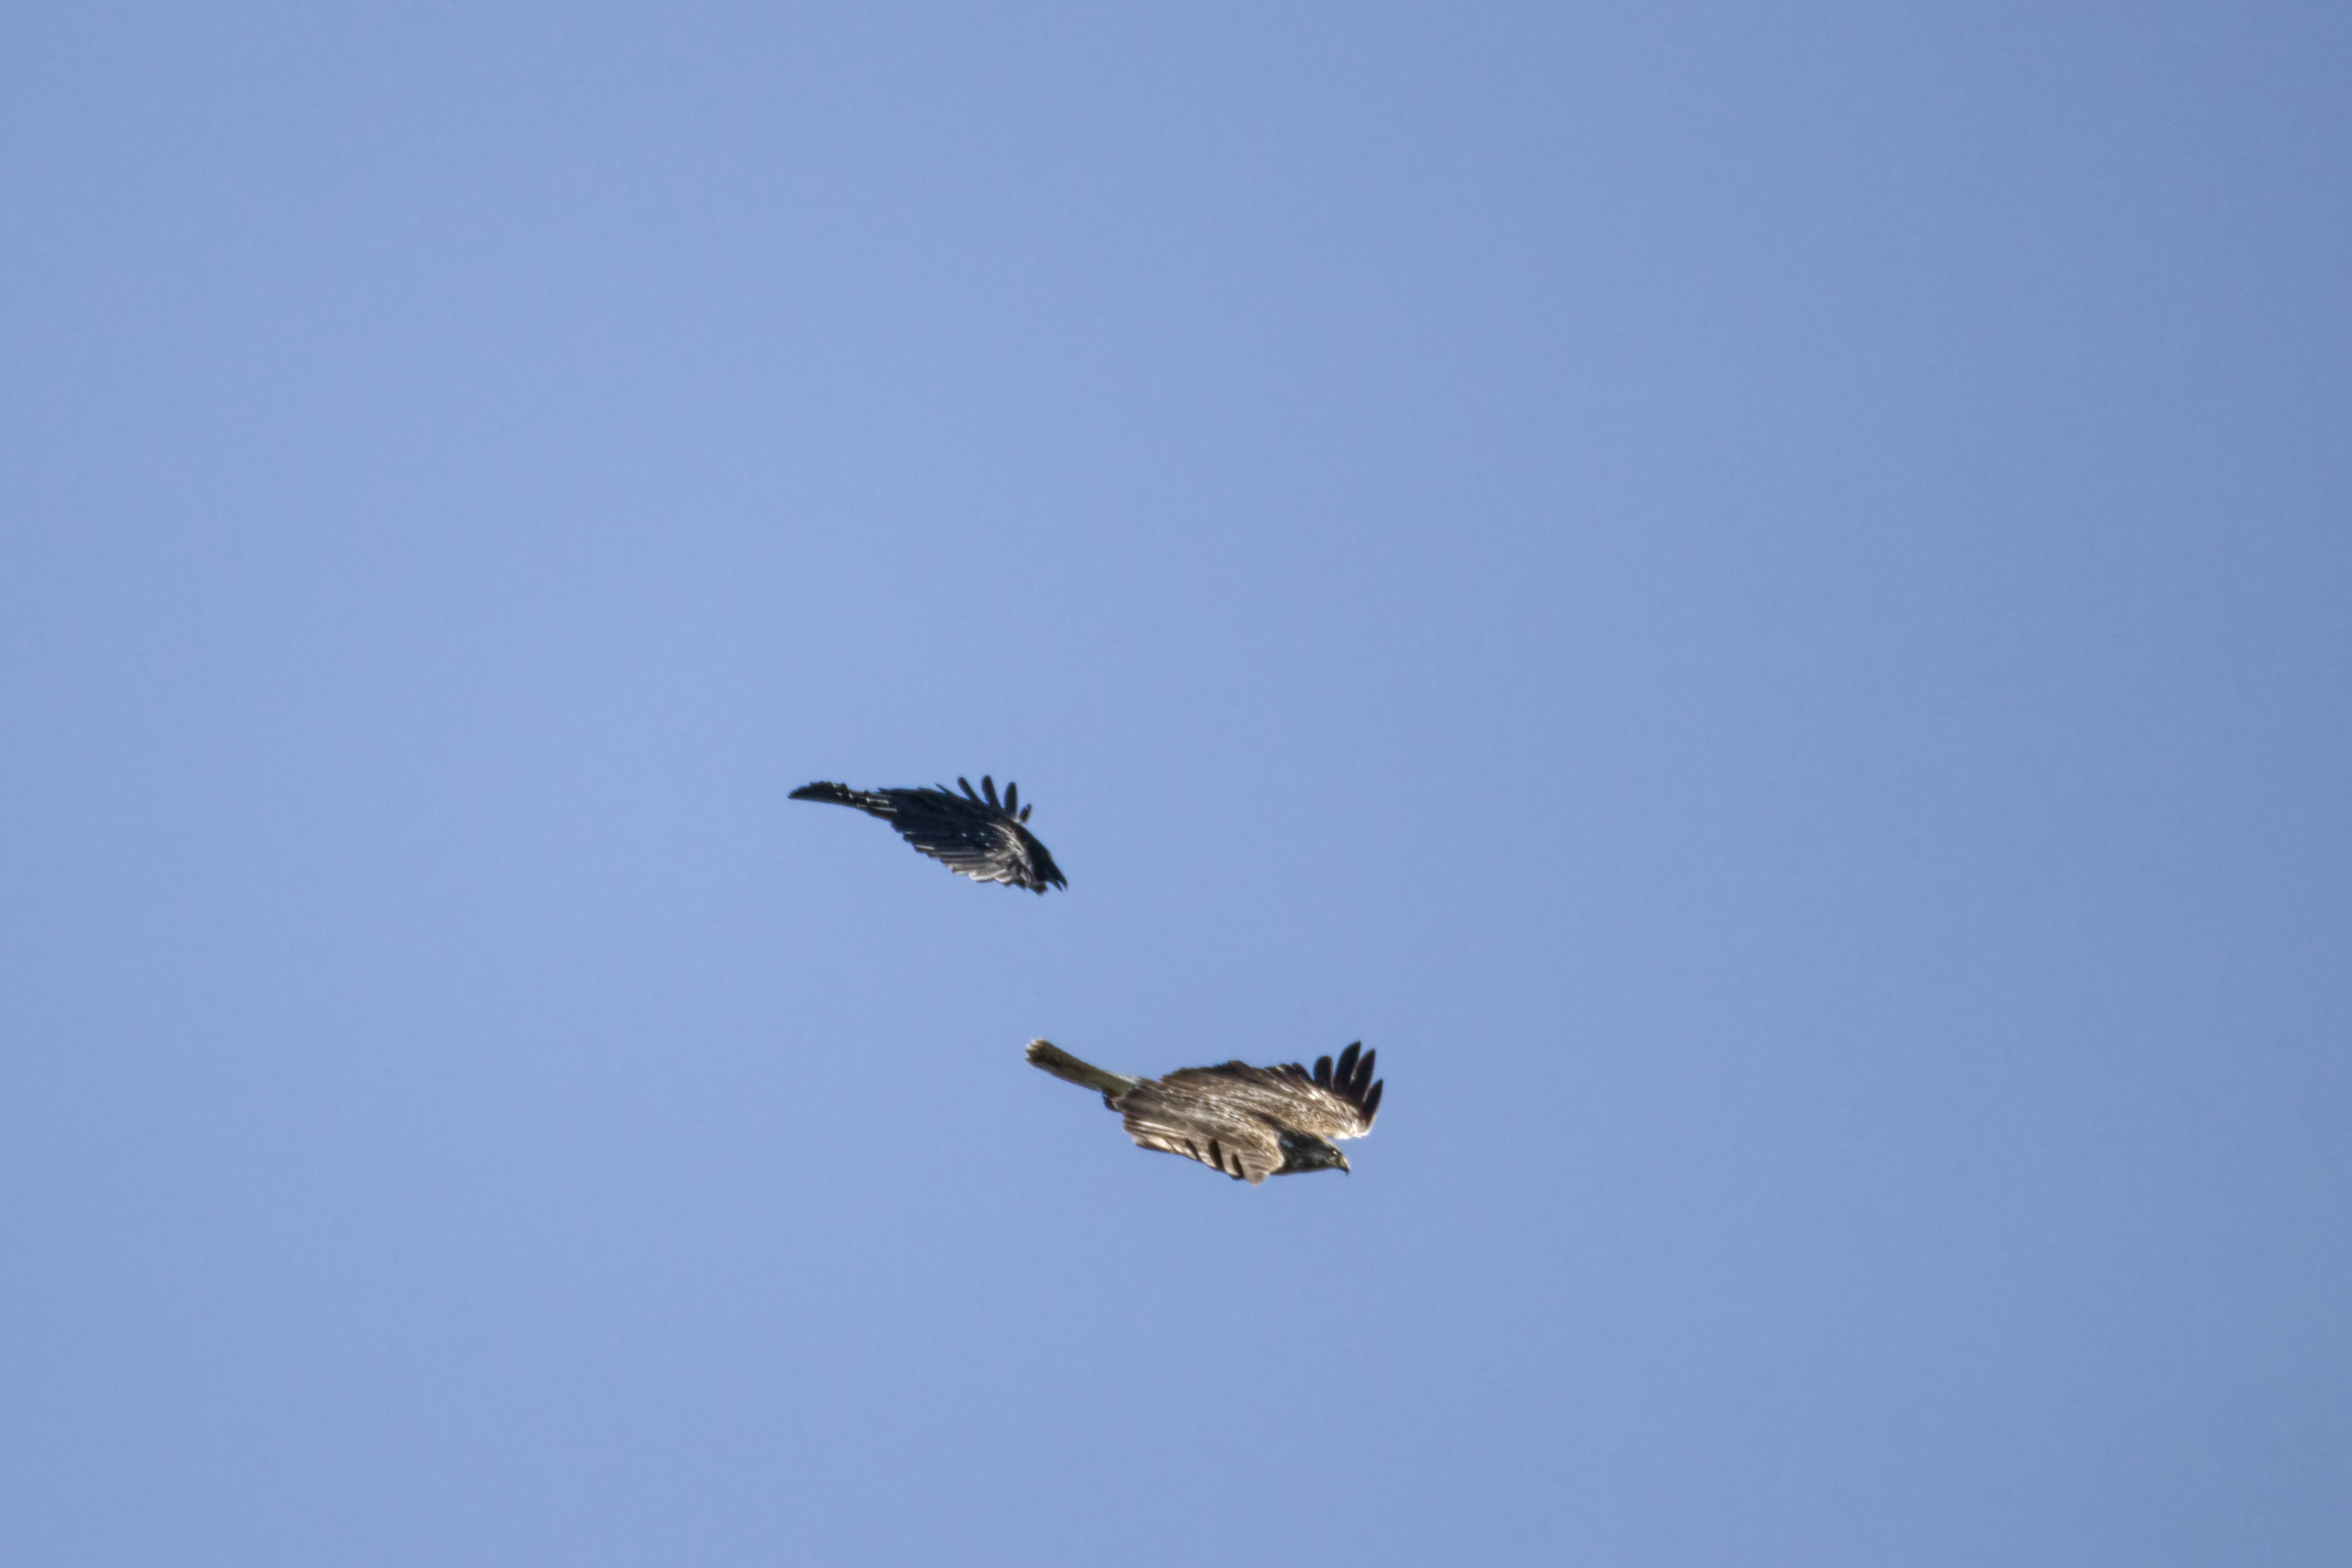
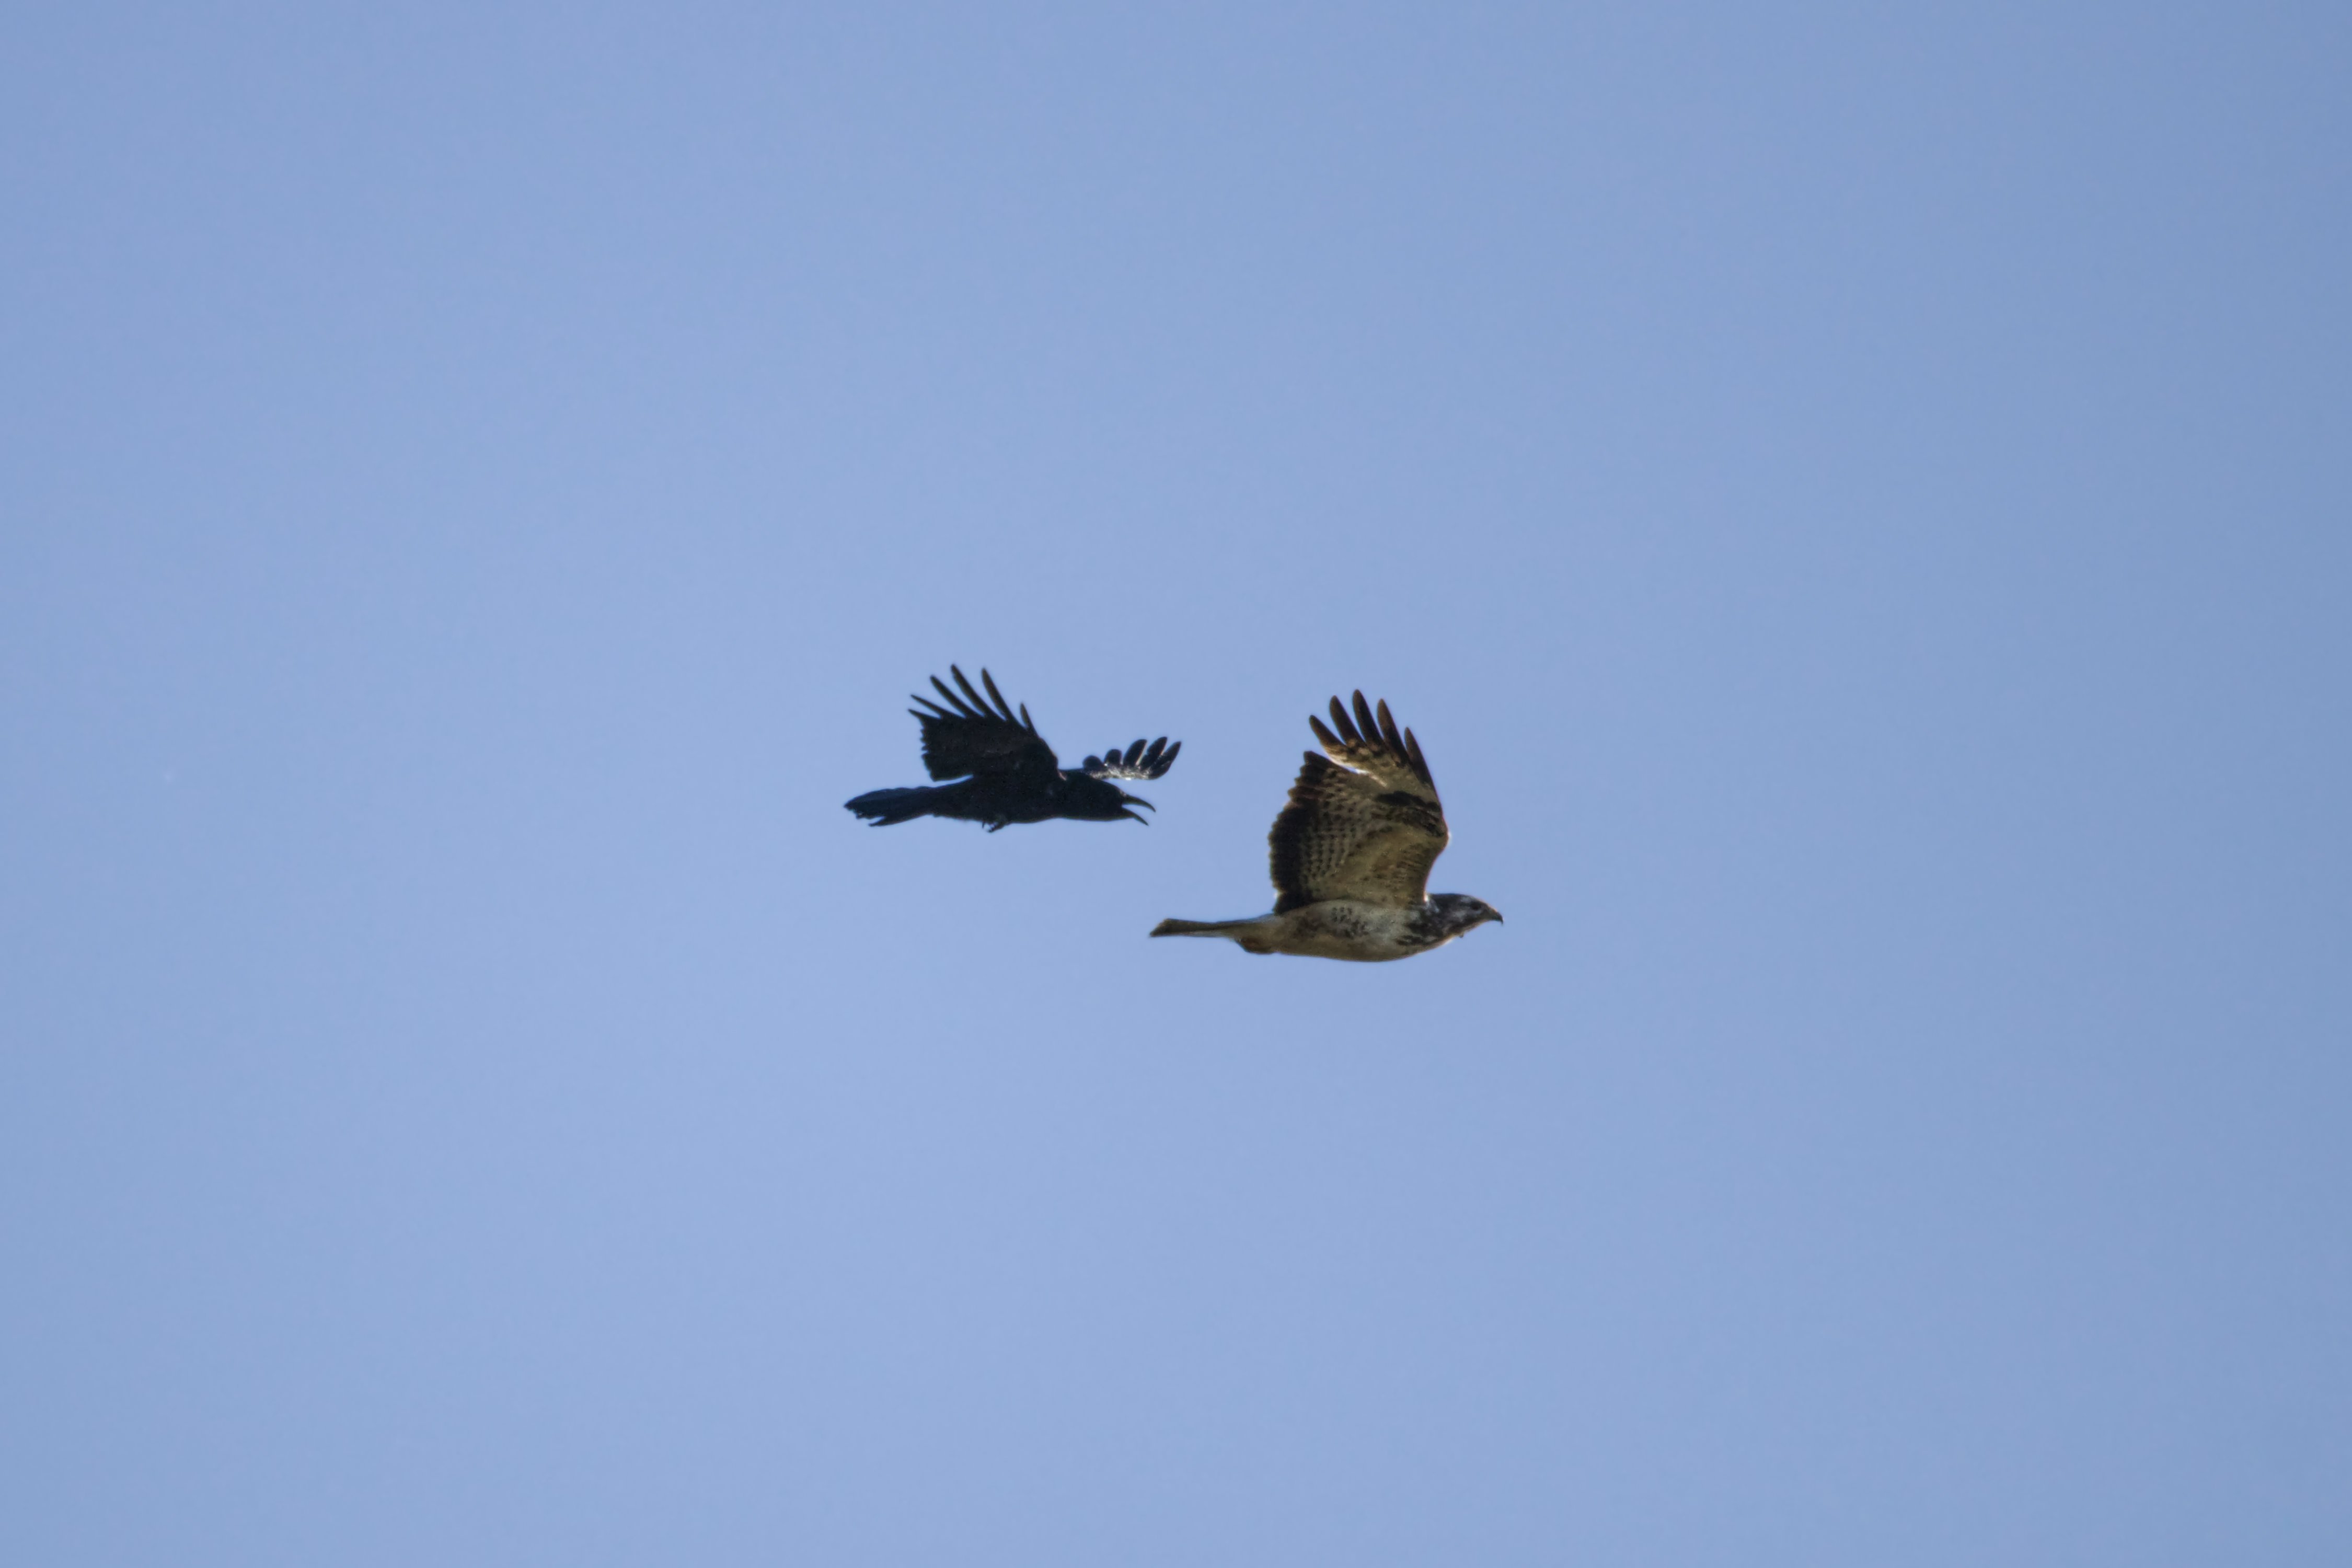
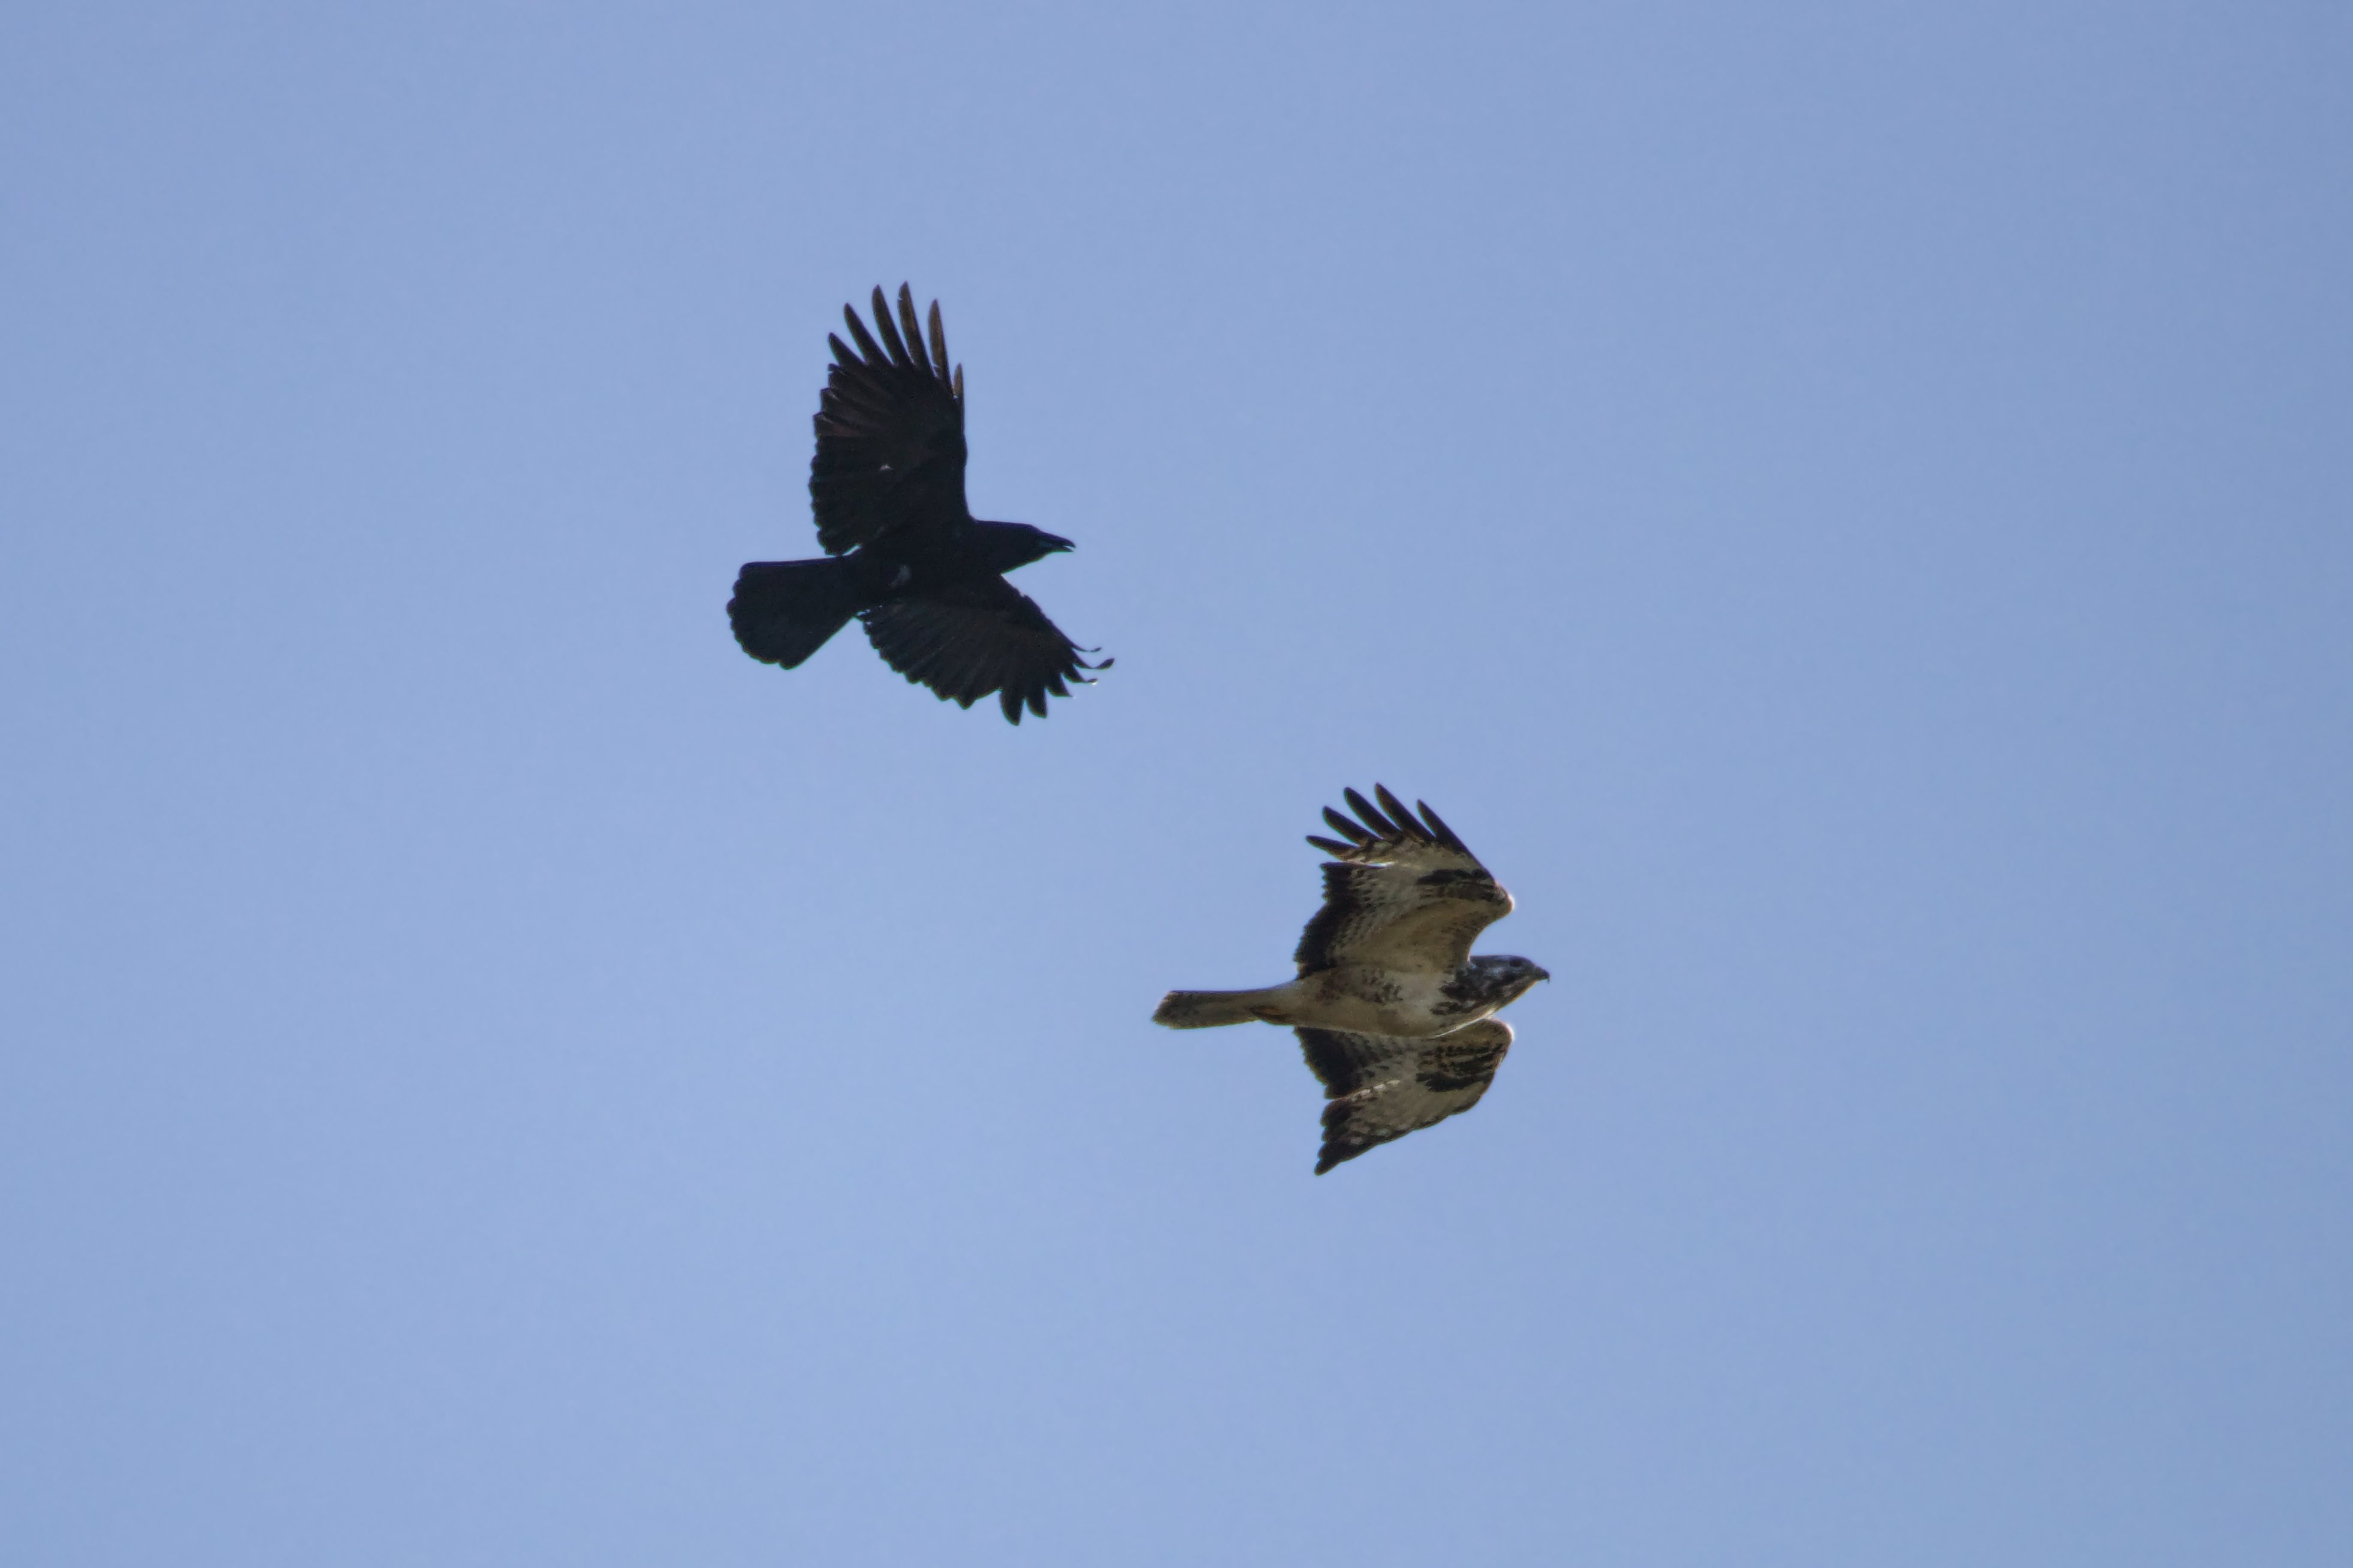
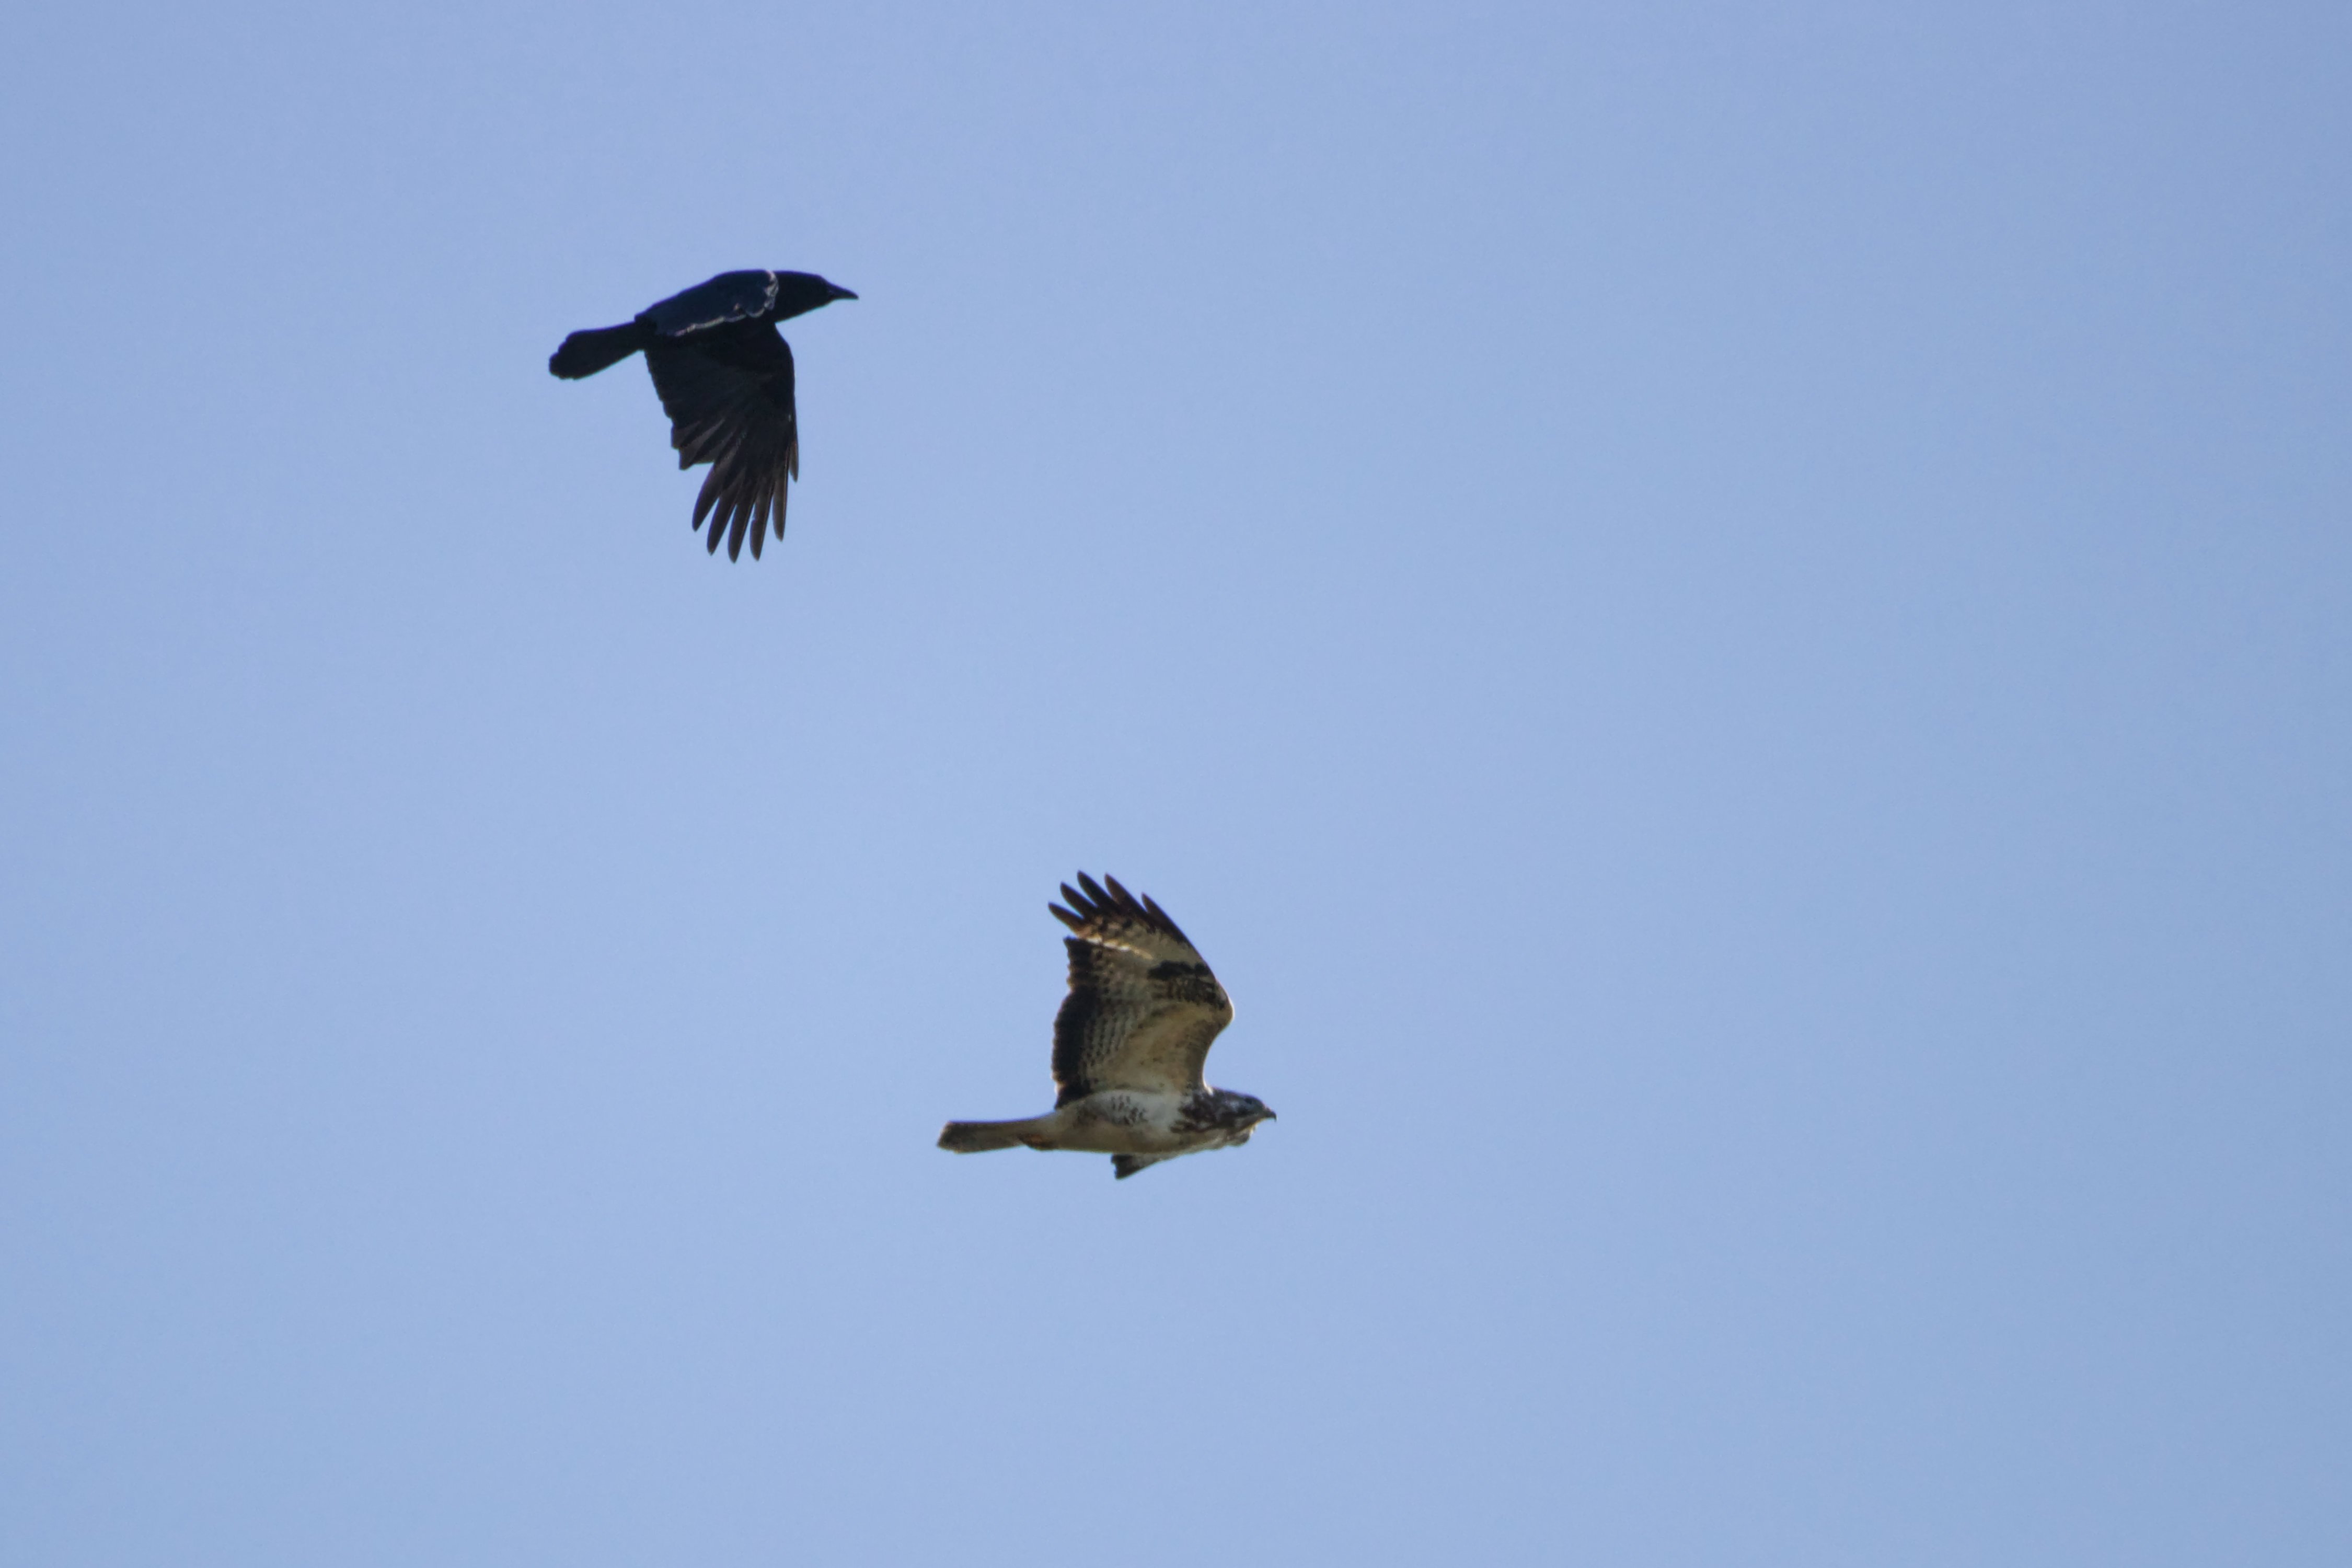
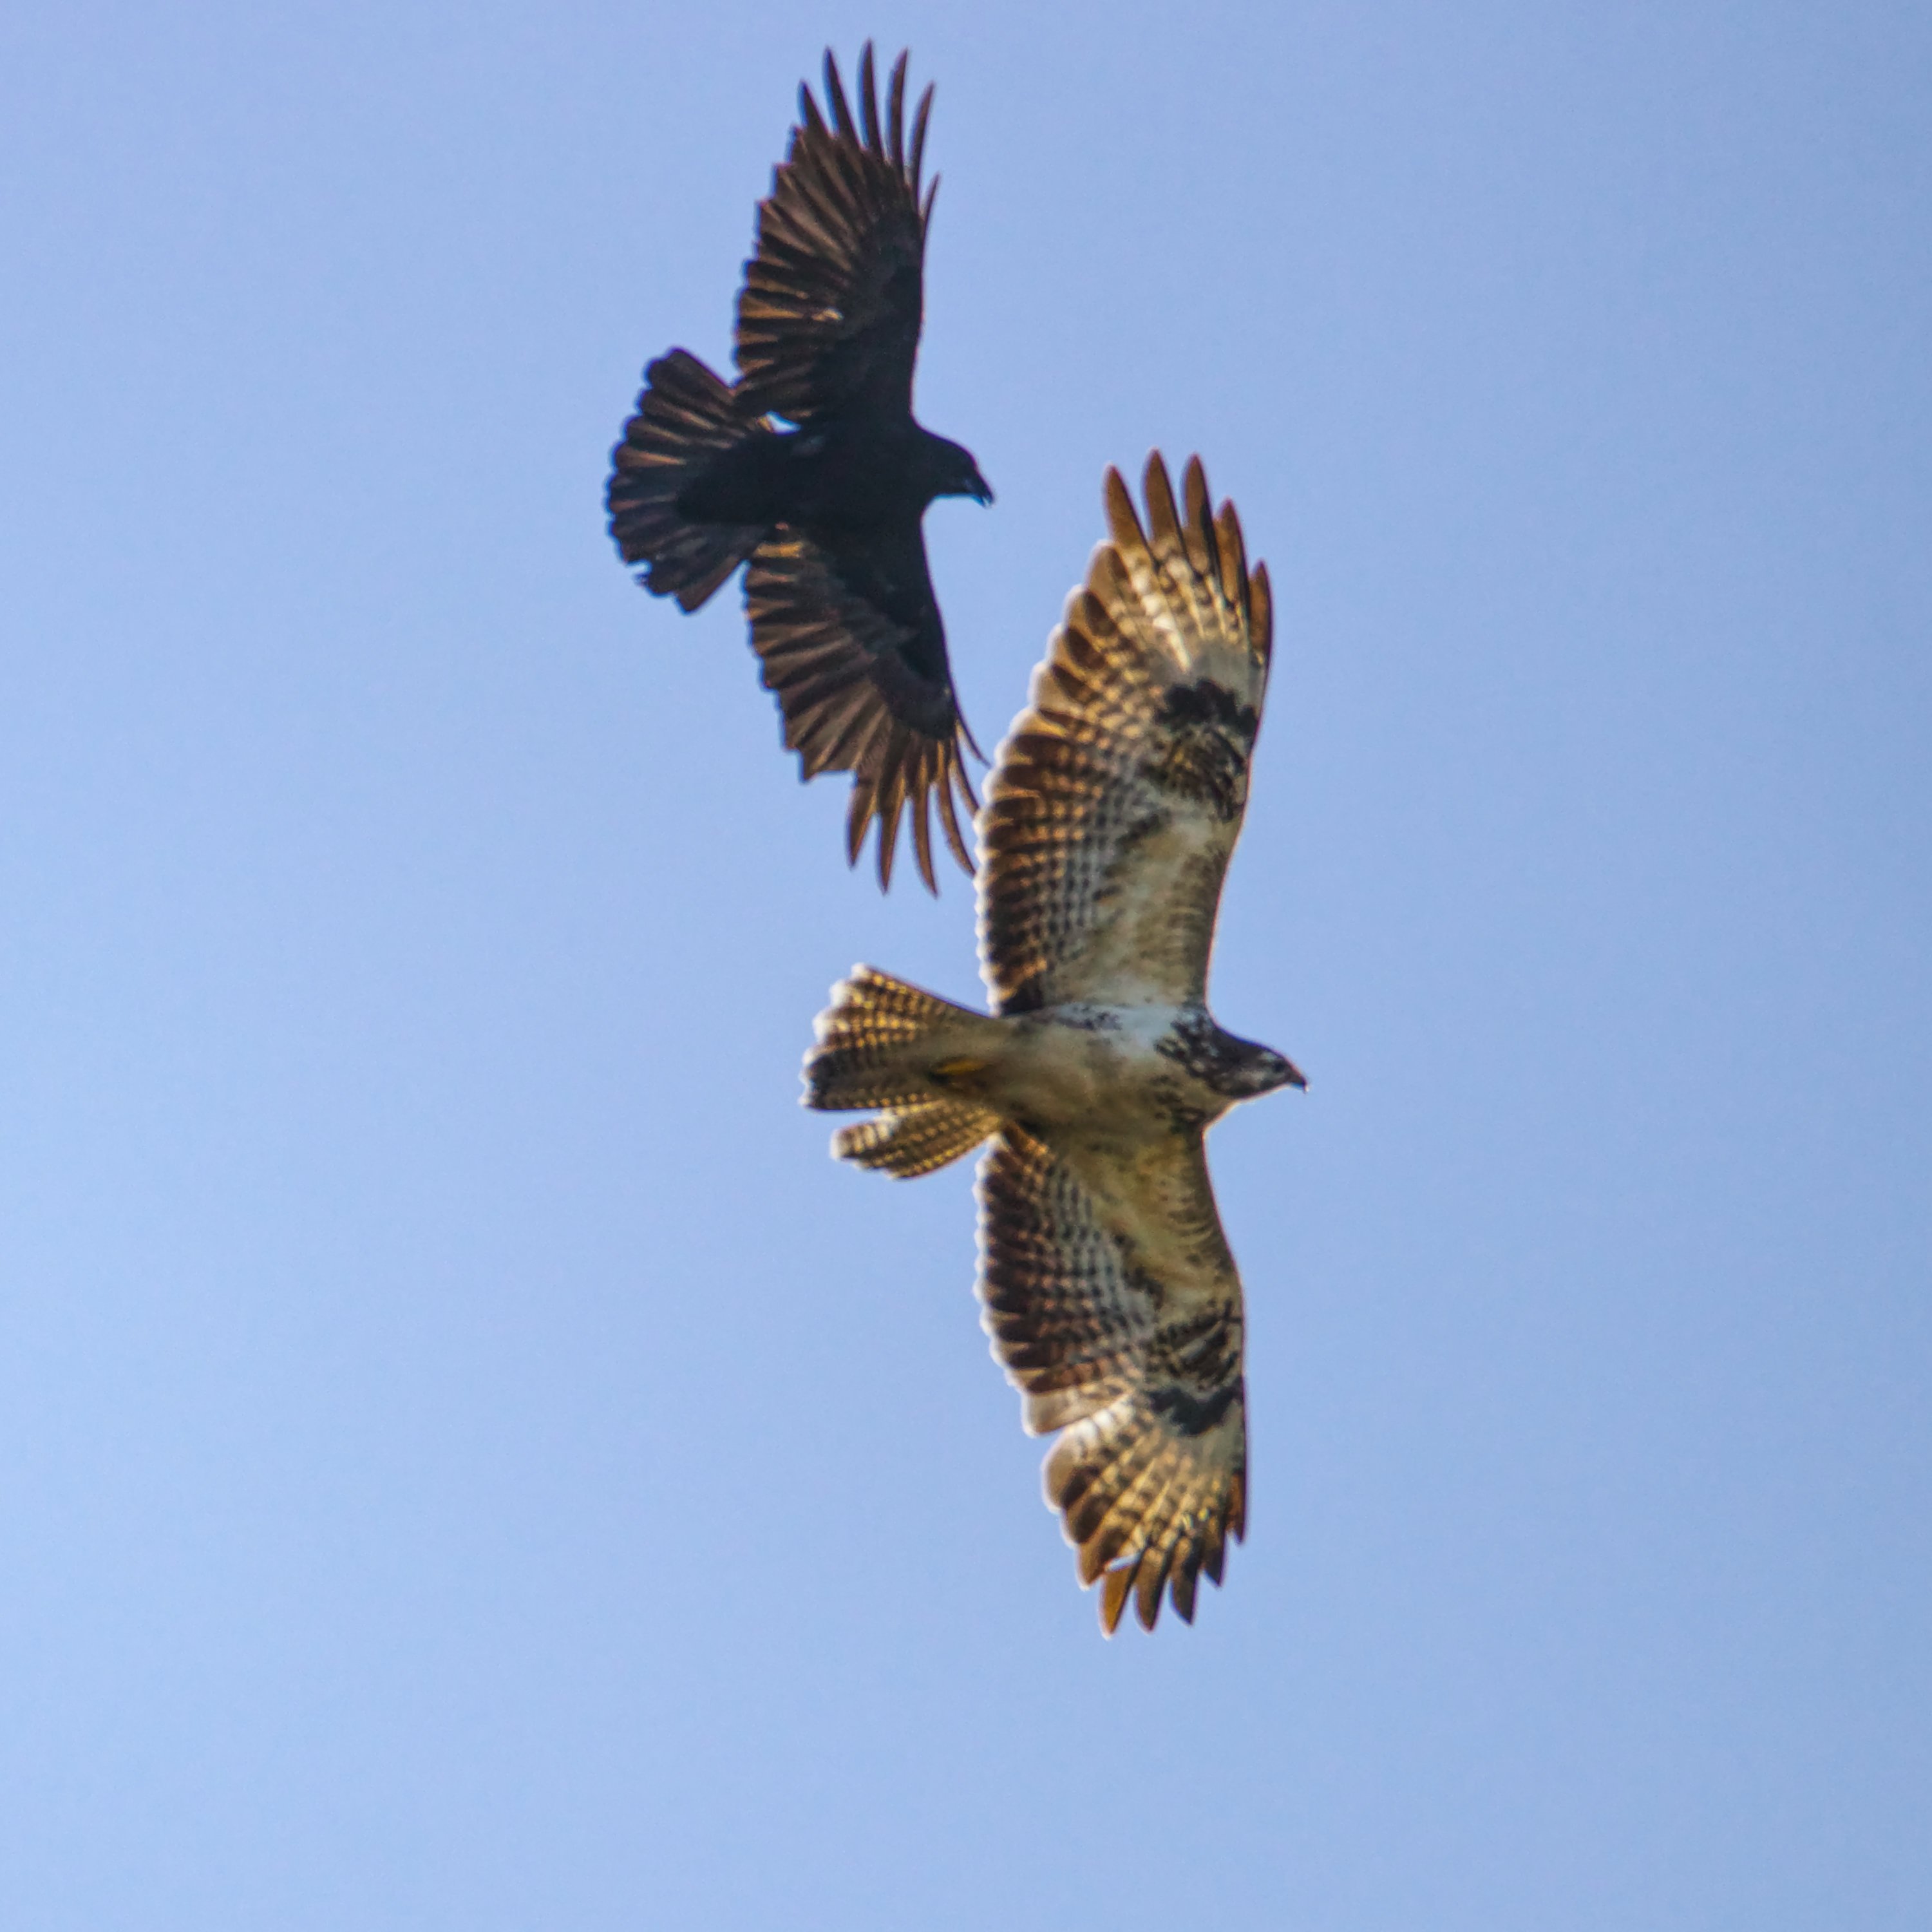
A buzzard and a crow over City of Hamburg / Eppendorf Canon EOS 80D Sigma EF 150-600 at 600 1/1600s Handheld Sky smoothed with denoise and bilateral blur Birds treated with mild tone map (20% / 20%) and clarity
-
It could be possible to have preset for the Equation filter as we have for Procedural? It is quite annoying to re-insert a formula every time when we open the Equation filter. We have to open a file where we have stored our equation and then to copy & paste it in the Equation filter. Waste of time...Much easier for us to open Equation filter and from the Preset panel we just pick it up. Maybe some basic Preset made by Affinty team will be welcome. (such as waves equation, shape equation, wobbly equation, and so on) Thx a lot.
-
Hello Affinity community I would like to share the first chapter of a new comic I've been working on for a Webtoon contest. Most of the "tracing" and coloring was done in Affinity Designer. Photo manipulation was done with Affinity Photo aside for some small tweaks. Hope you like it, some parts might me a mildly NSFW stuff, so better be wary where you watch it. Comic "The Function of Oblivion": https://www.webtoons.com/en/challenge/the-function-of-oblivion/list?title_no=792838 Most photos were taken from Unsplash (https://unsplash.com/) except for those made with Blender. I also used the Franketoon Assets if you want to check them out: https://frankentoonstudio.com/product/propaganda-affinity-designer/ https://frankentoonstudio.com/product/vector-markers-affinity-designer/
-
Raw image developed with Affinity Photo Develop Persona. Further tweaking with Color Efex 4 Pro: pro contrast detail extractor brilliance/warmth darken/lighten centre low key
-
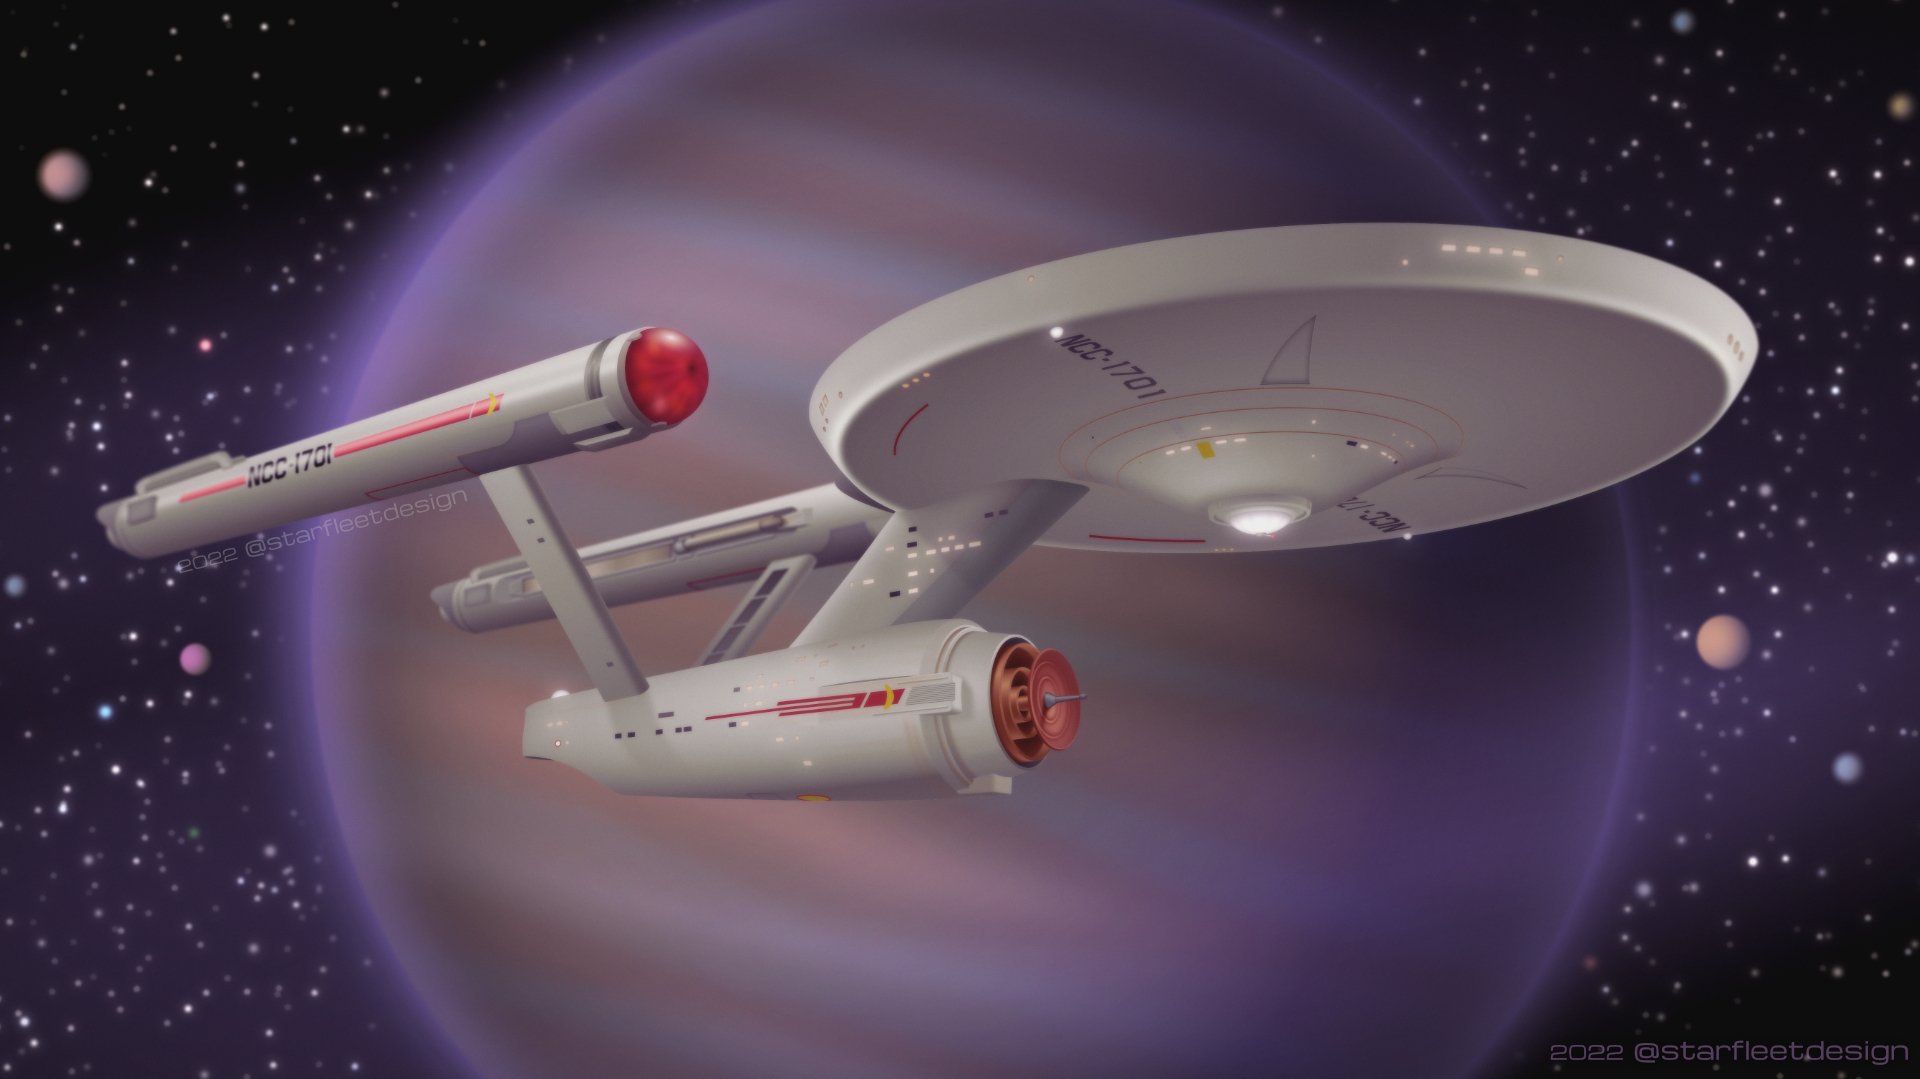
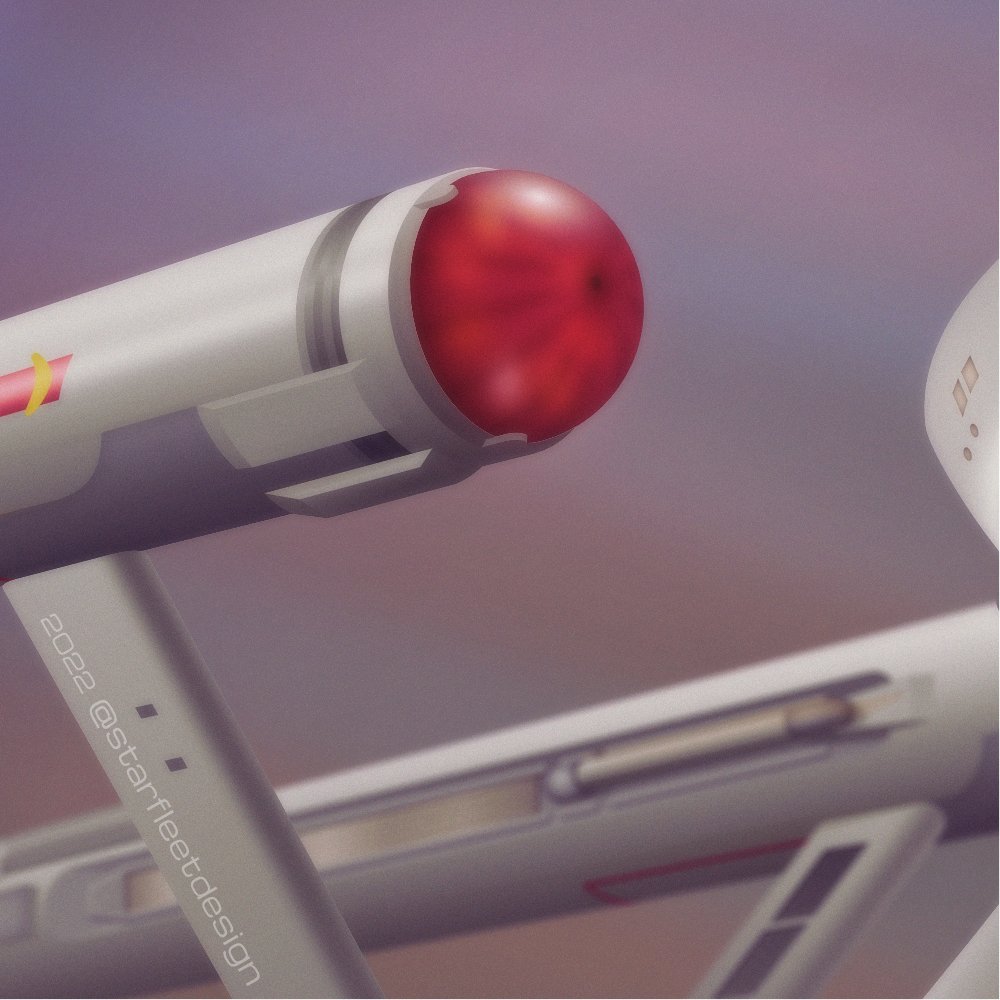
I've just finished what ended up being my most detailed Designer piece and thought it would be worth sharing here. Everything in this scene is vector, including the gas giant, with liberal use of blurs and other layer effects. While I could have completed this work purely in Designer, I opted instead to export various layers into Photos for final processing. Colours were adjusted, some subtle depth of field and grain added and a few other touches. If anyone is interested, I posted my work-in-progress on Twitter.