Search the Community
Showing results for tags 'Affinity photo'.
-
 Hey guys, I have a problem when trying to save pdf for print. I had successfully done this before, a number of times, the same exact way and this time it just doesn't work. Maybe It's something I'm missing here, please help. So, here is my problem. I am trying to save banner design with 3cm bleed and crop marks. I did set up bleed to 3cm in Document setup, I did include bleed in export pdf options, and I did make my elements bigger than artboard. And my bleed is still not saving... What am I missing?
-
 I've made some simple edits of a 17.9 MP JPEG using a few layers. When I save the file in the Affinity Photo format, the file is 225 MB, which is more than 10 times the size of the original RAW file. Is there a way to optimize this? With files this large I can't justify the disk space. Please advise.
 -
 Hi All I've recently purchased Affinity Photo and Designer plus both workbooks and intend to get into both of them. Up until now I've been a big Lightroom fan but, have recently debated the value of subscribing to Adobe as a photography enthusiast rather than pro. Now I have invested in a Surface Pro I'm looking at my workflow and debating how I can get the best out of both. Setup Prior to Surface Pro: LR CC Classic RAW Photos and Catalog Synced with One Drive for backup Choices moving forward: 1. Stick with LR CC Classic Sync Catalog via One Drive RAW Photos move to an external drive and use between the two Use Affinity as my go to editor Plus Points: A workflow I'm used to with LR CC Classic Negative Points: Still paying for Creative Cloud, catalog needs to be synced before opening on surface and vice versa 2. User LR CC Sync all RAW photos to the cloud with LR CC Plus Points: Works seamless between both devices Negatives Points: Still paying for Creative Cloud and cannot open in Affinity from LR CC (Booooo!) 3. Sack of Creative Cloud Use Windows to manage files / other software and run with Affinity Photo RAW Photos all synced with One Drive Plus Points: No Creative Cloud Subscription Negative Points: Need to adopt a new method for managing RAW Photos and quick edits. These are the options I think I have but, as this is the place for all Affinity Photo questions, I'm sure others have their workflows that they could share. What RAW Processor / File Management System do you all use prior to opening Affinity Photo? I've seen DarkTable amongst others and also debated converting my files to JPG once finished editing, one to save disk space and two means the files are how I want them to look. Obvious downside is reverting them back to original if you don't keep the RAWs. Thanks for anyone's help in advance, it's greatly appreciated. Carl
 -
Was a bit board last night and end up making this piece
- 8 replies
-
- 1
-

-
- affinity photo
- affinity designer
- (and 1 more)
-
 Untitled.afphotoAll images is worked done for various Projects & Companies & Individuals.. I used Affinity photo for all my work. thanks again for an awesome product
- 1 reply
-
- 2
-
-
 Hello all, I've been behavior I just can't explain. I've seen this on the iPad version and now on the desktop version. Example: I have two images I brought in as a stack, I did auto-align (tried with and without the live align).... I see the stack, I open it up and can see the individual layers, one on top of the other. The blend modes are all set to Normal. For some reason, the lower layers are bleeding through and showing through the topmost layer, even with no masking, etc.....and I'm at a loss to see why? I'm used to PS, where if you stack 2 layers, with nomal blend modes, the top one completely obscures the lower one, unless you mask it off, or have other blend modes enabled. I'm guessing something is set different in AP, I just don't know how to get the behavior I'm expecting. Right now, with both images there...I have them both turned on, again, expecting the top image to completely obscure the bottom one...but it looks strange, and if I turn off the lower layer...the top one becomes to look as it should be without the bottom one bleeding into it. The images I've tried on desktop are .tiff images....the ones on the Ipad that did the same strange thing, were from an iphone emailed to me. Can someone help me out here? I'm just wanting to stack 2 images, and not have the bottom one(s) show through unless I mask out the top later.... Thanks in advance, CC
 -
 When you use Affinity Designer or Affinity Photo in full screen on a Mac, the applications focus are incoherent to what the user would expect. If Affinity Designer is launched and in full screen. When you open an Affinity Designer file from the Finder, the file is opened in the current Affinity Designer space and the app is put in focus but you stay on the current Finder space. If you don’t pay attention to the menu bar you could thing it didn't work. For me the best behaviour would be to automatically switch to the Affinity Designer space (akin to Visual Studio Code). Another solution would be to open the file in the current space with a complete interface like Pages does but this doesn't seems suitable to me.
 -
 Hello, Just got back from shooting in RAW and when I uploaded my photo to edit, the data at the top of the window has "RGB" before the photo data instead of "RAW". I am new to Affinity photo, however in the raw tutorials I have watched I have noticed their data shows RAW at the top. If anyone could provide an explanation that would be much appreciated! Graham.
 -
 Hi, I have a series of tutorials about Affinity Photo iPad in german on Youtube:
 -
Don't believe everything that Hollywood tells you. I have it from good authority that these two guys get on like a house on fire; the first chance they get, out comes the piano and before you know it - it's an all out rendition of "Nessun Dorma." And if you thought the Italian language was difficult to understand. . .just you wait till you hear this mother sing. Put that in your dreadlocks and smoke it!
- 6 replies
-
- 4
-

-
-
- aliens really can play piano
- opera
- (and 4 more)
-
affinity photo I'm not a professional, but I enjoy Affinity
Moisés posted a topic in Share your work
Some works
-
 Hello, I'm using Affinity Photo on 64 bit Windows 8. In some files when I use eyedropper tool, the color I pick up is way darker than the original. I wonder why that might be? In other files I don't encounter that issue. I first started that file in Designer trial, and then continued in Photo. Can it be the reason? How do I fix that? It's really slowing down my work.
 -

affinity photo [APh] Cartoon Pirate - Finished art challenge
Mithferion posted a topic in Share your work
Hi there, guys! I was watching this Brad Colbow's video, where he proposes AAC (Another Art Challenge). The things goes as follows: He shares a sketch Others finish that specific sketch with their own style So, I decided to play along using Affinity Photo. I wanted to try that cartoonish style (as any challenge, the purpose is to improve, so it's a good opportunity). Also, I recently opened my twitter account just for this challenge. Glad to see that the Affinity account liked it. Any feedback will be appreciated. Best regards! Best regards! -

affinity photo My First Digital Painting In Affinity Photo
Gecko1993 posted a topic in Share your work
Hello, everyone. I am a relatively new member here. I want to showcase my first-ever digital painting courtesy of Affinity Photo. This piece took me 3 days to complete, and was meant to celebrate the 20th Anniversary of Eiichiro Oda's Manga: One Piece. What do you think of it? I was implementing all of what Affinity Photo had to offer as a Digital Painting tool, and it doesn't disappoint. Since the filesize is perhaps too big to be viewed on the forums-"There was a problem processing the uploaded file. -200" (exceeds the uploading size for the forums in question), I encourage you to visit the link of the submitted piece on my DeviantArt: https://www.deviantart.com/gecko1993/art/One-Piece-20-Years-of-An-Ongoing-Narrative-693176405. Any feedback is appreciated, and I hope to be a helpful, and contributing member to this community! Thank-You. -
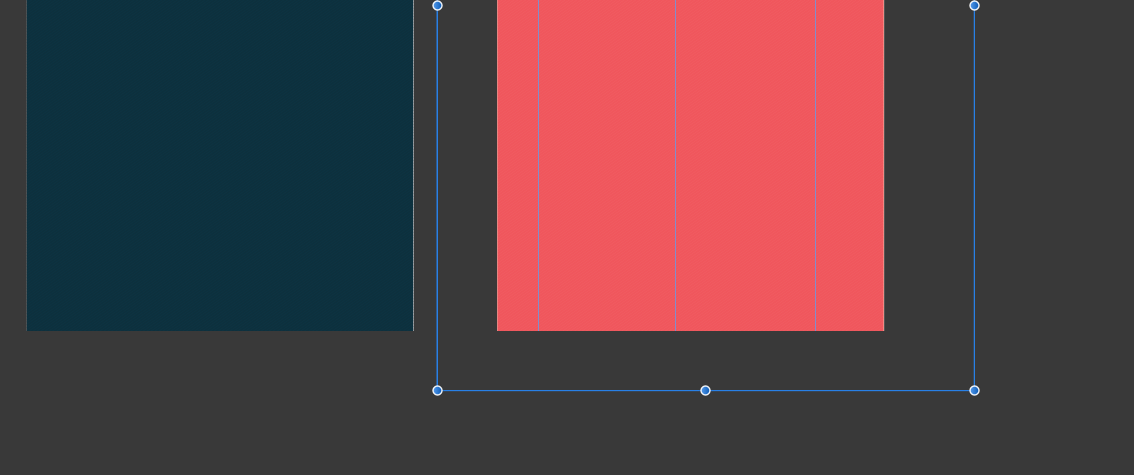
 I started with Affinity Photo around 3 days ago. I am currently trying to take a picture and put one third on one layer, the next on another, and the final on a third. Is there any easy way to do this?
 -
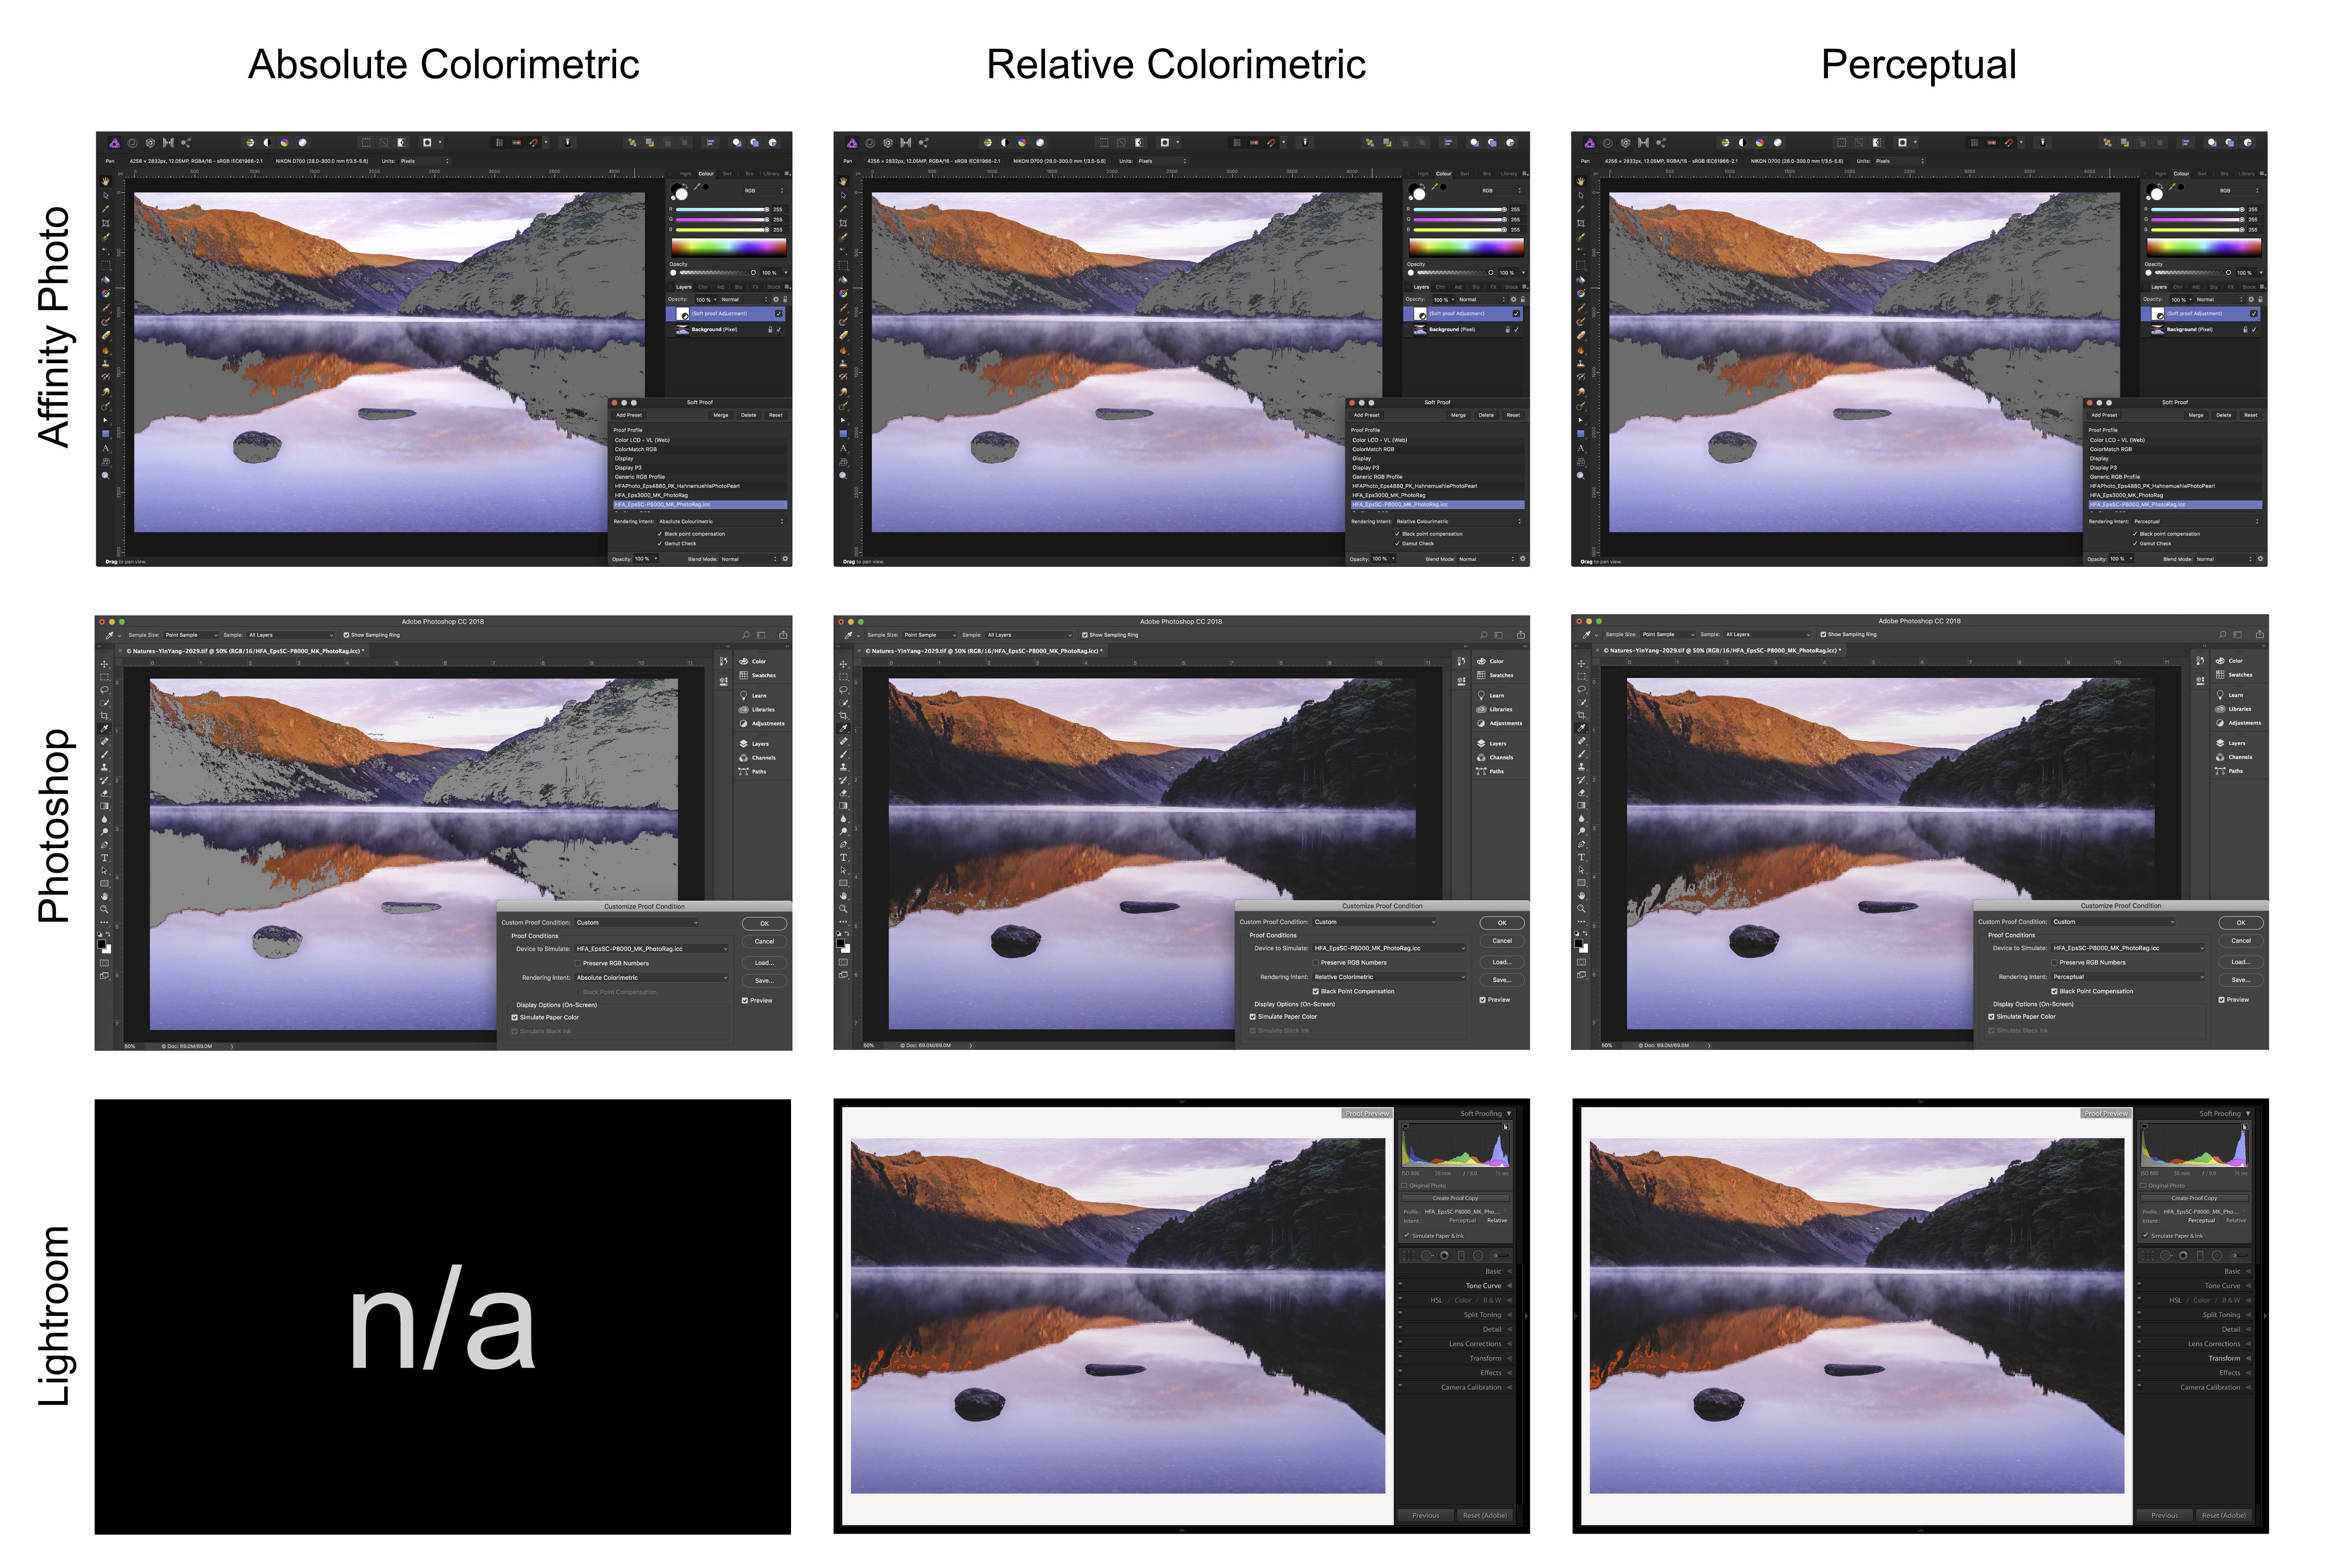
 Hoping someone can shed some light on an apparent issue with Soft Proofing in Affinity Photo, but first a little background; I am looking to switch from Adobe products and Affinity Photo will be taking over the role Photoshop has played so far in my workflow, and so far so good. Then recently I was contacted by a client that wishes to purchase a print of one of my photos. This is the first time I am making a large size print for a client so I am doing this via a gallery print lab (I have done printing on my home printer before so I know the basics of Soft Proofing, however it’s a home printer Epson XP-235 so no ICC profiles for that consumer model). So I though this is the perfect time to test out the soft proofing in Affinity Photo. However I am getting very strange, and what I assume are incorrect results out of Affinity Photo. The colour space required by the lab is sRGB and a TIF file with a DPI of 300 which will be printed on Hahnemüehle Photo Rag and are soft proofing using the ICC profile for the given paper and printer at the gallery, so far so good or so I thought. What first got me thinking something was off was when I changed rendering intent, in Affinity Photo and there was little to no difference between any of the intents and huge amount of out of gamut colour. So I went back to Lightroom and sure enough in Lightroom there was far from the same amount of clipping using the same ICC profile and rending intent. Hence I opened the file in Photoshop and here results were the same as Lightroom’s rendering intents (relative and perceptual), while Absolute matches what I see in Affinity Photo. I would have assumed since I use the same file with the same colour space and the same ICC profile on the same computer the results should be the same, unless one software is interpreting colours and the ICC profile differently which in that case begs the question; which is closest to the truth? Or is this a bug in Affinity Photo’s soft proof adjustment layer? (And yes I know that soft proof will never match the true to life print, however I like to get an as close to the print rendition as possible, but I now have a very hard time trustingt what I am seeing in Affinity Photo). Pictures speak louder than words, so here is a chart detailing the results I am seeing and as you can see it's a huge difference. Hope someone can answer this or if I am missing something in the workflow. Software versions: Affinity Photo: 1.6.7 Photoshop: CC 19.1.5 Lightroom: 6.14 standalone Thanks.
- 8 replies
-
- 1
-
-
- macos
- soft proof
- (and 2 more)
-
 Hello! Please have a look at the following image: https://drive.google.com/file/d/1O8yEvxtFKmYVeJZn5QgdxLKUXv_eRsdO/view?usp=sharing It's a low-res artwork of a neuron, often found in scientific contexts. The left part is the original image, the right part is the original image where black has been replaced by white (so that this image can be put on dark backgrounds). The right part is also the result of Photoshop, where I've simply used "Replace Color", chose full black to be replaced by full white, tweaked a little bit with the tolerance, and that's it. I'm having trouble getting the same result with Affinity Photo, unfortunately. I think the fact that the image is basically low-quality makes it a little bit harder. The goal would be to replace the black stroke with a white one, but leave the red color inside exactly the way it is, just like Photoshop did. Here's my first naïve approach using Curves: https://drive.google.com/file/d/140_HbrpTRi7PwpjuwgKQmbqCb6zA78k9/view?usp=sharing As you can see, I can keep most of the red color, but I'm getting some chromatic abberation around the red circle (why?). Second approach, using Gradient Maps: https://drive.google.com/file/d/1AwJtaEAy58O-O0ZWMno89S0sLIc1xbpC/view?usp=sharing The problem here is that I have to hit the same shade of red of the original image at any specific value point, which means I'm recoloring the red circle unfortunately. Any other approaches I missed, and which I could learn? I'd greatly prefer a non-destructive way (compared to Photoshop's) and keep using Affinity Photo/Designer (as always), so I'd be thankful for any help! Affinity Photo's Color Replacement Brush doesn't seem to work at all, it will try to do this: https://drive.google.com/file/d/101TrlMsApn2OfKwgkvKsM1bTs8M9-eEk/view?usp=sharing
 -
 Hi everyone, I'm having a hard time wrapping my head around the idea of soft proofing, or, rather, I feel like I'm missing some obscure nuance on it. I've read all of Affinity Photo's help files and watched all its videos AND spent hours bouncing around the web trying to come to grips with the subject. But here's the thing: as near as I can determine, soft proofing is always presented as something that you do after having processed the photo to what you want it to look like. So, by definition you're telling yourself, "all right! That's what I want my print to look like. Let's soft proof it... uuuhh, no, that's not it". Should this not be the other way around? That is, if your goal is to print a photo, shouldn't the very first adjustment layer be the soft proof adjustment layer, with the pertinent icc file and rendering intent chosen, and THEN you do all your other adjustments on top of that to get the photo how you want it to look? Also, let's say that you can do things in that order; when I'm done with all the other various adjustments, should i still deactivate the soft proof layer before sending the photo to the printer? I thank you all in advance for any light that you can shed on this subject. Happy post-processing to all!
 -
 In this short tutorial of a user request, I'll show you how to create an incision/ cut info graphic in Affinity Designer 1.6.1 and how to use it in Affinity Photo 1.6.7 as an image brush or as a vector graphic with the place function. Keep on drawin' Norbert
-
Decided to start a small topic with some work done by using Affinity Photo, as I recently fully switched from the competitors to Affinity Below I provide links to showcased images, just in case a full resolution wants to be seen: https://500px.com/photo/260934937/sunset-by-marcin https://500px.com/photo/224419259/galactic-center-by-marcin
-
Hello everyone! Today I gave another try to Affinity Photo. There has been some updates.. Shortcuts still does not work properly.. ok. let's wait. A basic function we use everyday in PS is the level layer. We use the clipping (in PS, pressing alt on Mac) to precisely set the value for each channel. It does not seem to work on Affinity.. Also you can not change channel using cmd-2, cmd-3.. like on PS. Any chance it will be implemented ? Regarda
-
Hi, Grouping layers while recording macro is not possible. Macros should allow to use all basic functions. Could you please solve it. Best regards, Greg
-
 I have a similar question in AP, my workflow likes these.. 1- open (or new from clipboard) 2- changes to CMYK mode 3- resizes the image to 300dpi I record the above steps as a Macro to apply on the other images as step 1, but the results are distorted, may be all follow the original width & height within the marco any way to make a "flexible" macro to acquire the result? thanks (split by mod)
 -
 The title says it all. We need a DAM and processing options far more advanced than currently offered. I'm a working photographer, I'm loving Affinity Photos capabilities but I hate the RAW processing and the lack of a DAM. I've had to concede and have gone back to Lightroom and Bridge as Affinity Photo just dosen't allow me to work as I need to. All my editing is done in Affinity photo but not RAW processing or sorting files. Please Serif sort it out for us working guys.
 -
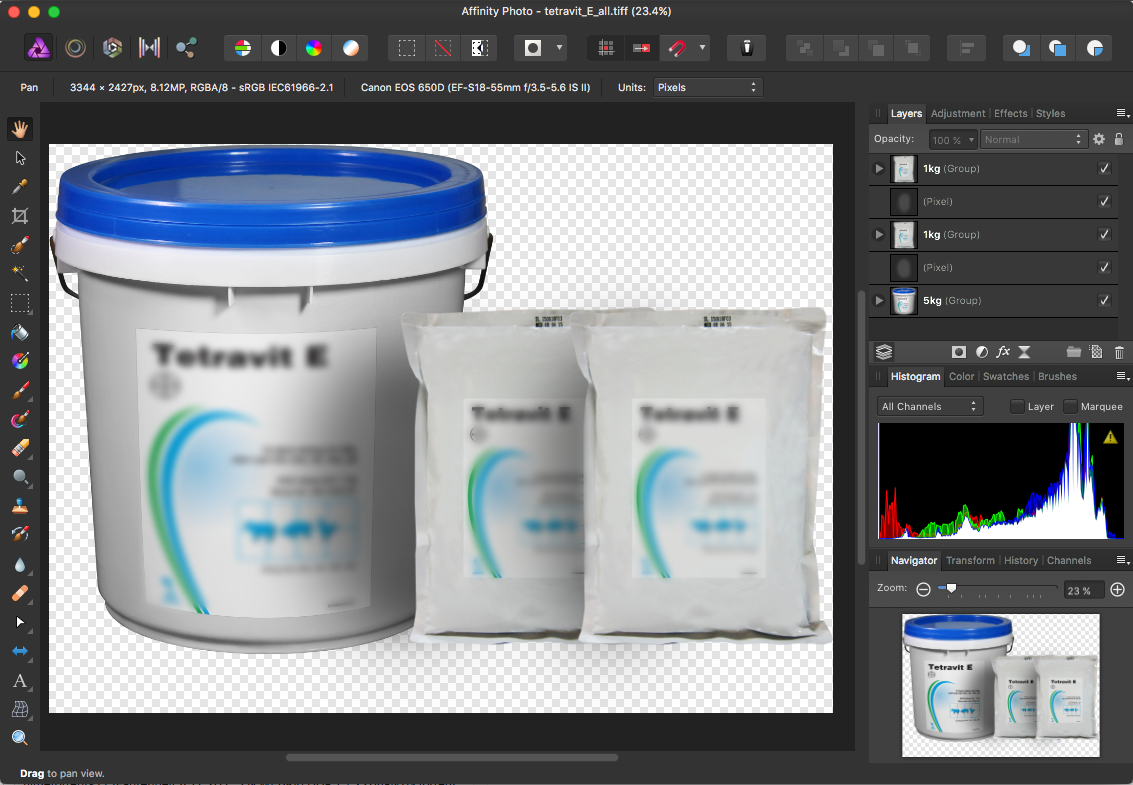
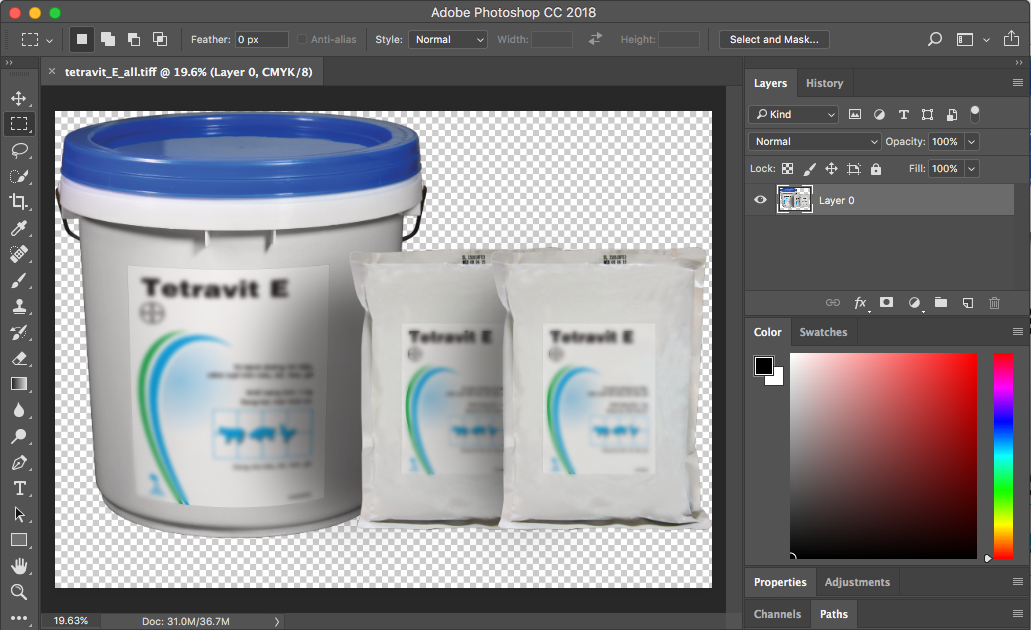
 I had a issue when exporting TIFF file with multiple layers in Affinity Photo. After exporting, the tiff file has multiple layers in Affinity Photo, but only one layer in photoshop at the same one (attached photos). My customer complained me about issue because they edited tiff file with photoshop. There were somethings wrong from me?