Search the Community
Showing results for tags 'Affinity photo'.
-
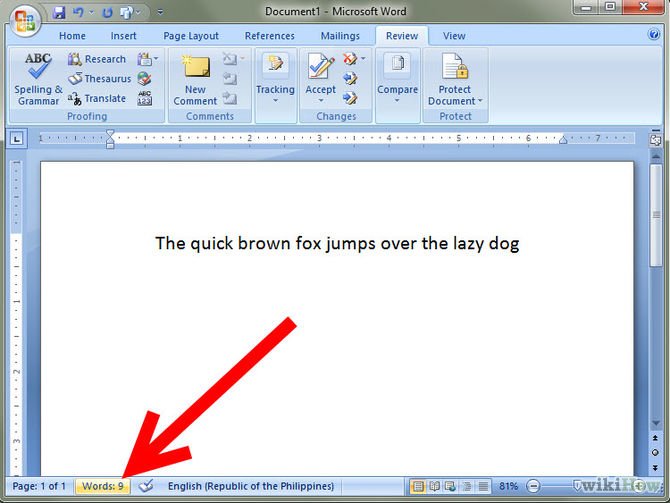
It would be neat if we can implement a word count feature, similar to what Microsoft Word has, here's a photo demo of what I was talking about.

- 13 replies
-
- 3
-

-
- affinity suite
- affinity designer
- (and 2 more)
-
 Hi, I am an occasional user of Affinity Photo. This time when I thried to create a new document to do some image combining, I could not get a response other than system sound. This is what I did . File New and I get nothing. All clues to what I am doing wrong or what the issue is?
 -
 Hello there, I created brushes i need to work and use on Affinity Photo like i used to have in Photoshop, im making a move to using Serif's software using my ipad... Though my brush were functioning well as i have watch some tutorials but seems i cant find other videos wherein the apply these strokes using the pen tool... So how to use my custom brushes to apply them as a Stroke using them on as the lines to stroke my pen tool curves?
 -
 Hi! I would like to ask how to prevent Affinity Photo from resetting it's toolbars each and every time I'm opening the software? It also resets it's location on my monitors to it's default, but that's what least concerns me. I'm running the latest version on Windows 10 and I'm also logged in to my account. Thanks!
 -
 Someone can help? I'd really appreciate! Photoshop: select all layers to be aligned Edit / Auto-Align-Layers Affinity Photo: select all layers to be aligned nothing found... 🤔 Cheers, Roland
 -
 I used the pen tool to make a shape and then converted it to a selection and painted within it inside Affinity photo. I did not save the selection but deselected it. I see there is a layer called "curve" with my shape in there - Is there a way to re-select it and make it a live selection again? I know I can save the selection - but I'm curious the value of the curve layer versus the value of saving selections and having to re-open them. What can be done in general with that curve layer? I see that I could add a pixel sub-layer underneath it and when i paint, it's contained to that shape, but I can't see the containing shape until I paint near the edge... Can anyone point me in the right direction? thanks!
-
Hello. I was working with a document in AFDesigner before the last update. There I used line spaced text like "16.5 pt", with decimal values. Today I updated to version 1.9.2 and it is impossible to work with text and line spacing as before. All decimal values (16,5 for example) are transformed into larger numbers automatically (in this case 165). I have the same issue in AFPhoto qith 1.9.2, but not in AFPublisher with 1.9.1 How can it be solved? I attach an example video. problem with line spacing.mov Thank you.
-
 Hi guys, some of you might be wondering if there's a skew or distort feature in Affinity Photo. So in this video, I will show you how to use and where you can find Skew, Distort, & Perspective feature in Affinity Photo. I hope you enjoy watching this video, thank you!
- 2 replies
-
- 2
-
-
- affinity photo
- tutorials
- (and 5 more)
-
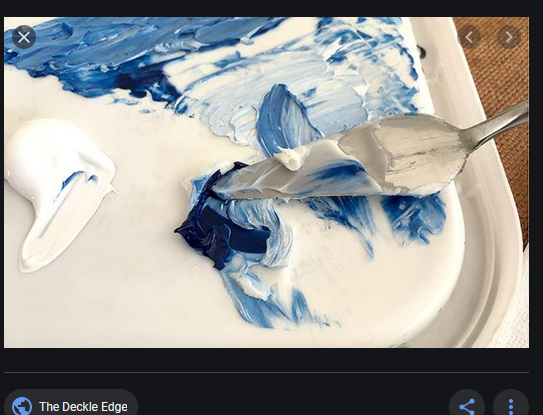
 Frosted Glass with Affinity Photo I saw an Adobe Photoshop tutorial similar to this, so I thought I would try it in Affinity Photo. It is a frosted glass look. https://youtu.be/411eLqLJXA8
-
 Please give me a hint. How to make a REAL crop in Affinity Photo? AP remembers all of the original canvas, which is super annoying . Many effects (maybe even all of them) are rendered from the original entire canvas, not the crop area. For example: this is the case with the mirror effect. It is centred but relative to the centre before the crop (of course we can move the kaleidoscope point). To render the reflection, graphic areas are used that are no longer present on the canvas !!! PhotoPlus started with the idea of remembering the original canvas, there was an option to uncheck it. It should be similar in AP, I have no idea where?
 -
Here's my first image post. I started this one in Designer with a pencil sketch in the Pixel persona. Then I created the "ink" lines with the pen tool in the Designer persona. I tweaked the ink line stroke profiles in the stroke studio and finished the art in Photo.
-
"After a long and bloody battle over the main capital, the female barbarian Helga ascends her throne as ruler over the kingdom. All shall tremble before her iron rule!" Got inspired to make this piece after helping someone with anatomy. Was a lot of work to transform the original sketch into this, but I feel pretty satisfied with how it turned out. https://www.artstation.com/artwork/3dYBlE
-
 I was going through various videos and articles on sharpening to understand it better. One unwanted by-product is halos and there are various ways to remove it. Also, some methods produce harsher areas in the brighter part. Found this video interesting but it is for photoshop. I was wondering how to use it for AP. Only two points are to be mapped for affinity photo. One is Surface blur and another is the Offset and Scale inside the PS Apply-Image dialog box. For the surface blur, AP equivalent is Bilateral blur. For the other two, I did some trials and found as below. In the video, there are two layers - High and Low. High layer is the target and Low layer is the source as far as Apply image command is concerned. Then offset is 128 and scale is 2. To get the same result in AP Apply Image command under Filters, we have to first select the High layer. Then from filters, click Apply image. Then click+drag the Low layer and bring it into the apply image dialog box. Now the equations box will get enabled. click it. Now enter to make like this . DR=((DR-SR)/2)+0.5 DG=((DG-SG)/2)+0.5 DB=((DB-SB)/2)+0.5 Blend mode is NORMAL and not SUBTRACT. Click Apply. Now the result is same as that of PS, in the video. The bracketed step shown in the next line which de-saturates is not a must I think but some videos recommend it. (To the High layer, clip a HSL adjustment layer . In the HSL, move the saturation slider to extreme left (-100%). This is to remove color info from the High layer. Merge the HSL layer with the High layer.) From here, the video can be followed as it is same for AP or PS. Incidentally, the above method is also used for frequency separation in many PS videos with the difference of using gaussian blur instead of surface blur. Here also, the same equations can be applied. (De-saturation step is never done in frequency separation). Since there is a frequency separation filter available in AP , manual method is not required unless one is experimenting or learning. I tried various advanced sharpening methods and found this PS video to produce very good results. With the above workaround, the video can be applied to AP also. If any expert or others on AP equations note any mistakes in the above formula or method, please step in and correct because I do not want anyone to follow wrong methods as I am not an expert in advanced methods of AP.
 -
 Hello. I love "Impasto". Can I use "Impasto" technique in affinity Photo? Thank you so much.
-
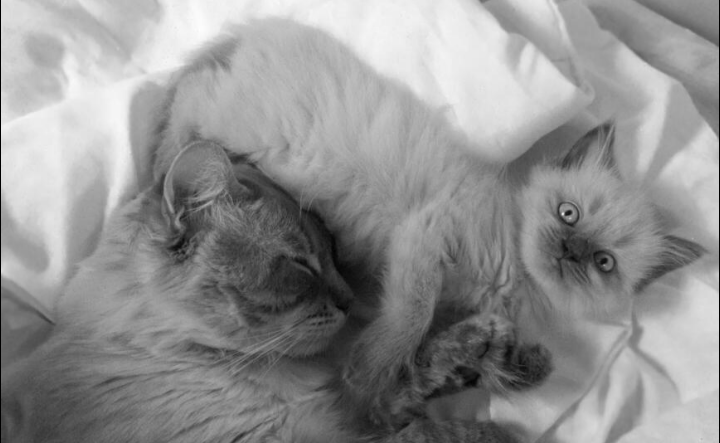
This is my first attempt at a black and white image, these are 2 of my cats. Thoughts and feedback much appreciated!
-
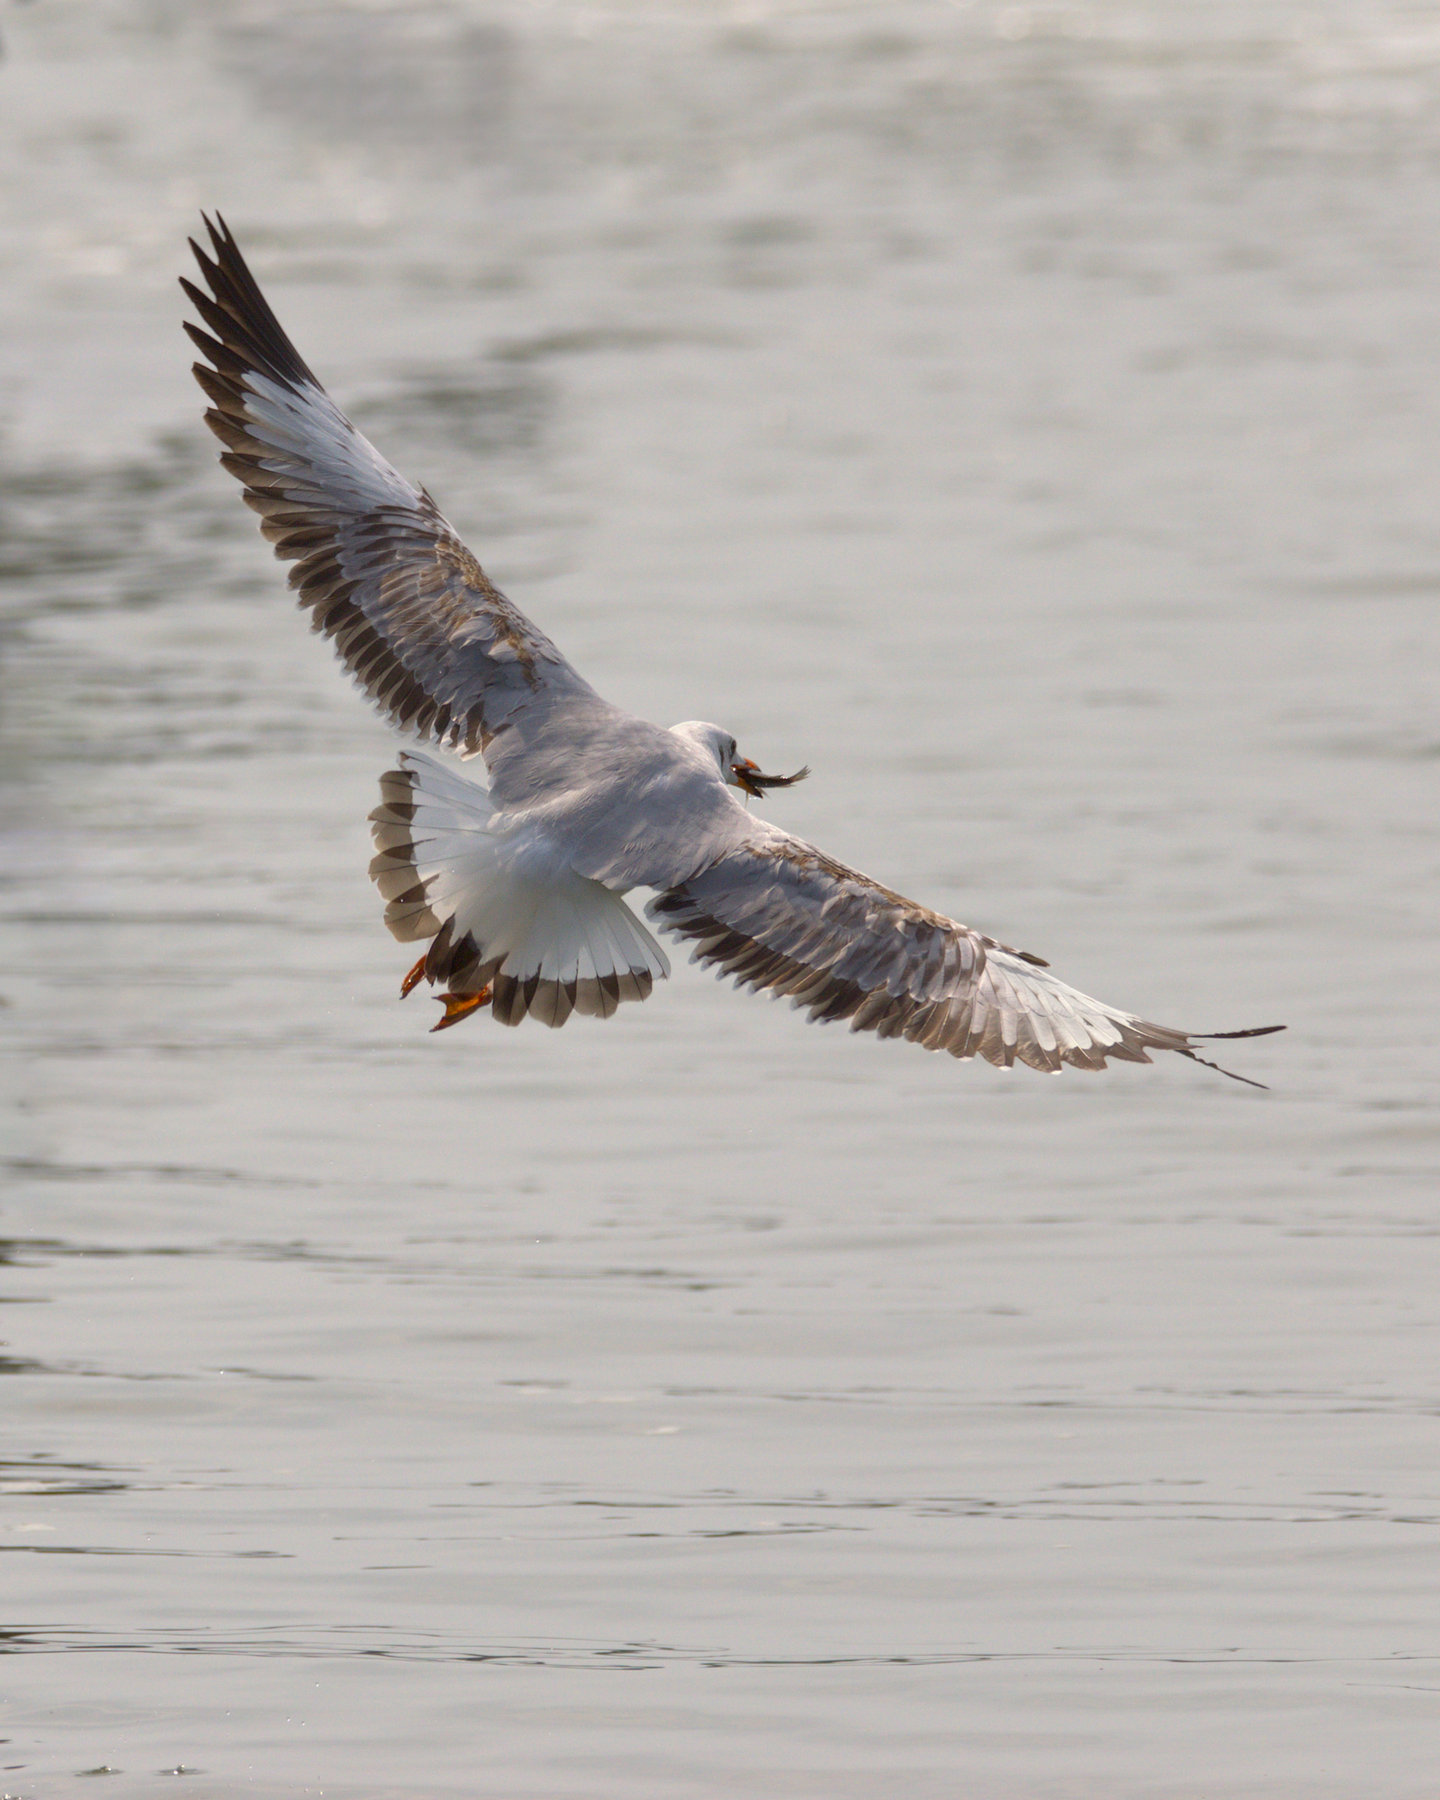
Original and LAB colour space processed image. Converted image to LAB space, added Curves adjustment layer, improved contrast using the L curve, applied slight unsharp mask to L channel, moved A and B curves by equal amounts of 0.25 at both ends (left point to 0.25 and right point to 0.75) Applied Filters>noise>dust and scratches at 1.7 radius only to A and B channels. The above made image sharper, less prominent colours deeper and removed little bit of colour noise that was present. Based on details from one of the best authors on LAB colour space : Dan Margulis First image is LAB processed image and second is original
-
My first creation using my new XP-Pen Artist 13.3 Pro. Very pleased with this piece of kit and impressed at how must it speeds up the whole process. Not sure how to deal with all these fine brush strokes though? Already caused the program to lock up once last night and file size heading towards 100MB? There must be a way to flatten or something? I tried adding all the brushes in each layer together into one layer, but that ended up increasing the file size and running a bit slow..
-
Double Click #26 of Affinity Photo Powerful Tools. Using double click makes it easier and saves you time. This is an Affinity Photo beginner tutorial and number 26 of the Digitally Fearless Power tools of Affinity Photo playlist. https://youtu.be/chftxH7U7To
-
- 1
-
-
- double-click
- groups
- (and 2 more)
-
With Photo, turned the image of a perfectly lovely adult wooden elephant into a baby, deleted some happy children, repaired his trunk, gave him a curved top of his head, and lost him in a tangle of undergrowth, thanks to @StuartRc's "Shy" assets, @firstdefence's "Light Rays by Dex", some swipes with one of the new Luminance brushes, some tricky(?) use of the Liquify Persona to create the grooves on a new front left leg, and some utterly failed attempts to delete the horizontal lines on the legs. By the time the border was in my sights, I had sundry layers sliding all over the place -- grouped or not -- so I left the black border superimposed with the grouped layers. (Picasso, or somebody else.) Anyway, it just goes to show that although somebody (me) without a smidge of artistic talent can learn to do all sorts of awful things with genius software, the genius software cannot make somebody an artist. I hope the talented people who created these extraordinary elephants pictured in today's "Times" won't mind.
-
 My trial is ending soon, and a I received an email offering a special price to purchase. However when I click through to the website the prices shown are higher than what was advertised on the email. I replied to the email but have not heard from anyone. Where can I get help on this please? I'm ready to purchase at the emailed price, as it would allow me to get Affinity Photo as well as Affinity Designer, which would be so awesome for me! I would love to be contacted by support staff to rectify this... hoping there is such a thing as this seems like great software. Thanks
 -
 After making a selection, I lose all graphical histogram representation in the curves tool. To recreate issue: Open file Make adjustment using Curves (histogram is shown) Create a selection (histogram disappears in Curves adjustment tool. Delete selection and problem still exists Delete previous Curves adjustment and problem still exists. Nothing I do, will bring back the original graphical representation on the Curves tool. This is happening on the current release (1.9.2.1035) as well as the beta (1.9.4.1065) OS Name Microsoft Windows 10 Home Version 10.0.19042 Build 19042 System Manufacturer LENOVO System Model 81Y6 System Type x64-based PC System SKU LENOVO_MT_81Y6_BU_idea_FM_Legion 5 15IMH05H Processor Intel(R) Core(TM) i7-10750H CPU @ 2.60GHz, 2592 Mhz, 6 Core(s), 12 Logical Processor(s) BIOS Version/Date LENOVO EFCN46WW, 12/4/2020 Installed Physical Memory (RAM) 16.0 GB Total Physical Memory 15.9 GB Available Physical Memory 9.47 GB Total Virtual Memory 21.4 GB DirectX version: 12.0 GPU processor: NVIDIA GeForce GTX 1660 Ti Driver version: 466.11 Driver Type: DCH Direct3D feature level: 12_1 CUDA Cores: 1536 Core clock: 1590 MHz Memory data rate: 12.00 Gbps Memory interface: 192-bit Memory bandwidth: 288.05 GB/s Total available graphics memory: 14269 MB Dedicated video memory: 6144 MB GDDR6 System video memory: 0 MB Shared system memory: 8125 MB Video BIOS version: 90.16.4A.00.78 Affinity Photo - Curves Bug.mp4
 -
Hi guys, in this video, I'm gonna show you how you can create your own light effect and apply it to your photo to make it looks more dramatic. I hope you enjoy and learn something new from this video, thank you!
-
- 2
-
-
- affinity photo
- tutorials
- (and 4 more)
-
 Affinity Photo 2021-05-27 22-18-22.mp4 I'm trying to blur the the with motion blur. It seems to be pulling pixels through my selection, which I do not want. I've tried various refine edge, but to no effect. Can someone with some experience, if possible, please help with a solution? I've attached two video screen shots for you to see what I mean. Affinity Photo 2021-05-27 22-34-23.mp4 Affinity Photo 2021-05-27 22-18-22.mp4 Affinity Photo 2021-05-27 22-18-22.mp4 Affinity Photo 2021-05-27 22-18-22.mp4 Affinity Photo 2021-05-27 22-34-23.mp4


.png.ab931ba2a37b157a9d11c409cf723f38.png)