Search the Community
Showing results for tags 'Affinity photo'.
-
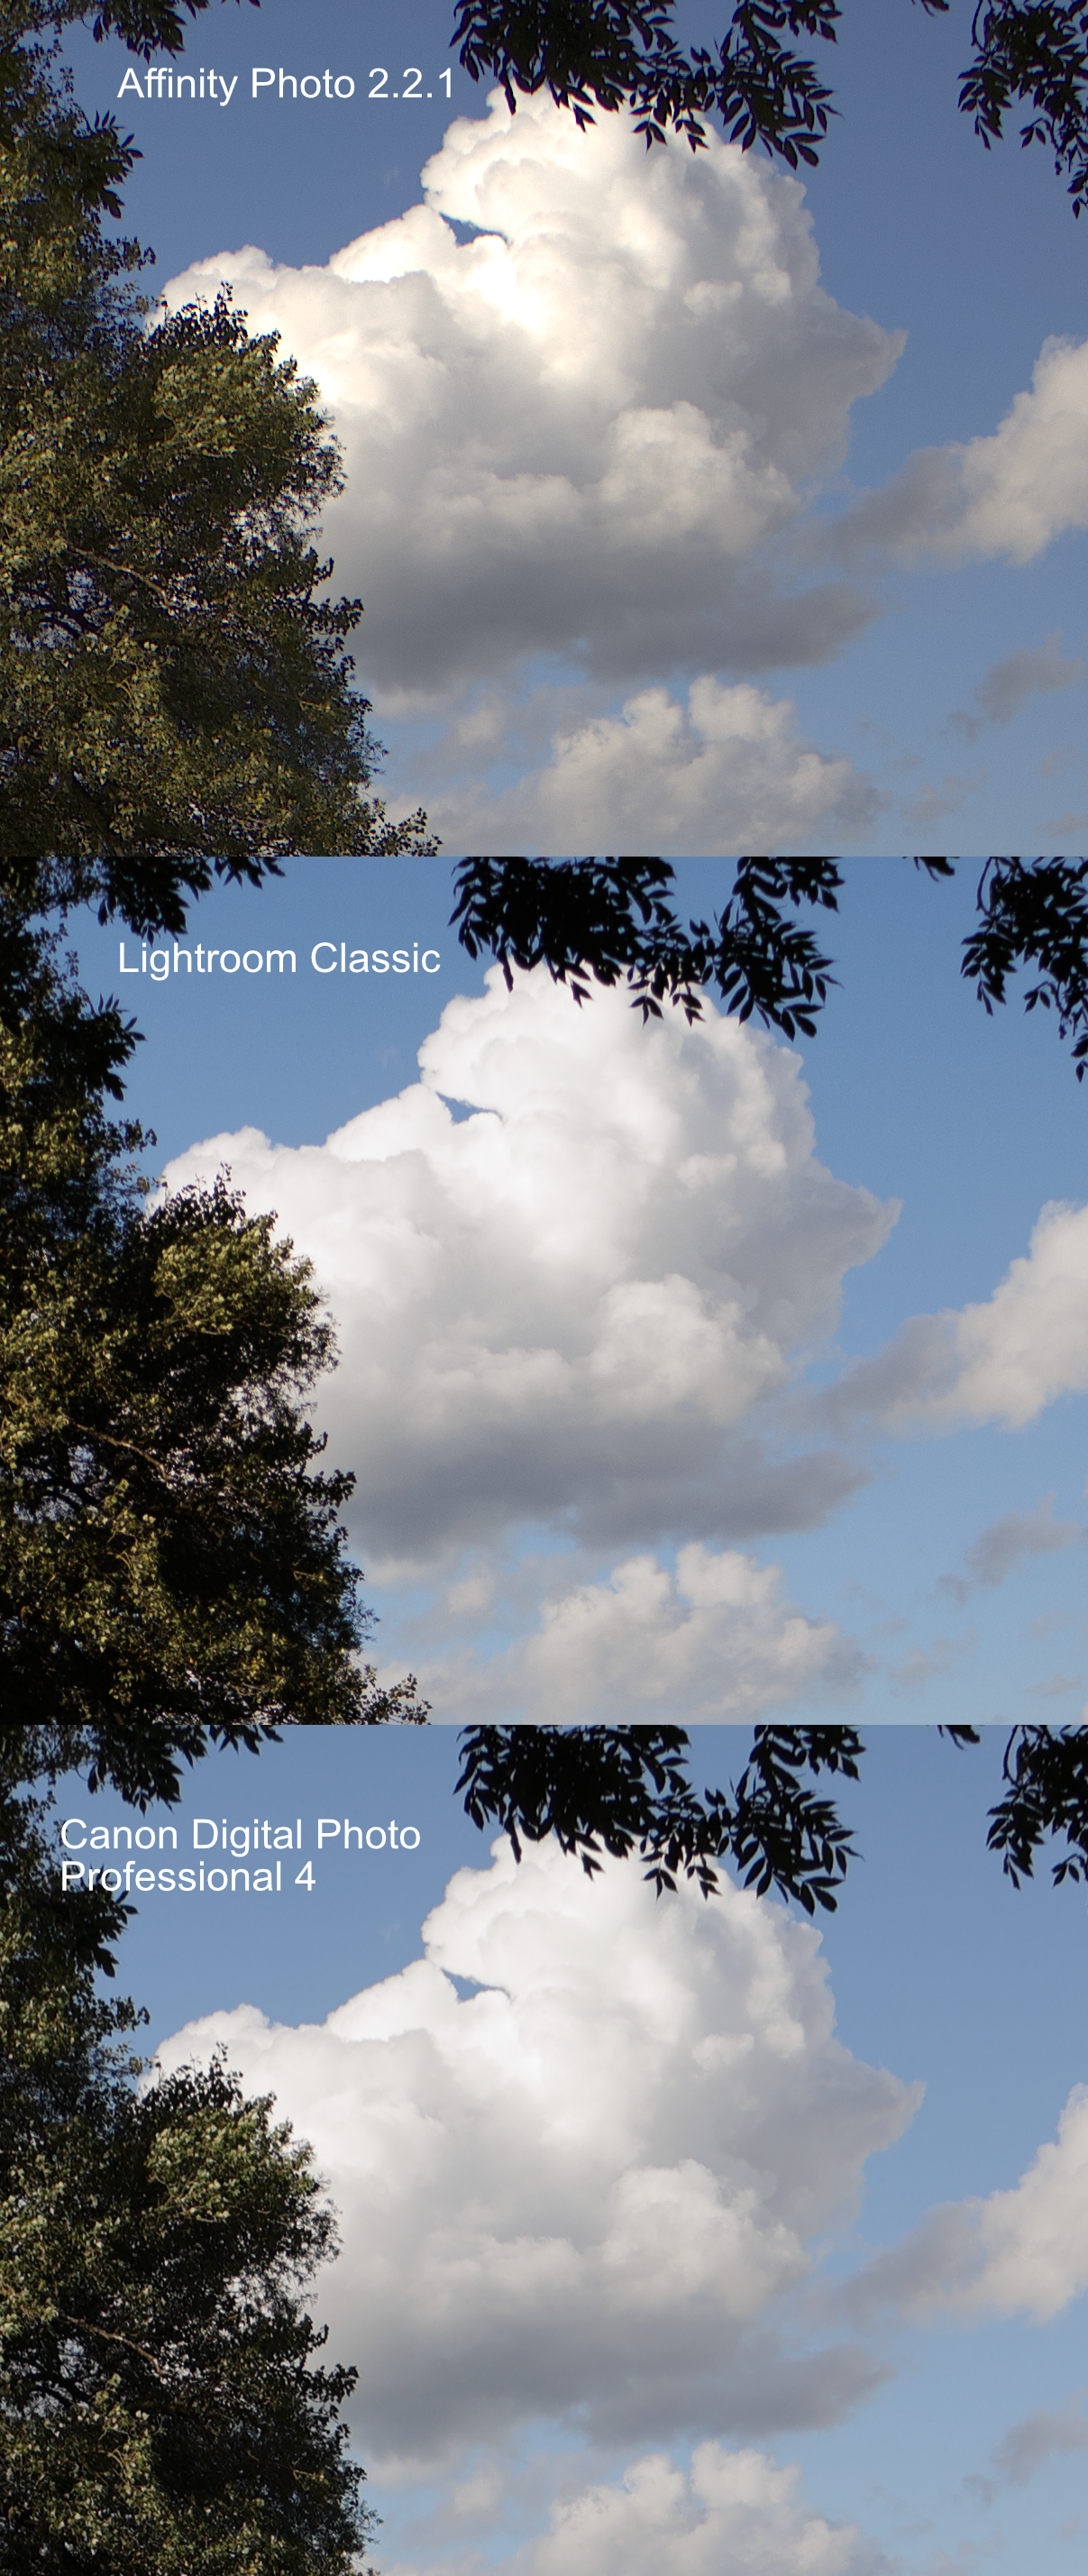
 Hi, I wanted to edit this raw photo (See attachement) in Affinity Photo, when i noticed that these clouds looked quite ugly. Their highlight falloff is steep and the colours shift towards orange. I tried various adjustments in the "Develop" persona (Exposure, highlights/shadows, tone curves), but i did not manage to get rid of it. Because i wanted to make sure it was not an issue with the raw file itself, i opened in two other tools, Lightroom Classic and Canon's free, in-house raw developer, Digital Photo professional 4. The two other tools handle this case visibly better. Why is that? And how can i get the same results in Affinity Photo? IMG_0426.CR3
-
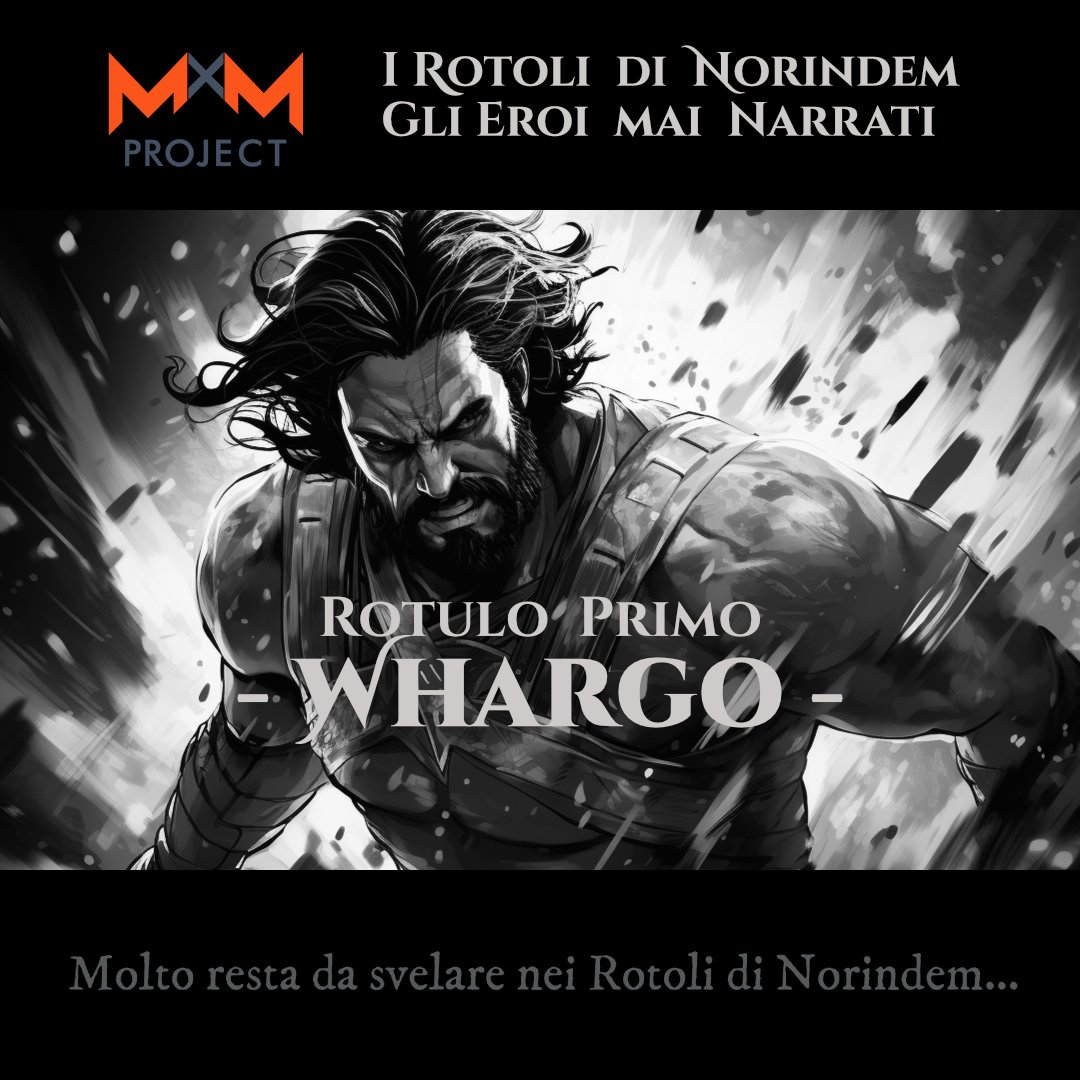
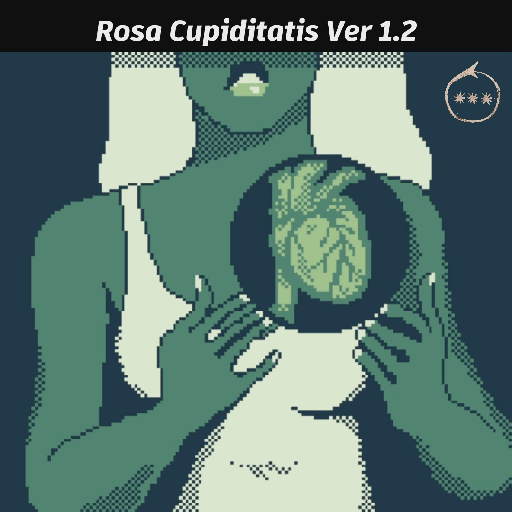
Hi everyone, I'm proud to share this dark fantasy novel made with AI images and reworked with Affinity Photo. I hope you enjoy the work. https://youtu.be/YUIBjkCj7HU?si=rugHqdLLfi7Xnnhz link to youtube from image too Let me know your impression!
- 1 reply
-
- 1
-

-
- norindem
- dark fantasy novel
- (and 1 more)
-
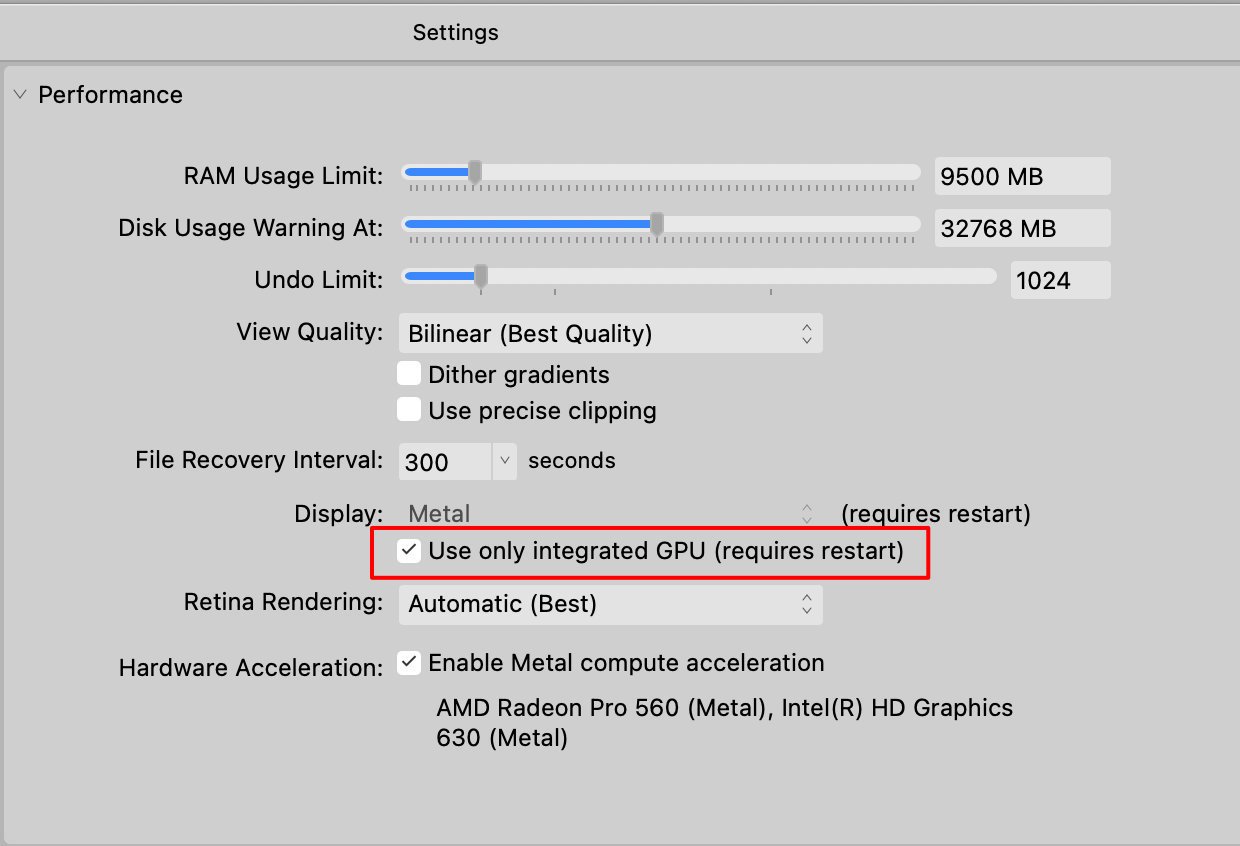
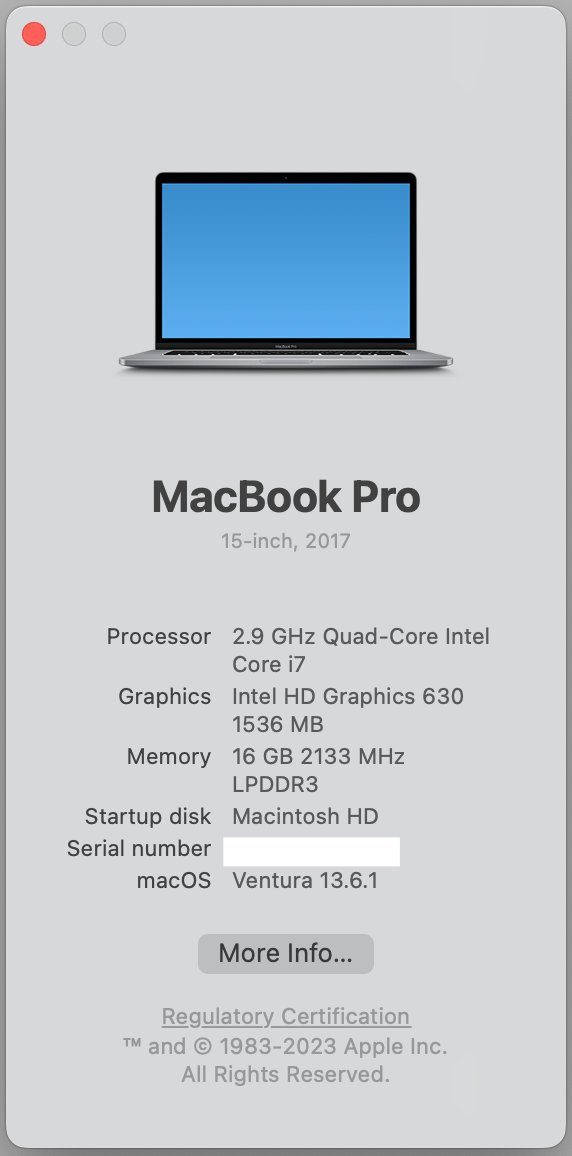
 I found some settings that have improved performance on my MacBook Pro, so I thought I'd share them in case it may be of help to someone else. I know computer configurations vary a lot, but it may be worth a try. This is with Affinity Photo v2.2.1. I have a 15 inch, 2017 MacBookPro, 16GB RAM, an Intel HD Graphics 630 with 1536 MB Metal 3, and an AMD Radeon Pro 560 with 4GB Metal 3, running Ventura 13.6.1. It is not a particularly fast or powerful machine, but it worked fine for quite a while. I'm not sure when I started having problems (sorry), but I think it may have started with v2.2. Performance has gradually gotten slower as the day progresses. Memory Pressure started out very low when the program first opened (single digits), but as I edited and closed more files during the day, Memory Pressure crept higher and performance began to suffer badly. Memory Pressure gradually climbed higher than 100% at times, and Memory Efficiency plummeted at the same time. Performance got so bad, I was forced to close the program and restart it multiple times per day if I wanted reasonable performance. At least on my computer, I found the setting that "seemed" to be causing much or all of the slowdown. The key on my system is to "Use Only Integrated GPU" for Display", as highlighted in Red in the attached screenshot. I'm still Enabling Metal Compute Acceleration, which uses both GPUs for computation. My RAM Usage Limit is set to 9500 MB, which is more than half of installed RAM of 16 GB, and higher than I've seen recommended in a few posts, but it seems to be working fine and performance is good now. As the day progresses, I no longer see slowdowns which cause me to restart Affinity Photo, and Memory Pressure stays well below 100%. Hope it helps somebody out there who has similar performance issues.
-
I have made 10 free tone mapping presets. I have not seen any tone mapping presets for affinity photo so I made some for anybody who might want them. Of course they will not all work with every photo like all presets but I hope someone finds them useful : ) To upload them just click on the zip. file, then in the tone mapping persona on the presets menu; click "Import Presets", Enjoy! Thanks! Hanan Edwards Presets.zip
- 68 replies
-
- 42
-

-

-
- free
- affinity photo
- (and 1 more)
-
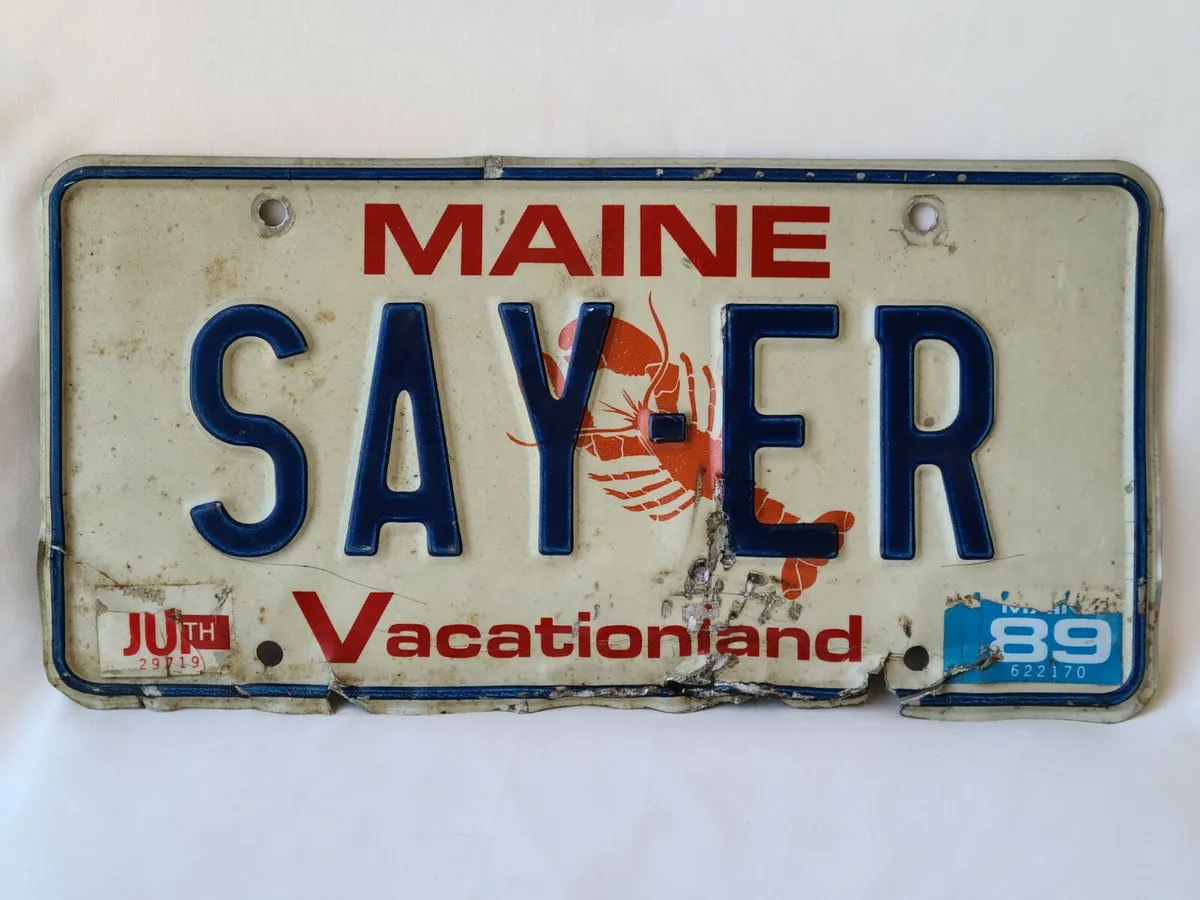
 Here is a different composite I started working on: Here is the base image: This is the base image of the ambulance used: This is the the image used to change the license plate to a vintage 1980s Maine one: I tried my best to match the look from the original movie:
-
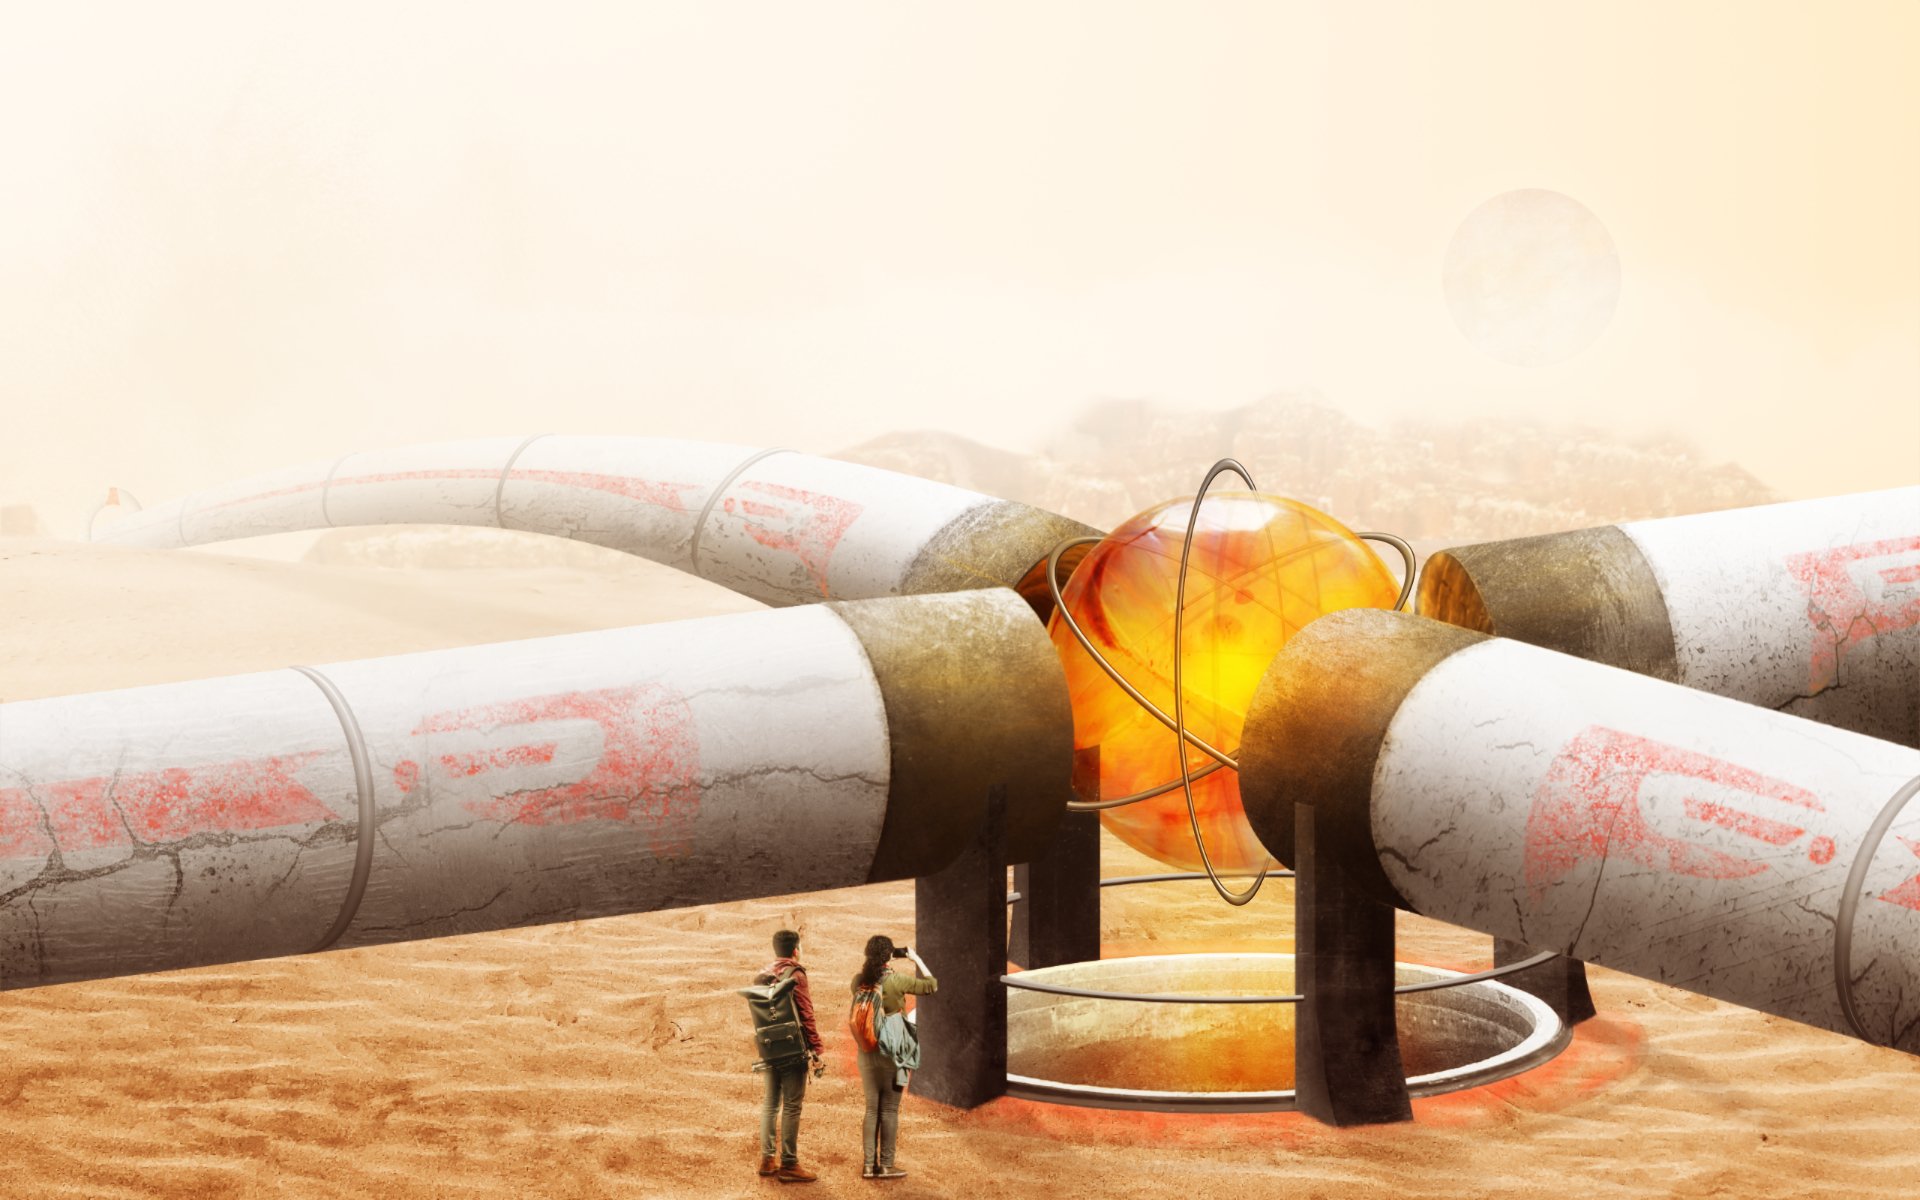
 .....Discovery by the research team of an energy sphere which they have coined, "The Power Marble." Apart from 4 base photographs, desert sands, distant rock structure, tourists, well hole, all concept designs created entirely within Affinity Photo using shapes and texture samples.
-
About The Box Set is hundreds of vector and raster brushes made for Affinity Photo & Designer. Each brush was handmade using real materials scanned at high resolutions and crafted to simulate real media. I wanted the origin of the brushes to have a heritage of the materials they are simulating. Scanning pools of watercolor, swatches of paint, and stipples of charcoal contributed to creating brushes with the same idiosyncratic material magic. My only request is that you take these brushes, with their clever names, as suggestions. They work superbly out of the box, but I strongly encourage you to adjust the sliders, rearrange or remove the textures, and discover how they can suit your hand(s). Make. Discover. Repeat. Cheers and happy art making, -Jef (WREN) RASTER BRUSHES For use in Affinity Photo and Designer. The blending brush in the Oil Set is the only one exclusive to Affinity Photo. DRAFTING INK OIL Oil Brush Dynamics Most oil brushes have blending built into pen pressure. With a single brush and hue you can adjust the luminosity of the stroke- giving it an oily blend. The Brush's color in the example above is the color of the background. A normal pressure gives you the hue without any lightening or darkening. WATERCOLOR ACRYLIC VECTOR BRUSHES For use with Affinity Designer Only. Pen & Ink Charcoal & Graphite Sumi-E Painterly Drips Handlettering LINKS The Box Set
- 209 replies
-
- 21
-
-
-
- affinity designer
- resources
- (and 4 more)
-
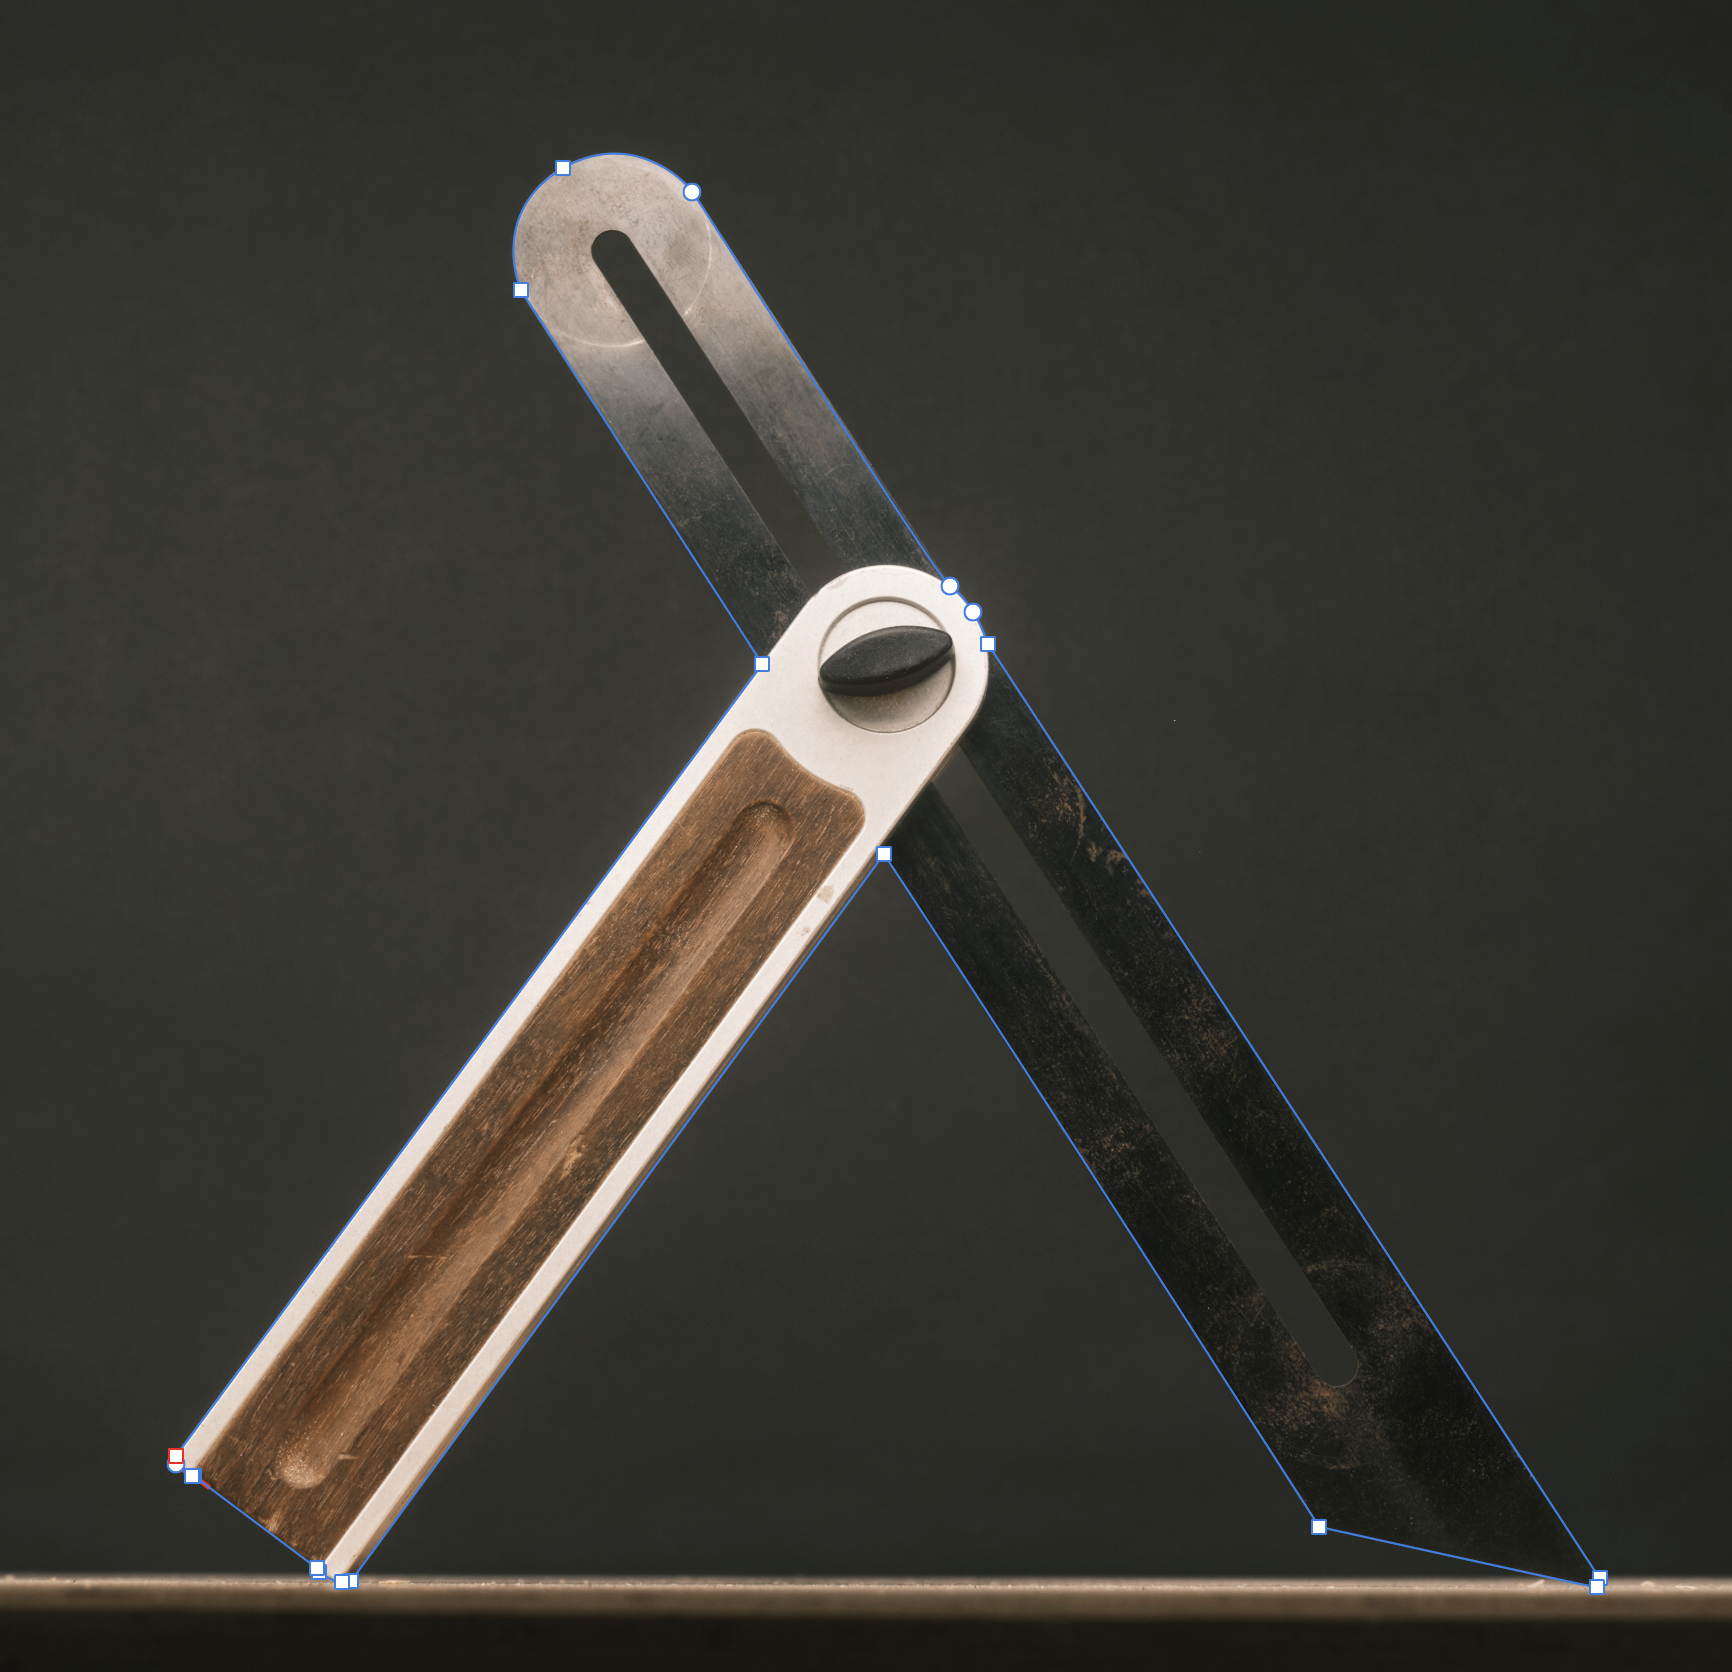
 I know it is possible to create a selection after I created a path around an object like so: Like this I have some tools to do, which might be not photographed for this purpose but also the automatic tools are not at all able to cretae a nearly perfect mask so I decided to do it old school but I cannot find the way to create a selection - as you may assume, yes finally I want to substract the thast long hole from the angle leg. Thanks in advance and Kind regards, Uwe
-
 After installing the last update of AP, I noticed that AP sometimes crashes while it is inactive for a while: AP was hidden or the AP window was minimized (I use Stage Manager) then. macOS 13.6 I attach the last genenerated crash report. I have a few more Affinity Photo 2 Affinity Store-2023-09-25-172356.ips
 -
 Hi, in this Affinity Photo Tutorial I show a typical situation. When you go on vacation, you want to have nice photos of it. You will often be disappointed with the result if the midday sun makes the whole photo look hazy and bland. In this tutorial I'll show some steps on how to improve these photos mit Affinity Photo V2. I wish you fun Ciao Jack
-
- 2
-
-
- affinity photo
- tutorial
- (and 4 more)
-
 What I'm thinking of is an alternative to the classic layers: a node editor, where each layer would now be a node, with a mask and before input, so that you can reuse layer groups. What I'm thinking of: Each node has inputs and outputs depending on the type (example blur: input=image, radius form=type, radius, output=image) Creating groups and naming them storing created groups as global templates (like macros, but as components that can be stored) adding custom inputs to groups with custom labels maybe sharing groups online? (like as a marketplace for quick templates) As an orientation for how it would work, I would like something like Blender 3Ds node editor. As for how it's integrated into the UI, either it's a separate editor that you need to toggle on/off on a per-project basis, or it's a layer (like a node layer or something) that then opens a UI
- 1 reply
-
- 1
-
-
- affinity photo
- affinity designer
- (and 7 more)
-
 Hi all, I've got a python warning telling me : "UserWarning: Palette images with Transparency expressed in bytes should be converted to RGBA images" when I use a png image with transparency in my routine. How can I convert (export ?) my png file in order to bypass that warning message ? Here is my source file : Here is the file I get with my routine : There is a problem, I lose my transparency (see green px)… Thanks for your help.
-
For this picture I had to completely replace the sky, which at first seemed unfeasible. Then I remembered a channel selection in this context. So I selected the blue channel (the main colour of the overcast sky), inverted it and cropped it with a mask. Selected a new sky and inserted it under the leaves layer. The rest was then just a matter of adjusting the tonality and colour.
-
I'm pretty new to Procedural Textures and need help creating a non-destructive version of Auto Contrast using a Procedural Texture filter. I want the filter to automatically set the white and black points in each channel to values that I specify, instead of just 0-255. I may want to leave a little headroom at the white and black ends for further editing. I'd like the use an Integer to set the Black value in RGB terms, e.g., 0, 5, 10, 15, etc. I'd also like to use an integer to set the White value in RGB terms, e.g., 255, 250, 245, etc. So, for example, I might choose to have the final Histogram adjusted so all 3 channels set to 10 R/G/B on the black end, and 245 R/G/B on the white end. Is there a way to do this? If so, can someone post the formulas I'd need to accomplish this? I couldn't figure out which formulas or functions to use. Thanks.
-
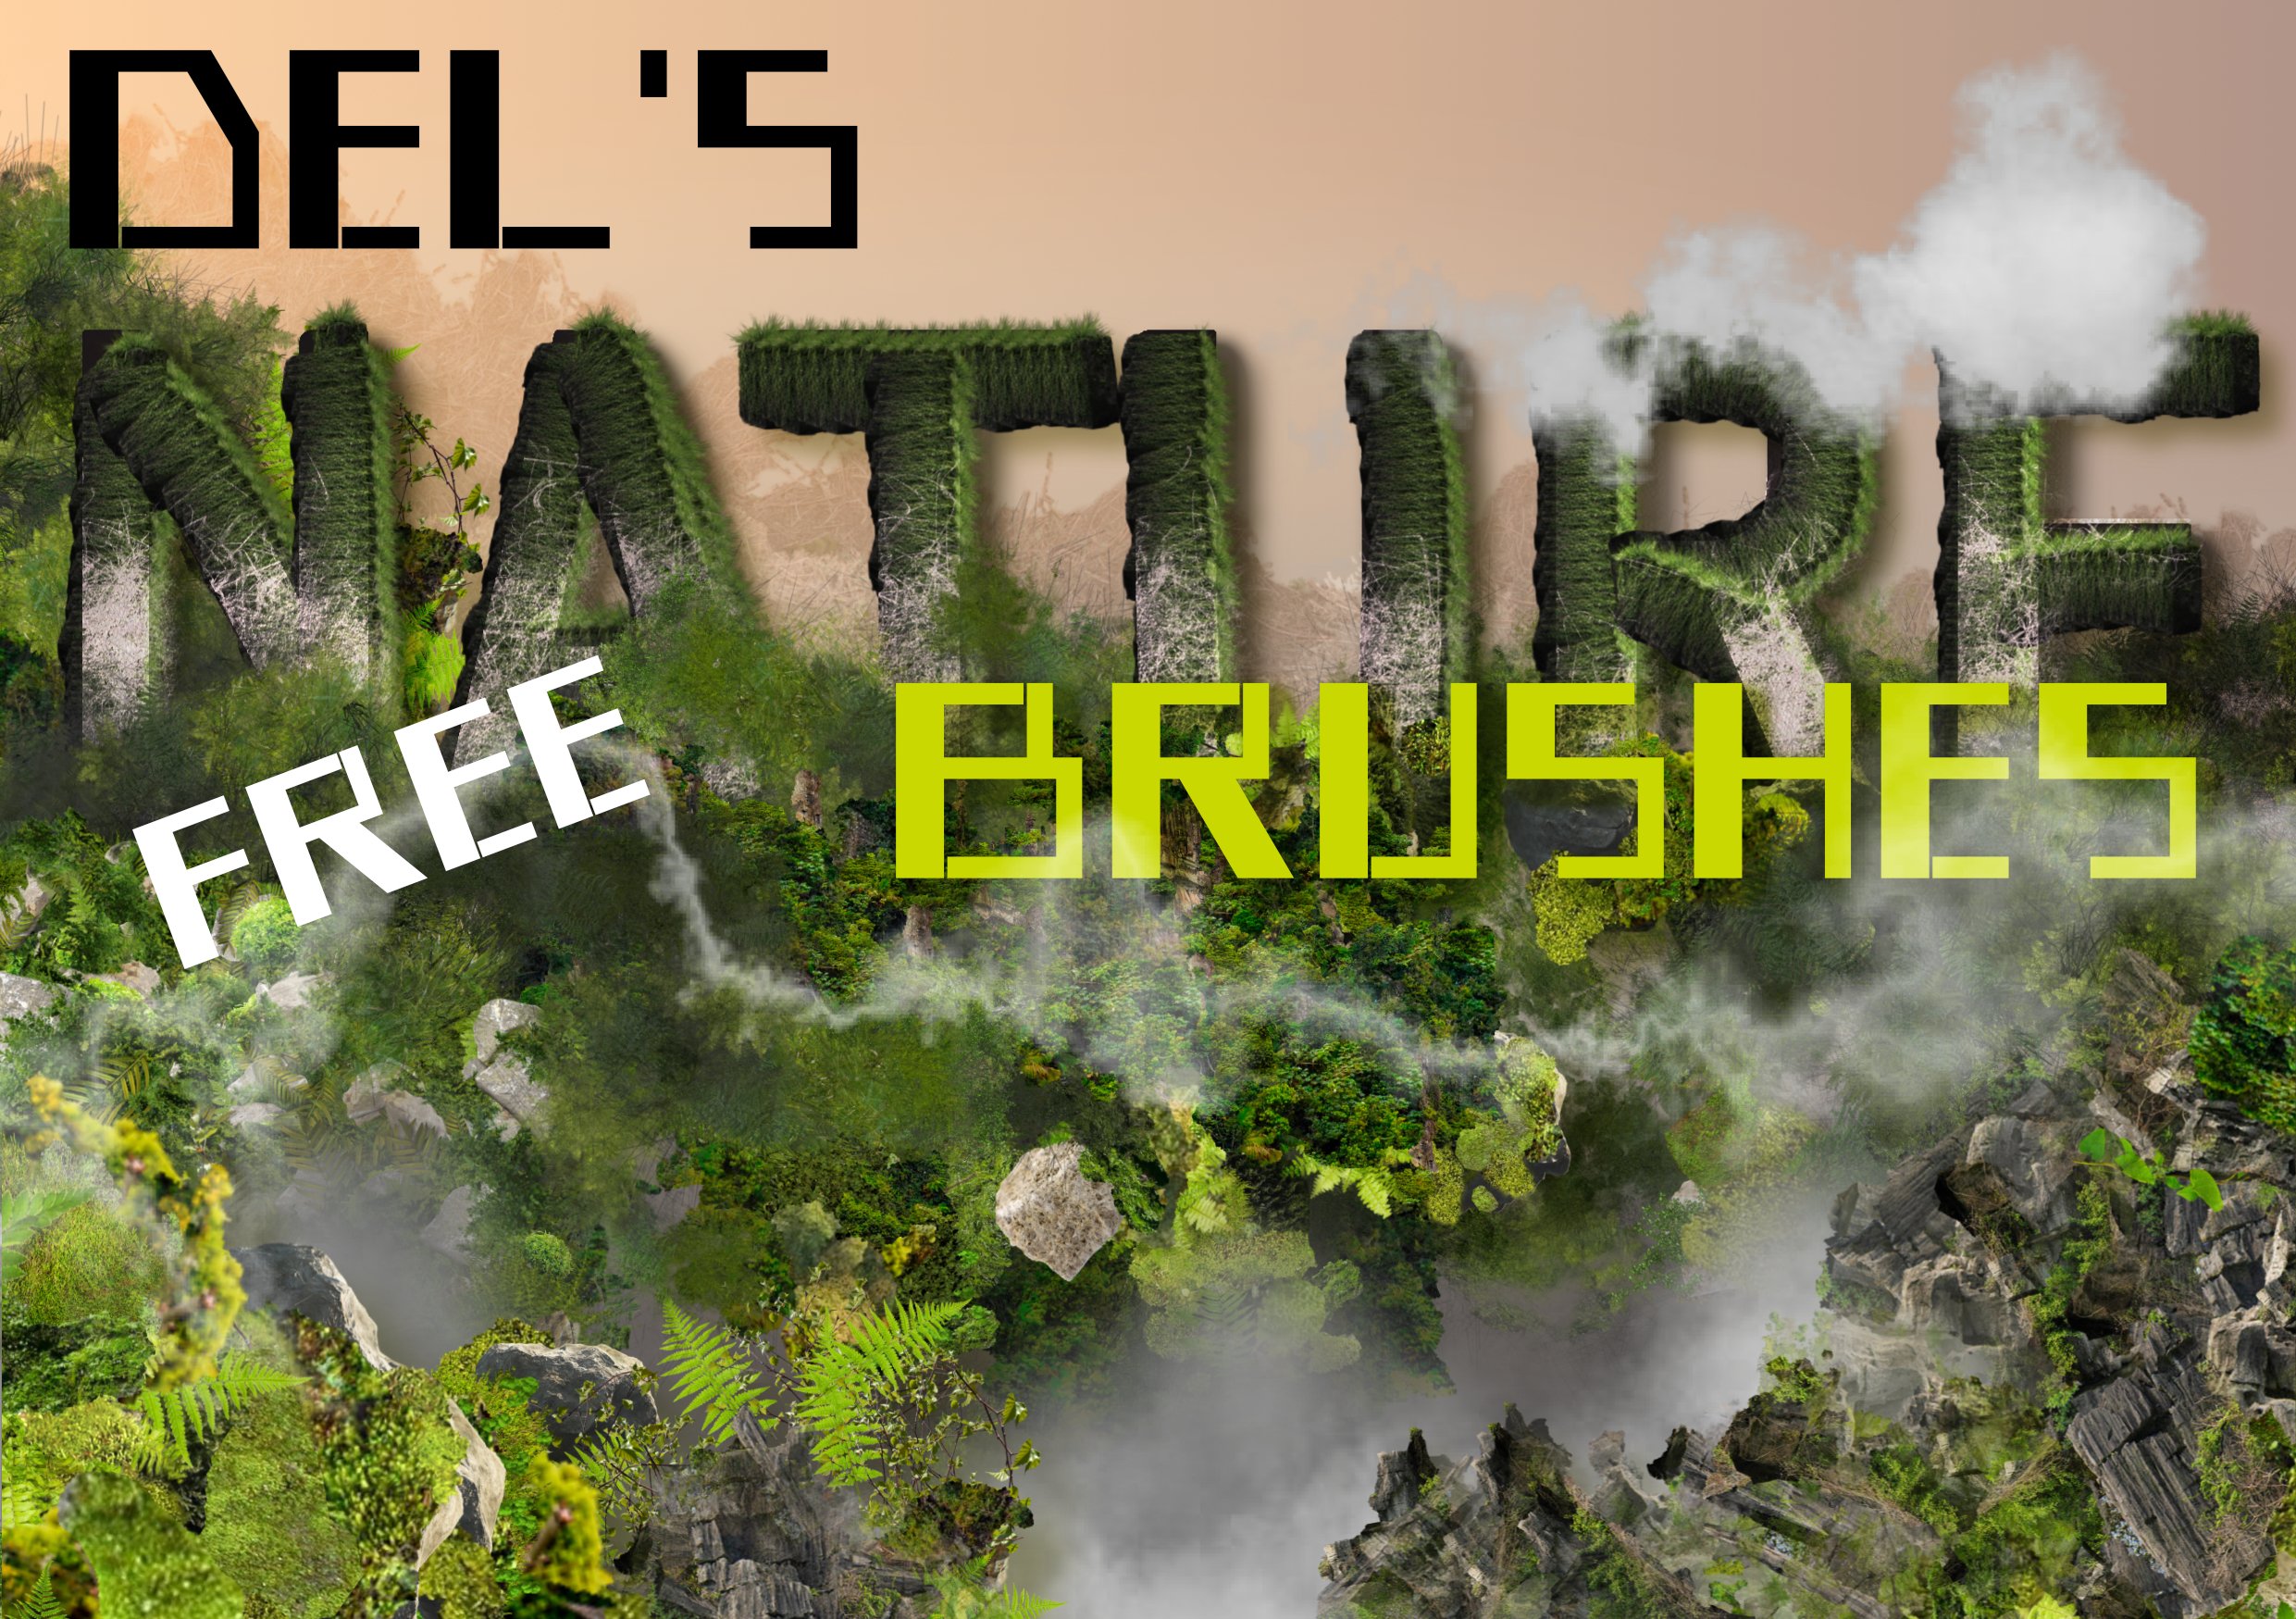
Just posting the link to my free 'Nature' brushes and 'Atmosphere, Mist and Fog' brushes. They are both split into two be cause they are quite large files. If you like them and use them, let me know and I will upload other brushes I use. Or better still, post artwork here that you have created using them (I'd love to see it!)
-
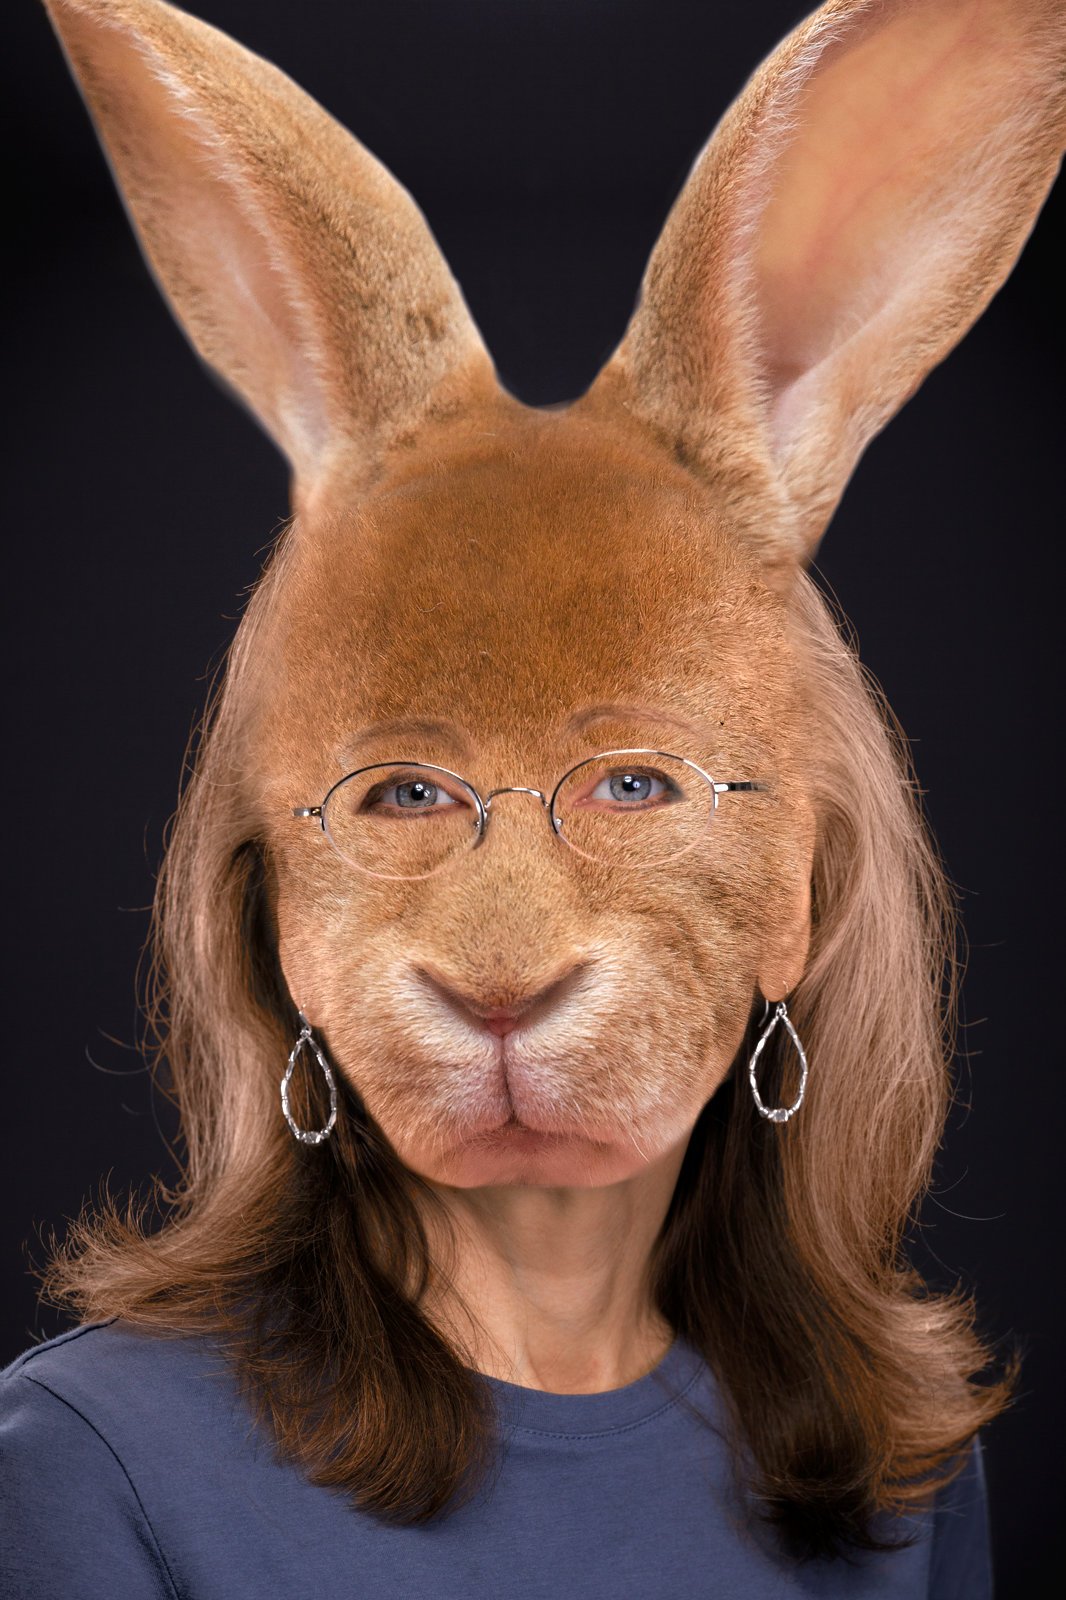
My wife is a RABBIT FANATIC. She even calls herself "RabbitMom". Over the years, she's begun to take on some of the attributes of her pets. Here's the proof!! 🤪
-
This, by rights, should've been picture 4 in the series, but due to a major computer malfunction I lost the version (3) I was working on. Hey-ho. # I don't trust technology.
-
- 3
-
-
- metra prime
- sci-fi
- (and 2 more)
-
Hello, Painted this in Affinity Photo.
-
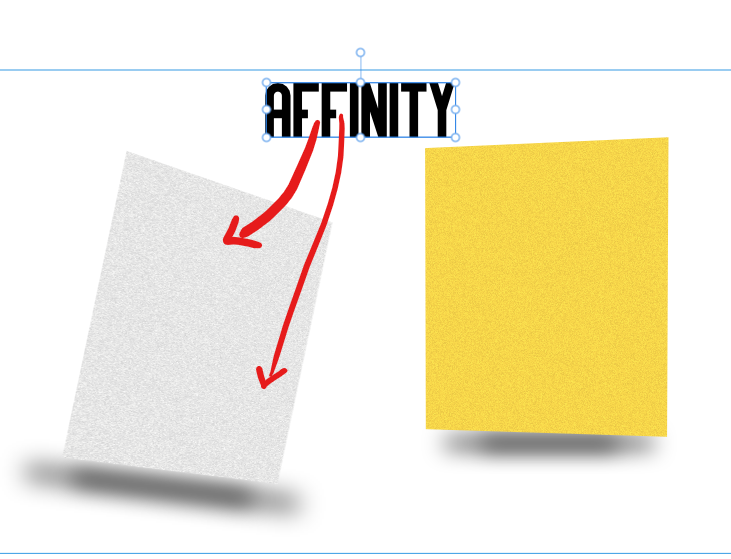
 Hi I'll start by saying I thought Hated Affinity Photo Cuz I tried AF-Designer, and it was A really Good Alternative to illustrator, but Photo was just not up to standard to PS.. That was A bad decision making on my part and I apologize to the affinity team even though you had no idea 🤣. I just want to say I still believe if you are coming from PS as a hardcore user don't switch, it'll be the worst experience of your life 🤣 at least if you think of this as a replacement or an alternative. I spent the last 3 months Using exclusively AF-Photo and AF-Designer for all my design needs and I have to say this is in a league of it's own IT'S BETTER THAT WHAT THE CURRENT STATE OF PS IS IN PERIOD. This is not an alternative this is its own "thing" and I regret not Figuring that out sooner. I took my time to understand your software because I had soo many pain points and now I'll be giving my own opinion on a better way to fix up soo many annoying things you have to offer 🤤 ummm.... Here we go! I'll arrange them based on Priority from top being higher to bottom being lower. I want to make this clear I have not touch PS in months hence I am confident 90% of everything am saying is just based on my AF-Photo experience and for the good of your software not making it another Photoshop! I am a developer myself though more into developing tools for developers and advancement of 3D and don't appreciate it when someone does the same comparison in my line after months of work. Features that are bugs to designers: 1. Selections: The way selection works in affinity is painfully annoying, Take alignment of this image for instance tell me how does snaping help 🤷♂️🙄. Tell me how to align the text in AF-SUIT without it moving the position of both the gray rectangle and the text. the yellow sure 100%. ask any designer here if they don't want control over this and see what they say. pls add selection to the mix - Selection tools Pls see tablet first approach, so I don't repeat 2. Ability to switch from text mode to hand tool or move tool without having to go the long way around with the mouse tool. 3. Tablet First Approch: This Sucks! I love it I use it about 80% of the time this is actually my reason for looking for a PS alternative in the first place. but IT JUST SUCKS! when using it in Desktop mode you guys just made my life hell by giving me the same experience as when I have a pen and no keyboard. I want shortcuts to work when am on desktop mode and probably on tablet mode. E.G. Selection tools WHy should I go up there Just to add more selection when I have CTRL, SHIFT, ALT, ETC already on my keyboard? 😭😭😭 4. Cycle tools same shortcut: I love this but it sucks with your current implantation, Say I was on move tool and I press M it swiches to round tool sometimes it's super annoying 5. Eraser tool: it just SUCKS! IT SUCKS!! pls fix it. you are designers yourself take a guess. 😤😤 6. Better glyphs editor: Pls fix this I don't want to have to scroll to the letter before using the glyph when I highlight a letter, I want to see it there. Requested features: 1. Better touch support on windows I know Microsoft does an extremely BAD! job of letting you have an easy time with this... but please invest some time in making a custom solution even if I have to turn of gestures in windows it'll be worth it. 2. Some functionality of smart object. I get it PS has patents on this, but this feature is extremely obvious and extremely useful, here all you need to make your experience better, you already have image layers Great Now all we need is the bare bones a way to have Mutiple images updated at once this is a really important feature for mockups and for noob clients when I make Tailored templates its a pain to use AF-Photos pls just add that one feature and we are GOOD! 3. Linked services, More options, + Font support it'll be great if you allowed us to add our own custom servers, or at least provide us the option to add other apart from Dropbox, G-Drive, One Drive and most importantly custom. - Font support! This solution should not be a pain to implement and does not have any legal issues since it's not counted as distribution if all you do is allow the user to seamlessly link there AF-SUITE FILES, AND FONT from one system "computer, tablet, etc" to another. and if you allow your source file to embed fonts iPad should not be an issues, I think 🤔 donno never tried it 🤣 5. support for AI Files in designer at least the ability to save over it like PSD? 6. Actual AFFINITY PLUGINS PLEASE!!!
-
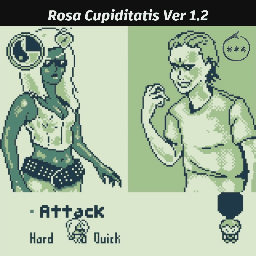
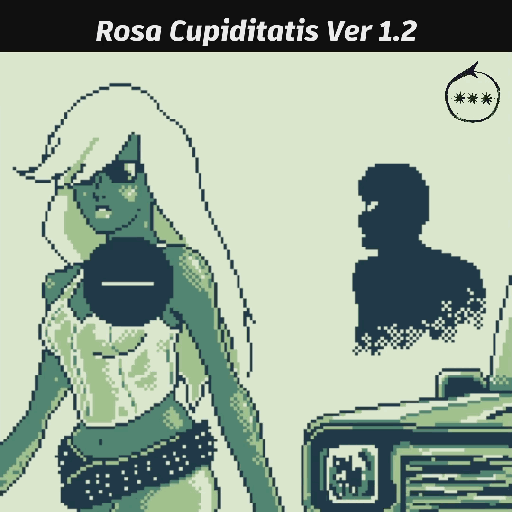
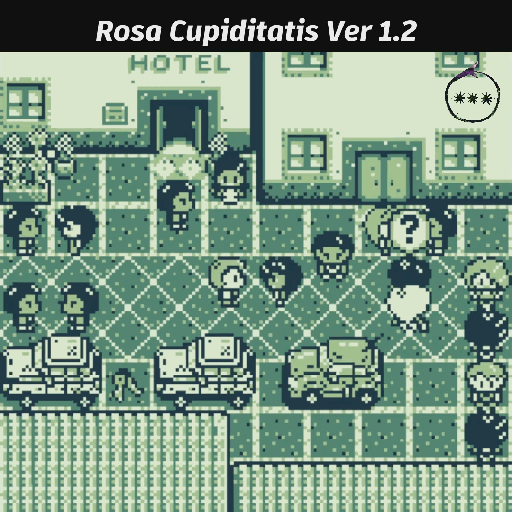
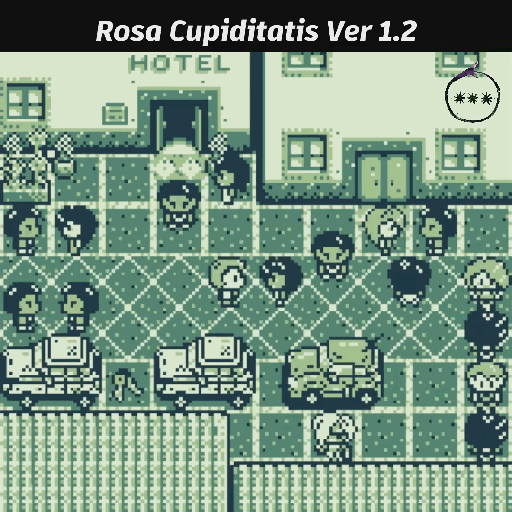
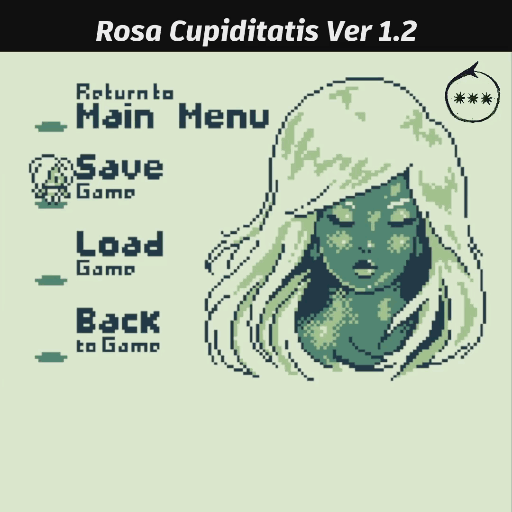
To those who are new, I tried to make a horror themed videogame for Gameboy around 2022. Now in 2023 I decided to remake this game and I've been able to finally catch up with my original demo, but with a more stable and more interesting gameplay. Although I first started using Pixel Studio, and later Hexels, as the project began to become or demanding, I transitioned completely to Affinity Photo and many of my social media assets were made using Photo and Designer. You can try my demo for free at my itch.io. Or if you're into that kind of stuff, you can watch the whole gameplay here on my YouTube channel. I leave this posts with some gifs of my game, thanks for reading my post Game Main Menu Title. The main protagonist Mara's great debut. Moving Mara around the map. Interacting with the NPCs. Save menu "Kill" gameplay mechanic "Run" gameplay mechanic. RCvid_V1.2_JorgeTalk_23303-23781.mp4 Meeting special characters RCvid_V1.2_MeetAlex_74798-75372.mp4 A possible romance ? RCvid_V1.2_BattleStalkerC_80063-81301.mp4 Battling a human enemy. Wow! you got here?! Thanks for watching my whole post
-
 On opening, the dialogue for the HSL Adjustment has the Picker button greyed out, and if one wants to use the picker to select a specific color from the image, they have first to select a color group. I don't understand why this extra step is necessary. If the Picker button was not greyed out, one could select EITHER a color group, OR the Picker..
 -

painting brush tool not working after V2.2.1
Helga Kaufmann posted a topic in V2 Bugs found on macOS
I haven't been able to use the painting brush tool after the upgrade version, it's nor working on the desktop version in Affinity Photo. I don't know what to do to fix it! Please, Help! -
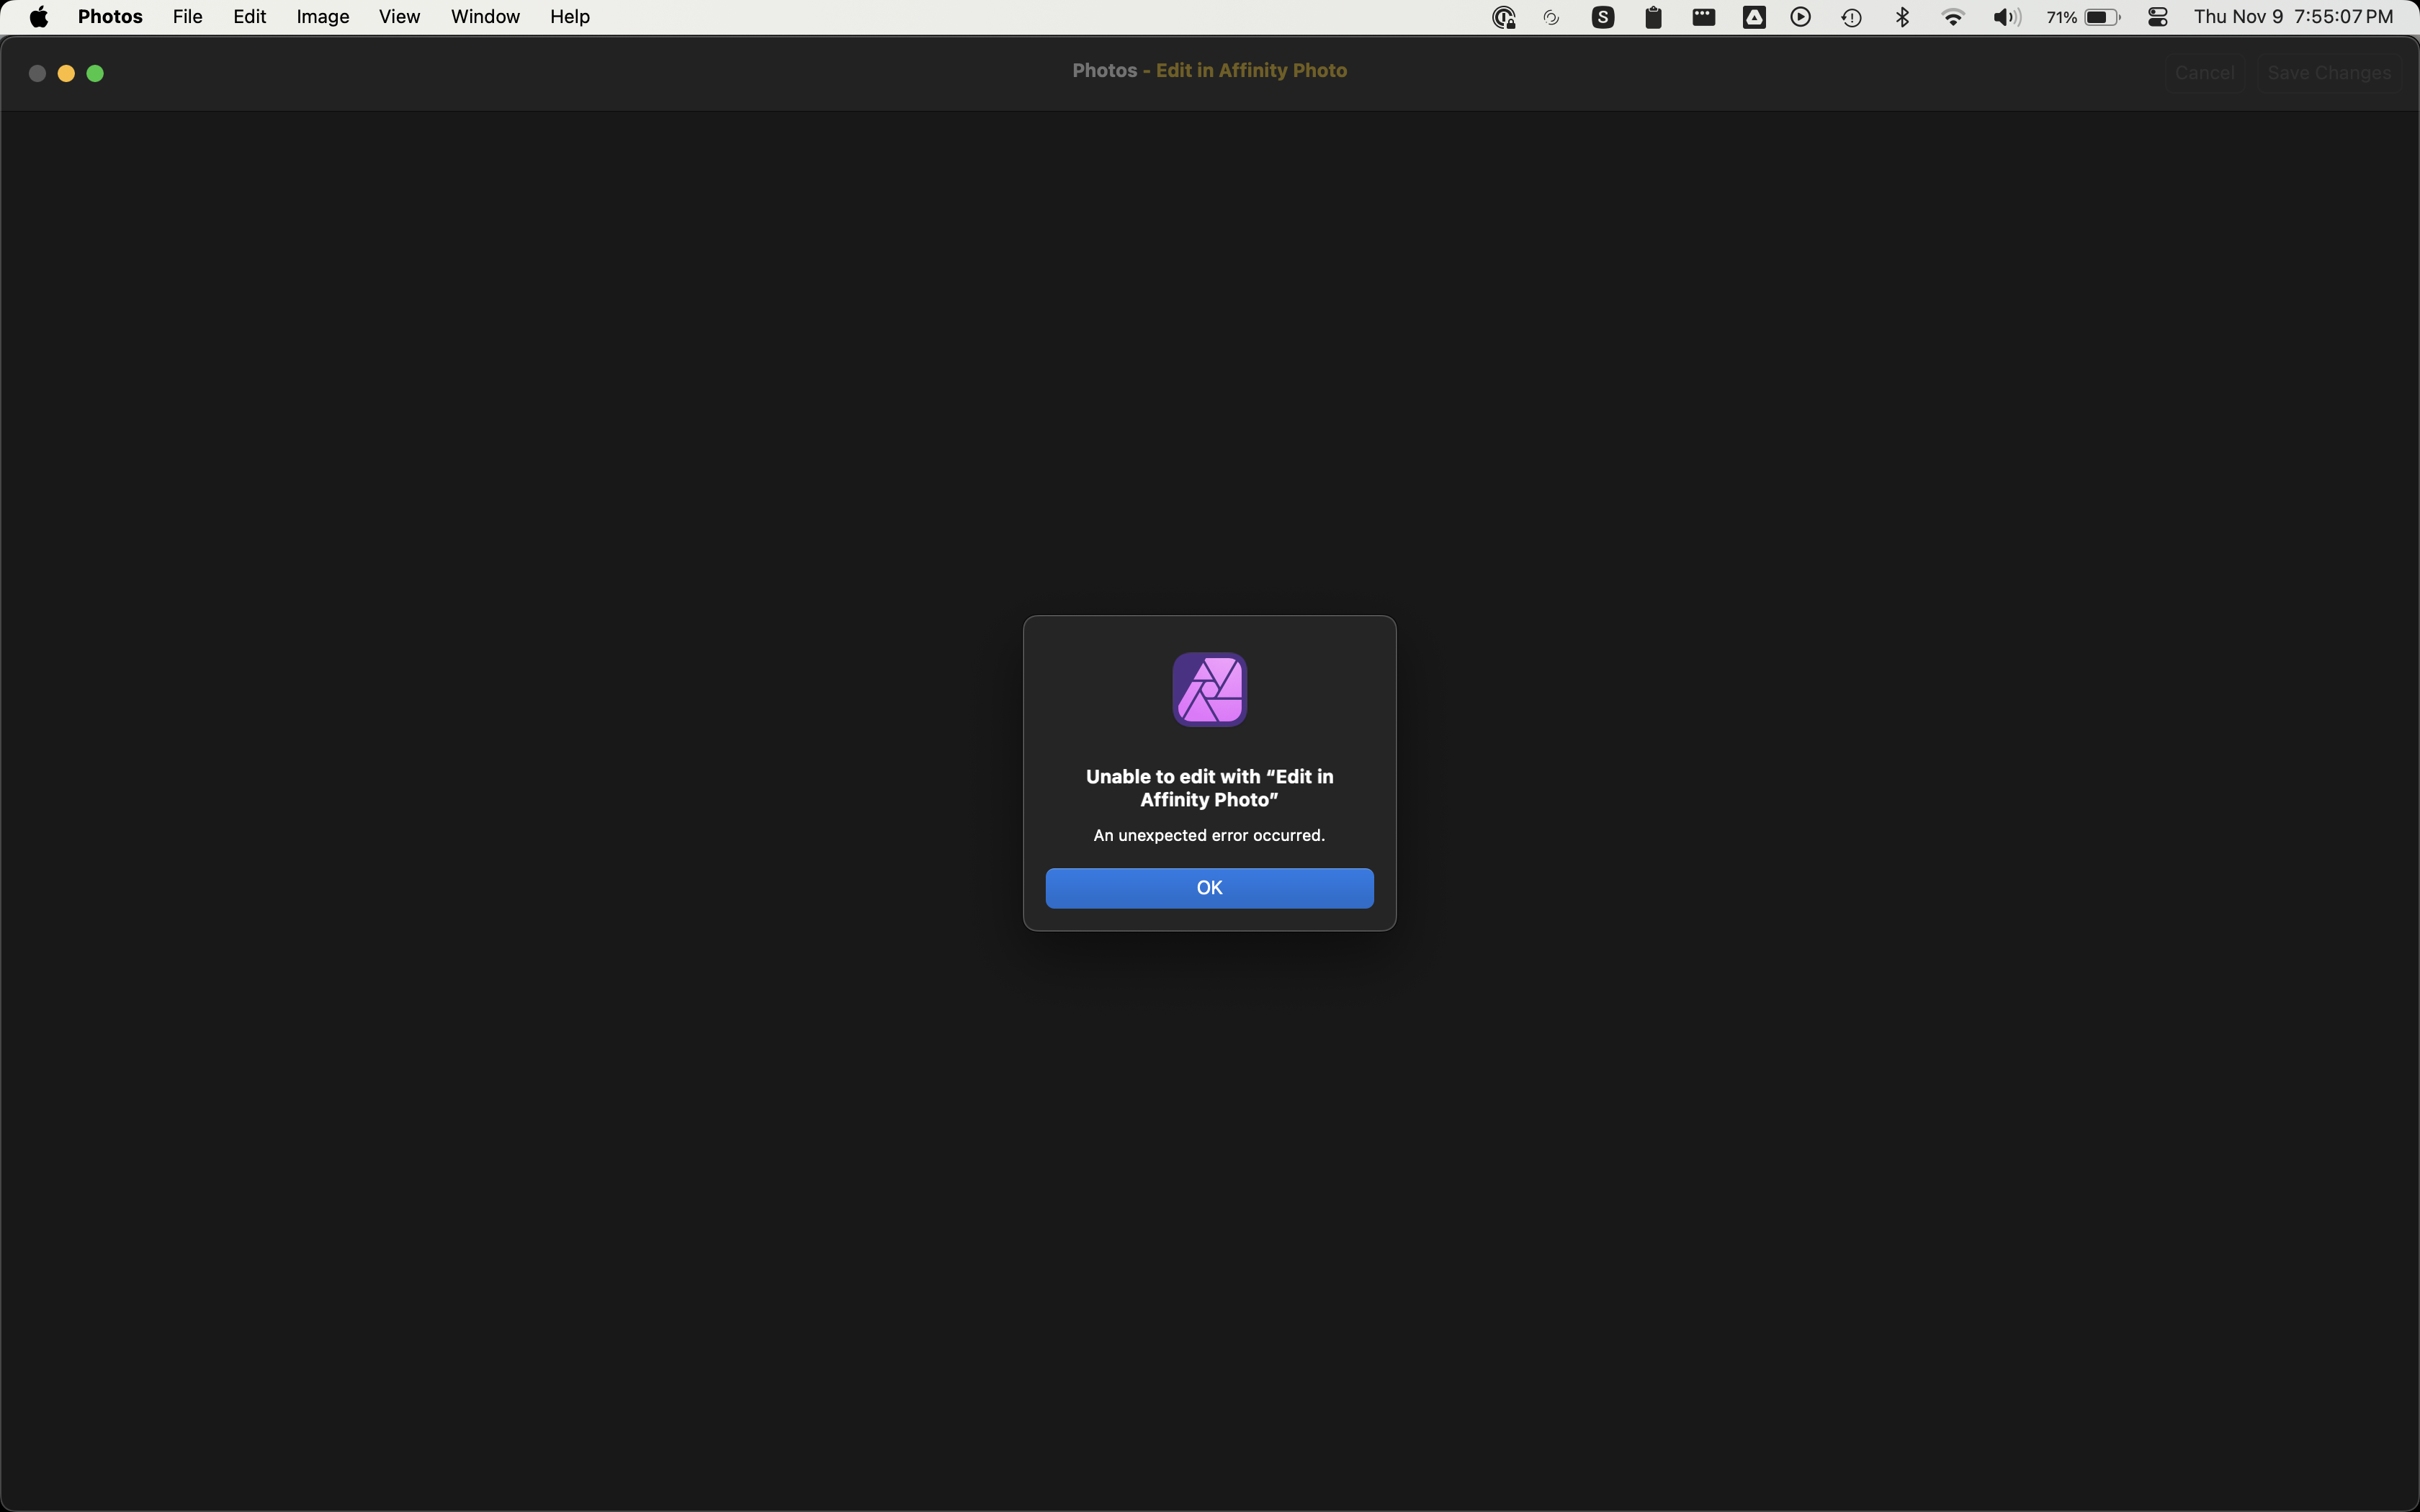
 Hi there. I'm on macOS Sonoma 14.2 beta and Affinity Photo 2 v2.2.1. I'm trying to edit an image from my Photos library in Affinity, but when I click on "Save Changes" in Photos, it tells me that it failed to save the changes and a crash report pops up for AffinityExtension. This has been happening for longer than I've been on macOS 14.2 or Affinity Photo 2.2.1. I attached the crash report and a screenshot of what Photos shows after this happens. It's able to see the changes (and update the preview) after I close the document out of Affinity, but just will not save them to my library. AffinityExtension Crash.txt
-
 In Affinity Persona, on my Mac, I can hold Control while using the vector brush to force a straight line. In Pixel Persona (or in Photo), I can't do that. I can only hold the Shift key to force the line vertical or horizontal. It'd be a quality of life improvement if there were a similar straight-line-only modifier for Pixel persona. While I'm asking, it'd be nice to have that same option available in the Eraser Tool (as it is for the Shift modifier). I see that a similar operation can be done by clicking, then shift-clicking on the 2nd point to connect the two points with a straight line, but I'm really asking for similar functionality as the vector brush where I can drag the final point around and see where the line (or eraser mark) will go so I can fine tune the location.
 -
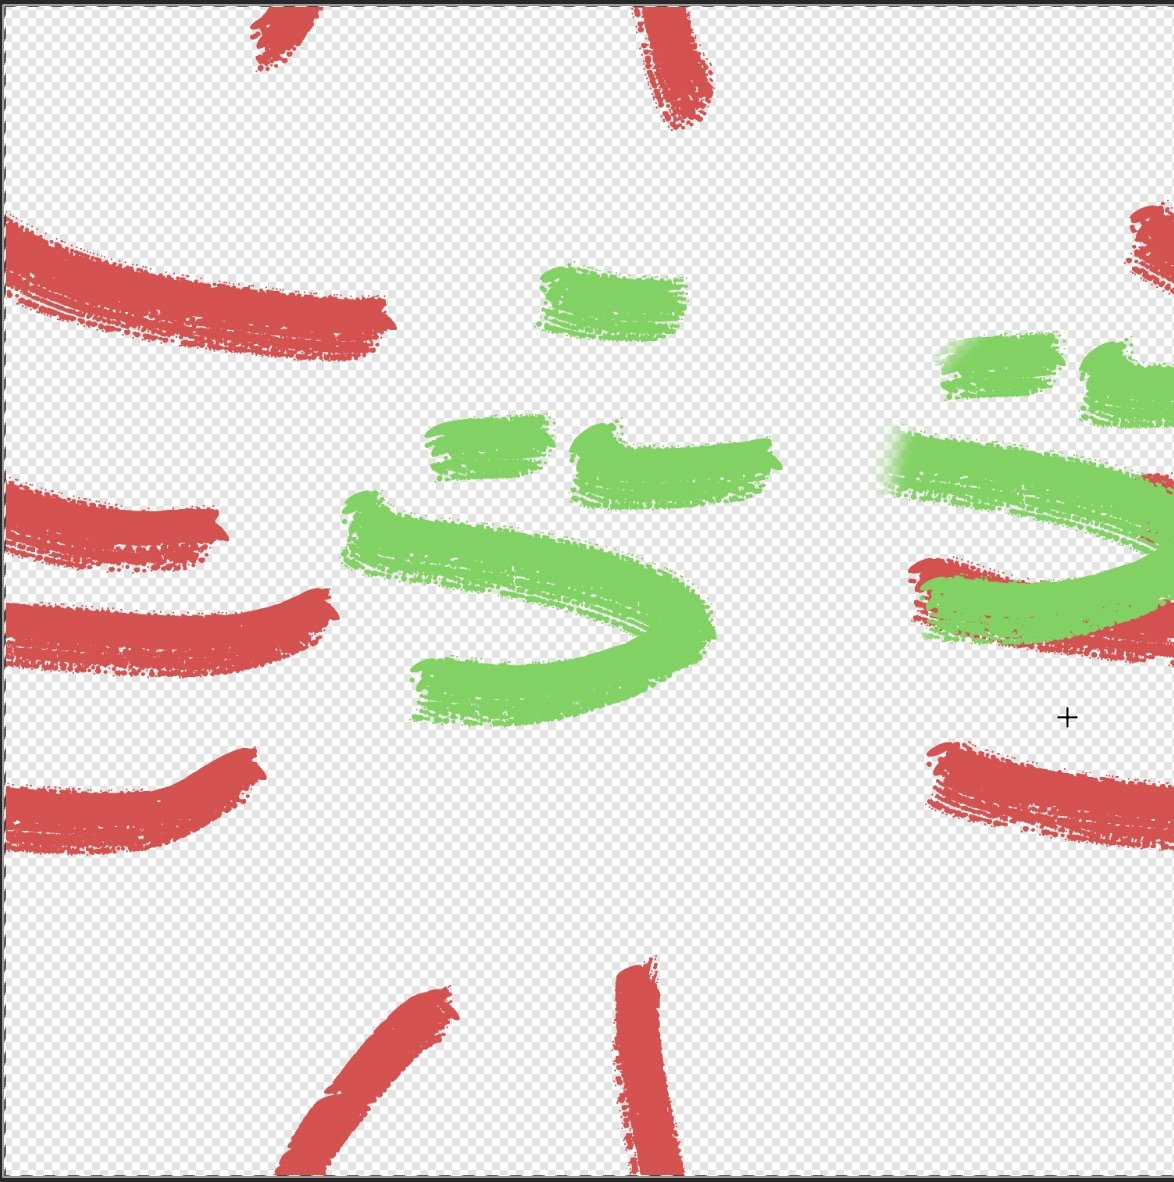
 I am trying to make a seamless pattern. Will have to work with scanned textures. So i will have to sometime use the clone tool. If I paint with brush tool on pattern layer, this is ok, the painting on the sides of the pattern layer repeats on the opposite side. When I do the same with the clone brush, it doesn't repeat on the opposite side. A I missing something or this is not implemented yet ? On red : painting with brush. On green, on the right stamp tool from center = no repeat. Thanks for help. All the best.