Search the Community
Showing results for tags 'Affinity designer'.
-
 Hi everyone! I'm a calligrapher, and I've just opened my calligraphy business - clearly the first thing to do.... create my logo! I did the calligraphy with a Wacom tablet and then edited the lines a bit etc to make it neater / thicker where needed. Simple but fun... and now onto the rest of the tutorial videos
-

daubbrushes DAUB Pigmento - 84 Natural Media raster brushes
paolo.limoncelli posted a topic in Resources
Hi! Pigmento is a set of 84 raster brushes carefully handcrafted for digital painters Designed for Affinity Photo and Designer, this set offer natural media look and feel. Acrylics, Gouaches, Oils and more with expressive colour dynamics and tablet responsiveness to speed, pressure and direction. Now updated with DAUB Spatula set (12 new tools for Paint Mixer Tool) and a new classification: you'll find them in different categories, hopefully now it should be easier to spot the correct tool! Check this video for a quick sample! This set is fully compatible with Windows and iOS Version of Affinity. This is a quick concept done using one of the included tool, to show the colour dynamic and blending features. Some Tips DAUB Grunge Acrylic 4 This is a brush that creates nice textures with a glaze effect and continuous tone modulation using pen pressure. You can use it as a pure cover changing the blending mode to Normal. Do you know that with Pixel tool presets if you press CMD key while painting you can erase using the same preset? Get it here I'll improve these tool with free updates, so if you want those please add your real email to the purchase page. Happy Painting! Paolo- 45 replies
-
- 18
-

-
- natural media
- brushes
- (and 2 more)
-
 Here is my very first work with Affinity designer. This is flyer to my and my friends company what had showcase at Slush last week here in Finland.
-
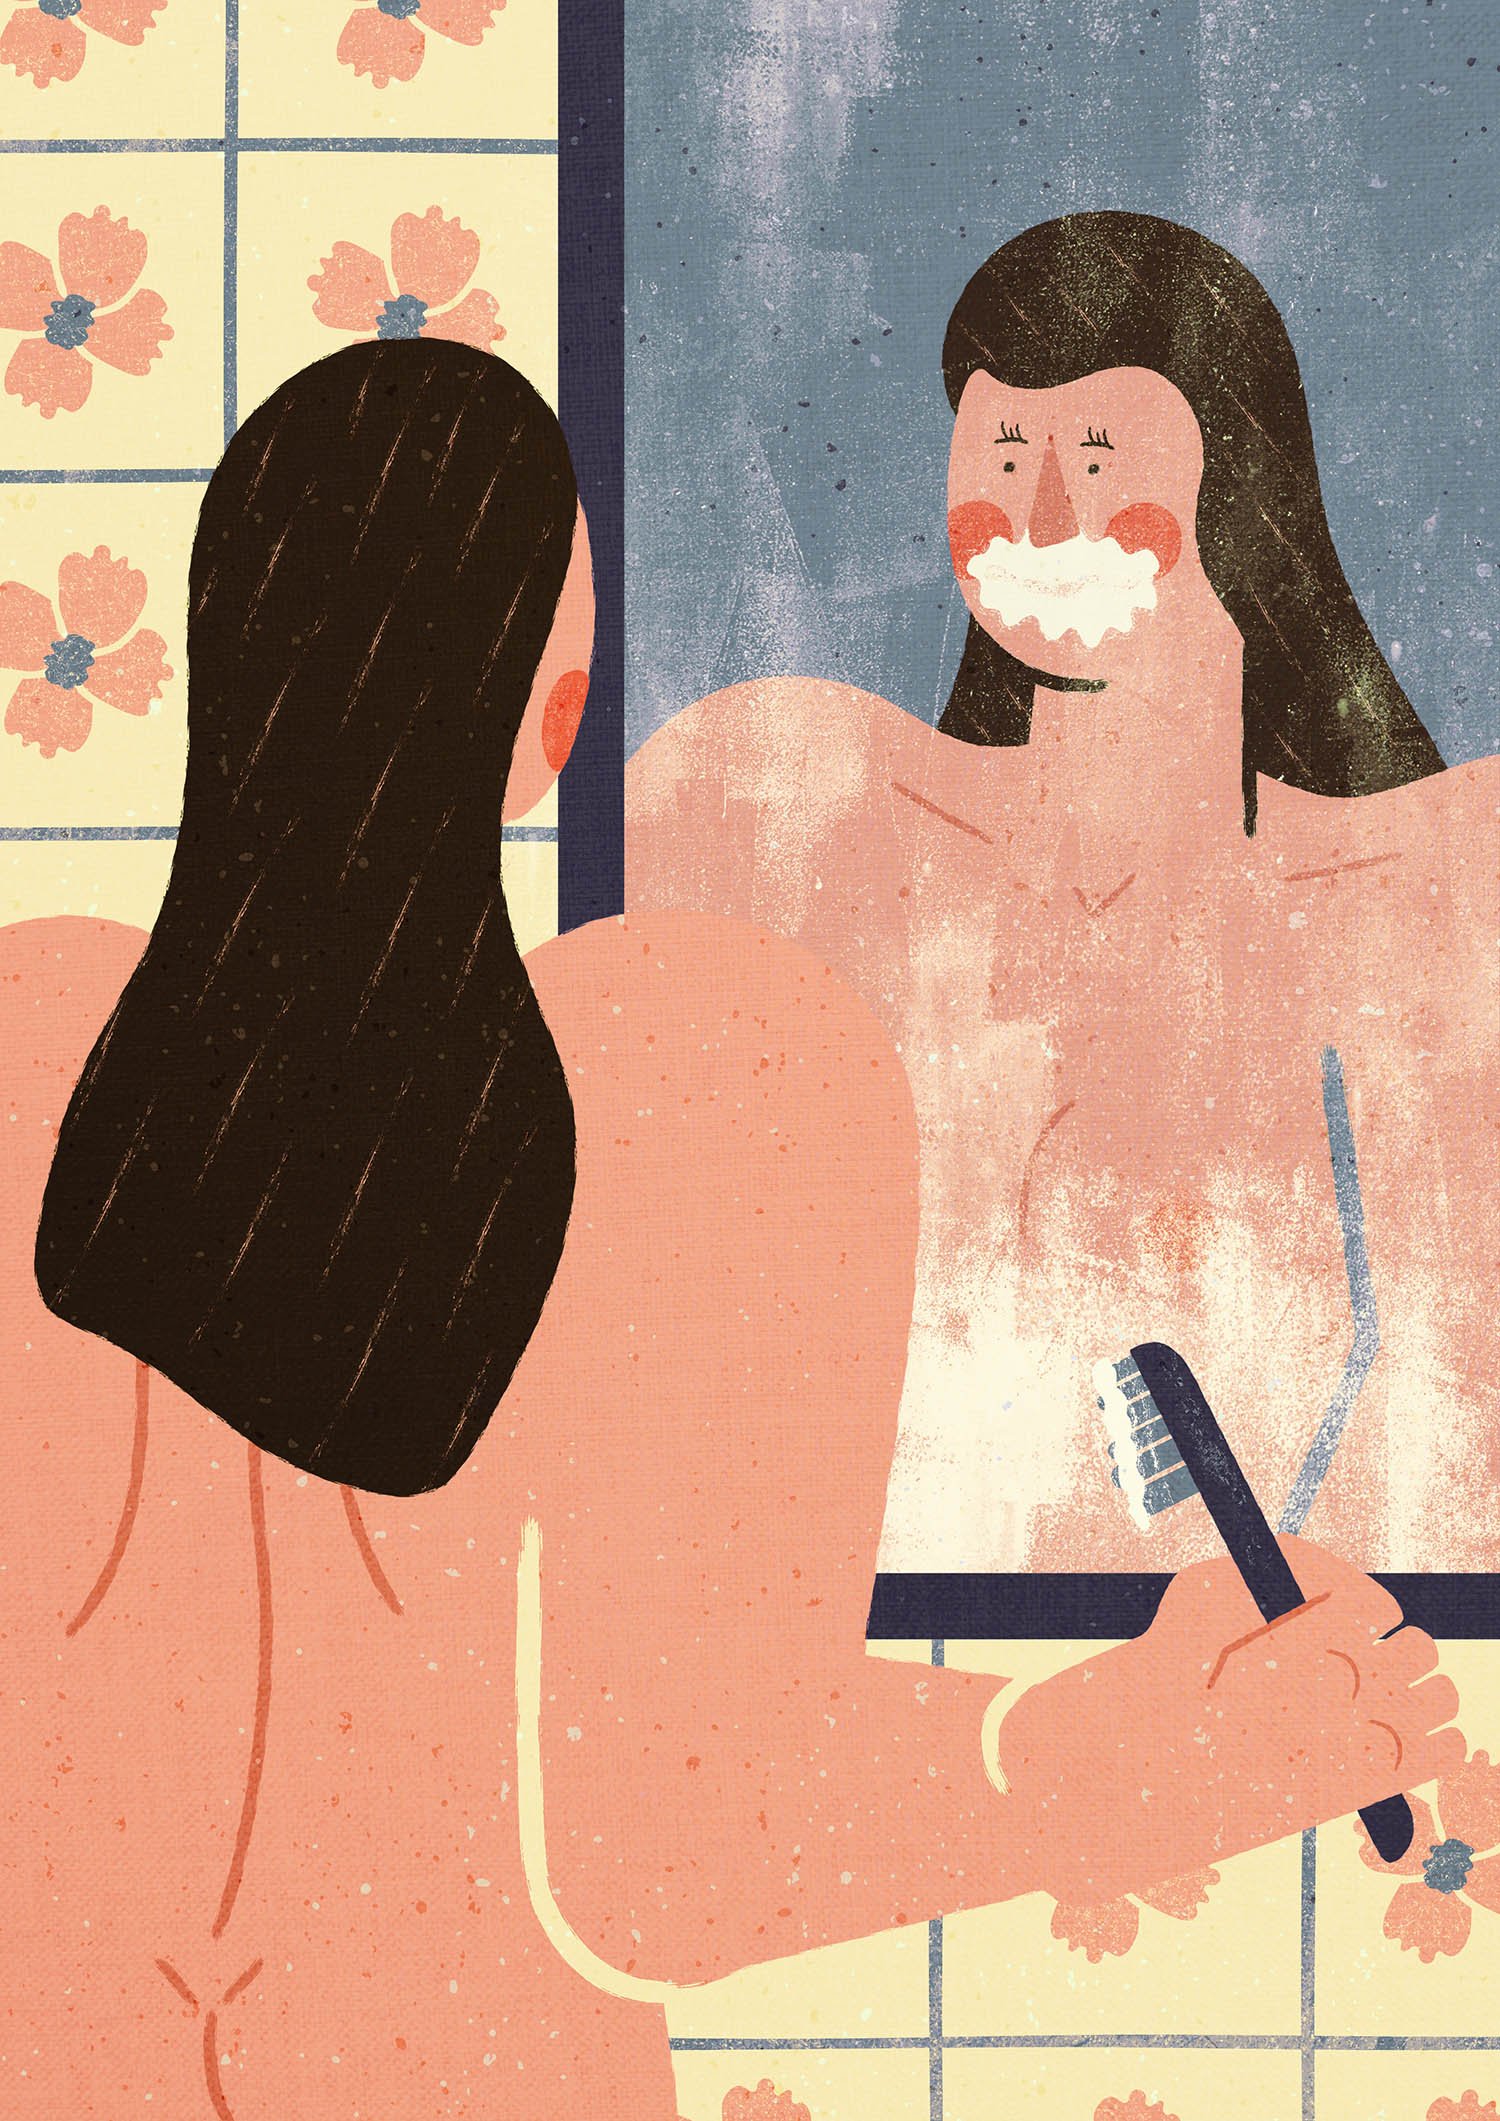
I did some self training with Designer and this is what did come out.. I realize that i have very hard to find what i would wanna do, basically i would say that i have lack of imagination. What is basically funny because i do lots of photography and there i have no problems but when i have to draw something... i have no clue what i wanna do. I start like 500 drawings and end perhaps 1. So, i know i should try to look lots of drawings, pictures, vector art etc to get inspired but it feels too much copying other peoples art. Just wondering stuff same time as i draw things and those are toughs what i got when i was drawing this head...
-
A variant of the figure (comic character) "Mela Luna", this time with a small picture gallery with most important steps. https://www.bodobe.de/mela-luna-mr-mautz-und-der-mond/
-
 Happy new year guys! I am in the middle of creating my first font (handwritten) and use Affinity Designer for designing the digits. However, the process is very tenacious right now. Since I'm new to font development, this is my current approach and setup. I created a document with a growing number of artboards, one artboard for each possible digit, ligature, symbol, and so on. I created each digit using a stroke with slightly varying line widths at the beginning and end. The program into which the digits are imported works with PDF, SVG, EPS among other (to me unknown) file formats – that's okay, because I can output each digit with the export persona named accordingly. SVG is the recommended file format. But I do run into some problems: The exported digit-files MUST NOT be exported as a path with a stroke The exported digit-files MUST consist of a single shape. The exported digit-files (even if points 1. and 2. were taken into account) as SVG are created with a white box in the size of the artboard around them, which lead to another step of selecting and deleting something manually that actually wasn't created in the first place while designing the digit. (The document is set up with the check for Transparent background under the Colour dialogue) I would have guessed now I can select all contents of the different artboards via shift+click in the layers palette and convert them with a single click on "Expand Stroke" - but this is not possible, because the selection is automatically limited to the artboards and not to the children. SelectChildrenOverMultipleArtboards.mov Furthermore, I would have liked to use an action/macro to merge the multiple curves of single letters like A, B, E or F into a single curve - but unfortunately the macro palette only exists in Affinity Photo, if I see it correctly. Does anyone have an idea how to convert the files without all the unnecessary additional effort/tasks? Cheers and have a nice day MrDoodlezz
 -
A new work, have a look. https://www.bodobe.de/strichzeichnung/
-
 Hallo zusammen, in Photoshop gibt es eine Möglichkeit die sich "Schnittmaske" nennt und ziemlich nützlich ist. Ich versuche mal zu erklären was ich meine: Beispiel (Ich Zeichne in Pixel Persona): Man hat 2 Ebenen A und B. Auf der Ebene A ist ein Hintergrund mit Farben usw. Auf der Ebene B ist ein Objekt (Ein Gesicht eine Hand was auch immer). NUR dieses Objekt in Ebene B soll jetzt coloriert- Schattiert werden usw. In Photoshop hat man dann die Möglichkeit, wenn man auf der jeweiligen Ebene ist, die Taste "l" oder "j" zu drücken als Shortcut (ich weiß es leider nicht mehr genau welcher Buchstabe es genau war) und eine "Schnittmaske" hinzu zu fügen. Dann hat diese Ebene in der Ebenenübersicht einen "Punkt" davor und man kann NUR in dieser Ebene Zeichnen, sodass die anderen Ebenen von der Farbe, nicht berührt werden. Das ist SEHR praktisch. Ich hoffe sowas gibt es auch in Affinity Designer/Pixel Persona und nicht all zu kompliziert? Hoffe ich konnte mich klar Ausdrücken ansonsten versuche ich es irgendwie anders zu erklären Netten Gruß
 -

affinity designer Affinity illustration set 2018
Mateusz Justkowski posted a topic in Share your work
Hello, 2018 year was realy exciting for me. I created many illustrations. So, now, I can present the set of my works created last year. Thanks for watching My website: Mateusz Justkowski
- 4 replies
-
- 7
-
-
- digitalpainting
- graphic
- (and 4 more)
-
Reworked sketch from Inktober 2017 [08:Crooked] Original drawing (Black) jpg created in Sketchbook Pro. Reworking and colouring in AD Size in AD 300 x 150mm 300dpi (Uploaded Size:1772x866px/300dpi/hq jpeg)
-
Affinity You Rock!!! This is my vector illustration of a painting I did almost 20 years ago, (I can’t take credit for the original work as that was copied from a magazine). I also did a photoshop version some years ago for a competition on worth1000 (anyone remember that?) I've tried to do something different and use more of designers tool’s than I did with the car in my 1st go. Hope you like it. cheers
- 5 replies
-
- 6
-
-
- vector
- illustration
- (and 1 more)
-
https://www.bodobe.de/no-means-no/
-
 Hi, I have an SVG file with paths on many layers. In some cases the layer paths overlap. I want to remove the overlapping areas. Here is a simple example: In layer A I have a large red circle. In layer B I have a small blue circle. Both circles are centred at the same point. In layer A I would like to remove the area which is covered by the blue circle in layer B, so that there is only one colour per layer. The result would be a red doughnut shape in layer A, and the unchanged small blue circle in layer B, which would fit exactly into the hole in layer A's doughnut. It's a bit like a screen print, one layer per colour, but with no overlap of the coloured areas. To achieve this I tried to copy the paths from layer B to layer A, so that I could remove the centre of layer A's circle (it's actually a very complex path, not a circle). This doesn't seem to be possible. Can anyone advise how to do this? Thanks.
 -
Thought I'd kick off the new year with some T-shirt designs. Here's two, check out the rest on my portfolio blog.
-

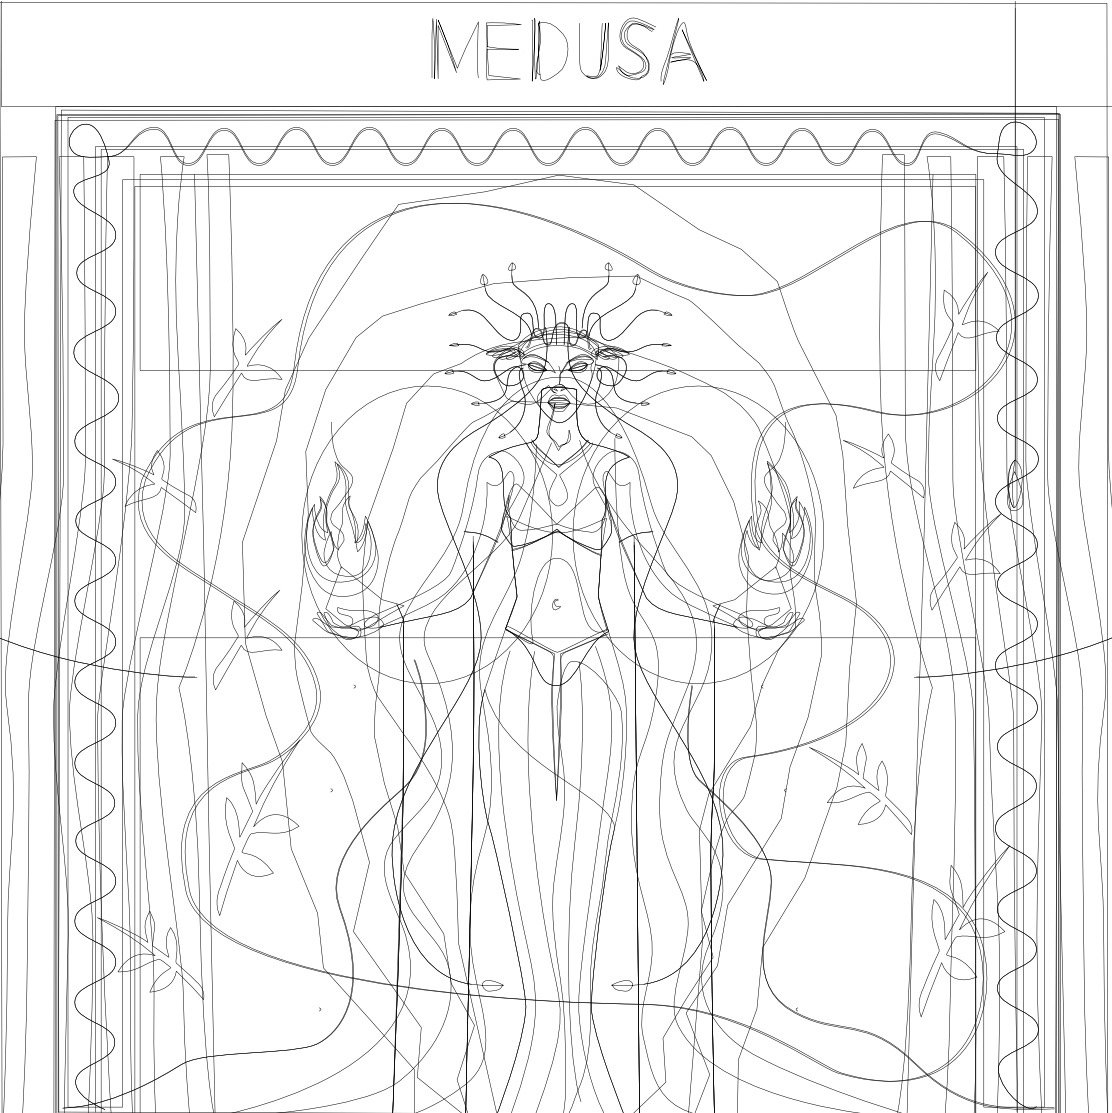
affinity designer MEDUSA illustration (AD file available)
Michelangelo_ posted a topic in Share your work
Hi to everyone! This is a personal project, the illustration was made by my daughter and I redrew it to AD. Maybe it can be useful, to have new examples on optimizing the project using the lines; the project is just 450kb (see the outline view).in this project I used very few forms. many objects are just lines with different types of hatching. The Dash line is a powerful tool in AD and allows me to create interesting objects. I thank AffinityTeam for the amazing job on the selections and the snap tools, in AI I use a lot more time and I do not have the same result. (it's one of the reasons why I left AI for AD). Moreover I also did an animated version using Hype and I discovered that the new vector tools (in the current Beta) are very similar to AD!! (also the SVG source). So, I decided to share this file because even the animation was much appreciated and I hope you like it. It would be great to use AD to draw Hype shapes and animate the AD file, probably the only missing tool to kill Adobe definitively Download AD file: medusa.afdesign.zip Michelangelo _____________ BTW, Another project with AD file: Isometric Mock-up
-
 When in the Color picker tool (eyedropper) changes of the layer selected from the layer panel do not change which layer is indicated by the blue outline in the drawing. I don't know if this is related to this report of not.
 -
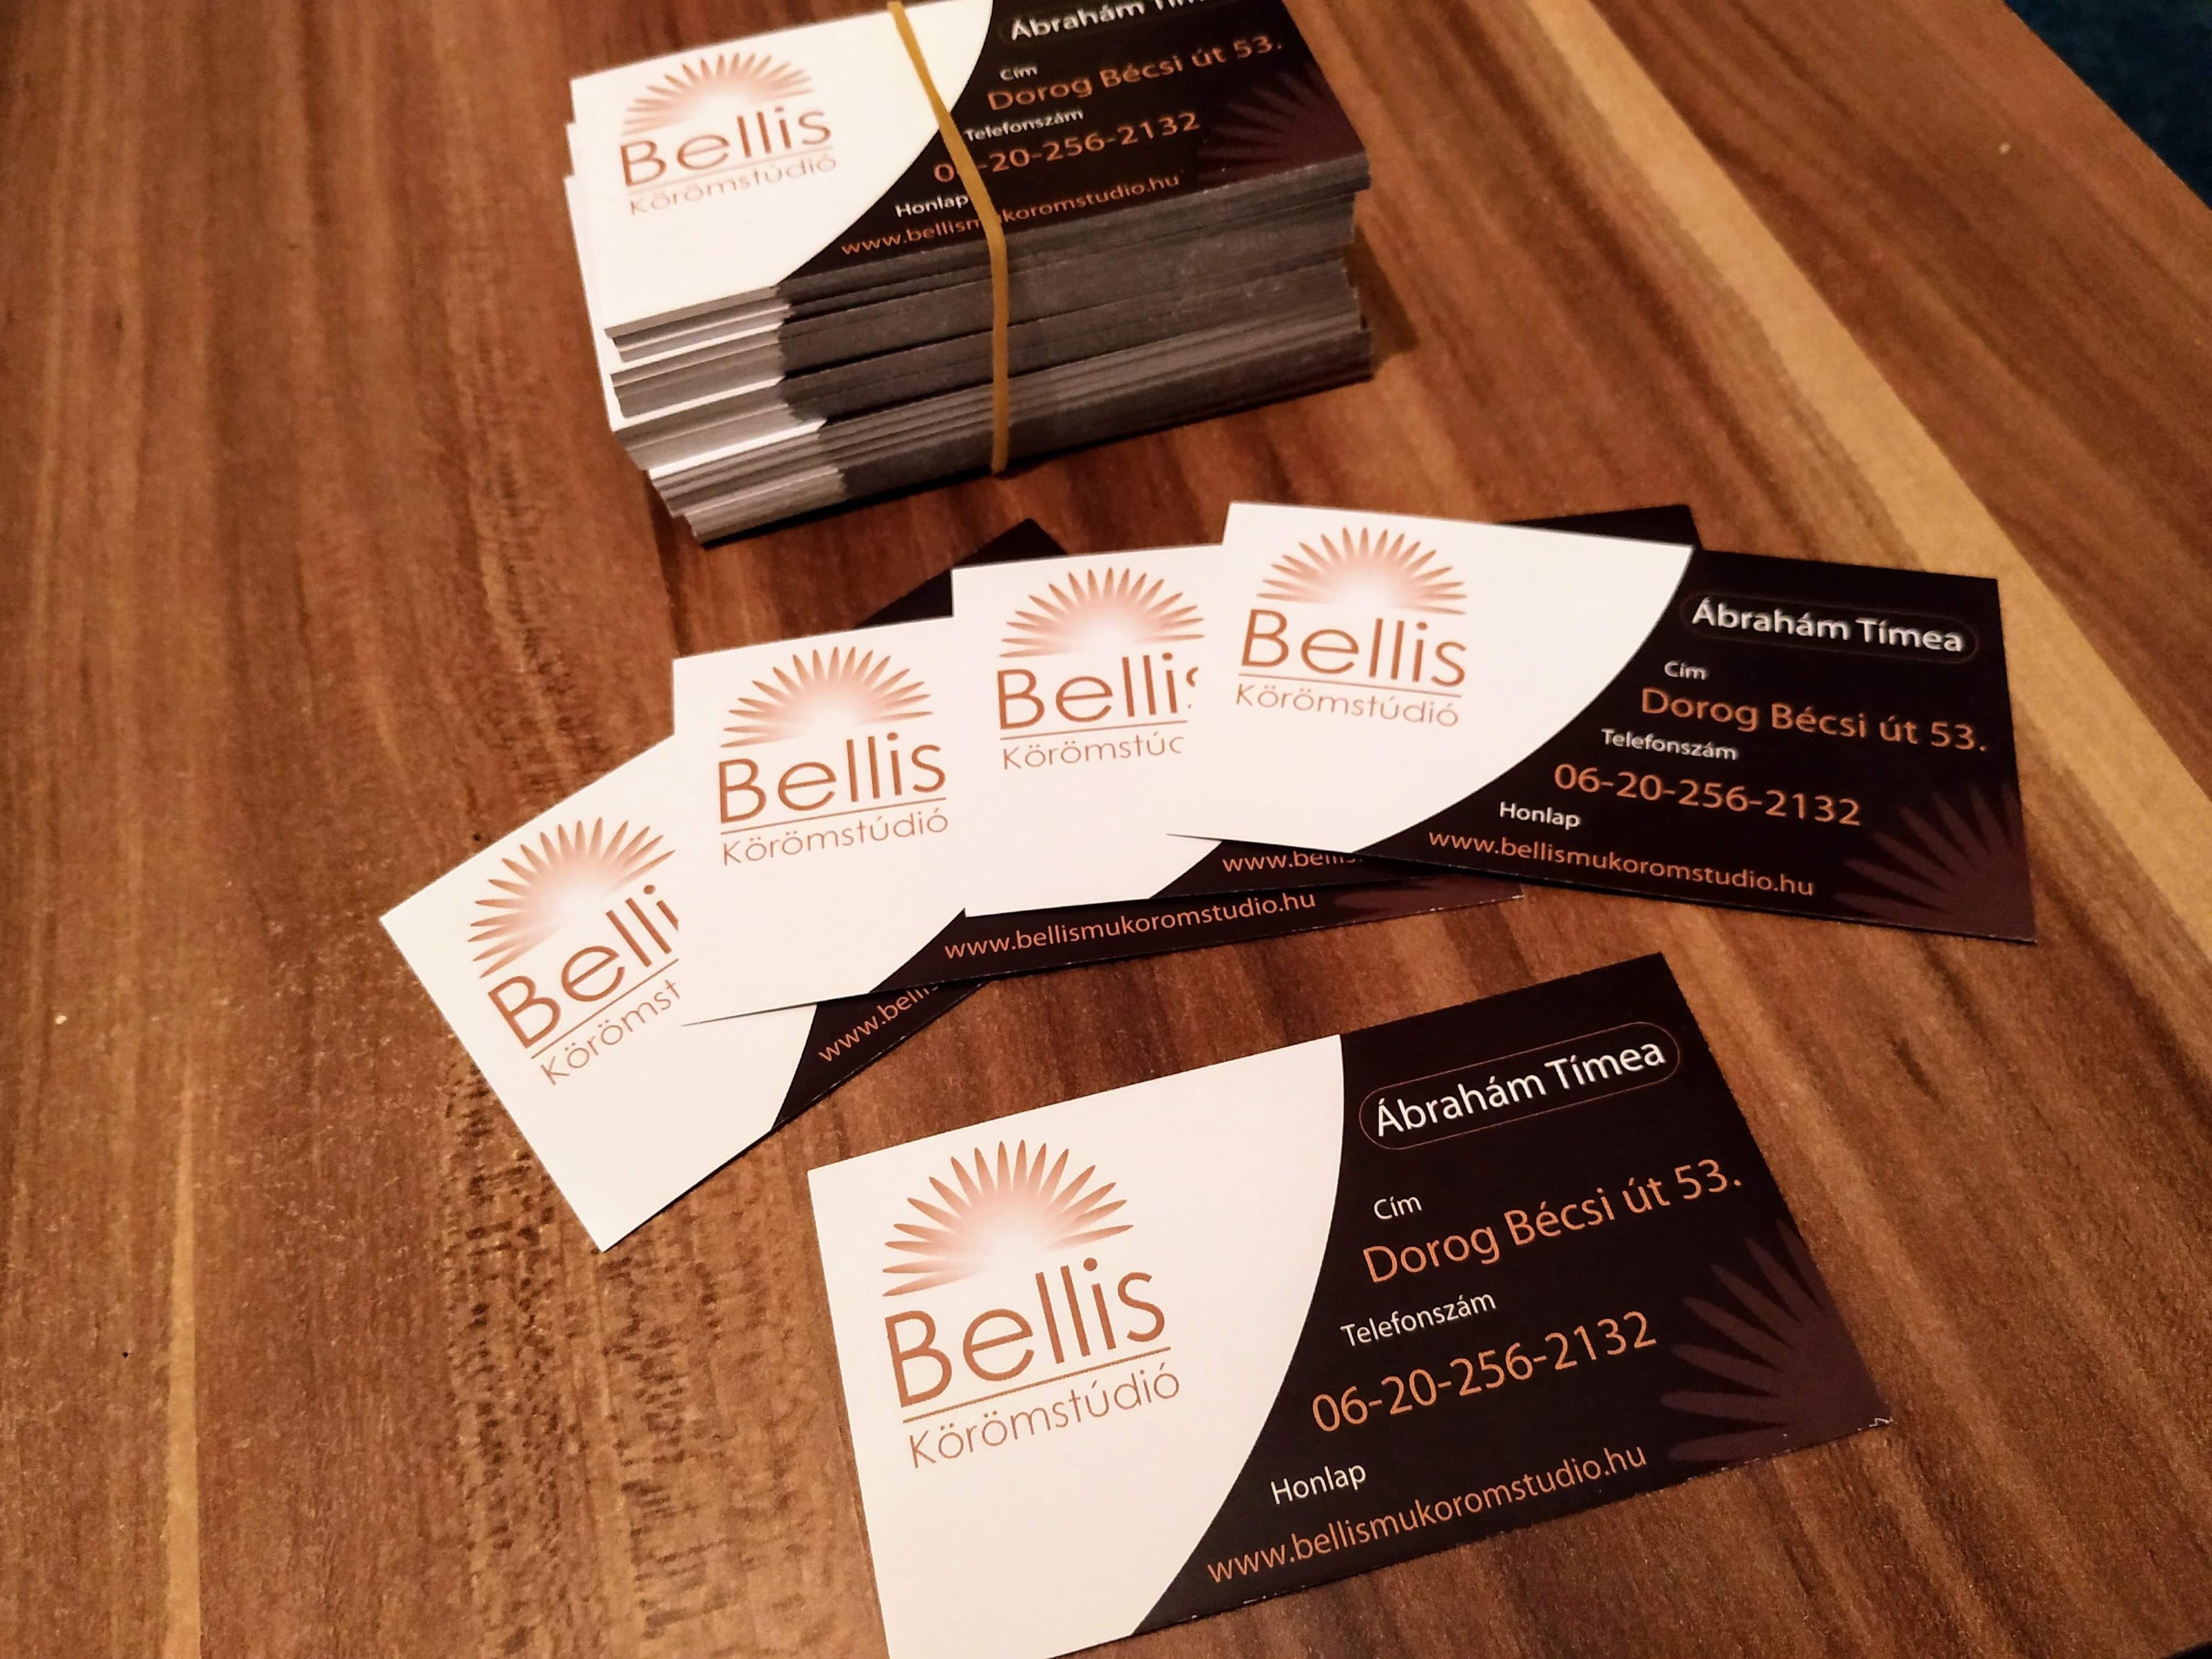
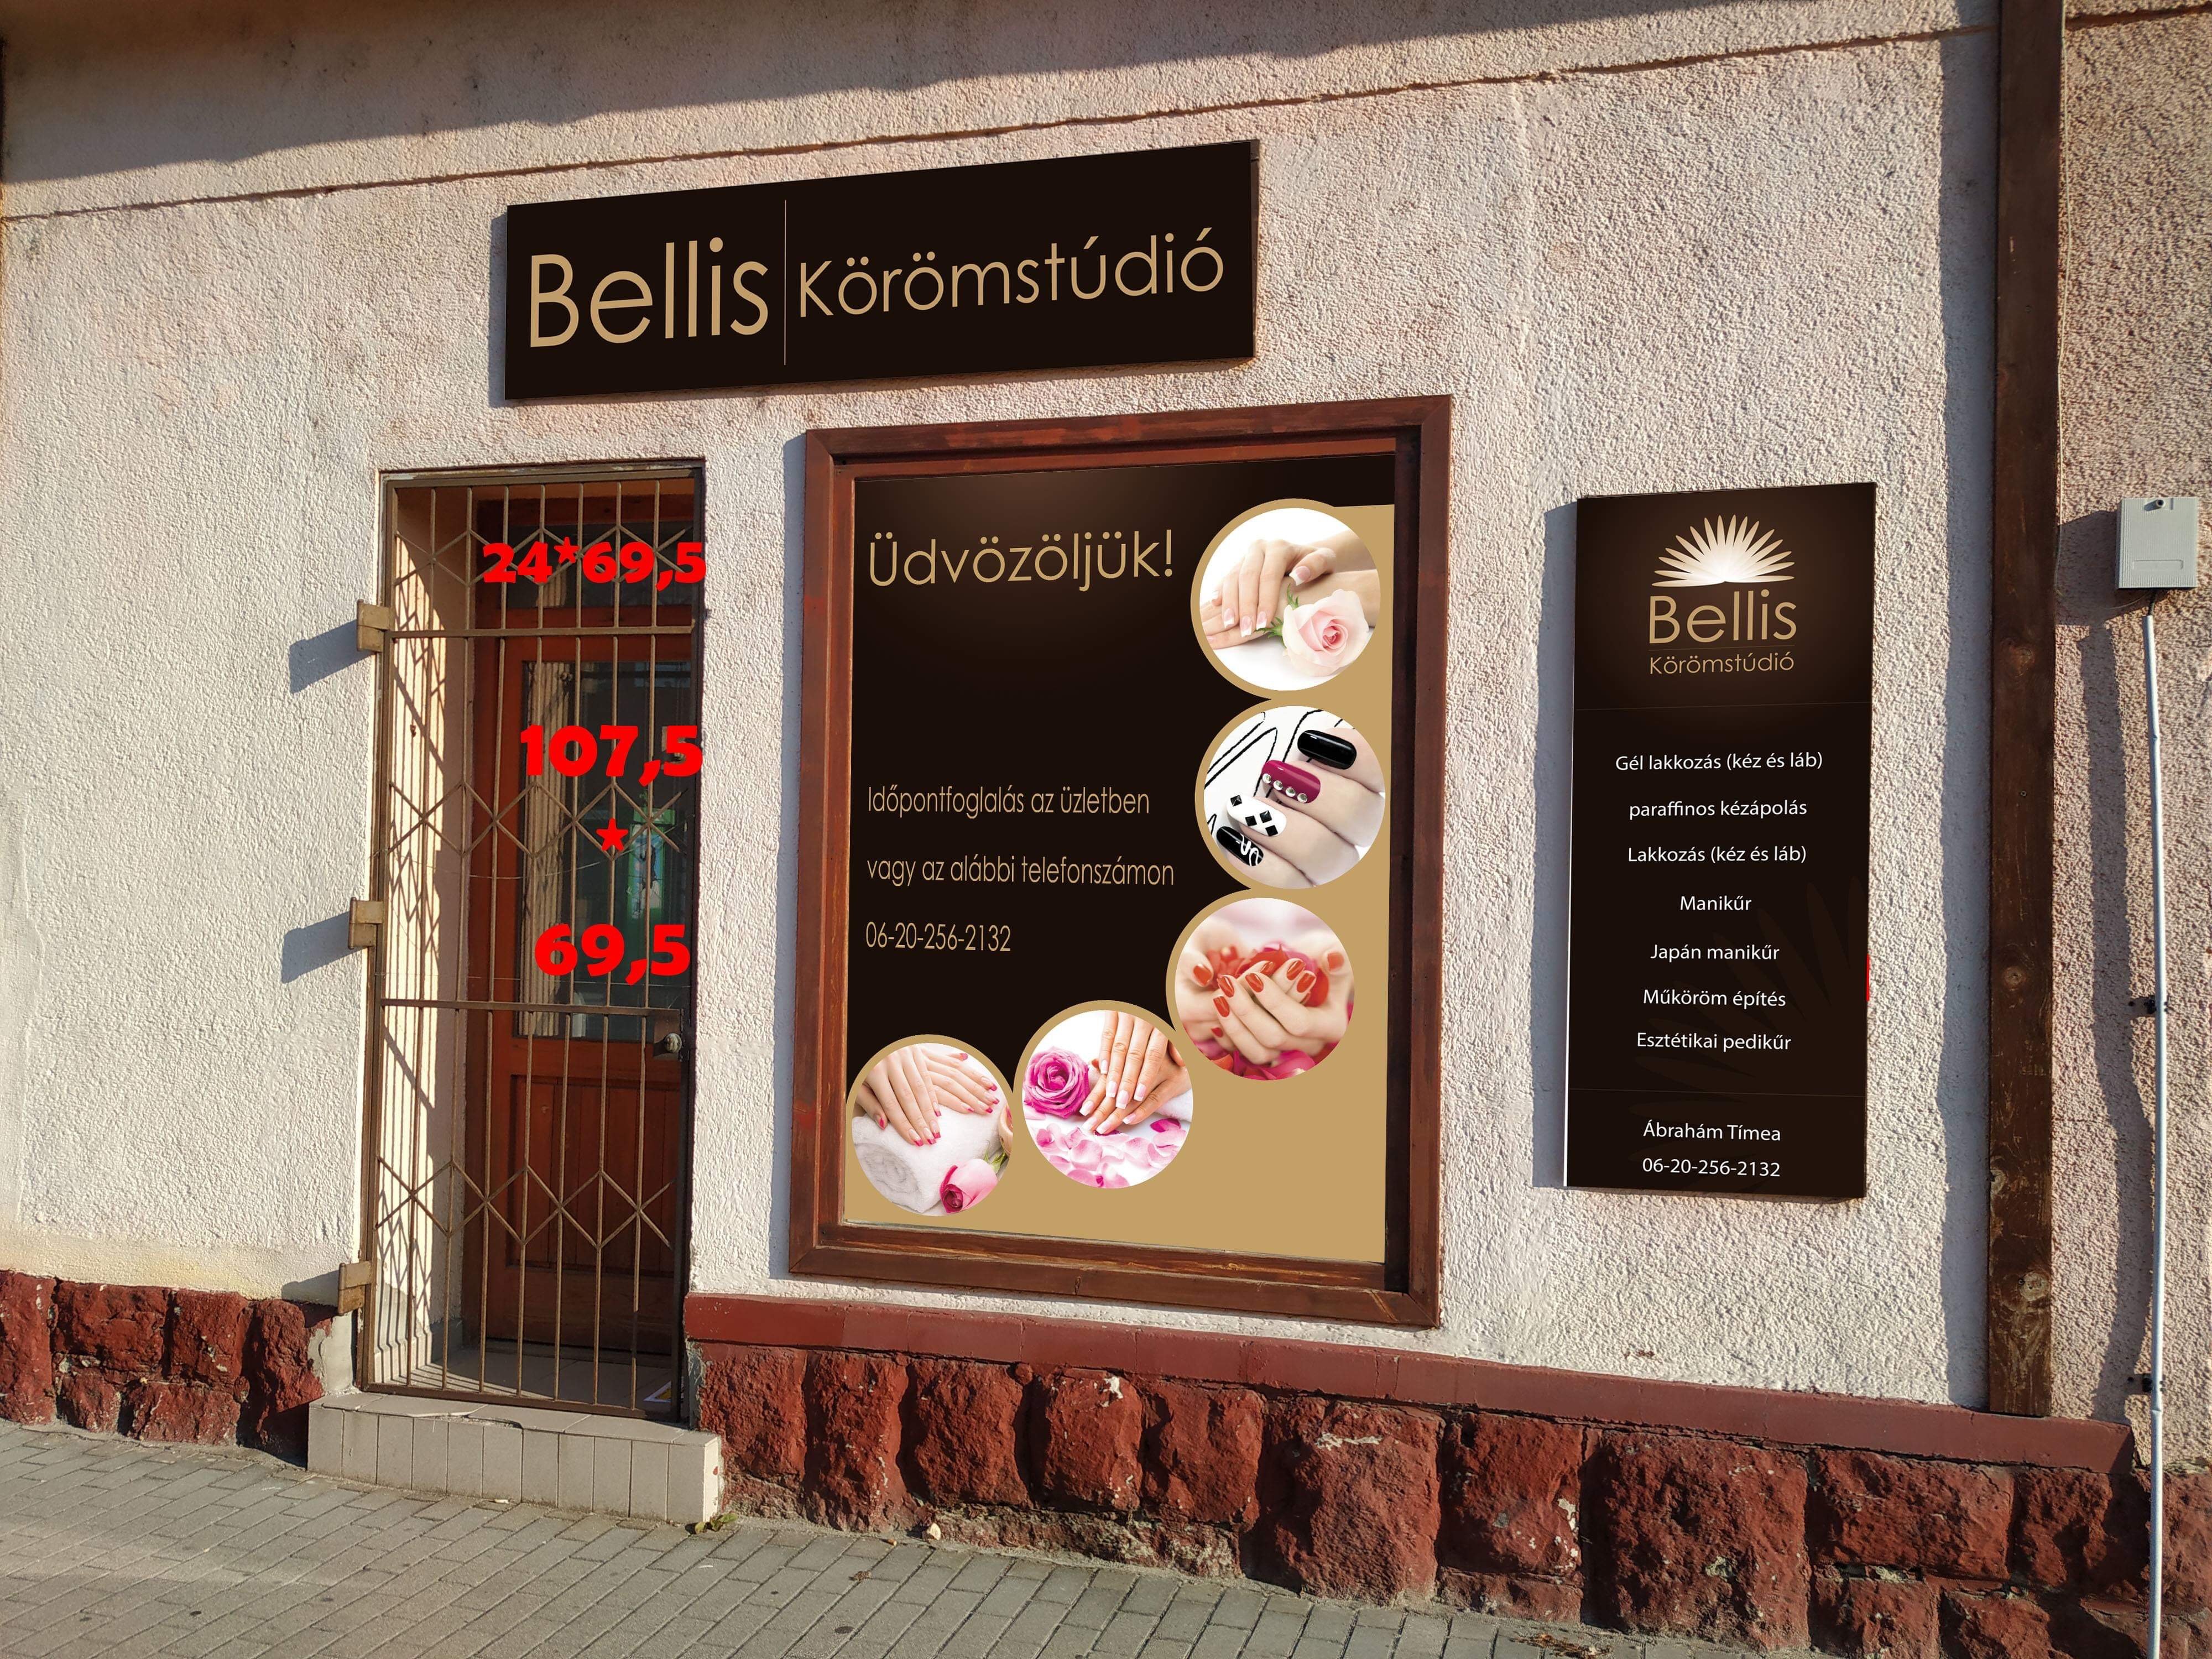
My last work for nail studio. Plan/printed Logo design Windowshop design namecard design
-
 After downloading the newest beta 1.7.0.3 I noticed that the Brush related UI hasn’t changed in several years and would like to suggest some productivity improvements. This is my situation. I am looking for a way to identify and switch to a brush quickly and easily from both the Brush menu(s) AND by means of clicking a brush stroke in an image. I have at this point, hundreds (and hundreds) of custom brushes. The previews of these brushes are in some cases very similar. I need a faster way to identify a Brush that may be stored in any of a large number of collections without having to hunt for the brush thru trial and error. My productivity problem: The sheer number of brushes I have makes searching for a specific brush from among many collections an extremely time-consuming task. Here is my first suggestion: Missing from the Brush palette is an easy way to spot a brush by name. Where the Brush palette shows a visual preview of the look of the brush and a size indication on the left, having the name of the brush appear in the palette would be far more helpful than the default size listed for quickly identifying a specific brush. See example: http://i-toons.com//storage/adbr04.jpg Being able to identify a brush in the Brush palette - by name - would make hunting for brushes in the Brush palette a little less time consuming However... My real desire would be the ability to do a fast switch to a Brush from a selection of the stroke that is already in a piece of art. I may be missing something that may have been changed in the newest beta - but what I still find is this: If I click on a stroke applied to the "canvas" I do see an indicator of the brushes identity in the menus top left. See upper portion of this image: http://i-toons.com//storage/adbr01.jpg A small preview of the brush. Clicking on this brings up a nice editing shortcut - but… This mini palette does not tell me what the brushes name is - nor does it give me an option to switch to the indicated brush See image: http://i-toons.com//storage/adbr02.jpg If I click then click the Properties button in this mini menu I do get a more involved Brush Editing menu - But - this menu also does not have the brushes name. See image: http://i-toons.com//storage/adbr03.jpg This is odd because the Brush Edit menu from the Brushes menu does have the name. This editing menu seems to be a different version of the full Brush editing menu. See image: http://i-toons.com//storage/adbr05.jpg Nor is there any option to switch to the selected brush from this Edit menu. Second suggestion: What I would like to see would be a way (or tool) to select a Brush stroke already applied to the “canvas” and have the brush both identified (named in all Brush menus) and the brush tools attributes switch to those of the selected brush stroke. Select stroke. Brush (tool) changes to (inheruts) the selected stokes attributes. Be able to immediately draw with those attributes. This fast switch would be a MAJOR productivity enhancement and time saver. If this feature doesn't exist - I would dearly love to have it added. Either in the form of a new selection tool addition or as something similar to the functionality of the Freehand tool or arrow tool in the application Expression3/Microsoft Expression Design. In those versions of the application, click (tap) a brush stroke on the “canvas” with the Freehand Pen or arrow selection tool and the tools attributes immediately switch to the clicked objects attributes. An example of why this would be useful. If I have several brushes in use in a drawing and want to use one of the strokes in my drawing... Just clicking on the stroke would switch me to the Brush. The drawn stroke would double as a palette and the file could even double as a Brush category - saving tons of time that is presently lost hunting up a brush in the Brushes/brush collections menus. Thanks Craig
-
- 3
-
-
- affinity designer
- brush
- (and 1 more)
-

affinity designer A drawing - from start to finish
giantlobsterprd posted a topic in Share your work
Here's a time-lapse of me creating a new comic-style drawing. Mistakes and back-pedalling included. Final result: Authoring file: Enjoy!- 50 replies
-
- 48
-
-
- illustration
- b/w
- (and 4 more)
-
Hi all, please add the option to create a brush from selection, I really can't see why we have to export a brush shape only to import it back in, it seems a very convoluted and needless process. Brush from selection would streamline the process of brush creation substantially.
-
- 3
-
-
- affinity designer
- affinity photo
- (and 3 more)
-
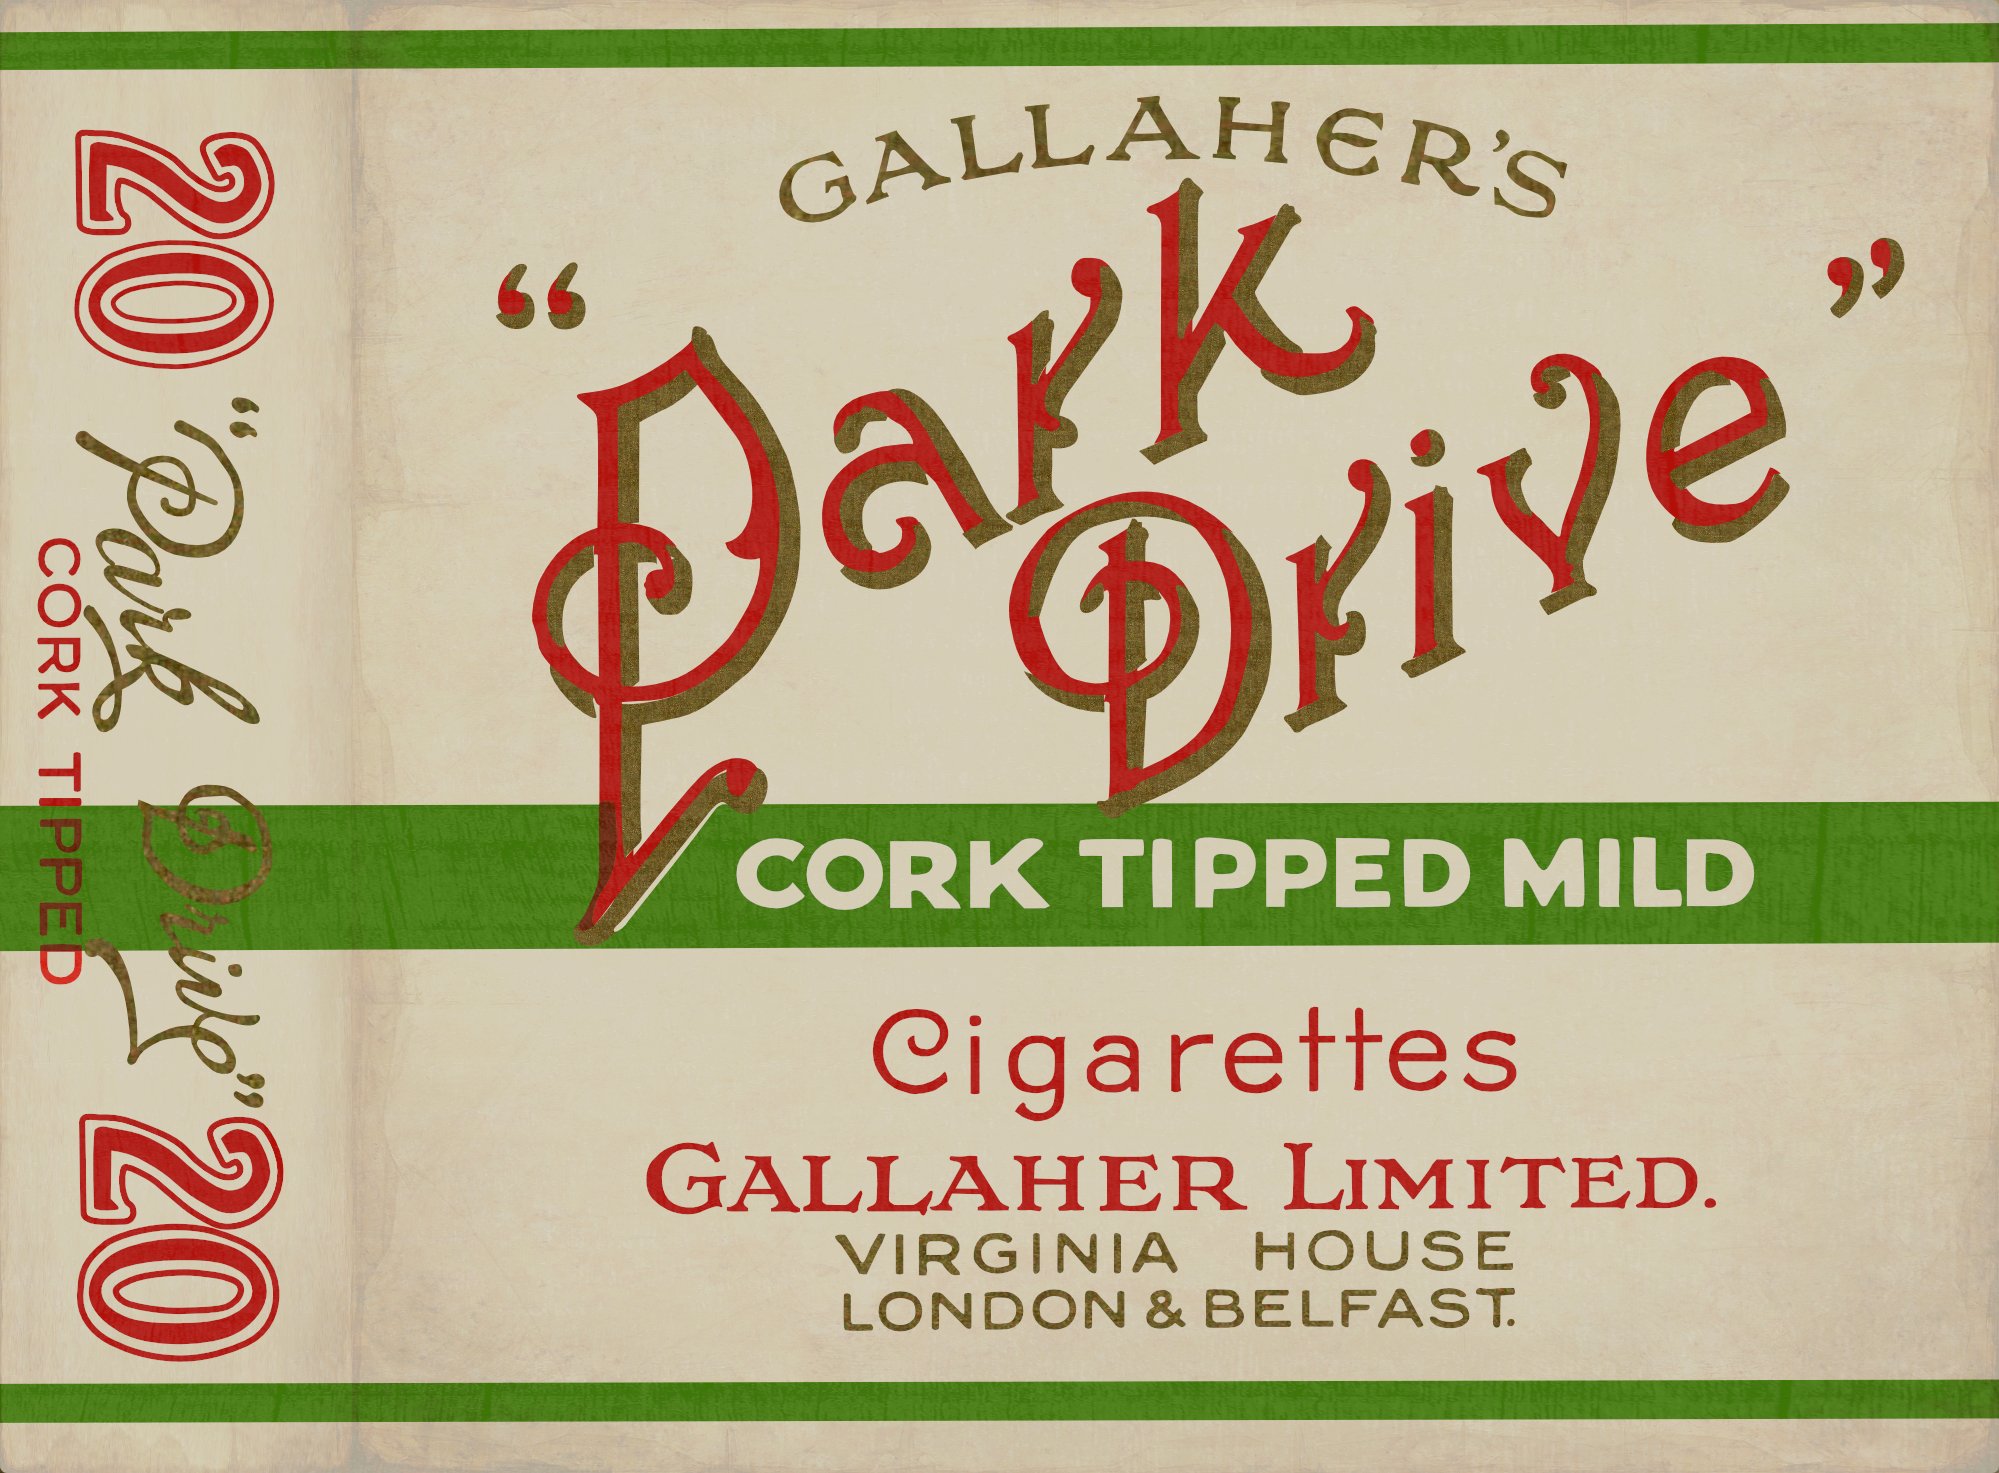
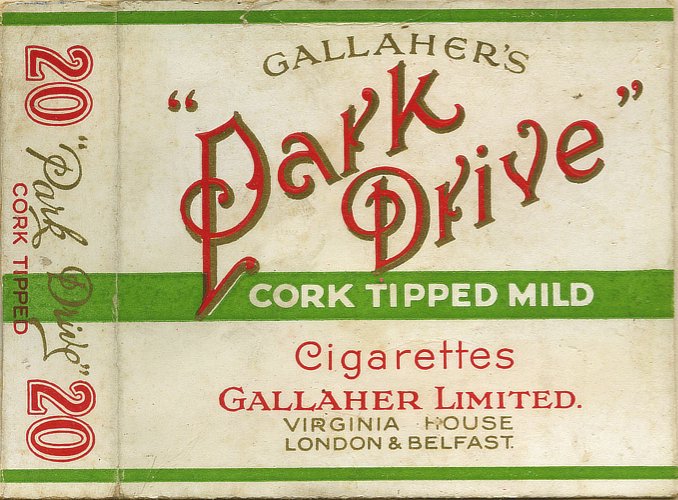
I said in an earlier post (https://forum.affinity.serif.com/index.php?/topic/75089-vintage-cigarette-packets/) I'd started a little project to reproduce some old cigarette packets (or packs, if you're on that side of the Pond). Here's another: Park Drive. Once again, I've used vectors to make the letter shapes, with a bitmap fill for the gold shadows, made by sampling the original image, and I've finished off in Photo with Merge visible and a couple of pixel textures to make it look a bit 'lived-in'. This time I thought I'd be a bit more ambitious... and try a twenty instead of a ten! And the original looked like this:
-
- 2
-
-
- vector
- affinity designer
- (and 1 more)
-
Every so often when using AD 1.7.0.3 I'll be moving a cusp node snapping it to another node and the cusp node will suddenly change into a smooth node sprouting 2 handles and the handles are twisted 180 degrees from where they would normally be. All without releasing the mouse button. Handles.mov If it is showing the twisted handles with the smooth node when the mouse button is released that then is what goes into the drawing, not the cusp node that was originally grabbed. Lots of times it will not do this, so it may be hard to reproduce on command. Other times it happens easily. I have not been able to figure out what was done differently. I am assuming this is a bug. Attached is the drawing I was doing when it last occurred. The Node tool was being used and all layers were selected when this occurred. Also a couple questions: In the video it's easy to see that when the node cursor turns white there is a small circle just in front of the cursor. What is this circle for? I've never noticed it in earlier versions but it's so small... Does it mean something? When dragging some nodes the cursor is white while for other cursors it's black. What do these colors mean? I'm not finding this in the help. When the cursor is black there is no little circle. I always use separated mode and until 1.7.0.3 the tool hints were not shown below the drawing, it's great that they are now included. But when a node handle is hovered over or grabbed the hints say "⌥ to ignore snapping". But this is not correct, it doesn't ignore snapping it breaks the constraint between the two handles so one can be moved separately from the other. Is there a way to "ignore snapping" when moving a node's handles without separating the handles? Other than turning off all 5 node snap widgets. I guess it does ignore snapping even though it breaks the bond between the handles, so I guess one could use the opt to position the handle without snapping then release the opt before the mouse button, but if it's close to a snap point it will then snap into position. So that doesn't work either. Temp 4.afdesign Thanks for all your work Affinity team.
-

affinity designer My first minimal logo design for gallery
Daviddesign posted a topic in Share your work
Which version you prefer? I love minimal design.
-
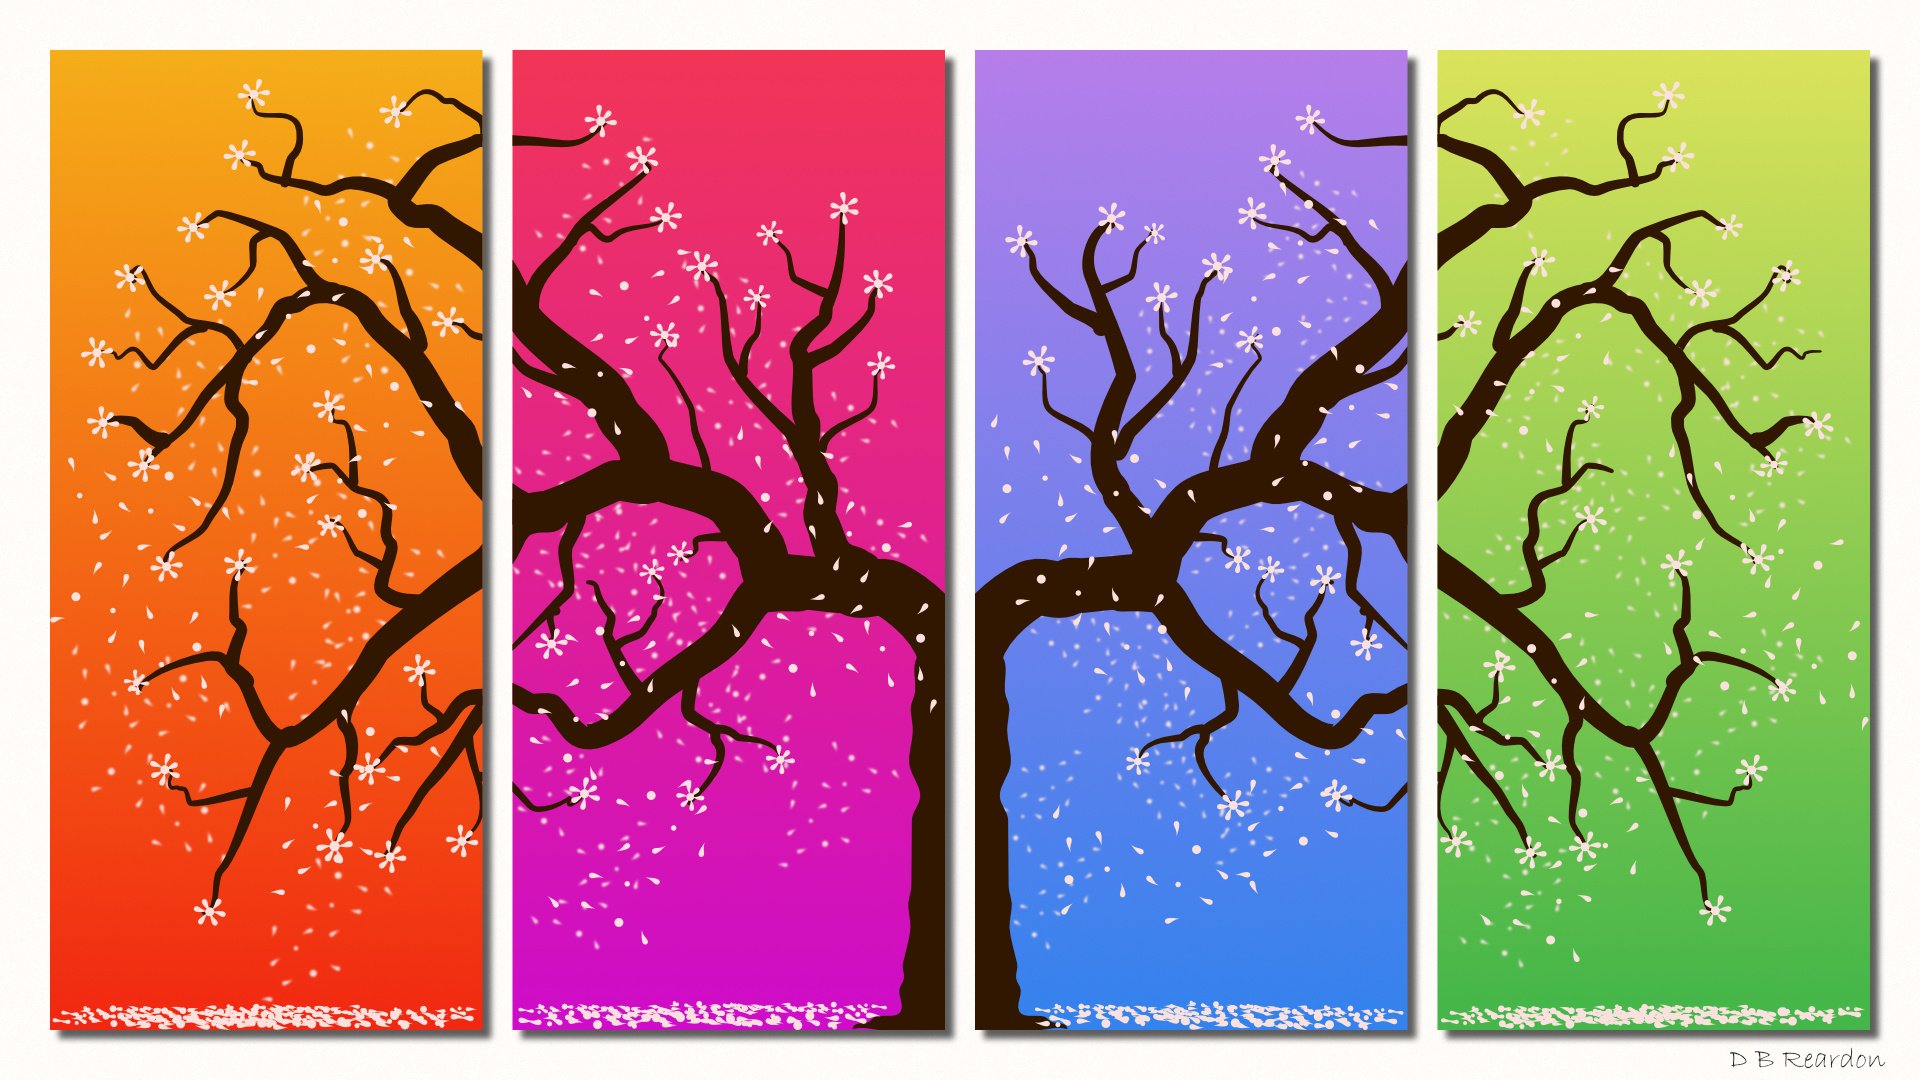
I used a mirrored symbol to design some of this. Branches were strokes (with pencil tool), then I "expanded stroke". I was unable to combine all the branches together into a single large curve/object using the "add" tool without having issues. So each branch is a separate object. Nonetheless, I think it came out well. I could have done more but this was just supposed to be a relatively quick design. I hope you enjoy!