Search the Community
Showing results for tags 'Affinity Designer'.
-
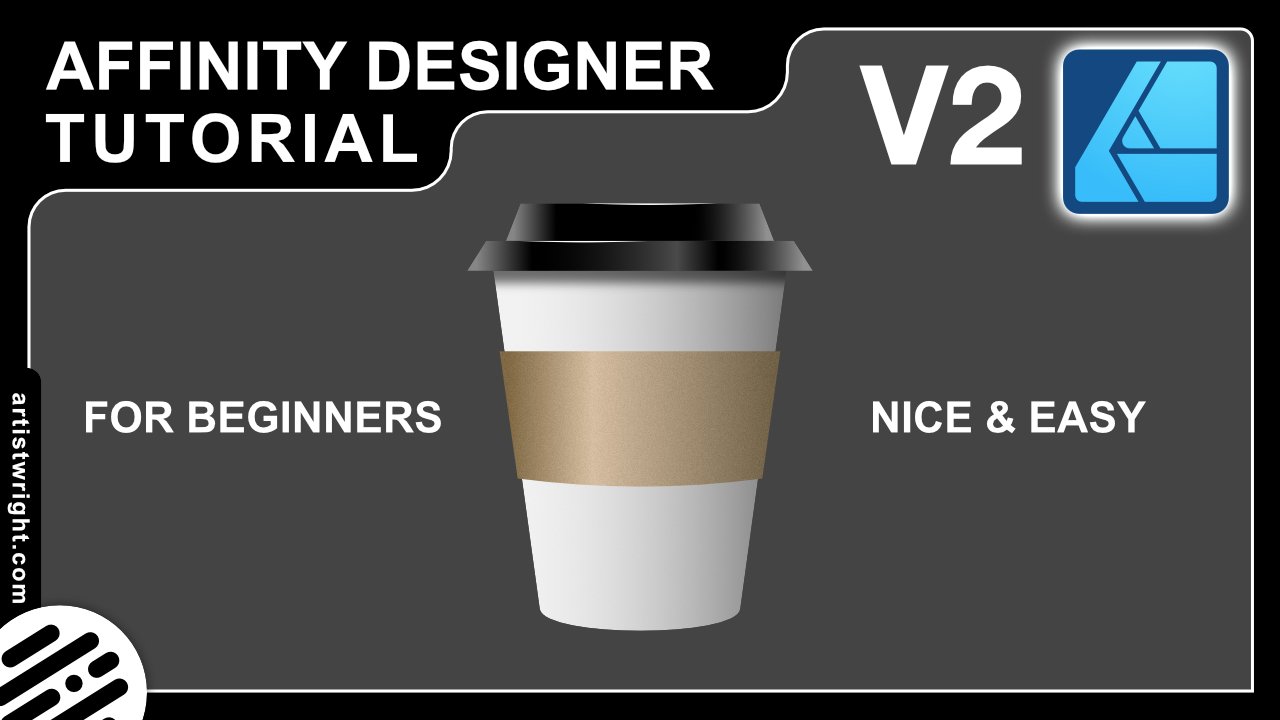
 In this video we are going to create a takeaway coffee cup. It’s beginner friendly and an easy project to get started on. We will cover many tools in this tutorial but I’ll take it slowly and teach you step by step so you can follow along with me. Affinity Designer V2 (2.3) Used in this tutorial. https://youtu.be/LFMAdOMuWyU
-
I began the illustrations for this in AD V1, but it went on the back burner for ages. I recently finished them -- all in V2 -- and yesterday I put the video together. Billy Bennett was a very popular 'comic turn' on the Variety stage in the 1920s and 1930. He specialised in songs an monologues, includng parodies of well-known 'straight' monologues.
-
- 4
-

-
- movieplus x6
- video
- (and 2 more)
-
 I'm trying to look for an angled/tilted brush for hand writing with my pen tablet. I know it sounds extremely simple – it's one of the default brushes on Adobe Illustrator – but I can't seem to find it on Affinity Designer. Everything is rounded... Some taper off a the ends. But none are actually angled. Please help!
- 61 replies
-
- 3
-
-
- brushes
- affinity designer
- (and 1 more)
-
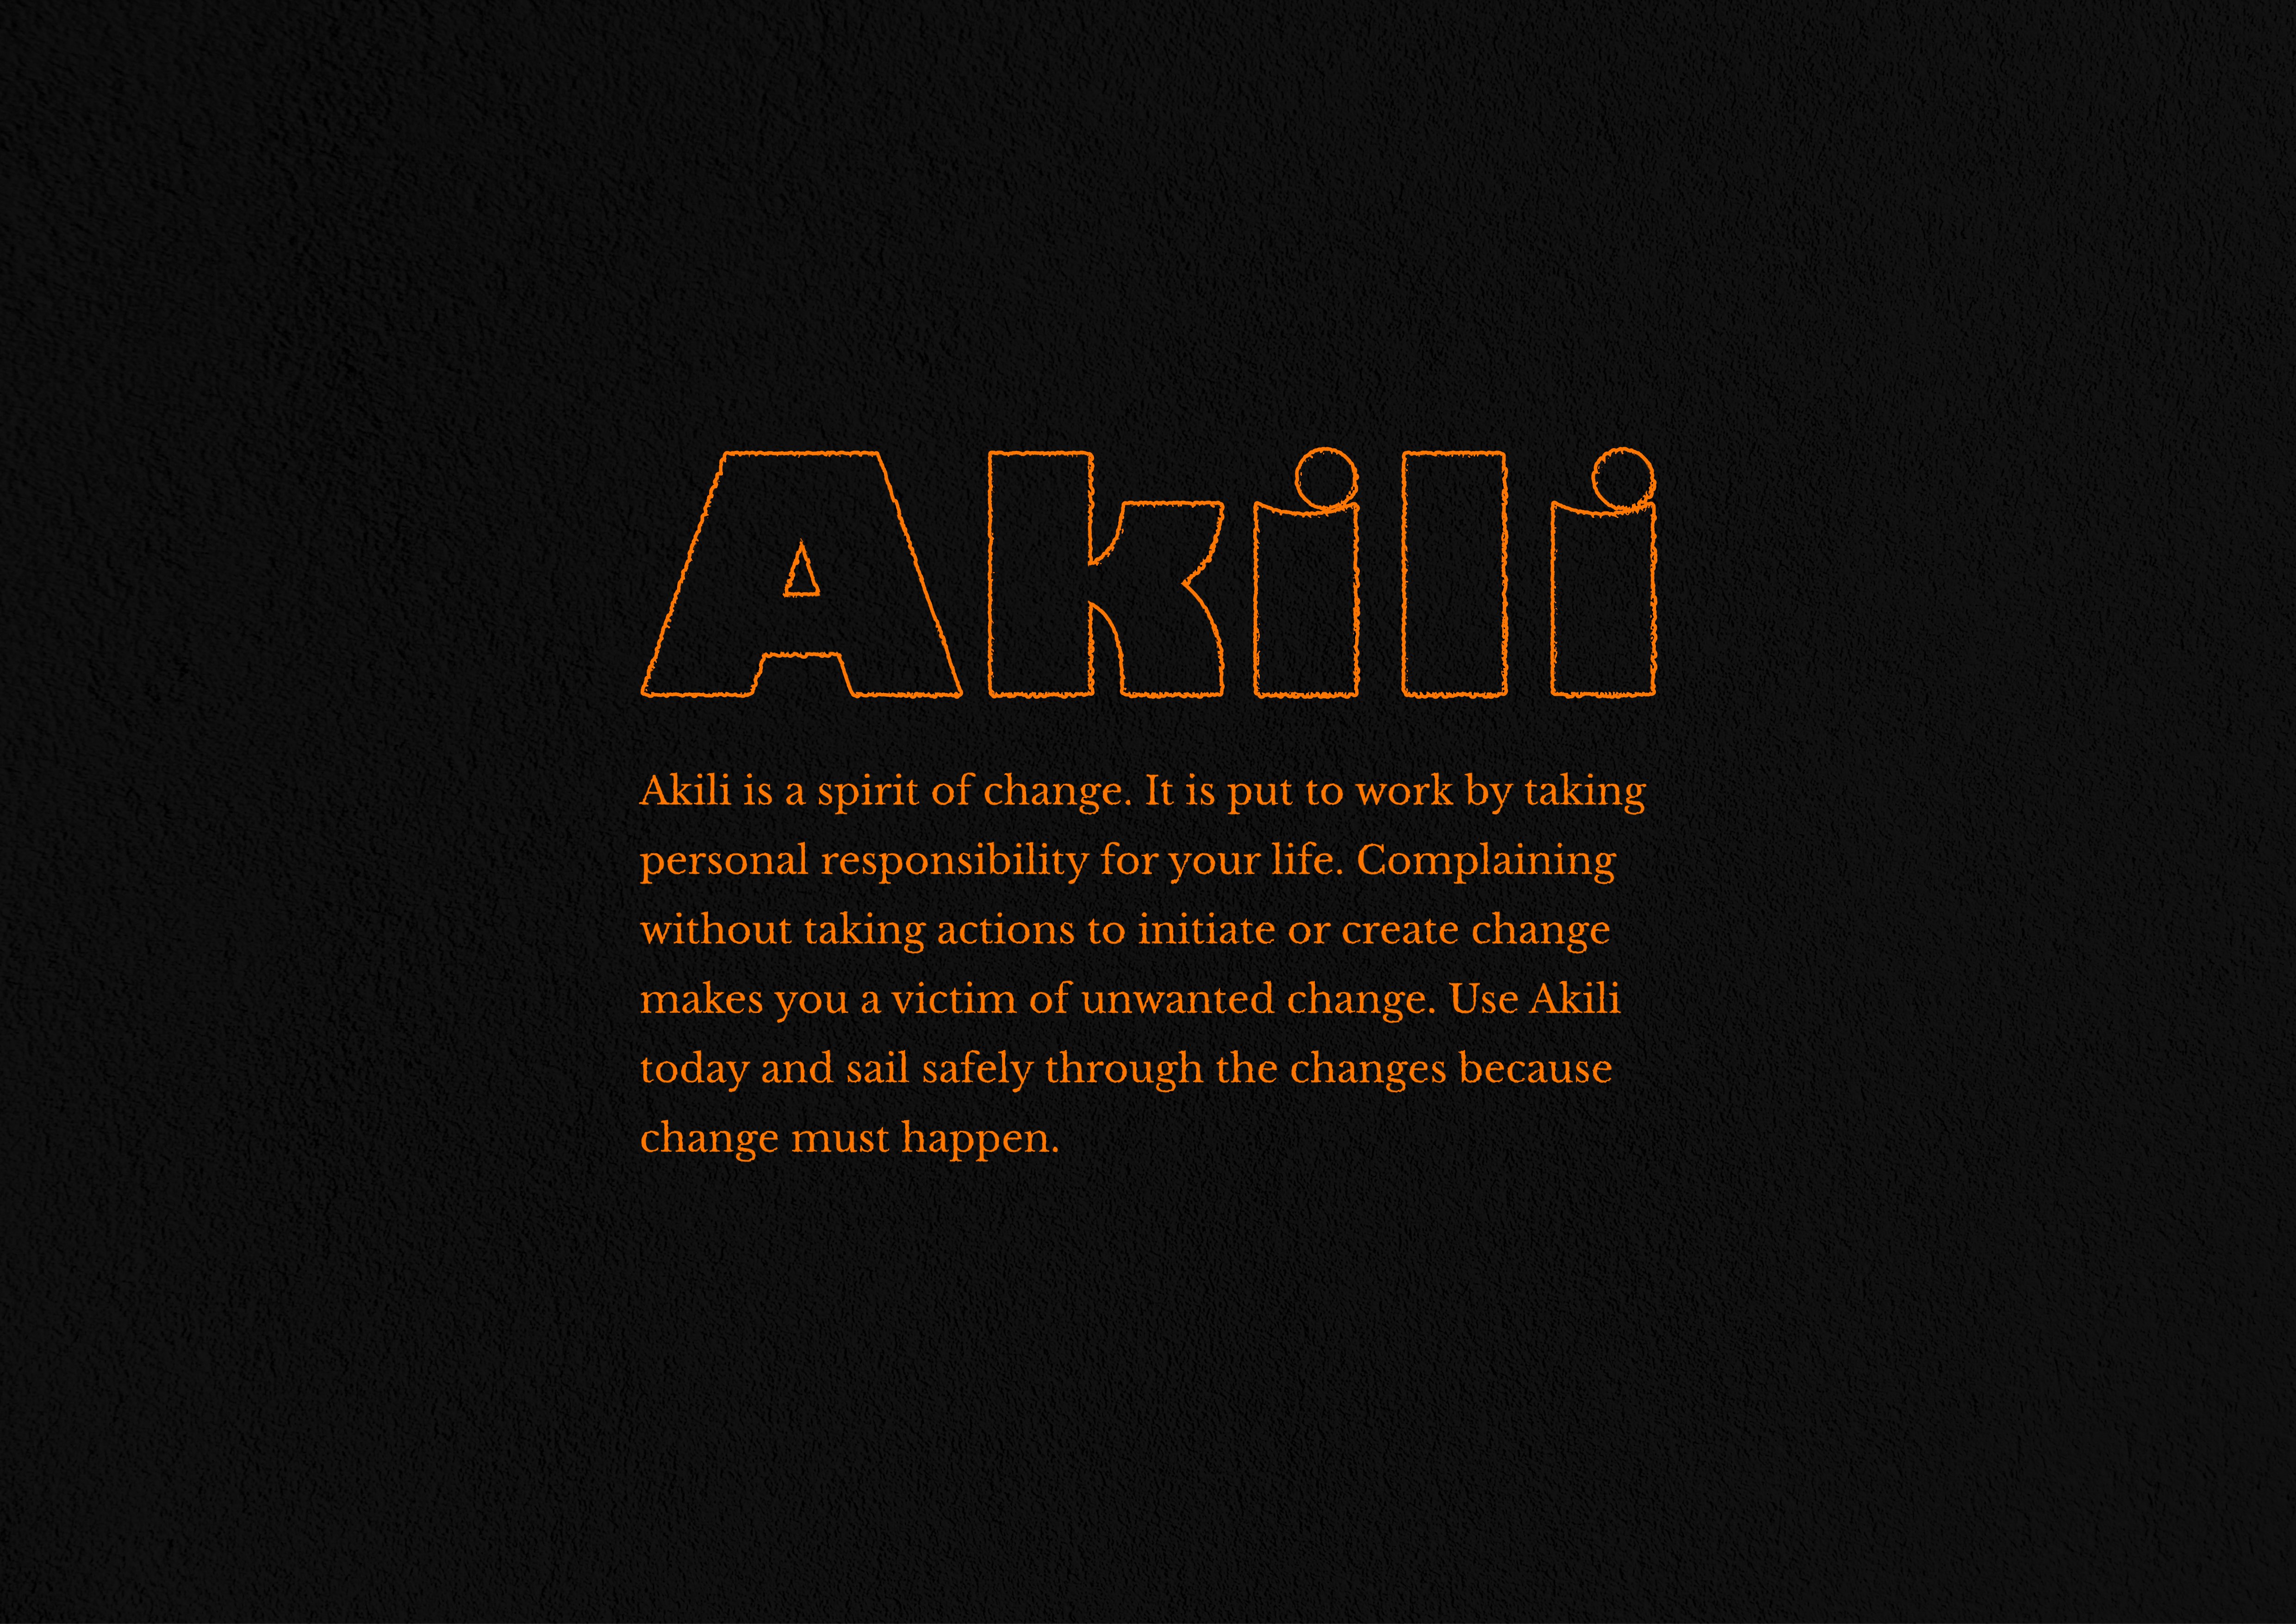
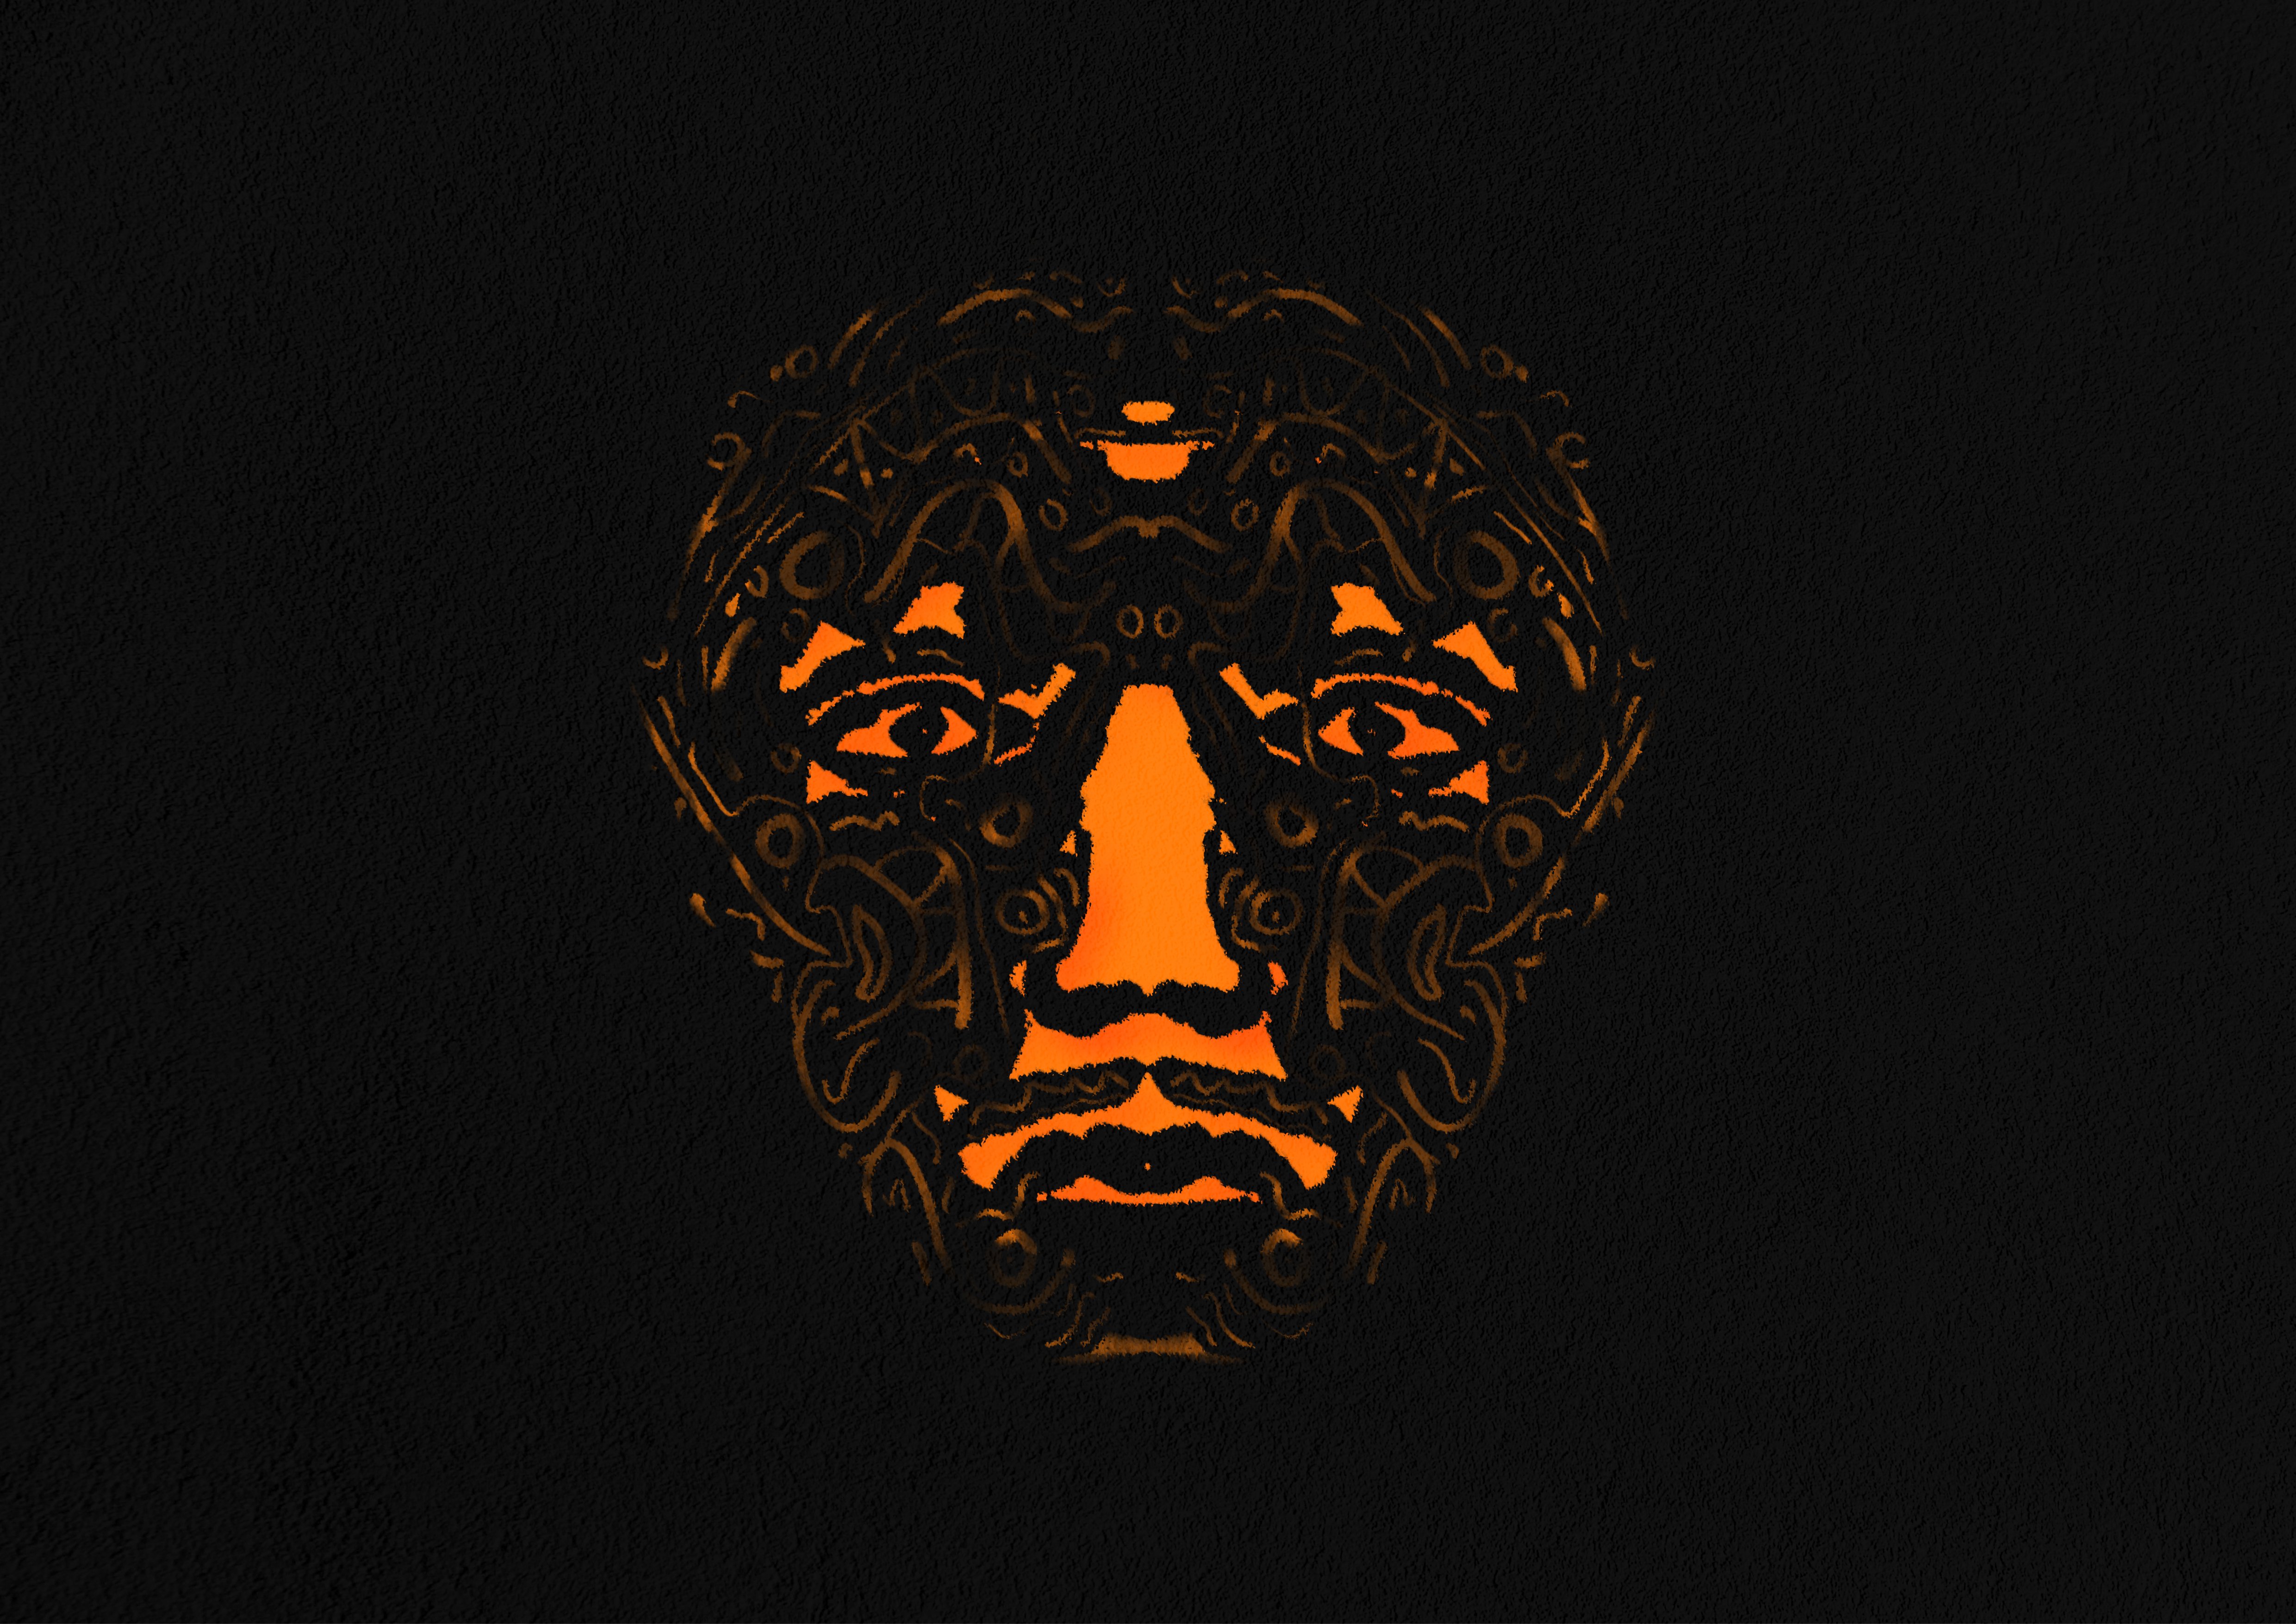
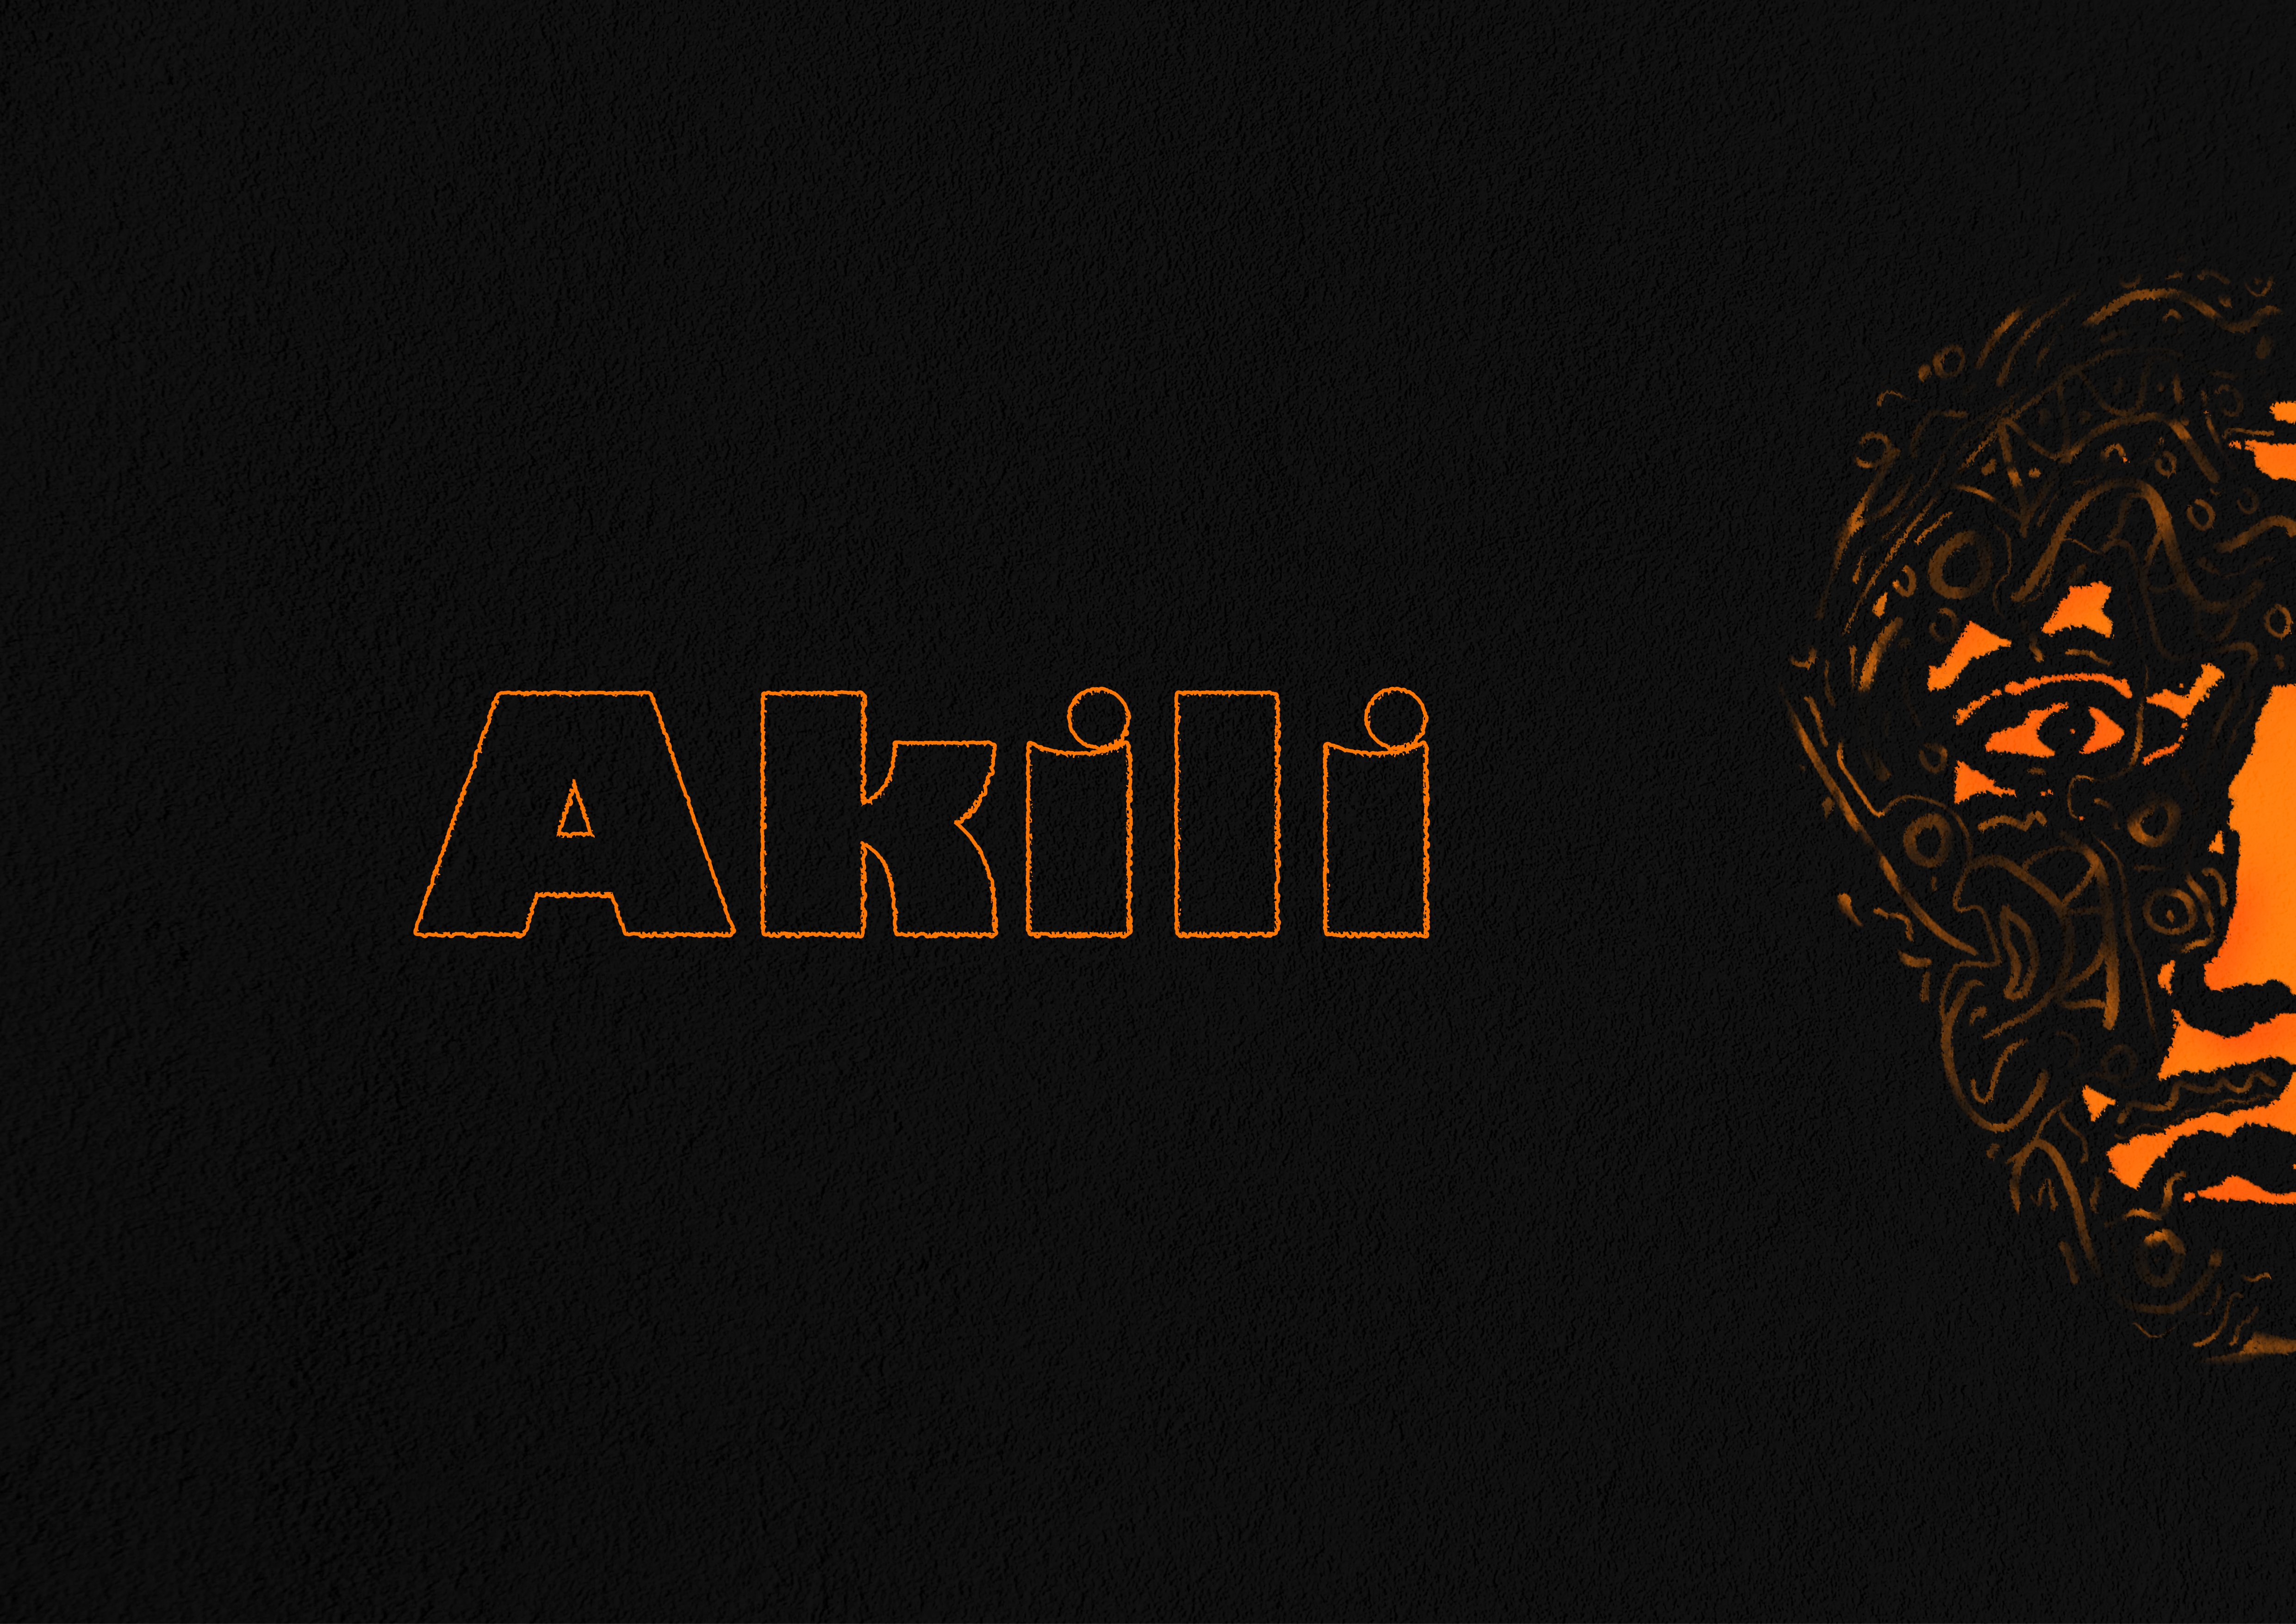
This is an update 1.1 of project Akili. Which version do you prefer? Thanks. Tools: Affinity Photo, Affinity Publisher Let's connect: https://www.behance.net/bah-is-life https://www.instagram.com/bah_is_life/
-
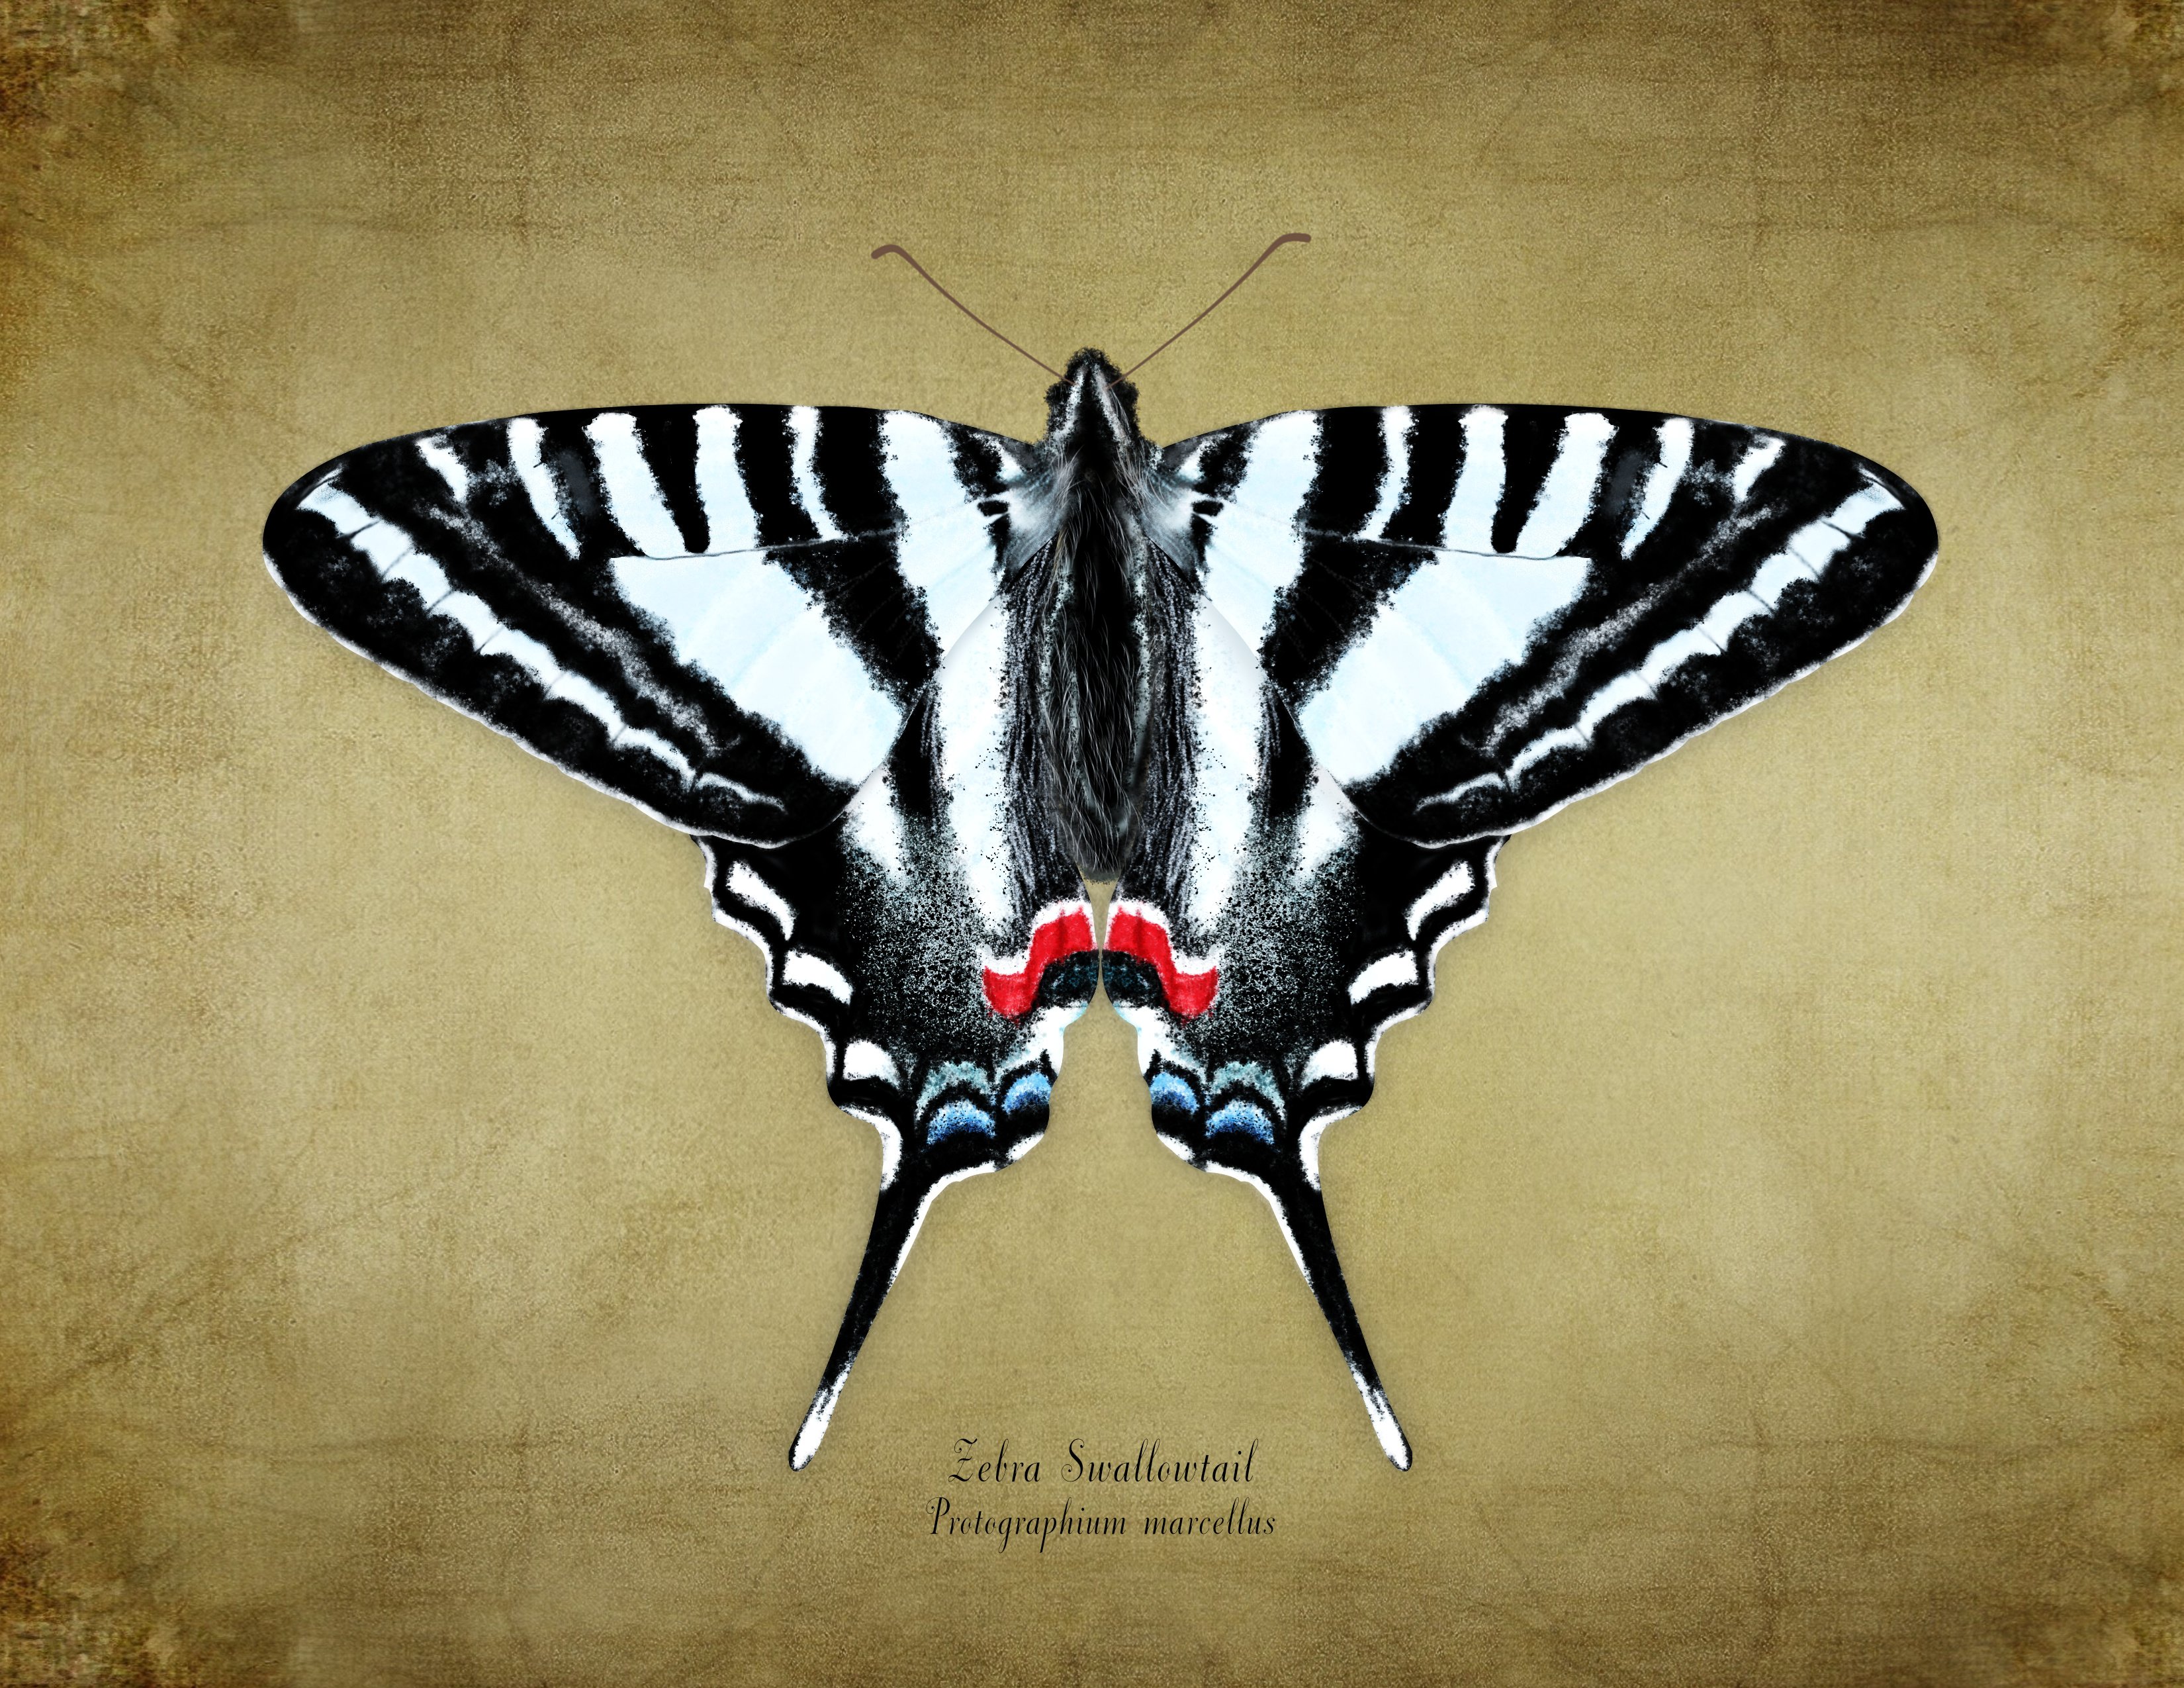
I recently illustrated a Zebra Swallowtail Butterfly (Protographium marcellus) for my brother. He wanted a photo, which I did not have, so I decided to create an illustration for him instead. I used AD v2.31., but spent a lot of time in the Pixel Persona. I also made a few trips to Affinity Photo for a few features that AD does not support. Hope you like it.
- 2 replies
-
- 17
-
-

-
- pixel persona
- butterfly
- (and 3 more)
-
I am having trouble with Affinity Photo and Designer(Mac OS) today. When I open the app it asks me to sign in?? After signing in the app crashes. It did manage to open once but the toolbar is floating and will not dock(weird), then after a minute it crashed again. Tried opening again, and was asked to sign in....then it crashed everything was working fine yesterday, but I am unable to use the app at all today. any suggestions thanks crash report1.txt
-
 Hi everyone! I recorded this quick tutorial on how to draw the Tik Tok logo in Affinity Designer. I hope you guys find it interesting.
 -
Our authentic marble and stone Affinity textures are perfect for creating stunning digital collages, product packaging designs and more! Introducing an authentic, user-friendly marble and stone texture pack for Affinity Designer! Our marble and stone textures were sourced from 100% genuine stone and marble and have been saved as seamless repeat patterns so you can fill infinite-sized areas without the disappointment of untidy edges and messy tiling. This marble and stone collage creator also features grout brushes and two grout texture styles – gold embossed and classic grout. This gives you everything you need to create stunning digital collages, packaging designs, and eye-catching backgrounds or add a touch of class to any design project. Check out the screenshots to see what’s possible with this complete texture tool kit. >>GET IT HERE!<< THIS COMPLETE TOOL KIT FEATURES ALL THESE HANDY DESIGN TOOLS AND FEATURES: The Marble & Stone Textures: Seamless, repeat patterns supplied as Affinity Styles. Use them to fill infinite-sized areas with ease. Grout Brushes: Add undulating edges and outlines to your designs. Grout Styles: Add embossed gold or classic grout effect to your outlines. An Example file: Backwards engineer this finished design. Not compatible with Affinity Designer 1. A Quick Reference Guide: Navigate this extensive collection of Affinity textures quickly and easily. Instructions: Learn how to use this marble and stone design tool kit. Technical information: All texture tiles measure 2000 x 2000px but because they tile seamlessly, you can fill infinite-sized areas. >>GET IT HERE!<<
-
 Hello, See example screenshot. This is a vector eps file downloaded from DepositPhotos. It does not open in Affinity Designer with layers...it opens as an "image"...how do I change this for editing?
-
 In the “Resources” section, I posted all of the vectorized pictograms that I used to create these visuals in the form of Assets…
-
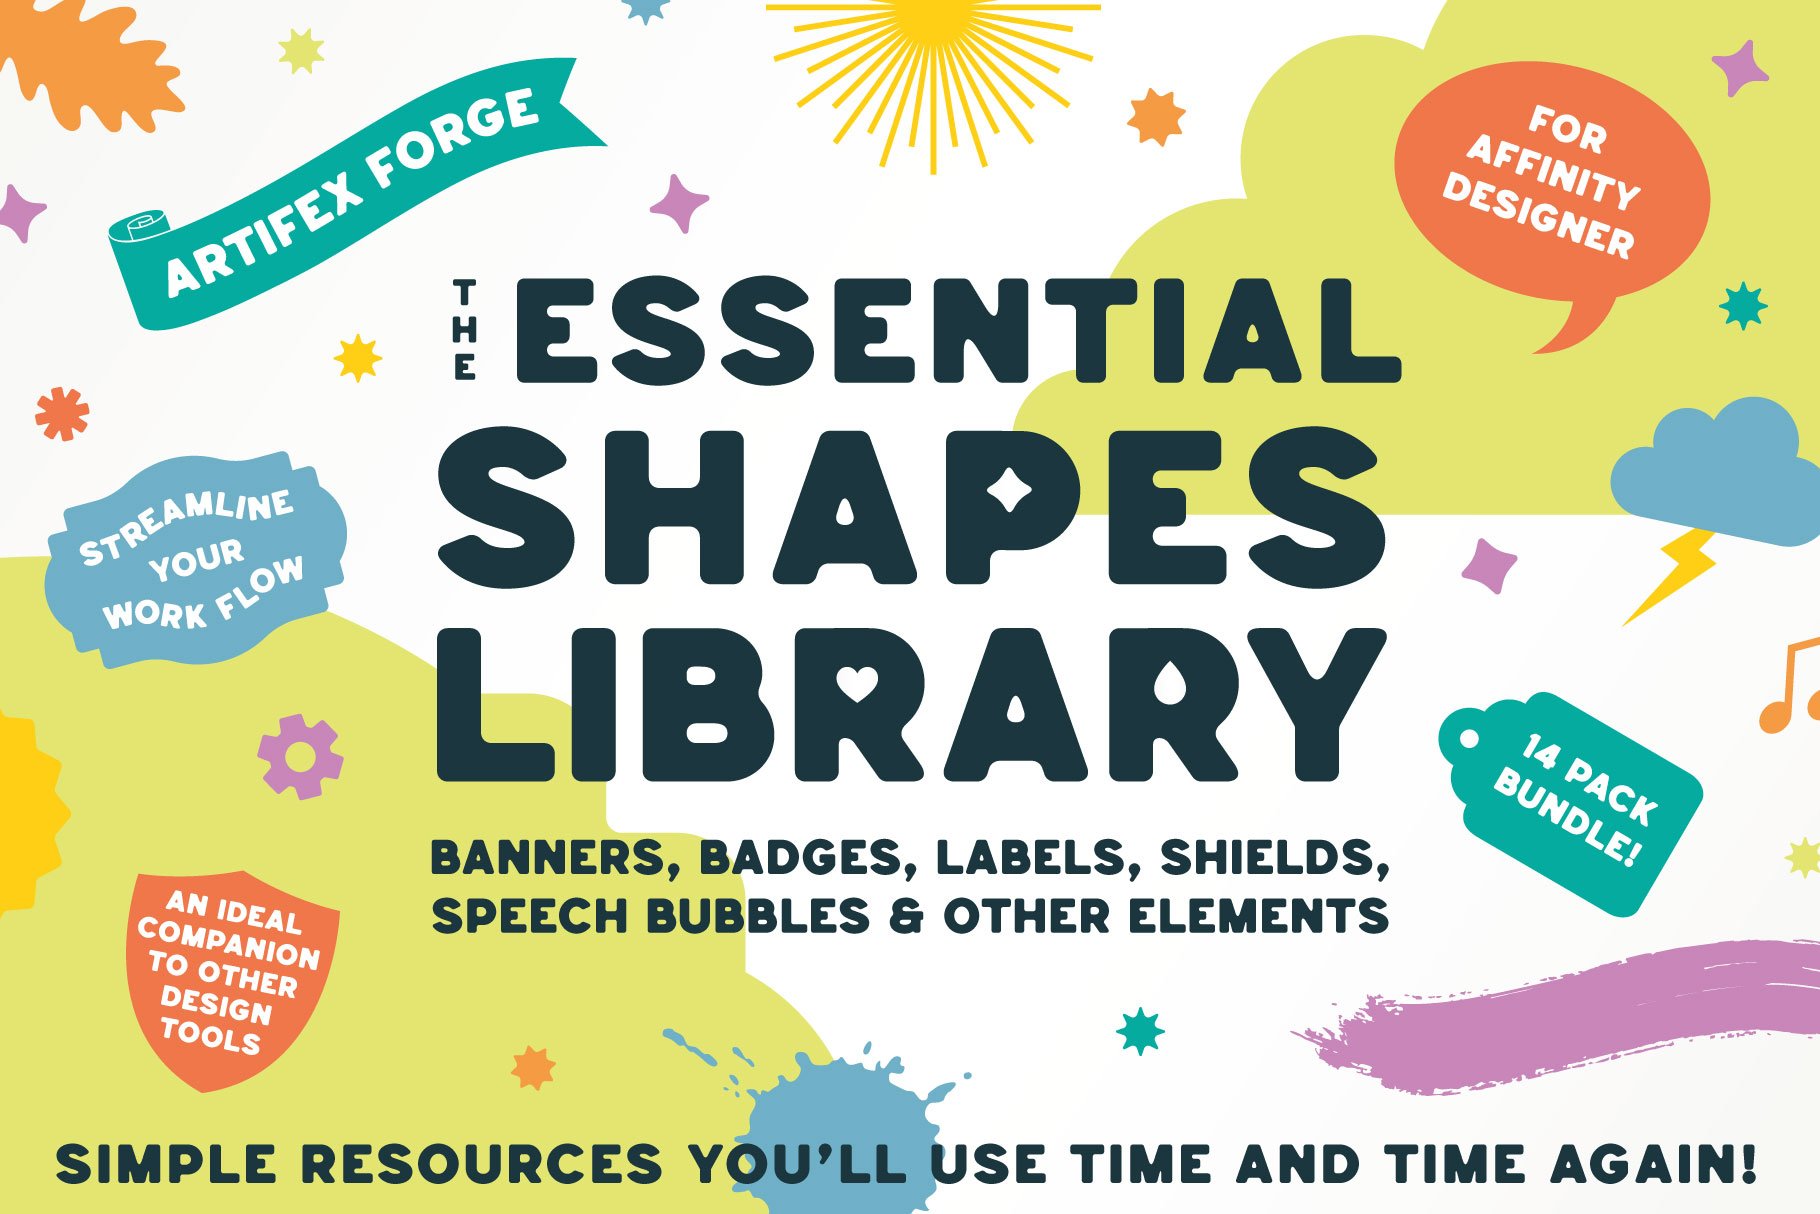
 Introducing a colossal vector shape bundle for Affinity Designer, featuring banners, badges, labels, shields, speech bubbles and more – shapes for any project! >>SEE IT NOW!<< This comprehensive vector shapes library for Affinity Designer is the perfect addition to your design tool kit! Read on to find out why… Affinity Designer comes equipped with the square, rectangle, circle and other basic vector shape tools and these have become the designer’s go-to, speeding up the design process (just imagine if you had to draw each circle by hand?!). This massive shapes bundle builds on the idea of ready-made vector shapes, supplying those most commonly used by designers and digital illustrators in one comprehensive shape bundle, which will save you time, again and again. What can the vector shapes be used for? Most product packaging, brand designs, catalogs, magazines, book covers, giftware designs and websites use simple shapes as part of digital designs and illustrations. These might promote sales, highlight import type, show off a logo or form an integral part of a wider design. Our shape library is useful for all of this and more. If you frequently create any kind of digital design then this massive bundle will become an indispensable addition to your design arsenal. Why vector shapes are so versatile: Easily add patterns, textures and gradients. Adjust the edges using brushes. Add shadows and other effects in seconds. Scale to any size without loss of resolution. Round the corners. Edit and re-shape by adjusting nodes. Warp non-destructively. They’re also compatible with other Artifex Forge products! To buy equivalent shape packs separately would cost $70+ Get the bundle today and arm yourself with this indispensable tool kit at a bargain price! The Essential Shapes Library features the following handy shape packs (supplied as Affinity Assets): Decorative Label Shapes – For logos, packaging design, and more. Simple Badge Shapes – Ideal for flashes, labels, logos, editorial design and more. Banner Shapes – Including classic banners and scroll banner designs. Cloud Shapes – A range of simple cloud shapes – use them for flashes, logos and packaging design. Shield Shapes – Perfect for logos, branding, packaging design and more. Splat and Splash Shapes – Good for creative-themed designs. They also make great flashes. Sunburst Shapes – Perfect for backgrounds and retro designs. Use for big impact! Tag and Label Shapes – Great for giftware, packaging, festive themes and sales graphics. Painted Shapes – Add a hand-made aesthetic to designs. Rough/Torn Edge Shapes – Ideal for digital scrapbooking, rustic or grunge-themed designs. Speech Bubble Shapes – Classic speech bubbles and thought bubbles. Amorphous Shapes – Quirky shapes with a liquid-like quality – ideal for packaging, editorial design and branding. Leaf Shapes – A range of simple leaf designs. Bonus Assorted Shapes – Handy shapes which could not easily be categorized. …Along with a set of instructions! >>GET OUR HUGE SHAPES LIBRARY NOW!<<
- 2 replies
-
- 1
-
-
- assets
- affinity designer
- (and 1 more)
-
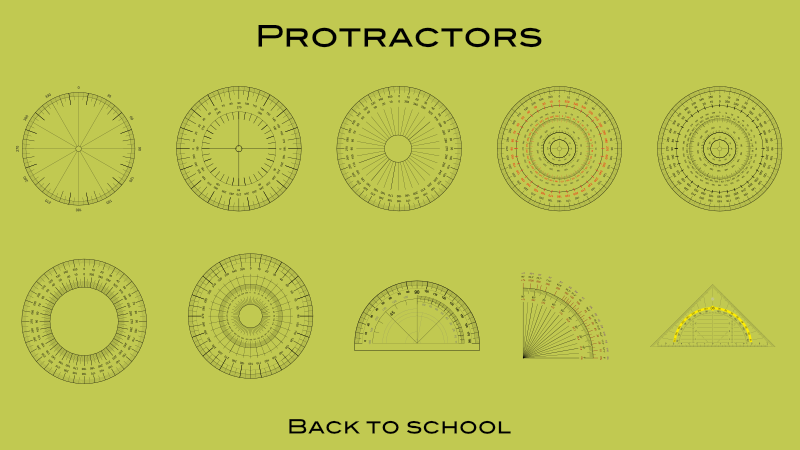
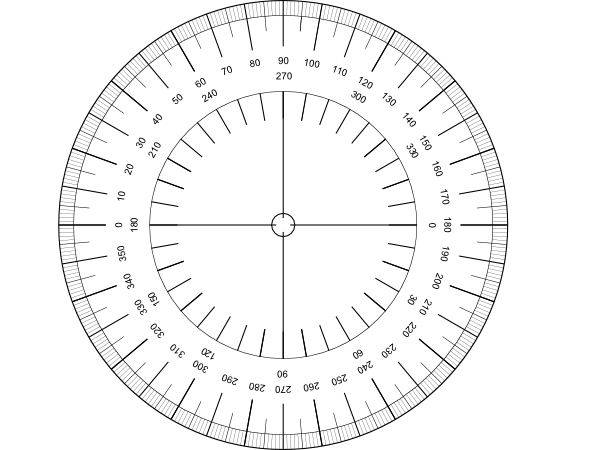
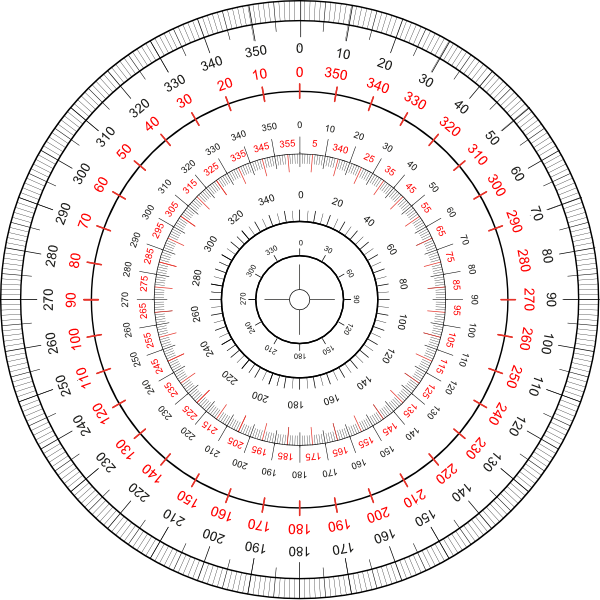
Let's go back to school, with some of those common and well known school protractors for measuring in degrees. ... etc. The protractor assets shared here ... ... are all vector based and do have printed on degree scales. You have to adapt/size the default assets protractor sizes to your document needs and thus scale them up/down so they nearly match your doc measurements. Note that all protractors are just a bunch of grouped/layered together vector parts (curves and text) thus they can be modified in colorings and the like. Also you should always move & size etc. a whole reused protractor group/layer when needed! Here is the associated assets file: protractors.afassets Have a nice school day!
- 3 replies
-
- 10
-
-
-
- vector
- protractors
- (and 4 more)
-
The 'Erase' blend mode in the appearance pane does not work on fill and stroke. When setting Erase in the Layers pane everything works as expected (the whole object including the stroke erases the objects behind). This is not true for Appearance. If setting the blend mode for stroke or fill to Erase it just makes the stroke or fill invisible. However, the other modes in Appearance seem to work. For me this would be very helpful if it worked correctly. For example when combining to cliparts, which technically overlap, but visually should not and one is cut out around the other with a distance. Now I have to set a stroke, expand it, subtract the expanded stroke from the object, etc...
-
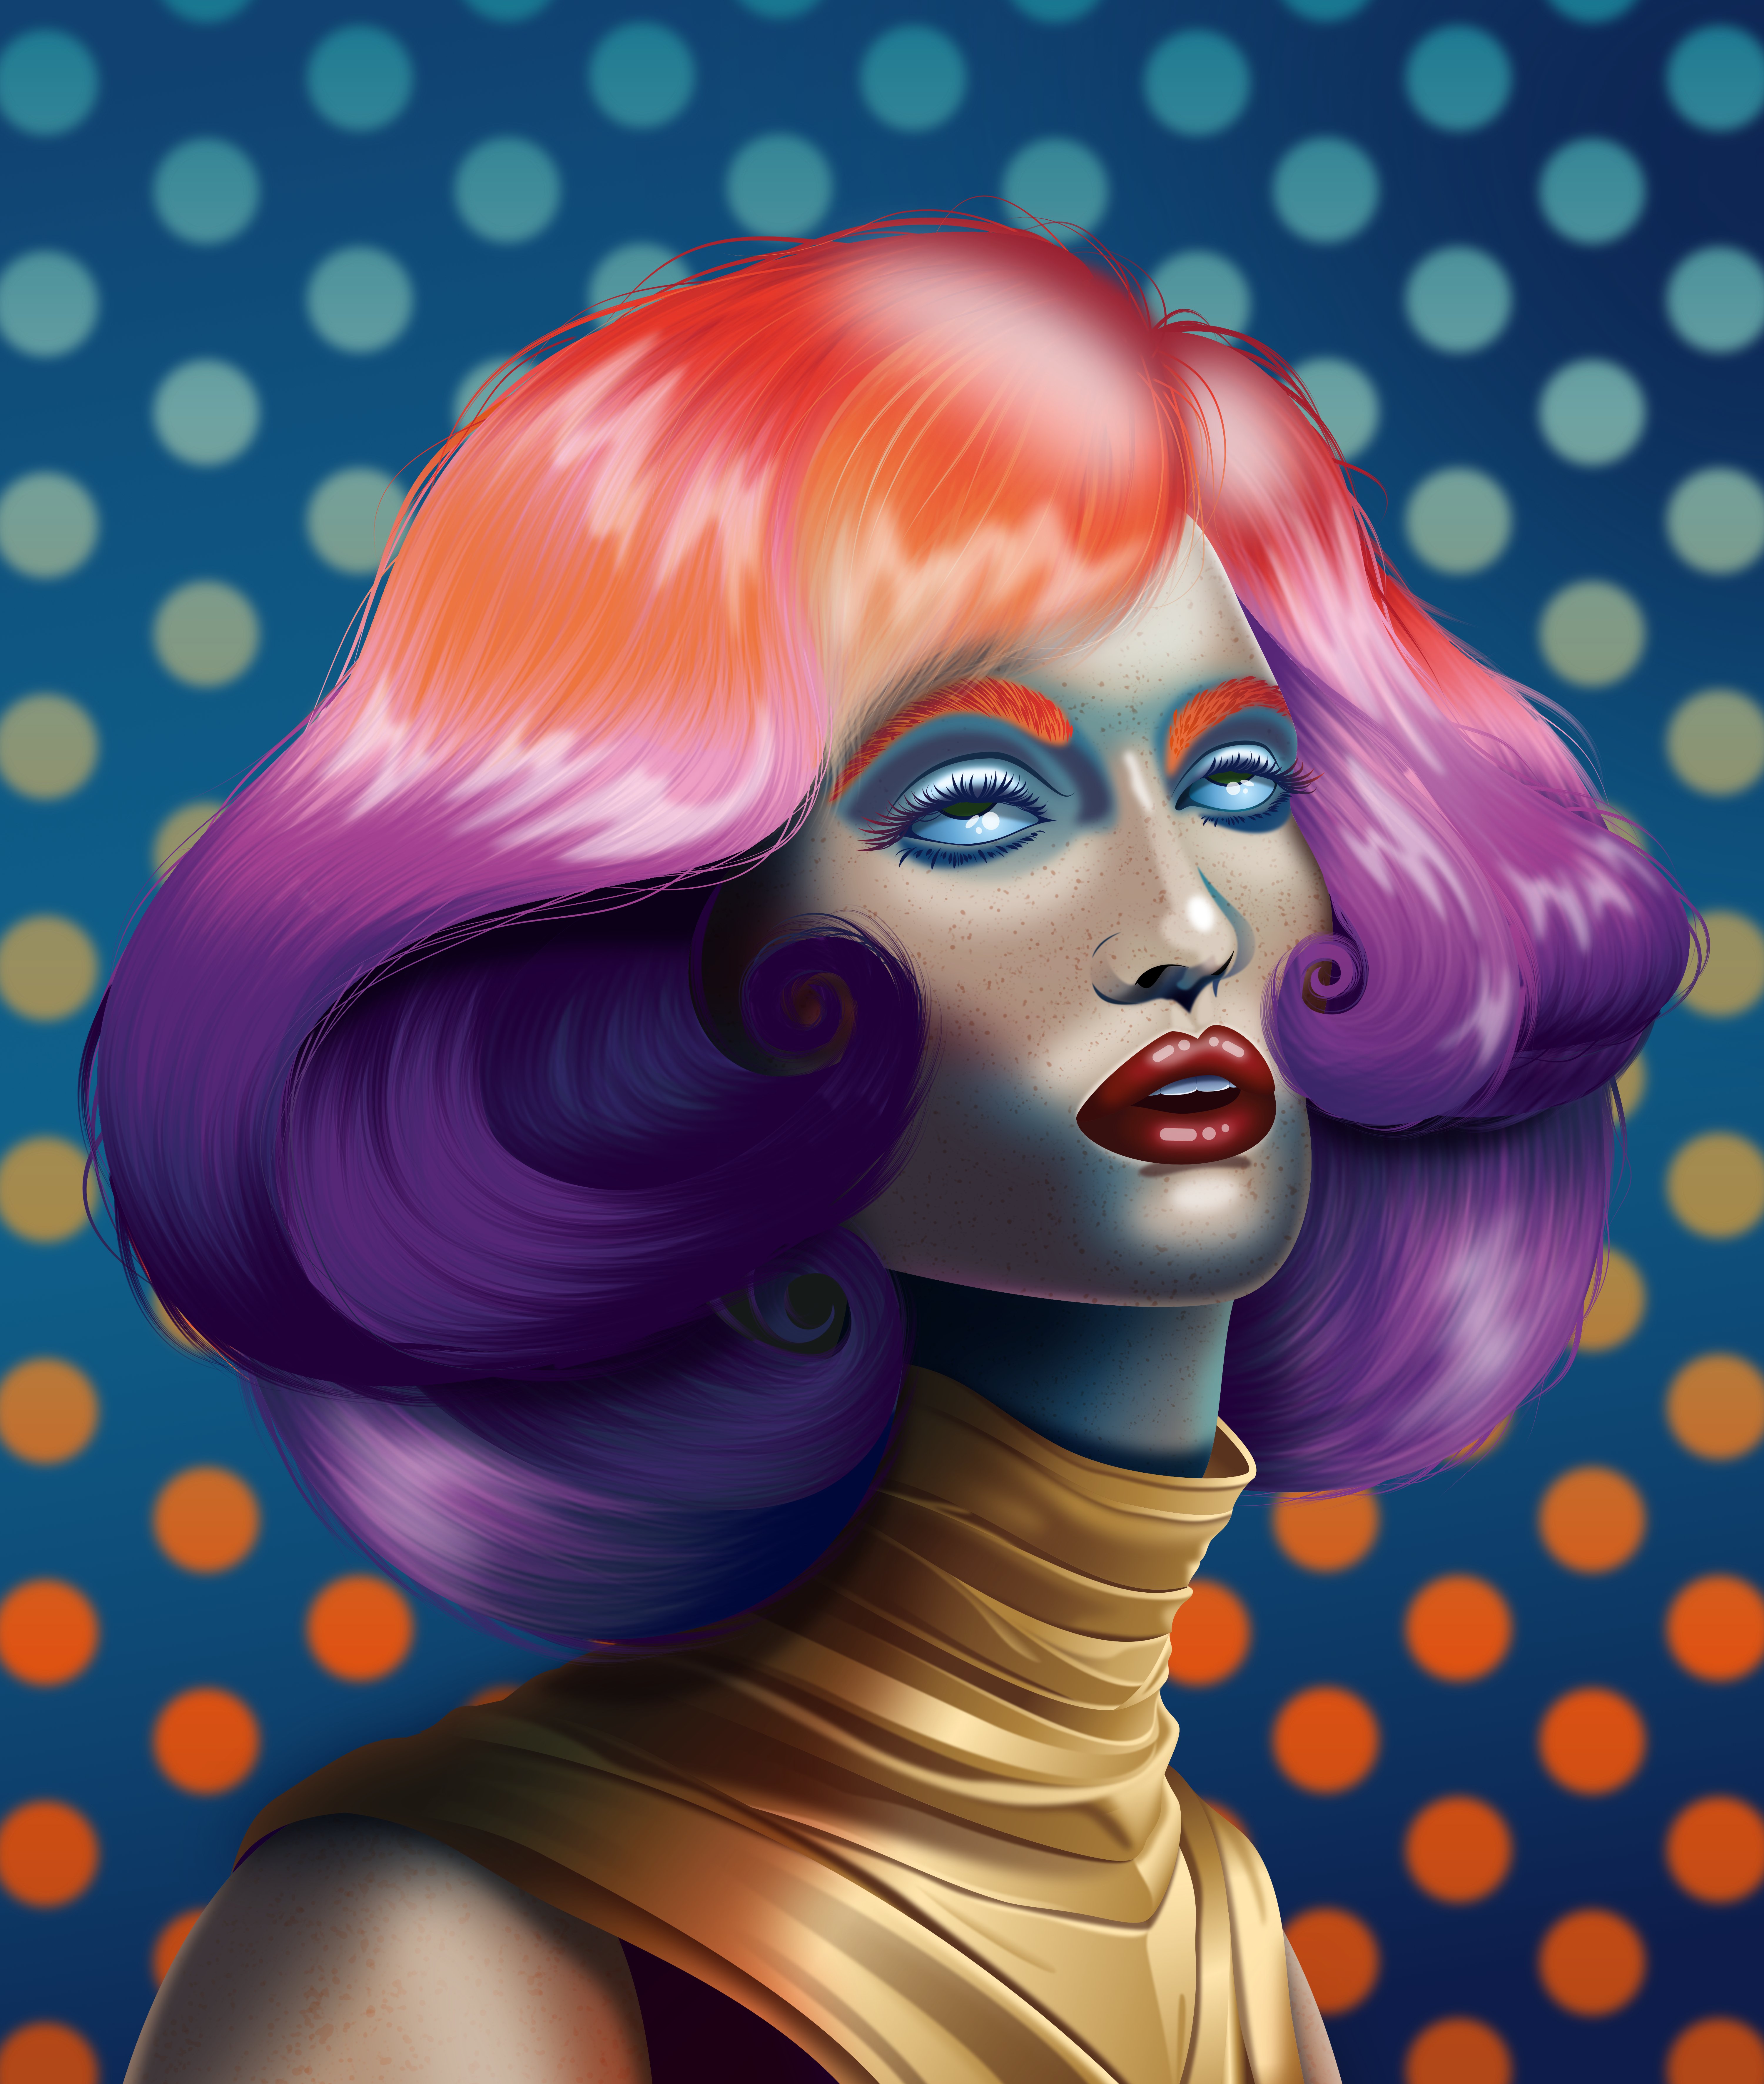
This started off life as a quick colour study for an oil painting I’ve been planning and wasn’t meant to be anything more, but - as usual - I started getting obsessed with adding the detail, and so here we are. I’ll still work on the painting, but I’m really happy with the vector version so thought I’d share. Hope you like her!
-
... or one of those typical forum discussions. 🤔 😉
-
 Hi, I had to discover this the hard way: with text rotated by 90° transformed in a bitmap image and downsampled. What I had done was to export my Designer image for reuse in another program. Therefore, I used the factory "PDF (for export)" preset, believing this was the one preserving all the details of the original Designer file. Not so. Is there a reason for this? Wouldn't one want to preserve the original elements when exchanging a project? In any case, I customized the preset to avoid rasterizing, and choose to include the advanced features in the exported file. It seems to work as expected. Text will remain text, even if rotated. But I would like to understand the reason for the factory settings, and if I'm doing the wrong thing in choosing that preset when exporting data for reuse in other programs (in my particular case, InDesign). Paolo
 -
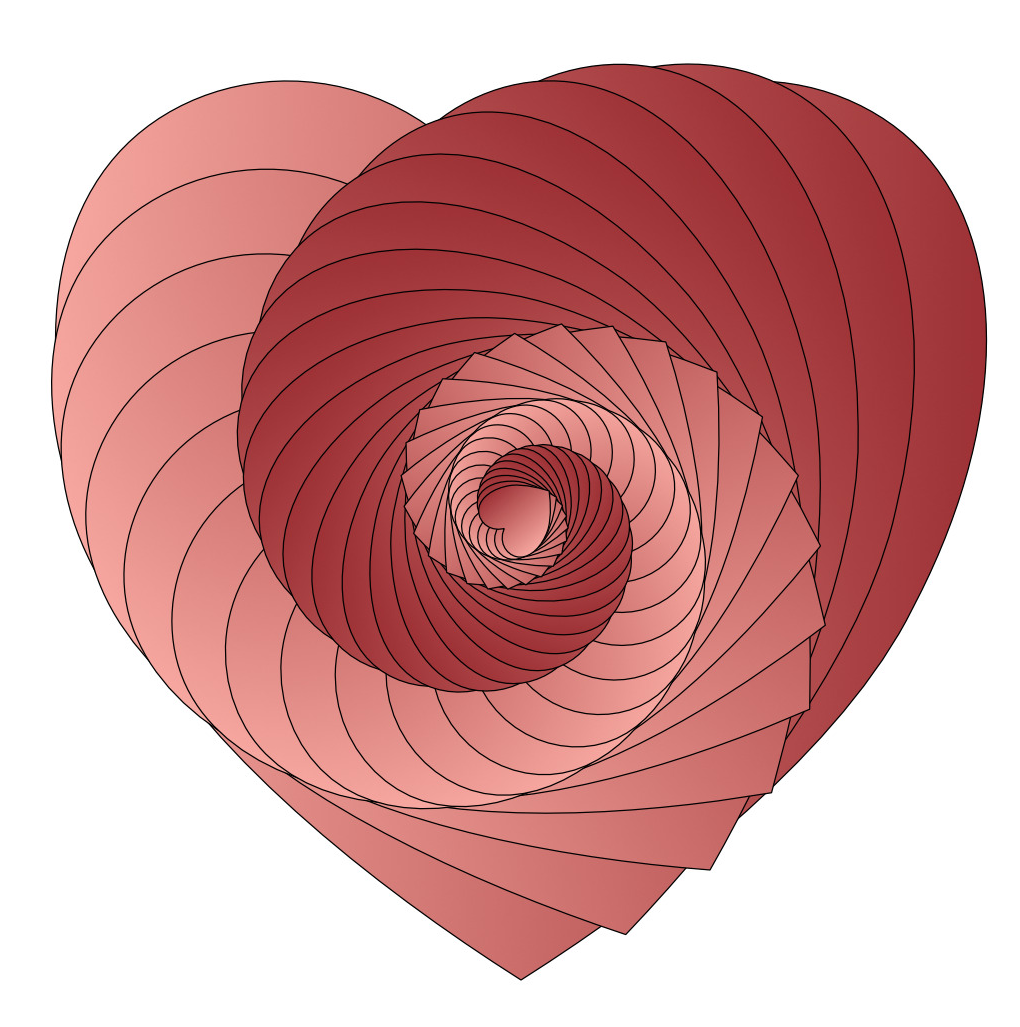
Borrowed from days of yore: "Roses are red, Violets are blue . . ." and now with days of more: Gradients are handy And Merging is too!
-
 I've just completed a large project ready for printing; my first using Affinity Designer. While working, I made a series of notes as I came across things I couldn't do, or which behaved in a manner I didn't expect. I'm happy to post feature requests, but I thought I'd ask here first in case some of these things have been disregarded, or perhaps there's a way I don't know of to do what I'm trying to do. THINGS I WANT TO BE ABLE TO DO IN AFFINITY DESIGNER: ☐Hover pen tool over anchor point (which becomes visible at that point) at end of unjoined line without first selecting the path, and click to activate it and continue drawing. ☐Join two open paths by clicking on each in turn with the pen tool, rather than having to select two paths and choose the Join command. ☐Eye dropper - copy styles to selected object or text, as well as colours and gradients. ☐Continuous export in Export Persona: it's always greyed out; why? This would be a really useful feature if I could use it. ☐Insert in front/behind/inside: keyboard shortcuts please ☐Stroke presets to click on; also up / down arrow to change stroke by preset increments. Is there a keyboard shortcut to change the point size up/down by single rather than double increments? ☐Use the direct selection tool to select a segment of a path, and copy just that segment. When I try this with the node tool, the whole shape is selected rather than just the part I wanted. I'd rather not have to drag a marquee around the part I'm trying to select; just choosing a couple of anchor points should do the trick in my opinion. ☐Command+Shift+{ is supposed to be the shortcut for range left text. Half the time it performs an operation called Move Nodes to Bottom - what even is that, and why does it get in the way of range left text? ☐Default leading is the same as the font size - needs to be defined as a percentage, eg. 120% of font size. This is really important! I really hope this is just a hidden option that I haven't yet been able to find. ☐Document setup box should close when Return (or another key, like esc) is pressed. It’s super annoying having to pick up the mouse each time to close the dialogue box. ☐Have a padlock as part of each layer to simplify locking and unlocking layers. I’m aware I can select the padlock at the top of the layers panel, and that I can CTRL click to lock - but as I’m doing this so often, one more movement of the mouse or an extra click really does feel cumbersome and not fluid at all.
- 5 replies
-
- 1
-
-
- Affinity Designer
- layers
- (and 4 more)
-
 This is with Affinity Designer 2.2.1.2075 on Windows 10. It seems to happen with Layers specifically. Triggering creation within the root Artboard doesn't cause the same garbled screen updating behavior when a Pixel Layer is created using Assistant. Steps: 1. Start document with Artboard 2. Switch to Pixel Persona 3. Create a Layer 4. Start drawing inside Layer forcing creation of a Pixel Layer using Assistant. 5. Reap: 23.10.22_11-36-18-AM_NV12_1920x1080.mp4 test-document.afdesign
 -
I did a fun illustration today. The original design is by the artist Laurel Burch...I love her work. I used a small JPG I downloaded as a template. Most of it was done in AD, but I did use some raster brushes in the Photo Persona, so it's not 100% vector. I also added some texture with a Lighting Filter and a Bump Map, created in Blender, which gives it a bit more variation and personality. Hope you like the final result.
-
- 10
-
-
- illustration
- laurel burch
- (and 2 more)
-
Greetings All, Happy Valentine's Day! This was created with Affinity Designer using 3D, inner and outer shadow effects and various brushes. Roxanne
-
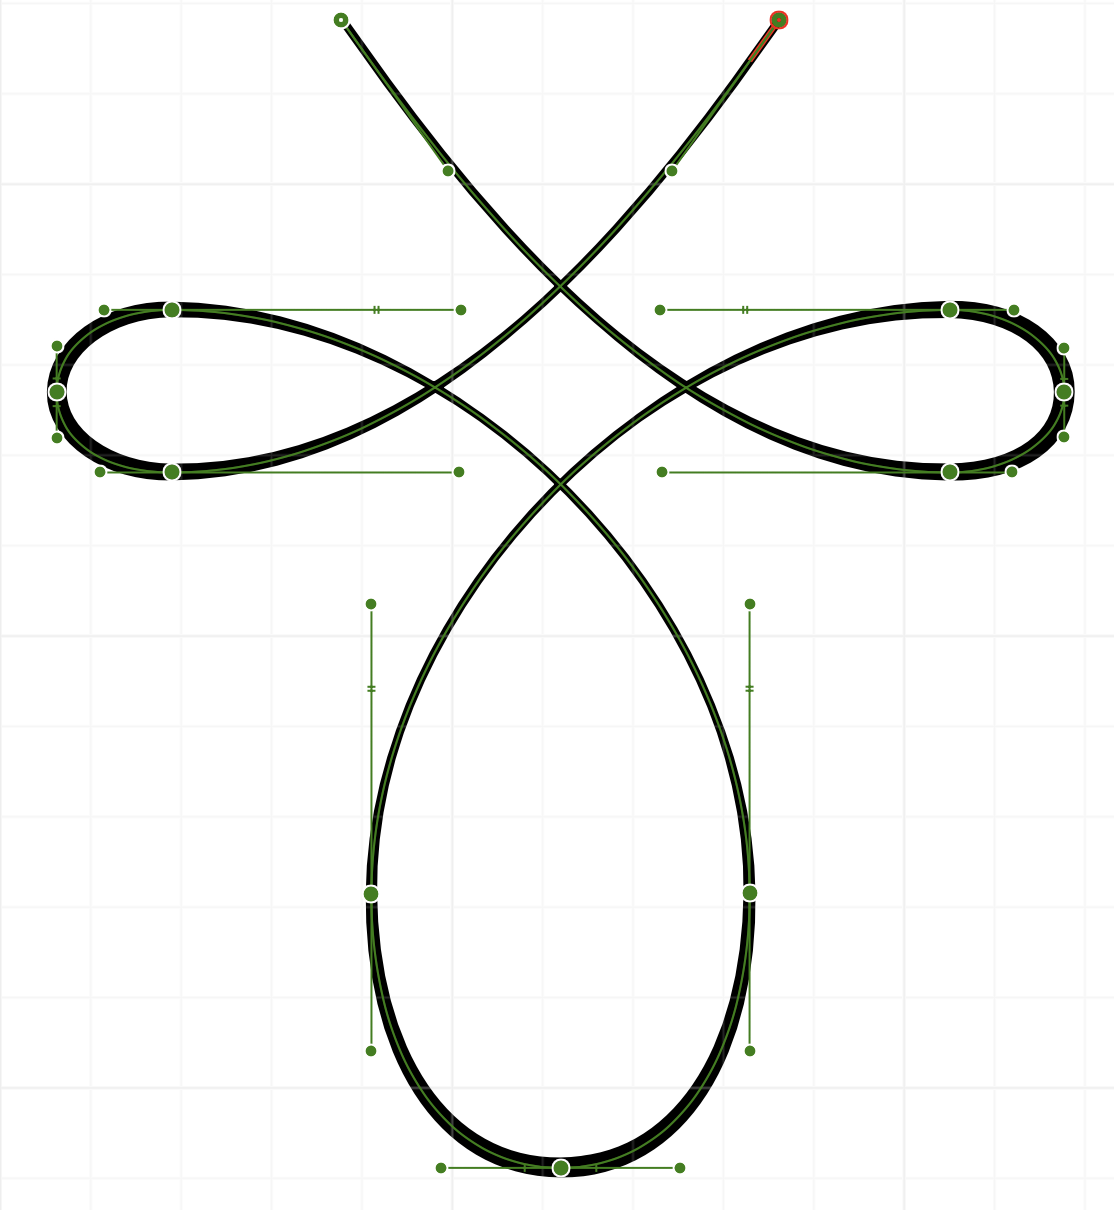
 I want to create some symmetric flourish swirls but I’m struggling with the symmetry part. For example with this shape: I can kinda drag the handles to be as close as possible but it’s not quite there. I tried to convert the object to a symbol, mirror it and then adjust it but this is also not making things easier. What’s the best approach here? How do I know that a handle on one side is as long and the same angle as the handle on the opposite side?
-
 EDITED to make clear file 1 and file 2 remained open the whole time, at the same time. Still think the problem is with the "embedding" logic. EDIT 2: now I understand the resource manager correctly, I can clear that description up... Designer 2 version available as of today, 2.3.1 methinks, MacOS 13.latest Ventura intel 2019 MacBook Pro 16inch 1. Open ai file download from domestika.org design course 2. Save to native file .afdesign we shall call this file 1. 3. drop in .psd files 4. make some art boards around all the assets (those already in the file, and those dropped in as PSD's) SIDE NOTE on STEP 4: (weirdly the objects within the ai file didn't appear to have an artboard at first opening in designer, a black bg in designer around all the files, but then dropping in new psds, they were only visible in the overlapping area with the including objects, invisible if dragged off the overlapping area of the original objects. So I had to make an artboard around them, then the document bg became gray (I later changed this since I didn't like that) but then I noticed in layers panel, there was only 1 artboard, the one I had created.... weird to me that there was an invisible "implicit" artboard from the original ai conversion/import? Let me know if this is supposed to happen? I have LOTS of ai files to deal with (as I'm sure we all do, sigh)... not just this project. 5. make a new design file, we shall call file 2, with several artboards 6. copy (command-c) one of the mb? embedded psd's in file 1 (resource manager lists the path of original file), but, "make linked file" is not available.! 7. paste into file 2. 8. click away until I am using pixel persona tools on the pasted in embedded file in file 2.... unfortunately, all changes I make there ALSO affect the embedded psd object in file 1. 9. confused I open resource manager in file 2 now. it shows the path of the same original psd object/file supposedly "embedded" in file 1.... Again, I cannot "make linked file", its grayed/ghosted/not available. But resource manager already considers it embedded in the file list, just as in file 1... on the other hand, since designer thinks it's correctly embedded, I cannot MAKE it actually embedded. So files can neither be properly embedded, nor linked in these two files. I played with another new afdesign file, dropped a jpeg in there, and it's fine, it says embedded, but the "make linked file" IS AVAILABLE. In the meantime, I will simply drop a new copy of the file from finder... but that sucks... b/c I Did some work already on a half dozen such objects in file 1.... which now is not copyable without "linked" editing behavior... I've done my best to be clear here. Hopefully this can be explained, or if not, squashed like a bug! Thanks for giving adobe a run! Things like this sorta suck though... sad face...
 -
 I frequently use my iPad with the folio case which props it at a slight angle. Interestingly Affinity Photo AND Affinity Designer seem to be reacting to this angle when trying to place photos. The whole interface flickers strangely and taps aren't always registered. The video demonstrates it in Affinity Photo but the behavior is also the same in Designer. Previous to 2.0 I noticed other features in Affinity Designer such as keyboard visibility that were delicately affected by the slight angle. I haven't determined if these are still issues but I haven't seen any other iPad app that has had issues with this angle. You'll notice the flickering only occurs while the iPad is at the slight angle, but not when it is upright. This is an 11in iPad Pro M1 running iPadOS 16.2 (a). I have noticed this in previous versions of the OS IMG_5679.MOV
 -
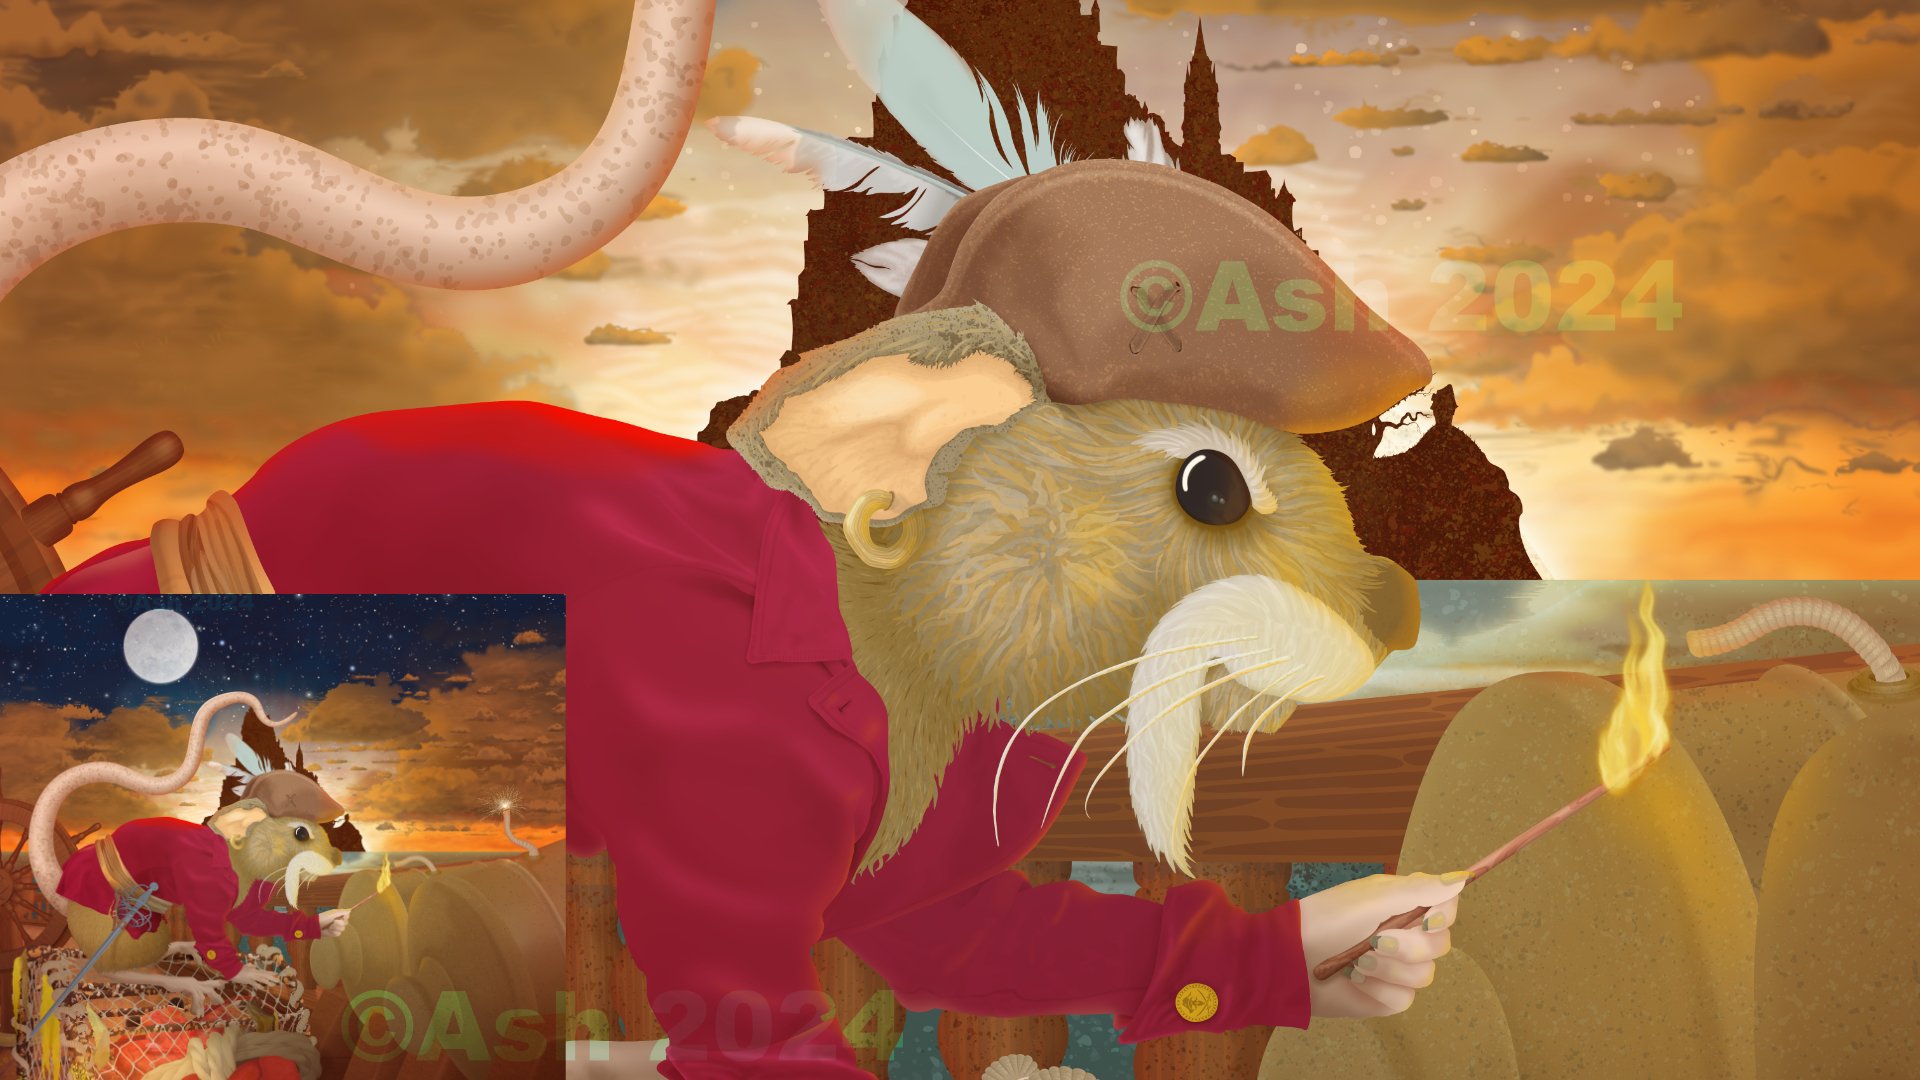
 In a recent discussion, within the forum, about Affinity Designer vs Illustrator, I was asked what I’m able to achieve using AD that I wasn’t able to do using AI. This has nothing to do with what each app is capable of it’s purely the way I’ve gelled with AD. I personally always found AI frustrating and usually ended up exporting my line work to AP and finishing off illustrations in that. I’ve never been a fan of using raster art with its many restrictions. So when I discovered AD and found I was able to do all my illustrating in the one app I was overjoyed. So anyway, now that I’ve bored everyone silly, here’s an example of my AD work with an additional enlarged section. Please excuse the watermarks and lack of the entire image. This is still a work in progress, one page, of about 30, from a book I’m doing. So I don’t want to give everything away and I’m somewhat concerned about all this AI art indexing, or theft as I prefer to call it. This is 100% vector. No brushes or raster elements used.
- 6 replies
-
- 10
-


.png.0493b51bb4b0cbd229c375e9d77fb772.png)