Search the Community
Showing results for tags '1.7.2.471'.
-
 First of all I have all three applications installed. There is a placed image in Publisher, select it and hit the Edit Image button. What I want to do is clear: I want to edit the image. The Persona stays on Publisher instead of switching to Photo Persona. Another thing I want to repeat what I have said is, that when in Photo Persona the layers the images has (not being in edit mode), are not shown. And that is a pity. Simple example: There is an image with some coloured cables and some extra layers where the colour of cables is changed. How nice it would be to show / hide the layers in the Photo Persona to have only one image instead of two versions of the same image. Hmm, hope this is understandable? I am pretty confident there is already a way to do what I want, but haven't found it yet.
 -
Preliminary: This just a best practice if the workflow is totally controlled by you, means if you want to switch from Indesign to APublisher you should have a copy of Indesign and / or all the original images. I am talking here about cropped / trimmed / rotated images in the original layout. State-as-is Replace Image: Replacing the image could be quite easy, but often (in my case) when I want to replace an embedded image in the document with the original image the position, orientation or the clipping is wrong. Best practice Replace Image: If you want to ensure, that position, orientation and clipping is correct, when you replace the original image, make sure that trimming image data to frame is not checked when you export the PDF from Indesign. This option can be found (ID CS6) on the compression page of the export dialogue. With this unchecked, the replaced image will perfectly fit to the right place. I bet nearly everyone has the trimming checked to make the PDF smaller. I hope this "tutorial" is of help to some of you.
-
Maybe this is covered elsewhere and I am too stupid to find it, maybe I am doing something wrong or maybe this is a bug? 1. Place an image. 2. Add an Outer Shadow effect -> Multiply 25 25 10 0 315° C0M0Y0K100 not scaling with object (or scaling with object makes no difference). 3. Add this style from selection. 4. Add another image and apply the style from step 3 to it. Which values would you expect for the outer shadow for the image from step 4? Same as in step 2? This was my inital thought, but it is not. The values differ and in this case a Style panel makes no sense to me, when I am not able to apply a consistent style.
-
I would not call it a bug and I guess there is a setting I forgot. Sometimes adding a soft hyphen makes an already autmatically hyphenated word act like I defined a No Break for this word. In the attached image (lower image) I would like to add a soft hyphen inside the word Luftschlitze right after the t (I know that this word would never be hyphenated there, just for giving an example). After adding the soft hyphen the complete word Luftschlitze moves to the next line as if there was never an automatic hyphenation after Luft. Is there something I can do to prevent this? I use the Hyphenation defaults in the panel, the Language is set to German and Luftschlitze is part of the dictionary.

-
Setup like this: 1. Type a one-liner in a text frame 2. Set top margin inset to 2 mm 3. Set height of text frame to 1,9 mm - overflow visible or not makes no difference Correction: Overflow has to be visible Result 1: No overflow warning 4. Click the top or bottom centered handle of text frame. Normally used to fit the frame to adapt to the height of the text Result 2: The text frame jumps to the upper left corner of the page, every single character (except spaces) is aligned vertically, all values for this text frame in the Transform panel have the value 0 (changing height or width do not change anything) jumping-frame.afpub
-
In the current round of the contest of who will be the next Master Chef layout application the jury sent Affinity Publisher into the infamous Pressure Test. Ingredients: - 432 pages PDF, Greyscale, 6 merged manuals all made in Indesign - about 240 embedded images inside the PDF - ca. 100 tables - ca. 1.200 vector graphics, some of them from a time when Windows 3.1 was the top notch operating system - 12 used fonts Aim: - Making a Master Chef worthy manual Observations from the jury: + Import lasted about 5 minutes, about same time for first saving - Rearranging pages, like inserting and deleting pages takes too long + Most text frames looked like the original - Tidying of recurring unwanted objects very time consuming - Tables not 100% the original with misplaced text. Tables are not reconstructed, but destroyed to its every single stroke - Text sometimes strangely combined. Means headlines combined with flowing text combined with captions - Linking text frames and formatting leads to unexpected results as overflowing text in next frame suddenly shrinks although correct formatted - + From time to time application not responding, but coming to life again after some time. Contents shown blurry, but can be revived mostly by sending the print keyboard shortcut - + Very seldom crashes ++ Small file size. PDF 17 MB, Publisher 67 MB. Jury expected a much bigger file - Snapping has to be completely disabled, otherwise very laggy + Vector graphics 99,9% looking as the original + Working gets faster the more you tidy the document Overall rating from the jury: Although some drawbacks and extra work, Affinity Publisher has to take place on the balcony for the next round. Overall speed could be better, but the jury is heavily impressed with abilities of this not mature application. I hope you enjoyed the meal.
-
 When using the Paint Brush Tool, the Stabilizer section of Context Toolbar has a box labeled Window. The tooltip for that box is incorrect, reading "Choose the flow of the brush", which is the same as the tooltip for the Flow box. It should say something about choosing the window size for the stabilizer. Also, the tooltip for the window-mode stabilizer button has an error: It should say "Produces a smooth, flowing output" rather than input.
-
... leads to strange results. 1. Create a picture frame and place an image inside. Increase the image inside the picture frame a bit, so that the image is bigger than the picture frame. 2. Switch to Photo Persona. 3. Add a Live Filter to the image inside the picture frame. 4. Add a Live Filter to the picture frame itself. Result: Rest of the image that should be cut off by the picture frame is visible. Try to zoom in and zoom out. Parts of the complete image are shown and vanish. Windows 10 Pro, Intel UHD Graphics 630. 2-live-filters.afpub
-
As part of my workflow over the years I place elements outside the spreads (what is the correct wording: workspace?) and quite fond of the fact, that this space is big not to say HUGE in Affinity Publisher. I wonder why it is so huge? But this is not the point here. If I place an element outside of the spread and I zoom into this element at about a zoom factor of 210% the scrollbar moves to its end on the right side and I am not able to scroll to the end of the element anymore. If I want to get to the end of this element I have to zoom out/in or use the pan tool or use the Navigator panel. So my question/s is/are: Is this huge extra space really needed? Or could the "workspace" be limited, that we get faster to elements placed outside? Just an idea.
-
My eyes are not the best anymore, but could it be, that there is some kind of halo when attaching gradients to an element? See attached image. I see this halo also in radial, elliptical etc. gradients. Second question: What is the opacity slider for? In my case I cannot move the slider. halogradient.afpub
-
There is a "bug" in the German help section. Posted this already in an other forum. The German help says Leinwand zuschneiden or Leinwandzuschnitt aufheben, whereas the menu items say Leinwand begrenzen und Leinwandbegrenzung aufheben.
-
 After upgrading to Affinity Photo 1.7.2.471 on Windows 10 laptop, the layer thumbnails no longer get updated. See image;
-
The title is only half true, of course the curves have a colour, but it is not so obvious. 1. Write some black text (black should be defined in the Swatches panel), irrelevant if Artistic Text or Frame Text. Have Panel Swatches with fill visible. 2. Convert the text to curves. Result: The curves seem to have no fill colour anymore, as the selection of black vanishes from the Swatches panel. 3. Ungroup the curves. Result: Black is selected back again in the Swatches panel. I do know, that it could not be displayed in the Swatches panel, when there are different colours in the text, but if there is only one? In the end perhaps not a real bug, but sometimes I have a big questionmark on my face while working with Publisher.
-
1. Create a symbol, do not rename it. 2. Drag the symbol into the layout. 3. Rename the symbol and drag it into the layout. Result: Now we have two symbols in the Layer panel, one with the orginal name, one with the changed name. Should not all instances of the symbol renamed as well?
-
1. Place an image. 2. Crop it a little bit, with the Crop Tool. 3. Convert to Picture Frame. Expected: Image stays in place. Result: Image is moved and the Picture Frame contains a Constraints Group. I tried many things with the Constraints, but I never managed to have the image stay at place.
-
 I've a series of diagrams I have produced in a single Designer file, on separate artboards. The diagrams are related in a series, so it is easier to produce them in sequence. I am however having difficulties adding them to a Publisher document using the picture insert tool. I've attached one of the designer files and corresponding svg files in the hope someone has an idea what is going wrong. If I save a Designer file for each individual diagram, the diagrams are on the whole as I would expect, except I am experiencing an issue with items outside the artboard being visible. If I export the individual diagrams as SVG, they look fine when viewed in a web browser. However, place them into a Publisher document and something rather bizarre is happening. The diagrams are made up of numbers of layers of the same elements - often in the same location, with the upper layers cropped so the whole thing replicates 3d knitting. The whole thing appears flattened, and it looks like the cropped layers are removed. I'm not entirely sure whether there is a better way to do this, or if there is bug or two causing the issue. Any help would be appreciated. I'm working with 1.7.2.471 for both software packages, though the Publisher document was started with the previous release. 3 round bobble for publisher.afdesign 3 round bobble #1.svg
 -
When your document preference for images is Prefer Linked and you replace an embedded image in your document. Which type of placement should be used here? Linked? Embedded? Personally I prefer the preference-method over the keep-it-as-is-method. In fact the image remains embedded although the preference is linked. More or less an academic question, because both sides could be right.
-
1. Make a new CMYK document. 2. Import a PDF containing a gradient built with spot colours. Result: Gradient is converted to CMYK.
-
1. Set up a CMYK document with a spot colour. 2. Export as EPS. Export option makes no difference. 3. Place PDF in Publisher and check the spot colour. This colour is now converted to CMYK. First thought, that upon placing the colour might get converted, but I cross-checked by opening the PDF with Adobe Acrobat DC Pro. From Indesign CS6 I am able to export an EPS including spot colours. The weak support for spot colours in the Affinity applications gives me some headaches, since the company's CI colour is HKS 7. I am really hoping for a massively improved colour handling in the near future, otherwise I am (hopefully not) forced to go back to Adobe. Attached are two EPS, one from Publisher and one from Indesign. eps-export-indesign.eps eps-export-publisher.eps
-
The bug is still present in Publisher. Especially if you want to place images taken from smartphones which are shot portrait, they will be placed landscape. I assume, that Publisher reads first the EXIF data and if no EXIF data is present it computes the orientation from the dimension of the image. Other orientations than Top left seem to be not valid e.g. Right Top. Attached EXIF data from a smartphone image (SM-G930F).
-
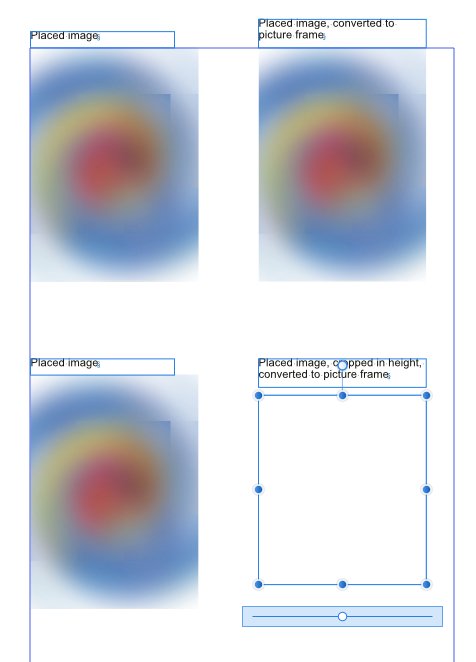
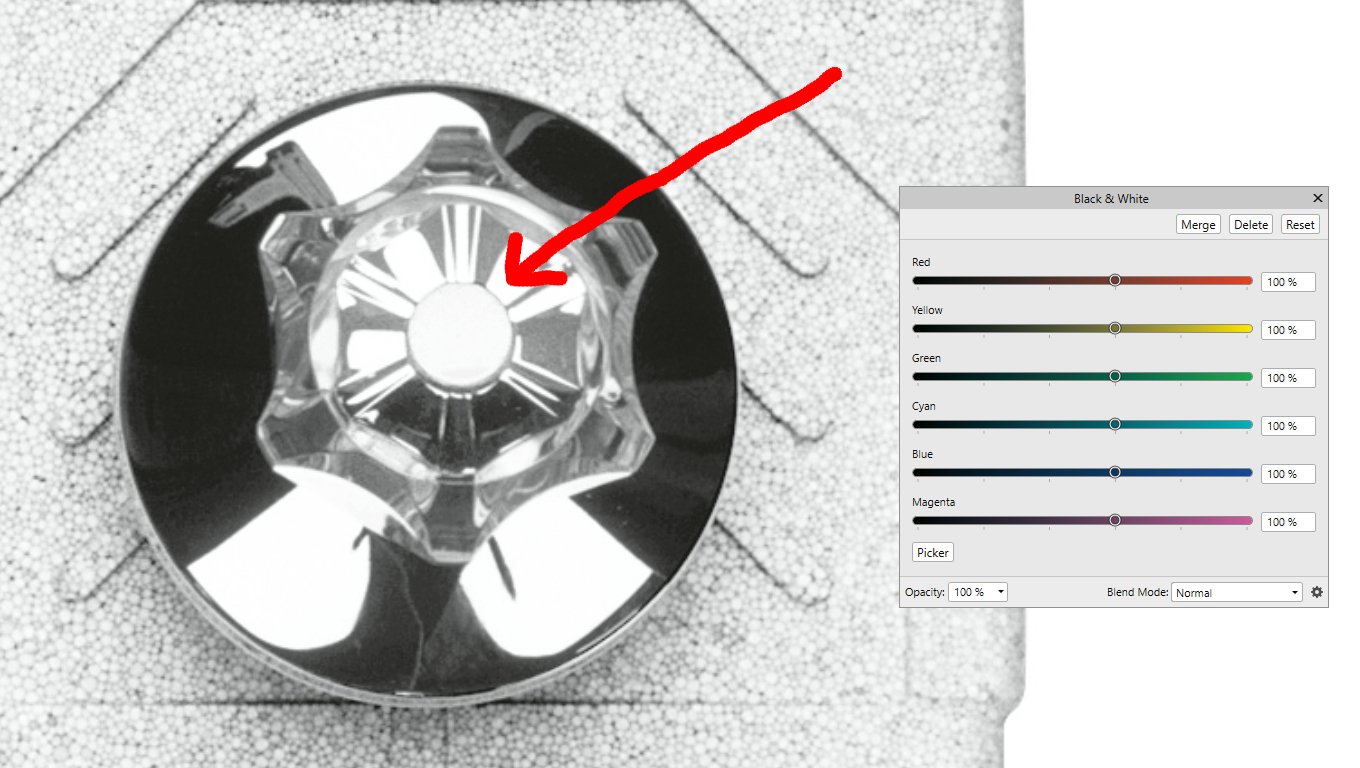
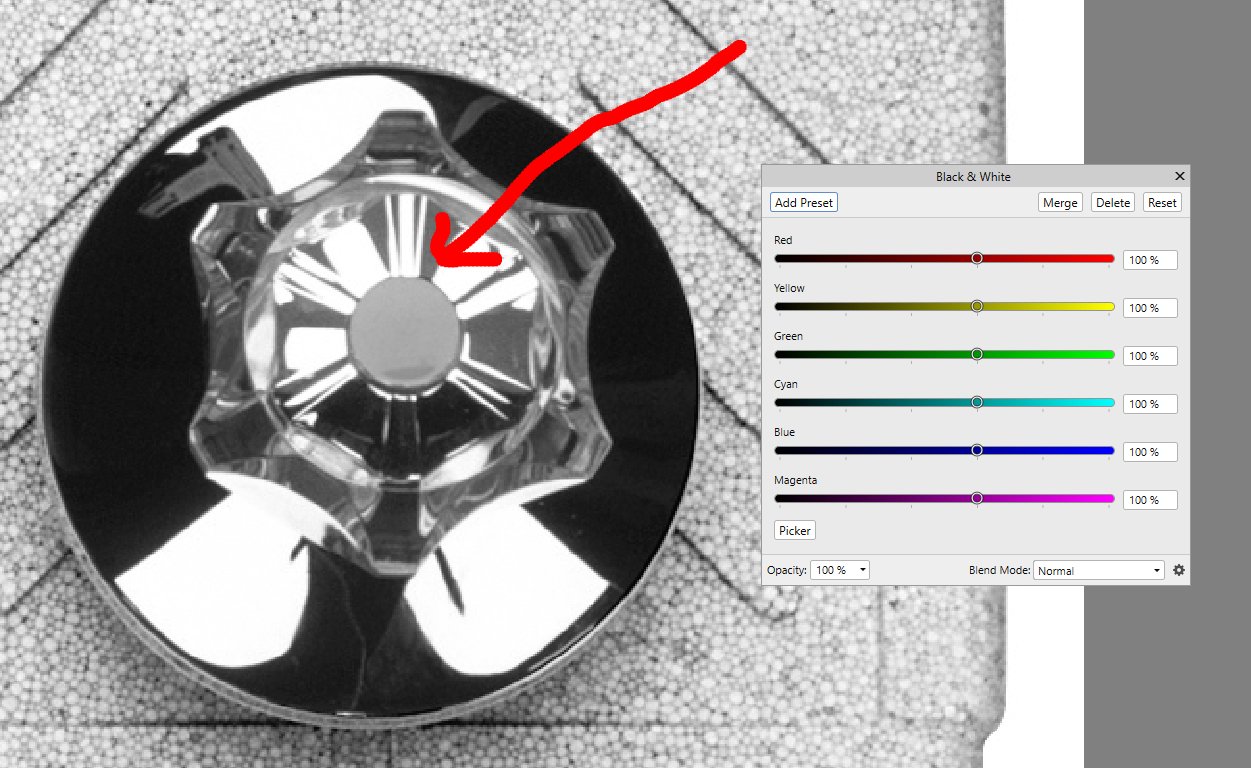
Now and then I am too lazy to convert a coloured image into a "real" greyscale file, so using the Black & White Adjustment in Publisher would be a nice tool. But this Adjustment seems to have severe problems with blue and red. I attached three images to see the effect in a) Publisher and b) the Black & White Adjustment directly used in APhoto.
-
Maybe I missed a few things over the years. A TIFF could have a bleed? Where to set this up? Or does this option moved unintentionally to the "More" section for export?
-
Yes, I do know that is error message is not new. I do know, that overly complicated vectors in the neighbourhood might be the reason. So this is only a feature request and maybe belongs more to ADesigner: Is it possible to add a function to APublisher / ADesigner to "simplify" or "tidy" complex vector graphics? My problem is, that the hundreds of original vector graphics were made with some obscure graphics programme and later save as EPS with Illustrator. Even small curves consist of dozen single line fragments.
-
Originally I wanted to praise the developers for adding such nice things like filler text randomly starting with other parts of the filler text, when filler text is added, but in the end I got a crash I have to report here. Perhaps not so easy to replicate. 1. I am using a custom filler text. 2. Make a new document A4 with a Master page. Not saving it. 3. Going to the Master Page and add a text frame. 4. Going back to page 1, double-click the text frame from master and insert filler text. 5. Adding a new text frame and linking it with the frame from master. 6. Going back to Master page and delete the text frame. Going back to page 1. Reposition the remaining text frame. Adding some other text frames with filler text. Resizing them, deleting a few of them. 7. Moving the slider in History back and forth results in a crash. Maybe there a too many steps in here, haven't tested it to the end. After the first crash Publisher asked me to recover the file, I said yes and file was up again with the complete history. Moving the history slider back and forth resulted in another crash. But this time I was not asked to recover, maybe due to the fact, that I only moved the history slider. Added: Publisher seems to crash at the position of the history, when I am going to delete the text frame on the Master page.
-
Plugin-Support for Designer
Joachim_L posted a topic in Feedback for Affinity Designer V1 on Desktop
Maybe covered elsewhere in the dungeon of this forum? Are there plans do add plugin-support for Designer? I would love to see the plugin for my Mimaki CG-60SR III cutting plotter working with Designer.