Search the Community
Showing results for tags '1.10.5.1342'.
Found 19 results
-
Maybe this was reported before? Or this isn't a bug, but it is annoying. Place the cursor in Author field, enter your text and use the Tab key to jump to Tags field. Result is, that you get a strange "marquee" instead of jumping to the Tags field. Pressing Tab key again will toggle the UI.

-
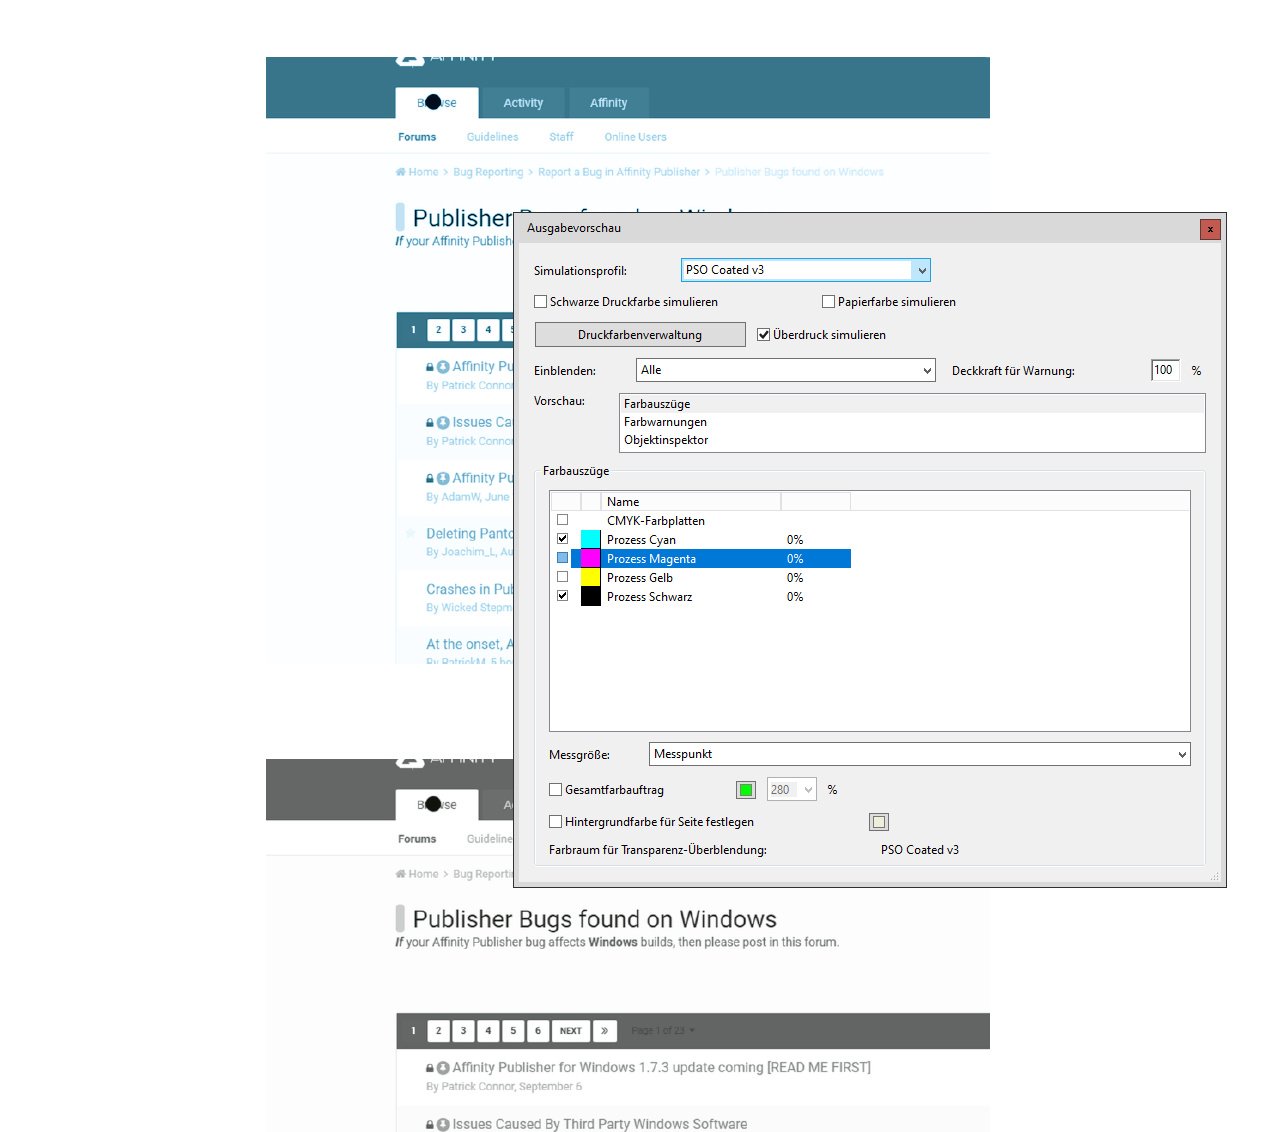
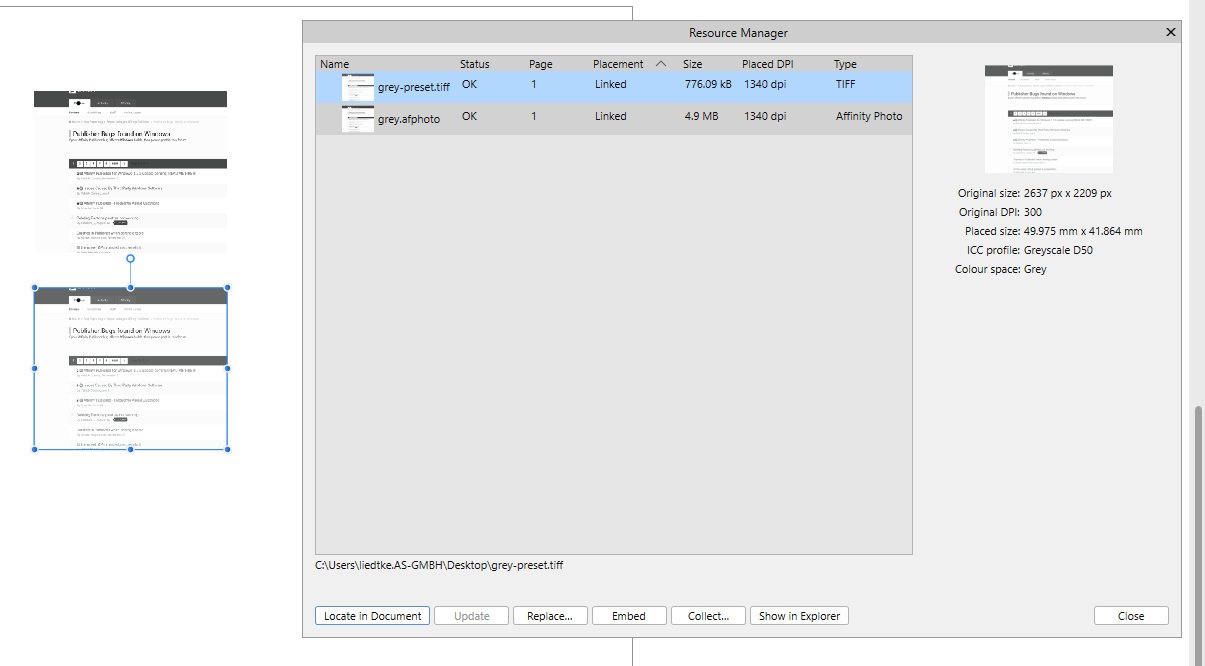
 I am not sure if this is a bug in APu or AP or both or by design? 1. Create a CMYK document in APu. In my case with ICC PSO Coated. 2. Convert a 8bit RGB image to Grey 8bit D50. It does not matter which Grey ICC profile and save it as .afphoto. 3. Export this image as 8bit Grey TIFF using the preset for it. 4. Place both images linked in your CMYK document. 5. Open Resource Manager in APu and look at the images. Results: The .afphoto is Grey, the TIFF is CMYK. 6. Export the document Press Ready and open in Acrobat. Result: The .afphoto is CMYK, the TIFF is Grey. Now the Magic! 7. Export from AP as TIFF again and have it automatically updated in APu. 8. Revisit Resource Manager. Result: The TIFF is now also Grey ... Magic!
-
It seems to be not a bug, although this is what I thought before. Setup: 1. CMYK document + placed RGB image (in my test case a simple fill with #ff0000) 2. Applied a Selective Colour adjustment by setting Cyan and Black both to -100% at Reds Visual appearance fine, but not matching to the printout on a HP Colour Laserjet M751. Obviously the printout shows what has to happen with the adjustment values. BUT what "annoys" me, is the fact, that printing directly and printing from PDF differ so much. Lessons learned: a) Don't mix colour spaces b) Don't be lazy c) Print from PDF in any case.
-
Maybe this is comparing apples with pears, but somehow this "feels" wrong to me. 1. Set up a 300 dpi document in AD and create an element covering the whole document. 2. Visit Document Setup and change on Tab Dimensions from 300 to 400 DPI. Have Anchor to Page active on this Tab. Click OK. Result: The created element gets smaller. With Rescale activated the element stays the same size. Doing this in APu has no impact on the elements size. Intended? Maybe I missed something here. 🤔
-
1. 300 DPI image (4,37 MB) placed (same colour space as document). 2. Rasterise Image. 3. Menu Layer > Convert to Image Resource. Resource Manager reports now a file size of 29,14 MB of the embedded image. Document file size is 4,92 MB. 4. Make embedded image linked. Image has now 2,31 MB and DPI was lowered to 96.
-
When you open an IDML file containing linked images, the paths to the files are "wrong", well, not wrong completely, but "malformed". Example: Open an IDML with one linked image and place exactly the same image from within APu. Then visit Resource Manager and click both images to check their paths. Result: The path to the image (1) that came with the IDML has forward slashes, the path to the image (2) that was placed within APu has backward slashes. Everything is fine with exporting and printing, BUT: Image (1) will not be shown with "Show in Explorer", but image (2) is shown in the Explorer ... at least here at my workplace with network drives.
-
Some fonts behave wrong and move out of the box, when Right Indent Tab, Figure Style Lining and Tabular Figure Width is used. This surely seems to be a problem of the fonts and not APu itself?!? Candara, Constantia, Corbel, Georgia (v5.59, TTF used in the attached image), Milo OT and Sitka to name a few.
-
Simply an observation, no worries for me and I guess this topic can be found elsewhere. The title says it all. Printing from PDF = all vector. Printing from ID CS6 = all vector. Printing from APu = all bitmap. Is Serif willing to admit, that the printing dialogue / printing engine needs more love?
-
Here is my recipe (also seen in the attached video): 1) Two text frames filled with text and some paragraph Text Styles including one for initial words. 2) Text frame on the left has already one paragraph formatted with initial word(s). 3) I pick a paragraph in the right text frame and apply the intial words Text Style. 4) Now I switch to the Move Tool and click the left text frame. Result: The one paragraph formatted with initial words is reset. Any reasons for this annoying behaviour or workarounds? In fact "First Word Off" appears in History. My workaround for now is hitting the ESC key twice. PS: Video shows a beta, but in the retail version it is the same. I have done this to prevent any interference with already used Text Styles in my retail version. initial-word.mp4
-
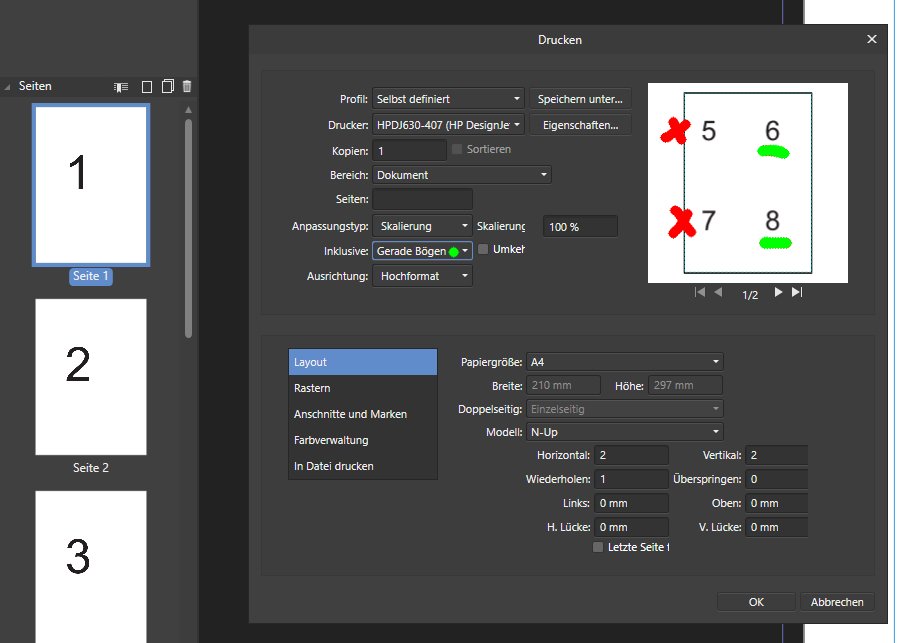
This is confusing, but perhaps my logic is broken. Nothing I would call even sheets (pages?). I would call 2, 4, 6, 8, 10, 12, 14, 16 even pages. Seems to be, that a block of 4 pages in a row was counted as odd, followed by 4 pages in a row counted as even. Document has 16 A6 pages. Is this by design? See image.
-
1. Make sure a panel different than Transform is selected. In my case History. Make sure the default fill is not transparent. In my case Gray. 2. Create a new document. Add some gray vector elements and switch to the Transform panel. Result: The last element gets filled with a different colour. Something I would not expect. ui-bug.mp4
-
1. Create a donut. 2. Place the Artistic Text Tool on the inner circle. 3. Switch to the Node Tool and move the inner red handle a tiny distance. Result: The text jumps to the outer circle and additionally this action can't be undone.
-
Is this intended behaviour, that only the Master Page is going to be exported while being on this page accidently? I mean Area in the export dialogue says Whole document and document does not mean solely Master Pages. There is no distinction between Master Pages and Spreads in the export dialogue. Just wondering.
-
Is there any reason why in AP the tool is called Gradient Tool and in AD and APu Fill Tool? A small inconsistency IMO.
-
I know this is not a show stopper and maybe the devs were too lazy to implement an additional condition. When you print a document with multiple copies having only ONE page, there is no reason to make the Collate checkbox available.
-
Maybe this is a bug. 1. Drag an image from the Stock panel onto the document. 2. Make it linked e.g. to the desktop. 3. Open the image in AP and change Colour Space to CMYK and save the JPG file (no export). 4. Keep an eye on the Transform panel with the image selected and update the image in Resource Manager. Result: You will see a small position change.
-
Under certain circumstances it is possible, that the picture frame loses its sizing and moving controls. And I fear this is by design. 1. Place an image and convert it to a picture frame. 2. Place another image and move it into the existing picture frame. Result 1: Controls are still there. 3. Delete the image placed first in the picture frame. Result 2: Controls are gone. I DO see the hatched rectangle on image 1 until step 2, so this image carries obviously some more information. But this is not convenient, losing the controls here. I stumbled upon this while dragging images out of the stock panel and trying to replace images. Yes, making the stock image linked and replacing the image would work, but too laborious for fast working. Feel free to move this to feature requests.
-
Perhaps it is just me? 1. Type beach into the search box of the Stock panel for Pixabay 2. Drag the scroll bar 8 times completely down to the bottom Result: The panel shows Connection failed and all images shown before vanish.
-
... or better: Behaving wrong. In my case it is an opened PDF generated from APu having a text frame containing text with 80% black and text with HKS 7 and there is a rectangle with HKS 7. 1. Switch to the Designer Persona (or Edit in Designer - makes no difference) 2. Click the rectangle and use Select > Select Same > Fill Colour 3. Now elements are selected. Use the Colour panel to change the percentage of the tint Result A: Even the gray text is changed although no HKS 7. Apart from that: 4. Revert history to the beginning 5. Select the gray text with the text tool 6. Select > Select Same > Fill Colour Result B: Same as Result A. Conclusion: Colour replacement is not working on text frames having text with different fills. colour-replacement.mp4