Search the Community
Showing results for 'ROMM RGB'.
-
 Affinity Photo 2 for iPad version 2.4.2 build 2371 IOS 17.2 - iPad Pro (11 inch) (2nd generation) Stage Manager is disabled The terminologie I use: default colour space: the colour space set in 'settings' > 'colour' > Default RGB Profile document colour space: the colour space as visible in the channels studio convert colour space: use the Document option 'Convert Document' and convert the colour space development: use the Develop Persona and submit using the '√' button. sRGB: sRGB IEC61966-2.1 ROMM RGB: ROMM RGB: ISO22028-2:2013 issue description I can't convert a documents colour space and use the Develop Persona. Under specific conditions, the colour space conversion is lost after using the Develop Persona. This happens when a document was initially developed using a different default app colour space. explanation After the described test procedures, It seems to me that a file has a default colour space 'build in', being the colour space that was set as default colour space in the Photo app settings when the file was developed for the first time. It does not seem to make a difference what the app default colour space is after that first development: whenever using the develop persona again (e.g. when one wants to make changes to a work-in-progress document), the document resumes the initial colour space that was set as the default colour space when the document was initially developed, no matter what the document was converted to or what the app default colour space is at this moment. In other words, whatever we convert a document's colour space to, if we use the Develop Persona after a colour space conversion, the colour space is reverted to an previous initial setting. my conclusion is based on the following procedures test 1 - basic test default sRGB set the default colour space to sRGB open a new .dng image. This document is automatically developed in the Develop Persona. Validate the development check the document's colour space using the channels studio. The colour space is sRGB save the document as .afphoto file and re-open the document convert the document colour space from sRGB to ROMM RGB, using 'convert document' check the document colour space. It is indeed ROMM RGB develop the document in the Develop Persona and commit check the document colour space. It is sRGB test 2 - basic test default ROMM RGB repeat the above procedure but 1. set the default colour space to ROMM RGB 5. convert the document to sRGB 8. the document colour space is ROMM RGB test 3 - basic test sRGB > changed default colour space before colour conversion to ROMM RGB set the default colour space to sRGB open a new .dng image. This document is automatically developed in the Develop Persona. Validate the development check the document's colour space using the channels studio. The colour space is sRGB save the document as .afphoto file ! set the default colour space to ROMM RGB ! re-open the document convert the document colour space from sRGB to ROMM RGB, using 'convert document' check the document colour space. It is indeed ROMM RGB develop the document in the Develop Persona and commit check the document colour space. It is sRGB test 4- basic test ROMM RGB > changed default colour space before colour conversion to sRGB repeat the above procedure but 1. set the default colour space to ROMM RGB 5. ! set the default colour space to sRGB ! 7. convert the document from ROMM RGB to sRGB 10. check the document colour space. It is ROMM RGB conclusion a colour conversion using Convert Document is undone after subsequently using the Develop Persona when the document was initially developed with a default colour profile that is different than the colour profile that the document is converted to. Under the above conditions, whatever change is made to a documents colour space by using 'convert document', this change is automatically made undone when the Develop Persona is used after such colour conversion. The resulting colour space is not influenced by the convert document step but is defined by the app default colour space that was used when the document was developed fot the first time.
 -
procedure: I convert a document colour space from e.g. sRGB to ROMM RGB. Then I develop the document in the Development Persona. After committing the development the document is now sRGB again. My default RGB colour space is ROMM RGB. This behavior does not occur when a raw file, e.g. a dng file, is already imported/developed with ROMM RGB set as default colour space etc. When a document was initially imported/developed with sRGB as default colour space in the settings this behavior does occur. ---- I can reproduce the issue: When setting the default colour space to sRGB and then importing > developing e fresh .dng file I get the described behavior. The file is imported as sRGB, as expected. I save the file as .afphoto. Now I open & convert the document to a wider colour space like ROMM RGB and save the file again. Next I open the .aphoto file, which is now ROMM RGB, and re-develop the embedded .dng file. After accepting these develop changes (any change wil do, the saving is the trigger here) the file is sRGB. When I change the default colour space to ROMM RGB after the original .afphoto file was created during this process the behavior is the same. The trigger seems to be the initial import/development with sRGB as default colour space. Whatever change is made to the default colour space after this event does not have any influence. When setting the default colour space to ROMM RGB and repeating the above process the behavior is identical. My conclusion is that a file has a default colour space 'build in', being the colour space that was set as default colour space when the file was imported / developed the first time. It does not make a difference what the default colour space is after that event, whenever passing by the development persona, the document resumes the initial colour space that was the default colour space when the document was initially imported/developed, no matter what the document was converted to or what the default colour space is at this moment. The terminologie I use: default colour space: the colour space set in 'settings' > 'colour' document colour space: the colour space as visible in the channels studio. development: using the development Persona and submitting the file using the '√' button.
-
I think my workflow is rather simple: I share a .dng (or other raw format) to affinity Photo on iPad to be able to process it in Affinity Photo. It gets opened in the Develop Persona etc. When I save the file I choose to have it embedded in my .afphoto document. Seems quit straightforward to me. I prefer to work in a wide gamut colour space, hence my choice for ROMM RGB. Sometimes I want to go back to the Develop Persona while working on a file in order to change some basic settings. Not often, but it happens. That is why we can go back to this Persona, right? I discovered this issue by accident, I was surprised by some colour differences between files from an older Adobe workflow and the ones I was seeing in Affinity. I noticed a difference in colour profile that I was not expecting etc. Let me add something though: When I changed the colour profile from sRGB to ROMM RGB I had some serious problems with the Selective Colour adjustments that I already made previously, I basically had to redo that. I have a feeling that the default colour space setting is not stable in the iPad versions of the Affinity applications, they seem to change somehow back to the standard sRGB from time to time. I have no proof of that yet but I set a wide gamut colour profile as default but somehow they get changed back to a default sRGB, it seems. Not definite proof yet, though.
-
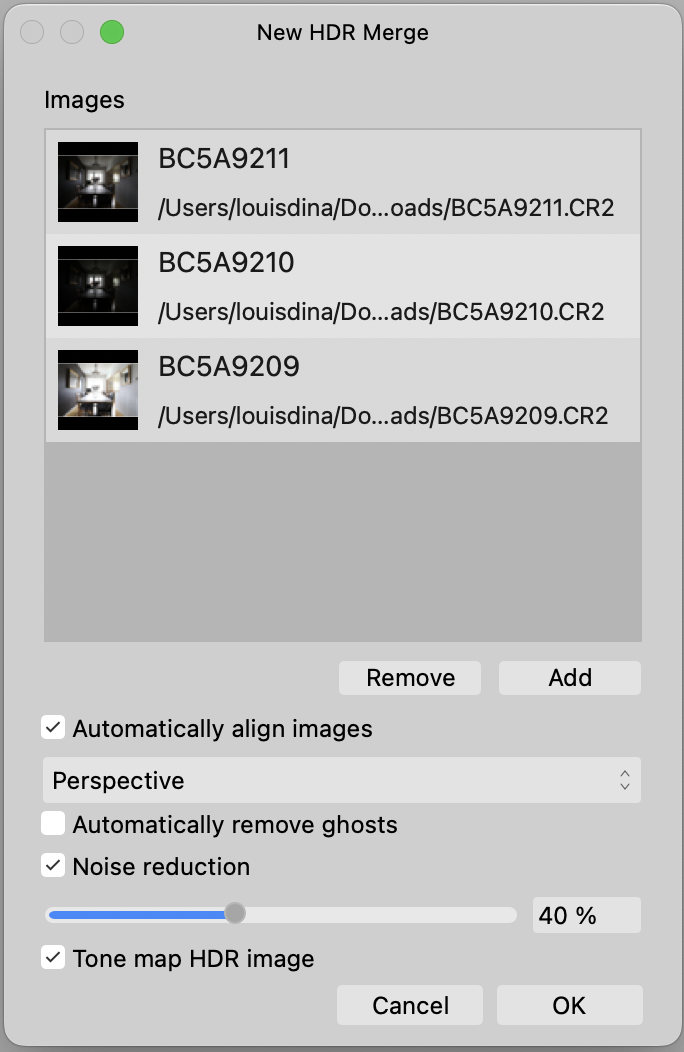
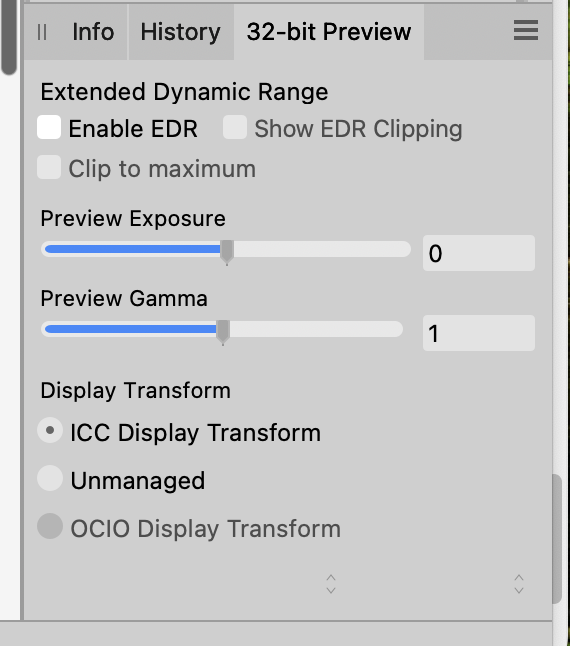
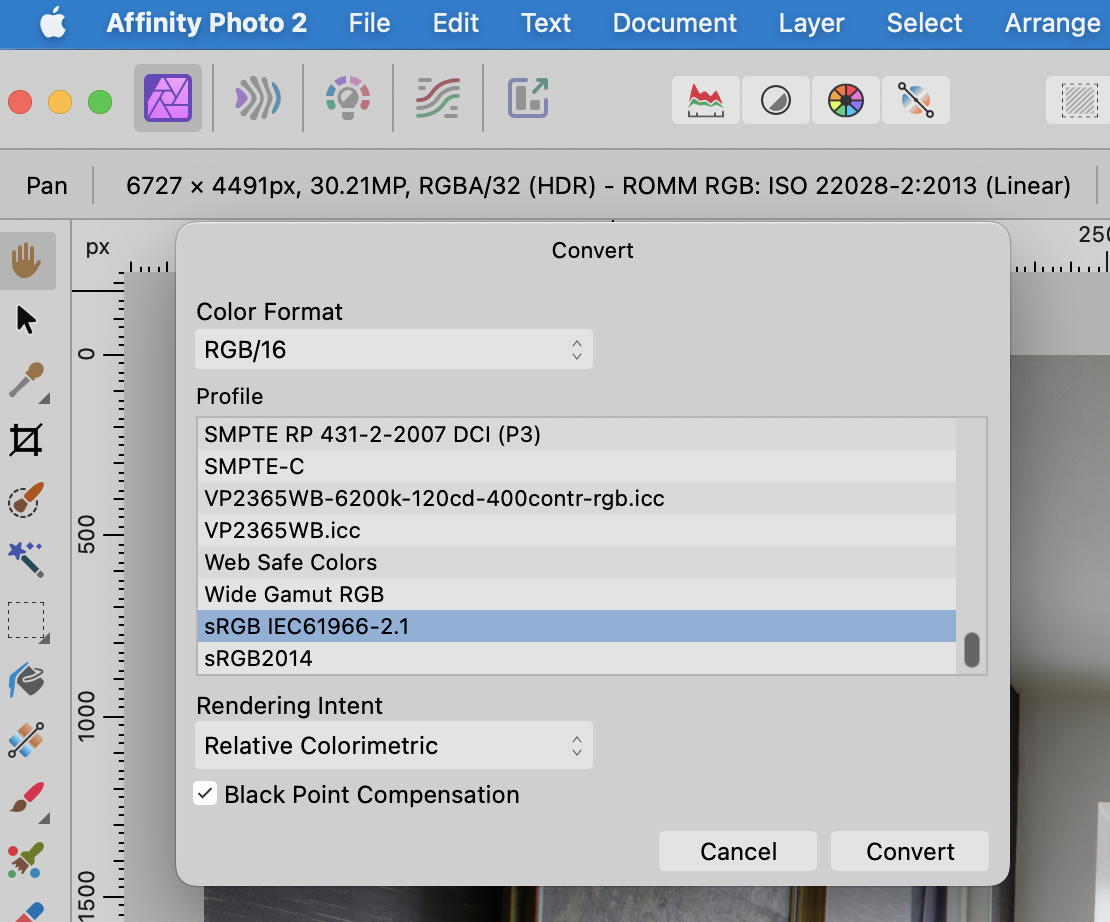
 @Max89 OK...first, what is your final delivered file format going to be? Standard JPG, PNG, TIFF, 8 bit, sRGB, etc? If your final format will be, for example, an 8 bit, sRGB JPG, here's one workflow... Create a new HDR image, add files, and leave it per the attached screenshot, then click OK. This will import, align, noise reduce your RAW images and send your file directly to the Tone Mapping Persona. In the lower righthand Studio, you will see the 32 bit Preview panel. If your end product is a standard JPG (which only supports standard dynamic range, i.e., 0–1 values), make sure you have the same settings as shown below. Next, make whatever adjustments you wish to make in the Tone Mapping Persona to sculpt tonal range, color, saturation, etc. When you are happy with your adjustments, click Apply. This will deliver a 32 bit, linear gamma (1.0 gamma) file to Affinity Photo in your chosen color space (sRGB, Adobe RGB, etc...whatever you chose initially). This will be a single, flattened pixel layer. In the screenshot below, you can see that the Tone Mapping persona delivered a RGBA.32 bit HDR file in ROMM RGB to Photo. I'd immediately convert the file to 8 or 16 bit (both of which are 2.2 gamma and limited to 0-1 standard dynamic range). I'd also chose your final color space. sRGB is probably the best overall choice if you plan on posting images online. Document > Convert Format / ICC Profile. Below, I chose RGB/16 and sRGB. Now that you are in a file space compatible with JPG, PNG, TIFF, etc, feel free to "edit away", adding adjustment layers, live filters, or whatever. The appearance should be preserved when saving and exporting. Export to JPG, sRGB, etc. That should do the trick. Your final JPG will be 8-bit, sRGB and should match what you see in AFPhoto.
-
 Hi, I use to develop photos using ROMM RGB colour space (and 16 bit depth). I've setup the develop assitant and prefs that way. I'm trying to get the same colourspace when using Stack photos. But once the stack is made I always get an sRGB / 16bits document. I guess 16 bits is coming from the develop assistant, but I can't find how to change the default target profile from sRGB to ROMM RGB. Any clue ? Thank you for your help
 -
 I don't know if this has been brought up yet, but I am working on a photo manipulation that has 6 layers, with each layer being a separate image. When I was trying to initiate the Shadows/Highlights adjustment from the Filters dropdown menu to make adjustments on one layer the program would quit and I would get the error notification to send to Apple. This has now happened 10 times, which is why I am posting it in the forum to see if this particular error has been encountered before. I am running AP2.4 on a 2021 MacBook Pro Ventura. The problem seems to be affecting only this one file because I tried the same adjustments with a Nikon D810 raw photo and had no problems. The image I am working on is 7000 pixels square, 32bit HDR in ROMM RGB color. As I mentioned, it is composed of 6 layers that have been rasterized. The file is rather large at over 700 megabytes saved as an Affinity Photo Document. I have worked on files much larger than this without a problem, so I am wondering if this has something to do with the number of active layers. The problem started when I added a 6th layer. If this is a bug that is currently being addressed please let me know so that I can await the next update.
 -
 I use to use ProPhoto RGB as my working space. Should I choose ROMM RGB now at Preferences>Colour (AFF.Photo)? Thank you.
 -
 In the absence of (or in addition to) any other factors that might be an influence, my general practice* is to keep the color space as large as possible, for a long as possible, throughout my editing workflow. The reason is to, as much as possible, avoid potential gamut / conversion issues and maintain the most room for stretching, raising, etc., colors and tones with minimal artifacts. That's why I stay in ROMM RGB / ProPhoto until export. So generally I'd lean toward #3 but I'm no uber-expert (at all!) and there may be specific considerations that come into scope for your workflow. If you run into conversion artifacts upon export, maybe drop back to #2 but just prior to export (so you can check and mitigate). * Not specifically for print, but the same logic generally applies unless something specific overrules it.
 -
 I would suggest updating the graphics driver first as it's free. I don't have any Affinity results to share but using PhotoLab v7.2.0 to export 42 images 5134x3888 down to 600 high took 2h 1m 20s with the old driver, it now takes 0h 28m 25s Just created an image in V1 per your numbers 7086 x 10629, 32bit ROMM RGB and the performance is fine using paintbrush, clone stamp, smudge, erase brush 1000px diameter, this is a pretty mediocre spec pc as you can see below
 -
.thumb.jpeg.6f143e8223547aba974205ef53397036.jpeg) The issue is related to complexity of colour and values falling outside of the gamut being used for colour processing (Photo uses ROMM RGB internally for raw development). I wouldn't advise underexposing whilst shooting to try and mitigate the issue, as that will compromise the quality of your images: rather, it's something that needs to be addressed by Photo's RAW development (it is being looked at). Magenta solarisation in saturated blue areas is typically seen when one or two of the components (R,G,B) have negative values—from user reports, this is the most common form of artefacting. Other issues can occur as well, such as worsening of colour fringing and banding around intense areas of light. There are a handful of solutions that exist for this issue, and thanks to the open nature of the VFX community they are fairly well documented. I've recreated one of these solutions (a colour matrix shift that protects 'core' values based on a threshold) as a macro. If you want to continue developing your RAW images in Affinity Photo, you're welcome to try it and see if it helps? To use it effectively, you need to develop your RAW images to a linear unbounded colour format. This is easily done via the Develop Assistant settings. Here are the steps: Install the macros (drag-drop the .afmacros file onto Affinity Photo's user interface) Without opening a file, go to the main assistant settings (the robot icon), then click the "Develop Assistant" button to go to the RAW development settings Change RAW output format to "RGB (32 bit HDR)". Important: leave Tone curve set to "Take no action" Open your RAW file and perform any initial editing, then develop it Run the "Gamut Compression (sRGB)" macro. You can also try the Tone Mapping variant, which will compress the dynamic range. This may be useful for scenes with intense lighting. The ROMM variants are for if you want to edit in a wider colour space—the usual caveats with colour management apply here... The image will be corrected, then converted to 16-bit per channel precision so you can continue regular editing Here is a screen recording of the process as well: Screen Recording 2023-11-09 at 11.58.06.mp4 I've included the old gamut shift method in the macros as well, as you may find that you prefer the result depending on your own imagery (it tends to produce a more saturated result). Hope that helps, James JR - Out of Gamut Colours Fix.afmacros
The issue is related to complexity of colour and values falling outside of the gamut being used for colour processing (Photo uses ROMM RGB internally for raw development). I wouldn't advise underexposing whilst shooting to try and mitigate the issue, as that will compromise the quality of your images: rather, it's something that needs to be addressed by Photo's RAW development (it is being looked at). Magenta solarisation in saturated blue areas is typically seen when one or two of the components (R,G,B) have negative values—from user reports, this is the most common form of artefacting. Other issues can occur as well, such as worsening of colour fringing and banding around intense areas of light. There are a handful of solutions that exist for this issue, and thanks to the open nature of the VFX community they are fairly well documented. I've recreated one of these solutions (a colour matrix shift that protects 'core' values based on a threshold) as a macro. If you want to continue developing your RAW images in Affinity Photo, you're welcome to try it and see if it helps? To use it effectively, you need to develop your RAW images to a linear unbounded colour format. This is easily done via the Develop Assistant settings. Here are the steps: Install the macros (drag-drop the .afmacros file onto Affinity Photo's user interface) Without opening a file, go to the main assistant settings (the robot icon), then click the "Develop Assistant" button to go to the RAW development settings Change RAW output format to "RGB (32 bit HDR)". Important: leave Tone curve set to "Take no action" Open your RAW file and perform any initial editing, then develop it Run the "Gamut Compression (sRGB)" macro. You can also try the Tone Mapping variant, which will compress the dynamic range. This may be useful for scenes with intense lighting. The ROMM variants are for if you want to edit in a wider colour space—the usual caveats with colour management apply here... The image will be corrected, then converted to 16-bit per channel precision so you can continue regular editing Here is a screen recording of the process as well: Screen Recording 2023-11-09 at 11.58.06.mp4 I've included the old gamut shift method in the macros as well, as you may find that you prefer the result depending on your own imagery (it tends to produce a more saturated result). Hope that helps, James JR - Out of Gamut Colours Fix.afmacros -
(Searching revealed several loosely related existing posts on this topic but I found no answers, so I'm asking) Although I'm sure there are corners where I'm fuzzy, I pretty much grasp color models, spaces, gamuts, profiles, soft proofing, etc. at a working level. Per the subject, I'm asking about the Document | Convert Format / ICC Profile and Document | Assign ICC Profile menu choices in the context of what Photo actually does. I've looked through the Help and found only a very little specific info. Maybe it's there and I'm missing it, but without a per-menu-choice index it can be challenging to find information on a specific operation. https://affinity.help/photo2/en-US.lproj/index.html?page=pages/Clr/ClrProfiles.html?title=Color management Much of what's in Help sounds related to soft-proofing based on the language, which is a different matter. The "Assigning Color Profiles" section at the link above uses both "color profile" and "working color space" somewhat interchangeably. For example: Document | Convert Format / ICC Profile It says this will "change the document's color profile". Does this mean it will actually change the color space? That's what it looks like based on the dialog box. The profile is what describes and documents the space. Document | Assign ICC Profile Nothing found. Does this refer to simply writing a profile to metadata? ...and as long as I'm asking... File | Import ICC Profile Nothing found. Does selecting a profile here simply make it available in the two above dialog boxes? If so, how do we edit the list afterward if necessary? At this point it's mostly curiosity. I raw-develop and save in ProPhoto (separate app), TIFF-edit (with AP) in ROMM RGB -- i.e., ~ProPhoto -- then JPG-export in sRGB as the last step. So my workflow is OK, I'm just trying to understand what AP does. Thanks.
-
 There are multiple wide gamut color profiles for RGB/16 which will cover probably all gamut you need. LAB/16 has some other nice properties like more oriented to human perception. https://en.wikipedia.org/wiki/ProPhoto_RGB_color_space The ProPhoto RGB color space, also known as ROMM RGB(Reference Output Medium Metric), is an output referred RGB color space developed by Kodak. It offers an especially large gamut designed for use with photographic output in mind. The ProPhoto RGB color space encompasses over 90% of possible surface colors in the CIE L*a*b* color space, and 100% of likely occurring real-world surface colors documented by Michael Pointer in 1980,[3][4] making ProPhoto even larger than the Wide-gamut RGB color space. LAB implementations have their own issues, leading to unwanted clipping of gamut and not reaching the theoretical benefits: https://en.wikipedia.org/wiki/CIELAB_color_space Range of coordinates As mentioned previously, the L* coordinate nominally ranges from 0 to 100. The range of a* and b* coordinates is technically unbounded, though it is commonly clamped to the range of −128 to 127 for use with integer code values, though this results in potentially clipping some colors depending on the size of the source colorspace. The gamut's large size and inefficient utilization of the coordinate space means the best practice is to use floating-point values for all three coordinates. Do you have any test images proving that an export (from PS) to lab/16 covers a wider gamut than RGB/16 with ROMM RGB(ProPhoto)? And that Affinity Photo is unable to deliver equivalent results from its RAW engine (with target format LAB/16)? Do you expect adding LAB/16 RAW editing provides any benefit without solving the current color format issues before in Affinity Photo?
 -
 Hi all, I've watched the videos https://affinity.serif.com/de/tutorials/photo/desktop/video/332654440/ and https://affinity.serif.com/de/tutorials/photo/desktop/video/310551180/ but there is still one question. After developing a Raw file and assigning ROMM RGB, then converting document to LAB do I have also advantages if my monitor is only a 100% sRGB. I realise that sRGB is a much smaller colour space, but do I still have advantages because the gradations/tonalities within the sRGB colour space are then more accurate. At the latest when outputting for printing, sRGB is assigned, so I am really only concerned with the image processing part between develop and print. I look forward to any answer, or even a supplementary video on this topic. 😃 best regards Guenter
 -
I set APh to ROMM RGB in 16bit, but in the 32bit settings I can't find the entry. Where is it ? In AD and APB I can set it. Also in the APhbeta. APh 1.9.3 on Big Sur
-
You are may be right, stacking may be not support RAW files. And AP 2 is only using embeded jpegs instead. I think I found out ! It's in the prefs pane under the Colour tab: When "Convert open files to workspace" is UNchecked (which was at the beginning), Stacked photos are using sRGB color profile. (but why sRGB, when it's raw ?) When "Convert open files to workspace" is CHECKED, stacked photos are using ROMM RGB profile, that is set under the RVB colour profile above. This also means that any photos (RAWs as well as jpegs, tiffs, etc...) will now open with ROMM RGB profile. Which is fine with me
-
 Hello, New to the Forum. Hope I’m in the right section? I recently watched James Ritson’s video regarding where it’s better to edit in ROMM RGB and not sRGB, of which I did, but I noticed one big difference, and that is, my image edited in ROMM RGB is a lot softer than the same image edited is sRGB; both with the same High Pass filter settings. Just wondering what I’ve done wrong, and is there a way to fix this problem? Cheers! Tony
 -
This is inadvertently having the wrong effect: I believe the way Affinity colour manages on Windows means that the profile is applied during startup, but cannot be changed or refreshed during app use. Therefore what's happening is that you're disabling colour management entirely, launching Affinity with it disabled, then when you activate the ICC profile that change doesn't refresh within Affinity (until you restart). So the reason Affinity now looks the same as your other software is because nothing is being colour managed. In your first post, the screenshot comparison with the slight difference in saturation might be because Affinity is colour managing your image correctly. I had a quick search for ImageGlass and colour management and came up with this: https://github.com/d2phap/ImageGlass/issues/43 There seems to be some confusion there between image colour profiles and display colour profiles. The software author is talking about embedded/referenced image profiles and being able to change them, but the key issue here is managing between the image profile and display profile. This is what the Affinity apps do—they will take colour values from the document or image profile (e.g. sRGB, Adobe RGB) and translate them based on the active display profile so that they display correctly when viewed on the monitor. From reading the above issue on GitHub, it looks like the author implemented the ability to change the image profile, but hasn't implemented the actual translation from image to display profile. Therefore I wouldn't expect ImageGlass to be fully colour managed (only based on that observation above though, please don't just take my word for it). As far as I'm aware, the Windows desktop composition has nothing to do with the document view in the Affinity apps, so you wouldn't have a situation where colour management is inadvertently applied twice. It may be worth doing a quick test with an image that uses a wide colour space. I've attached a TIFF of one of my images that's been edited with a ROMM RGB document profile (I've compressed it in a ZIP to prevent the forum software from mangling it!). If you open this TIFF in Affinity and ImageGlass (plus any other software you use), do you notice a big difference in rendering? Affinity should be taking that ROMM RGB profile and translating the colour values based on the custom display profile you have created. Software that isn't colour managed will simply send those colour values to the screen with no translation. You should notice a big difference between a colour-managed and non-colour-managed result with this example. I'm not really sure about this—I use DisplayCAL on both macOS and Windows and wouldn't consider anything else. It sounds like you should maybe just calibrate and profile with DisplayCAL, use its own calibration loader and then assume what you see in Affinity is correct. You can experiment with other apps as well, but do check that they perform document-to-display (or image-to-display) colour management, and don't just offer an option to override the image profile being used. A useful diagnostic "hack" you can use within Affinity Photo is to go to Document>Assign ICC Profile (not Convert) and assign your display profile to the document—for example, mine might be UP3216Q #1 2022-09-19 11-11 D6500 2.2 F-S 1xCurve+MTX. This will effectively bypass colour management and show you what the image would look like if its colour values weren't being translated. If your document is only in sRGB, you might notice a very minimal change, if anything at all—you might see a small shift in saturation like with your first landscape image example. If it's in a wider space such as Adobe RGB or ROMM RGB, however, you should see a more noticeable difference. And on that note, a general rule to observe: always use device or standardised profiles for your document (sRGB, Adobe RGB etc), never display profiles. Display profiles should only be used by the OS and software to colour manage between the image/document and display. Hope the above helps in some way! JR ROMM RGB_6030007 8-bit.tiff.zip
-
 Hello, I'm new to Affinity photo and want to make sure I get color/profile issues straightened out from the beginning. I shoot raw out of a Nikon camera and import into On1 Photo Raw, which is set to ProPhoto. If I need to go into Affinity Photo from On1, I have a dialogue that appears where I can check that the file gets converted to either Tif or PSD and stays with the ProPhoto profile, 16 bits, 360 dpi (Epson print resolution) when opened in Affinity Photo. When in Affinity Photo the only way that I can see to check the document specs (size and color) is to go into the Document menu. If I go to the convert or assign profile menus I am expecting to see the ProPhoto profile highlighted in the pull-down menu but it is not. The preferences for convert always revert back to rgb/8. The assign dialogue has nothing highlighted. Is this the correct behavior? Do I always need to go to this menu and select ProPhoto or Romm rgb? Some more things.... 1. If I change the profile preferences to ProPhoto or Romm RGB , the next time I open Affinity Photo the pull-down menu is set to srgb again...how do you get ProPhoto to "stick" as the default? 2. When I open the preferences with an open image, sometimes ProPhoto is a choice and sometimes it is not. What is up with this?? ROMM rgb is always an option. Is this exactly the same as ProPhoto. 3. If I open an images that does not have prophoto embedded Affinity Photo does not try to change the profile. It does not ask or warn even if this is checked in the color preferences. 4. What are wsRGB and wscRGB, and why do these have an * next to them?? Thanks in advance for helping out! Regards, Michael
 -
One of those things....I just tried to "Open" one of the raw files instead of "Sending" from On1 to AP...now the preferences is staying at ROMM RGB. After this, I tried "Sending" from On1 again and the preferences remained at ROMM RGB...weird. I am the newbie...I will take blame, although I have no clue why this did not work until I "opened" a file. I notice that ProPhoto remains an option in the pull-down list if I send a file to AP with this profile. If not, only ROMM RGB is available. Is this normal and will this cause any issues when I send the file back to On1 for organization purposes or additional edits? BTW...this is a newly built PC running Windows 11 Home Edition.
-

HSV saturation gives me funky results
user_0815 replied to user_0815's topic in V2 Bugs found on macOS
I'd like to bring up another finding. By just Adding the HSL adjustment, there is a colour shift in red. No need to do anything else, just add the default HSL adjustment layer. As far as I am aware, this happens when a new 32-bit document is created. Converting to another color space fixes it somehow, for example from Adobe RGB to ROMM RGB. How to reproduce: 1. Create a new 32-bit document. 2. Add anything of red colour, for example a shape or brush stroke. 3. Add an HSL adjustment layer on top. When I create a 32-bit document form raw via the develop persona, the existing reds from the raw file ("Background" layer) aren't affected, only the ones that are added later. Setting the adjustment layer to "Invert contrast" at 50% opacity should make everything grey. But in this case it doesn't. That's why I think it might be a part of the current HSL funkyness. Please see the attached screen capture. Bildschirmaufnahme 2023-10-11 um 18.55.53.mov -

colour setting reset when app closed
spiderpod7d replied to spiderpod7d's topic in Beta Software Program Members Area
Hi Paul I did further investigation and the only colour profile that is not retained with app closure is Pro RGB colour. When I select Romm or Classic RGB these settings are remembered. When I first installed the generic 1781 these colour spaces didn't exist and I complained about this when the first beta was released at which time Walt indicated I shouldn't be using this beta but rather the latest release version, which I did. Don't know why when it was working with 1743 beta version it would suddenly act up with the last two updates 1779 & 1781? since when I install 1732 everything works as expected? Any way for now I will use the Romm as it is the same as Pro RGB but I would like to know why this is happening. Can you send me a link to download 1743 so I can try it again, to conform it worked in this version too? Thanks, -

Feature Request - RAW files in LAB/16 format
pano replied to pano's topic in Feedback for the Affinity V2 Suite of Products
If I have a RAW file, I don't know what colors are there and what color space is including the whole native camera color space. So the only viable choice is LAB, that contains all colors. Any other arbitrary choice may lead to a gamut mapping with an error. Picking RGB/32 and then automatically converting to ROMM RGB (the largest color space) is not a warranty of loseless colors, the camera color space is often wider than that. Converting to LAB after won't recover any color lost. That's why Adobe is allowing the direct RAW->LAB conversion. -
When creating a new stack image, the target document uses sRGB colour profile. Bit depth is correctly managed by the assistant. There should be an option to set the colour profile of the target document (like it is possible when going from Develop Persona to Photo Persona). My use case is I'm loading multiple RAW file (DNG) to the stack panel. I like to keep as much information as possible, but the resulting document always default to sRGB. The current workaround is to first convert all RAW file to DNG setting colour profile to my prefered profile (ROMM RGB), then stack TIFFs. that is an extra step ini the process. Regards,
-
 I can reproduce this, though, with several TIFF and JPG images that I have in my collection. They are all sRGB, but if I set my working space color to ROMM RGB in Preferences, Photo 2 loads them as ROMM RGB rather than sRGB.
 -
 I’ve worked out what it is about that particular TIFF which causes a problem. It has, as its embedded profile, a camera profile generated using Lumariver Profile Designer, for use with Capture One. This is probably a very strange profile indeed! I regenerated a similar TIFF from the same raw file, this time using the Prophoto RGB profile as is my usual practice, and the problem goes away. I verified again using the version with the camera profile that the problem still happens, so nothing on my system has caused it to go away. (Capture One calls Prophoto RGB “ROMM RGB”.) As the camera profile was used in error, and my practice is to use Prophoto RGB, this bug no longer affects me. The original TIFF with the camera profile was uploaded the next UK business day after being requested. I can supply the RGB ROMM version I used for the A–B test, but the engineers can probably extract the camera profile for their own A–B test using exiftool or a similar tool.