Search the Community
Showing results for 'ROMM RGB'.
-
 OS 14.4.1 Publisher: 2.4.2371 This is since the latest update because the book redo (.idml is full of rubbish and there are too many linked images) never had this bug the first 230 pages which were BEFORE the latest update. (Don't dare to open those files until this is solved, rather delay the release than destroying a year's work because a sudden bug which wasn't there before the update) The images are all linked and in the same folder as the layouts. I start a new document every 20 or so pages that's a file size of 20mb or so. It can replicate this bug, well, I found out why it does this and how to solve it. This must be fixed, the book has over 1000 photos (several documents make the book). I redo all the cmyk files now, then the document acts normal again, although I don't trust it. I can open the document without a problem after this crash and it saves normally too! It makes normal pdfs too. It gives this warning after 'save'. Twice, first on the file, then on the black background. If there are NO cmyk .eps or .psd files linked, there is no bug (I think...) at least I had no warning when I did 'save' which is baked into my left hand after 30+ years. That means I must change all the old files to rgb and afphoto SINCE THE LAST UPDATE. That's a lot of extra work...
-
 Affinity Photo 2 for iPad version 2.4.2 build 2371 IOS 17.2 - iPad Pro (11 inch) (2nd generation) Stage Manager is disabled The terminologie I use: default colour space: the colour space set in 'settings' > 'colour' > Default RGB Profile document colour space: the colour space as visible in the channels studio convert colour space: use the Document option 'Convert Document' and convert the colour space development: use the Develop Persona and submit using the '√' button. sRGB: sRGB IEC61966-2.1 ROMM RGB: ROMM RGB: ISO22028-2:2013 issue description I can't convert a documents colour space and use the Develop Persona. Under specific conditions, the colour space conversion is lost after using the Develop Persona. This happens when a document was initially developed using a different default app colour space. explanation After the described test procedures, It seems to me that a file has a default colour space 'build in', being the colour space that was set as default colour space in the Photo app settings when the file was developed for the first time. It does not seem to make a difference what the app default colour space is after that first development: whenever using the develop persona again (e.g. when one wants to make changes to a work-in-progress document), the document resumes the initial colour space that was set as the default colour space when the document was initially developed, no matter what the document was converted to or what the app default colour space is at this moment. In other words, whatever we convert a document's colour space to, if we use the Develop Persona after a colour space conversion, the colour space is reverted to an previous initial setting. my conclusion is based on the following procedures test 1 - basic test default sRGB set the default colour space to sRGB open a new .dng image. This document is automatically developed in the Develop Persona. Validate the development check the document's colour space using the channels studio. The colour space is sRGB save the document as .afphoto file and re-open the document convert the document colour space from sRGB to ROMM RGB, using 'convert document' check the document colour space. It is indeed ROMM RGB develop the document in the Develop Persona and commit check the document colour space. It is sRGB test 2 - basic test default ROMM RGB repeat the above procedure but 1. set the default colour space to ROMM RGB 5. convert the document to sRGB 8. the document colour space is ROMM RGB test 3 - basic test sRGB > changed default colour space before colour conversion to ROMM RGB set the default colour space to sRGB open a new .dng image. This document is automatically developed in the Develop Persona. Validate the development check the document's colour space using the channels studio. The colour space is sRGB save the document as .afphoto file ! set the default colour space to ROMM RGB ! re-open the document convert the document colour space from sRGB to ROMM RGB, using 'convert document' check the document colour space. It is indeed ROMM RGB develop the document in the Develop Persona and commit check the document colour space. It is sRGB test 4- basic test ROMM RGB > changed default colour space before colour conversion to sRGB repeat the above procedure but 1. set the default colour space to ROMM RGB 5. ! set the default colour space to sRGB ! 7. convert the document from ROMM RGB to sRGB 10. check the document colour space. It is ROMM RGB conclusion a colour conversion using Convert Document is undone after subsequently using the Develop Persona when the document was initially developed with a default colour profile that is different than the colour profile that the document is converted to. Under the above conditions, whatever change is made to a documents colour space by using 'convert document', this change is automatically made undone when the Develop Persona is used after such colour conversion. The resulting colour space is not influenced by the convert document step but is defined by the app default colour space that was used when the document was developed fot the first time.
 -

Black ink fill rate control in CMYK?
lacerto replied to mykee's topic in Affinity on Desktop Questions (macOS and Windows)
I am not sure if Softproof adjustment is something the messes this up for you (at least it should be turned off when you export). But Affinity Publisher is really quite lost when checking effect of effects 🙂 The following demonstrates how it wrongly reports an RGB 0,0,0 shadow with low opacity as excessive ink usage (so just staring at naive conversion of RGB 0, 0, 0, not taking into account the opacity level), while it totally ignores the effect of K99 shadow (not in itself causing excessive ink alarm, but because of having Multiply blend effect, will mix with underlying colors so that the TAC limit is exceeded): effectofeffects.mp4 So, the cause of effective TAC becoming too heavy in your design might be either in leaving Softproof adjustment on when exporting and messing up the colors, or using shadow effects with RGB 0, 0, 0 (becoming four color CMYK when converted) with Multiply effect. You could try if defining the shadow color as something like K99 and lower opacity level makes the job pass within the defined TAC limits. -
procedure: I convert a document colour space from e.g. sRGB to ROMM RGB. Then I develop the document in the Development Persona. After committing the development the document is now sRGB again. My default RGB colour space is ROMM RGB. This behavior does not occur when a raw file, e.g. a dng file, is already imported/developed with ROMM RGB set as default colour space etc. When a document was initially imported/developed with sRGB as default colour space in the settings this behavior does occur. ---- I can reproduce the issue: When setting the default colour space to sRGB and then importing > developing e fresh .dng file I get the described behavior. The file is imported as sRGB, as expected. I save the file as .afphoto. Now I open & convert the document to a wider colour space like ROMM RGB and save the file again. Next I open the .aphoto file, which is now ROMM RGB, and re-develop the embedded .dng file. After accepting these develop changes (any change wil do, the saving is the trigger here) the file is sRGB. When I change the default colour space to ROMM RGB after the original .afphoto file was created during this process the behavior is the same. The trigger seems to be the initial import/development with sRGB as default colour space. Whatever change is made to the default colour space after this event does not have any influence. When setting the default colour space to ROMM RGB and repeating the above process the behavior is identical. My conclusion is that a file has a default colour space 'build in', being the colour space that was set as default colour space when the file was imported / developed the first time. It does not make a difference what the default colour space is after that event, whenever passing by the development persona, the document resumes the initial colour space that was the default colour space when the document was initially imported/developed, no matter what the document was converted to or what the default colour space is at this moment. The terminologie I use: default colour space: the colour space set in 'settings' > 'colour' document colour space: the colour space as visible in the channels studio. development: using the development Persona and submitting the file using the '√' button.
-
Black ink fill rate control in CMYK?
lacerto replied to mykee's topic in Affinity on Desktop Questions (macOS and Windows)
If your blacks are RGBs, basically just applying (assigning) an appropriate color profile would limit the total ink to a specific maximum value. If the max TAC is as low as 260% you appear to have uncoated (or very lightly coated) media. Choosing e.g. US Web Uncoated would limit the total ink to 251% and keep the job neutral, not making it diluted or desaturated but basically just limiting excessive ink in darkest areas. If your colors are already in CMYK, you may consider converting the job (color definitions) to RGB, and then choose an appropriate profile in context of the press conditions and media that limits the total area coverage and manages ink usage with proper methods (like applying undercolor removal and gray color replacement curves). (Converting from CMYK to CMYK is normally not a good idea but if there are clear spots with excessive ink you might get away with it by applying manual tone control.) But my point is: by using an appropriate profile you will get balanced (non-color cast) properly managed tones and will get excessive ink usage automatically limited. Playing with soft proof and manual tone controls can be useful in RGB based output workflows (that expect the print file to be in RGB color mode), but typically not when using commercial press. See below how changing from an app. max 330% TAC Euroscale Coated profile to US Web Uncoated effectively limits the inks to max 250%. limitingtac.mp4 Note how Affinity apps appear to require refreshing of placed RGB images before ink limit of a changed profile takes effect (something that does not happen when using e.g. InDesign, so there both early and export-time profile reassignments are correctly applied for RGB objects when exporting to PDF) -- I have a feeling that this did not happen earlier within Affinity apps, either. It also seems that the macOS versions are even more broken as there (at least with native chip on macOS Sonoma 14.24.1 and latest Publisher 2.4.2) assigning a different CMYK profile does not seem to have effect on conversion of neither native art in RGB color mode (the RGB 0, 0, 0 black rectangle), nor in RGB image, so on macOS profile-based TAC limiting is badly broken. Note that US based profile may not be ideal in European press so you could ask your printer if they have a recommendation for the output profile considering the press conditions and used media. UPDATE: It seems that on macOS the native objects can be "reassigned" (refreshed) at least by selecting them and switching the color model within the Color panel (without making color conversion). On Windows "refreshing" is not needed (and should not be required on macOS, either). UPDATE2: Sorry, I read your initial message a bit carelessly and thought that TAC 260 was the goal, instead of TAC 280. You can come pretty close with e.g. Uncoated_Fogra47L_ViGC_300.icc, which has 274% as the TAC. -
Black ink fill rate control in CMYK?
lacerto replied to mykee's topic in Affinity on Desktop Questions (macOS and Windows)
Odd, now that I tried, the macOS version of Publisher (2.4.2 on macOS Sonoma 14.4.1) does have native objects CMYK readings updated after a profile change, so perhaps it was just a temporary (memory related) issue. But for placed images, reopening is still necessary. I tested the profile you referred and it seems to operate correctly: limitingtacmacos.mp4 Color data seems to be very easily affected by memory issues. At some point I experienced problems (on macOS) where I could not get realtime CMYK readings (in Photo Persona accessed Info panel) at all for placed RGB objects, neither for native or placed RGB images. -
I think my workflow is rather simple: I share a .dng (or other raw format) to affinity Photo on iPad to be able to process it in Affinity Photo. It gets opened in the Develop Persona etc. When I save the file I choose to have it embedded in my .afphoto document. Seems quit straightforward to me. I prefer to work in a wide gamut colour space, hence my choice for ROMM RGB. Sometimes I want to go back to the Develop Persona while working on a file in order to change some basic settings. Not often, but it happens. That is why we can go back to this Persona, right? I discovered this issue by accident, I was surprised by some colour differences between files from an older Adobe workflow and the ones I was seeing in Affinity. I noticed a difference in colour profile that I was not expecting etc. Let me add something though: When I changed the colour profile from sRGB to ROMM RGB I had some serious problems with the Selective Colour adjustments that I already made previously, I basically had to redo that. I have a feeling that the default colour space setting is not stable in the iPad versions of the Affinity applications, they seem to change somehow back to the standard sRGB from time to time. I have no proof of that yet but I set a wide gamut colour profile as default but somehow they get changed back to a default sRGB, it seems. Not definite proof yet, though.
-
I think that the repeated questions are typically related to separation preview, while images (and possibly also native elements) are still in RGB color mode. If that kind of tool can also show problems in placed CMYK content (already when it is placed on the canvas and not just in the exported PDF), then all the better. That is, users would like to have a kind of an interactive in-app preflight tool that exists e.g. in InDesign (note that this tool also takes into account effective TAC assisted by things like overprinting and blend modes): properinkcontrol.mp4 In lack of something like that, post-export tools like Adobe Acrobat Pro and callas pdfToolbox, and PackzView (the only one that is free, but with limited availability), are pretty much the only tools that can handle TAC and other preflight related tasks effortlessly and professionally. Everything else that I have seen (including postprocessing of separated inks e.g. with Ghostscript) are rather convoluted workarounds, but of course better than not having anything at all (= dismissals from the printer).
-

Massive problem with saving tga files with alpha channel
NotMyFault replied to IdleJohn's topic in V2 Bugs found on Windows
The trigger condition is simple: If mask is full black: TGA export is broken (mask is ignored, export is fully opaque). If mask is not fully black, but is only non-black where the pixel area is black: The exported TGA does not allow to recover RGB pixels. all RGB values get zeroed out. You may have any number of black mask pixels but you need at least one single pixel which is both not black in RGB channels and not black in alpha channel. Then the exported TGA file can be fully recovered in RGB channels. Tested on Mac with Photo V2. You milage may vary on iPad or V1 -
Black ink fill rate control in CMYK?
lacerto replied to mykee's topic in Affinity on Desktop Questions (macOS and Windows)
Have you tried the save, close and reopening trick, as advised by @thomaso. This should result in RGB images being properly assigned with the "new" (currently active) target CMYK profile so that you get correct reading already when using TAC picker or CMYK picker, but most importantly, when you actually export to CMYK PDF. -
 If you can demonstrate that the Photo correction is different for the same lens used on a full frame body and a crop body then carry on trying to modify the profiles to cope with both. I think that it would be a pain to select the right profile during development but then I'm not doing it. If you are serious about lens correction I recommend a trial of PhotoLab. I use it with Viewpoint, it's easy and produces superb results. If I only had Affinity Photo for raw development I would go back to shooting rgb files from the camera Hopefully a Serif expert will be along soon I have nothing further to add, good luck
 -
It's 2023 and we still get frequent request to "edit the alpha channel as normal color channel", and export / import files where the alpha channel is used for e.g. depth information (z-axis) or something else / not for alpha. I support these feature requests to allow easier editing of alfa channels using all brushes, filters, adjustments etc. Never the less, it is perfectly possible to do this even today with Affinity Photo, Designer both in V1 and V2. Opening a file The key is to separate alpha channel as greyscale layer once you open such a file, and fill the alpha channel to recover RGB pixel values where alpha was 0. Open a TGA, PNG, TIFF file which contains exactly one RGBA layer. Assuming the layer name is "background" Use channels panel, click on background alpha, and "create greyscale layer" Use channels panel, click on background alpha, and "fill alpha" Rename the greyscale layer to "alpha" You can now edit the alpha layer with all tools. Notes: keep the alpha channel in background always at 100% (if not: channels panel->fill). keep the alpha layer in greyscale (all pixel should have identical values for R and G and B channel for one pixel, do not colorise) (if not->HSL adjustment, set SAT to 0, merge down) In case you want to see the alpha channel acting as traditional alpha channel: Create a channel mixer adjustment Choose alpha channel (output) Set "red" input to 100% (all color channels should have identical values) set „alpha“ input to 0 Nest channel mixer layer in masking position to alpha layer Nest alpha layer to background layer You can continue to edit both layers individually, but you see a preview of the document using alpha layer as alpha channel. Exporting the file To export the file: unnest the alpha channel layer from background layer, move it to top rasterise to mask The file should have exactly 2 layers: alpha on top (mask layer), background on bottom (RGB channels, alpha filled 100%) Export as TGA, PNG, TIFF etc Closing notes Gamma is not handled correctly for alpha channel when simply mapping from alpha to color channel or vice versa. RGB channels need gamma correction (normally 2.2), whereas alpha stays linear for rendering. If the difference is critical, you can correct the gamma with help of a procedural texture filter. I have tested the import and export steps repeatedly with TGA files in Photo V1.10, V2.04, V2.1 This method was not invented by me, I simply wrote this tutorial to have a URL which I can use if someone raises questions or feature request concerning this topic. Edge case (added 24.04.2024) It is not possible to correctly export with empty mask (alpha zero for all pixels).
-
 Hi, so Ill start by prefacing that this doesnt happen with every color code but it does happen often. Today for example I am trying to achieve the color Royal Blue (RGB Hex# 4169E1 ) When i do this the color on the screen is purple. I even printed it out on my Epson F570 and pressed it to a substrate fabric and sure enough its purple. This also happened to me last week when i was trying to create the Argentinia and Equador Flag colors. I ended up just grabbing the color picker and using that to obtain the color i needed, but this cant always be the solution. Is there something I might have clicked that has caused this color shift? If theres any information i didnt provide please let me know. Id really like to fix this.
-
 After a successful Focus-Merge I attempted to convert the Document>ConvertFormat from RGB/8 to RGB/16. In 7 attempts (each time with different images) to convert, APh crashed 5 times, crash reports are attached. Hardware acceleration is disabled. My hardware and OS, see signature. No further editing was done before the conversion attempts. When restarted, APh re-loads one image. I have seen these crashes on different APh versions, and as far as I remember, these happened in combination with focus-merge (many of the APh crashes that I have observed, seem to happen after a focus merge). dd884b5b-69a7-44f3-8612-e142107a1d78.dmp 818c90e9-d1e0-4dbd-9d09-79855259ec38.dmp 661c8fbd-b1b3-4068-b6b7-e554ce6887cc.dmp 40f14d60-062b-45a9-bf19-783deead003a.dmp 6c3f054e-e580-46d6-aebb-60ca9f4fd812.dmp
 -

Black ink fill rate control in CMYK?
mykee replied to mykee's topic in Affinity on Desktop Questions (macOS and Windows)
@lacerto your video is very useful, and this is exactly the little tool I miss in Affinity (Total Area Coverage), which I could really use to easily check if I am exporting good color coverage or not. Here I use FOGRA39 for my prints, so by default I use the FOGRA39L_VIGC_300 profile and put the RGB images on that, but for some reason it still crosses the 300% limit and exports 325%. If I put a Soft Proof layer with ISO ECI 300 on it, it has already taken back the tints, which may be a temporary solution, but it can distort the colours a bit. -
When using a specific method for channel packing (see link below), export is wrong for TGA format if mask is fully or almost black. The test file has a mask with only 2 white pixels upper left / lower right. Problem 1: When exporting to TGA, the mask gets ignored and the TGA is fully opaque, despite the preview rendering. When changing export from TGA to PNG, export is representing the rendering. Image 1: Preview rendering for TGA wrong, check with navigator Panel Image 2: Image rendering correct for PNG (same file) Image 3: Solo / Isolation Mode of Mask Problem 2: If you re-import the TGA or PNG back gain into Photo, the RGB channels are not recoverable, but zeroed out. If you fill the mask with a white to black diagonal gradient, all TGB pixels are recoverable by filling the alpha channel after opening. almost empty mask export bug.afphoto
-
 Hello, I've got a document where the masks change (white patches appear) when the document's bit depth is changed from 8 bits to 16 bits. Hardware Acceleration/Open CL compute in Settings is turned off. Please check the attached file. Steps to reproduce: Open the file. Go to Document > Convert Format / ICC Profile... Change format from RGB/8 to RGB/16. Check the masks. White patches will appear in the masks. convert-to-16-bit-mask-changes.afphoto
 -
on Mac the behaviour changed as below: The tutorial works as before, when having a mask which is not fully black, e.g. using a black to white gradient. If the mask is full black (all zero), the exported file gets wrong: either the zero mask is ignored (despite correct rendering of preview), and the exported file is 100% opaque, or the export is not recoverable (RGB channels zeroed out). For your specific case requiring alpha to be zero for the complete canvas: this specific edge case is currently not possible with Affinity apps.
-
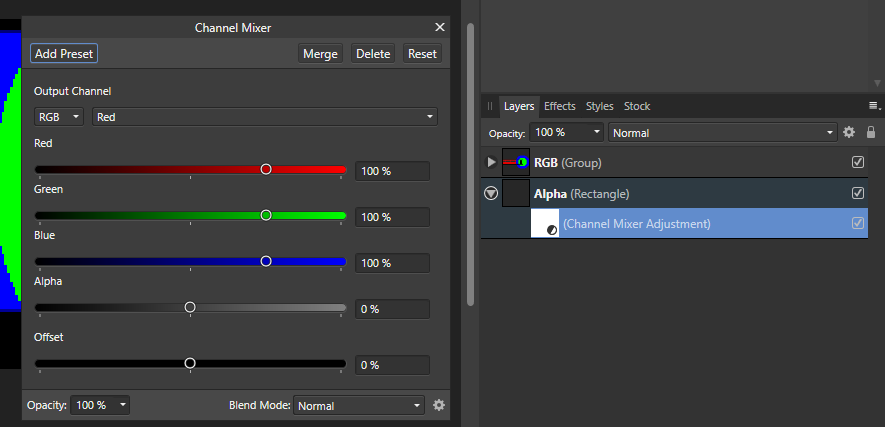
 I assume it should work regardless of what the channel mixer is nested on? since its all just the same data being modified no? All I want is to have the alpha channel be 0, whilst not messing with the RGB channels AlphaTest.afphoto
 -
I followed it along but I must be missing a step as it always just comes out black, Im trying to set the alpha channel to 0 because a shader uses alpha to control something and I need it not to so it must be 0. However when I drag the greyscale layer to the top of the stack and rasterize to a mask it just makes the entire thing black. Firstly editing the greyscale layer does nothing visibly so I dont even know if its working in the first place, the composite alpha channel stays white regardless of the greyscale value in the Alpha layer I made, It also just doesn't update the channel mixer when I set the values correctly, they just immediately reset to controlling the red channel when I reopen the window? When inspected with something like blender to see the rgb channels, they're all just white now? It also made the alpha channel itself white when it should be black? This whole work around is god awful just because they don't care about a certain group of users trying to use a very often needed feature...
-
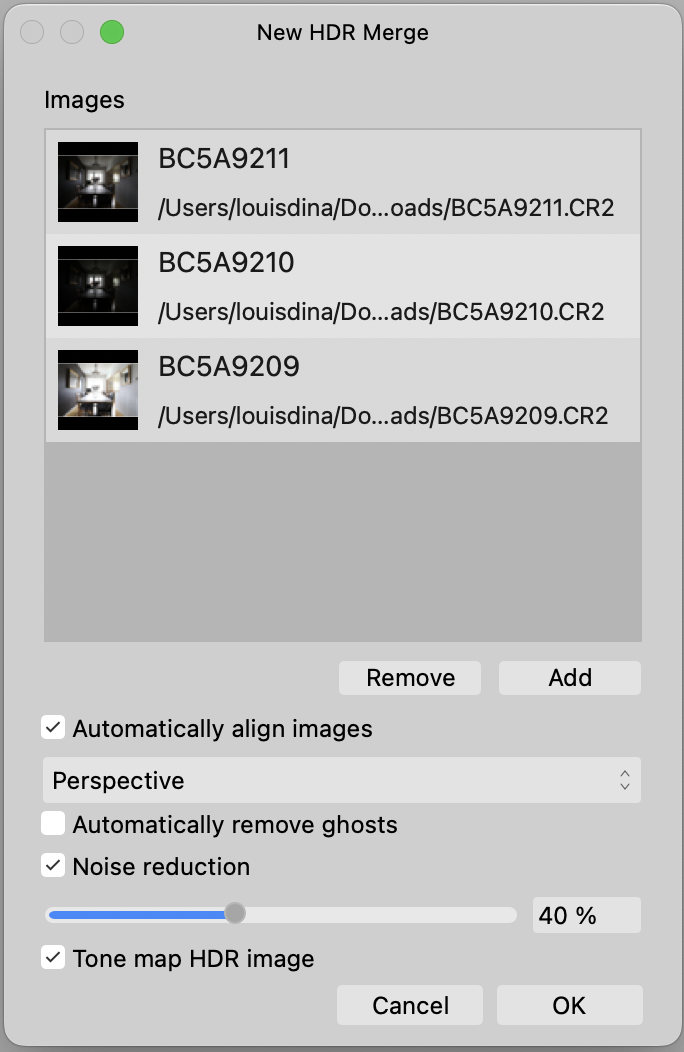
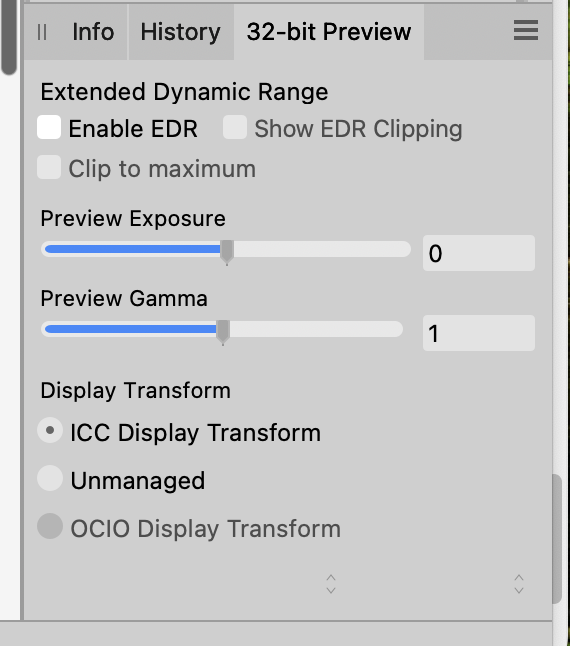
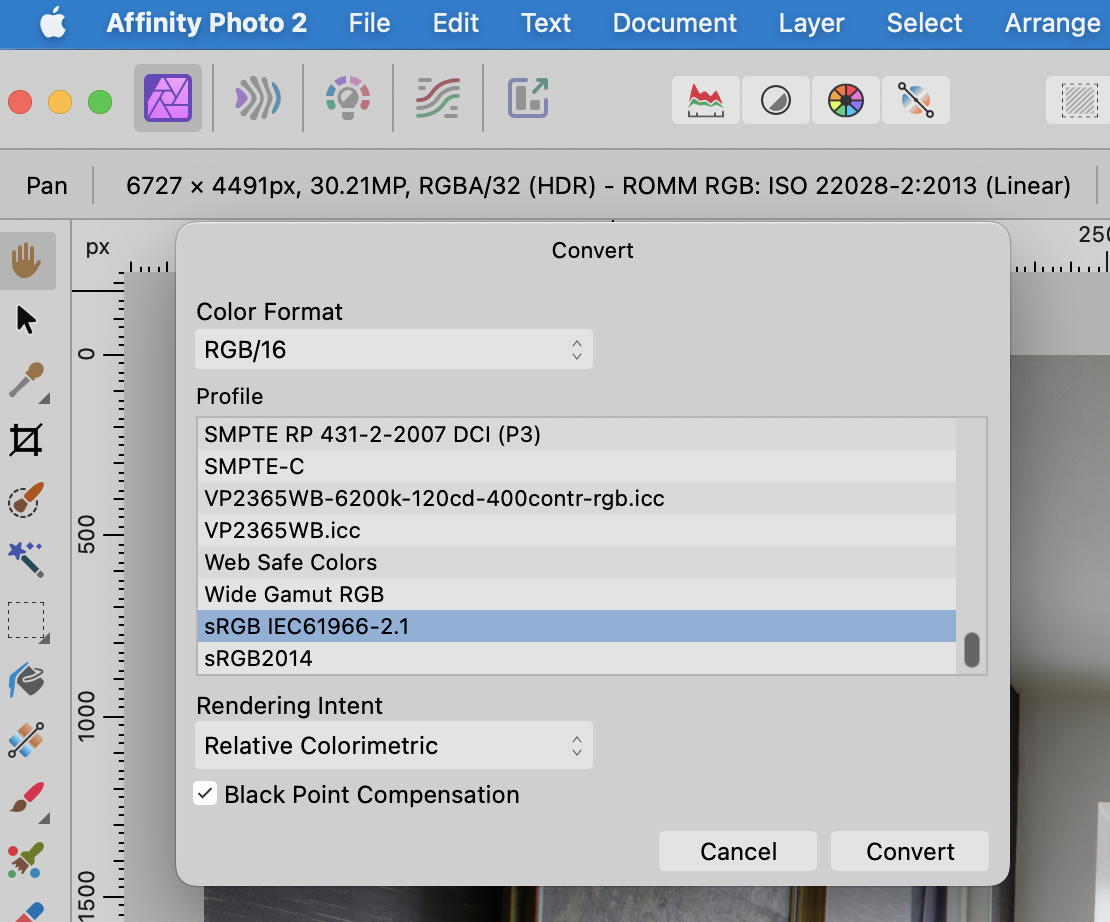
 @Max89 OK...first, what is your final delivered file format going to be? Standard JPG, PNG, TIFF, 8 bit, sRGB, etc? If your final format will be, for example, an 8 bit, sRGB JPG, here's one workflow... Create a new HDR image, add files, and leave it per the attached screenshot, then click OK. This will import, align, noise reduce your RAW images and send your file directly to the Tone Mapping Persona. In the lower righthand Studio, you will see the 32 bit Preview panel. If your end product is a standard JPG (which only supports standard dynamic range, i.e., 0–1 values), make sure you have the same settings as shown below. Next, make whatever adjustments you wish to make in the Tone Mapping Persona to sculpt tonal range, color, saturation, etc. When you are happy with your adjustments, click Apply. This will deliver a 32 bit, linear gamma (1.0 gamma) file to Affinity Photo in your chosen color space (sRGB, Adobe RGB, etc...whatever you chose initially). This will be a single, flattened pixel layer. In the screenshot below, you can see that the Tone Mapping persona delivered a RGBA.32 bit HDR file in ROMM RGB to Photo. I'd immediately convert the file to 8 or 16 bit (both of which are 2.2 gamma and limited to 0-1 standard dynamic range). I'd also chose your final color space. sRGB is probably the best overall choice if you plan on posting images online. Document > Convert Format / ICC Profile. Below, I chose RGB/16 and sRGB. Now that you are in a file space compatible with JPG, PNG, TIFF, etc, feel free to "edit away", adding adjustment layers, live filters, or whatever. The appearance should be preserved when saving and exporting. Export to JPG, sRGB, etc. That should do the trick. Your final JPG will be 8-bit, sRGB and should match what you see in AFPhoto.
-
I'm not entirely sure if this already exists but I've tried it several times. I'm an astrophotographer and in my editing flow I'm often manipulating individual RGB channels, compositing and then re-inserting them in. Or just adding in totally different images to RGB channels. So far I have to make a spare channel, name it. THen make a new white layer, then go in and load that spare channel into R, G or B. I think this is a really convoluted method where as in Photoshop you could literally click the channel, and hit paste to put the photo into the channel. If this already exists and I'm doing it wrong please inform me. But otherwise I would enjoy seeing this. Thanks
-
Good morning @Hangman, Yes some photos are used twice because the English can't choose what name they want to give a colour of a chicken. To accommodate their indecision, I gave both options. The printer & me, already did a 12 pages printing test, which I needed because I've never sent them pdfs from Affinity Publisher and the standard .pdf from Publisher give perfect printing results. Zero issues. Consistency is not my thing, throughout the book (some 260 pages) cmyk and rgb (new photos in rgb) and .eps .jpg .afphoto are mixed and I never looked what colour space is used for the Publisher documents because only the pdf matters. RIGHT > just checked, all Publisher documents of the book are cmyk US swob-something, haha. I do remember I 'discovered' the colour space when making a new Publisher document and put it to rgb, hoping for a smaller file size. I don't use the book feature, because InDesign-trauma 😅 Now continue the images/texts in your fixed document, thank you!
-
 Hi @Sigs, That's no problem at all... There are several images not sitting in a picture frame which isn't a problem, some but not all don't have the thin black border so you may want to drop them in picture frames for consistency and to add the border. but it's not essential when they already include the border... The duplicate image that appears on pages 5 and 19 is RoodWitgezHa.afphoto. On page 5 it is under the heading 'Chamois - (Gold dominant white laced) On page 19 it is under the heading 'Gold white laced, Chamois' If you're not already you use Publisher's Book feature which would allow you to split the book up into Chapters... The version I've sent you is, as mentioned CMYK using the U.S. Web Coated (SWOP) v2 profile but if you're moving forward with everything in RGB you can open the .afpackage file, change its profile back to sRGB, move it to a folder alongside your RGB images and relink the RGB versions. Let us know how you get on and whether you encounter any issues. I didn't see any error messages when working with your file so hopefully, all is good.
 -
@Max89 Max, Welcome to the Affinity Forums. I don't do a lot with HDR, but I gave your images a shot. After doing a standard HDR Merge, I went into the Tone Mapping Persona and tweaked a few settings (your choices may be very different). When applied, this remapped all the tones to Standard Dynamic Range (0-1). I had EDR (Mac terminology for Extended Dynamic Range) turned off in the 32 bit panel, which limits you to the standard 0-1 range (0-255 in 8 bit RGB terms). I assumed, perhaps incorrectly, that your final image would be a standard dynamic range PNG, TIFF or JPG, so I immediately converted the file to RGB/16 and used my standard RGB profile, which is Display P3 (sRGB is probably the safest for the internet). I added some adjustment layers and left them intact in the attached AfPhoto file. I don't know what the colors looked like in real life, so again, your choices may vary considerably, but HDR definitely works. The attached file is large because it is 16 bit and has multiple layers. HDR Merge.afphoto


.png.c51c989fa335384c745a7a0caaf1bd8e.png)
.png.9dd6afcde370f4278b0aca718f6ac46c.png)