Search the Community
Showing results for '100%K'.
-
 It's 2023 and we still get frequent request to "edit the alpha channel as normal color channel", and export / import files where the alpha channel is used for e.g. depth information (z-axis) or something else / not for alpha. I support these feature requests to allow easier editing of alfa channels using all brushes, filters, adjustments etc. Never the less, it is perfectly possible to do this even today with Affinity Photo, Designer both in V1 and V2. Opening a file The key is to separate alpha channel as greyscale layer once you open such a file, and fill the alpha channel to recover RGB pixel values where alpha was 0. Open a TGA, PNG, TIFF file which contains exactly one RGBA layer. Assuming the layer name is "background" Use channels panel, click on background alpha, and "create greyscale layer" Use channels panel, click on background alpha, and "fill alpha" Rename the greyscale layer to "alpha" You can now edit the alpha layer with all tools. Notes: keep the alpha channel in background always at 100% (if not: channels panel->fill). keep the alpha layer in greyscale (all pixel should have identical values for R and G and B channel for one pixel, do not colorise) (if not->HSL adjustment, set SAT to 0, merge down) In case you want to see the alpha channel acting as traditional alpha channel: Create a channel mixer adjustment Choose alpha channel (output) Set "red" input to 100% (all color channels should have identical values) set „alpha“ input to 0 Nest channel mixer layer in masking position to alpha layer Nest alpha layer to background layer You can continue to edit both layers individually, but you see a preview of the document using alpha layer as alpha channel. Exporting the file To export the file: unnest the alpha channel layer from background layer, move it to top rasterise to mask The file should have exactly 2 layers: alpha on top (mask layer), background on bottom (RGB channels, alpha filled 100%) Export as TGA, PNG, TIFF etc Closing notes Gamma is not handled correctly for alpha channel when simply mapping from alpha to color channel or vice versa. RGB channels need gamma correction (normally 2.2), whereas alpha stays linear for rendering. If the difference is critical, you can correct the gamma with help of a procedural texture filter. I have tested the import and export steps repeatedly with TGA files in Photo V1.10, V2.04, V2.1 This method was not invented by me, I simply wrote this tutorial to have a URL which I can use if someone raises questions or feature request concerning this topic.
 -
Apps: All Platforms: macOS, Windows and iPad A new QR Code tool is now available from the shapes flyout in the toolbar, making it easy to add a QR code to your documents. After creating or selecting a QR Code object you will find a 'Payload' option in the context toolbar. Here you can type whatever URL you want the QR code to link to when it is scanned. In addition to URLs you can use other syntax as detailed below to have the QR code trigger other functions when scanned by a device: SMS Payload structure: SMSTO:number:text message Eg. SMSTO:07513123456:Hello mate! GEO location Payload structure: GEO:lat:lon:height Eg. GEO:40.71872,-73.98905,100 WIFI credentials Payload structure: WIFI:S:ssid;T:type;P:password;; Eg. WIFI:S:MyWiFiSSID;T:WPA;P:MyPassW0rd;;

- 46 replies
-
- 29
-

-

-
 I found this on the support pages: Importing Microsoft Word documents Microsoft Word documents saved in DOCX file format can be imported into Publisher. Adobe InDesign and Microsoft Word content can also be added to Publisher using copy and paste. However, I have not had any luck. If I copy content (text and images) from a Word docx document and then try to paste it in Publisher, I only get the first paragraph pasted. Same thing happens if I try to "Place" the document--I only get the first paragraph. And, no further detail seems to be available for the first option, "importing" the Word document. Any suggestions? I'm trying to move from working in Word to working in Publisher, but I have about 100 pages done in Word already and was hoping not to have to start from scratch. I can export from Word as a PDF and then open the PDF, but that comes with it's own formatting issues. Thanks.
 -
 Hi there, I'm getting stuck with masking and the paintbrush tool (in Affinity Designer)... - Pixel Persona - Have a photo I want to mask - When I select a part of the photo with any of the selection tools and create a mask from that selection, things are fine. I get a proper black and white mask layer. - Now I want to REFINE my mask, by selecting the mask layer, selecting the brush tool, setting the brush color to BLACK and then painting black inside the mask over parts I want to hide. The problem is... I can never make the brush tool to paint in COMPLETELY BLACK color! The color setting in the color panel is set to completely black (#000000), but the actually painted color on the mask is always dark gray. Never completely black. Thus there are always semi-transparent parts of the image visible. I can never mask them completely. Any ideas how I can make the brush color to be 100% black? Thanks!
 -

Publisher 2.4.2 does not recognize stroke width from Designer
Hangman replied to anto's topic in V2 Bugs found on macOS
Hi @anto, You are copying from a 60 px x 60 px, 72 dpi document set to px and pasting to a 300 dpi document set to mm. ((300 - 72) / 72) x 100 = 316.67% 60 px + 316.67% = 250 px 60 px x 60 px @ 72dpi = 250 px x 250 px @ 300 dpi or 21.17 mm x 21.17 mm You also have 'Scale with Object' checked in your source document. 7.5 pt + 316.67% = 31.25 pt svg.mp4 -
Publisher 2.4.2 does not recognize stroke width from Designer
Hangman replied to anto's topic in V2 Bugs found on macOS
Hi @anto, This is expected behaviour... All SVG files are opened (incorrectly) at 72 dpi in Affinity and Adobe apps (they should honour the W3C spec and open at 96 dpi). You are copying and pasting a file between two different document dpi settings, i.e., copying from a 72 dpi document to a 300 dpi document so: ((300 - 72) / 72) x 100 = 316.67% 7.5 pt + 316.67% = 31.25 pt You will find the same if you copy and paste the SVG to a 300 dpi Designer file. Likewise, opening the SVG in Publisher will equally open it at 72 dpi and honour the stroke weight... -
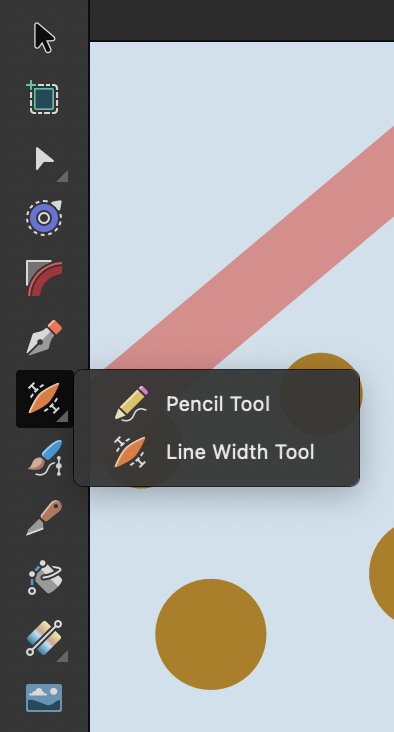
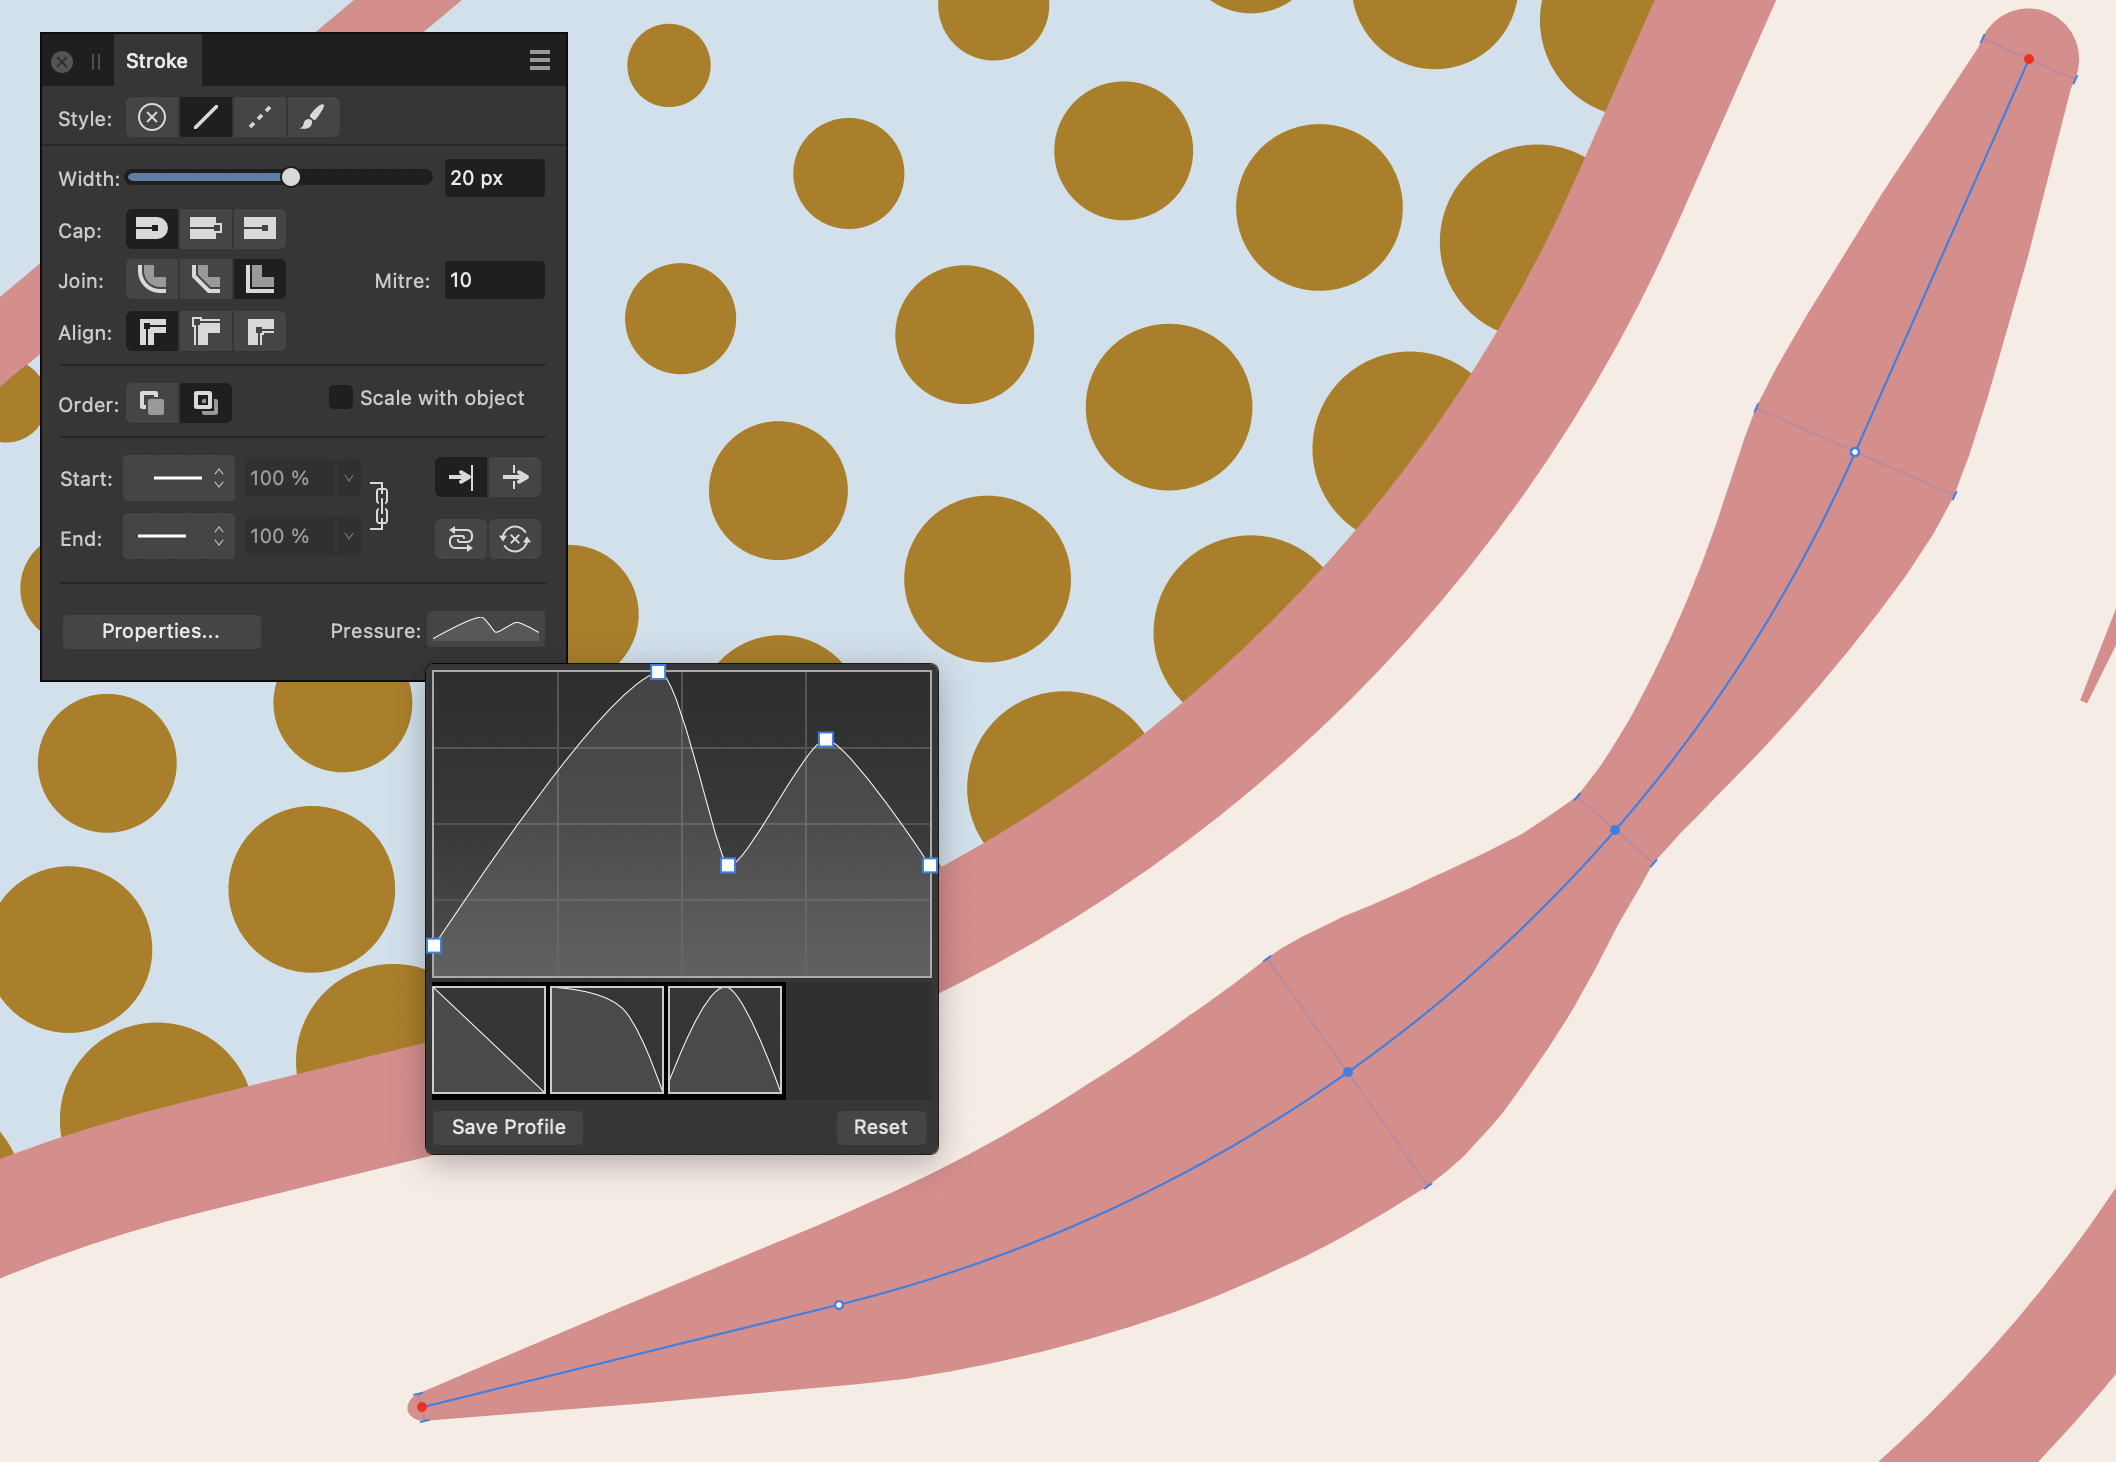
Apps: Designer Platforms: macOS, Windows and iPad Affinity Designer now includes a new width tool which is available by default alongside the pencil tool in your toolbar: The Line Width Tool gives you an on-document way of editing the pressure profile of any curve. For example the curve below has 3 pressure points (5 including the start and end pressure). While in the Line Width tool the position of those points are shown along the curve, and you have the ability to drag to change the width and position of them. You can also click to add a new pressure point, or double click to remove any pressure point on a curve. There are various modifiers available which you can see in the status bar: Shift + Drag - allows you to modify the width at any point without adjusting it's position Cmd (Mac) / Ctrl (Win) + Click - manually enter the width required at the chosen point Ctrl (Mac) / Ctrl (Win) + Drag - move the point position without adjusting the width Double click - remove pressure point Additionally you will find some other options in the context toolbar when using this tool: Adjust Line Weight - if this is turned on then should you drag the width of any point to be greater than the current line width (i.e. greater than 100% pressure) the line width will be increased to allow you to drag the width unrestricted. If it is turned off then the maximum width you can drag to is 100% of the set line width. Allow point reordering - This option allows to you to specify whether you want to allow the tool to drag one point past another along the curve, effectively swapping their order, or not. Snap to curve nodes - This will show any nodes on the curve as small white dots and will snap any pressure points to those nodes Snap to widths on same curve - this will snap the width at any pressure point on a curve to other widths which already exist on that curve. This only applies when holding shift (i.e. you are adjusting the width without altering the point position). Snap to curve geometry - this will snap the width to the geometry of any selected curves (again if you are holding shift).
- 117 replies
-
- 39
-
-
-

-
 Another one keen to have a shortcut way to add a caption to an image and the caption is locked to the image. I format books (usually novels) with Vellum but when I get a client with non-fiction (memoirs, histories etc) it would save so much time if there was a function to add a caption to images. We're talking 100+ images per book. Sometimes 4 images to a spread. I'm using version 1.10.8 on a Mac. Is this issue resolved in any of the new versions? Thanks so much for any help/advice.
-
I have about 100 pages of text to paste into Affinity Publisher V2 and was hoping there was an automatic way to do it. I thought that Autoflow was the answer, but for me, it is only autoflowing to odd-numbered pages. This is what I found in Affinity help, but it's not working for me. "To autoflow text into multiple new text frames: Click the Flow button at the bottom-right edge of the overflowing text frame with the Shift key pressed." Because of deadlines, I will have to continue with the more tedious method of linking one frame at a time and doing it 100 times. But perhaps, if there is a solution, it will help someone else.
-
 When buying the whole suite, the Studio Link feature in Publisher is SUPER powerful. It would make things even greater if this functionality would encompass 100% of the separate other two apps, now it is only 95%. Such as slices in AD, and Photoshop plugins in AP, and perhaps one or two other features. Its almoost there, it would be great if in the future Affinity would be able to be just 1 super flexible super app thats all that is needed ..Why have 3 apps when most people buy all and could use practically all features in the super app Publisher (maybe better called 'Affinity Suite/Collection' or so.. It is currently not the most logical implementation, that Publisher has Photo and Designer, but Designer does not have Publisher, but does have Photo.. Then one could buy the seperate apps and have only that app in the left top corner, if one buys all, one simply has 3 icons in the top left with full features. Or if one buys two one has two icons.. Would be much more clean & intuitive
 -
 Hey, I've been having issues with my erase tool. I am using windows 11 and I am updated to the latest affinity photo. When i try to erase from a image my erasing tool has a low opacity but the opacity is set to 100. I am using the basic brushes also. I will attach a screenshot of the issue. If any can help please let me know. Thank you!
-
 Hallo. Gibt es im Publisher (Windows, V2.4) eine Möglichkeit, Bildunterschriften für Fotos automatisch mit einer Nummer zu versehen und diese Nummer automatisch für das nächst folgende Foto zu erhöhen? Beispiel: Ich habe in einer Publikation 100 Fotos platziert, unter dem 1. Foto steht z.B. "Abbildung 1", unter dem nächsten Foto soll dann automatisch "Abbildung 2" stehen, unter dem 100. Foto "Abbildung 100". Ist das möglich?
 -
 It worked!! @walt.farrell thank you 100 times. By using Edit > Defaults > Revert and then saving the document, the defaults are reverted and my sanity is restored. There does seem to be some kind of weird bug if you have an empty Artboard selected when you Revert... it turns grey. Not sure if this is just rendering or something more sinister. If I ever figure out how this gets in this background color situation in the first place, I'll let everyone know.
 -

AD: SVG only exported as bitmap
DarkClown replied to DarkClown's topic in Affinity on Desktop Questions (macOS and Windows)
It's just a color overlay that I've been using on 100's of icons beforehand - without any problems .... -
 I'm currently working on a document in publisher and I would like to maintain a regular 100% zoom while working on the document but no matter what when I change pages it goes to an 84.4% zoom to fit the entire page on screen. Is it possible to turn this feature off or to set a 100% zoom default?
 -

Other Improvements
Frozen Death Knight replied to Ash's topic in 2.5 Beta New Features and Improvements
It means only the key object has a height of 100 pixels while everything else gets resized, but none of them have 100 pixel heights like the key object. -
Other Improvements
Frozen Death Knight replied to Ash's topic in 2.5 Beta New Features and Improvements
@Aammppaa How does it work? I activated Transform Objects Separately and typed in "=100" in the Height box in the Transform panel. The objects did not become 100 pixels in height except the one I had selected. -

Text Autoflow issues
MikeTO replied to Doozybird's topic in Affinity on Desktop Questions (macOS and Windows)
There's a design flaw with importing text with endnotes from MS Word. Here's what happens: Create a facing-pages document with 1 page Draw frames on both sides of the master and link them together On page 1, place the cursor in the frame and place the docx file into the frame - Publisher will fill the frame with text and add page 2, based on the master with the frames but ignoring the master frame and drawing an Endnotes frame on top of it. The frame on page 1 will be overset if your Word document was more than a page and the Endnotes frame on page 2 will be overset if you had more than a page of endnotes. Use AutoFlow on the frame on page 1 (shift+click the Text Flow Out icon) and Publisher will flow the text into the master frame on page 2, below the Endnotes frame, and continue on creating pages and linking frames as it should. This is the problem and you now have to move the Endnotes frame on your own. Create an extra page at the end of your document and move the frame there. But you have to drag it because if you cut and paste it you will delete your endnotes. And if your document is 100 pages long, dragging it there will be fun. Once your endnotes frame is on the right page you can use Autoflow on it to create additional pages of notes. That's obviously no fun so here's a workaround that works perfectly: Follow steps 1-3 above Delete the endnote frame from page 2 - this will delete all the endnotes in the document Autoflow the frame on page 1 - this will create pages and link frames Choose Select All and then Delete to delete the text you placed Place the docx file into the frame again - now there will be sufficient linked frames for all of the text and when Publisher creates the endnote frame it will create it on the page after all of the linked frames, putting it into the right place without you having to drag it there Now you can use Autoflow on the endnote frame if required to create additional pages of notes Good luck -
For anyone who may be interested, in addition to the options provided with the initial post for the new QR Code creation tool here are a few additions that work with iOS... Syntax Provided in the Initial Post for QR Code Creation in Affinity 2.5 Beta Apps SMS Payload structure: SMSTO:number:text message Eg. SMSTO:07513123456:Hello mate! GEO location Payload structure: GEO:lat:lon:height Eg. GEO:40.71872,-73.98905,100 WIFI credentials Payload structure: WIFI:S:ssid;T:type;P:password;; Eg. WIFI:S:MyWiFiSSID;T:WPA;P:MyPassW0rd;; Note: I've not tested these on Android but I'd be keen to know which work (with the applicable options) and which don't if anyone is happy to test... Additional Syntax Options for QR Code Creation in the Affinity 2.5 Beta Apps Phone Payload structure: TEL:number e.g., TEL:07772123456 Email Payload structure: MAILTO:email address e.g., MAILTO:jon.doe@example.com Email Additions (Cc, Bcc, Subject, Message) Payload structure: MAILTO:email address?CC=email address&BCC=email address&SUBJECT=subject&BODY=message e.g., MAILTO:john.smith@example.com?CC=john.doe@example.com&BCC=jane.doe@example.com&SUBJECT=Friday Drinks&BODY=We are all meeting at the Dog & Duck on Friday after work, hope you can make it. FaceTime Payload structure: FACETIME:mobile number e.g., FACETIME:07772123456 YouTube Payload structure: URL:https://youtubeurl e.g., https://www.youtube.com/AffinitySuite WhatsApp Payload structure: URL:https://wa.me/internationalnumber?text=message e.g., https://wa.me/447772123456?text=We are all meeting at the Dog & Duck on Friday after work, hope you can make it. Note 1: The mobile number needs to include the international dialling code without any prefixed zeros, e.g., UK 44 and US 1 as opposed to 0044 or 01. Note 2: Reserved characters need to use URL encoding when included as part of the message, i.e., ‘Dog & Duck’ should be typed as ‘Dog %26 Duck’ otherwise the message element is truncated at ‘Dog’. Examples of Reserved Characters Spotify Track Payload structure: https://open.spotify.com/track/songlink e.g., https://open.spotify.com/track/3Z5VaAEN7NWkgBXbCXNilW?si=91dfd85f75df4009 Spotify Playlist Payload structure: https://open.spotify.com/playlist/playlistlink e.g., https://open.spotify.com/playlist/7y40TSg305MTZ3n3Q2LqSF?si=dc0c24f1a6a34cdd Address Book Contact (vCard) Payload structure: BEGIN:VCARD VERSION:3.0 PRODID:-//Apple Inc.//macOS 12.7.4//EN N:LasteName;FirstName;;; FN:FirstName LasteName ORG:Company; EMAIL;type=INTERNET;type=WORK;type=pref:name@company.com TEL;type=WORK;type=VOICE;type=pref:Work Number TEL;type=CELL;type=VOICE:Mobile Number ADR;type=HOME;type=pref:;;Address NOTE:Notes item1.URL;type=pref:Web Address item1.X-ABLabel:_$!<HomePage>!$_ BDAY:2000-02-28 END:VCARD While the QR Code generator library (used in the v2.5 Beta for QR Code creation) supports the vCard (.vcf) format, currently Affinity apps don’t because of the requirement to use a CRLF (Carriage Return/Linefeed) after each line entry which the single-line Payload format used for QR Code creation in the Affinity apps don't accept and means the vCard formats fails with a No Usable Data Found error message. The alternative for Contact QR Codes is to use the more limited MECARD format which is accepted by the Affinity apps when creating a new Contact QR Code… Address Book Contact (MECARD) Payload structure: MECARD:N:Last Name,First Name;ADR:Address;TEL:number;TEL:number;EMAIL:emailaddress;NOTE:note e.g., MECARD:N:Cook,Tim;ADR:One Apple Park Way, Cupertino, CA 95014, United States;TEL:+14089961010;TEL:+17513123456;EMAIL:tim.cook@apple.com;URL:https://apple.com;BDAY:19600111;NOTE:”Apple Vision Pro, You navigate simply by using your eyes, hands, and voice.”;; PDF File Payload structure: https://hostlurl/file/pdflink e.g., https://drive.google.com/file/d/1WZD6wOgG1bkPQfcNA_MMCIuPhKVhWWQf/view?usp=sharing Add to Calendar Event for Apple and Google Calendar (.ics) Payload structure: BEGIN:VCALENDAR VERSION:2.0 PRODID:Spatie calendar-links BEGIN:VEVENT UID:90bbafd033c512f7590d844a0d65b449 SUMMARY:Run the London Marathon DTSTAMP:20240421T080000Z DTSTART:20240421T080000Z DTEND:20240421T130000Z DESCRIPTION:I'm running the London Marathon LOCATION:London END:VEVENT END:VCALENDAR While the QR Code generator library (used in the v2.5 Beta for QR Code creation) supports both the VCALENDAR AND VEVENT formats, currently Affinity apps don’t because of the requirement to use a CRLF (Carriage Return/Linefeed) after each line entry which the single-line Payload format used for QR Code creation in the Affinity apps don't accept and means the VCALENDAR AND VEVENT formats fail with a No Usable Data Found error message.
-
 The reason for this question is that I plan to make edits to layer 101 from time to time. In Affinity v1 it seems Export Persona could only export individual layers or individual groups, so using that software I would have had to copy layer 101 into 100 groups (one for each layer to export) and then batch export the groups instead of the layers. However it would be tedious to manually copy layer 101 into 100 groups after every time I've made an edit. Is there a more effective solution for this in Affinity suite v2? (I have Photo and Designer) BR Leo
 -
It went very well, Gary was not a particularly good Elvis impersonator, but he made up for that in spades as a good all round entertainer. It was a sell out, just short of 100 guests, had to do a ticket re-run as I had only printed 75. Food was great (Scampi-n-chips. Cheeseburger-n-chips and Chicken burger-n-chips). Everybody voted for him to be rebooked in September. Thanks for asking @William Overington
-

Variable Font Support (coming soon to 2.5 beta)
kenmcd replied to Ash's topic in 2.5 Beta New Features and Improvements
The current SVG table format does not support it. So at a minimum that would have to change - or a new table added. SVG has some advantages but COLR is adding those. Similar to... the current CFF table for OpenType-PS fonts does not support variable - so they added a CFF2 table to be able make variable OTF fonts. But one of the things in the boring-expansion-spec is to be able to put PS curves in the glyf table where the TT curves are now. So the OTF variable fonts may end-up being an Adopey-only thing and not catch on widely. That is being discussed for COLRv2. And perhaps images too (so virtually all SVG advantages would be gone). Behdad posted a summary of the ideas for COLRv2 in the colr-gradients-spec repository on GitHub. SVG fonts are not likely to go away any time soon. They are easy to make and also support a monochrome fallback. SBIX does not have that fallback. Hopefully it will go away. CBDT - Google put that out to pasture in favor of COLR. COLR is the future of color fonts. COLRv0 is stable. COLRv1 is still being tweaked, fixed, and added to. But people can and are making COLRv1 fonts now, both static and variable. You download them from GF, and there are some others in GitHub, and you can find them more and more in places like CreativeMarket, etc. Once COLRv1 is stable then the focus will turn to COLRv2. Color-SVG fonts which are only vectors can fairly easily be converted to COLRv0 and COLRv1. The COLRv0 fonts already work in Affinity. We tested quite a few. Hopefully Affinity will add support for COLRv1 - the sooner the better. Microsoft added COLRv1 to the Win11 Segoe UI Color Emoji font a few months ago, in addition to the existing COLRv0. So 100% perfectly scalable with gradients. Only a matter of time now until a user asks why the emojis do not look the same in Affinity (COLRv0) as they do in their other Windows apps (COLRv1). It's very late here. I'm rambling... Hope when Affinity adds variable support that it also includes at least COLRv0 variable. -
 Introduction I'm "kicking the tires" of the Affinity Publisher, Designer, Photo V2.40 suite this week and wondered if anyone else has also been thinking of or are using it as a Swiss Army Knife program suite for all document related work like notes, letters, reports, papers, books, websites rather than just traditional "desktop publishing", to replace Microsoft OneNote, Word, Adobe Indesign, Illustrator, and Photoshop totally. I've been wanting such a suite for 34 years and after just 4 days of experimenting, I'm already dreaming of a world where the Affinity Publisher, Designer, Photo suite is dominant in all these areas. We are only allowed one main question, so what additions to the Affinity Publisher, Designer, Photo suite would be required for my vision of the future? Version 2.40 now has almost all the things that critics claimed were missing in version 1.0 as a desktop publishing program. The present plague I got my first "real"computer 34 years ago in 1990 and within 1 year I was already trying to import AutoCAD drawings into Microsoft Word for a steel pole manufacturing company user manual. Most of you know that Microsoft Word has never displayed vector illustrations properly and likely never will. I asked the secretary of the company to print out a few pages I had made with filler text and the drawings I had imported, to check the quality of the lines which looked horrible on the monitor. The secretary was horrified at the filler text thinking this was the final draft and notified all the head people in the company and soon I was confronted by an angry mob in the lobby where the head accountant put me in a choke hold and tried to strangle me to death. After this I experimented with Ventura Publisher which only displayed thumbnails in the image boxes, then Page Maker, Frame Maker, and finally Indesign, Illustrator, Photoshop where I discovered how huge those Adobe files are and so would only be suitable for the largest of projects. The file size problem Smallest Microsoft Word version 2016 docx files are 12 K, Adobe Indesign version 2.0 indd files are 144 K, but Affinity Publisher V2.40 files are only 10 K. So Adobe Indesign documents are not typically going to be used in any corporate or home office for small items. Below are minimum file sizes for different documents. Affinity Publisher 10 K, no thumbnail on save Affinity Designer 9 K, no thumbnail on save Affinity Photo 8 K, no thumbnail on save, 22x20 mm stamp size image Adobe Indesign 144 K, compression, no ICC, no pdf editing Adobe Illustrator 273 K, compression, no ICC, no pdf editing Adobe Photoshop 685 K, 22x20 mm image, CMYK, 8 bit Writing everything directly in the desktop publishing program Most people think that writing should be done in a word processor and later inserted by a professional into a desktop publishing program if required. We all know how many times documents are edited, so in the end the "finished" document spends more time being edited than the original write, and it only makes sense for the author to do the editing in the desktop publishing program. So everyone in a company should be using the Affinity Publisher, Designer, Photo suite. The desktop publishing experts would be used to set up the documents and help people with the editing, illustrations, and photos? Program suites Visual documents filled with illustrations and photos are much more compelling but also are often required. A long document text, vector, raster suite of programs developed by the same company is required for this to work seamlessly. There are only 2 companies now in the world selling reasonably popular, reliable, and easy to use suites that do this, Adobe with Creative Suite and Serif with Affinity Suite. Alludo (Corel) decided to drop Ventura Publisher, and Microsoft decided to focus on text and ignore complex graphics. File sizes of Adobe documents are too big and the subscription fees too high for wide use. This leaves only Serif to fill that void for the mass markets. And just like QuarkXPress lost their domination, Adobe Creative Suite could lose it's title of being most popular by missing on the mass market end if my vision of the future becomes reality. Even note taking could be done by Affinity Publisher There are likely over 100 different note taking programs available. Everyone of them has the same problem, not being able to draw or edit quality (Bezier) vector illustrations or add vector text to raster images. The original Zettelkasten note system was using 3x5 inch stiff paper cards, were widely used by academics for text, charts, diagrams, but present computer note programs focus on text only. But what is also required is a proper note making program. I work in the field of science and engineering and we make a lot of research and design notes. So instead of copying something from the Internet, we have to make our own drawings, tables, and formulas. And these are often quite formal with quality drawings and illustrations, as orderliness, precision, and attention to detail results in better conclusions. None of the present note taking programs will do this, they are more for fleeting notes. So am considering using Affinity Publisher to generate these permanent note and invention files. The actress Joan Rivers was reported to have one million cards in her Zettelkasten system. This is why small file size is so important. Because digital documents can be text searched, I am proposing to use longer notes than what was used in the original Zettelkasten system, might be up to 20 pages if there is one main idea, with individual digital files for notes instead of a single huge file like in present programs. This allows addition of different file types like document, database, spreadsheet, presentation, drawing, and image. A descriptive file name is typically used in computer filing systems and complex coding could be used, but also tags would be required for searching. Presently l can't find any tags that can be added in Affinity Publisher that can be found with the advanced search in Windows Explorer?
 -
 I draw a square with 40 x 40 mm. I apply the distortion tool Arc to it and set it to 100%. After that, as expected, a clean semi-circular arc should emerge. Unfortunately, however, there is a small gap on both outer sides. If I create two arcs and rotate one by 180 degrees, I should get a perfect circle of 120 mm. Unfortunately, when I place a clean circle on top of this construction, the two arcs are not congruent. I have attached an example file in the appendix, where it becomes clear. I am using the latest version of Affinity Designer. The bug can be reproduced at any time. My computer is a MacBook Air M1 (2020, 16GB) with OS Monterey 12.6. Hardware acceleration is on, the bug is independent of that. Bug.afdesign
 -
 Its 'handyness' may vary with the spread aspect ratio (+ document/screen resolution) because it zooms to the centre if it gets used in the full spread view (i.e. after double-click in the Pages Panel or CMD-0) which zooms to the spine on 2-page spreads. Unfortunately even having a layout object selected does not ensure a 100%-zoom reliable to this specific page area, neither with trackpad double-tap nor with keyboard shortcut CMD-1. (unlike zooming via the scroll wheel, which takes the cursor position into account quite well)