

Omprakash Selvaraj
-
Posts
35 -
Joined
-
Last visited
Posts posted by Omprakash Selvaraj
-
-
Version 1.7 beta is real power house.
Love the realistic brushes and textures it provides.

- GDPR-229204 and Smee Again
-
 2
2
-
I am using Wacom Pen and tablet for retouching on Affinity Photo 1.7 beta.
The issue is that when I use wacom pen and go and click Brush Icon in the tool box and come back to image area, the cursor or pointer still appears as pointer instead of round shaped brush.
For bringing round shape, I always have to move mouse slightly and then start using the pen.
This is not show stopper, but a real usability issue for pen users. We have to place the pen down and use the mouse just to bring the cursor into brush shape and then start using pen.
-
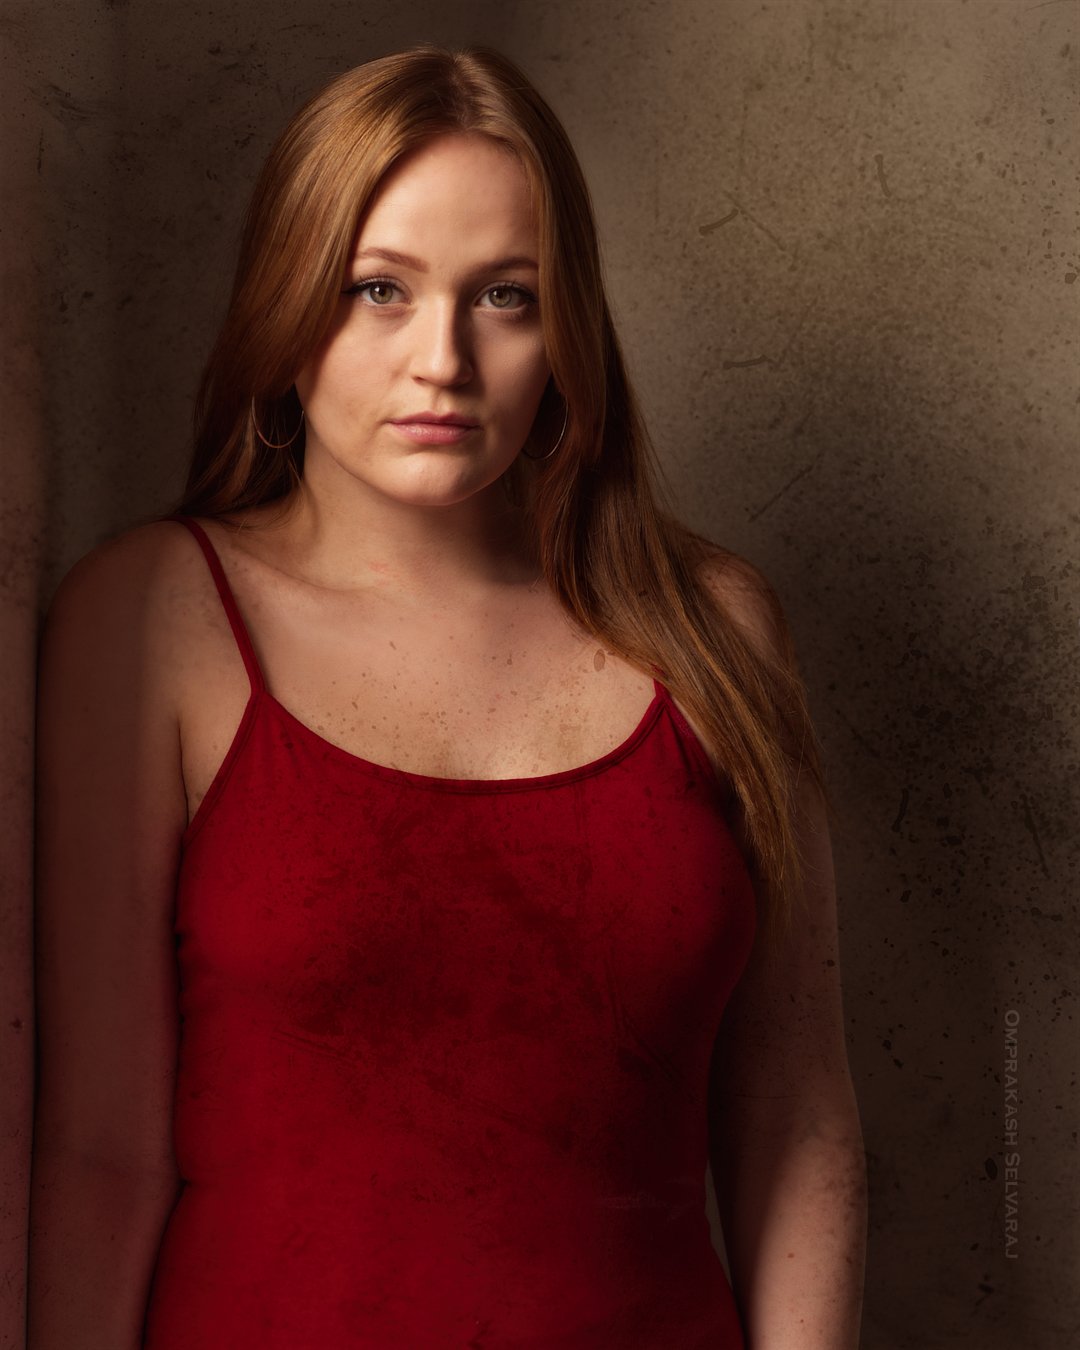
Affinity Photo 1.7 beta completely replaced my Photoshop needs.
I would like to have a Digital Asset Management software like Lightroom from Affinity. This will enable culling and then taking them to Affinity Photo for more detailed work.
So how to do image management until we get another gem from Affinity?
Nikon View NX-i does the job for basic image management. View NXi + Affinity Photo is a true replacement of subscription based Adobe Photography CC plan.
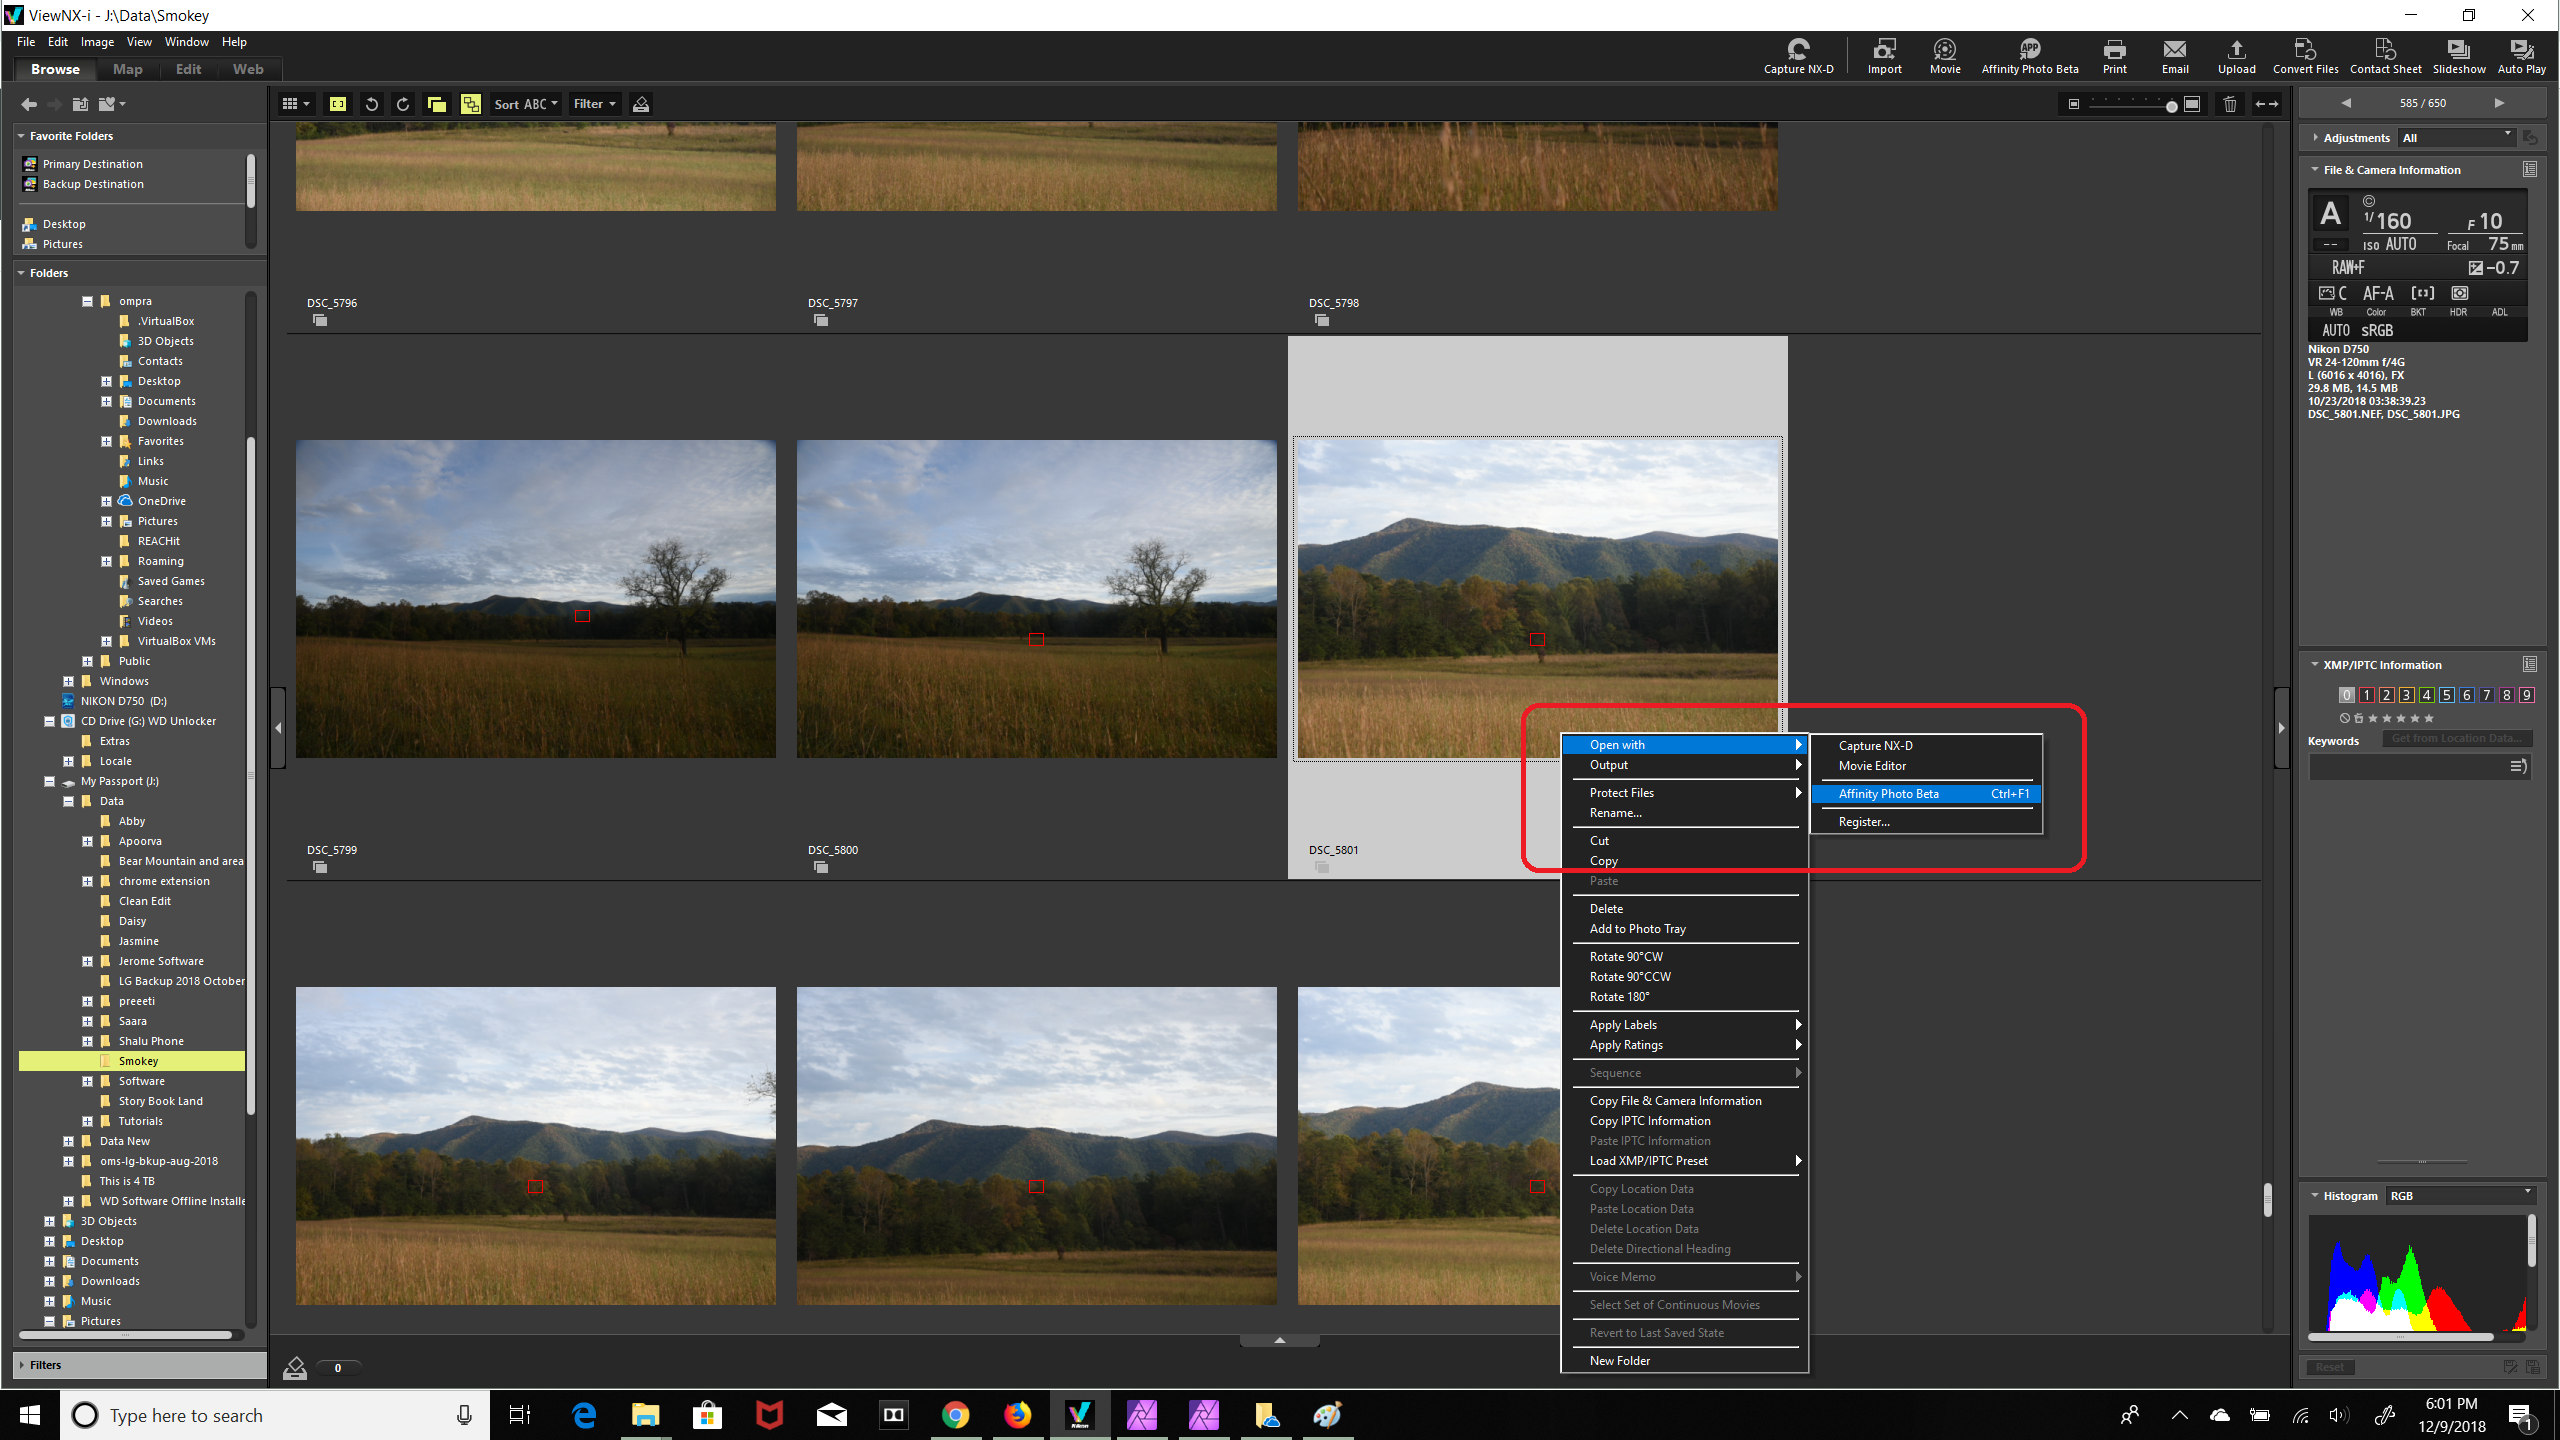
Right Click The Image you want to take to Affinity Photo.
Register If you have not registered before.
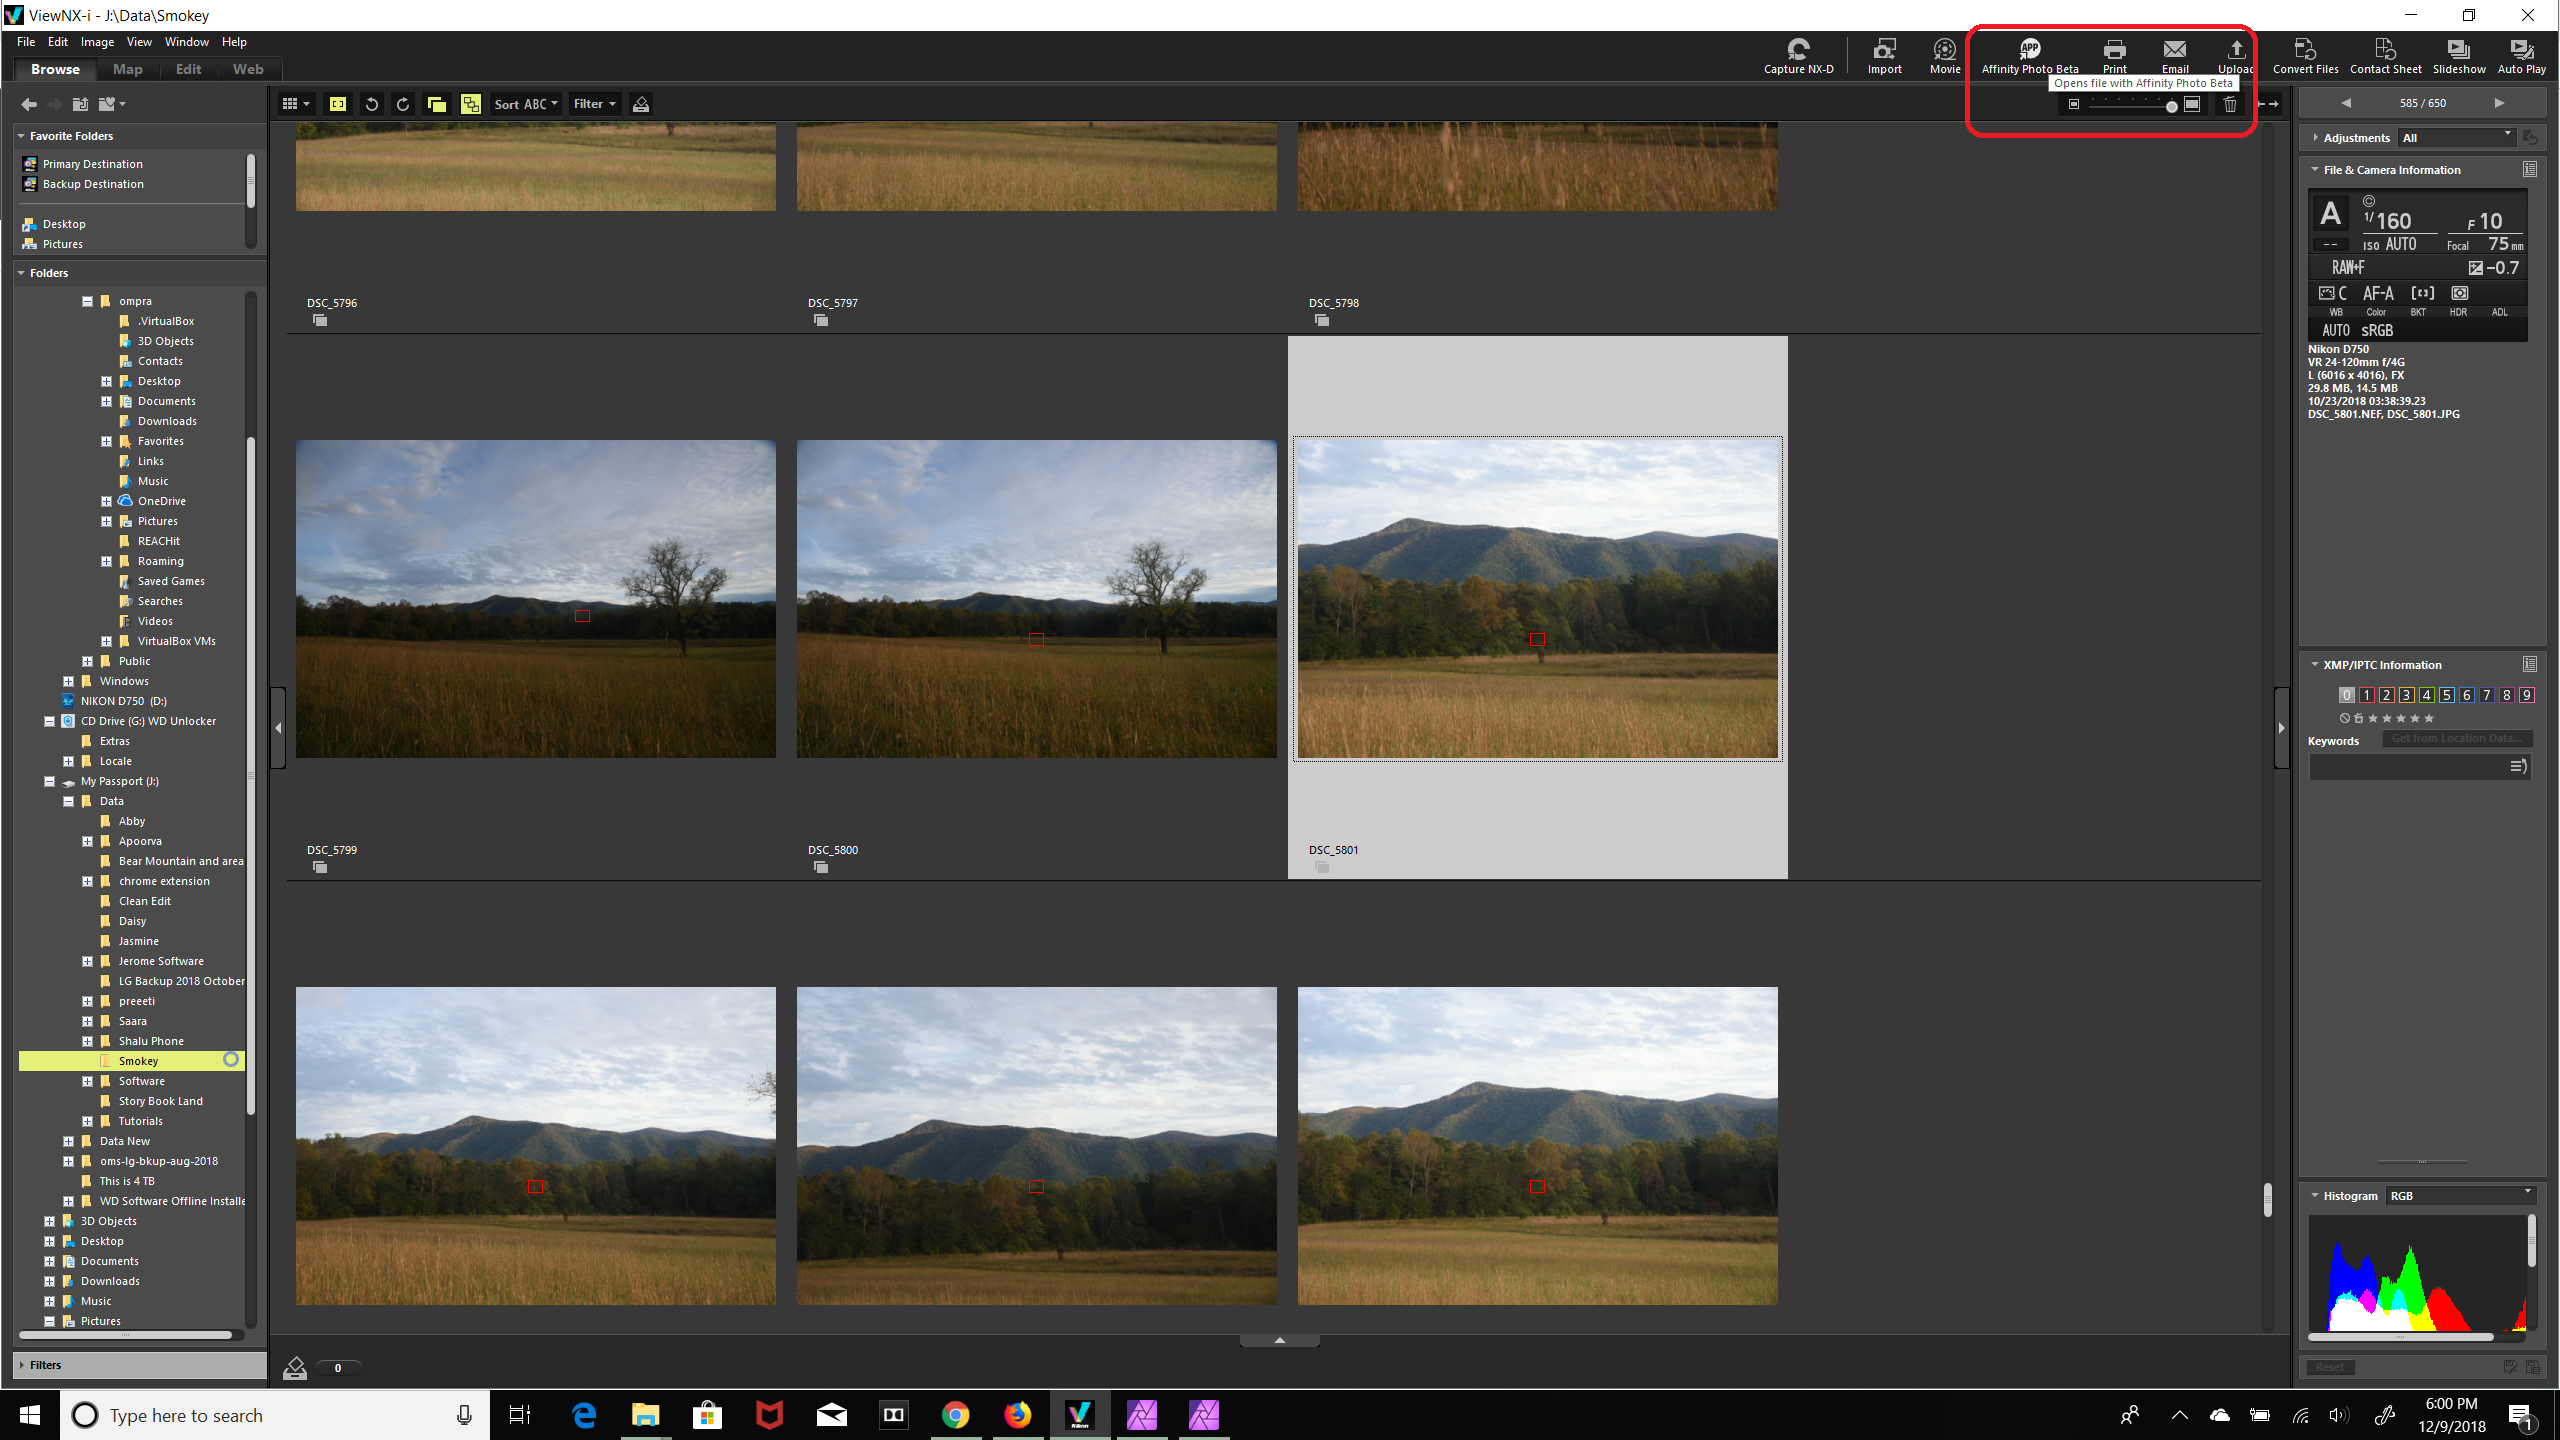
Another way to take your image to Affinity Photo.
-
I would like to have one DAM from Affinity. Until then, Nikon View NX-i and Affinity Photo covers my workflow. This pair kicks the subscription based Adobe Lightroom and Photoshop away.
-
1 hour ago, walt.farrell said:
I'm sure that Serif will work on updating the videos, once 1.7 is fully stable and released. Until then, any video they might make showing new or changed features is likely to become out-of-date as the code is modified during the beta process.
Thank you Walt. It looked like the courses had been created and list was last updated on 2015. But we got 1.6 release in 2018 this year March. So I am sure, there are things to add.
But not a show stopper. We can manage to use those features by seeing features list.
-
On 7/19/2017 at 5:05 PM, MartinsRibeiro said:
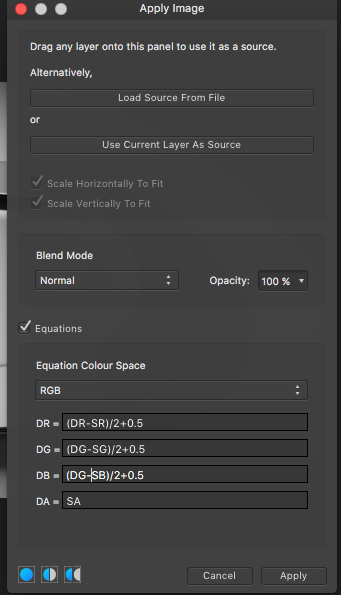
Issue solved! This is useful to subtract one layer from the other, for example for Frequency separation.
So this is how I did it for a 8 bits image (16 bits should need a change in the 2 and .5 values bellow)
1 - Create two layers with the same image
2 - Change the layer bellow as you like (gaussian blur, median blur or anything else)
3 - Make the top layer Linear Light (could be done afterwords but if you do it before Applying image, it's easy to see the result as it happens)
4 - Apply image with the following parameters:
Source: layer bellow modified
Blend mode: Normal
Equations: on
DR=(DR-SR)/2+0.5
DG=(DG-SG)/2+0.5
DB=(DB-SB)/2+0.5
DA=DA (no change to the Alpha )
A couple of explanations. In the equations:
DR stands for Destination Red an is the value of the Red in the layer you chose to Apply image (in this case the top Layer)
SR stands for Source Red and is the value of the Red in the source layer (in this case the layer bellow)
The 2 and 0.5 are based on this info: https://helpx.adobe.com/photoshop/using/channel-calculations.html (look for "Add and Subtract blending modes")
Hope this helps for future reference.
Well Done Martin! I was looking for this. Excellent job! Thank you!
-
On 11/28/2018 at 5:24 PM, DM1 said:
Check in Layers Studio to see if layer is labelled Pixel or Image. If image then you will need to 'Rasterize' the layer using the Command menu 'Rasterize'.
Thank you for your response. It was pixel layer only. Heard there are such instances before on specific files. I created new project. Thank you!
-
On 7/9/2015 at 3:55 AM, acapstick said:
In support of our fantastic photo editing app, please use this comprehensive and structured set of videos for accelerated learning!
The video tutorials are available on Vimeo and YouTube via these links:
Vimeo - http://affin.co/PhotoVids
YouTube - http://affin.co/photoyt
We now have a specific Beginners Series of videos tailored to absolute beginners, with a more manageable pacing and focus on concepts and straightforward procedures. They all include subtitles to aid understanding.
The tutorial set includes:
Beginners Series- Opening & Saving - YouTube / Vimeo
- Layers - YouTube / Vimeo
- Adjustments - YouTube / Vimeo
- Filters - YouTube / Vimeo
- Exporting - YouTube / Vimeo
Introduction
Basics
- Document Setup
- Layer Concepts
- Layers Overview
- Live Filter Layers
- Scaling and Transforming
- Cutting Out
- Understanding DPI
- Accessing Help
Transforming
- Document/Image Resizing
- Canvas Resizing
- Cropping: Practical
- Cropping: Aesthetic
- Straightening Images
- Cropping: Golden Spiral
- Cropping: Options
- Aligning Images
Selections and Masking
- Making Selections
- Refining Selections
- Pixel Selections from Layers
- Quick Masks
- Mask Layers
- Exposure Merging
- Clipping vs Masking
- Vector Masking
- Using Adjustment Layers on Masks - YouTube / Vimeo
Correction
- Adjustment Layers
- Levels
- Curves
- Shadows/Highlights
- Split Toning and Selective Colour
- LAB Colour Mode
- Defringing and Chromatic Aberration
- Live Perspective
- Haze Removal
- FFT Denoise
- Removing Lens Flares
- Changing Eye Colour
- Graduated ND Filter Effect
- Salvaging Underexposed Images
- Dual Perspective Correction
- Perspective Skew Correction - YouTube / Vimeo (New: 20th April)
Retouching
- Cloning
- Inpainting
- Frequency Separation
- Liquify: Retouching
- Vector-Based Retouching
- Enhancing Landscapes/Architecture
- Vector Architecture: Worked Example
- Enhancing Camera Phone Photography
- Making Images Pop
- Revealing Sky Detail
- Bringing Out Water Detail
- Quick Inpainting Crooked Horizons - YouTube / Vimeo
RAW Development
- Raw: Discover Develop
- Raw: Developing Images
- Raw: Overlays
- Raw: Redeveloping Images
- Raw: Noise Reduction
- Maximising Raw Latitude
- Custom Tone Curve
- Raw Development Quality
- 32-bit Raw Development - YouTube / Vimeo
- Raw Colour Quality
- Automatic Lens Corrections
- Raw: Recovering Overexposed Highlights
- Raw: Exposure Bias
Getting Creative
- Lighting
- Creative Gradients
- Creative Black & White
- Sepia Images
- Brushes
- Blend Modes
- Blend Ranges
- Liquify Persona
- Sky Replacement
- Adding Borders
- Text: Branding/Watermarking
- Diffuse Glow
- Displacement
- Circular Bokeh
- Swirling Bokeh
- Simulating Ambient Occlusion
- Texturing with Blend Modes
- Creating Atmosphere
- Creating Light Beams
- Vector Lighting
- Simple Gradients
- Technicolor Emulation - YouTube / Vimeo
- Creative Painting
- Colour toning with shapes
- Infrared Emulation
- Radial Blur
- Regular Tone Mapping
- Compositing Landscapes
- Adding Extended Borders
- Creating Photo Collages
- Abstract Ideas #01
- Abstract Ideas #02
- Enhancing Low Light Trails
- Light Painting Compositing
- Tone Mapping Portraits
- HSL Tonal Separation - YouTube / Vimeo
- Orton Effect - YouTube / Vimeo
Design Aids
- Snapshots
- Modifiers
- Designer/Photo Interworking
- Pixel Accurate Design
- Placing Documents
- Useful Keyboard Shortcuts
- Non Destructive Inpainting and Cloning
- Layer Creation Behaviour
- Layer Nesting
- Exporting 3D LUTs
- LUTs for Tonal Adjustments
- View Points
- Global Cloning
- Subtle Toning
- Multiple Colour Formats
- Scopes
- Curves Picker
- Non-Destructive Dodge & Burn
- Flexible Defringing
- Edge Detection for Masking
- Split & Mirror View
- Batch Processing
- Clone Sources
- Pixel Art Resize
- Direct PSD write-back (round tripping)
- Freehand Selection Tool
- Undo History
- Importing .abr Brushes
- Undo Brush with Snapshots
- Quick Toggling Panels - YouTube / Vimeo
- Light UI - YouTube / Vimeo
- Brush Stabilisation - YouTube / Vimeo
Channels
- Channels
- Channels for Alpha Masking
- Channels: Creating/Storing Selections
- Editing Single Channels
- Channels: Greyscale Blending
- Channel Packing
Filters
- Live Filter Layers (Also in Basics)
- Apply Image
- Apply Image: Equations
- Equations Filter
- Dust & Scratches Filter
- Halftone Scanlines Effect
- Mirror filter
- Diffuse Glow Filter
- Defeating Filter Limits
Panoramas
HDR (High Dynamic Range)
- HDR: Merging & Tone Mapping
- HDR from one exposure - YouTube / Vimeo
- HDR: Tone Map Presets
- HDR: Panoramas
- HDR: Preprocessing
- HDR: Advanced Editing
- HDR: Ghosts Removal
- HDR: 32-bit Editing
Focus Merging (Focus Stacking)
Live Stacking
- Maximum Stacking
- Big Stopper Effect
- Light Painting Blending
- Stacking: Long Exposure Simulation
- Stacking: Noise Reduction
- Stacking: Object Removal
- Stacking: Exposure Merging
- Stacking: Star Trail Effect
- Pin Sharp Stars
Live Projections (360 editing, perspective projection)
- 360 Live Editing - YouTube / Vimeo
- 360 Advanced Editing
- 360 Retouching
- 360 Multiple Views
- 360 Roll Correction - YouTube / Vimeo
- Live Perspective Projection
OpenEXR/32-bit
- OpenEXR Multichannel Import/Export
- OpenEXR Import Options
- Editing 32-bit 3D Renders
- OpenEXR: Using Alpha Channels & Association
3D Render/Texture Work
- Seamless Textures
- Clone Sources: Texture Creation
- Enhancing 3D Renders #01
- Enhancing 3D Renders #02
- Tone Mapping 3D Renders
- 3D Relighting with Normal Map Passes - YouTube / Vimeo
Colour Management
- OpenColorIO Setup
- OpenColorIO Adjustment
- Soft Proofing
- Printing on Mac
- Printing on Windows
- Wide Colour Profiles vs sRGB - YouTube / Vimeo
Macros
Finishing Off
Plugins
Projects
- Nature Portrait
- Supermoon
- Product Shot Retouching #01
- Nighttime Architecture Workflow - YouTube / Vimeo
- Portrait Retouching Workflow - YouTube / Vimeo
Bonus Content
Windows Workflow videos
In addition to the regular tutorials, we've also got some workflow videos shot on the Windows version of Photo that cover using a variety of features to edit an image to completion. These tend to be released on a more informal basis.
- Hadrian's Wall
- Tiled Building
- Portrait Retouching
- Monochromatic Architecture
- Canary Wharf
- Banded Demoiselle
Please let us know about areas you think need covering, have problems with, don’t understand, or just tell us if we’re on the right or wrong track. Simply reply to this pinned topic.
Have fun with Affinity Photo!
Best wishes from the Affinity Documentation Team!The courses have been created and list was last updated on 2015. But we got 1.6 release in 2018 this year March. So I am sure, there are things to add.
Since version 1.7 beta is out with loaded features, I wish these tutorials are revisited to cover new features.
Was as regular ps user for one year. Moved to affinity few days back, due to the greed based monopoly subscription model of ps.
It is just bad for the art to let just one tool a strong dependency. Had been searching for alternatives.
Bought 1.6 version of Affinity photo. Initially slightly disappointed that it could not replace ps for what I was doing for last one year.
Just after that day of purchase I came to know beta 1.7 is out.
When I use 1.7, it could do everything for my work. It gives same feeling as I was using ps. I am confident that there won’t be such bad dependency in the art of photography anymore.
Cheers Affinity!
-
I was working in Affinity photo for iPad.
In one image, I created layers and did some basic tonal changes. Ran a macro that came with Windows version.
Now I am able to create layers but when ever I do any pixel edits like paint or clone or any tonal changes, nothing happens. I am able ot see value gets changed in tool. But does not appear in image. Ex. I am increasing Temperature. But image remains same. Did I click any lock or something.
But new projects work fine. Only this specific file shows this behavior.
Thanks in advance.

Brush does not appear round automatically when using Wacom Pen
in [ARCHIVE] Photo beta on Windows threads
Posted
'Show bush previews' were enabled by default.
What helped me in this case was Installing Wacom tablet software from Wacom site. This updated pen and tablet drivers.
Now it is working.
Thank you Chris for reminding about drivers.