

Omprakash Selvaraj
-
Posts
35 -
Joined
-
Last visited
Posts posted by Omprakash Selvaraj
-
-
I meant eraser and brush on linear, elliptical and *radial overlays..
also invert option on radial overlays. Look at the video to know why this might be a real game changer for affinity.
-
Dear Affinity Team Developers,
The eraser/brush on linear/gradient overlay is one of the most used tools in lightroom by major artists.
We miss this feature badly in affinity raw edit. Currently "Overlay erase" only work on brush overlay. It is not working on gradient/linear overlay.
I wish the overlay area of linear/elliptical/gradient overlay can be increased or decreased using brush and eraser.
Look at the below video. Can the similar thing be done in Affinity raw editor? This will reduce lots of layer works in affinity. I am sure this will drag many of artists to affinity from lightroom.
-
5 hours ago, walt.farrell said:
It does, for me, if Snapping is enabled.
Oh. Yes. My bad. How did I forget?
") Thank you for saving me.
Thank you for saving me.
-
While resizing crop tool, it should pause for a while when it touches border of photo or canvas.
Thx.
-
We add linear or radial overlay in RAW Develop persona.
It would be great if we could mask out desired areas in the same overlay. It will help out to create some artistic styles more elegantly.
Also please add inside and outside options in radial overlay.
For ex: I create a radial overlay to darken. I wish there is option to specify where to darken pixels (i.e) outside the overlay or inside the overlay and wish there is a brush to mask out or add some areas in the same overlay.
These steps can still be achievable with existing tools but very time consuming and lacks artistic touch.
-
This is really useful. You may just want to change on Copper 1. Looks slightly different from photoshop
-
On 3/10/2019 at 4:23 PM, Ron P. said:
I've always understood Luminosity and Lightness to be interchangeable, ie; the same thing.
L in the HSL mean lightness. And this L does not come into picture when you use luminosity, color and hue blend modes. What comes is the luminosity (i.e) perceived brightness.
-
On 2/28/2019 at 10:30 AM, Chris B said:
Hey Omprakash Selvaraj,
I've heard back from the developers and this is by design.
We use the same maths as can be seen in this PDF spec (the same as Photoshop)
https://www.adobe.com/content/dam/acom/en/devnet/pdf/pdf_reference_archive/blend_modes.pdf
Yes. I understand that Adobe works that way too. Because Luminosity is to be retained from bottom layer on most occasions.
But latest version of GIMP offers two kind of "HUE" blend mods one that retains Saturation and Luminosity from bottom layer and another "HUE" blend mode that retains Saturation and Lightness from bottom layer.
Hope we expect this in future version of Affinity.
-
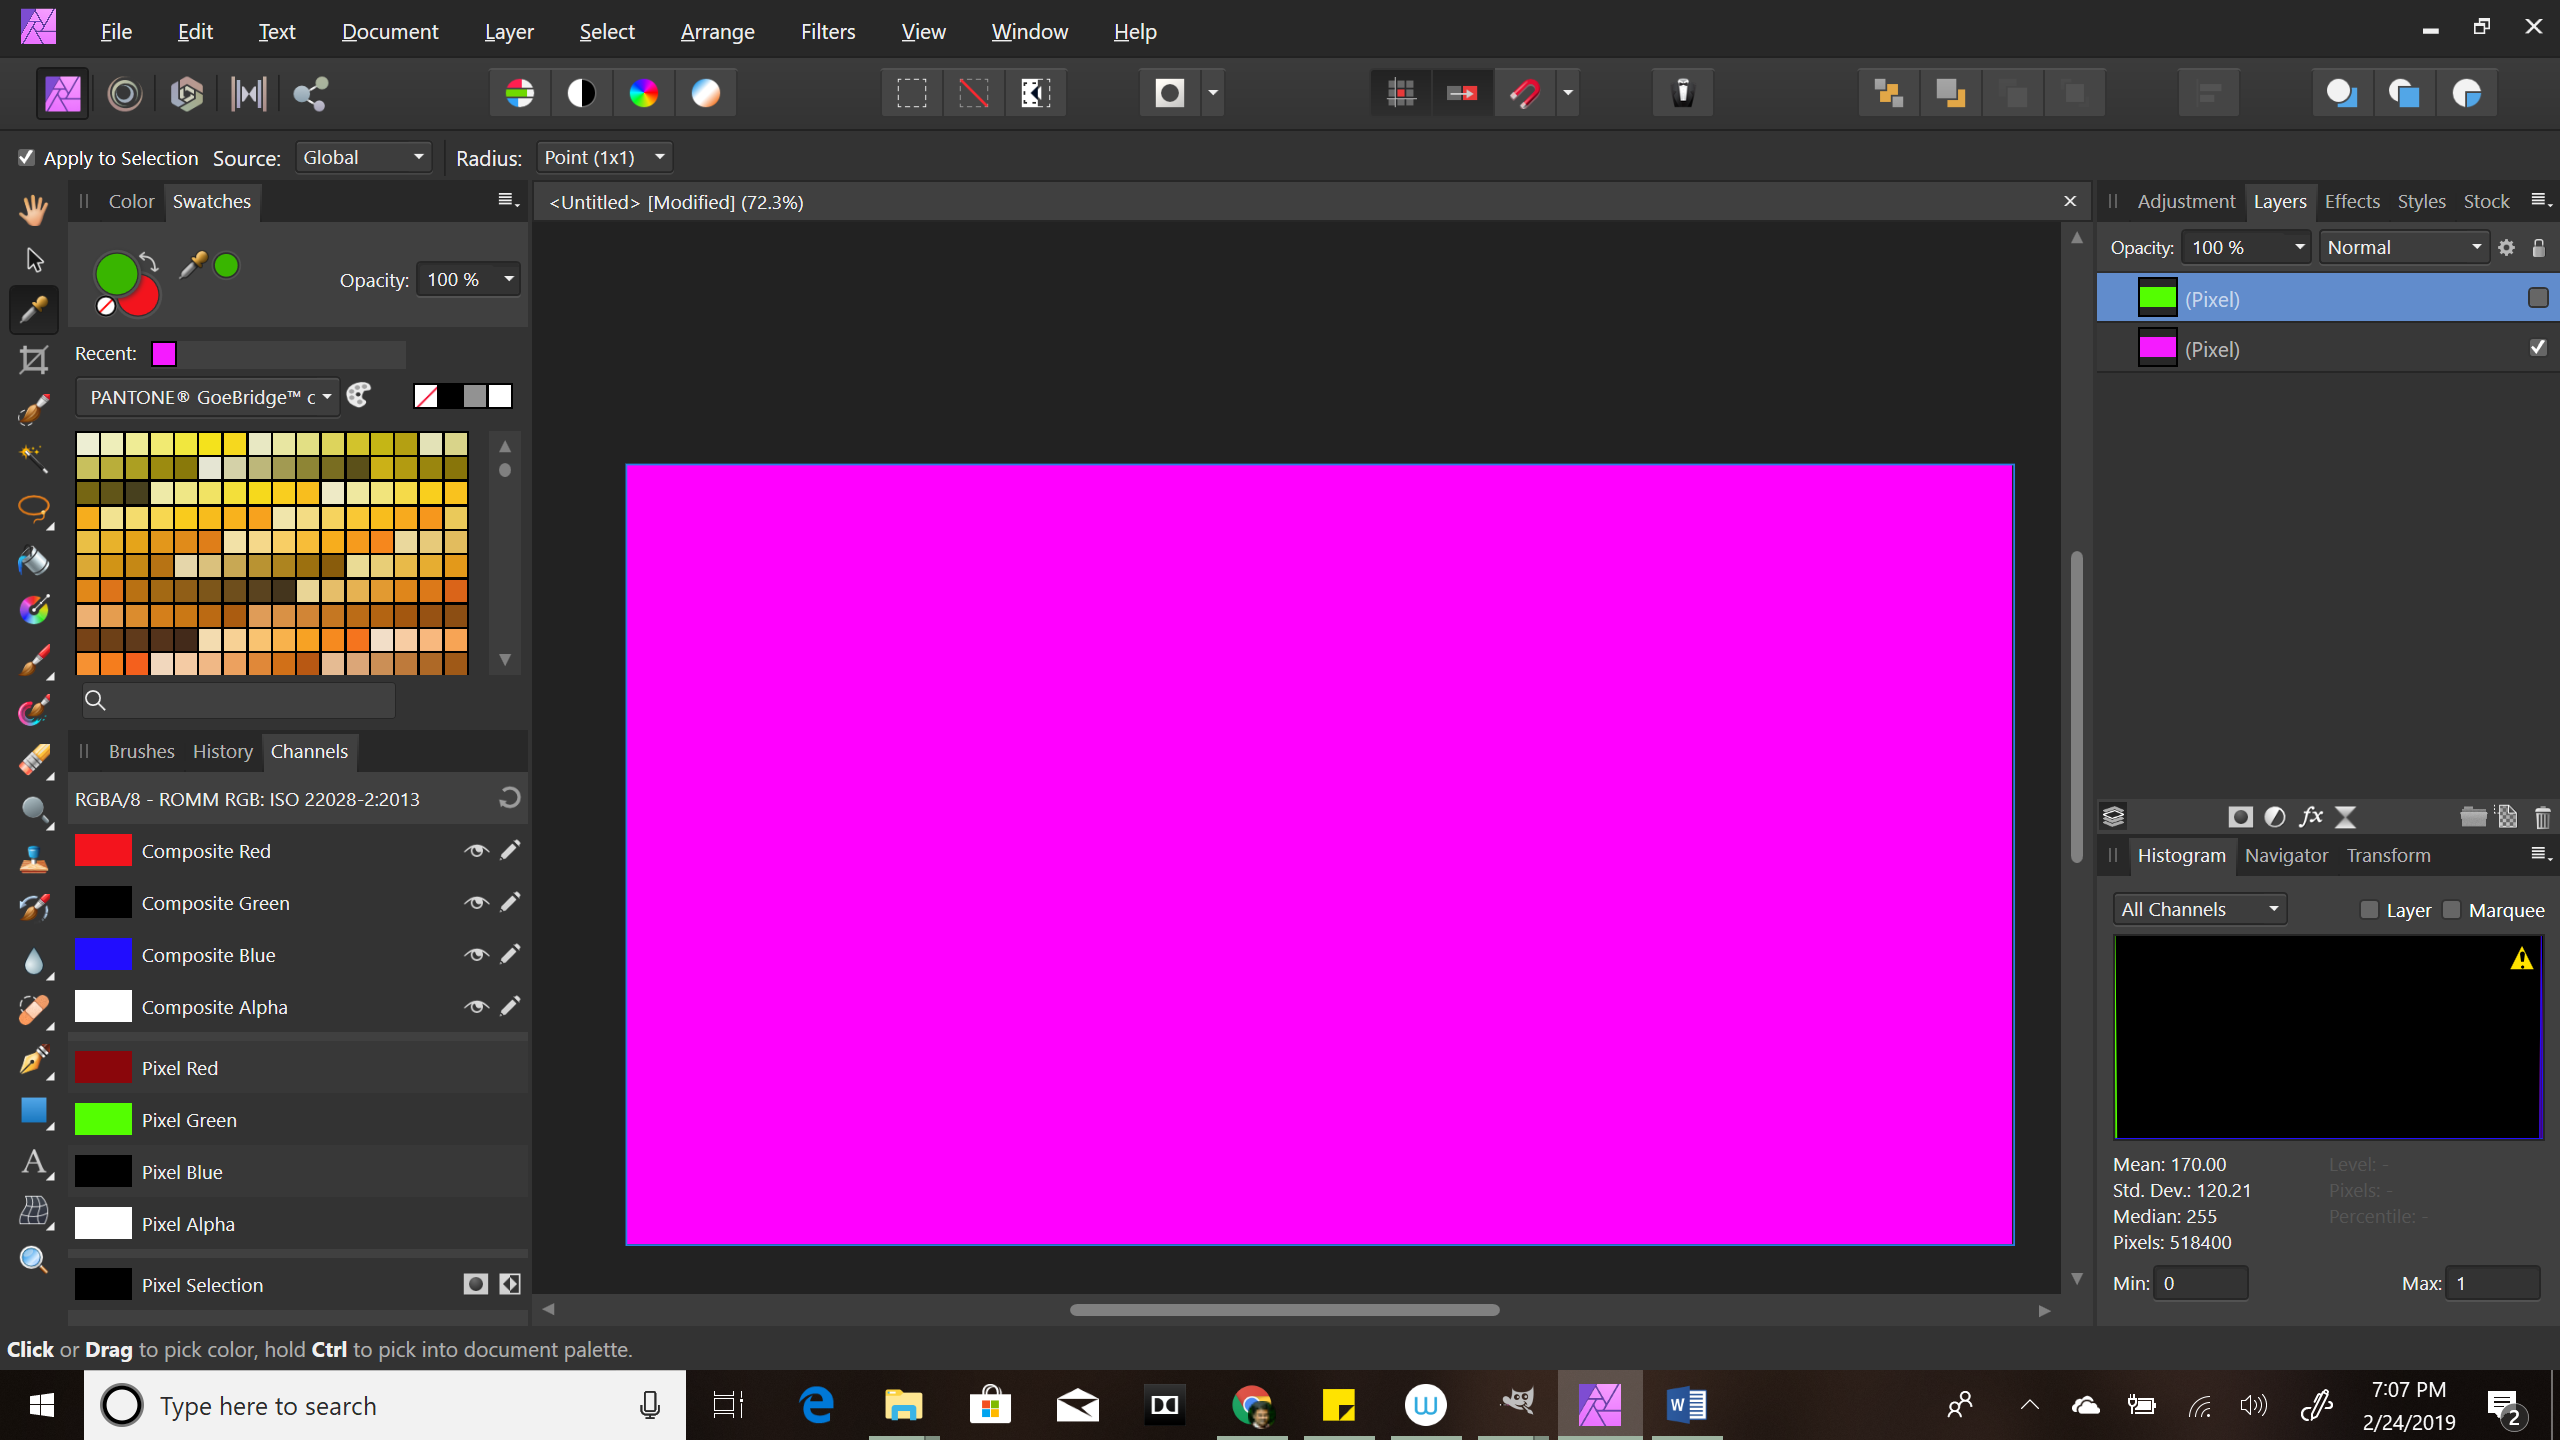
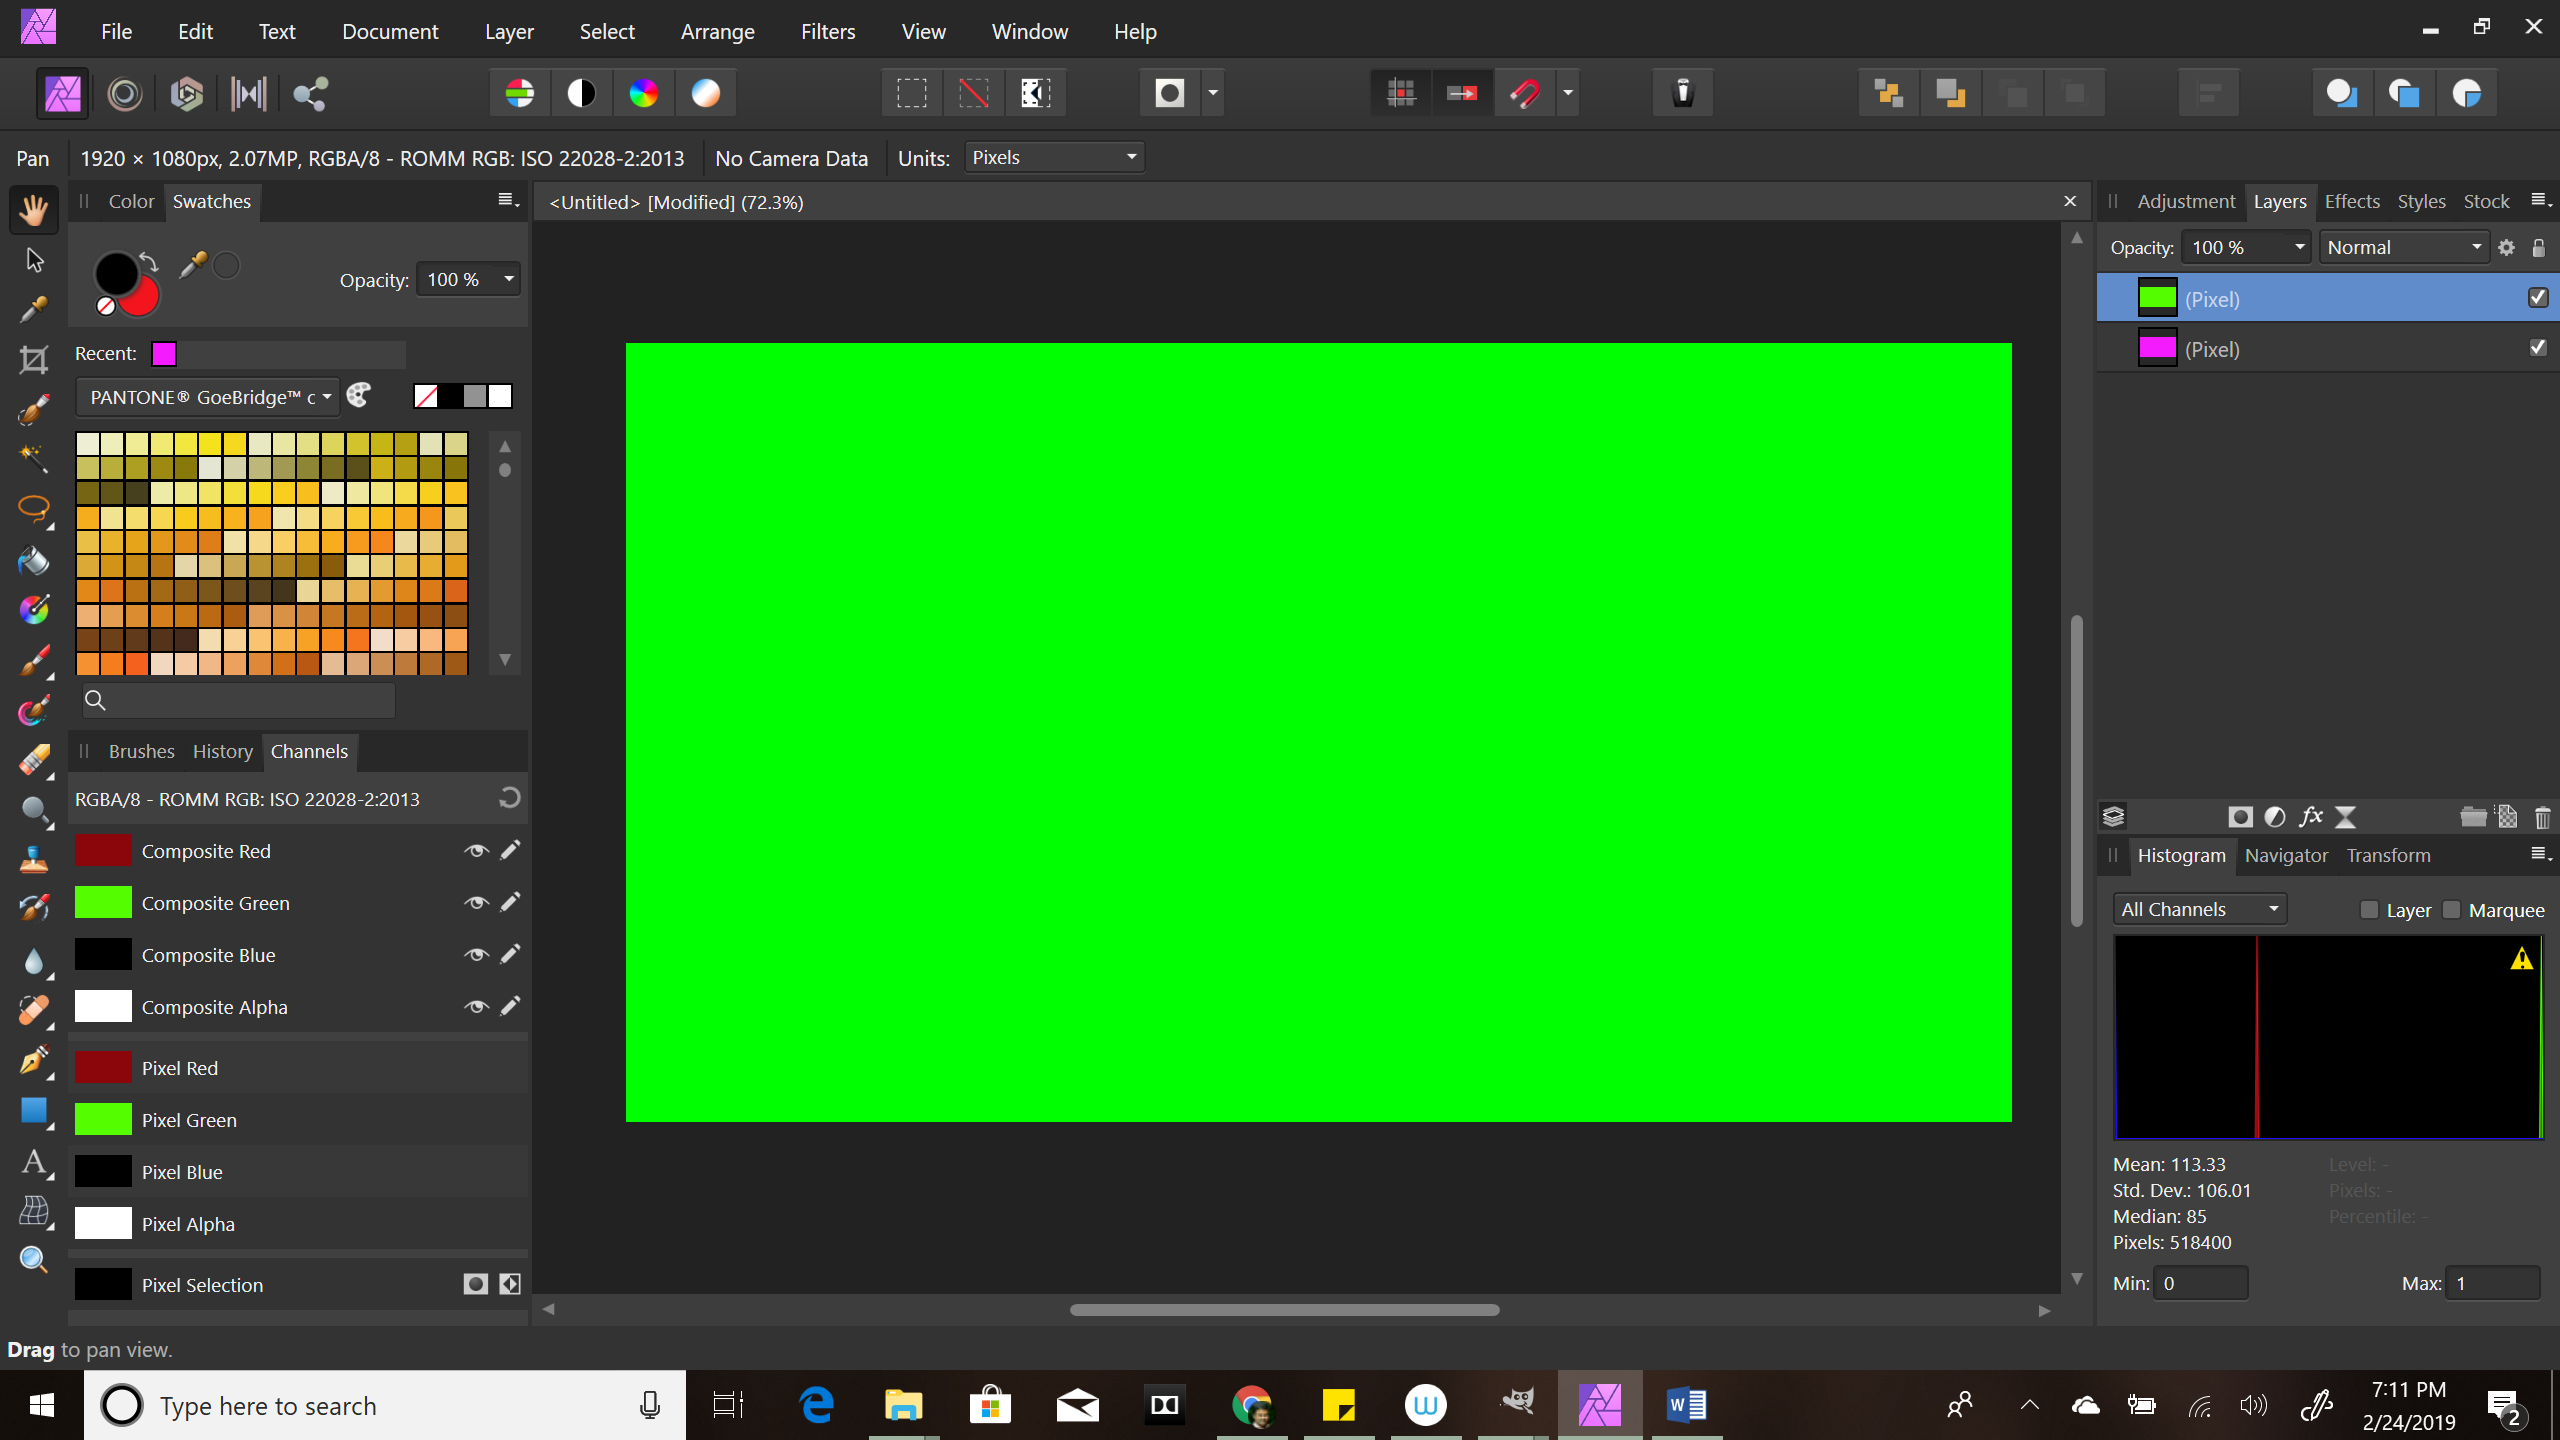
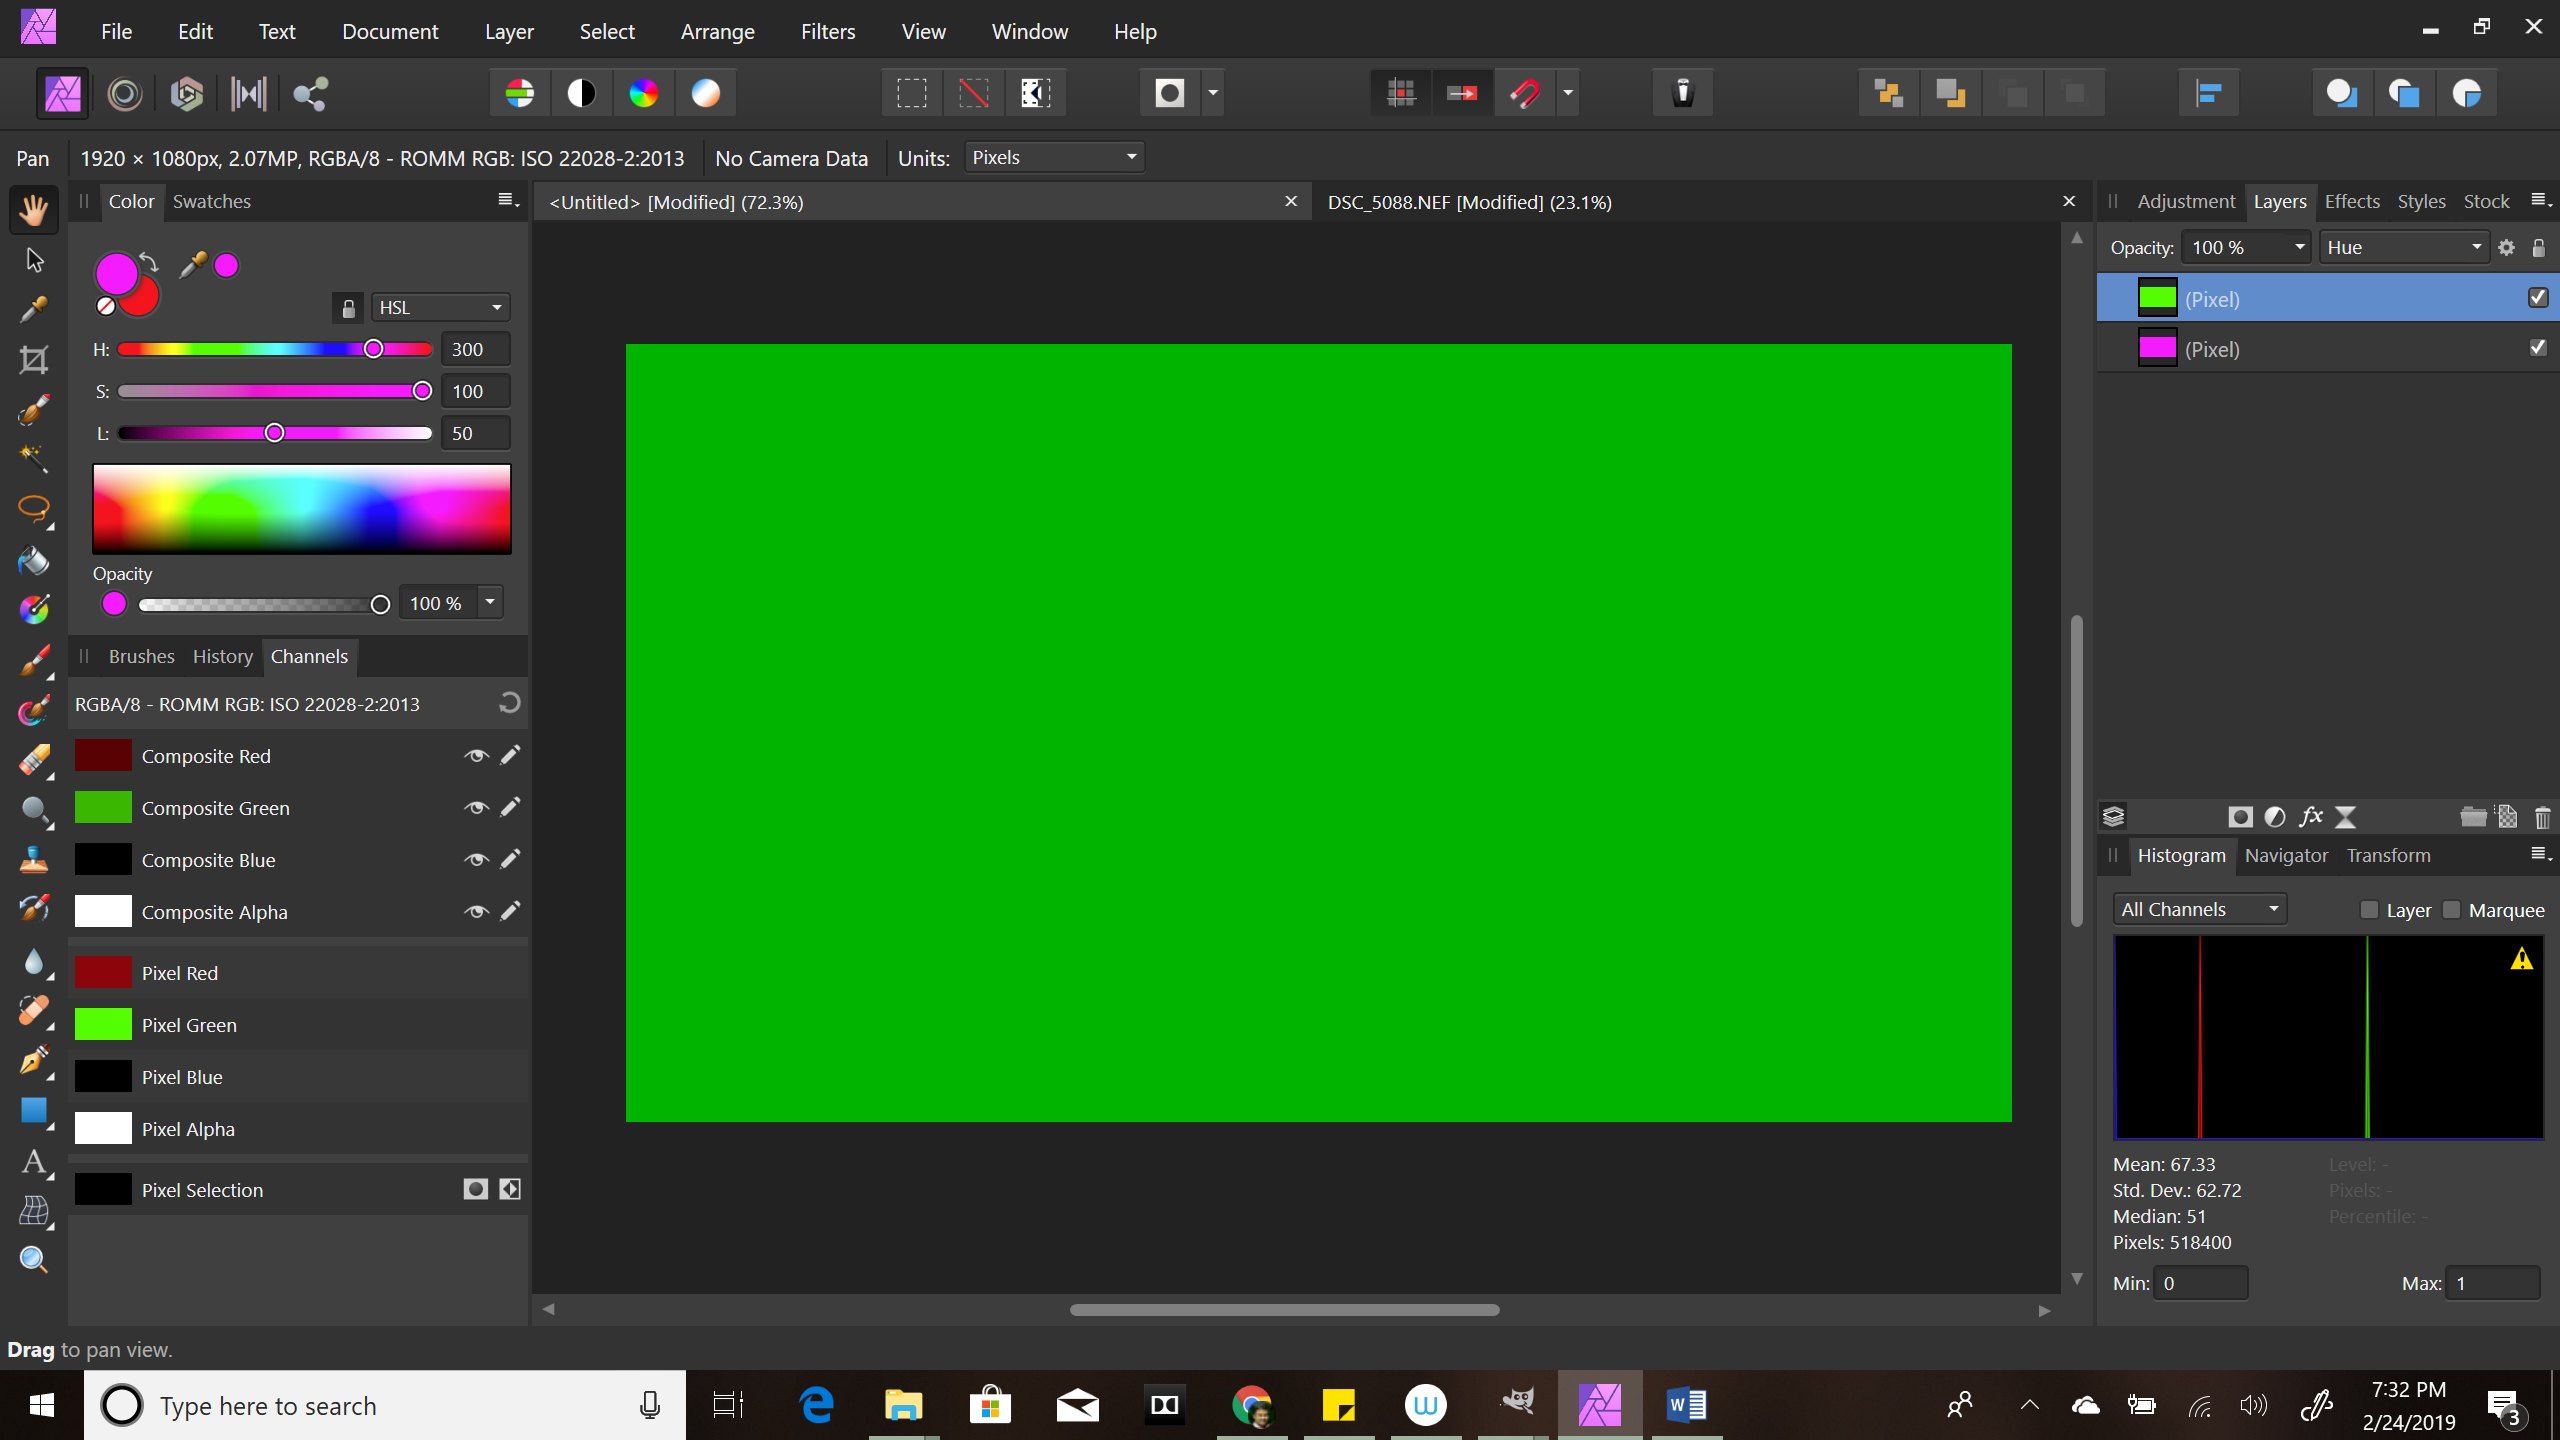
Software version: Affinity Photo Beta 1.7.0.243.
The Hue Blend mode in affinity is taking Saturation and Luminosity from bottom layer and Hue from Blend layer.
Could anybody suggest is there any blend mode that retains Hue and Lightness from bottom layer and Hue from blend layer.
View Screen Shots:
Bottom Layer: HSL (300, 100, 50)
Blend Layer: HSL (100, 100, 50) (Blend Mode Normal)
Result with Blend mode Hue: HSL (100, 100, 30) Vs (What I want is (100, 100, 50) )
-
What is the advantage of doing tonal corrections in "Develop Persona" when compared to do the same changes in "Photo Persona" in RGB 16 bit mode?
My usual workflow is:
I open a RAW file in affinity. Just set to output profile Prophoto and color depth to RGB 16 bit. Then click develop and go to Photo persona and do the tonal changes there.
Am I loosing anything by skipping the RAW development and directly going to Photo Persona with 16bit image?
Thanks
-
9 hours ago, walt.farrell said:
There have been topics posted about this already, and the bug has been acknowleged. The Develop process, when developing to RGB/16, is assigning a linear ICC profile rather than the proper profile. If you check the context menu in Photo Persona you'll see it says "ROMM RGB ISO... (Linear)". Until the bug is fixed you can go to Document > Assign ICC Profile... and assign the non-linear version of the profile.
Thank you Walt. I just observed that the issue is there for 32bit image also.
-
1 hour ago, >|< said:
Yes when the image produced by Develop Persona is 16 bits per channel.
Thank you. I just observed that, even if 32bit image is produced, the issue is there. User has to manually assign a profile in photo persona.
-
On 2/7/2019 at 5:25 AM, MEB said:
Hi squeezer,
Open a RAW file go to menu View ▸ Assistant Manager..., make sure the RAW output format is set to RGB (16bit). If it's already set as such, develop the file and you should be able to assign the non linear profile going to menu Document ▸ Assign ICC Profile (the sRGB is usually on the bottom of the list). If the RAW output format was set to 32 bit, change to 16 bit, close the RAW file and re-open it again. Follow the steps I described in. the beginning of this post.So """Document ▸ Assign ICC Profile""" should be done by user every time they open a raw file right? (until this is fixed)
-
On 2/7/2019 at 3:21 AM, Rusty Arrow said:
Same problem with Nikon and Olympus files , Assign ICC Profile to assign to my calibrated monitor profile and it corrects it, however I dont wish to have to fiddle with this each time.
I am not sure if you should assign your calibrated monitor profile in there. Ideally you should assign the profile the camera assigns to the image. If you assign the calibrated profile again, then there is no use of calibrating. The calibrated profile is already used by your monitor and you monitor is showing colors correctly.
-
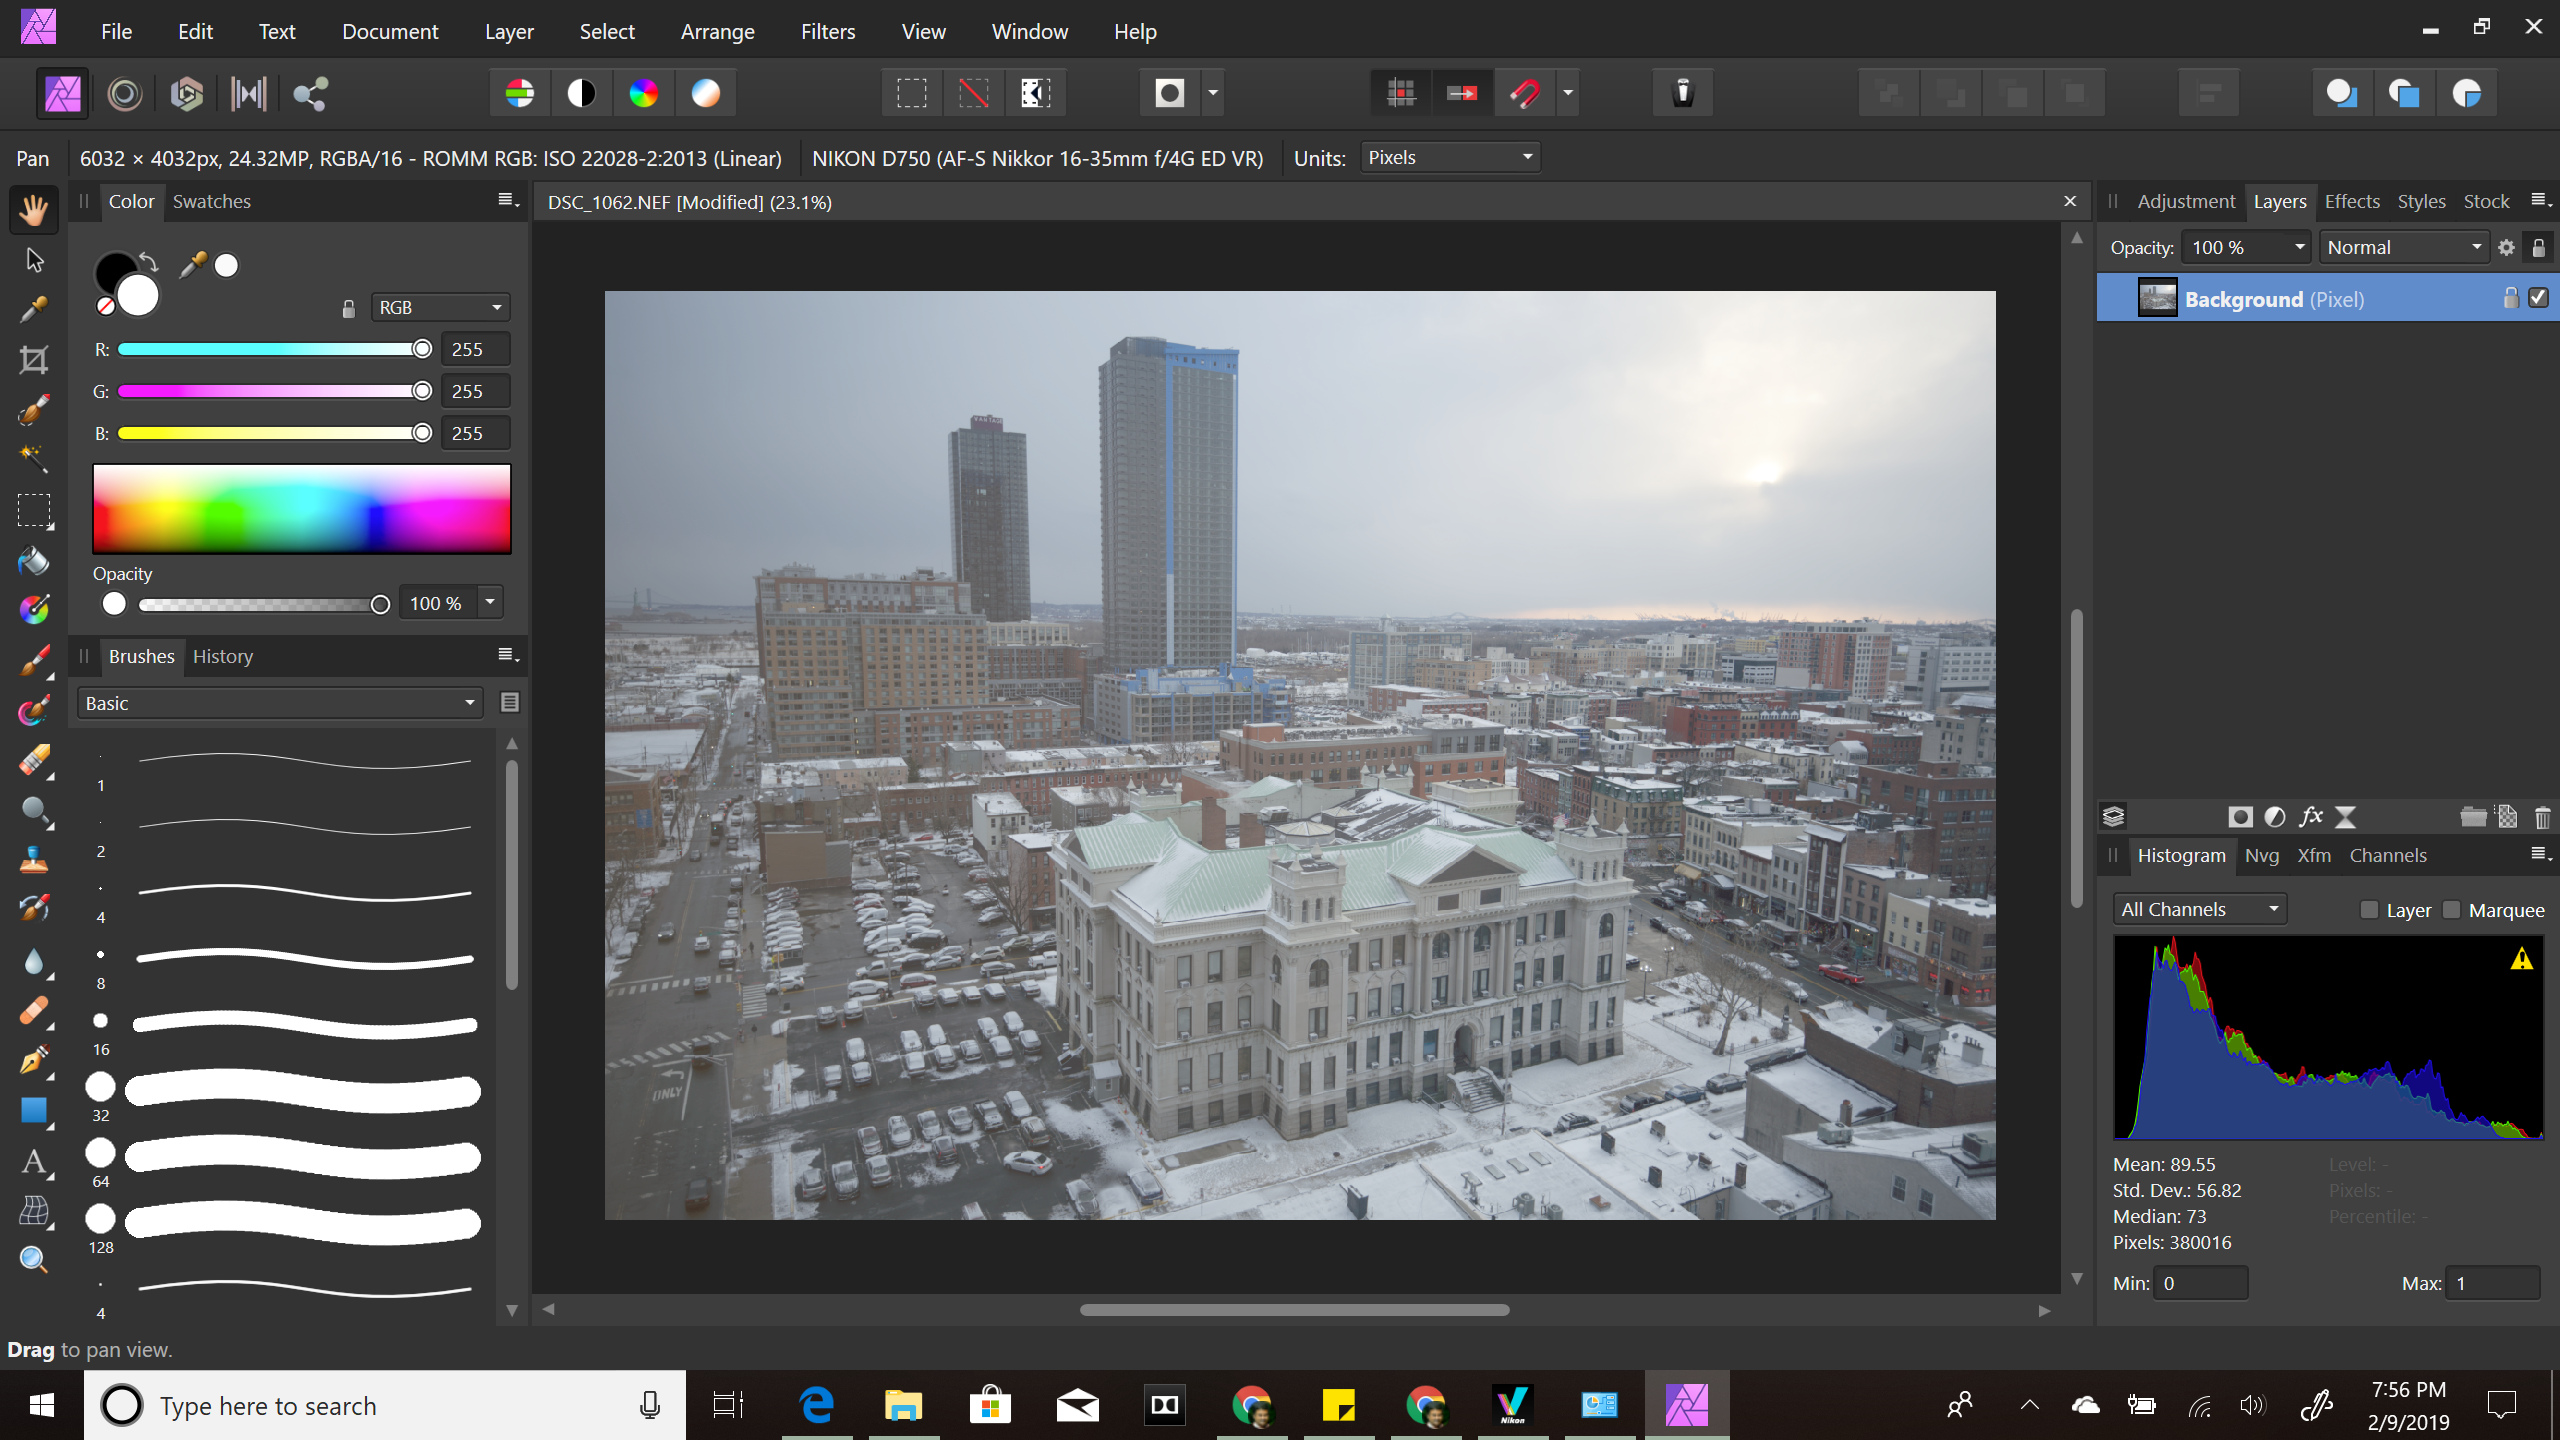
Verified that this issue is not happening in previous beta versions.
Steps.
1. Open a RAW image in Affinity photo
2. Click develop button in the "Develop" persona and go to the "Photo" persona
Issue:
Now in the Photo persona, the image looks washed out compared to the image that was shown in Develop persona. I understand that, Clipping to 8 bit is no longer done in new version. But it should be consistent between how image looks in "Develop" Persona and "Photo" Persona.
Screen shots: (New Image opened and shown in "Develop Persona":
Now after clicking develop the image is shown in Photo Persona:
-
36 minutes ago, Rex lf said:
Beautiful portrait.
Thank you Rex!
-
-
11 hours ago, ianrb said:
nicely done. I'm guessing that is a popular spot for such photos
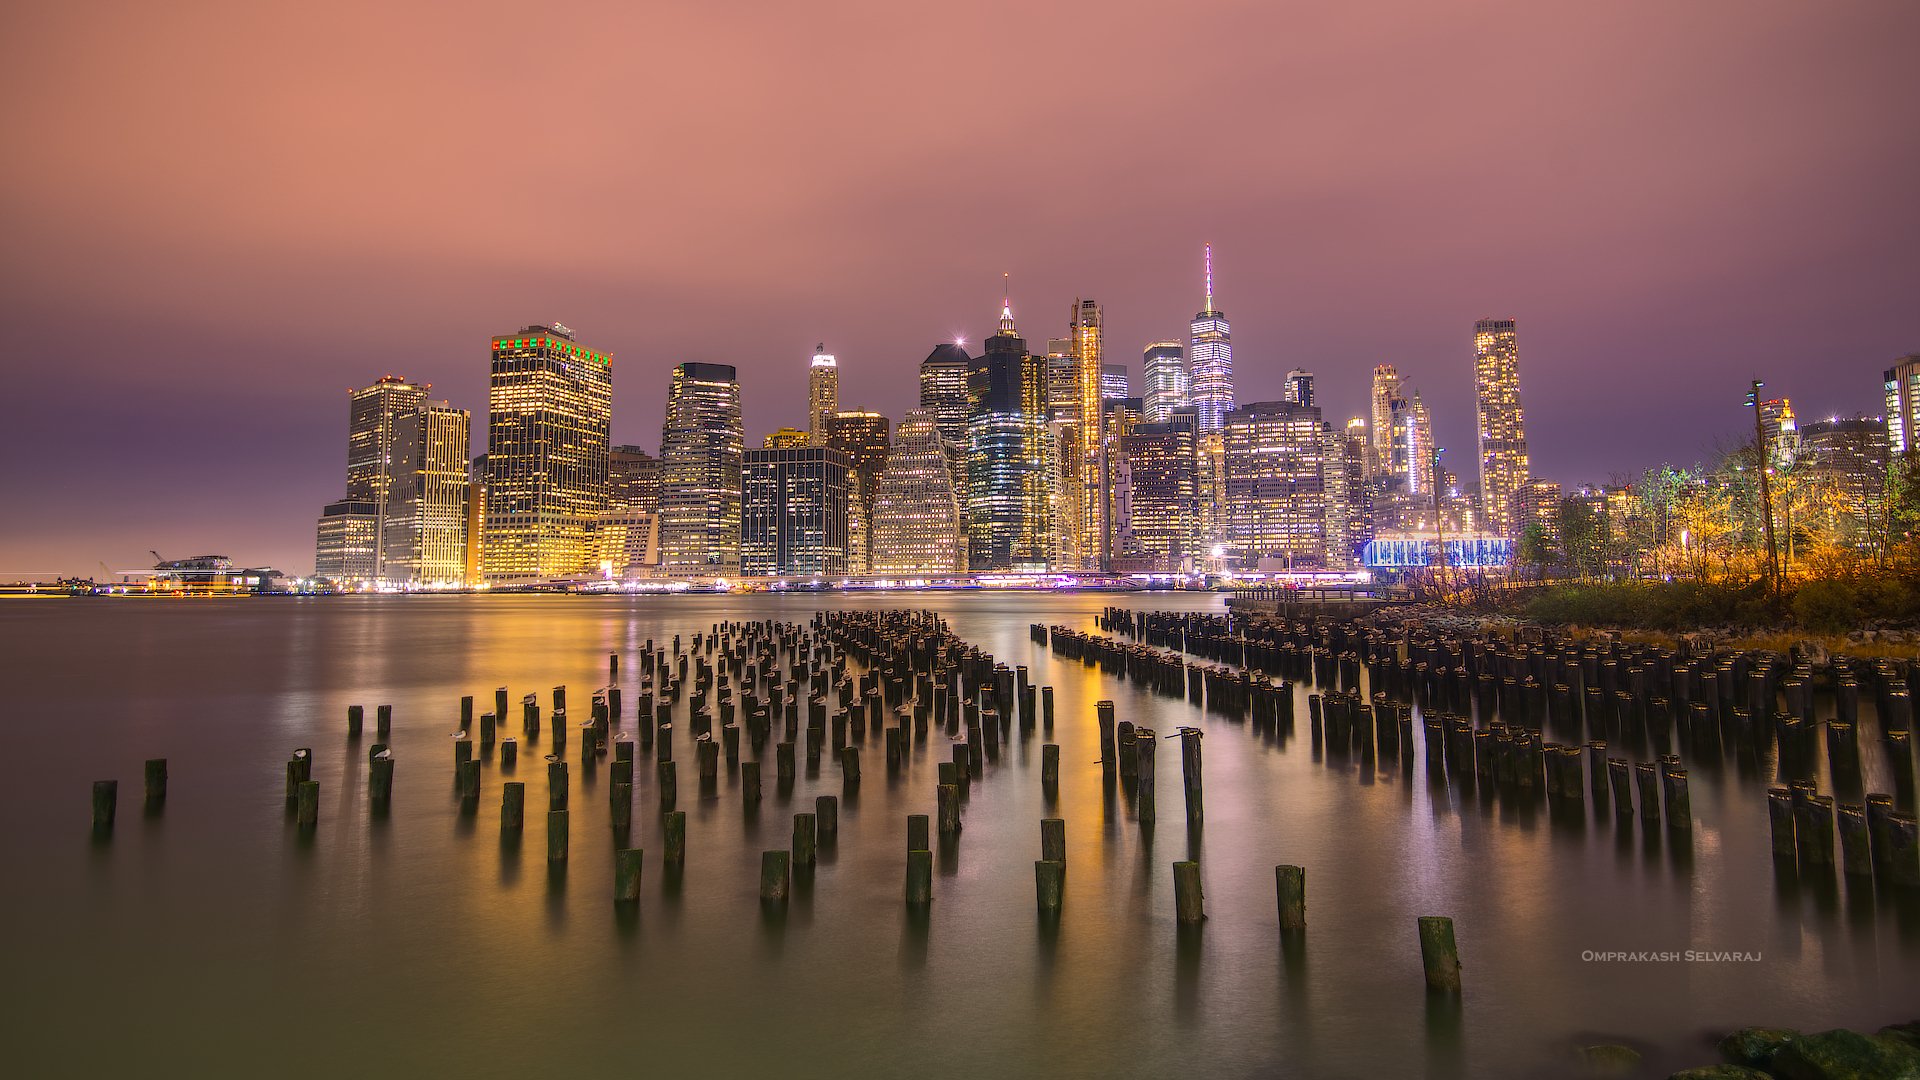
going be the image on my scene, I feel a little darker/more contrast could be added (??)Thank you ianrb. You are spot on. I was wondering something was missing from very beginning. Yes. More contrast makes this shot even more beautiful. Thank you!
-
4 minutes ago, northfork said:
Thank you!
-
-
3 hours ago, 276ccm said:
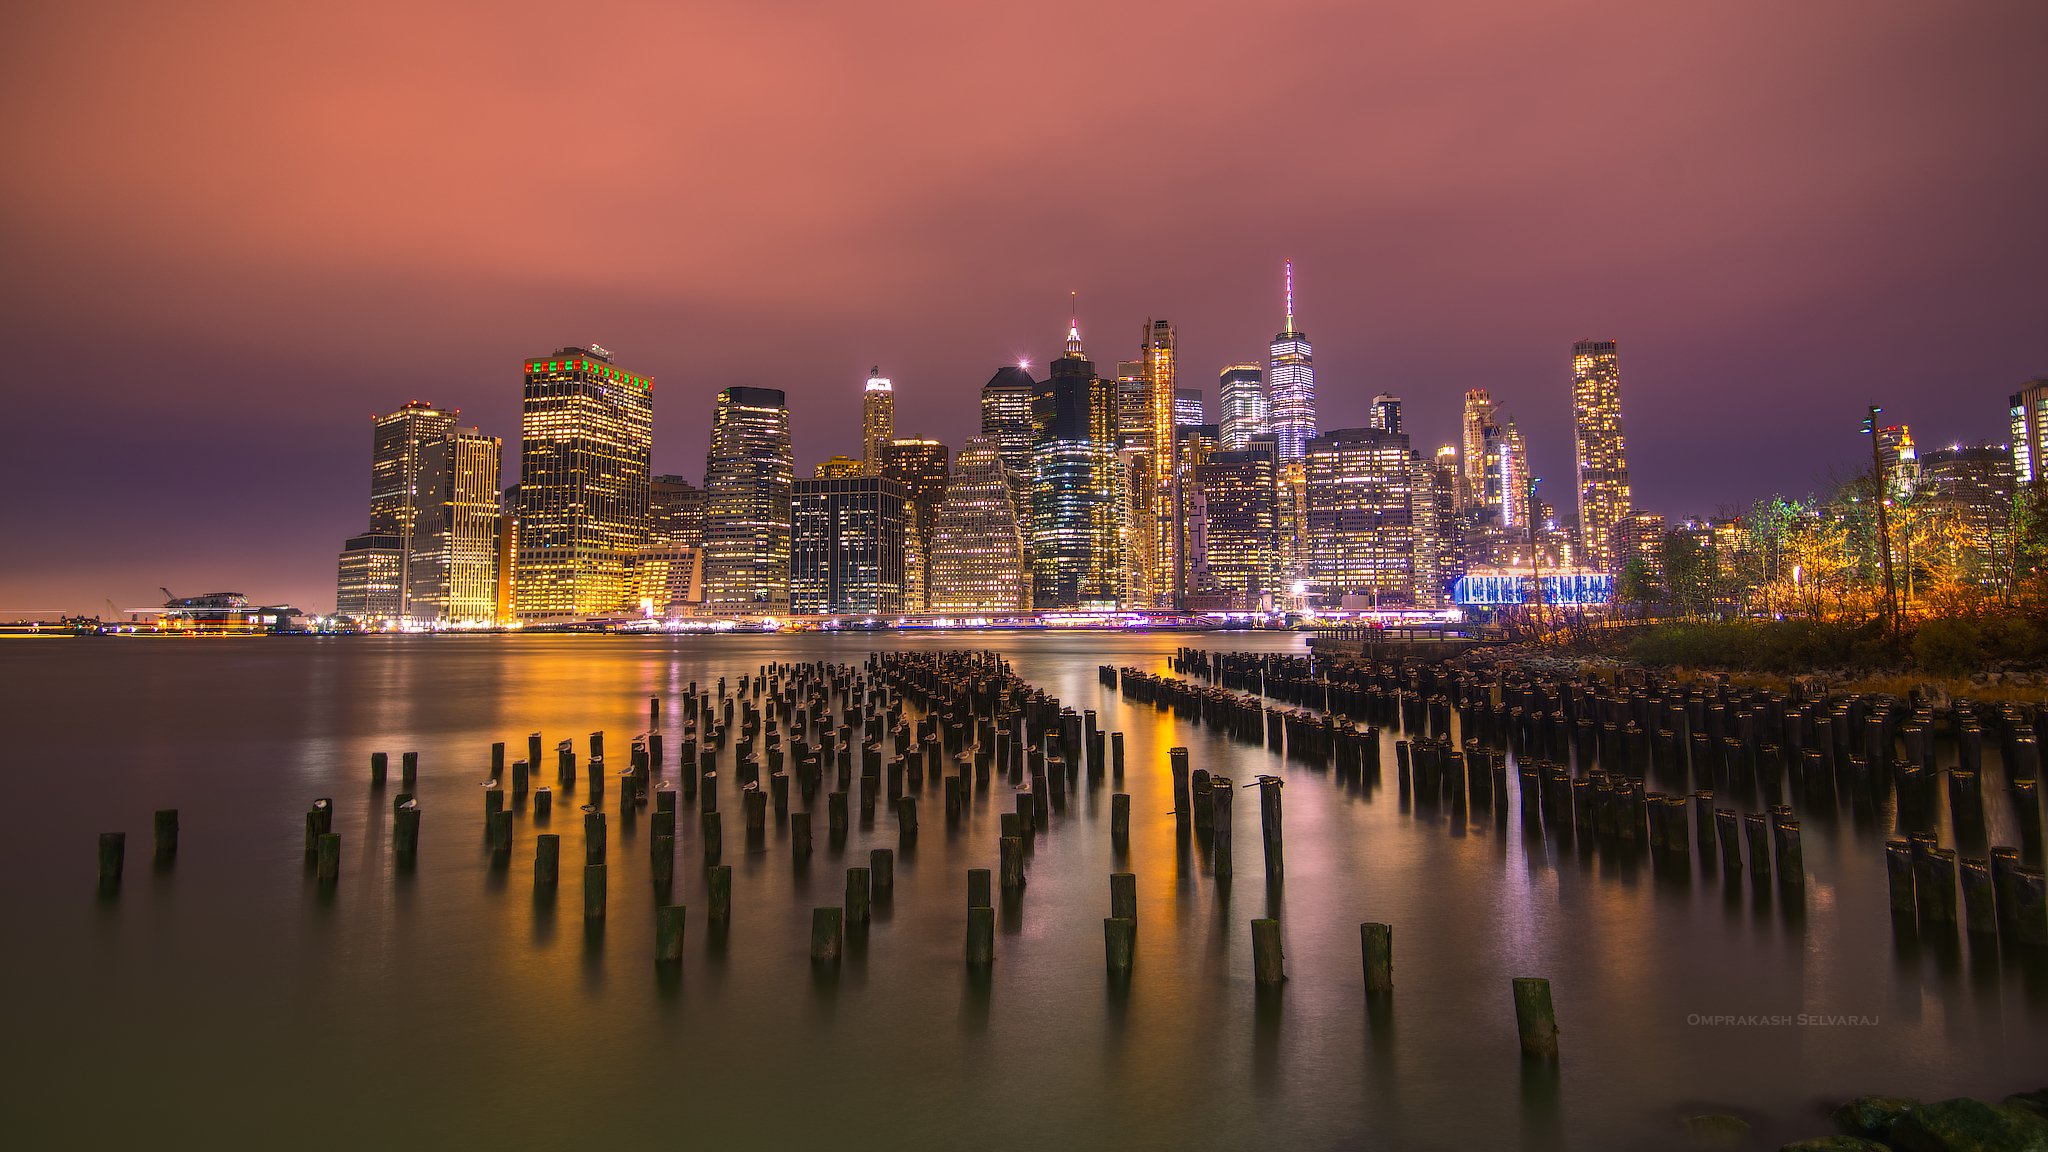
Very beautiful! :-) Love NYC
Thank you! ☺️
-
Check out my night scape shot processed with Affinity Photo. Check who are on pier.
- 276ccm, AffinityJules, StuartRc and 9 others
-
 12
12
-
2 hours ago, Claudio60 said:
Hi, Tks for your answer but I don't use Wacom hardware but only the Surface pen together with My Surface Pro 4 and I don't have any drivers to update. Any other suggestions?
I believe proper drivers will solve this. They default generic pen drivers that comes with Windows has this issue we reported.
Try uninstalling the existing pen drivers and reinstall them.
https://www.microsoft.com/en-us/download/details.aspx?id=49498
The another reason could be because of one Windows 10 update that messed pen behavior.
-
8 hours ago, Claudio60 said:
Same problem here with stable version 1.6.5.123 on a Surface Pro 4; using the Surface pen with the brush tool I have only a pointer visible on screen and if I want to see the brush size (the circle) I have to move the mouse on the active area first, after doing so the pointer turns into a circle and I can use the pen, as Omprakash Selvaraj described.
PS: "show brush preview" enabled or disabled doesn't change anything.
Please check my response above.


")
overlay erase does not work on gradient overlay
in [ARCHIVE] Photo beta on Windows threads
Posted
@MEB
I have seen many artists use this feature extensively in lightroom / camera raw.
For most of the edits we try to start and finish images right from one place ex: Affinity Development persona, Lightroom/Camera Raw.
Think of this case, we add a linear overlay for background to darken it. In most cases, that overlay will fall on subject as well. So just to erase that part on subject, do you want us to switch personas and coming back. This is very inefficient way to edit images. It breaks the artistic flow of editing images.
Lightroom/camera raw editor has this feature that allows user to delete part of the gradient overlays.
This is why lightroom / camera raw editor is successful. We wish to have this feature badly in affinity develop persona.
Please check out this video of an artist elegantly editing an image where she is extensively using overlay erase options.