Thomahawk
-
Posts
307 -
Joined
-
Last visited
Everything posted by Thomahawk
-
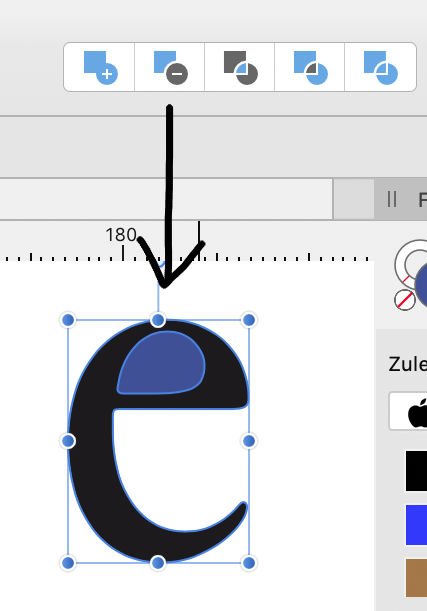
 Subtract does not even work correctly with areas only. In this case, I want to subtract the inside of the letter e, but after subtract, the blue part disappears, and instead of a hole, it is all black.
-
Well, I just dragged it from desktop into the Designer Layout as I always do. I close de document, trash de images and when opening, warning appears and the images are completely blurred on the page. So they really are linked. Only way around I find now is open them in afPhoto and copy paste from there.
-
I think I always placed images in Designer, they simply got embedded, I never stored the image documents separately. Now today after I trashed an already place image, Designer alarmed about missing resource. No clue why sudenly images dont get embedded anymore. And I can not find a setting about that or let alone the ressource manager to manually embed it. I am stuck now, not able to embed... what else can I do?
-
I have the newest and fastest MacMini with 32GB Ram and SSD HD, working on a 5000x2000 Pixel image, drawing with a 90px brush is so TREMENDOUSLY SLOW, it is a pain. I just don't understand why a perfectly new software is outrun by a 3 decade old dinosaur (Photoshop) in speed AND usability.
-
Like I said. They are placed as PIXEL layers, not (image). Makes no difference to use any distort tool or simply resize the 1200x1200 pixel (sharp and clean) pasted smaller image. The result is unusable because of low resolution.
-
Pantone colors?
Thomahawk replied to Gutshot's topic in Pre-V2 Archive of Affinity on Desktop Questions (macOS and Windows)
And how can I add a Pantone color to the global colors list? And make it overprinting? -
Sometimes, when I resize or distort part of an image, the result has a very bad resolution - it looks like something reduced to a 20x20 pixel resolution and then zoomed up again. Here I pasted in a plate-design with typography on it. I placed a pixel image 1200x1200 pixel, sharp and clean, then resized it with distort tool and ended up with this clunky representation. One can see, the surrounding image has a much better resolution (plate and background are both pixel images, marked as such in layers palette). Makes no difference if "move whole pixels" and "force pixel position" in top tool bar are on or off).
-
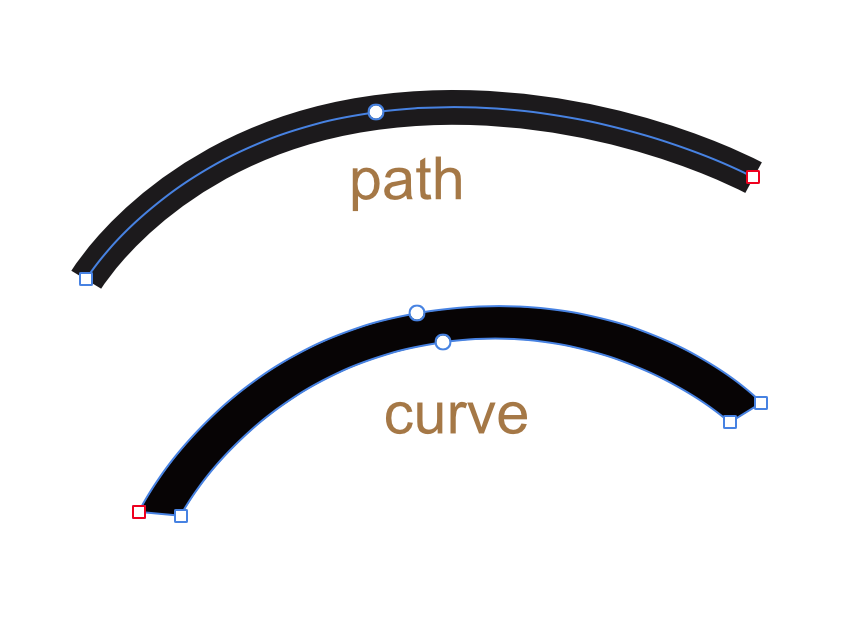
Path to curve
Thomahawk replied to Thomahawk's topic in Pre-V2 Archive of Affinity on Desktop Questions (macOS and Windows)
See? I had this to use this again now and could not remember the solution, had to come here again. This is one of the most basic functions and one can not do without looking it up. Not good. -
Path to curve
Thomahawk replied to Thomahawk's topic in Pre-V2 Archive of Affinity on Desktop Questions (macOS and Windows)
FreeHand managed to do this perfectly. Truth is, Affinitys approach of a GUI is way behind that in every aspect. It's not about putting icons and shortcuts for every possible function everywhere. It is about logic and easy of use. But for that, one needs a understanding of working with vector paths, its essentials and basics, and THEN creates a logical interface, where those basic tools can be found where they are needed. Convert a path line into shape to be found within the layer menu???? Come on! -
Copy paste an image inside an image frame results always in the image being very distorted in some way or another. There seems not to be any logic behind this, because its proportions have not even any relation to the image it replaces inside that frame. This would be half as annoying, if there would exist a possibility somewhere to set an images original proportions back to 100% 100%. The only option one has, is to visually try to drag the image into normal proportions.
-
Path to curve
Thomahawk replied to Thomahawk's topic in Pre-V2 Archive of Affinity on Desktop Questions (macOS and Windows)
One can do that in such a case of course. But it's not about that. It's about intuitivity, easy of use – means to have functions there, where one would expect to find it, without having to consult a manual or help. -
Path to curve
Thomahawk replied to Thomahawk's topic in Pre-V2 Archive of Affinity on Desktop Questions (macOS and Windows)
It's also not helpful that "expand stroke" is not there in the context menu, when right-clicking on the path. Who goes looking for that in the "layer" menu... -
Path to curve
Thomahawk replied to Thomahawk's topic in Pre-V2 Archive of Affinity on Desktop Questions (macOS and Windows)
Yes, CLC, exactly what I wanted. THANKS! Great releave. Strange that this is not working logically. Like with any shape, if there would be the same convert tool available, one could solve this intuitively. -
Path to curve
Thomahawk replied to Thomahawk's topic in Pre-V2 Archive of Affinity on Desktop Questions (macOS and Windows)
-
How do I convert a (thick) path into a curve, so that I can further edit the outlines?
-
This is for all Affinity apps, actual version 1.7.3, but this bug is still here since the beginning: Copy/place an object into another document, the swatches that were set for it, are missing (not copied with it), even when they were global swatches.
-
Designer 1.7.3 on OSX 10.14.6 After Copy a text, "paste style" (Stil übertragen) is not available. Clearly not working right.
-
Good point, Joachim. I never looked into that block of text down there. I also noted later, that I had "line" in foreground in the color palette, instead of filling. This is generally a problem with Affinity, that difference is way too modest/undemonstrative by design. But the first thing that is GUI wise simply not working correctly, is that, like you say, the chosen color has to show and stay inside the style settings - that's the source of all confusion.
-
Here is a screen recording showing how paragraph style color setting is not saved and not applied! ScreenRecorderProject2.mp4
-
I have the same problem – and I reported that a long time ago. Now in 1.7.3 of PUBLISHER this seems still not working and this is a MAJOR problem. Setting a text paragraph style with a certain global document color swatch. When I check the text that style was applied to, it does NOT have that color swatch set for that text. When I go back into the settings of that style, there always comes up the CMYK panel set with that color, not the Swatch. Specially important in this case, because the Swatch is set to overprint. I can even set that Swatch in the style color setting, close that color setting window and when I click on that color rectangle again, again CMYK color panel shows up, not the Swatch. I can double click on that Swatch, it still is not locked in.
-
Find Overflow Text
Thomahawk replied to Husbandman's topic in Feedback for Affinity Publisher V1 on Desktop
View > Show Text Flow enable is one thing But the real problem is, you have still to go search manually through all the pages. Not very userfriendly when you just had to finish a 300 page work to a deadline, you finally get to export the whole thing within the last minutes and – DANG – a warning message pops up "overflow text", with no option whatsoever to point you to said text. In Indesign you would be able to solve that within seconds. -
No, that is not the problem. I can set it full black 100% opaque and still nothing is visible.
-
Okay, I think I found the necessary setting. These two have to be activated. Without it, copy/moving the single pixel (left side) ends up like the two 2x2 block right to it. Only after activating these options, pixel stays how it originally was (copy on right side). This should be the standard setting for work in af Photo or else any movement is destructive.
-
Bones, I see what you mean. In my example, there is no need to recalculate anything. Recalculation has to be done only, if you resize something or rotate in angles outside 90°. Otherwise, each pixel is just moved to the spot of another pixel. No antialias or any kind of change occurs. Of course if you try to move a pixel only a half-pixel step, this would need recalculation, what I suppose is happening here. But I do not see any setting how to prevent this. In a pixel app, usual behaviour would be only to work in full pixel-steps (= nondestructive).
-
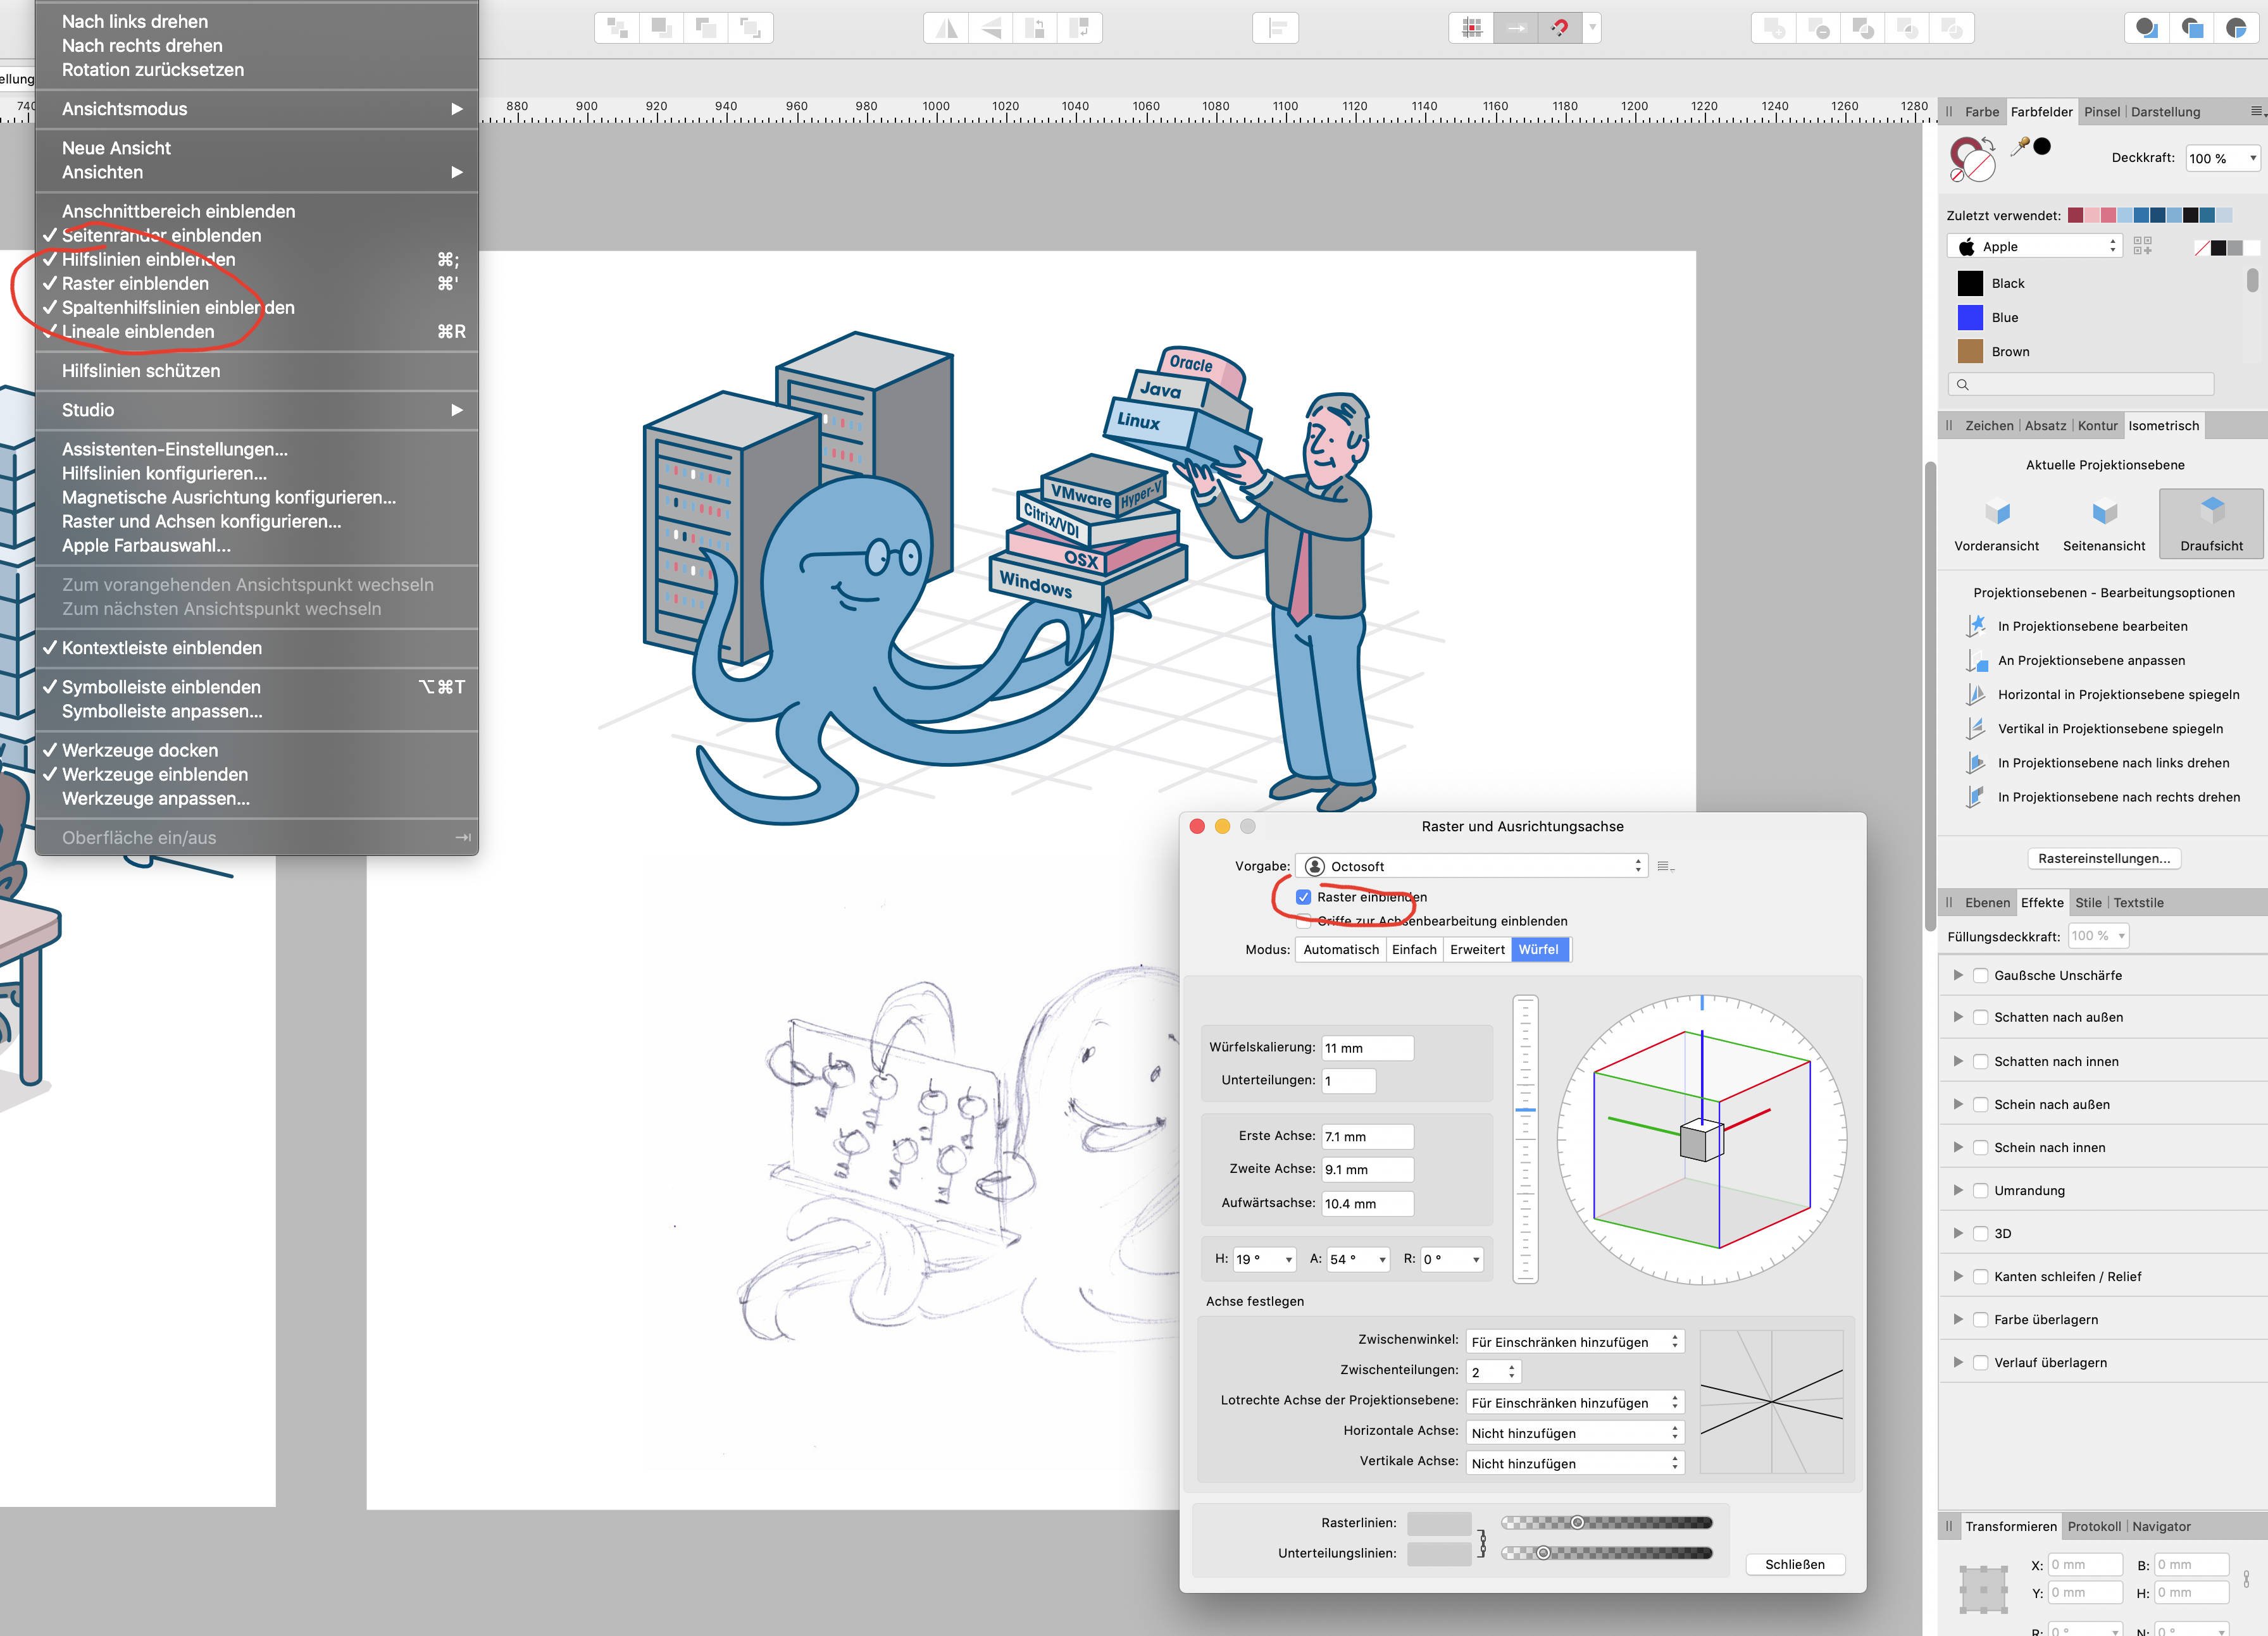
Like always before, I did set everything for the isometric grid to show, but it does not. What am I missing here?