elmonopascual
-
Posts
62 -
Joined
-
Last visited
Everything posted by elmonopascual
-
I attach a video (using the color wheel to choose the fill color of a rectangle, then with dropper pick the fill color, and finally apply the picked color to the same rectangle: the HSL values change!!!)... By the way, my color picker is configured to 1x1 (point). Color Picker Tool.mp4
-
Hi _Bluebug. I have the same problem with color picker tool. Can't pick the exact color (HSL, CMYK, ...). I started this topic in the beta forum: https://forum.affinity.serif.com/index.php?/topic/87562-problem-with-dropper-tool-color-picker/ The bug is present in Photo, Designer and Publisher. The color picker tool is not accurate. It picks a similar color, but not exactly the same.
-
I have noticed that if the color space is RGB (new / type: print), the problem occurs much less frequently than if the color space is CMYK (new / type: print press ready). For example, in RGB, with the second color of the palette (orange) does not give problems, but with the fourth color, the problem occurs (yellow). This way, the color picker is not accurate. Can someone confirm it? EDIT: If I use the color space CMYK in Affinity Photo, the problems occurs too.
-
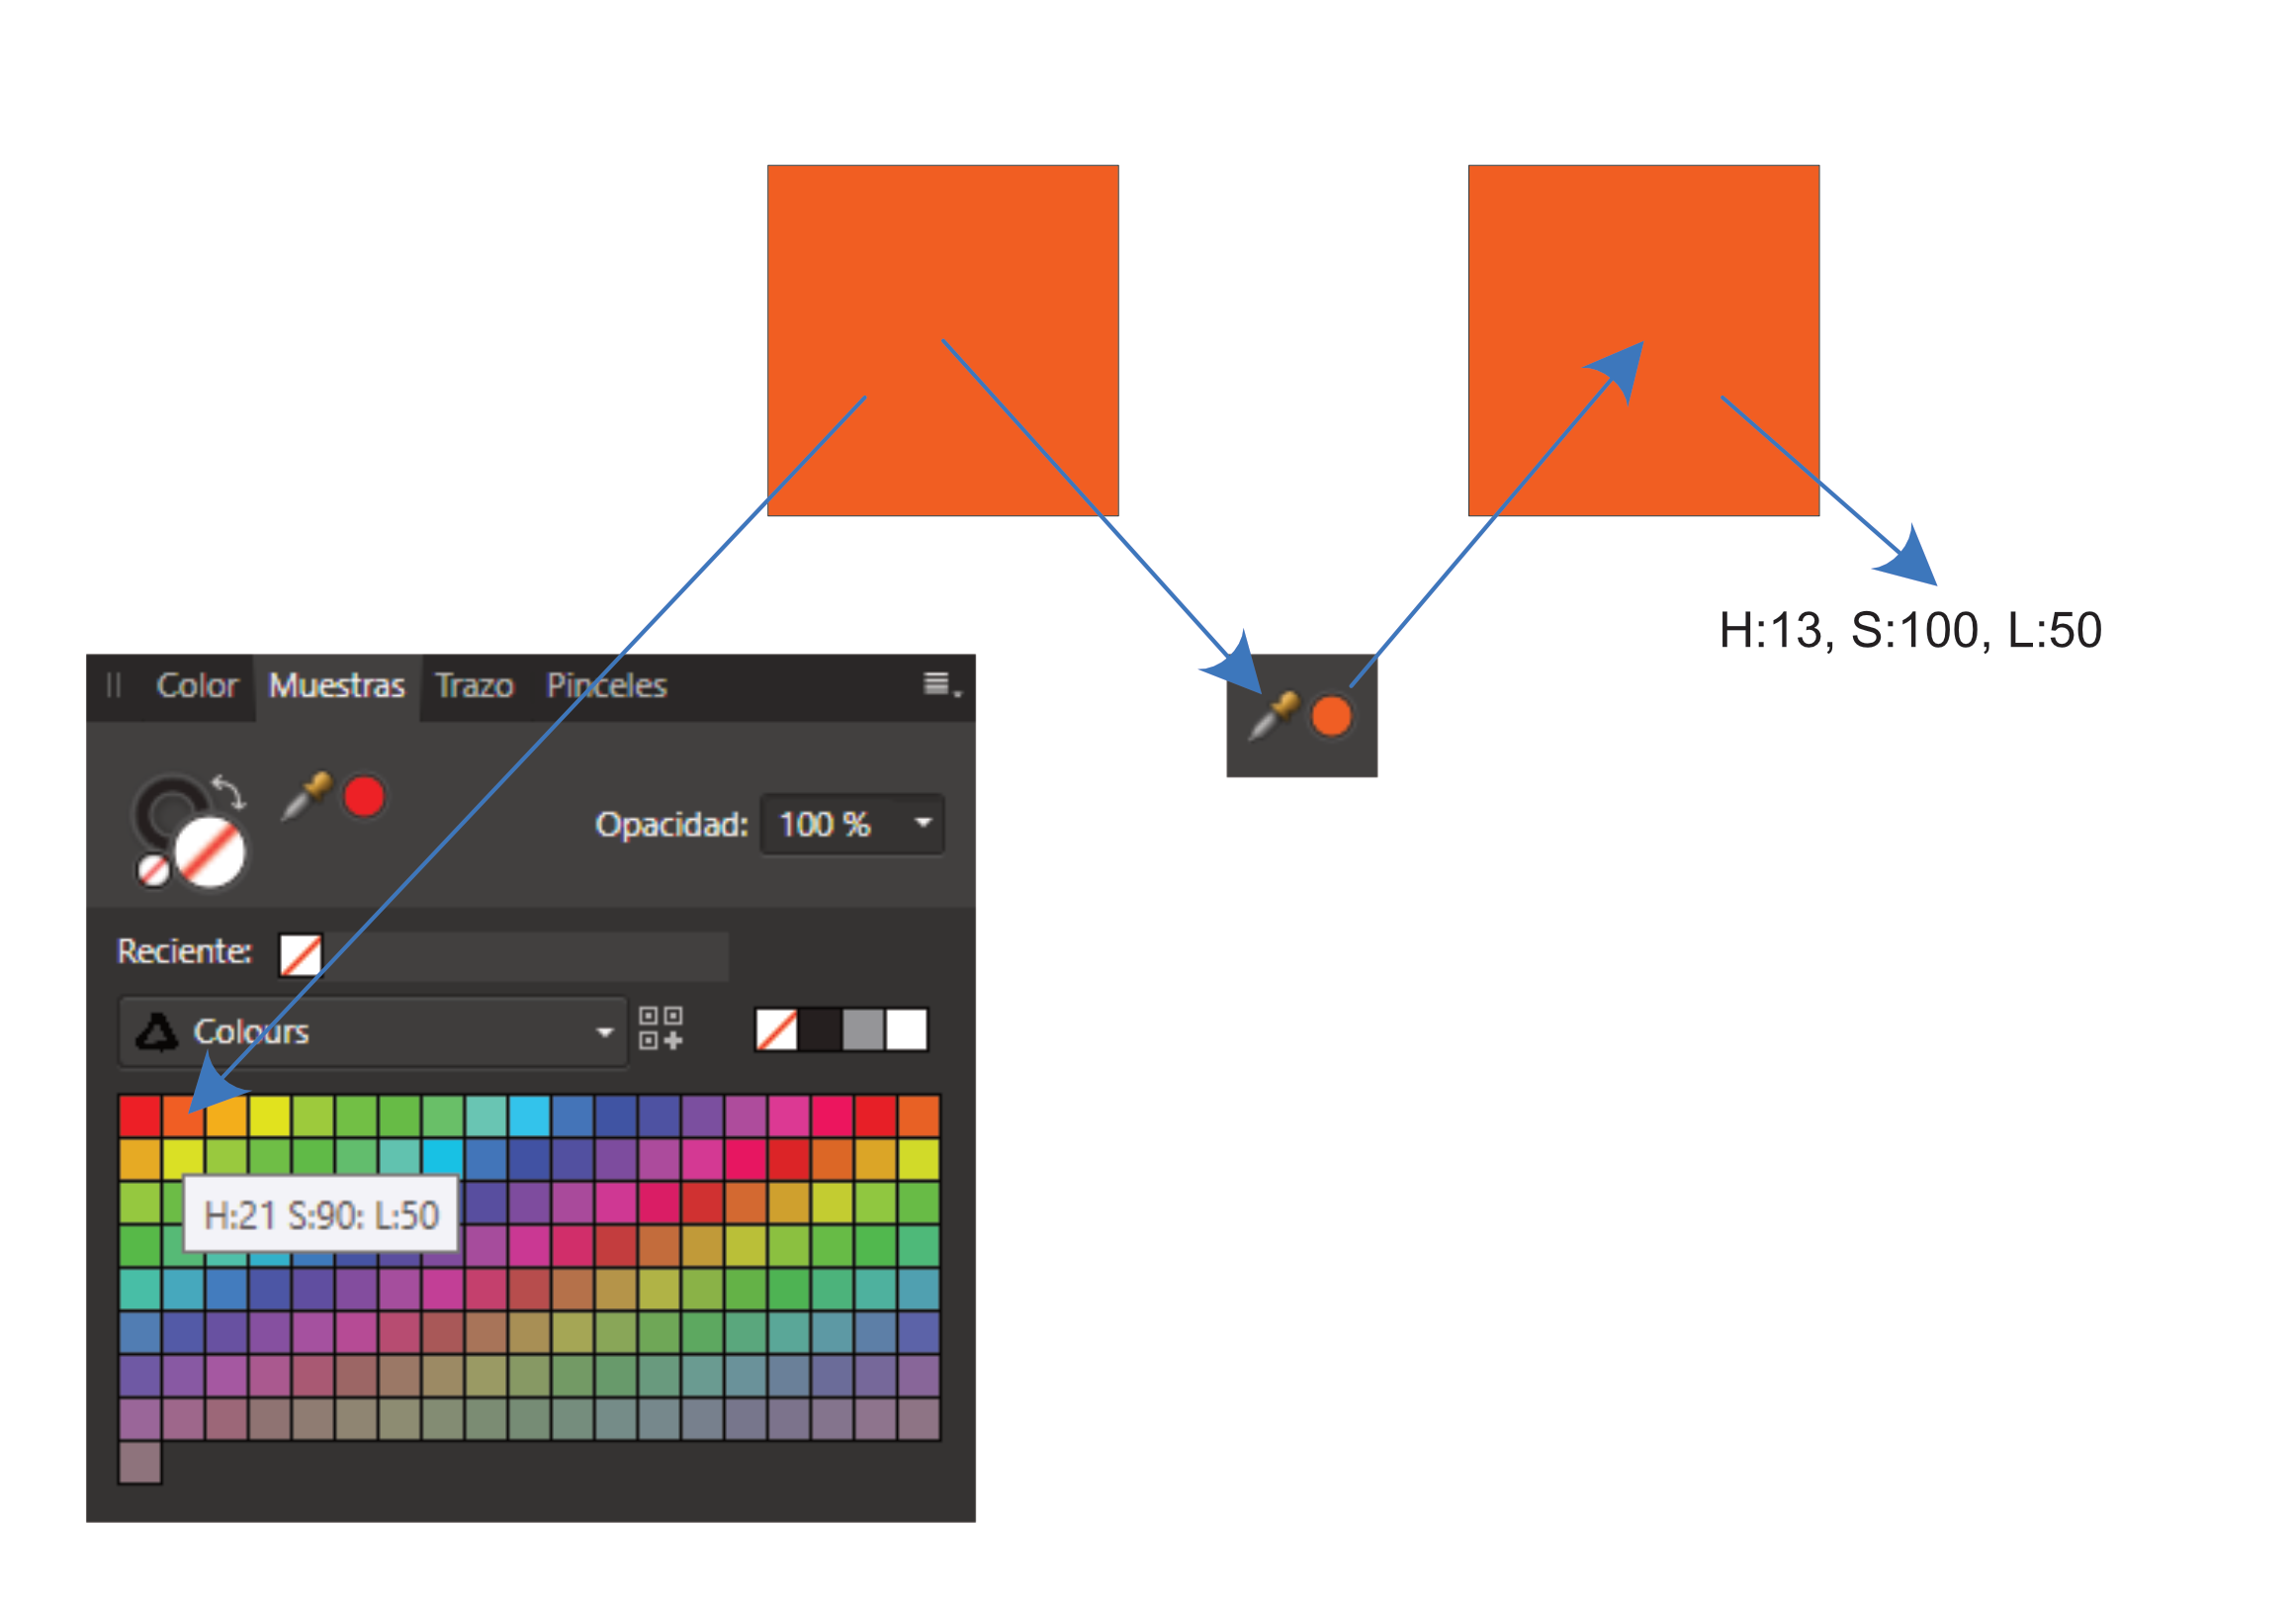
Hi, I think there is a bug with the dropper tool (color picker tool): 1 - Create a new document 2 - Draw a rectangle 3 - Select a color from the panel of swatches to apply as a fill for the rectangle (for example, the second (orange) of the Colours palette, H: 21, S: 90, L: 50) 4 - Drag the dropper to the rectangle to take the fill color sample 5 - Click on the selected dropper color ... The color applied is different from the one originally in the rectangle (H: 13, S: 100, L: 50). The same happens with the color wheel, the panel that is under the sliders, etc. Also when comparing CMYK values, they are different too. I'm using the version 1.7.0.367. EDIT: The same problem is present in Affinity Publisher (last version). In Affinity Photo it seems to work OK. EDIT: I attach an image to clarify...

-
Distort feature is a must
elmonopascual replied to BGSvM's topic in Feedback for Affinity Publisher V1 on Desktop
+1 -
Nudge guides with arrow keys
elmonopascual replied to Jeremy Bohn's topic in Feedback for Affinity Publisher V1 on Desktop
I agree too. Yesterday Tom Schülke posted something similar to this: https://forum.affinity.serif.com/index.php?/topic/79462-i-wished-that/ -
I wished that.....
elmonopascual replied to Tom Schülke's topic in [ARCHIVE] Publisher beta on Windows threads
Totally agree! -
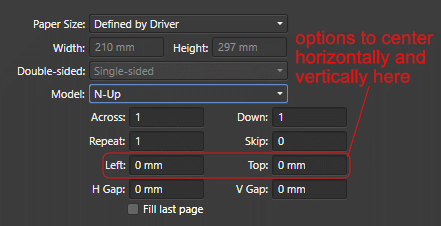
Hello. It would be useful if the print dialog had an option to center horizontally and vertically when using N-Up layout. That way you has not to calculate the top and left distance manually. I attach an image to clarify.
-
Elements on Master Page(s)
elmonopascual replied to Petar Petrenko's topic in Feedback for Affinity Publisher V1 on Desktop
Hi Petar. I understand what you say now. You mean freely edit a master page object on any page, only for that page. Anyway, I think is good that certain properties of master pages objects be locked by default to prevent accidentally move them (or change them) because master page objects are "suppossed to be the same on all pages", at least initially (of course with the possibility of unlock them). For me is a question of agility / safety that could be configured depending how the user feels more comfortable. -
Elements on Master Page(s)
elmonopascual replied to Petar Petrenko's topic in Feedback for Affinity Publisher V1 on Desktop
Hi. The problem I see with this, is that you can accidentally move some master page element when working on a page and the mistake will propagate accross all pages. In my opinion turning on explicitly the edit mode is a safety step. To make all us happy, this behavior could be configurable under preferences. -
Thanks for the new version! Great work with the new master pages functionality. I like it!
-
Artistic Text Tool: Text is invisible
elmonopascual replied to Steps's topic in [ARCHIVE] Publisher beta on Windows threads
Hi Steps. This happened to me when I dragged a text asset from the Assets Panel. In my case, if I change the zoom level, the text appears. -
Symbols
elmonopascual replied to Mark Oehlschlager's topic in Feedback for Affinity Publisher V1 on Desktop
Hi Mark. In my case it synchronizes well (stroke width, stroke color, fill color) on both: shapes and curves. Are you sure you didn't switched off the Sync button accidentally? -
Text style: numbering bullets error
elmonopascual replied to Pinnochio's topic in [ARCHIVE] Publisher beta on Windows threads
Hi Pinnochio. I don't know if this is what you want, but you can change the TAB of the bullets for a space and then the bullets will remain near to the text. I attach you a screen shot.
-
I found this playing with the new version 192 (thanks for that, by the way!) If you open the Glyph Browser and try to do double click on any glyph (but not being positioned in a text frame or artistic text) the app closes immediatly. Suggestion: It would be nice that if you drag and drop any glyph over the page (or double click as mentioned), it would be inserted as curves.
-
Numbered List Override Text Issue
elmonopascual replied to Mr. K's topic in [ARCHIVE] Publisher beta on macOS threads
MickRose: You are right. I didn't knew that option. Thanks! -
Numbered List Override Text
elmonopascual replied to Mr. K's topic in Feedback for Affinity Publisher V1 on Desktop
Here are the screen shots!
-
Hi Neufmontiers. Choose the Fill Tool [G] and make sure the start node and the end node of the fill reaches the borders of your shape.
-
Numbered List Override Text
elmonopascual replied to Mr. K's topic in Feedback for Affinity Publisher V1 on Desktop
Hi Mr. K. Here is a workaround: Open the Glyph Browser and insert the character named "Glyph 1" before the "S" letter (using the same font that the text in your list). Now you can select the word "Step" and apply any style you want. The "Glyph 1" character does not add any extra space. The style of the number remains as it is. -
I'm curious.....
elmonopascual replied to Jennymac's topic in Feedback for Affinity Publisher V1 on Desktop
Hi Jennymac. Thank you for your answer. You can configure the nudge distance in Options/Snapping. I've tried to do what you say but when I open again the file, the position of the line (or shape) still remains in 40.001 (the 0.001 appears on 40th keystroke, not in 39th.). Anyway, PagePlus is a great software and I'll keep using it to things like color separation, imposition, data merge and other things Publisher has not implemented yet. -
I'm curious.....
elmonopascual replied to Jennymac's topic in Feedback for Affinity Publisher V1 on Desktop
I also bought PagePlus to have all functionallity that Publisher and Designer doesn't have yet, considering the price is very good. It's an amazing software. Nevertheless I found a big bug in PagePlus that is important to me (I work with printed forms, invoices, etc.). If you use the arrows to move a line using a nudge distance of 1mm, after 38 keystrokes the distance is altered by 0,01mm: 1, 2, 3,..., 38, 39,001 It is a big lack if you need presition. I tried changing the units to inches and it works ok, but I need to work in mm. Sadly PagePlus has not more updates -
I totally agree. A few days ago I started another topic where I suggested the possibility of a Print Persona, in wich you could do all pre-printing tasks as imposition, separation of colors and of course all the pre-press tasks you mention.
-
I found this: 1. Draw a shape. 2. Go to Swatches and pick a Pantone color. - The color is applied on the selected shape, a new document palette is created and the color is added as a global color to it. 3. Draw another shape. 4. Pick another Pantone color. - The new color is applied on the selected shape, but is not added to the document palette (in Affinity Designer it does).
-
Problems with Importing Assets
elmonopascual replied to Chrisw5's topic in [ARCHIVE] Publisher beta on Windows threads
In my case, the app don't crashed but the import is not working correctly: I exported some assets I had in Affinity Designer, but when I imported them in Publisher they had been resized. Eg.: In Designer the width was 60mm, and when imported in Publisher the width is 125mm. Maybe I'm missing something? -
Still NO...
elmonopascual replied to chris@555's topic in Feedback for Affinity Publisher V1 on Desktop
Anyway I agree that tool (Replicate) is a very good tool to create patterns in the design. It would be amazing if that dialog box had the posibility to save presets. I don't understand this: