rogershuff
-
Posts
39 -
Joined
-
Last visited
-
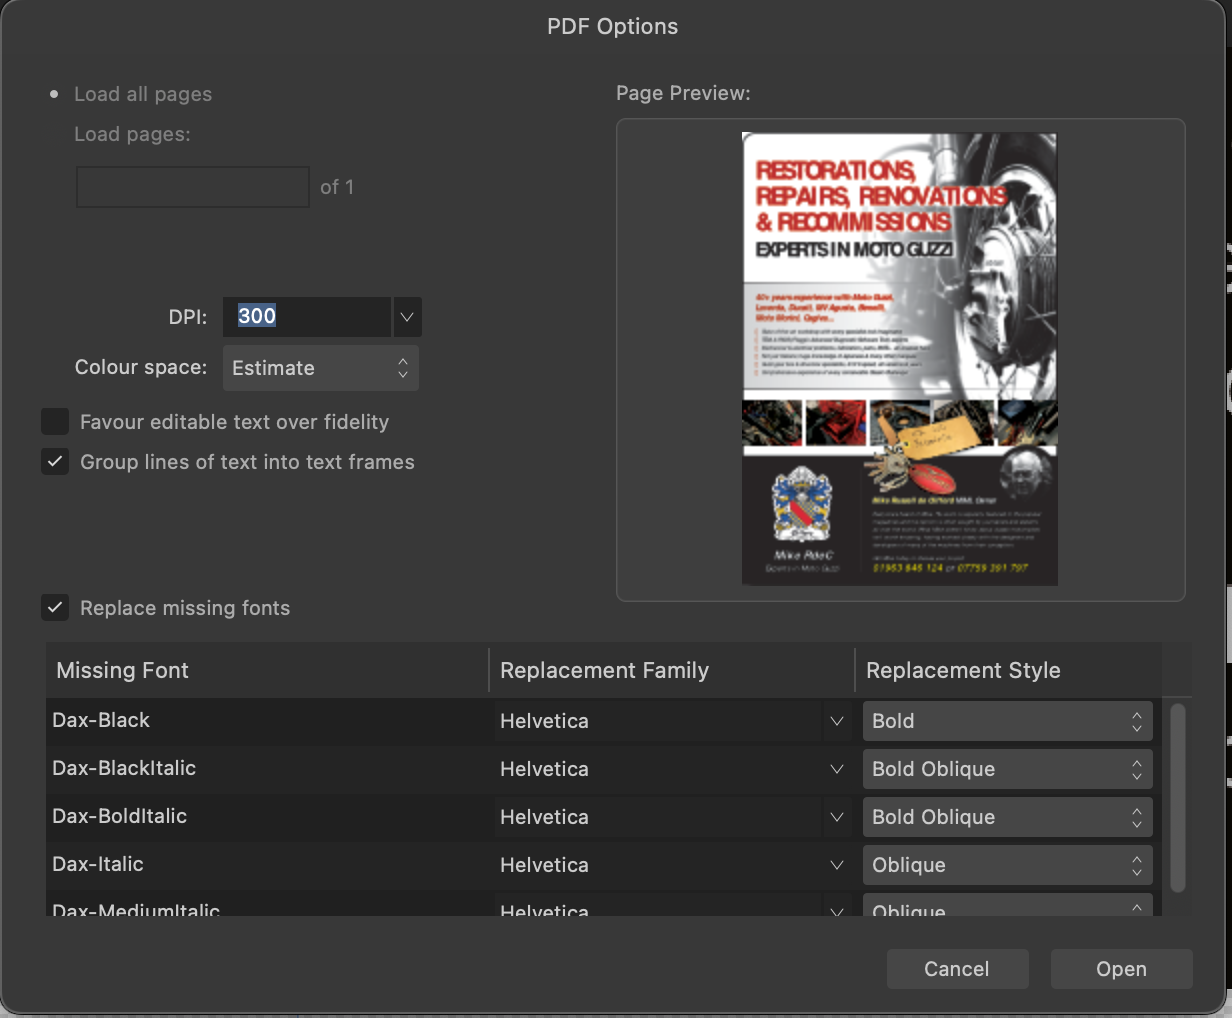
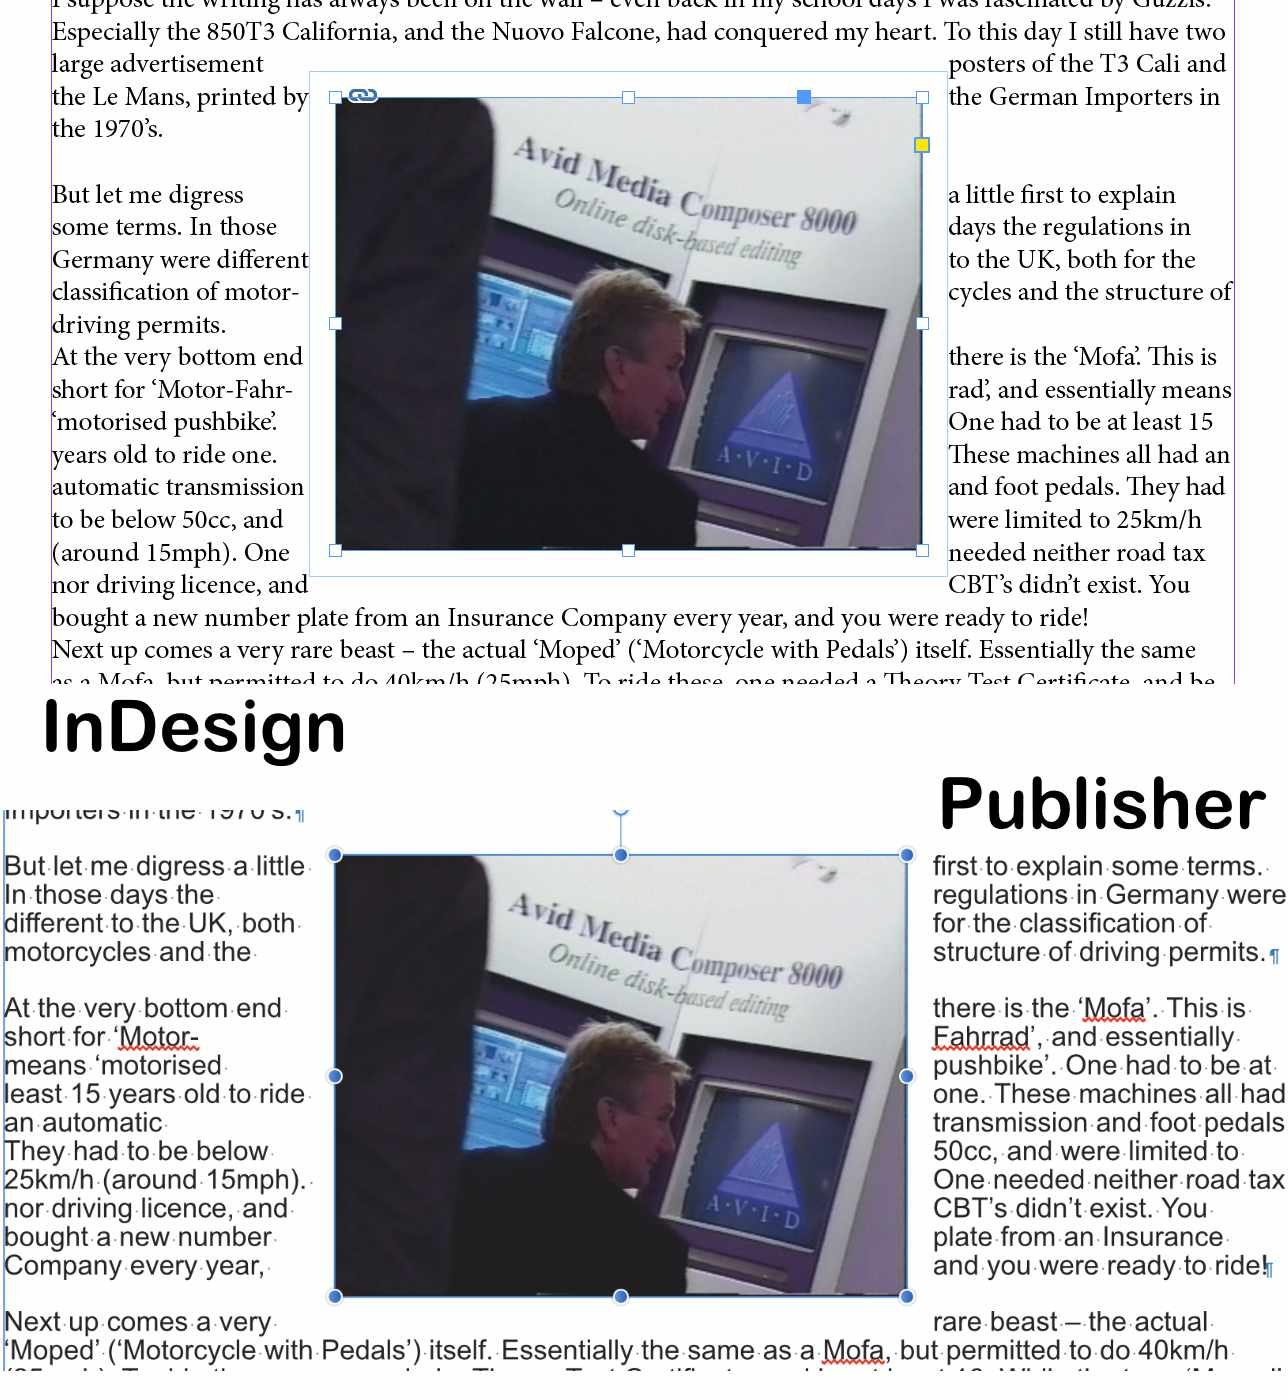
I am sent PDFs from advertisers for a magazine I edit. When placing them in Publisher (2.2.0) sometimes they display correctly and sometimes not. Usually I can switch Passthrough to Interpret (and maybe back) to fix things but with one, I could not fix the letter spacing errors (see screenshot). In the example I tracked this down to the originator using a font called 'OpenSans' whereas my Mac has fonts called 'Open Sans' (note the space). If I open such a PDF in Affinity Photo, I am alerted to this problem (see second screenshot, from a different PDF). In Publisher, I am not alerted. Seems like this would be a useful thing to implement. I have taken to opening such PDFs in Photo and exporting as a high-quality JPG and using that. Oddly, going File>Open and opening a PDF in Photo gives the alert, but creating a blank file first (say a 300dpi A4 page) and using File>Place does not show the alert. Mind you, placing a PDF into a blank Photo file does not show the text spacing error! Thoughts? Mac OS Ventura 13.5. 27" Mac 2017.

-
 I may have already asked this but if not, here goes. If I modify a particular text frame - say 'ignore text wrap' or modify the inset values, I only want those settings to apply to that one frame. When I create the next frame, I want it to be a default, unmodified frame. I have managed to make a Style called 'Blank Text Frame' but why should I need to use this? Can we have a setting with a check box: 'New frames [or whatever] inherit previous frame [or whatever] attributes' so I can just deselect it? It may be possible already but the usual behaviour leads to plenty of head-scratching as I try to work out why my carefully created text styles are misbehaving. Grrr.
 -
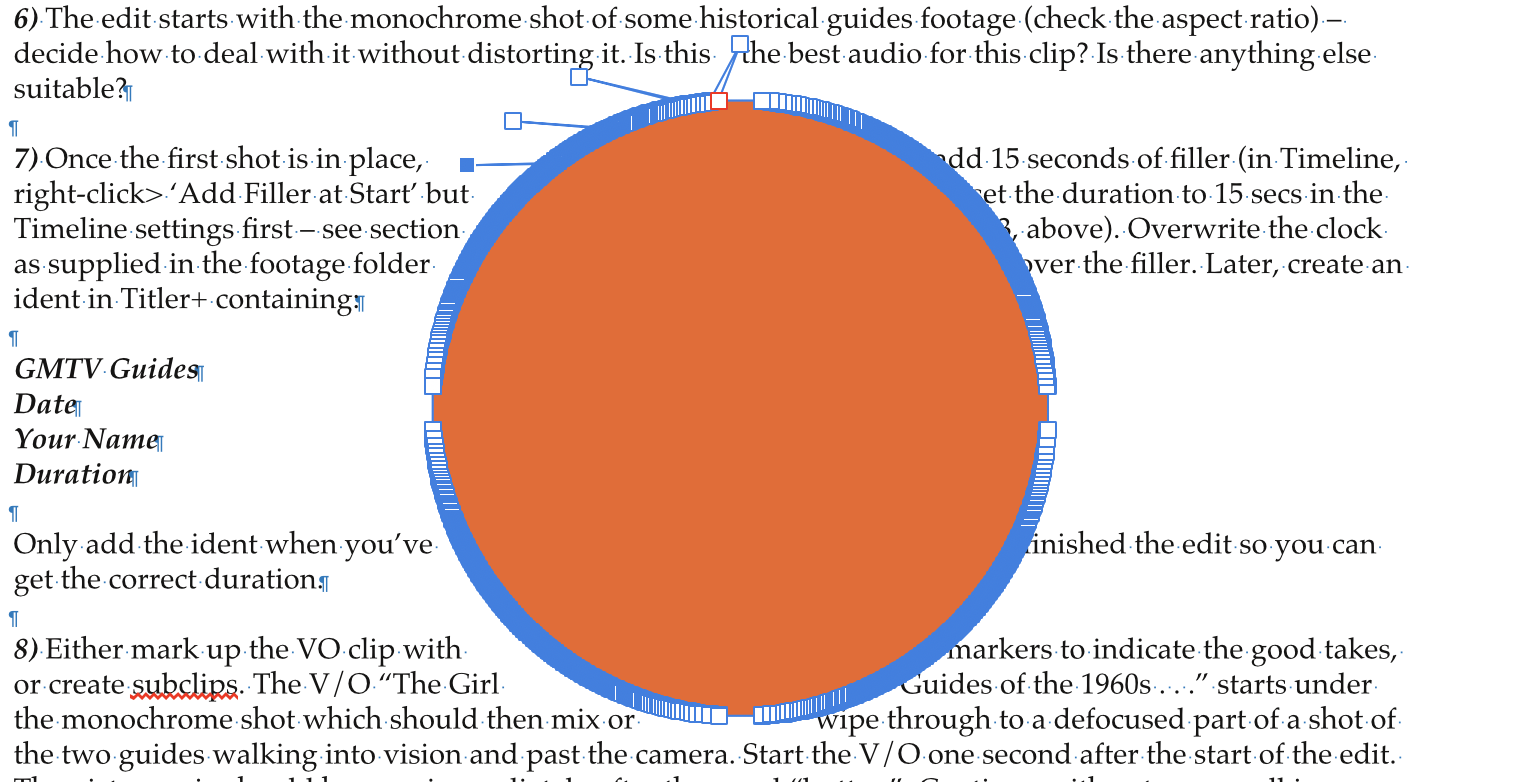
This is what I used to see in InDesign. Note the outline indicating the extent of the text wrap.
-
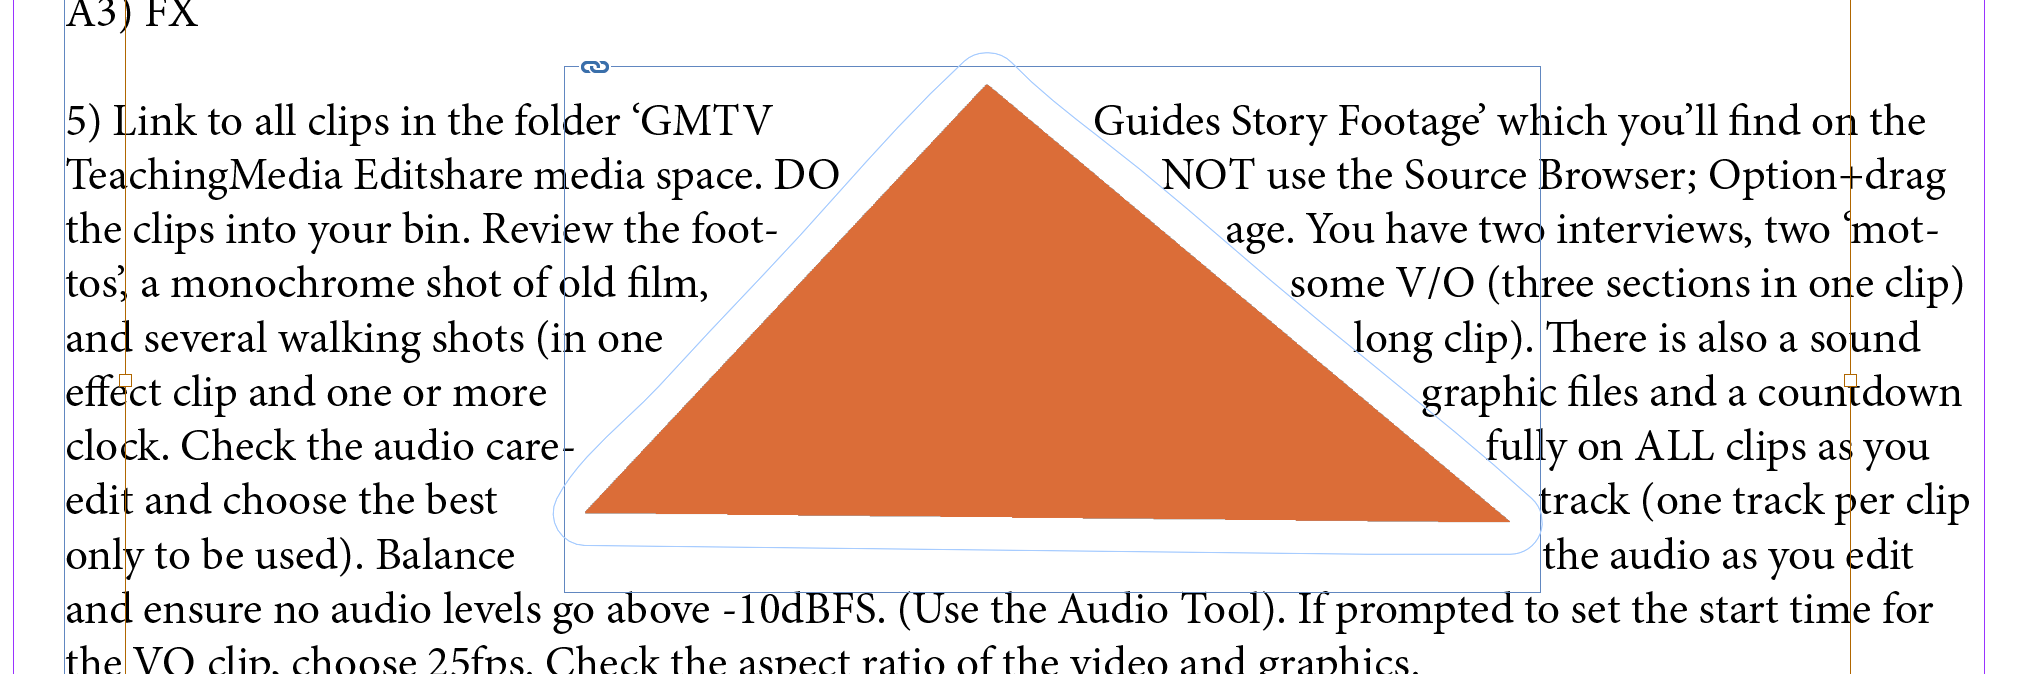
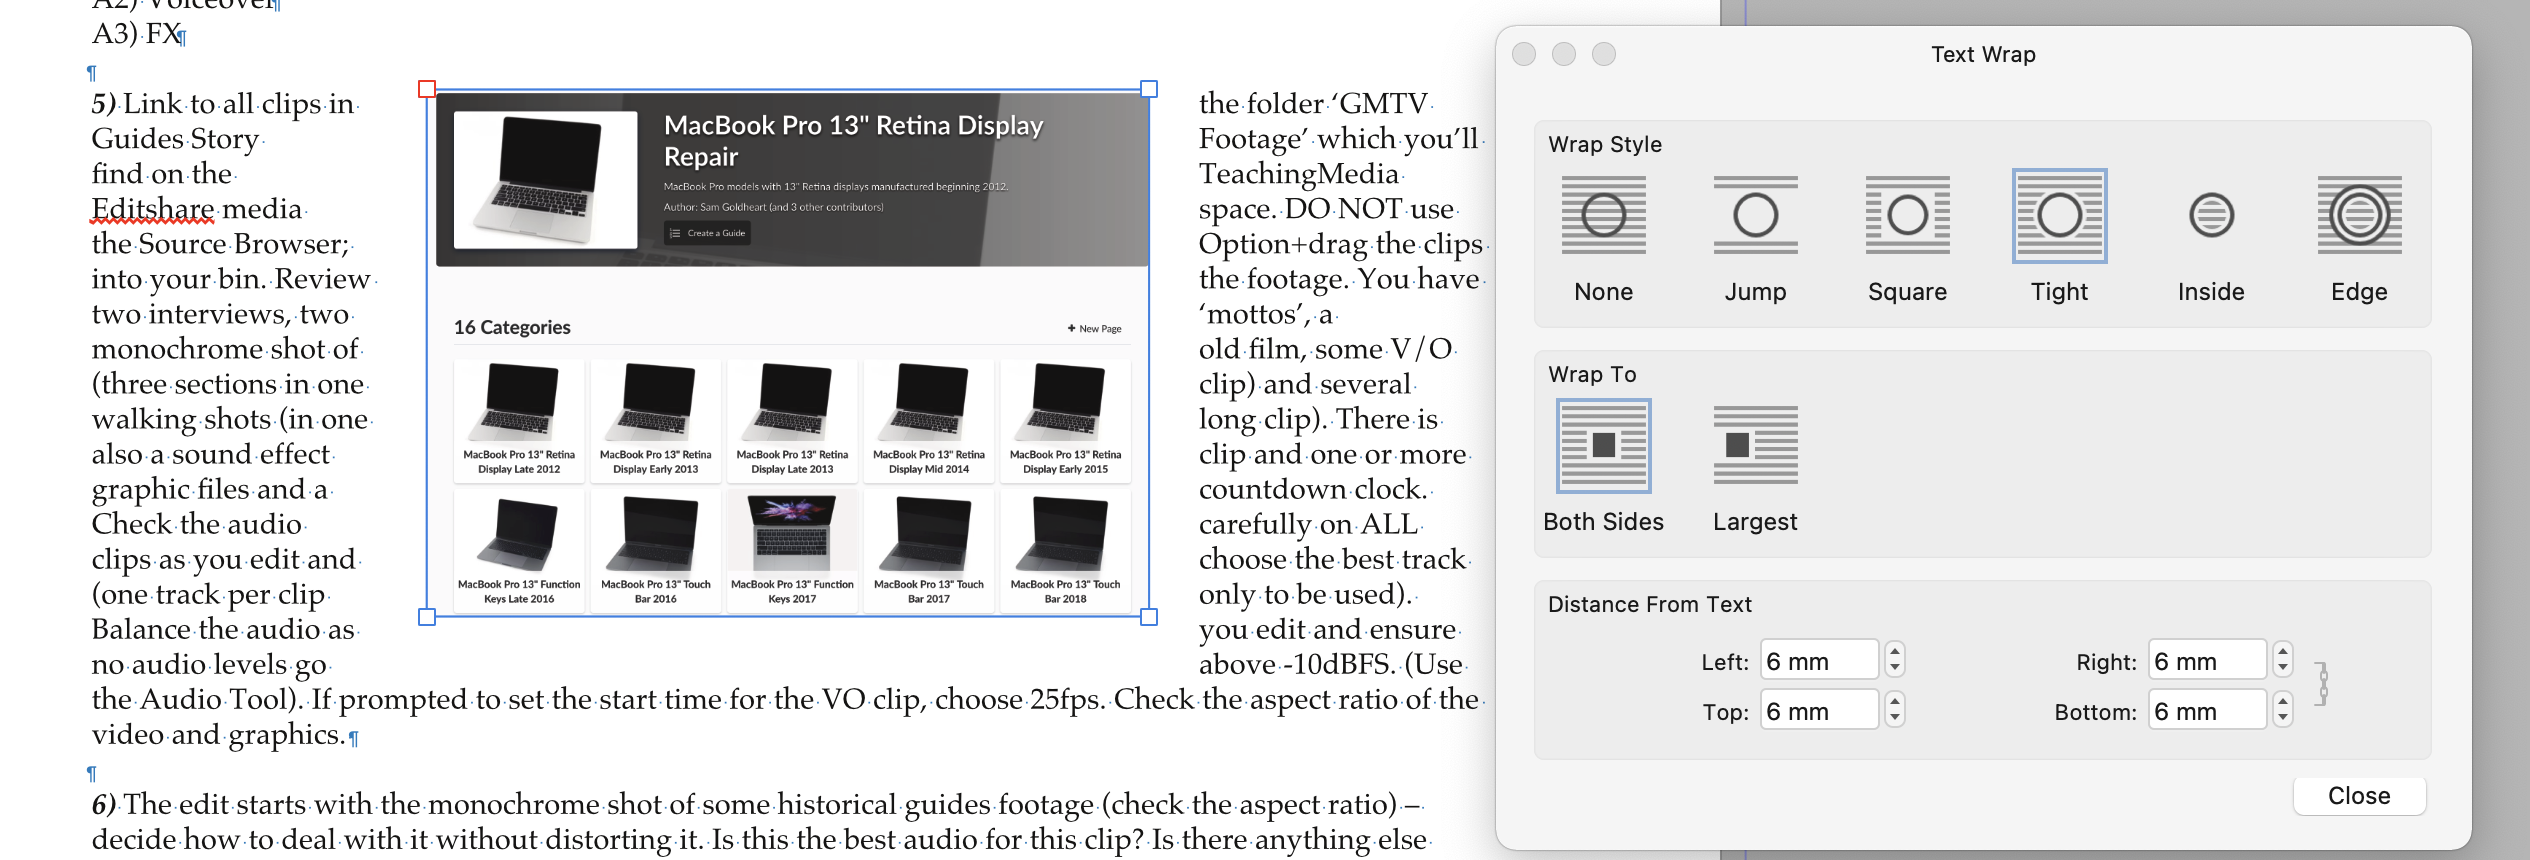
OK - I have tried that but it's not what I am looking for. In the attached example, I have set wrap to 6mm in the main Text Wrap dialogue. If I click 'Edit Wrap Outline' as I have in the screenshot, the outline is displayed around the boundary of the graphic shape, NOT at the perimeter of the wrap area, which I'd expect. If I grab a handle in the outline, it's pushing out the text 6mm from the outline and I still can't see exactly where! If I start with a tight wrap of 0 (zero) mm, I could manually adjust the outline, as in the example in the previous answer, but it's much faster for me in 95% of my work, to set the offset in the main Wrap dialogue and see quickly whee the wrap edge is (like, dare I say it, InDesign). And look at the second screenshot. How is one supposed to work with that?
-
One thing I really miss in Publisher V1 is the inability to show the extent of the text wrap around a graphic. It will sound bad if I say that InDesign does this ... but it does - and it is so useful. In Publisher V1 (which I am using for paid projects, mostly happily), all I can do is change wrap values and see which way the text jumps. Tedious. Please say this has been addressed in v2!
-
11.6.8 evaporates Affinity Publisher (and Photo).
rogershuff replied to rogershuff's topic in V1 Bugs found on macOS
Panic over - fizxed by a restart. -
Panic over - a restart fixed it.
-
Text Wrap Indication
rogershuff replied to jbartley's topic in Feedback for Affinity Publisher V1 on Desktop
Any progress on this? I am now fully committed to Publisher and produce six magazines a year, full of graphics. I feel like I am working in the dark when it comes to text wrap. -
Shift+Option to duplicate?
rogershuff replied to rogershuff's topic in Feedback for Affinity Publisher V1 on Desktop
Thanks, Walt. That would work - just one extra keystroke. Helpful. -
I live by keyboard shortcuts. If I wish to place an image (which I do all the time), I don't want to have to mouse over to the toolbox and click the Place Image Tool. There's a File menu shortcut for 'Place' but if I leave a text frame selected, I can't place a graphic - they are all greyed out. So, I either have to click outside the text frame or click the Place Image Tool. Even if I use Esc>V to activate the Select Tool, only text objects are available with Shift+Cmnd+M, if I left a text frame selected. I have never wished to 'Place' a text file! I can't create a useful keyboard shortcut in the Keyboard settings as modifiers are not permitted. Groan.
-
I have searched for this (maybe I missed it). Option+mouse drag duplicates but for me it is imprecise. In InDesign, Shift+option+a cursor key (no mouse) duplicates an object and offsets the dupe from the original but keeps its alignment with the original (either vertically or horizontally, depending which key I use). I use this a lot to duplicate (say) a line that I'd like to align with another without any mousing. Maybe there's another key combo I'm missing to do this?
-
Further to this, I'd really like a preference to allow new text frames to either a) assume the characteristics of the last used frame or b) be an absolutely clean default non-modified frame. I'm fed up with my new frames appearing with an inset or stroke that I used previously but that I do not want on my new frame. Even worse when you inadvertently create a series of linked frames - all wrong :-(. I have created a 'Basic Frame' style to reset things but here's another thing - i sometimes have to click another style, then click back on the one I really want to get the style to stick.
-
Many thanks - I did not know that option was there - exactly what I need. I've been doing page layout since 1985 (Ventura Publisher) but there is always something to learn.
-
Text Wrap Indication
rogershuff replied to jbartley's topic in Feedback for Affinity Publisher V1 on Desktop
Looks like this is the topic I was about to raise. Why? Why? Why can't we see the outline of any text wrap we have set? This is so fundamental! In the attached image, I've set wrap around the picture to 4mm in both InDesign and Publisher - spot the difference. What's more galling is that if I set a wrap value by hitting the 'Show Text Wrap Settings' button, then innocently click 'Edit Wrap Outline', I can't see the outline! The editable shape starts at the edge of the image or graphic or frame, NOT where it's been set earlier. Without ranting ;-), I do hope this is addressed. Or am I missing something?
-
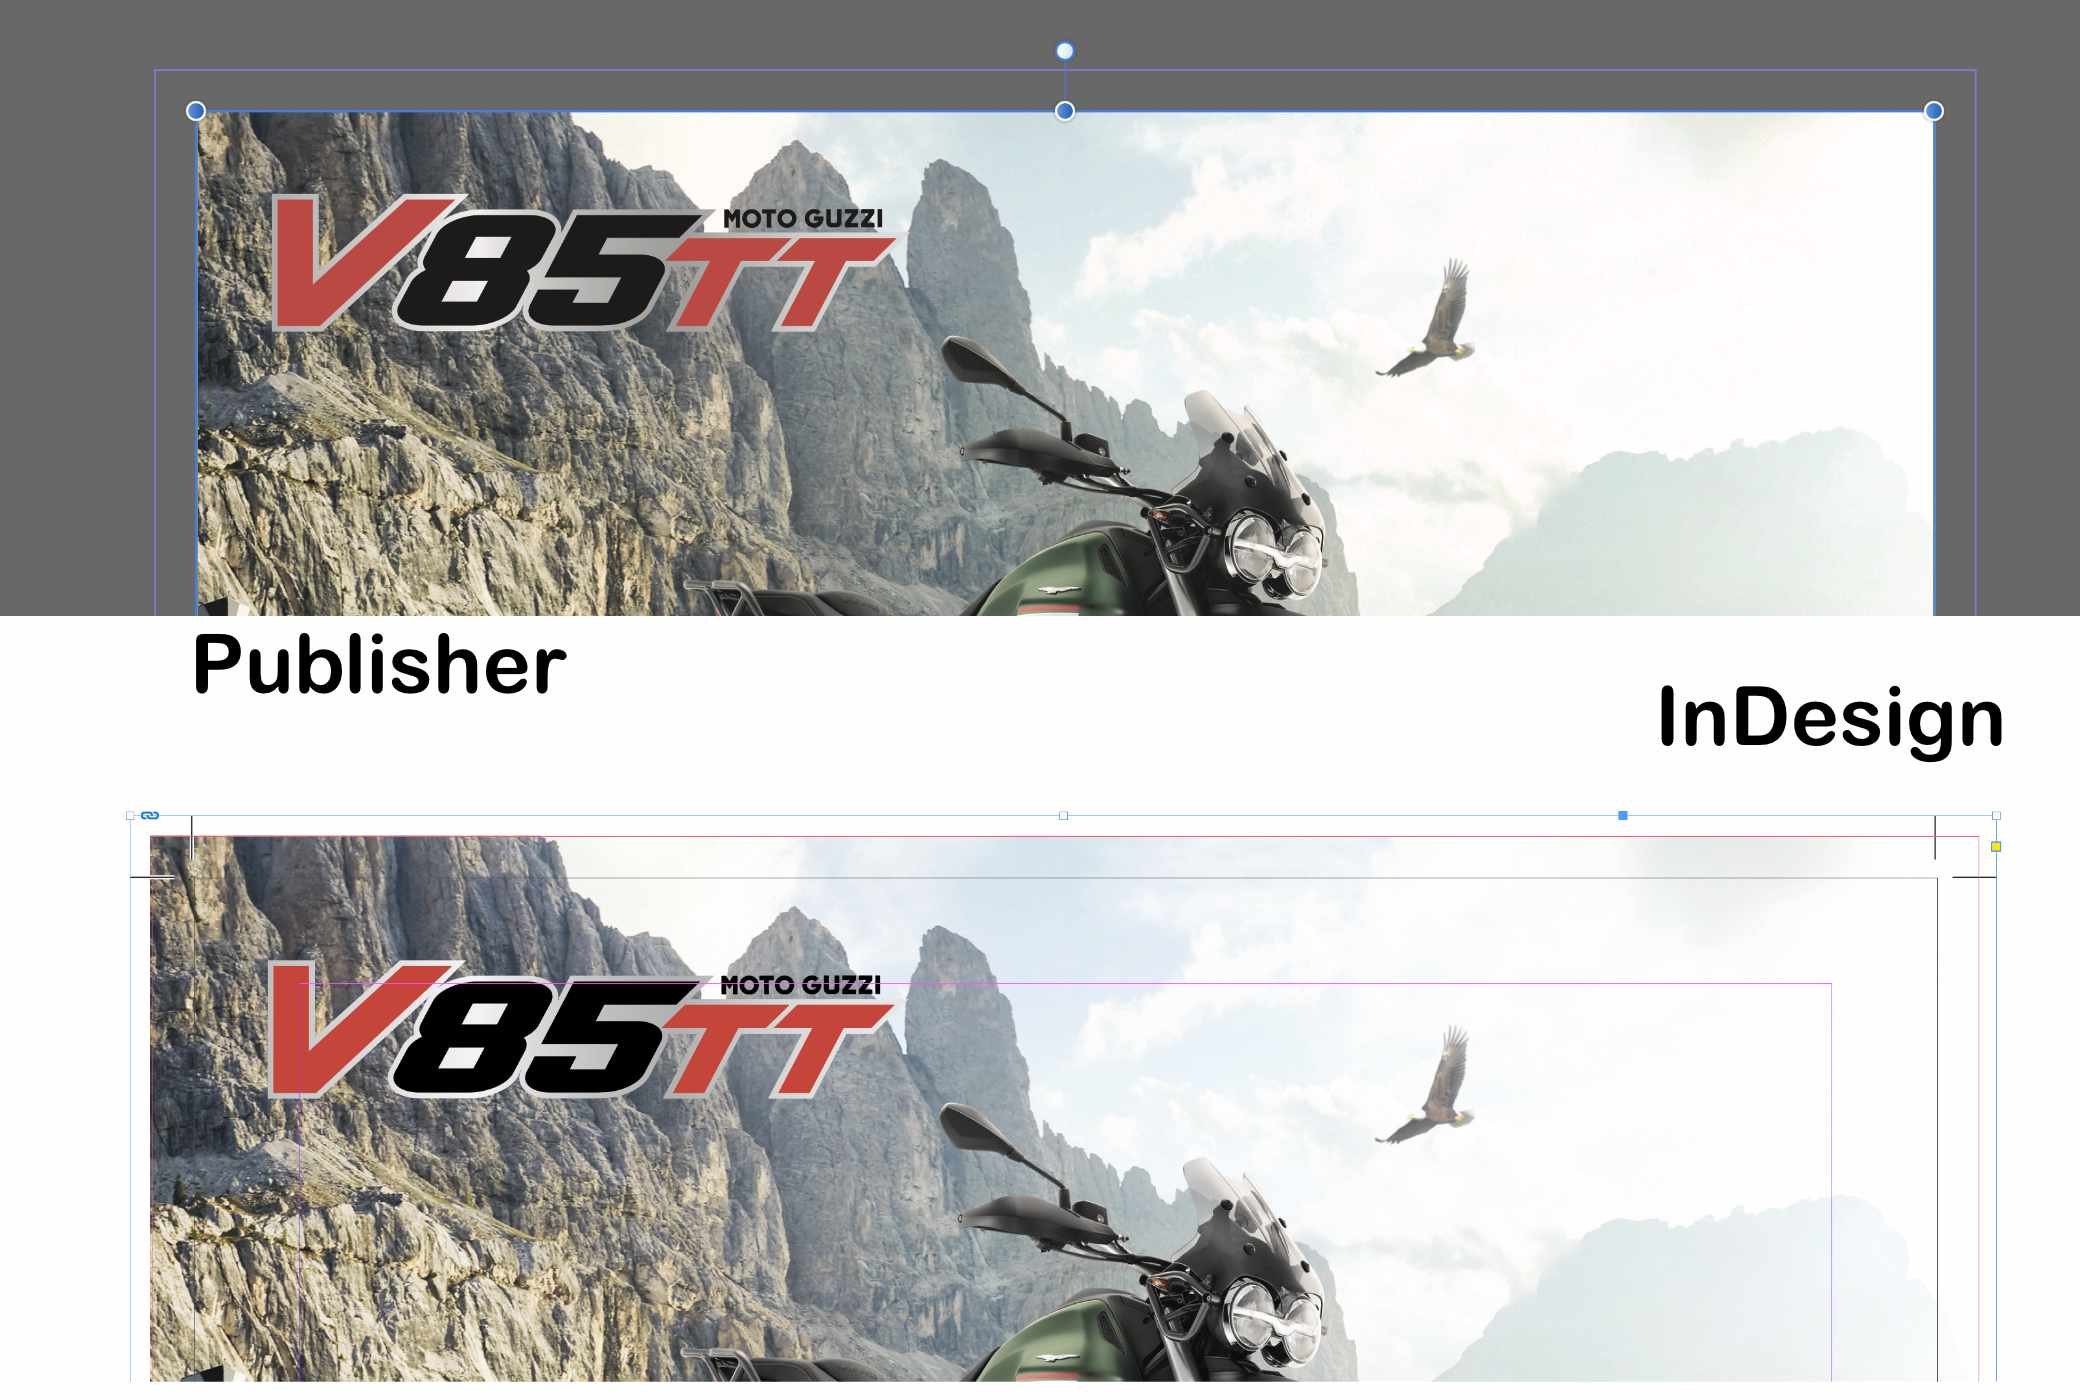
I'm stumped. I have worked with InDesign for years and recently moved over to Publisher. Mostly a good experience but I am now stumped. I publish an A4 magazine with adverts. A client just sent in new A4 artwork as a PDF generated in InDesign. As requested, they extended the graphic area out by 3mm as a bleed. I am used to seeing the entire artwork so I can check the bleed and adjust if needed. If I place this file on to an A4 page in Publisher (1.10.4, Mac, Big Sur), the bleed vanishes and I only see the exact A4 area. This is unhelpful. If I open the PDF in Apple Preview, Adobe InDesign, or Acrobat, I see the entire thing with bleed and crop marks. If I hit the spacebar to get a quick preview before opening the file, I also see the bleed and crop marks. What's going on? Image attached showing part of the same file placed in InDesign and in Publisher. To emphasise, this is not to do with exporting with crop marks. Thanks.

.jpg.644730930c316459816077852f1f7ef6.jpg)