Mark Oehlschlager
-
Posts
634 -
Joined
-
Last visited
Everything posted by Mark Oehlschlager
-
@evtonic3 I've tried to reproduce the video tutorial above, and I can't apply levels directly to the spare channel in Affinity Photo either. You can paint on the spare channel, but you cannot apply levels, curves, or any other adjustment. The only approach is to rasterize any placed background image; Control + click on a layer channel and select Create Grayscale Layer; apply a Levels adjustment to that Grayscale layer; then Control + click on the adjusted Grayscale layer and select Rasterize to Mask. But none of that is achieved by working directly on a spare channel.
-
Is it possible build press-ready documents in the Affinity Suite apps where one can control the inks used (CMYK and spot inks), and where one can both proof the color separation, and be able to output black & white color separation files complete with registration and printer's marks?
-
Presently, in Publisher, one can only setup symmetrical, two-page spreads, but I am requesting the ability to set up variable width, multi-page spreads for use cases such as the following: page fold-outs in books and magazines that reveal large maps, charts or photos half-page inserts in books and magazines soft covers and dust jackets for books and magazines with panels for front flap, front cover, spine, back cover, back flap In Designer, one can group several artboards to set up accordion or gatefold brochures. Can't the same principle be extended to Publisher to allow variable width, multi-page spreads? Thank you for your consideration.
- 1 reply
-
- 1
-

-
@dsnaps12 Pricing should not be complicated nor encourage the user base to be scattered or fragmented across multiple versions of the software. The price and frequency of paid licenses should strike the right balance between covering operating costs for development, marketing and support, and making the purchase decision a no-brainer. The pricing strategy must cover cost + modest profit, but remain attractive enough to grow the user base, where everyone can afford to stay up-to-date — no user base fragmentation.
-
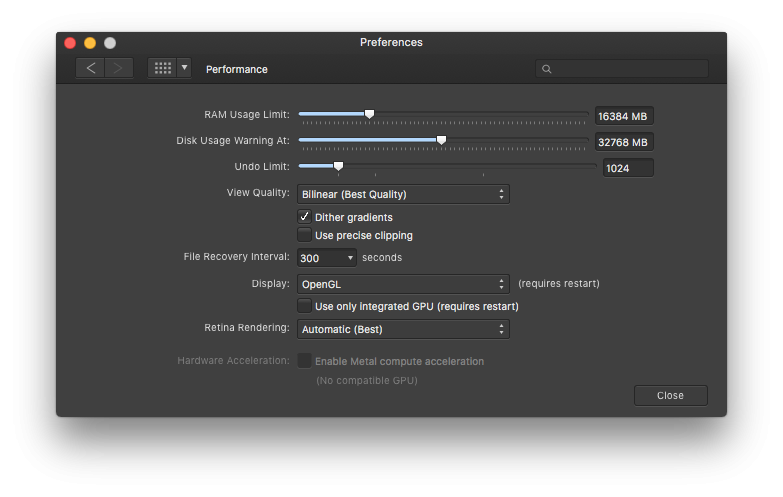
@MEB Here are my Performance preferences. I accepted the defaults of the download: Open GL. I'm running on Mac OS High Sierra (10.13.6) on a 2012 iMac. 2.9 GHz Intel Core i5 16 GB 1600 MHz DDR3 NVIDIA GeForce GTX 660M 512 MB

-
Just downloaded Photo Beta 1.9.0.199. I noticed that many brushes are not rendering in the Brushes Panel nor in Brush Editor. See attachment.
-
I see that the app icon has much rounder corners. Was this imposed by the Apple Human Interface guidelines for Big Sur?
-
Not a show-stopper, but off-putting nonetheless: often layer thumbnail images for new layers and masks do not render. Is there a way to force layer thumbnails to render correctly as they are created?
-
@anon2 Thanks for that tip. I would never have guessed.
-
@Andy Somerfield Would it be possible to use the Dodge and Burn tools directly on a Spare Channel as well as Mask Alpha Channels? EDIT: Maybe, for now, the solution is to paint greyscale tones with the Brush tool set to Overlay blend mode, although one can't target shadows, midtones or highlights in that way.
-
Is the Contour tool actually a "Path Offset" tool? I can't find documentation about the new Contour tool in the help files. Can you post the documentation here, or as part of a new topic thread?
-
New Beta 1.9.0.195 Crashes Have just installed the 1.9 Beta, and it crashes upon creation of a new document. Running High Sierra, Mac OS X 10.13.6 on an iMac.
-
@Lee D I'm beginning to understand the Affinity approach. For example: 1) a greyscale layer dropped to the right of an image layer will not mask according to greyscale values, rather according to whether or not there is pixel data present – white, grey or black. 2) only Layer Alpha channels from the Channel Panel can be used as a source to create a Mask Layer or a Greyscale Layer. Neither color channel information, nor the Composite Alpha channel can be used as a source to create a Mask Layer or a Greyscale Layer. 3) Spare channels can be loaded into empty existing Mask Layers, but cannot be used as a source to directly create a Mask Layer. With regard to the Minimum and Maximum filters, I was thrown by their categorization under Blur filters and missed them. REMAINING QUESTION With regard to the challenge of dodging or burning the values of a Mask Layer, the demo you cited above doesn't seem to apply. How does one go about dodging and burning the values of Mask Layer in Affinity Photo?
-
For a simple 1- to 2-color vector file, if you're on the Mac, search for the utility app "Image Vectorizer" in the Mac App Store. It's inexpensive and does a good job.
-
@Datum If you're on a Mac, there is an inexpensive little utility app that will convert bitmap images to 1- and 2-color vector files. It's called "Image Vectorizer". Look for it in the Mac App Store.
-
I've been struggling to understand the Affinity method for creating and editing alpha channel masks in a way that doesn't involve 5-8 steps, right-clicking my way though the channels panel. In Photoshop, one can target a layer mask directly in the Layers panel and manipulate it. For example: Not so in Affinity Photo. For example, I can't select a layer mask in Affinity Photo and apply Dodge or Burn tools to refine the mask. And there seems to be some mysterious difference in the way that masks created by the Affinity Refine Selection function and the way a greyscale layer that is clipped to another pixel layer functions. I'm so confused by it all. What am I missing?
-
Often, I will make use of the Blend Options dialogue box on various layers in a multilayer file for compositing effects, but there is never a visual indicator of which layers have Blend Options applied, and this can sometimes lead to an unnecessary hunt for which layers have the effect applied. I often lose track, and when I exchange files with my collaborator, it's often unclear where the other applied Blend Options. So, my request is for an icon to appear on the layers to which Blend Options have been applied – either by applying the Blend Options cog icon to the layer, or by incorporating Blend Options into the Layer Effect grouping and letting the "fx" icon symbolize the change. Thank you.
-
@Chris B Screenshot and file attached below. The problem occurs regularly, but is not reliably reproducible, which is maddening. Southeast Corner 01.afphoto Southeast_Corner_01.afphoto.zip
-
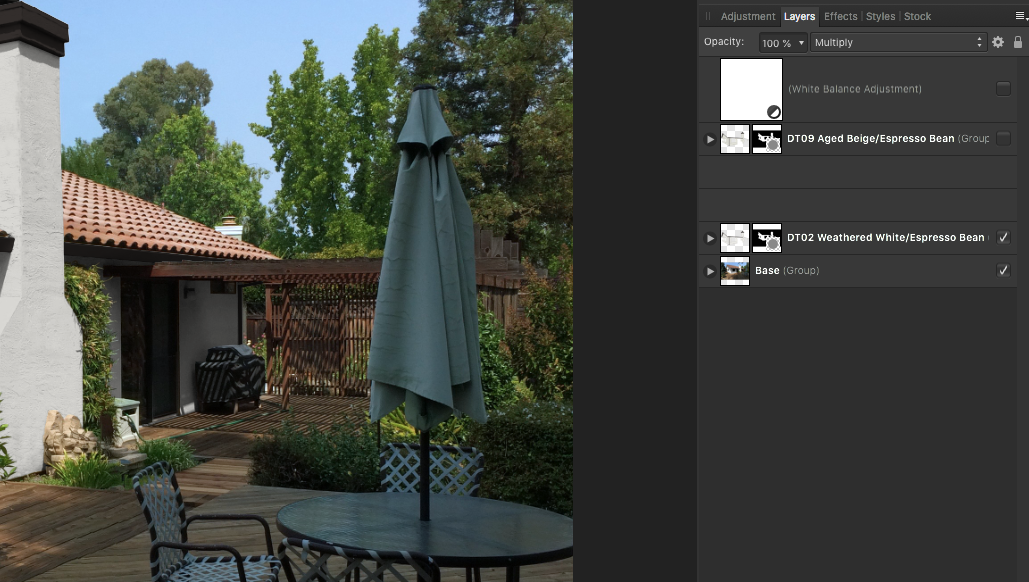
I've created a file where the base layer is a photographed image of a house, which is then recolored in various alternative color schemes using colored shapes in multiply blend mode. Each colors scheme is contained in a separate layer group. The bug I'm experiencing is that when I reopen the document each day to continue work, some layer groups are invisible to me in the layers panel. They seem to disappear. Sometimes this can be remedied by expanding and collapsing other visible layer groups. Other times I must close and then reopen the document. Please have a look at this problem.
-
@HannaCecilia You can access Pantone spot colors from the pull-down in the Swatches panel. You can successfully apply spot colors to vector shapes and type. However, you cannot apply spot colors to gray-scale images (as you can in InDesign) without them converting to CMYK. Publisher does not have the ability to preview color separations. If you own a copy of Adobe Acrobat Pro, you can open a PDF export from Publisher and check color separations in Acrobat Pro. The Affinity Suite holds out a lot of promise for those eager to escape the subscription costs of the Adobe Suite, but there remain feature holes, and the development team is small. I think they're a bit under water, and have trouble filling in all the holes in a timely manner.
-
@Sean P Ah. Okay. Got ya. BTW, the zoom issue has existed for several update cycles. It seems to me to be a basic function that should've been easily fixed in one of the point updates. Is it more difficult to fix than I imagine, or is it just at the very bottom of a very large priority list?
-
@Sean P Sure. That's what I thought I was doing here by quoting the old post. What do you mean by "bumping" the previous thread?
-
Just another reminder to the dev team that the Zoom & View tools and contextual toolbar controls for managing zoom remain broken across the entire Affinity Suite as of the 1.8.4 release. Double-clicking the Zoom tool should result in the document being zoomed to 100% Double-clicking the View tool should result in the document being zoomed to fit. The Zoom pop-up in the contextual tool bar should be synchronized with the Zoom & View tools, as well as the Zoom slider in the contextual tool bar. The Zoom slider in the contextual tool bar should be synchronized with the Zoom & View tools as well as the Zoom pop-up in the contextual tool bar. Thank you for your attention. Mark
-
@tudor In InDesign, or any other document layout application, set a paragraph style to express Avenir Medium 12/14. Select a word/phrase in the paragraph and change the local leading to 12/30 using the "Leading" attribute field. That would be a local leading override. Go on to redefine the paragraph style to Avenir Medium 12/18, and the previously applied leading override remains 12/30. Having said all of that, what's the point of the introduction of this unnecessary "Leading Override" attribute field that displaces the "Leading" attribute field to a separate panel? What is the use case scenario that justifies breaking a standard UI for capturing basic text setting attributes? Why force designers and typesetters to click through to additional panels to record the basic typesetting idea of "face; weight; point-size; and leading"? And if Serif insist that it's necessary and useful to introduce a new "Leading Override" attribute field, then at least don't displace the "Leading" attribute to a separate panel, and please make the distinction between their "Leading" and "Leading Override" fields clear with very different panel symbols.
-
@Fixx Coming from Adobe and other creative apps, one does not find a "Leading Override" attribute field. It's unnecessary because, as I described, one simply has to select a word or phrase and change the leading value locally using the "Leading" attribute field. Affinity has departed from convention here by moving "Leading" to the Paragraph panel and introducing a new "Leading Override" attribute field to the Character panel where the "Leading" attribute field normally resides. There is no compelling reason for this special function field, and no compelling reason for breaking the UI up in a way that interferes with a typesetter's fundamental design concept of face, weight, point size, and leading. What is this weird duck, the "Leading Override" attribute field? Why does it even exist? Apart from some expressionist, avant garde setting of poetry, what is the use case? Why did Serif move the "Leading" attribute field? None of it makes any sense to the designer / typesetter.