

PaRunk
-
Posts
163 -
Joined
-
Last visited
Posts posted by PaRunk
-
-
Hello,
I have just noticed that I can open layered tiff files created with Adobe Photoshop without any major problems and all layers are preserved. But when I now try to export a tiff file with layers and transparencies from Affinity Photo, I only have the option to save the layers for Affinity's programmes. When I then open the tiff in Photoshop, all the layers have disappeared and have been merged into one layer. This is really annoying.
Is there a way that I can save tiff files with layers and transparencies so that I can open them again in other programs like Photoshop with all layers and transparencies?
It is very important for me to be able to save tiff files with layers and transparencies and open them again in other programmes without losing the layers and transparencies.
If this is not currently possible, I would be happy if this possibility could be added through an update.
-
Hello, I found out today that the Bitmap blending mode doesn't work with the gradient tool on the iPad.
If I select the bitmap blending mode for the gradient tool, the previously set gradient remains on the one hand, although I have not set it to bitmap. In addition, it is not possible to select the bitmap. A window doesn't open like in the desktop version, and I can't find a button to access the image to be used either.I'm using an iPad Pro 11'. Either it is not displayed (I found that I also have problems displaying the top bar with other tools) or the selection button was forgotten.
-
Yes, I've also noticed that I have significant speed losses and severe delays when using raster brushes and vector brushes, regardless of whether it's an iPad or desktop version. Hope this problem can be fixed in a timely manner.
-
Hello, I finally managed to record a video to show my problem.
No matter what I tried, whether values with commas or points, I can enter correct values. I can only enter full values. -
Well, the AI file format is Adobe's, I also know. But I can't quite imagine that Adobe wouldn't disclose the specifications. Because with Corel Draw and a few other programs, it is possible to open AI files and save them again as AI files.
I tried the tip of simply changing a PDF file's file extension to .ai. But when I open the rewritten file in Illustrator, the file is still recognized as a PDF.
In addition, Affinity Photo can also open psd files (Photoshop) and save them via export.
And in Affinty Desiger there is also the possibility to output psd files via the export.
It would therefore be desirable if you could also open AI files in Desiger and export them as AI files again.
-
-
Hello,
I would be very happy if I could not only open Ai files in Designer V2, but also save them as Ai files via export.
Would it be possible to integrate this?
-
The national language of the program corresponds to the operating system. I use 'German' as the language of the country. I don't know if that's the reason.
If I tried to enter a value with a comma, the value jumps back to the previous value.
If I enter the value with a period, the period is removed and I suddenly have a value that is much too large. More precisely, if I enter a value of 1.5, it suddenly becomes a 15.
-
Hello,
I noticed that I can't make any entries with decimal places, although I have set up to three decimal places for all units of measurement in the settings.
Once I can't even set an outline with 0.5pt. As soon as I confirm the value with Return, the value is reset to 1pt or if 0pt was previously entered as the value, the entered value is reset.
The decimal point values can only be set using the slider. This is annoying and imprecise.
There are also problems when you have a value with a decimal place, that when you scroll with the mouse wheel from a value of, for example, 2.545pt, the value suddenly changes to 2545pt and not to 3pt as usual.
I have the above problem in all programs.
Please correct the errors as soon as possible.
-
Thank you for the information. I have just uninstalled the program and installed the previous versions. Until version 1.10.1, the problem was not yet present. From version 1.10.3 this problem occurs. Maybe this information helps to find the problem.
-
Hello, I have a problem with the Invert Selection function when I want to crop an object in Publisher with Photo Persona. When an object is on a solid color background, the selection is much easier if you select the background and then you invert the selection. But when I do this, the selection is already inverted, but is offset at the same time. And when you run the command again, the selection is moved again and is no longer in the right position. This is really annoying, because I have to open the object directly in Affinity Photo and do the cropping there, because there the inverting of the selection works perfectly.
I attach a video with my problem. -
A new update to fix functional errors and problems.
But unfortunately, functional errors and problems that have been reported in the forum for more than a year have still not been corrected.The best example is the incorrect calculations with the Divide function from Geometry, when you want to divide several superimposed shapes (especially more curved shapes). And if the shapes have additional strokes, these are separated from the shapes and become their own elements, which even with too many overlays become individual fragments of a contour.
-
I meant "I would be really happy if you can use XML and JSON data in the Data Merge".
-
Hello, too, I would be really happy if you can use XML and JSON data in the data summary, as these files are usually issued by databases. Is very important when creating catalogs.
-
Also I would be really happy if in the near future, maybe in version 2 of photo more creative filters, similar to in Photoshop, would give. I miss it very much and the many free and paid filter programs I find a matter of taste or not as effective as these filters work destructive and you can not change the parameters back or subsequently. Especially you should be easier to use, so without any formula writers, as the filter synthesized textures is the case. Is far too complicated for beginners and too, these textures are always the same and not as coincidentally in Photoshop on the principle, so that the textures always apply to each other.
-
Hello Ron P.
Thanks for the answer. Now I know that Affinity Photo is not Adobe Photoshop and that they work slightly differently. But what I noticed and I'm somewhat disturbs that all shades, no matter what attitude I make, and I can therefore not use this tool as well as the dodge tool for specific work, as I am used to photoshop .
I also use these two tools to create (by a copy of a matching color channel) and correct mask levels. Here it is important that the Burn tool, if I put the attitude on shadows, does not even change the highlights, but what happens in Affinity Photo and not in Photoshop. In Photoshop, the bright shades of 0% -25% are not touched.
And when I use the highlights setting, Photoshop does not change the dark shades of 75% -100%, in Affinity Photo already.I know the various Dodge and Burn techniques very well, since I have been practicing professional image editing for more than 20 years, all with the Adobe products. But in private, I am more working with the products of Affinity and Co, as I can not afford the monthly subscription from Adobe and not ready to pay this and found a very good alternative with the products of Affinity.
-
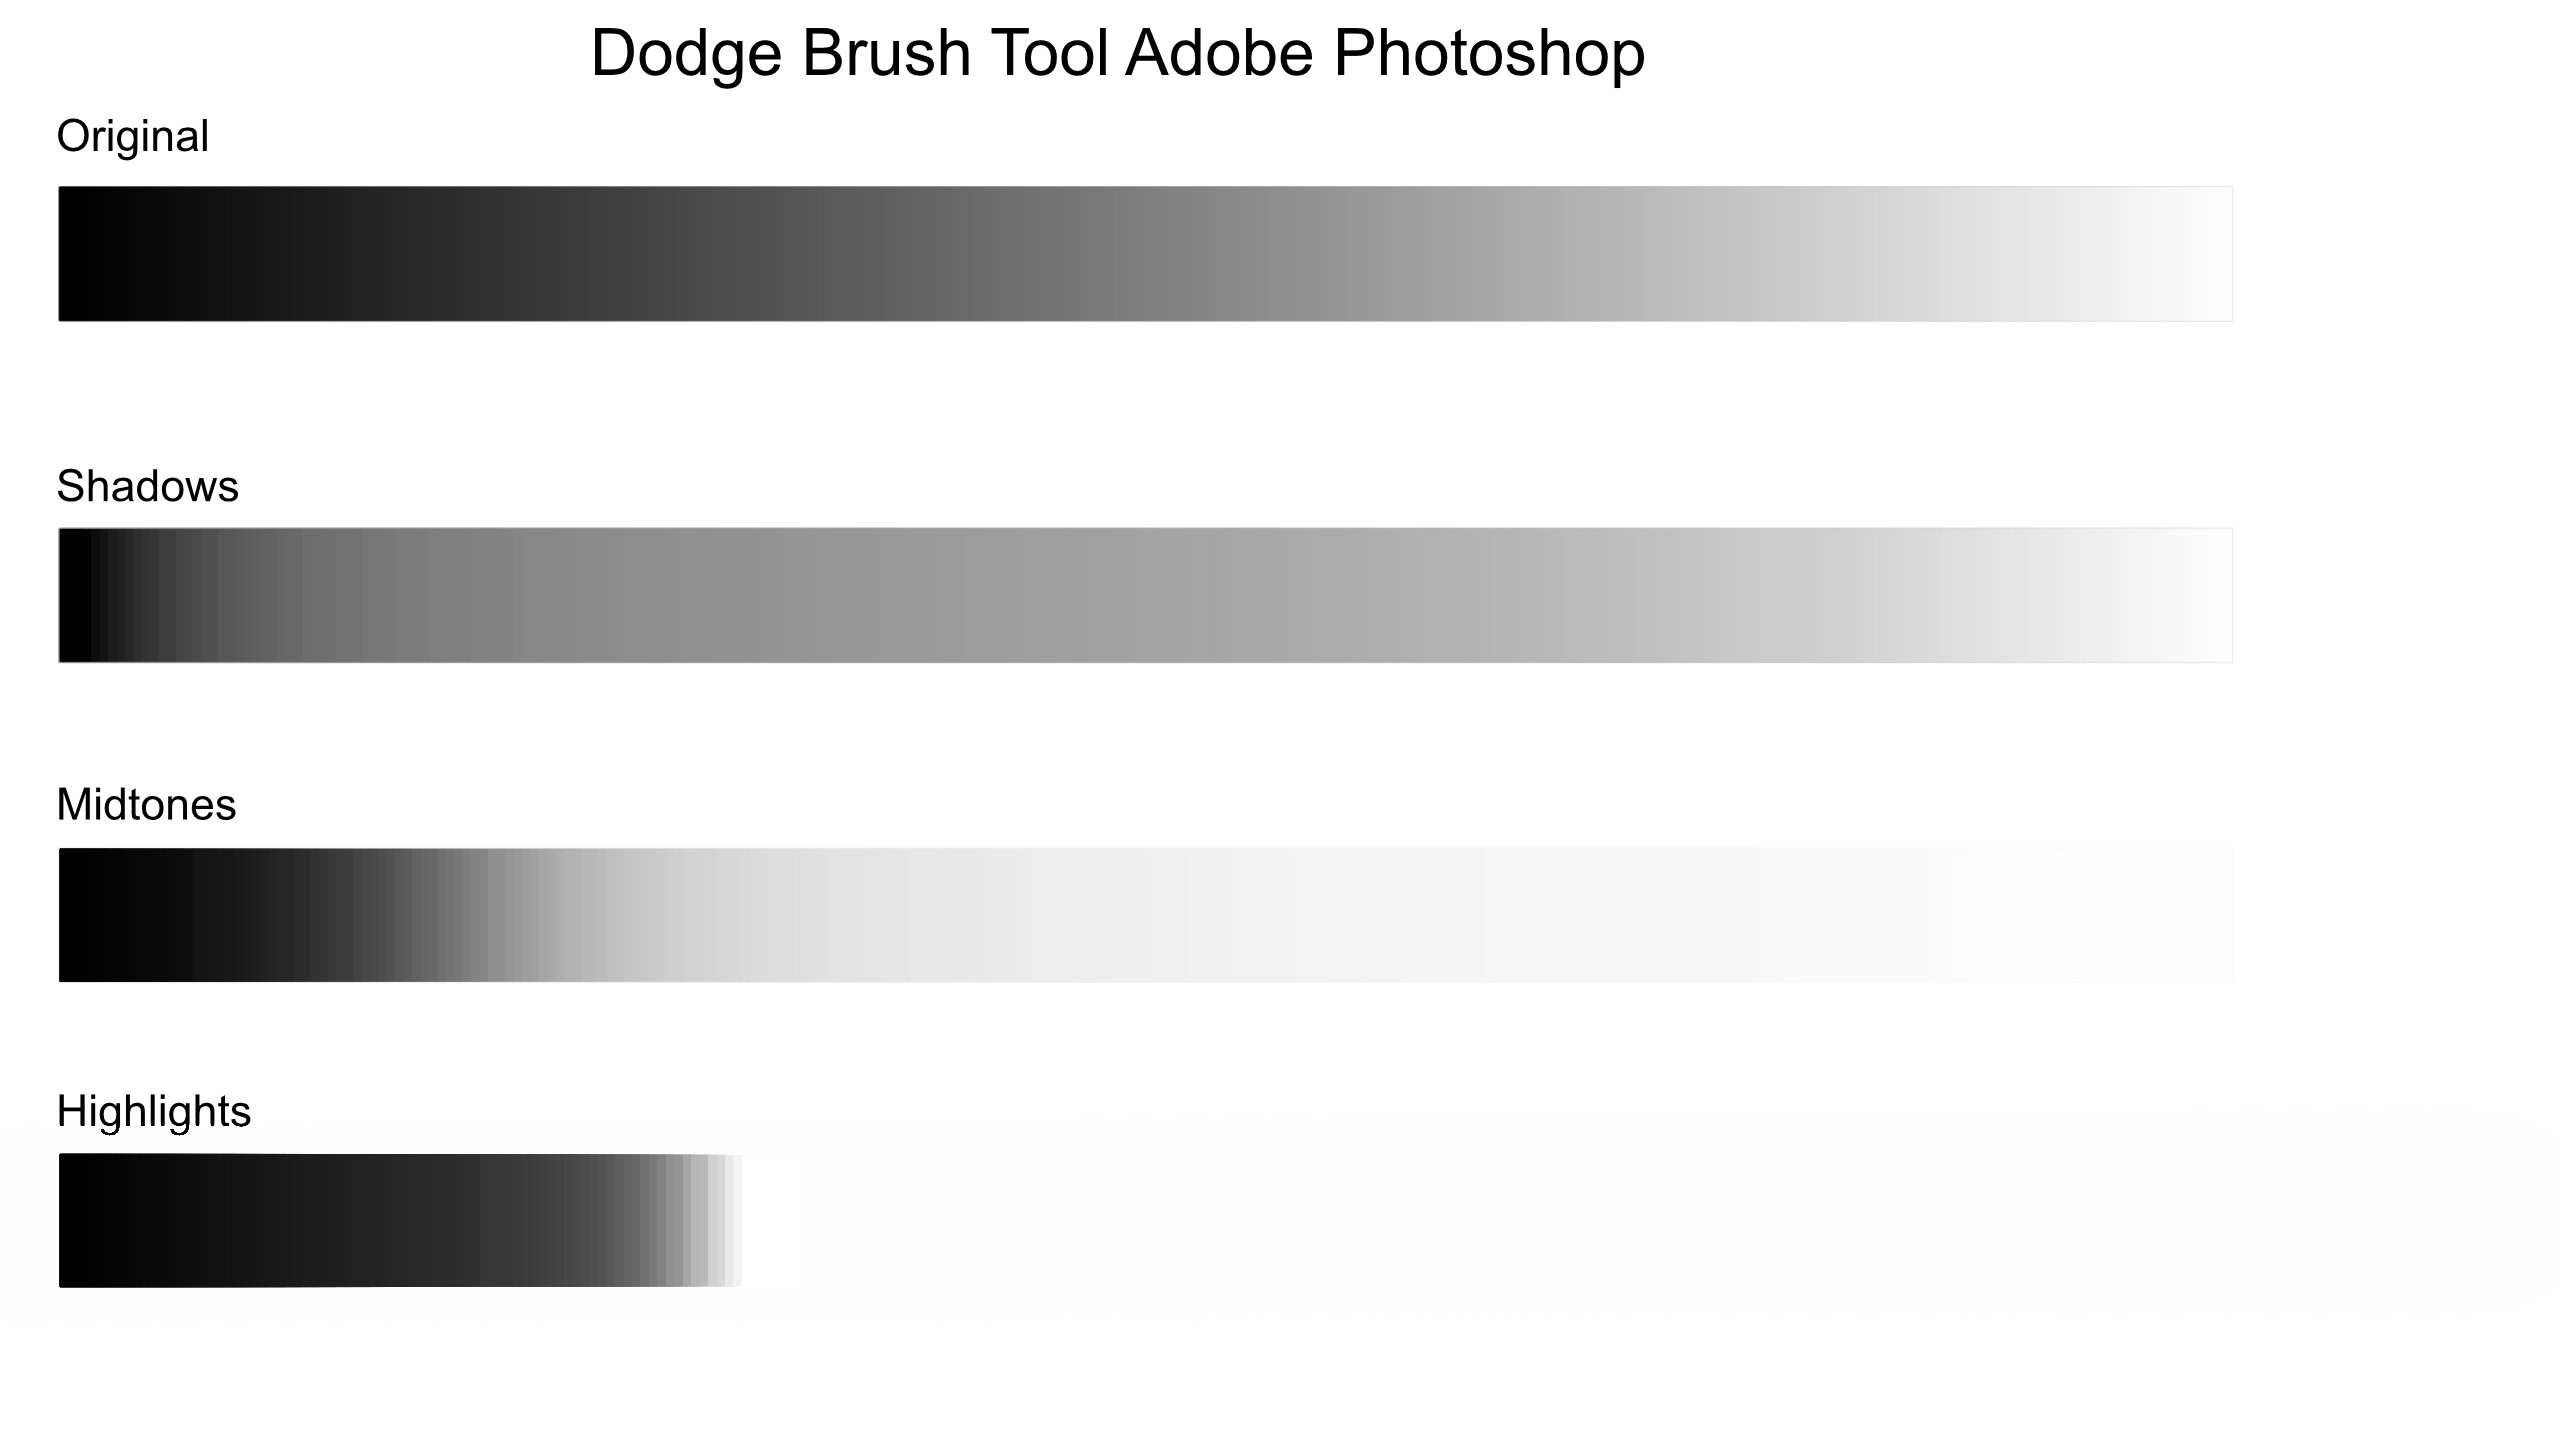
Hello Affinity Team,
Like the Burn Brush Tool, I also found the Dodge Brush Tool that it does not work properly or does not work as I know it from Adobe Photoshop.
Whether I set up the setting on shadows, midtones or highlights, the set areas will not be brightened, but all the shades are brightened. Depending on which area I agree are not the color ranges selected there are brightened, but manifests here somehow aggressively the tool works, at least it looks like this.
I'll keep a comparison between Affinity Photo and Adobe Photoshop to illustrate the differences.
It would be really great when the Didge Brush Tool would work like in Photoshop.In this test, I drove five times over the complete course over it to determine which color areas are really touched. All will be set to 100%.

-
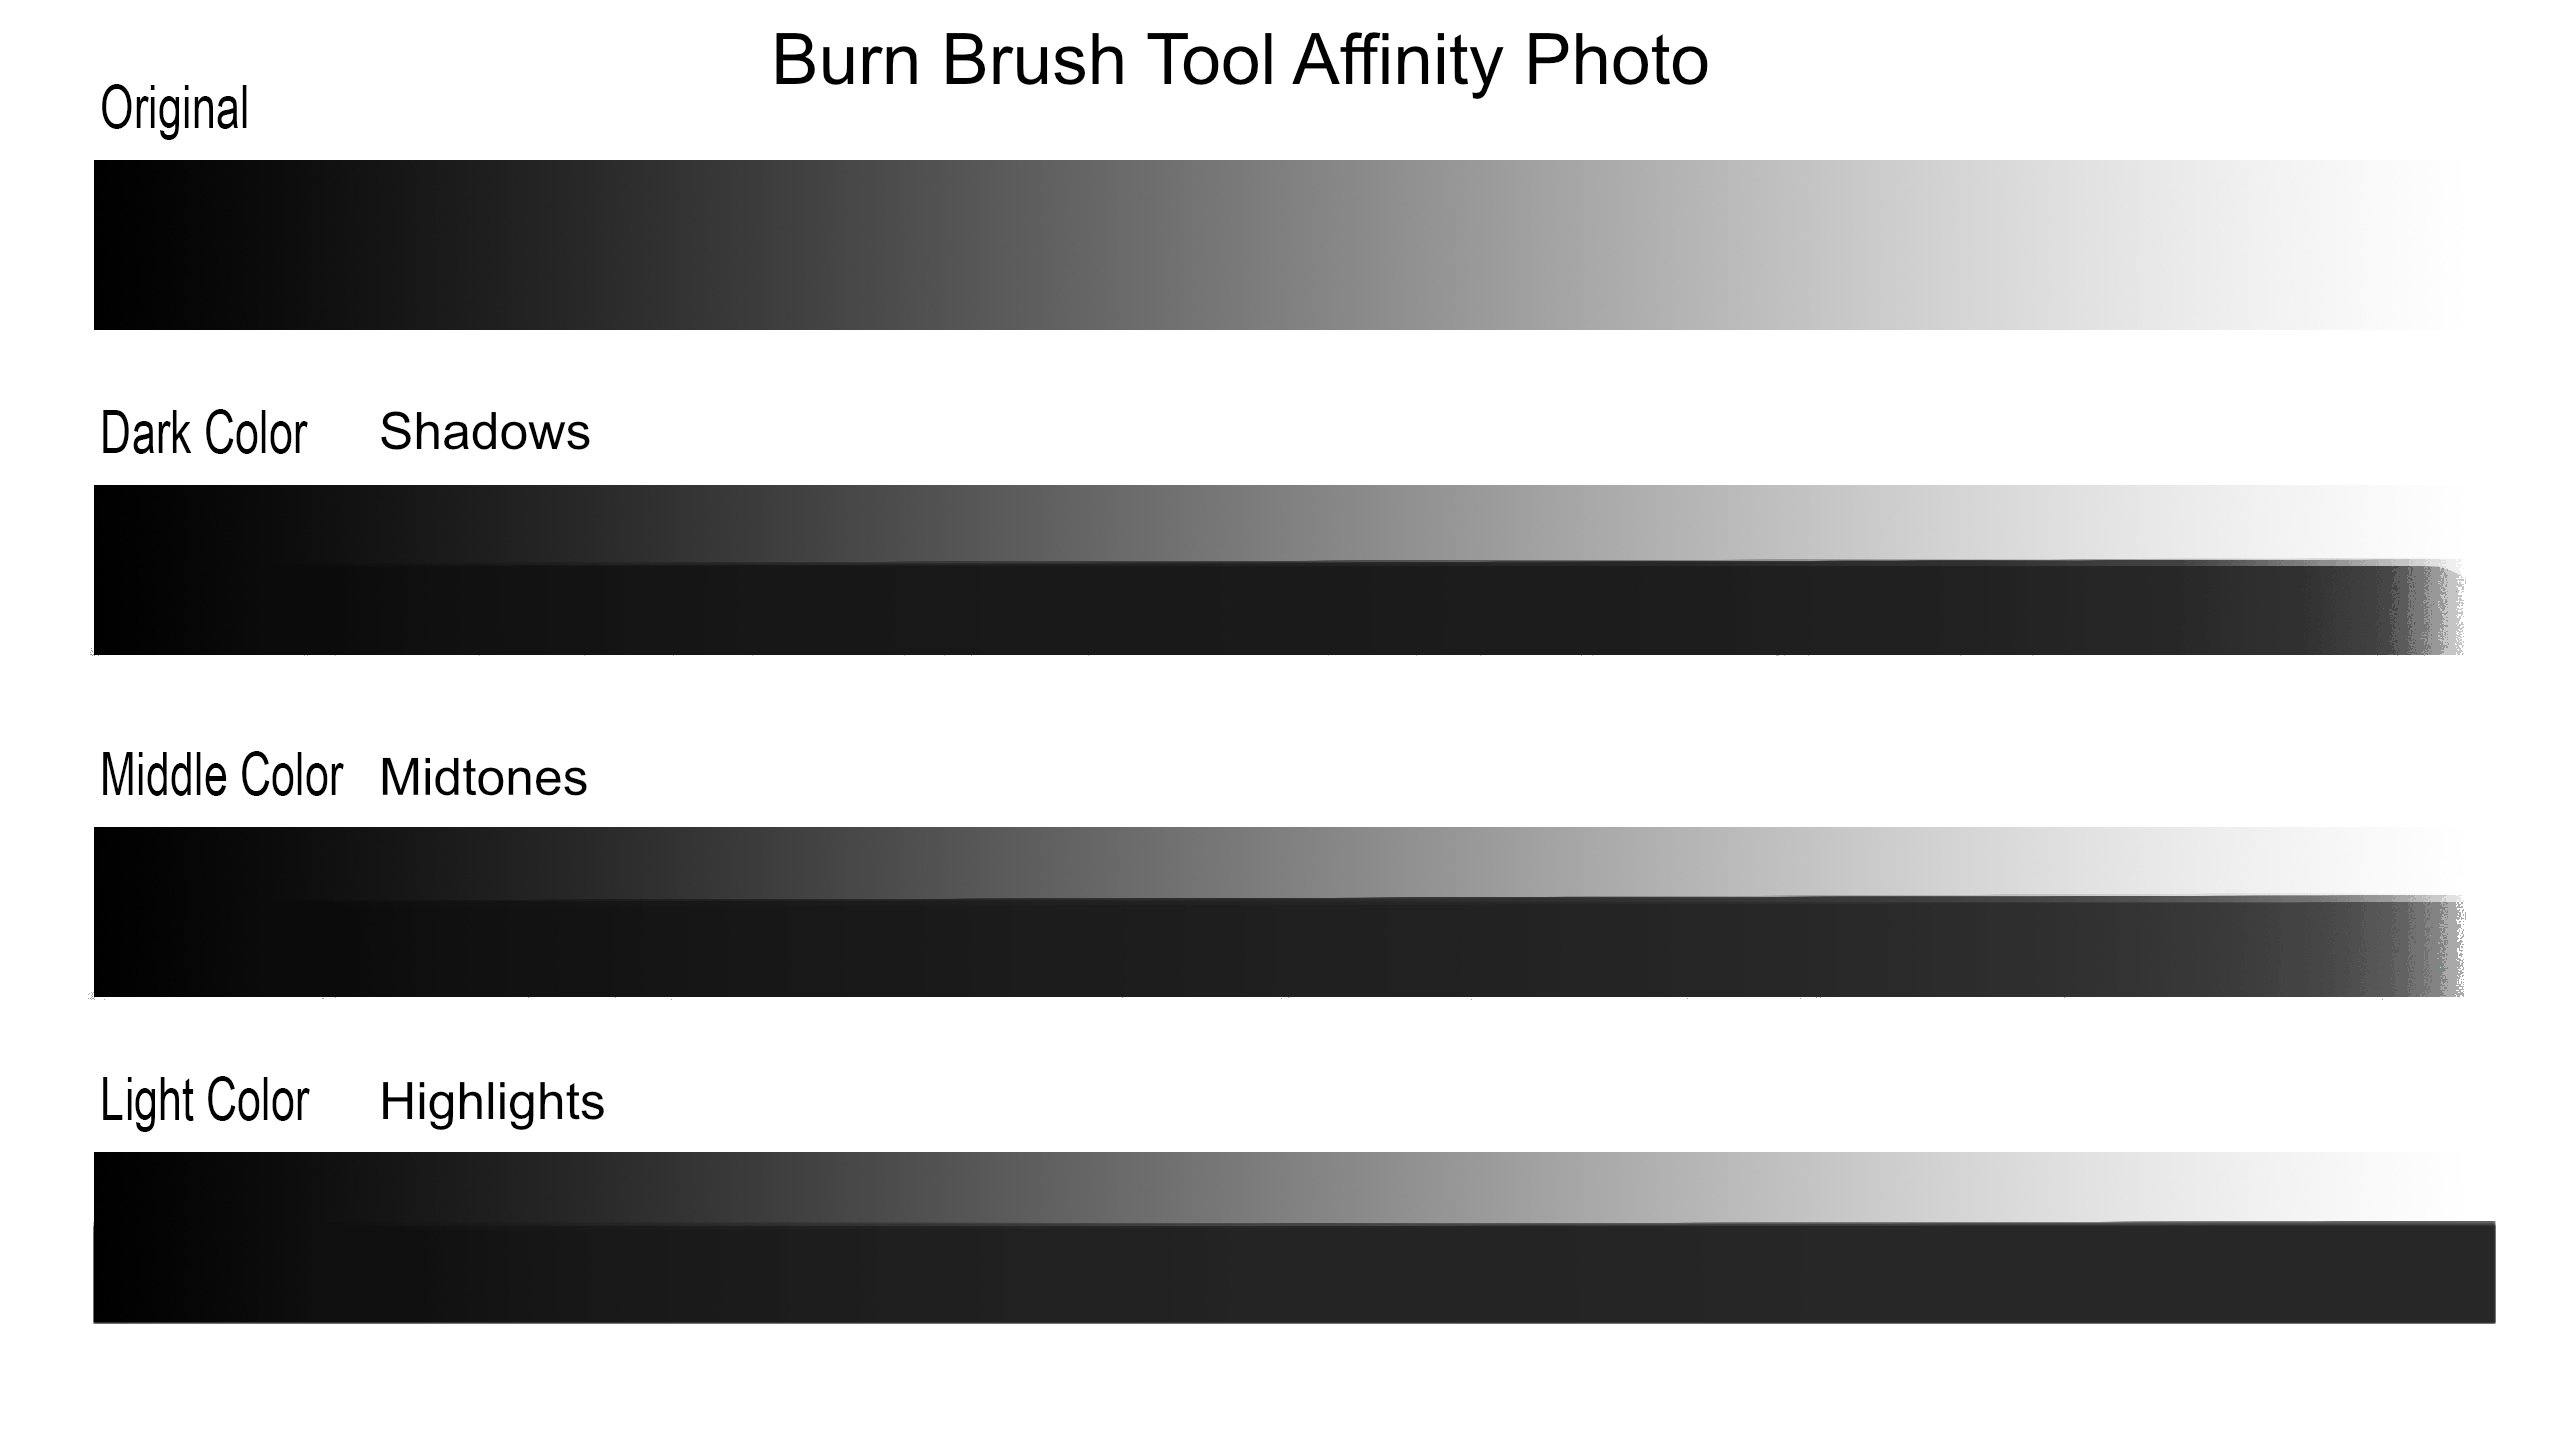
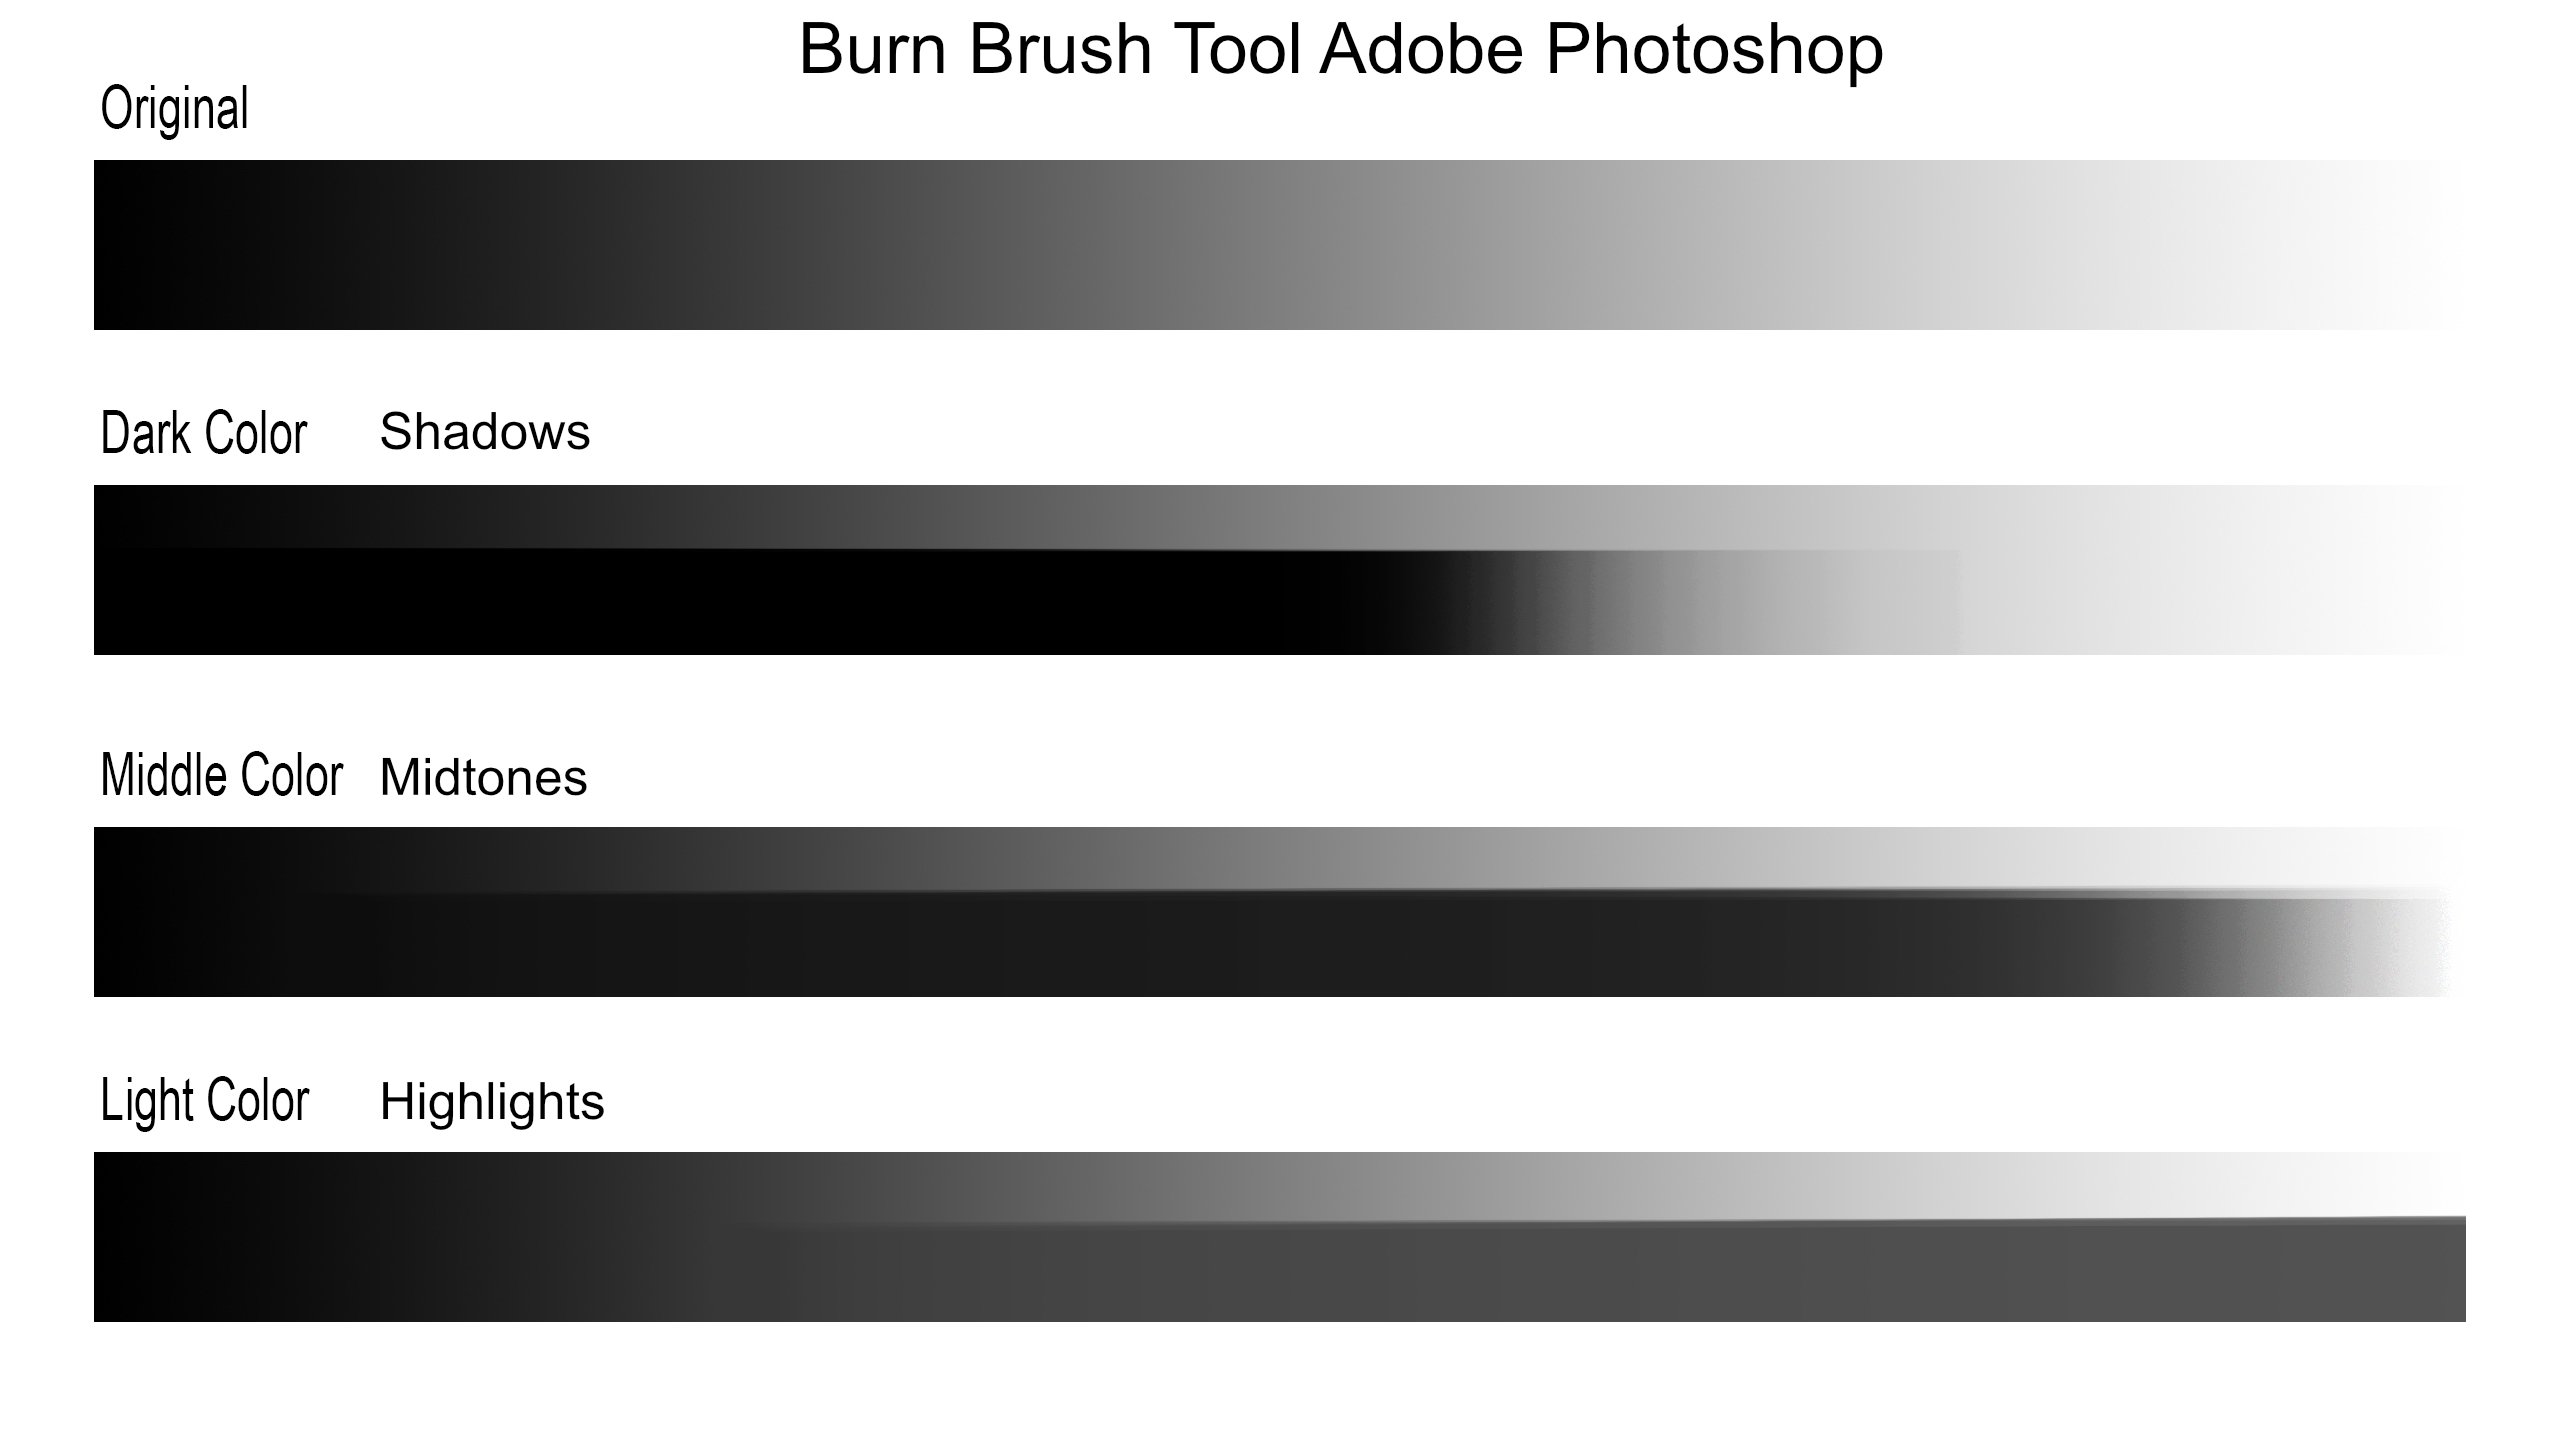
Hello Affinity Team,
I had just tested the Burn Brush Tool and had to find that it does not work as I know it from Adobe Photoshop.
What I mean by that is that in this tool yes the possibility has the areas of shadows, midtones and the lights to choose. But when I used a course as a test, I had to realize that the tool always worked completely, which is not allowed to be.If I set up the shadow setting, only the dark shades should actually be reinforced.
For middle tones the middle and highlights only the bright shades.Then I did the same test in Photoshop and there worked as I am used to.
I hang two pictures for comparison.
So that you can do this test yourself, here my approach:1. Create black and white history.
2. Select the Burn Brush Tool and select the depths.
3. Draw this setting up to five times over the entire course of the entire course.I also conducted this process for the Midtones and highlights.
It would be great if you revised the functions again, so you get the same results as in Photoshop.
-
Hello Affinity Team,
You might be able to add a few more features, corrections and tools in the "refine" function:
1. A tool that has the opportunity to make the jobs where no changes should be made. If you have created a selection and now the refinite option opens, all edges are automatically corrected, whereby areas are also changed, these should not be changed. For this reason, such a tool would be useful.
2. A brush as in masking mode, with which I can correct the mask without edge detection the mask, especially the difficult points where the automatic is failed because of too little contrast difference (color difference of 0% - 5%) because it fail the existing tools "Background mask "," foreground "and" background ".
3. A controller for the contrast detection, with which one can be enhanced on the places where the edge of the automatic is not well recognized is being enhanced.
4. In addition, the function new level with mask would have to be revised again, because here will be automatically inserted everywhere around the selection of color areas to get a clean masking and exemption of the object.
Mostly it fits, but in places with very fine details and exemptions arise very unsightly areas, these are not created under the mask, but in visible areas and the fine details on the edge destroyed. -
Hello,
I do not know if it lies on my iPad, but I can be any numerical entries in the fields to sizes for lines and accurate sizes for the objects. Whether now with the Apple pen as well as by finger. Each time the value jumps back to the old value. Only through the sliders can be changed with me the information. Use an iPad 2020, which I had only recently purchased. App and operating system are up to date. Have read that a similar problem is also available in the desktop version.
-
-
Hello,
thank you for your answer. Of course I know that Designer is not a layout program. But in the desktop version there is this function and now I was looking for it in the tablet version.As long as I don't have Publisher available on the tablet, but want to create layouts, I use Designer as an alternative. Am actually a PC user and do not have a Mac. Want to be able to open my files on the PC as well and not work on the tablet with another layout program whose files I end up not being able to open on the PC.
Bought an iPad just to be able to work with Affinity products on the go. A laptop is too bulky for me and would then also have to take a graphics tablet in addition. Use mainly a graphics tablet for operation.
Have now saved me in the assets several text frames with different length texts, so I do not have to search for it every time online.
Hopefully there will be publishers for the tablet soon.
-
Hello Mr. Connor,
thank you for the quick reply.Yes, on the desktop version I know all the different functions to be able to create color palettes. Have been using all the programs for quite a while and know my way around quite well.
But since about two weeks I have now also acquired an iPad and therefore also Designer and Photo. But unfortunately these functions are not available there and so it's a real hassle to get all my color palettes onto the ipad. It would be really helpful if there would be the same functions on the ipad version.
I've also found that some of the features that I use a lot on the desktop version are not available on the tablet version, which limits my design work.
-
Hello,
who can tell me where I can find the command "Create palette from document"?It's bad enough that I can't import and export color palettes in the tablet version to use all my palettes on the tablet as well.
So I went to the trouble of creating all my palettes on multiple pages as color swatches, with the hope of using the above command to quickly create my color palettes.
But I can't find this command. Where is this command hidden?
Or is this command also not available?Not even the command with the color pipette and pressed Apple key works to be able to add by clicking the color field immediately in the new created color palette. This is another function that I often use in the desktop version.


QR generator and watermaking for Affinity Publisher V2
in Feedback for the Affinity V2 Suite of Products
Posted
Yes, I too would be very happy if there was a QR code and barcode generator in both Publisher and Designer. I always need these as vectors because I want to use them in variable sizes without losing quality. I would like to have the ability to create watermarks in Affinity Photo to protect images.
In the digital age, QR and barcodes are essential and are being used more and more frequently in advertising to obtain further information about products and the like in digital form.