

Lefteyeshooter
-
Posts
25 -
Joined
-
Last visited
Reputation Activity
-

 Lefteyeshooter got a reaction from zpuskas in Macro for inverted color infrared simulation
Recently migrated to Affinity Photo and I found an interesting tutorial for infrared. I decided to turn it into a macro (in fact, my first macro with APh). You can download it here: Ivans Infrared Macro.afmacro
Here are two results:
This is the original video tutorial:
-
 Lefteyeshooter reacted to Helmar in HOW TO: Book editing in Affinity Publisher
Hi,
this is a 12min video how I am blasting through the styling of a book in Affinity Publisher. I want to show you how easy it is to even edit mulit-hundred pages long books. I never thought it would be such a "blast" until I did it - as you can see in the video.
My suggestion if you come from Indesign or if you start with just plain text.
Set up your text styles first. Use the first chapter for it until you are happy - unless you already have a ready-made layout. Assign keyboard shortcuts where necessary. Set up your master pages, too. Don't apply them yet. Use a "running page" master page as your first page, because if you auto-add new pages (Shift-Option-Cmd Click), it will take the current master page as a template. Apply your special master pages for new chapters etc only after your text is formatted properly and flowing beautifully. Otherwise it will mess up your page layout. Apply sections last, too. So if you are afraid of throwing a 300-odd page book at Affinity Publisher, fear no more! If you do your homework (see above) first, the final formatting is a piece of cake.
Cheers,
Helmar
[Note: This is a not a polished video. It's just to share my joy of editing in AFP compared to InDesign. ]
Screen_Recording_2020-03-17_at_11_58_43.mov
-

 Lefteyeshooter got a reaction from BiffBrown in Create a basic cyanotype image using a gradient map
Based on the two video tutorials, I made my first platinum palladium simulation (with border).
-
Lefteyeshooter got a reaction from BiffBrown in Create a basic cyanotype image using a gradient map
Great tutorial! Motivates me to start experimenting myself!
I also found this video very interesting because it shows how to add a border:
-
 Lefteyeshooter got a reaction from MartinB78 in HaldCLUT LUTs for Affinity
Thank you so much. I know these from Rawhtherapee (on my Ubuntu laptop), and I really like them. Very nice to have access to them in APh aswell!
-
 Lefteyeshooter got a reaction from Uncle Mez in Linux Support
Some years ago, I gave Linux a go and that was exactly my feeling. I couldn't even get wifi to work.
Now, anno 2018, I'm a big fan.
I installed Ubuntu Studio on several HP Probook laptops, it takes about 15 minutes, and everything works out of the box. Studio comes with all the typical open source graphical programmes pre installed (The Gimp, Darktable, RawTherapee etc). And many others.
Rather than cursing it, you should give it a try.
-
 Lefteyeshooter got a reaction from Przemysław in Macro for inverted color infrared simulation
Recently migrated to Affinity Photo and I found an interesting tutorial for infrared. I decided to turn it into a macro (in fact, my first macro with APh). You can download it here: Ivans Infrared Macro.afmacro
Here are two results:
This is the original video tutorial:
-
 Lefteyeshooter got a reaction from MartinL in Woodland photography
This really good video is about woodland photography and spec. fungi.
-
 Lefteyeshooter got a reaction from LostInTranslation in Macro for inverted color infrared simulation
Recently migrated to Affinity Photo and I found an interesting tutorial for infrared. I decided to turn it into a macro (in fact, my first macro with APh). You can download it here: Ivans Infrared Macro.afmacro
Here are two results:
This is the original video tutorial:
-
 Lefteyeshooter got a reaction from HickW in Photo changes after export to jpg
If you post a screenshot form AF here, and then also the jpg, we should be able to see what you see, right?
Perhaps you are exporting while the adjustment layers are turned off?
-
 Lefteyeshooter got a reaction from Wosven in Woodland photography
This really good video is about woodland photography and spec. fungi.
-
Lefteyeshooter got a reaction from MartinL in Woodland photography
This was natural light only indeed. I was very lucky with the light that day. In fact, the Nikon V1 doesn't even have a built in fill flash. As for the old knees... for me the lower back is a problem. I wouldn't think of digging a 1m deep hole for a picture! A camera with a tilt screen is a bonus for this type of photography and doesn't require acrobatics of yoga poses
-
Lefteyeshooter got a reaction from MartinL in Woodland photography
A friend of mine is really into nature photography. In order to get his mushroom picture, he dug a manhole of one meter deep next to a mushroom. He then could take the shot from the viewpoint below the mushroom. At the end of the day, he filled the hole, of course. But before he did that, he waited for hours until the light was just right. It took him a whole day to shoot this series, but in the end it made him win a photography contest.
When he told me about this, I got inspired and some weeks later, when I was on holiday in Spa, Belgium, I made these. I was very lucky with the light and with the natural geology of the area, which allowed me to go very low, without digging a hole in the ground. I used a very basic Nikon V1 with the 18.5mm f1.8 lens (equivalent to a standard lens). These are images straight from the camera. No work was done in post.
More shots of this trip can be seen here: https://flic.kr/s/aHsjZJSu8w
-
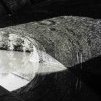 Lefteyeshooter got a reaction from Lovemonkey in Infrared (simulation)of Ypres Ramparts + canopy: macro
Recently migrated to Affinity Photo and I found an interesting tutorial for infrared.
Here are two results:
Ivans Infrared Macro.afmacro
-
 Lefteyeshooter got a reaction from unni in Woodland photography
A friend of mine is really into nature photography. In order to get his mushroom picture, he dug a manhole of one meter deep next to a mushroom. He then could take the shot from the viewpoint below the mushroom. At the end of the day, he filled the hole, of course. But before he did that, he waited for hours until the light was just right. It took him a whole day to shoot this series, but in the end it made him win a photography contest.
When he told me about this, I got inspired and some weeks later, when I was on holiday in Spa, Belgium, I made these. I was very lucky with the light and with the natural geology of the area, which allowed me to go very low, without digging a hole in the ground. I used a very basic Nikon V1 with the 18.5mm f1.8 lens (equivalent to a standard lens). These are images straight from the camera. No work was done in post.
More shots of this trip can be seen here: https://flic.kr/s/aHsjZJSu8w
-
 Lefteyeshooter got a reaction from lepr in Woodland photography
A friend of mine is really into nature photography. In order to get his mushroom picture, he dug a manhole of one meter deep next to a mushroom. He then could take the shot from the viewpoint below the mushroom. At the end of the day, he filled the hole, of course. But before he did that, he waited for hours until the light was just right. It took him a whole day to shoot this series, but in the end it made him win a photography contest.
When he told me about this, I got inspired and some weeks later, when I was on holiday in Spa, Belgium, I made these. I was very lucky with the light and with the natural geology of the area, which allowed me to go very low, without digging a hole in the ground. I used a very basic Nikon V1 with the 18.5mm f1.8 lens (equivalent to a standard lens). These are images straight from the camera. No work was done in post.
More shots of this trip can be seen here: https://flic.kr/s/aHsjZJSu8w
-
Lefteyeshooter reacted to unni in Woodland photography
The scene is good. After watching for a couple of minutes,i felt : going closer, lowering view angle some more vertically, using larger aperture f2.8 or so, using 50 to 100 mm focal length . This is to get more details of fungus, more background blur. Decreasing ratio of subject foreground to background distance increases background blur more than obtained from aperture. In processing, I would have sharpened with unsharp / high pass for small details and then clarity filter also for emphasis of larger details on the fungus, reduce green color. some stone or wooden log ,I would use to support camera. Would have also attempted to use on camera flash by covering it with paper or so for fill below the fungus. Well, this is just one of many view points . I have noted with myself that many ideas do not come to mind when in the field due to lack of time but as I take more and more pictures, the judgement at field is improving. I take lesser shots of a scene now but think more on how the end result will be, what processing flow will be used, etc. Earlier,i used to click just like that with the scene over attracting the mind but after coming home the picture looks ordinary and editing was not able to bring the desired effect. Being a hobbyist with poor artistic sense and more technical interest, my ideas and suggestions will lack correctness and efficiency !
-
 Lefteyeshooter got a reaction from John Rostron in Woodland photography
A friend of mine is really into nature photography. In order to get his mushroom picture, he dug a manhole of one meter deep next to a mushroom. He then could take the shot from the viewpoint below the mushroom. At the end of the day, he filled the hole, of course. But before he did that, he waited for hours until the light was just right. It took him a whole day to shoot this series, but in the end it made him win a photography contest.
When he told me about this, I got inspired and some weeks later, when I was on holiday in Spa, Belgium, I made these. I was very lucky with the light and with the natural geology of the area, which allowed me to go very low, without digging a hole in the ground. I used a very basic Nikon V1 with the 18.5mm f1.8 lens (equivalent to a standard lens). These are images straight from the camera. No work was done in post.
More shots of this trip can be seen here: https://flic.kr/s/aHsjZJSu8w
-
Lefteyeshooter got a reaction from Wosven in Woodland photography
A friend of mine is really into nature photography. In order to get his mushroom picture, he dug a manhole of one meter deep next to a mushroom. He then could take the shot from the viewpoint below the mushroom. At the end of the day, he filled the hole, of course. But before he did that, he waited for hours until the light was just right. It took him a whole day to shoot this series, but in the end it made him win a photography contest.
When he told me about this, I got inspired and some weeks later, when I was on holiday in Spa, Belgium, I made these. I was very lucky with the light and with the natural geology of the area, which allowed me to go very low, without digging a hole in the ground. I used a very basic Nikon V1 with the 18.5mm f1.8 lens (equivalent to a standard lens). These are images straight from the camera. No work was done in post.
More shots of this trip can be seen here: https://flic.kr/s/aHsjZJSu8w