Eugene Tyson
-
Posts
156 -
Joined
-
Last visited
Everything posted by Eugene Tyson
-
Graphics within text
Eugene Tyson replied to Sabine 108's topic in Feedback for Affinity Publisher V1 on Desktop
Anchored objects are not supported in the Beta - I don't know if or when they will be added.- 1 reply
-
- 1
-

-
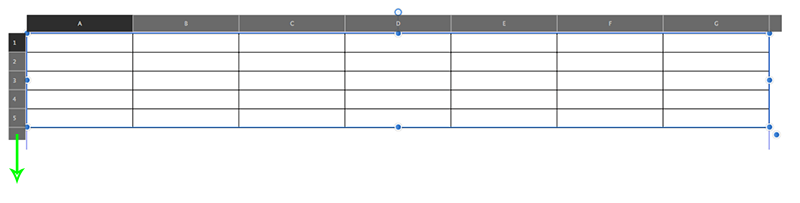
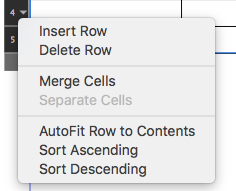
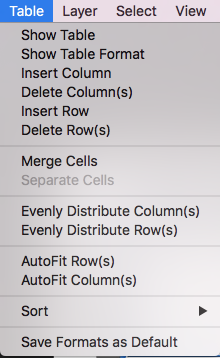
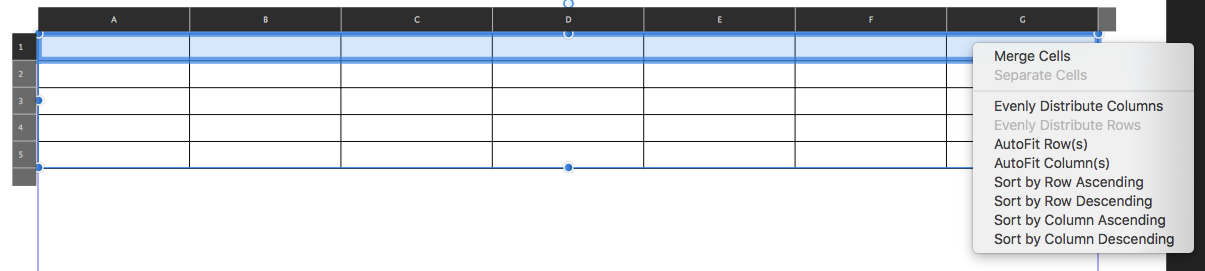
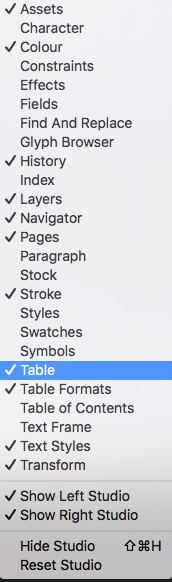
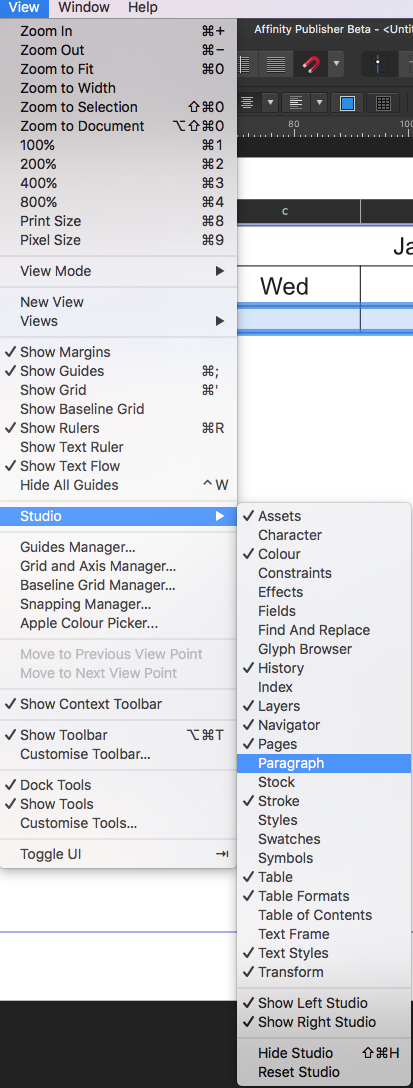
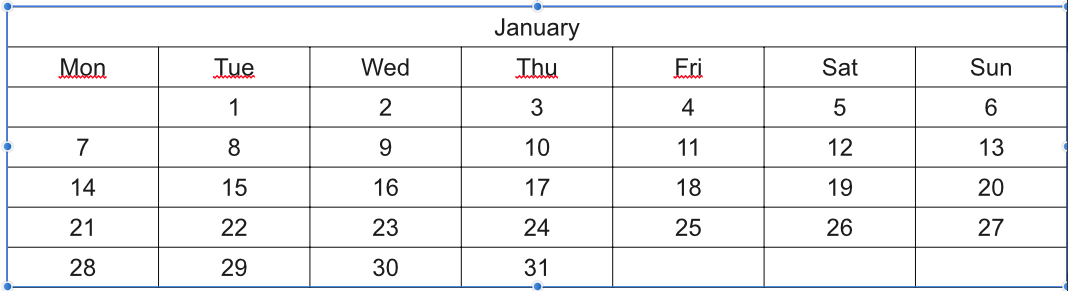
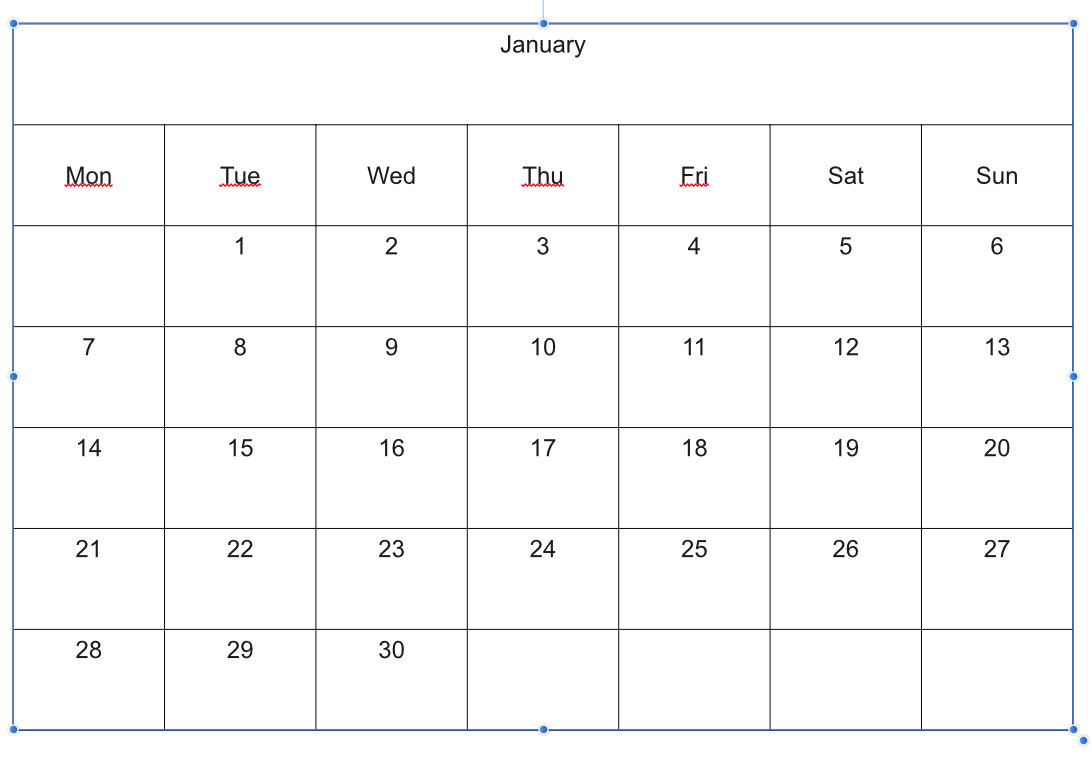
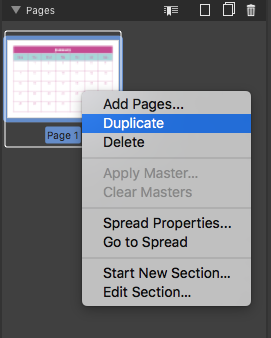
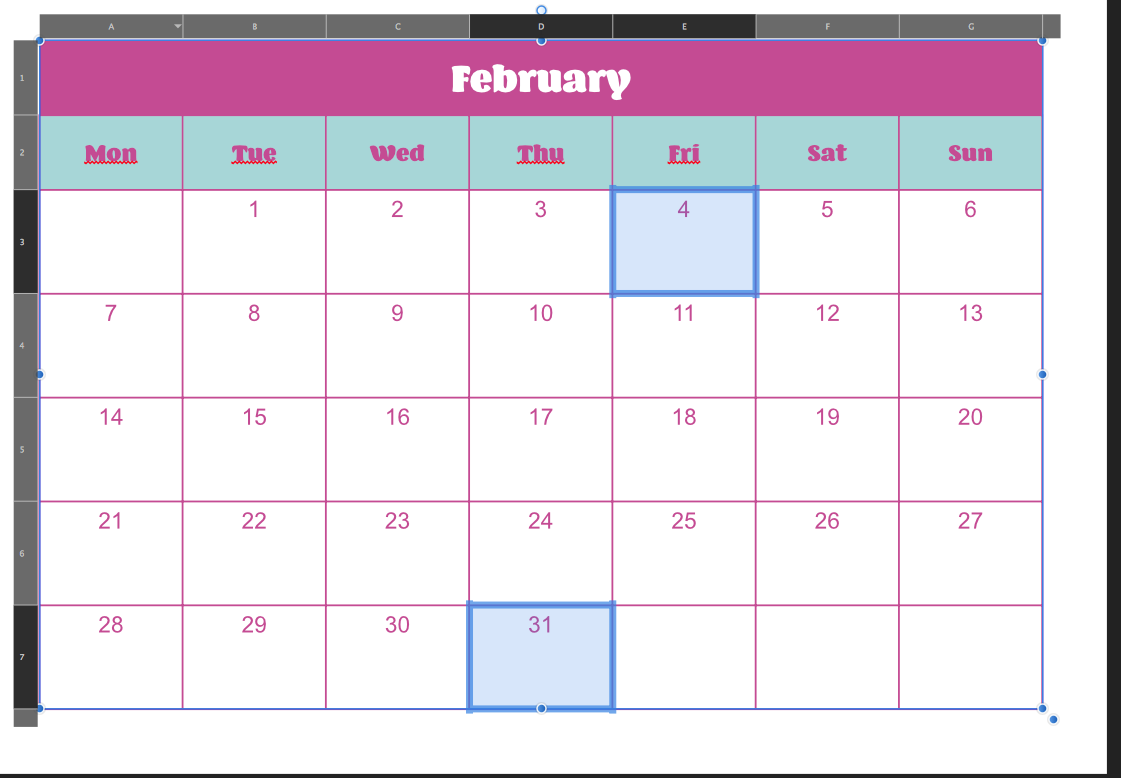
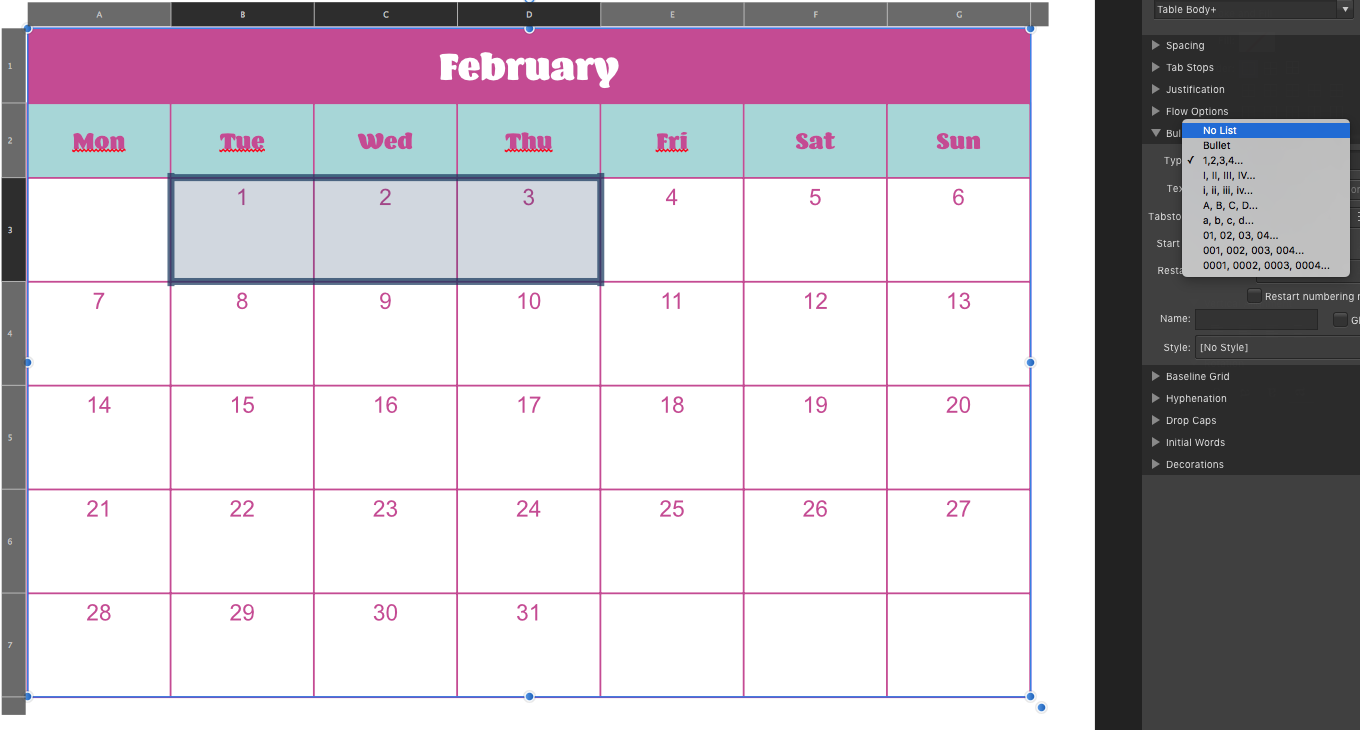
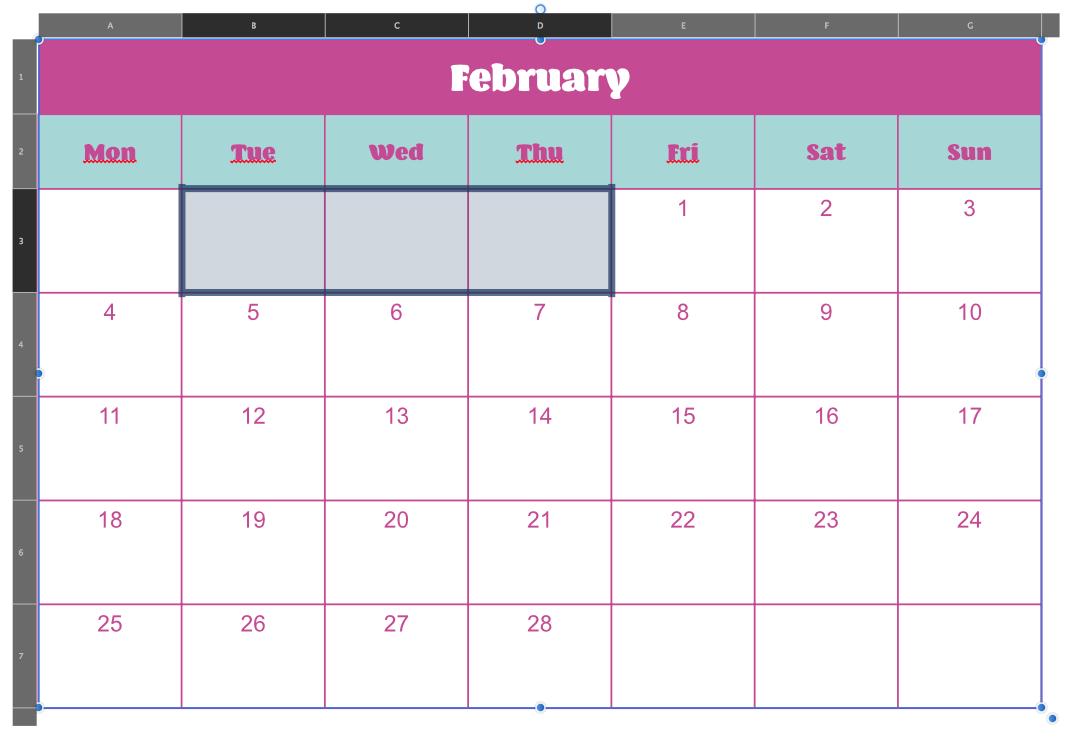
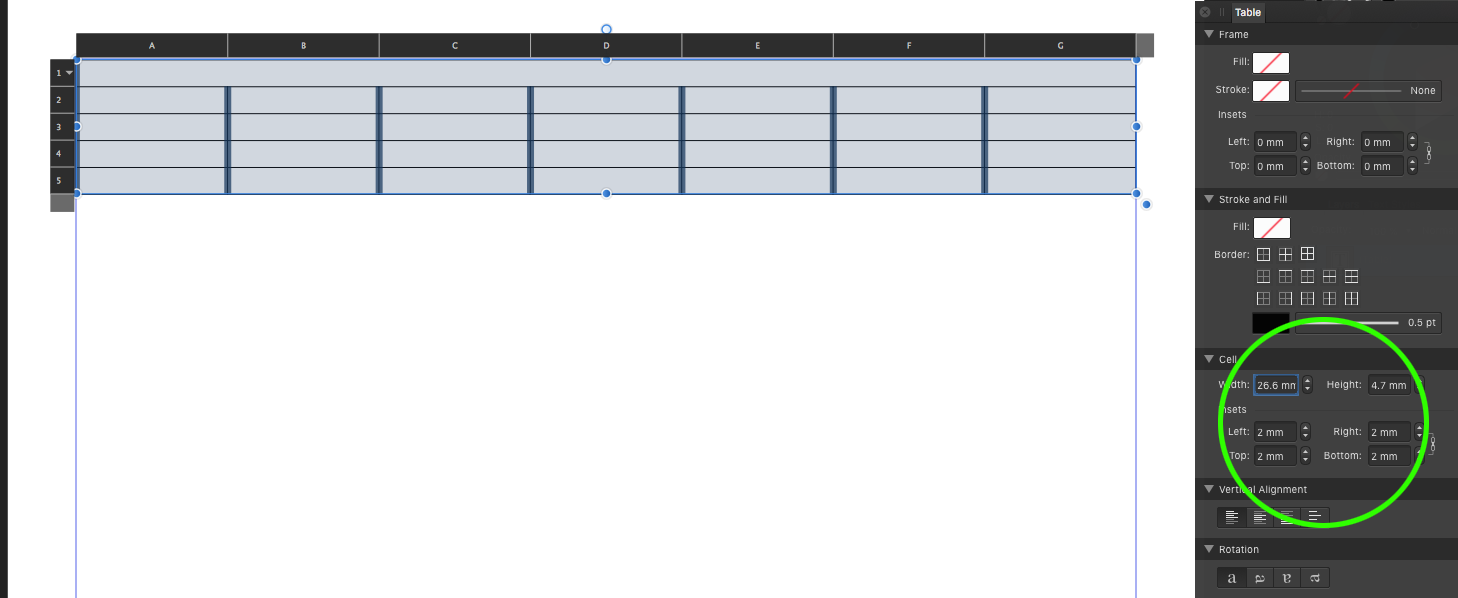
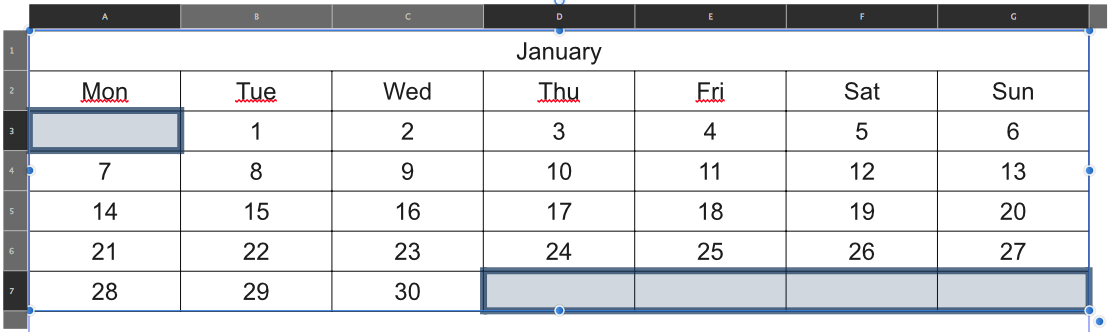
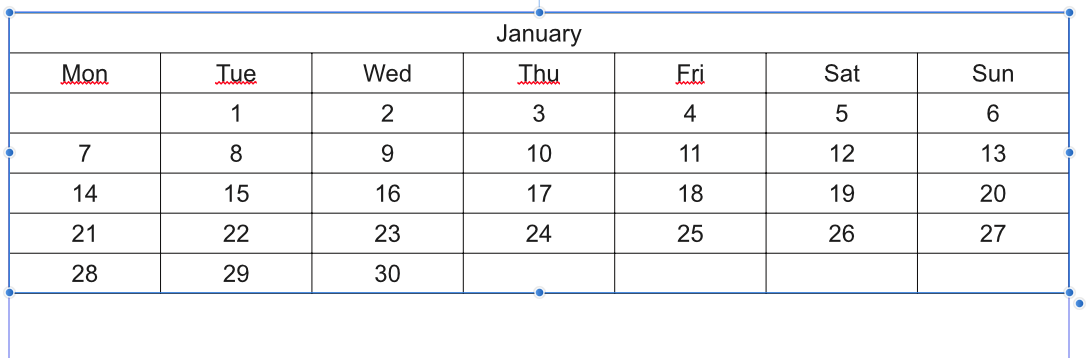
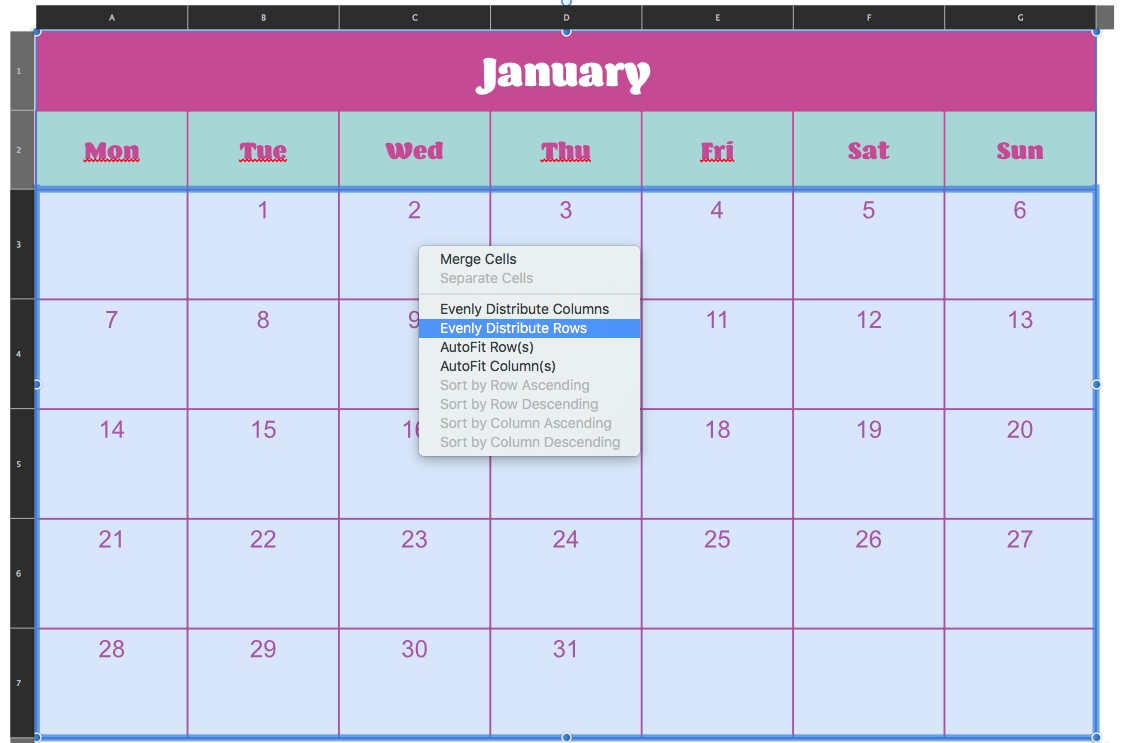
Someone suggested I put this here - posted in the Affinity Publisher Forum - See the link above for additional comments Post from link is copy and pasted below: I'm going to use a Calendar as a way of showing a few useful features I found out - and some suggestions.Firstly, dragging out a table is great! Select the Table icon in the tool bar, select the Snapping tool to get it to snap to the margins, and simply Drag Out the table - you will see it gives dimensions - rows and column counts too! Pretty cool!There are only a few modifier keys available. A modifier key is when you are using the mouse to move/alter something and press a key on the keyboard to get it to behave a different way. Shift = constrains proportions CMD = sizes from the centre point where you clicked on the screen What I think is missing is a modifier key to allow the amount of rows and columns - simple arrow keys could add and remove rows and columns would be super useful! For this calendar - I only want the First 3 rows to appear. Month - Days - DatesI draw out the table and let go of the mouse and low and behold - I have 7 (that was lucky) columns and 3 rows, as I only dragged down that far. The added feature that's pretty cool!With the Table tool still selected - you can drag down the table from the tab as indicated. Or similarly - on the right hand side, grab the tab and drag to add more columns!You can slide them up and down or left and rigth until you have the desired amount of columns or rows. However, once you have made your decision - you cannot remove the rows/columns by dragging them back up. I presume this is to prevent deleting information accidentally, however, if the cells are empty I don't see why this can't be done If you want to remove the column/row you can select it and right click and choose Delete RowHowever if you have more than one row/column selected you cannot choose to Delete Rows! No option to Delete Rows To delete more than one Row/Column you have to use the Table menu and choose "Delete Rows" or "Delete Columns" Onto the calendar!Select the top row and right click and choose Merge Cells View>Studio>Table (I believe this menu and sub menus are subject to change) Select your table and add some "Insets" so the text doesn't butt up against the cell wall - this is optional and you can adjust to how you like. Very important to ensure you're on the CELLS portion - there is an option for the FRAME - which is above in the screenshot of the Table Panel, this is relating to the Frame the table sits in and not the Table Properties.That's a bit confusing becuase you'd expect the Table options to the forefront of the options, however, not a major issue! In fact it's all optional - I'm leaving mine plain because I want to show another feature.Insert the Month top row - days on the 2nd row - and leave the 3rd row blank.Select the entire 3rd row and go to View>Studio>Paragraph Expand the Bullets and Numbering List! Choose 1. 2. 3. 4. Change the text section to read as. Note - when you edit this panel option - you need to hit Return - this shouldn't be the case - if you don't hit return your changes won't be implemented. Your table should now look like this! Grab the TAB as shown before - to expand the table to add more rows. January 2019 starts on a Tuesday (any calendar will tell you that )Cool feature! You can select cells noncontiguous - that means they don't have to be beside each other. To do this - select the A3 cell - then let go of the mouse to leave it highlighted. Press the CMD key (possibly CTRL on PC) which is the "modifier key" then select the remaining cells. From the List Type in the Paragraph Panel - you can then set this to NO LIST. Your table will now automatically renumber to ensure all the days have the correct number assigned. Drag the handle down on the side of the table - to make it fill the page! Select the numbered rows - right click and select distribute rows evenly Duplicate your page Rename Month to February January ended on a Thursday - so February starts on a Friday and February 2018 has 28 days. Select the first 3 days - and set the Paragraph Numbering to No List Voila! February is Done! Add your icons! Now you can repeat the steps to make the remaining calendar months! Download the file here https://www.dropbox.com/s/jrww5ta141zzck3/Calendar.afpub?dl=0

-
Didn't know there was such a thing! Please do @Patrick Connor if possible! Cheers!
-
Made a master page with a box drawn for the bleed - hoping to snap to items to this as a faux-bleed guide in the layouts. However, it's not showing on the canvas area in the pages. File is here - not sure if I have done something incorrectly - if it's a bug - or if it's a setting I'm missing? I have it setup as a spot colour - hoping to eliminate the spot colour after exporting PDF. https://www.dropbox.com/s/irzlgh8mpr8d2z6/Untitled.afpub?dl=0 It was only a test to see if it could be done.
-
Thanks! Yes - I was going to get into the Table Styles but the post was quite long as it is. Table Styles are definitely 100% the way to go!
-
Thanks! @GaseousClay Yes a lot of people insert the dates manually - which leaves room for errors. If you automatically number the cells using Numbering in the Paragraph panels, you can avoid costly mistakes! It's virtually impossible to make a mistake, unless you start on the wrong day! As a sidenote: in my youth I designed a comic book called Gaseous Clay, a boxer who won by farting out his opponents - needless to say it never took off - funny though that it's your username, brings back memories...
-
You can downlod the file here https://www.dropbox.com/s/jrww5ta141zzck3/Calendar.afpub?dl=0
-
I can't stop the images repeating at the end - sorry!
-
I'm going to use a Calendar as a way of showing a few useful features I found out - and some suggestions. Firstly, dragging out a table is great! Select the Table icon in the tool bar, select the Snapping tool to get it to snap to the margins, and simply Drag Out the table - you will see it gives dimensions - rows and column counts too! Pretty cool! There are only a few modifier keys available. A modifier key is when you are using the mouse to move/alter something and press a key on the keyboard to get it to behave a different way. Shift = constrains proportions CMD = sizes from the centre point where you clicked on the screen What I think is missing is a modifier key to allow the amount of rows and columns - simple arrow keys could add and remove rows and columns would be super useful! For this calendar - I only want the First 3 rows to appear. Month - Days - Dates I draw out the table and let go of the mouse and low and behold - I have 7 (that was lucky) columns and 3 rows, as I only dragged down that far. The added feature that's pretty cool! With the Table tool still selected - you can drag down the table from the tab as indicated. Or similarly - on the right hand side, grab the tab and drag to add more columns! You can slide them up and down or left and rigth until you have the desired amount of columns or rows. However, once you have made your decision - you cannot remove the rows/columns by dragging them back up. I presume this is to prevent deleting information accidentally, however, if the cells are empty I don't see why this can't be done If you want to remove the column/row you can select it and right click and choose Delete Row However if you have more than one row/column selected you cannot choose to Delete Rows! No option to Delete Rows To delete more than one Row/Column you have to use the Table menu and choose "Delete Rows" or "Delete Columns" Onto the calendar! Select the top row and right click and choose Merge Cells View>Studio>Table (I believe this menu and sub menus are subject to change) Select your table and add some "Insets" so the text doesn't butt up against the cell wall - this is optional and you can adjust to how you like. Very important to ensure you're on the CELLS portion - there is an option for the FRAME - which is above in the screenshot of the Table Panel, this is relating to the Frame the table sits in and not the Table Properties. That's a bit confusing becuase you'd expect the Table options to the forefront of the options, however, not a major issue! In fact it's all optional - I'm leaving mine plain because I want to show another feature. Insert the Month top row - days on the 2nd row - and leave the 3rd row blank. Select the entire 3rd row and go to View>Studio>Paragraph Expand the Bullets and Numbering List! Choose 1. 2. 3. 4. Change the text section to read as. Note - when you edit this panel option - you need to hit Return - this shouldn't be the case - if you don't hit return your changes won't be implemented. Your table should now look like this! Grag the TAB as shown before - to expand the table to add more rows. January 2019 starts on a Tuesday (any calendar will tell you that ) Cool feature! You can select cells noncontiguous - that means they don't have to be beside each other. To do this - select the A3 cell - then let go of the mouse to leave it highlighted. Press the CMD key (possibly CTRL on PC) which is the "modifier key" then select the remaining cells. From the List Type in the Paragraph Panel - you can then set this to NO LIST. Your table will now automatically renumber to ensure all the days have the correct number assigned. Drag the handle down on the side of the table - to make it fill the page! Select the numbered rows - right click and select distribute rows evenly Duplicate your page Rename Month to February January ended on a Thursday - so February starts on a Friday and February 2018 has 28 days. Select the first 3 days - and set the Paragraph Numbering to No List Voila! February is Done! Add your icons! Now you can repeat the steps to make the remaining calendar months!
- 18 replies
-
- 15
-

-
-
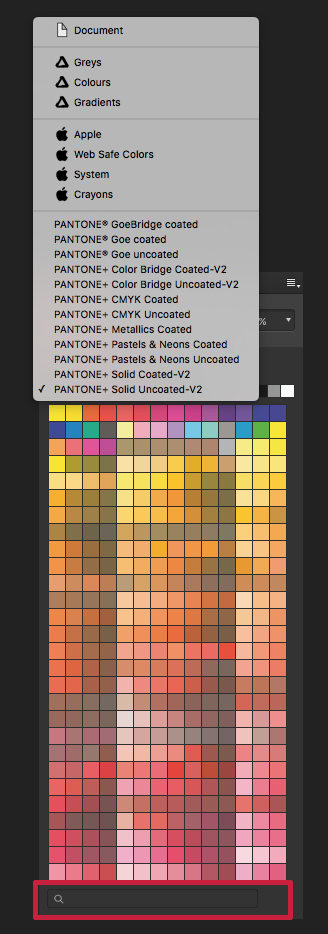
Maybe I am doing it wrong. But when I add a swatch spot colour - I have the search function. When I want to edit the swatch to assign a different spot colour. The Search Function is missing... There's also the issue of adding the Spot colour - would it make more sense for the default for adding Pantone colour to be set to "Global" by default.
-
Master Pages Suggestions
Eugene Tyson replied to Ernsti's topic in Feedback for Affinity Publisher V1 on Desktop
Totally agree, based on master pages would be a huge plus. -
Separations?
Eugene Tyson replied to Eugene Tyson's topic in Feedback for Affinity Publisher V1 on Desktop
Good to see you too MIke! Absolutely - separations preview would be very welcome indeed! Plus showing ink percentage/coverage. -
You may not use it - but I get hundreds of files who have used this - and I get files in prepress in this format all the time. I am a prepress operator, graphic designer, and typesetter of over 20 years, and I see all types of files. Most of the time we receive files, original artwork setup in spreads. It's just the way the industry has gone, at least in Ireland. I rarely get a file that is setup as an A4 with guides for a tri-fold. But then again - it's nice to have the option to set it up that way and if people are used to that, then they won't be used to doing it the old-fahsioned way! Thanks for the welcome! Appreciated! 4) Defo - first version, very impressed! These are simply my suggestions and feedback on how to make it even better! Power duplicate: I get what you're saying. Nice!
-
True - it's possible and was the way for years to create a document at full spread, column guides, and all that. For a tri-fold printing, it needs to be short on one panel or it won't fold correctly. It's very easy in InDesign, or other programmes, to set up a 3 page spread, and two pages 2mm shorter. The advantages I see are this: You get 3 pages with the margins set equally on all pages (even the shorter page) You get automatic trim fold marks on output of PDF with crop marks I also use it for the Spine of a book. 1 page A4 - 1 page at 10mm - 1 page at A4 Very easy to adjust the spine if the printer comes with a spine adjustment of say 2mm. Or page count goes dramatically up, resize the middle page to 15mm if necessary. Plus - it's easier when they are pages when asked for content, say they want the front cover as an image for social media - it's quite easy to export Page 3 of the layout - rather than cropping pages, exporting etc. It's already done with a 3 spread layout. Covers with fold outs - dust jackets etc. all easily done by adding an extra page to the side of the cover - and you can then adjust just this page to get the size of the fold out correct, or the size of the dust jacket. Yes - it can be done manually - but as a wise person once said to me - "If I'm using a computer, why am I doing it myself!" In other words - the computer should do the hard work... Anyway - I'm sure there are other uses of multi-page spreads - just my take on it. The beauty is, you can use it if you like it, or don't use it - at least you have a choice. For many people, multi-page spreads are common workflow these days. Essential - maybe not - but it takes the hard work out of it. For example, go from a 12 page concertina to a 6 page - I don't know why - client asked for it - just delete the pages. Done.
-
Ok the Place of multiple images is a bit cumbersome. 1) If you just use File>Place and select 3 images, you can't place them neatly on the page 2) Pre-setting up image frames is different the File>Place of images, as if you place an image it is not automatically inserted into a Picture Frame. If you place into a frame - it's a different process. 3) It's not neat at all - placing images into a frame. If you move the image within the frame, then resize the frame, the original size and position of the image iside the frame resets - I've tried all the settings, locked layers, image properties box and all that - nothing works. Seems buggy. 4) It's not efficient - InDesign allows you to use FIle>Place and you can create a grid of images in seconds - https://tinytutorials.wordpress.com/2010/09/30/indesign-cs5-new-feature-grid-mode-gridify/ I think this Place feature is great - with the panel on the side - the large thumbnails etc. - but I feel it could do with a few options in the Place panel that appears. Like an option to place all images at once, select 1 row to get all 3 images in a row. Or if you have 10 images - you could select to have 2 rows, which gives a grid of 2 rows x 5 columns. Or alternatively, you could want 12 images placed, and use a grid of 3 rows, giving 3 columns. Power Duplicate! That's awesome, didn't know how to do that in Publisher - looks great! Is there going to be a Panel for this, so you could choose offsets, rotation, steps etc. with a preview before committing to adding 250 objects to the page? Gap Tool I find this useless, it's a feature from InDesign - I have used InDesign since about 2004 - and Gap tool was introduced in CS5 circa 2010, 8 years ago. I think I have used it about zero times! However, a quick onscreen option to adjust gaps, alignment, align to margins, spread, page etc. would be very welcome! Or even the control panel to throw up the option when multiple items selected. It would be a very powerful feature! Pages - spreads! Definitely need to have multiple pages stepped up - vital for tri fold, gatefolds etc. to have 3 or more pages in a spread. This could also give fold marks on the exported PDF or other file formats.
-
Calendar tool
Eugene Tyson replied to jzarg's topic in Feedback for Affinity Publisher V1 on Desktop
I can show you ho to do a calendar from scratch that is sorta automatic! Let me see if it works in Publisher -
Geometry (boolean) tools
Eugene Tyson replied to Daniel Gibert's topic in [ARCHIVE] Publisher beta on macOS threads
I can confirm I am missing this too on the Mac! -
Because you need to resize frames afterwards on some occassions. Replicate the issue Draw a frame File>Place Select an image Resize the image in the frame Resize the frame. The image snaps back to the original size and position. This is undesired behaviour.
-
Yeh - same here. Place an image puts an image standalone in the app - and you can crop it just fine. Place that image into a frame - and crop it, resize it and it jumps back. Not ideal if you're placing an image into a custom shape and want to resize.
-
Shapes
Eugene Tyson replied to Eugene Tyson's topic in Feedback for Affinity Publisher V1 on Desktop
Hey - I just figured it out - just drag the opposite handle and a red line appears when it's in the correct position to the other handle. Pretty cool. Still be nice to use a modifier key to move both handles at the same time to keep the shape symmetry. -
How can I proportionally change both sides of an arrow to reflect changes on both ends? I've tried a helluvalot of modifier keys, and all the sliders in the control panel, holding down shift etc.... nothing works. Is it possible to have the change reflect on the opposite side when making changes? I know i can input the same vales, but it's easier to slide the little orange handles.
-
Separations?
Eugene Tyson replied to Eugene Tyson's topic in Feedback for Affinity Publisher V1 on Desktop
Any plans for it? -
I this in the Beta? I can't find it in the panels, may be called something else.
-
Resource Manager
Eugene Tyson replied to sportyguy209's topic in Feedback for Affinity Publisher V1 on Desktop
Just to add - "Document Resource Manager" is a very bad name for this too. Resource Manager is something I open when looking for programmes on my computer that are stalling it or not working. It's not indiciative to what it really is - which is a essentially better named to Links Manager/Embed Manager/Asset Manager/Placed Object Manager or something else more apt. -
Resource Manager
Eugene Tyson replied to sportyguy209's topic in Feedback for Affinity Publisher V1 on Desktop
Defo agree - linked by default is a must. And an open panel all the time is a must.