suizenji
-
Posts
27 -
Joined
-
Last visited
-
 thedivclass reacted to a post in a topic:
Please add a colorless icon to each border and fill.
thedivclass reacted to a post in a topic:
Please add a colorless icon to each border and fill.
-
ronnyb reacted to a post in a topic:
Please add a colorless icon to each border and fill.
-
 If you often make borders colorless in the designer, it is a hassle to switch from fill to border and press the colorless icon.If there is a button to make the border and fill colorless, you can use it without switching.
-
Rectangular Marquee Tool does not snap to the grid.V1andV2 for Photo. I've been trying to snap to a grid to divide the pics evenly, but I can't. Fix.
-
suizenji reacted to a post in a topic:
It is very confusing that formulas such as Sin do not calculate unless you put in units such as mm, pix, etc.
-
suizenji reacted to a post in a topic:
It is very confusing that formulas such as Sin do not calculate unless you put in units such as mm, pix, etc.
-
suizenji reacted to a post in a topic:
It is very confusing that formulas such as Sin do not calculate unless you put in units such as mm, pix, etc.
-
In the Transform panel, the calculation between numbers is done as it is, but functions such as sin are not calculated unless the units are entered. I am very confused. The deformation panel will calculate the numbers, but when using functions such as Cos, Sin, etc., you have to put in the units for the calculation to work. Example1: 20 + 40 → The number 60 is entered.Good!! Example2: cos(33) → The result of the calculation does not change.Bad work Example: cos(33)mm →0.8 good...but. Since you specified units such as mm, inch, px, etc. when you created the document, it is a good idea to use those units if you did not include them when you used the function. Since mm and pix are specified in the document, it would be better to be able to calculate without putting in units. Thanks
-
suizenji reacted to a post in a topic:
I wish Ctrl+Shift+M would bring up the move dialog box like in Illustrator.
-
ashf reacted to a post in a topic:
I wish Ctrl+Shift+M would bring up the move dialog box like in Illustrator.
-
If an object needs to be moved by an angle and distance, it must be calculated in the deformation panel. For example, if the x and y coordinates are (123, 456) If you need to move 10 mm in 22 degrees, you can put in the Transform panel X 123*10*cos(22) y 456-10*sin(22) If you put in the following, it will calculate it for you, but if you need to move a lot of work, it would be very useful to have a panel appear where you can move it once you specify the distance and angle. I wish Ctrl+Shift+M would bring up the move dialog box like in Illustrator.
- 1 reply
-
- 1
-
-
I have created multiple pages in Publisher and want to export only the current page, but each time the export settings default to "Area: All Pages" and it is a pain to manually set the export settings to "Area: Current Page" each time! (For example, I am managing a one-page flyer layout in Publisher, which can manage multiple pages. Therefore, when exporting, I always do only one page. (I don't need to export all pages). However, I can't even get the export settings area into the presets. It is depressing to have to change it every time. Is it possible to fix (save) the default for the area to the current page in preferences or something?
-
Even if you change the spread origin in the Guide Manager in affinity photo, the coordinate values in the Info Panel remain in the upper left corner. For example, if you change the spread origin to the center, the infopanel will still display the coordinates from the top left. The mouse coordinates in the Info Panel should be at the spread origin. thanks
-
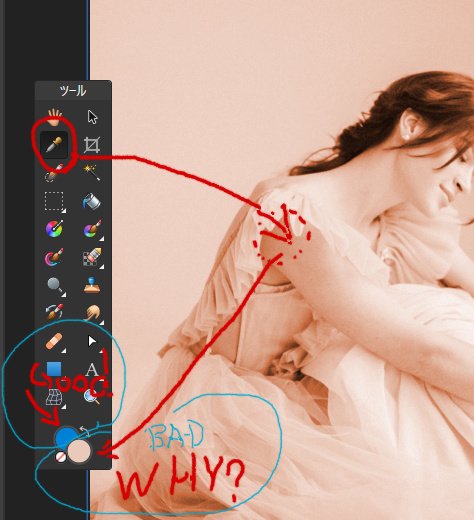
Thanks. For those who paint or process photos, if the color of the brush can be fixed to the primary color instead of the secondary color when picking up the color with the eyedropper, there will be no need to switch with Xkey.
-
Hi. If I'm painting with a brush on a pixel layer, and I switch to the eyedropper tool icon to pick up a color, the primary color changes, but I want the secondary color to change. People who draw pictures or retouch photos or begginer without using shapes will be puzzled. (Of course I know you can use ALT+CLICK to pick up the color, but this is a suggestion to improve the eyedropper tool in the tools menu.) I'm sorry my English is weird.thanks.
-
suizenji reacted to a post in a topic:
When creating a shape, it would be useful to be able to input numerical values on the fly after clicking on it.
-
suizenji reacted to a post in a topic:
When creating a shape, it would be useful to be able to input numerical values on the fly after clicking on it.
-
Zizo reacted to a post in a topic:
When creating a shape, it would be useful to be able to input numerical values on the fly after clicking on it.
-
Krustysimplex reacted to a post in a topic:
When creating a shape, it would be useful to be able to input numerical values on the fly after clicking on it.
-
suizenji changed their profile photo
-
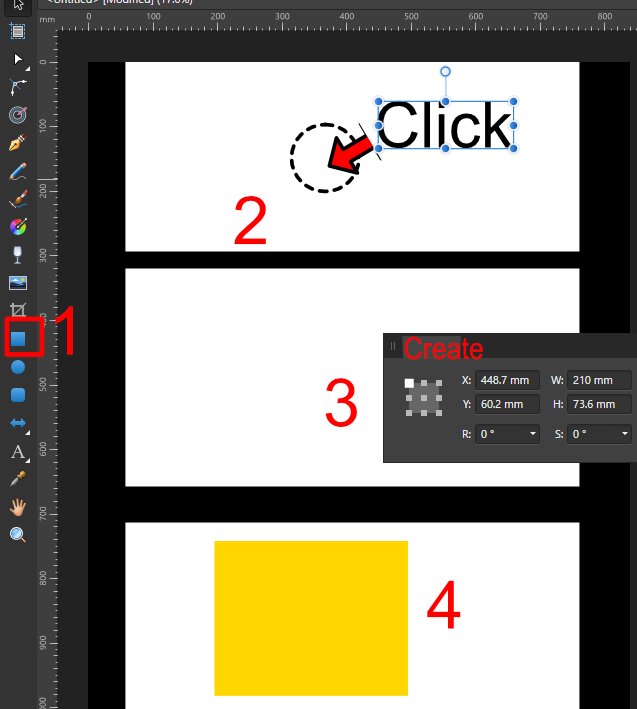
When I need to create a shape frequently in design or drafting, I currently have to drag the shape and then change the values in the Transform panel. It would be nice if a creation panel similar to the Transform panel would appear at hand when you click the mouse on the spot (without dragging) (pressing Enter would disappear as soon as the shape is created). For small amounts, you can just drag the shape and enter the values in the Transform panel after creating it, but for large amounts, it's a pain.
-
Lisbon reacted to a post in a topic:
Is there any way to divide 10X10 in slices evenly on the grid?
-
Thank you very very much.
-
 suizenji reacted to a post in a topic:
Is there any way to divide 10X10 in slices evenly on the grid?
suizenji reacted to a post in a topic:
Is there any way to divide 10X10 in slices evenly on the grid?
-
lacerto reacted to a post in a topic:
Is there any way to divide 10X10 in slices evenly on the grid?
-
Mr.v_kyr & Mr.Hens Thank you for showing me how to use this useful tool. This time, I am looking for an easy way to slice using Affinity. Mr.Lisbon Do you draw a procedual grid and then manually create slices while looking at it? It would be useful if there was a way to automatically slice based on the guide, but if there isn't, it's very difficult.
-
Mr.v_kyr I installed ImageMagick-6.9.12-Q16, but I am not good at English, so I did not know how to use the software. Anyway, thanks for the information. Mr.Lagarto Thank you very much for the very useful tutorial video. The idea is great and I like it very much. I'm going to request a Feedback for a tool to slice images into squares in batches, as it might be more useful. Thank you very much.
-
hi, This is a very useful slicing tool, but is there any way to divide it into 10X10 evenly on a grid, for example? (Even 3X3 takes a long time.) https://streamable.com/3j7ck6 https://streamable.com/0pd1rl thanks
-
sorry.I don't speak English so I can't read all of it. thanks.