Michael_
-
Posts
17 -
Joined
-
Last visited
Everything posted by Michael_
-
Added .icc profile doesn't appear in lists.
Michael_ replied to Aaron D's topic in V1 Bugs found on macOS
With the newest update 1.9.2 via the App-Store (Designer) or directly in Publisher the profiles showed up properly. -
Added .icc profile doesn't appear in lists.
Michael_ replied to Aaron D's topic in V1 Bugs found on macOS
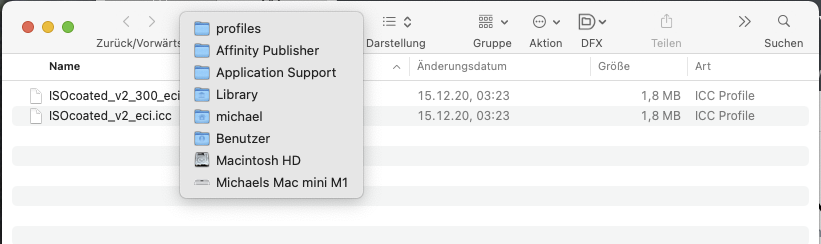
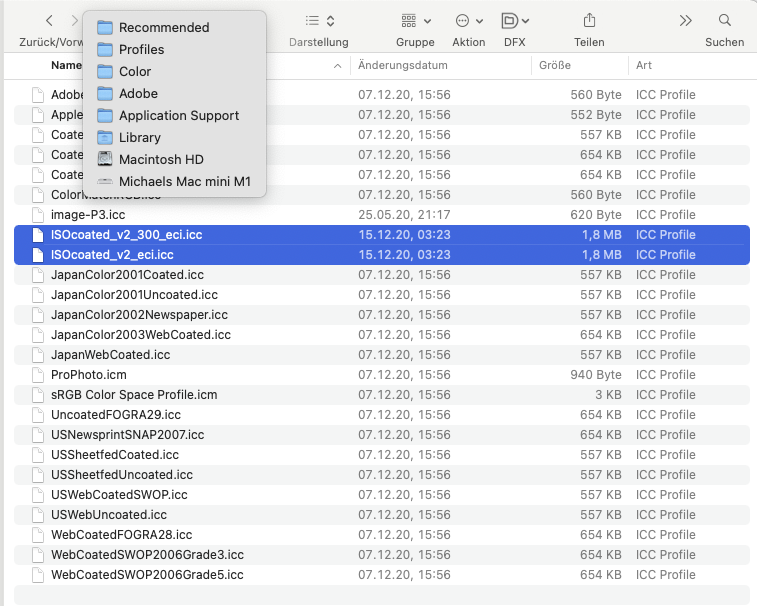
I have found a solution: When I copy the ICC-Files into the folder shown in the screenshot, the profiles are available in Publisher. All other folders are not working.
-
Added .icc profile doesn't appear in lists.
Michael_ replied to Aaron D's topic in V1 Bugs found on macOS
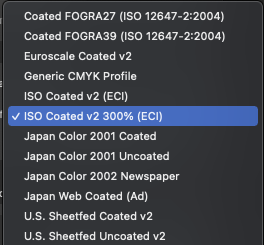
Hi thomaso, placing the profiles in the library folders works. I can choose the profiles in publisher 1.8.6 but the I can't see them in publisher 1.9.2.1014
-
Affinity Publisher Customer Beta - 1.9.2.1014
Michael_ replied to AdamW's topic in [ARCHIVE] Publisher beta on macOS threads
Thank you for your work. No I can place and update all pictures. What still does not work is house a specific ICC-Profile. I have installed them as mentioned here but the profiles are not shown in the dialog box. Kind regards Michael -
Added .icc profile doesn't appear in lists.
Michael_ replied to Aaron D's topic in V1 Bugs found on macOS
This does not work on Mac mini M1, Big Sur 11.2.3 and Publisher 1.9xxx even the actual beta 1.9.2.1014 -
Replacing a photo resets frame properties
Michael_ replied to Jeremy Bohn's topic in V1 Bugs found on macOS
I can confirm this. All images I've placed in my test-document stayed in place when I replace oder actualize them. Even a afpublisher-file I've tested works fine. It seems to me, the problem is fixed. Kind regards Michael
-
Affinity Publisher Customer Beta - 1.9.2.1006
Michael_ replied to AdamW's topic in [ARCHIVE] Publisher beta on macOS threads
I can confirm this. -
Affinity Publisher Customer Beta - 1.9.2.1006
Michael_ replied to AdamW's topic in [ARCHIVE] Publisher beta on macOS threads
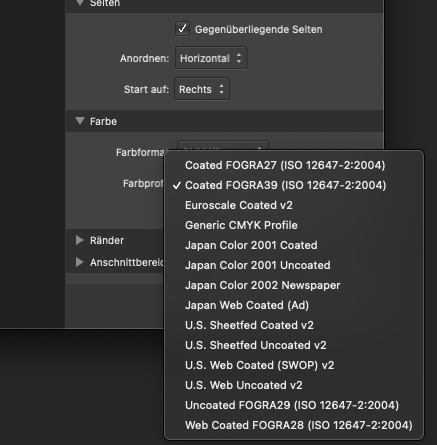
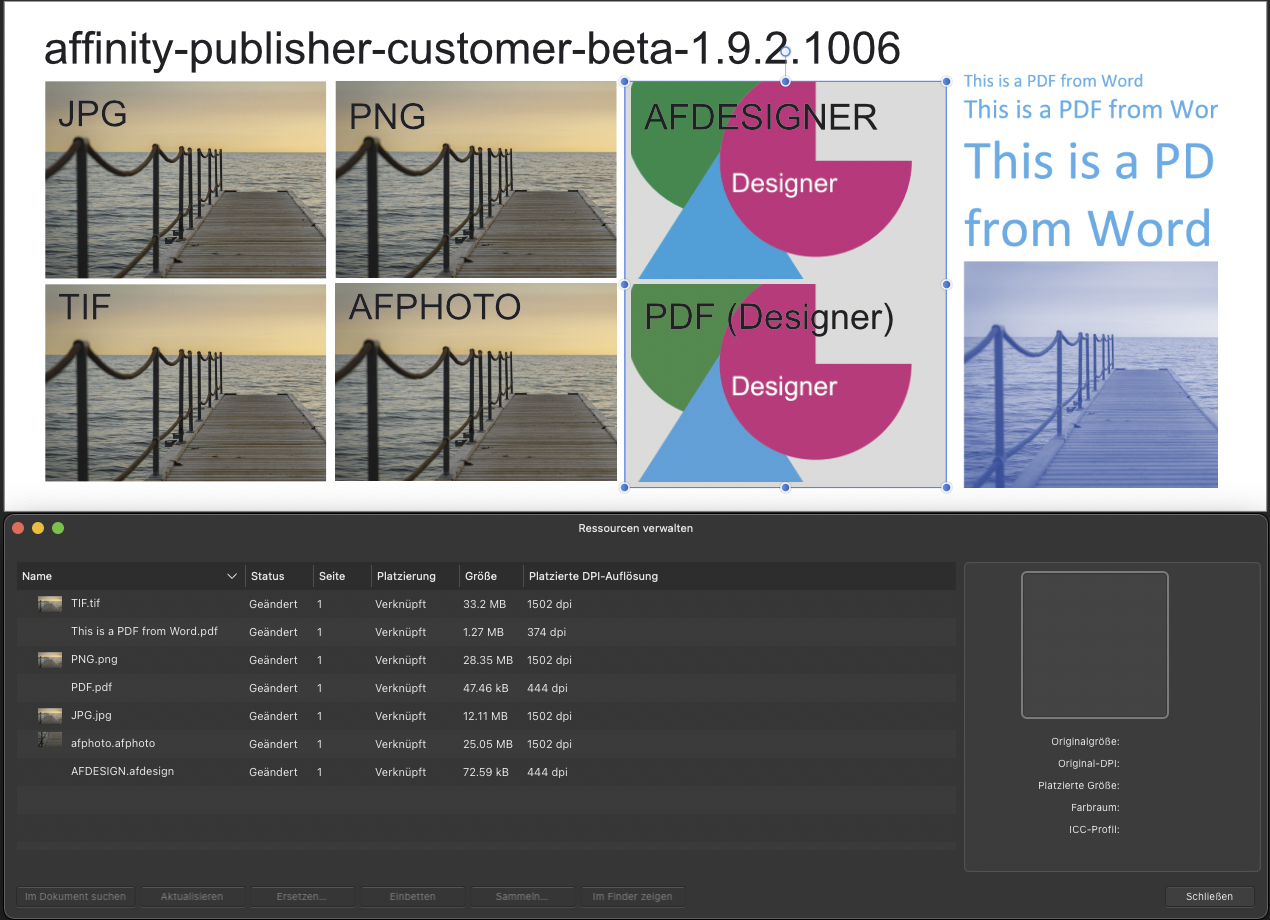
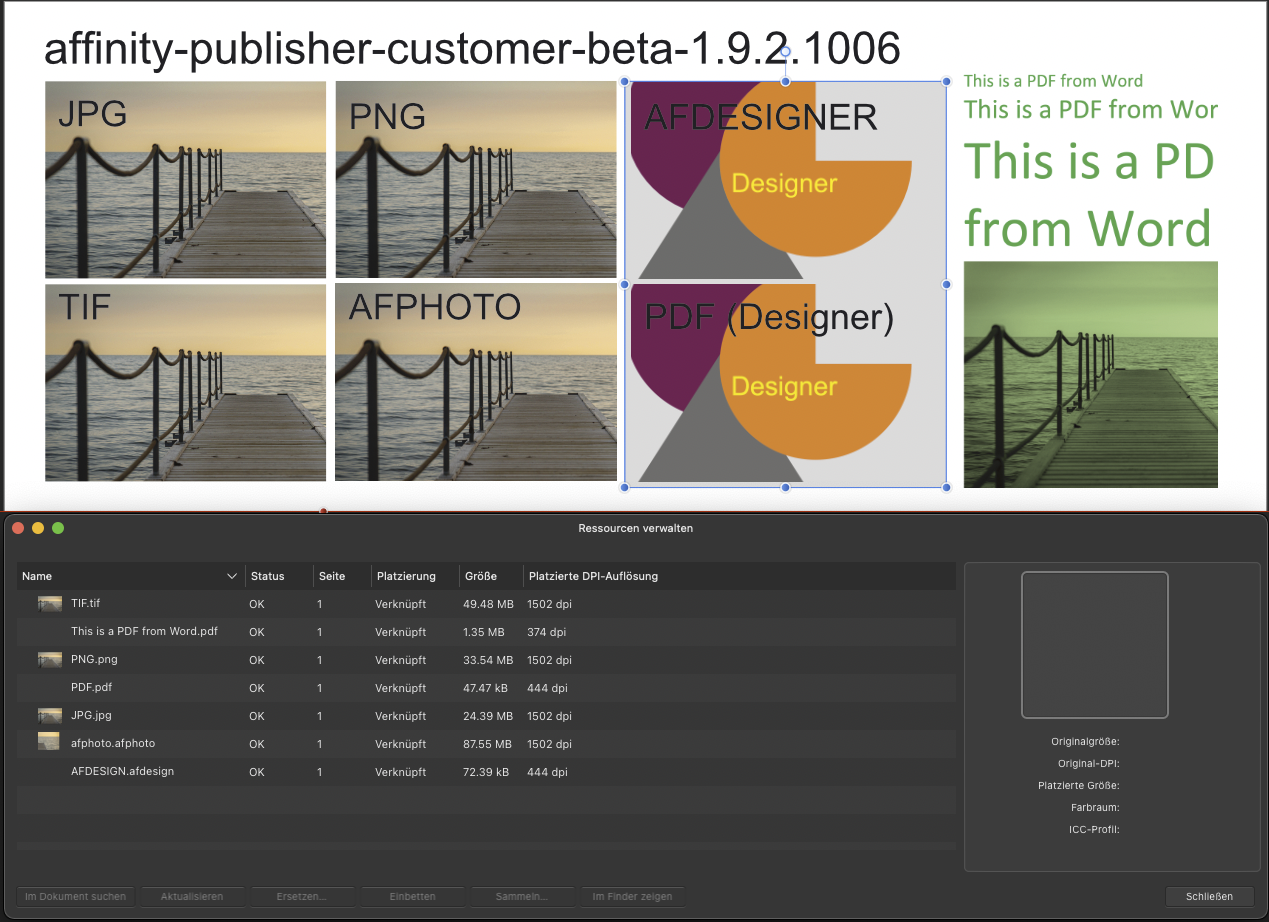
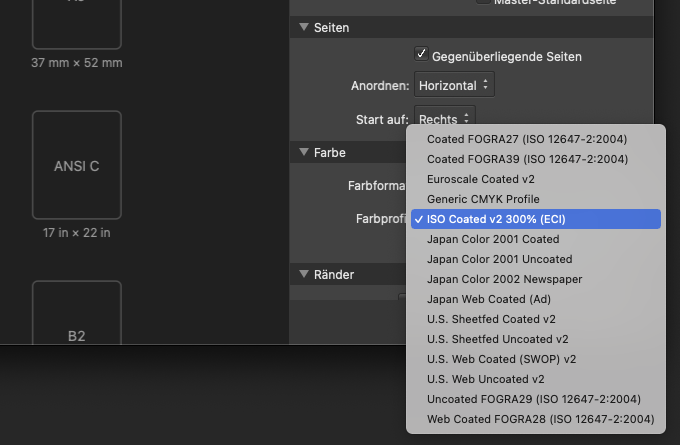
I guess the bug is nearly fixed. I placed several files in publisher, changed the files in color or color-mode and updated the links. This is what happen: JPG + TIF, both in a picture frame, scaled, free position: fine afdesign-files 1 as "linked document" scaled, no picture frame: fine 1 in a picture frame, scaled, free position: fine PDF from Designer 1 as "linked document" scaled, no picture frame: fine 1 in a picture frame, scaled, free position: fine PDF from Word 1 as "linked document" scaled, no picture frame: fine 1 in a picture frame, scaled, free position: Fail BTW: When I start a new document in publisher 1.9… I can not choose my own color profile. The dialog in publisher 1.8.6 shows my the caller ICC-Profile, 1.9 does not. I'm looking forward to a final release of Publisher 1.9xx I hope this helps. Kind regard, Michael Update: I found the solution for the missing ICC-Profile here. Neither really convenient nor the of the art. It works for designer (where the profiles are missing too) but not for the publisher beta.
-
Affinity Publisher Customer Beta - 1.9.2.998
Michael_ replied to AdamW's topic in [ARCHIVE] Publisher beta on macOS threads
This is still not working properly as you can see here: I just changed the color mode from RGB to CMYK. When I actualize the image, it remains it’s size, but not it’s position within the picture frame. In Versions 1.8.6 this works fine.
-
Replacing a photo resets frame properties
Michael_ replied to Jeremy Bohn's topic in V1 Bugs found on macOS
Hi Gabe, for me it is not "slightly worse". It is a catastrophe! Usual I am working with low-res RGB pictures when I am lay outing the pages. At the end - when the layout is confirmed - I replace all pictures with the final retouched High-Res Versions. This works fine - until now. I am so so happy, that I did not update to 1.9. until my last photobook-projekt with 180 pages and 250 pictures was ready. By now I can dump my actual project with several pages and lots of pictures an re-do all the work in Publisher 1.8, where the problem does not occur. Unfortunately there is no way to export a 1.9 .afpub file to 1.8 or something like an IDML. Good to know you’re on it and I really hope, you can fix this soon. Kind regards Michael -
Hi Dan, thank you for your answer and sorry for my late response. I've had some trouble with my Mac mini M1. I have already begun to copy all pictures to a new document because presumed, the complete file was defect. Even if I inserted the text into a new frame, the ill behavior won’t change. Unfortunately my file has 180 pages with approximately 250 picture - some kind of coffee table book from my last vacation in Denmark. Good to know that this failure is logged in. I am looking forward to a future update 😀 Kind regards Michael
-
Hi Walt, thank you for the quick response. I know the function of the two handles. The way I insert the text is: a. 1. Frame: Sample-text is formatted, I mark the text and overwrite it with plain text from the clipboard. Text is too much for the frame. Size, color etc. is OK (10.5 pt, color 100% K) b. I click on the lower right red arrow, then click an drag for an new textframe c. Text flows into the 2. frame: Alle tat in this frame is 7.9 pt, color RGB-black. If I mark all text and increase the font size manually or add an text stile, the font size in the 1. frame remains bigger as in the 2. frame. Even if I reduce the frame size: the text that flows now into the second frame becomes smaller. I create a new document. The behavior of the frames is as normally expected. When I copy a text frame from the problem-document to the new one, the text keeps its size over all frames. Is there any preference in publisher or basic setting that can cause this incorrect behavior? kind regards Michael
-
Hi, I am working with Publisher 1.8.6 on my new Mac mini M1 Big Sur. When I connect two text frames (text flows to the next frame) the fantasize changes to a smaller size and the color ist RGB instead of CMYK. I am using text stiles to format the text, but this does not help. Even if I try to adjust the fontsize manually, it remains bigger in the first and smaller in the second frame. How can I fix that? Michael
-
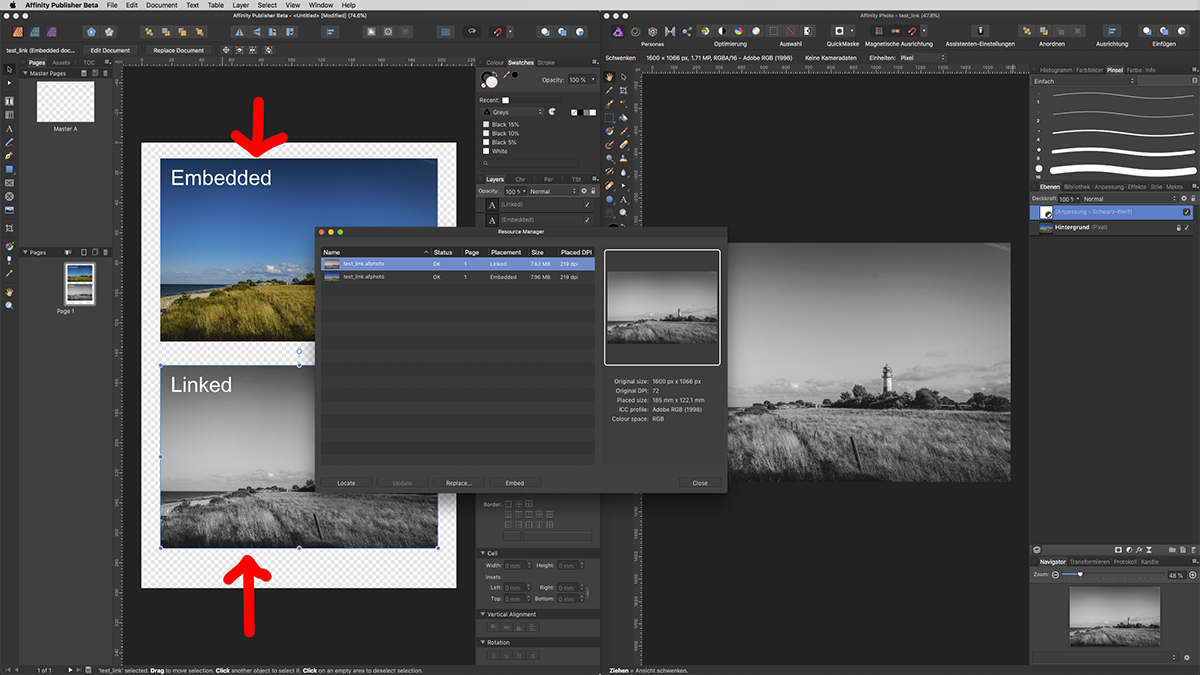
Embed vs Link
Michael_ replied to telemax's topic in Pre-V2 Archive of Affinity on Desktop Questions (macOS and Windows)
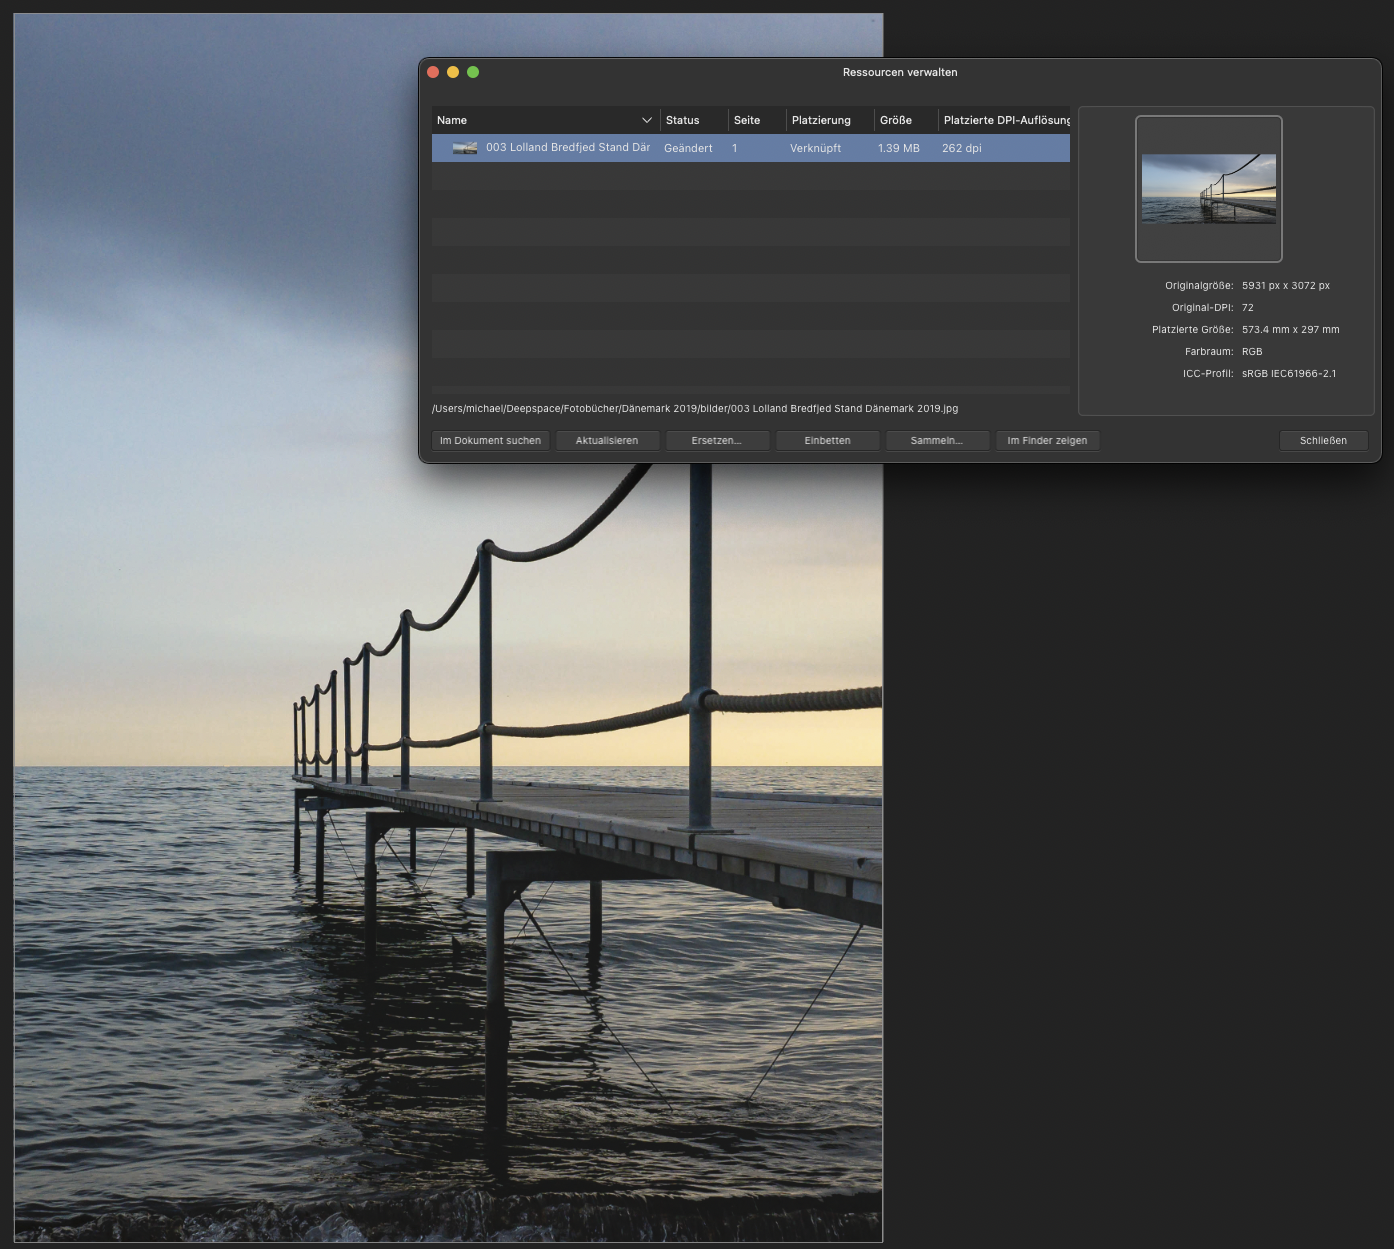
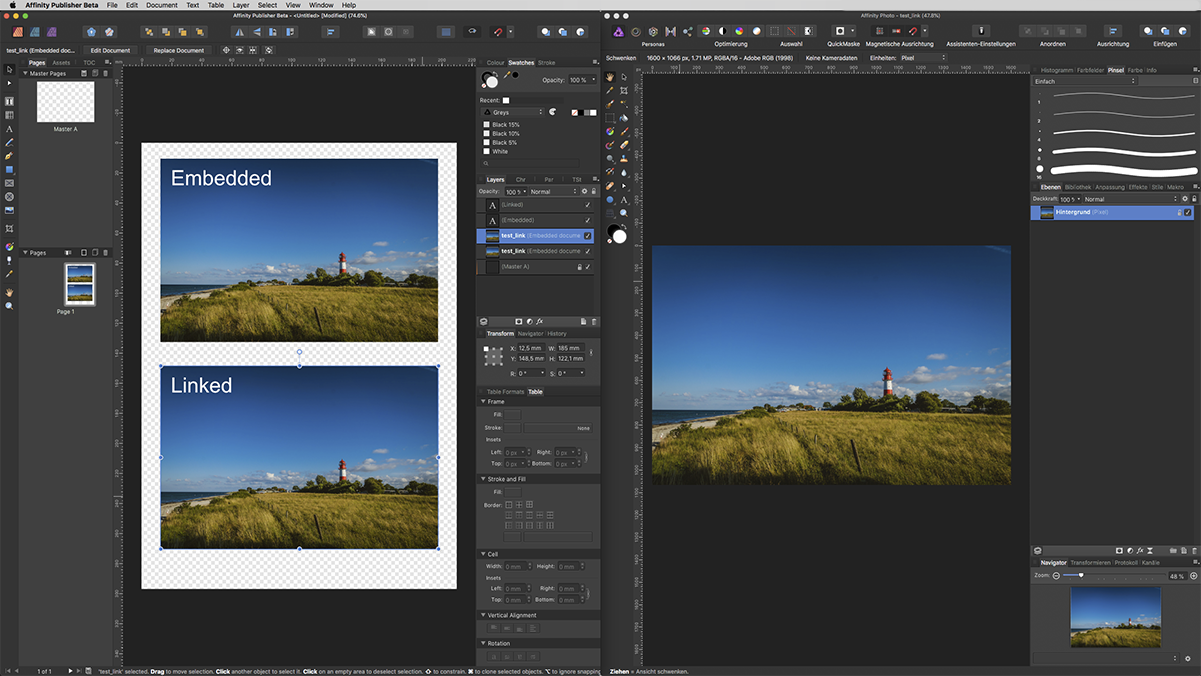
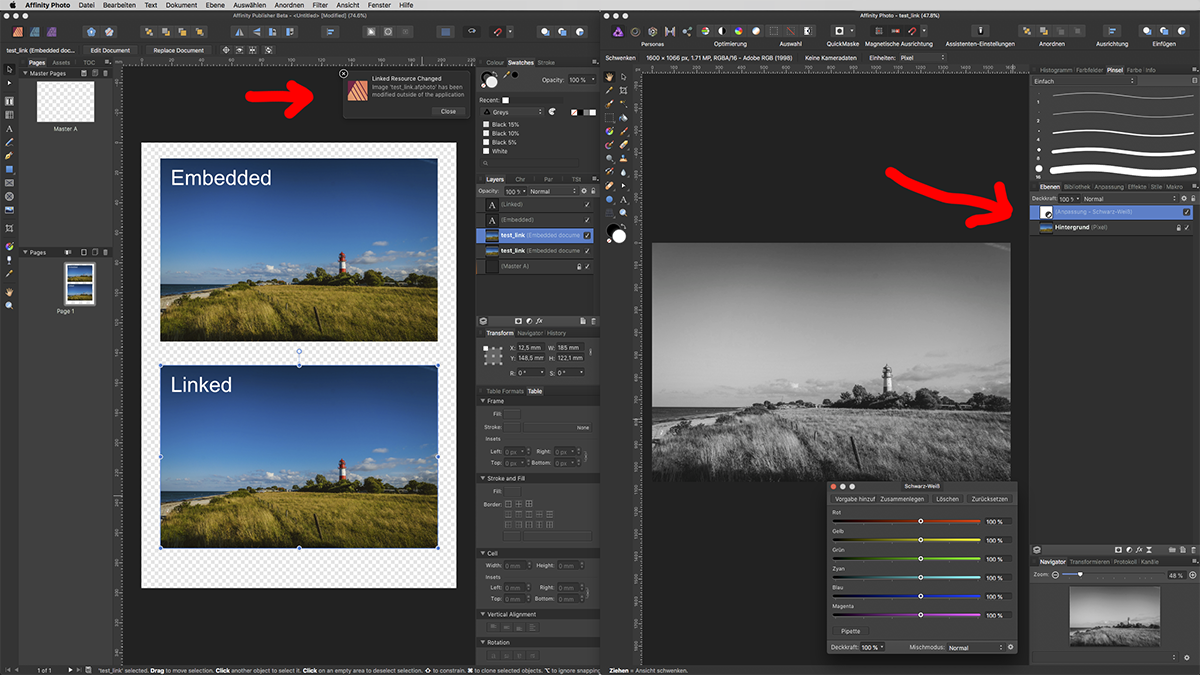
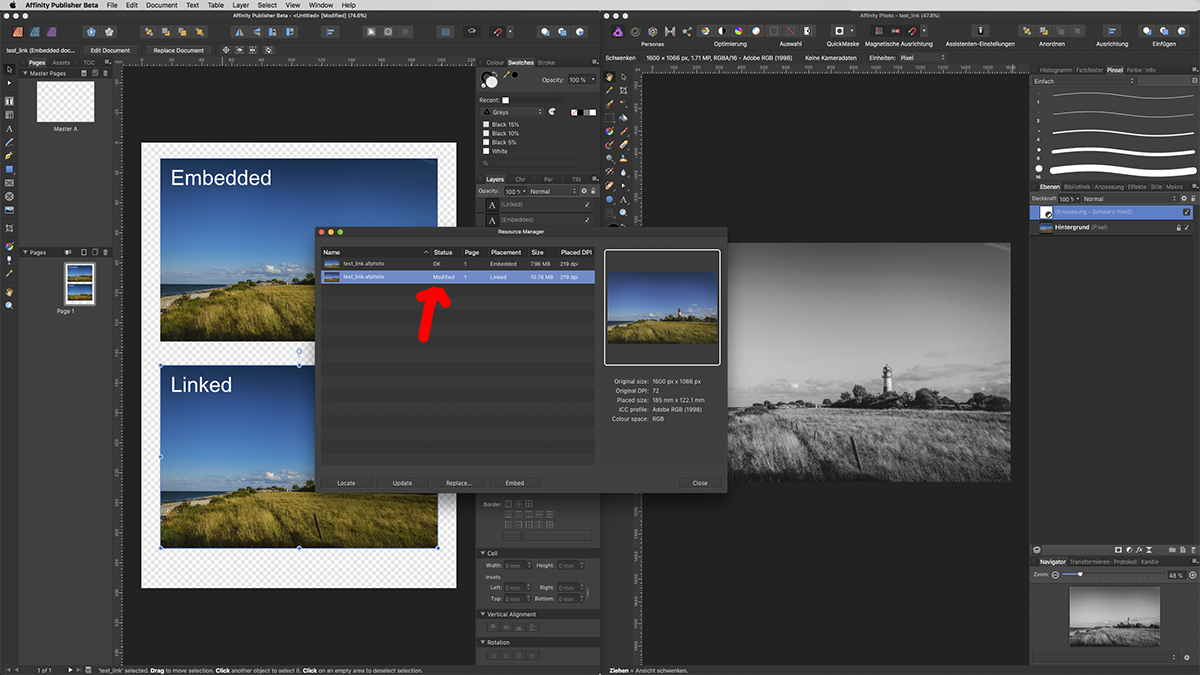
Hi, the difference is, an embedded picture looses his connection to the original, a linked picture stays in contact. This is very usefull, if you want to place a picture more than once (f.e. a logo) or you want to retouch the picture. Indesign or Quark XPress are working that way. These programs are showing a preview and stores the link to the original file. I can place hundreds of GB of pictures, but the file size increases not that much. Last month i have been working at a catalog with 1.200 pictures, app. 210 GB, and the filesize of my indesign document was 240 MB. Unfortunately Affinity Publisher is embedding even the linked file including the complete file size of each picture. My first Publisher project is a calender: 12 .afphoto pictures between 180 and 360 MB, 2,5 GB all together. The publisher file ist 2,4 GB and I need to place all pictures again on the titel…. I hope Serif will fix this in the final version. Have fun Michael
- 17 replies
-
- 1
-

-
- replace image
- link
- (and 1 more)
-
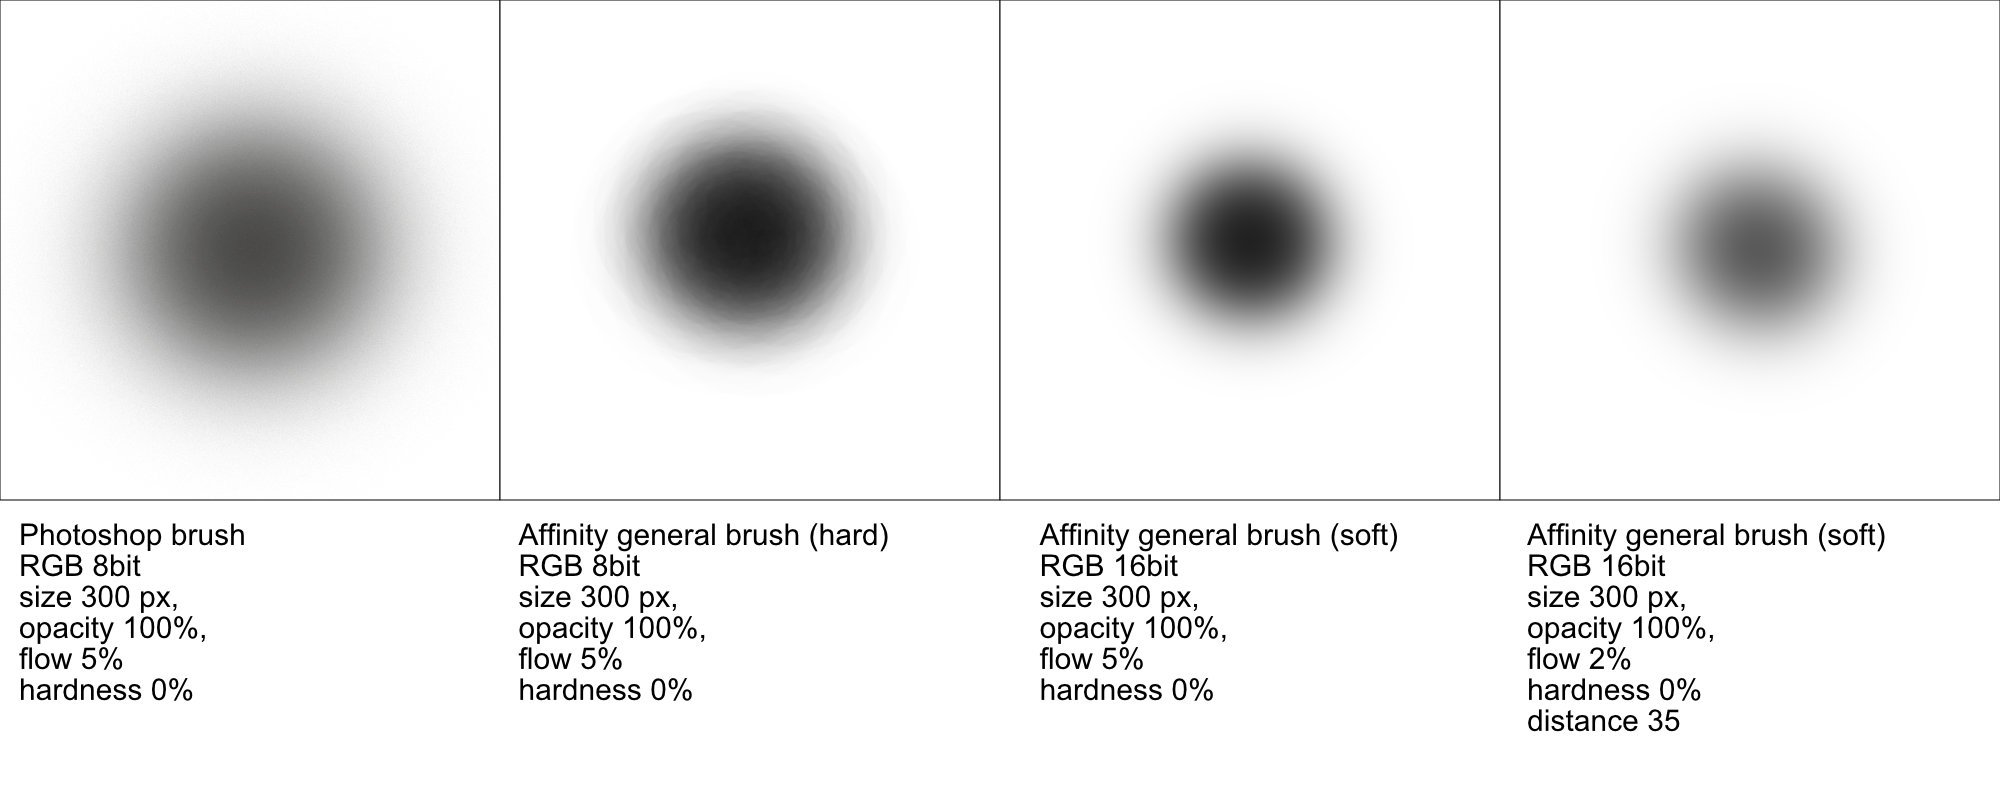
Thank you all for your help. @gdenby: I used the soft brush now @gdenby: No, i didn't use wet egdes. @IndigoMoon: 16 bit work! Here is the result: In a 16 bit picture, a soft brush with 2% flow and (under "More") 35 distance works fine. At least, Affinity Photo brushes act much more different than the PS-brushes. Thats OK if I can get the desired result. have a nice sunday Michael
-
Hello to all, what I use most of all in photoshop ist a soft brush with 1-5% Flow to paint masks, shadows, lights and color into my pictures. It is essential, that the flow is really low and the edges are very smooth. Please take a look on my example: I paint 10 tiny little circles with a normal brush (300px, opacity 100%, flow, 5%, hardness 0%). In Photoshop, the color builds up slowly to app. 50% ant the edges are soft and smooth. Same way in Affinity Photo i got 100% opacity and hard edges. I've tried a lot of way to create a brush that acts like the one in Photoshop. Nothing works. What should I do? I've got Affinity Photo, Designer and Publisher Beta. These are really great tools. Especially publisher make me smile because I hope, I can kick Indesgin. And Illustrator and Photoshop too. But with brushes working like this, I can't do 90% of my retouching in Affiniy Photo. I hope u can help. Thank in advance. Michael