

Thisismandatory
-
Posts
54 -
Joined
-
Last visited
Posts posted by Thisismandatory
-
-
Thank you for the hard work!
-
Great!
ctrl + W is a great replacement for f10. Not only does away with Touch Bar issues it also seems faster, due to the resting position of my left hand.
Thank you! <3
-
I think F10 is a mistake. Given that MBP have now 'removed' the F keys this becomes a very cumbersome quick access key. Then if we factor in other small keyboards and many laptops having the F keys used in conjunction with an FN keys, I can't see this a good choice.
Working on a full keyboard this might be ok, even though still not optimal, as it is not a the extremes of the groupings of 4 F keys, like F9 or F12 would be.
I would appreciate some other options. Something like an cmd + any key.
-
in app update? yes, thank you!

- debiant and Patrick Connor
-
 1
1
-
 1
1
-
I have been using it recently for various things. It started as a hope to find something I could use instead of indesign. So far it is progressing nicely and it might actually fit my night in a pinch, with the attractive pricing I am considering to actually invest in this one when it comes out. And considering that at the first beta I was taken aback, this is quite something.
In light of this positive and encouraging post for the developers, I would like to give only one major thing I would need/love to see come soon, and this are footnotes and endnotes.
Thanks for being busy and updating us with newer betas.
-
Hey!
After this post, I haven't used it much this way, I needed 2 screens all the time. I have thought tried this again now. And after closing the lid, the resource manager is nowhere. I have to switch desktop (swipe left and right) to get the manager back on the screen.
Since, this might be setup oriented, let me give you the details.
I am using a MBP 2016, so the only ports I have are USB-C. I have the monitor connected through and USB-C to HDMI cable (no adapters). The external monitor is set as the main screen. APub is opened on the external monitor (main screen) in full screen mode. With this configuration, the issue can be consistently reproduced.
I have now tested another option, which is to have APub run in windowed mode and the issue is not to be seen. So this happens only if APub is opened in fullscreen mode.
I hope this is enough detail. If not, I can provide additional info.
-
15 hours ago, walt.farrell said:
They all provide different capabilities, and depending on what you want to accomplish one will probably be better than the others.
picture frame and place image are the same thing. In the end both serve to place an image on the document. Them behaving differently makes it even more of an issue. Especially if you would have a mix of both in the document and in the end there is no visual cue to differentiate them.
The crop tool can be useful, especially when is used to crop multiple placed objects. But in the perspective of an image does the same as the frame itself.
-
2 hours ago, Fixx said:
This playing with frames is not necessary, InDy autoframes just fine. That makes quite a smooth workflow. Of course readymade frames can be useful if you have regular structure built in the master page. (And that latter is still something that is weird in Publisher..)
Frame or no frame in Publisher is something I have not yet decided if there is faulty logic supporting both or am I just not seeing the genius of it.
I find it confusing. Basically you have 3 tools for 1 job. Frame, directly placed image and the crop tool. Seems redundant
-
-
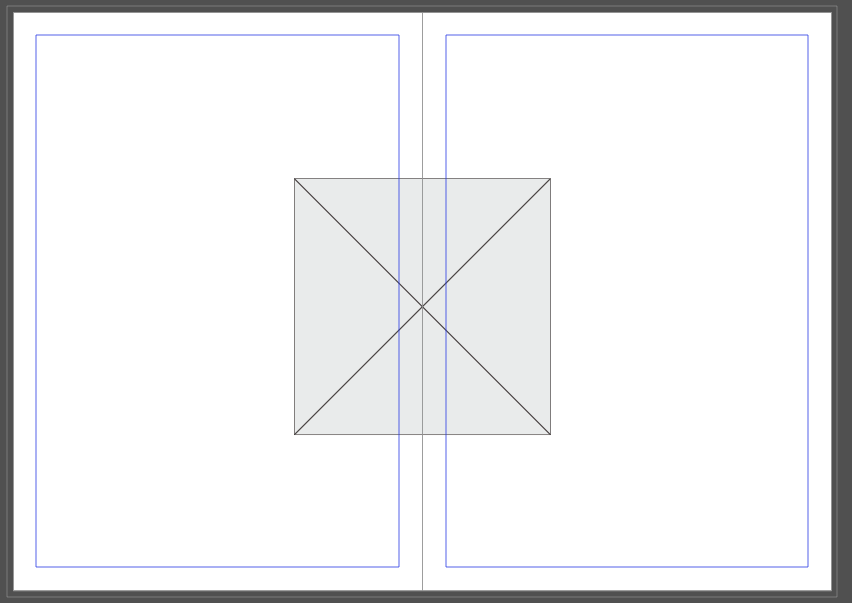
I was pointed elsewhere I could use the vector crop tool. So I went and checked it out. I had document with 1 page. I put in an image frame, used a screenshot as the image to place. PNG file. Selected the vector frame tool, tried to crop it, used one of the key modifiers and the APub just closed itself. Tried something similar 3 times in a row same result.
Reopened APub. Placed 2 objects (square and triangle) placed another PNG image in without using the frame. Grouped them, cropped them as a group and no issues.
I am not sure what caused the crashes. Maybe the key modifiers. Trying to recreate it... no luck.
I hope it was fluke...
otherwise working MBP 2016 with dedicated graphic card on High Siera.
-
not much to say. The program quits, when I try to use the vector crop tool.
-
20 minutes ago, Fredy said:
There is a tool which crop the image like you want!
Take the "Vector Crop Tool" to crop the image without any change of the size.
Its realy not the best name for the tool, because in my sight there is nothin with vector in this case.
Take a long time to find out that.
Best Regards
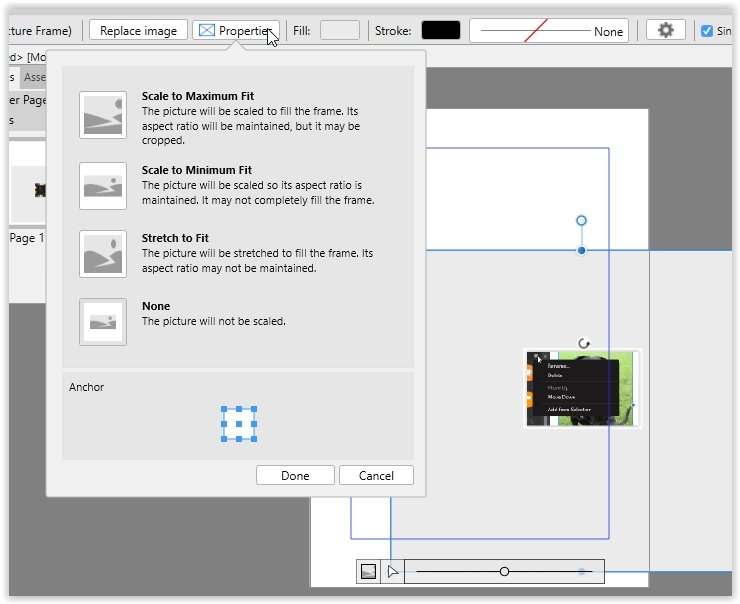
FredyI do not want to crop the said image. I want to keep one of the dimensions of the picture frame as set prior placing the image and then conform the frame to the image.
-
On 9/7/2018 at 4:31 PM, PMan said:
Hi, If you have placed an image in a picture frame and you want to return it to its native properties
i) select the image/frame, then going to Preferences (top left) and selecting None (picture will not be scaled). Image will revert to its original size
ii) As someone else stated, if you double click on an image in a picture frame you can resize it separately and still revert to its original size using i) above or use any of the other Scales in Preferences
Pman
I think you are misunderstanding the need. I do not want the image to come to the original size. I would need the frame to conform. The only way would be to place the image directly. But sometimes you know the height of the image or width you want. Then you have a coupe of options for the image you want to place, they are of different aspect ratios. Using scale to minimum fit won't work properly in that occasion.
-
2 hours ago, Eugene Tyson said:
I may be misunderstanding your issue here.
I have exported both INDeisgn and Affinity files to PDF and get the same result.
Please can you clarify? I would love to help you with this.
This actually was very helpful. It was on me. Idk what I was thinking. I went on replicating your thing and tried a few more thing. Two objects that go in the gutter and one that spans over, and it works well.
Thank you Eugene!
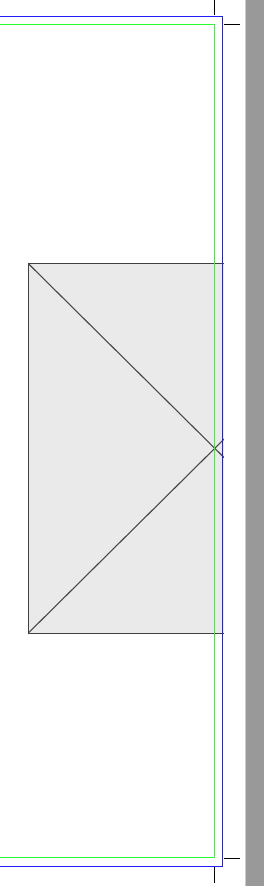
I have though notice something else. In facing pages, the bleed cannot be set separately for inner and outer edge, only left and right. I don't know if that was intentional.
-
1 minute ago, Eugene Tyson said:
That's pretty normal behaviour for a spread - as you can see it's on the trim edge.
If you want to bleed off the gutter - then you'd need to use single pages.
Sorry - I don't think there's a way to automate this in Publisher.
As the object will only go so far - think if it was a complex image of a face, if the image stopped at the nose, then there's no further information. So how would it know what to bleed to the next page?
Basically - doing any wirebound books etc, requires bleed on both edges - so you'll need to turn off Facing Pages to use single page instead.
What are you talking about. It is pretty common to set up a book in spread mode with the intention of creating a glue bound book. ID offers gutter bleed. And there is nothing special about this feature. It actually makes more sense to create a book in spreads than single pages. Single page documents brings other issues. If you want to put an object on both spread, you have to put it in the document twice. Let's not forget the whole issue of not being able to see what you are actually creating.
I hoped I was missing something and this was actually possible in APub. Since this is not resolved, I think it is fair to point it out. Would be great to get this implemented. I use this kind of placement pretty often, so for me is quite must.
-
Using two monitors and keeping some of the windows (resource monitor) on the secondary display, after disconnecting won't return to the main window.
Keep in mind I am using a laptop with external monitor. When external monitor is connected it acts as the main display. Closing the lid an putting the computer in clamshell mode results in the window not jumping on the only monitor used.
-
-
-
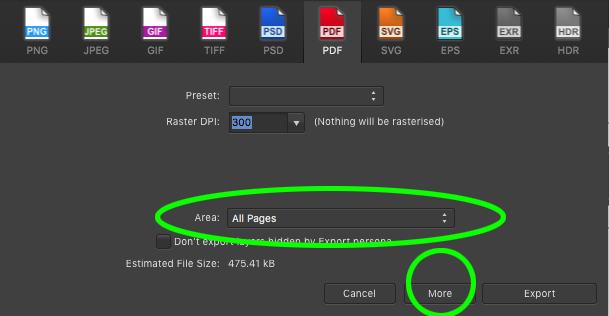
1 hour ago, Eugene Tyson said:
Works for me
Thanks, yes.. I see now where is the option to print as single pages. Did not notice that.
I am still having issue with placing two object on the gutter, both in the bleed. Is there a way to do it?
placing them both in the middle 3 mm into the bleed, makes them show on the other page.
-
-
On 9/6/2018 at 8:46 AM, Nathan Shirley said:
Coming from InDesign this took some getting used to, but I think Publisher is actually much more intuitive with how it handles images overall. InDesign's use of frames is not especially intuitive.
One big difference I noticed with Publisher is the ability to place an image with or without a frame. If you place an image without a frame, it works more like many of you are wishing it would. If you want to crop the image, you can apply a vector crop (nondestructive). For my own work flow I think I would end up placing images without frames most of the time, and with them when I wanted to work very quickly, when absolute precision wasn't required.
It might be more intuitive and it kind of makes sense, the image is resized when the frame is resized. But there are occasions when you need to resize the frame and then fit the image. Is not so much the difference in workflow, there is a lack of functionality. Placing frames for the layout and coming back with images is sometimes more suited for the job. As well replacing an image is common.
Programs like this have to have options for different workflows, it is impossible to predict all use types of the program. And if a tool (program) is adaptable it way more useful than something with a too rigid structure.
-
Ok I have now more report on using the picture frame tool. This in my opinion is lacking and needs polishing. After setting up a dummy book I can list annoyances that should be addressed.
As I said the frame needs to conform to the content. Now the workflow looks way cluttered. Setting up the image with the frame filled proportionally. Adjusting to fit the page to my liking. If the frame happens to go into bleed, since this has yet not been implemented I have to manually adjust frame size for it. Because any resizing of the frame will change the size of the image as well, I have to first fit the frame to the content, so I can enlarge the frame into the bleed (only one side). This is now done with copying the image size in mm and copy the value to the frame. Then the frame is adjusted for bleed in one dimension. Prior to that I have to set up a guide so I do not loose the positioning.
Second issue is that the images get embedded automatically. Because I moved the folders around I cannot simply make them linked, I have to replace every single image and after that make it linked. Here another issue arises the picture frame does not remember the setting I have chosen for it. This means that I have to go to properties and choose again how the image should fit in the frame. Very cumbersome for now.
Finally the workflow as is slow as there is no shortcut for any of it. I know I can do my own shortcuts, but I think most of this would be basic functionality hence I would expect pre-made shortcuts.
-
To share what it takes to make a photo book with bleed. I started to make the booklet as spreads and since I need bleed all around, gutter included. I plan to print it as single sheets and do thermic/glue binding. After setting the whole document as a spread I had to revert to single pages so I can then manually fix every image requiring bleed to fit the requirements.
-
I do like an option of embedded images and it could facilitate when the design file is shared etc., but I do prefer to have them linked. With embedded images the APub file is just to big to make sense in addition it replicates resources that are already taking space on my drive.
And how does one make images linked without saving the embedded ones?
edit: figured that once is embedded and you move the original file, you have to replace firs and then it can be made linked. This could be adjusted, that making it linked could at the same time replace it.


3 page spread
in Pre-V2 Archive of Affinity on Desktop Questions (macOS and Windows)
Posted
This is a very needed function when making any sort of book for print or even a simple leaflet.