unni
-
Posts
155 -
Joined
-
Last visited
Everything posted by unni
-
 Thanks for the above details. I downloaded the file and tried the controls of the three adj layers to get a feel of how it works. Have to try in few of my images.
 -
@NotMyFault I use Apply Image for sharpening. The image is duplicated, top layer named HI,bottom layer made LO. LO layer is then blurred with bilateral blur. Then the HI layer is selected with blue band. Bring the Apply image dialog box from Filters button on top. Click and drag the lower LO layer into the Apply image box. On releasing the mouse, the equations buttons will be enabled. Click and bring the tick mark in the Equations button. Then make entries as below: DR=((DR-SR)/2)+0.5 DG= ((DG-SG)/2)+0.5 DB= ((DB-SB)/2)+0.5 DA=SA Now the screen will go grey color with fine outlines showing the edges(high frequency component). Press Apply button. Now delete the LO layer. The HI layer will be grey now. Have one image layer below. Change the HI layer to vivid light/Linear light. The image will now look sharper. If needed, add a curves layer (clipped) to the HI layer to further enhance the sharpness, use masks to mask out areas not required to be sharpened etc, as usual. This is like a frequency separation but in manual mode. I noted that the bilateral blur in frequency separation does not produce enough blur when compared to the one under Filters (top) menu. Otherwise, frequency separation itself could have been used for this purpose, something like an action. I wonder how this can be achieved with channel mixer. Best regards, Unni
-
@walt.farrell Thanks for the feedback. I have posted in the Feature requests&suggestions part.
- 10 replies
-
- 1
-

-
- affinity photo
- macro
- (and 1 more)
-
Apply Image is not fully usable in a macro because of an issue described in this thread. Hope this will be improved sometime in future. Best regards, Unni
-
Hope this will be addressed. Due to this I am not able to create macros with apply image. Apply image is a very important feature and it's use should not be limited like this !
-
affinity photo Improving clarity on background view
unni replied to zaflemos's topic in Share your work
Good work. Improvements possible. The mask for the rock needs further refinement. You can use refine mask option. Blurring mask slightly will improve the edge issues. Water can be left without clarity effect as it is a moving stuff. Apply the effect only where it is required. For this, put in a group and have a black mask for the group. Paint white on this mask in areas where you want the modifications to be revealed. These are easy and commonly used steps, with some practice it will be easy. Overall effect can be reduced by controlling opacity of the modifications,it is a bit strong. -
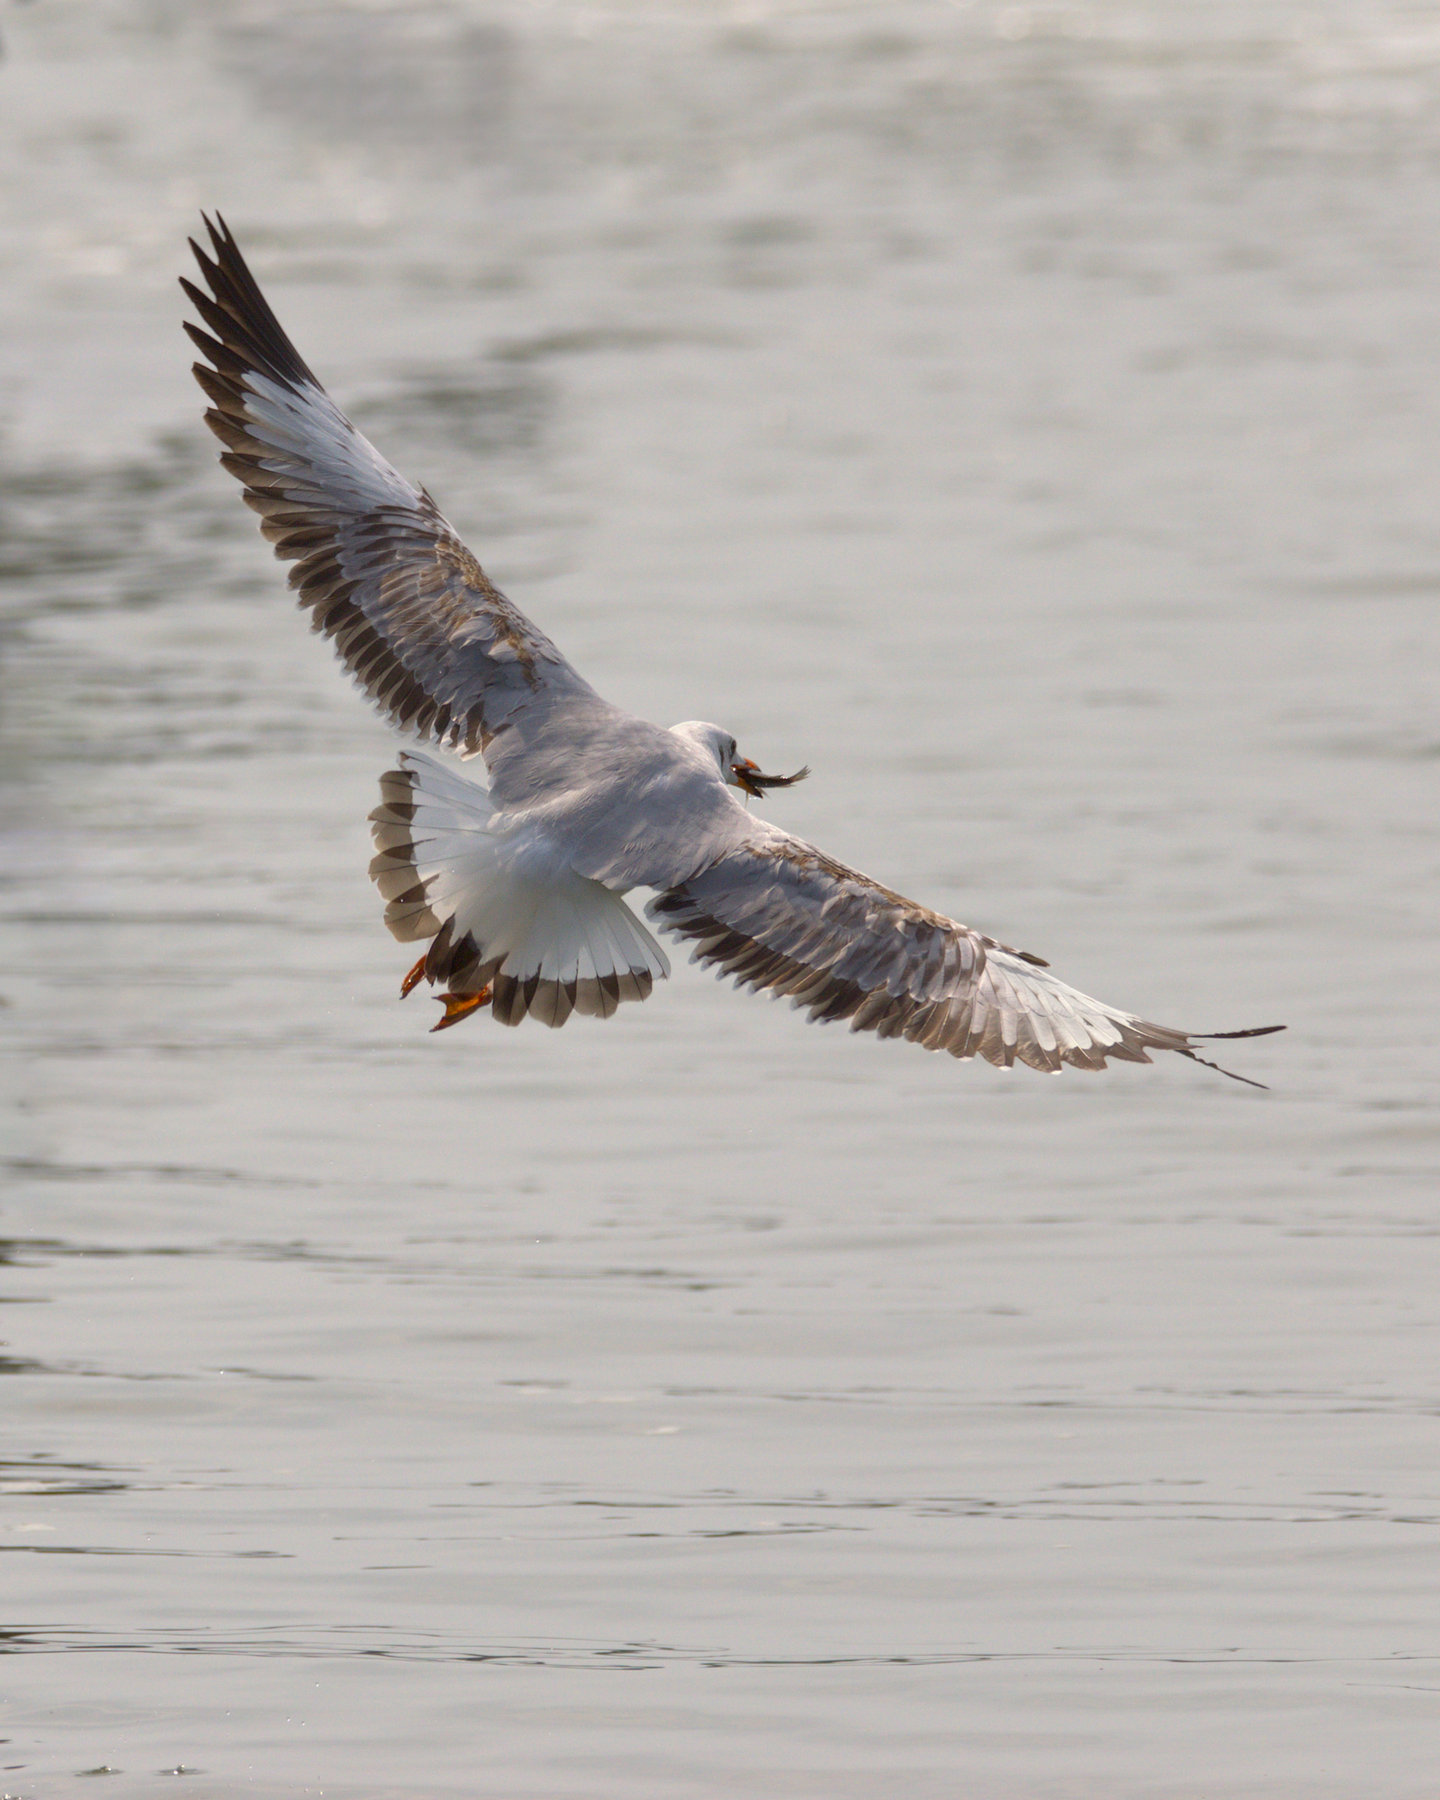
Here is another screen shot of 100% or 1:1 pixel on screen. The left image is original and right image is sharpened with above method. Before sharpening , mild colour and contrast improvement was done in LAB mode. Sharpening done last, in RGB. The background is masked out from the sharpened layer using a mask that is white for the bird. So only the bird appears sharpened. So no unwanted noise or grains in the background green unfocused area. D7000/ sigma 150-600 C, 1/320 sec / 1000 ISO, 600mm , handheld.

-
The images below shows that the advanced method is really good, does not smudge away details and also does not make highlights overly bright. I have also not used the HSL de-saturation step in the trial below. This is original 100% magnification screenshot without editing. This is the advanced highpass method described in the first thread. In one image I did about 7 radius and 14 threshold for the blur. In another image, it was 14 radius and 14 threshold. So the second image has more sharpening. A mask was used to bring only the face from the 2nd image and not the hair. Note that compared to the USM sharpened last image, there is no smudging on the face and the small white highlight below the left nostril is not harsh. USM sharpened image is harsher. USM sharpened image
-
The above text is edited today. There was a monochrome conversion(de-saturation) of the High layer using vibrance adjustment layer after Apply image. This step was giving color cast. It is now done with an HSL adj layer with its saturation slider set to -100%. B&W adj layer can also be used. Now there is no color cast. After viewing different videos on advanced sharpening , I note that some of them de-saturates and some don't. Technically, de-saturation is preferred I think because it then uses only the luminosity value.
-
I was going through various videos and articles on sharpening to understand it better. One unwanted by-product is halos and there are various ways to remove it. Also, some methods produce harsher areas in the brighter part. Found this video interesting but it is for photoshop. I was wondering how to use it for AP. Only two points are to be mapped for affinity photo. One is Surface blur and another is the Offset and Scale inside the PS Apply-Image dialog box. For the surface blur, AP equivalent is Bilateral blur. For the other two, I did some trials and found as below. In the video, there are two layers - High and Low. High layer is the target and Low layer is the source as far as Apply image command is concerned. Then offset is 128 and scale is 2. To get the same result in AP Apply Image command under Filters, we have to first select the High layer. Then from filters, click Apply image. Then click+drag the Low layer and bring it into the apply image dialog box. Now the equations box will get enabled. click it. Now enter to make like this . DR=((DR-SR)/2)+0.5 DG=((DG-SG)/2)+0.5 DB=((DB-SB)/2)+0.5 Blend mode is NORMAL and not SUBTRACT. Click Apply. Now the result is same as that of PS, in the video. The bracketed step shown in the next line which de-saturates is not a must I think but some videos recommend it. (To the High layer, clip a HSL adjustment layer . In the HSL, move the saturation slider to extreme left (-100%). This is to remove color info from the High layer. Merge the HSL layer with the High layer.) From here, the video can be followed as it is same for AP or PS. Incidentally, the above method is also used for frequency separation in many PS videos with the difference of using gaussian blur instead of surface blur. Here also, the same equations can be applied. (De-saturation step is never done in frequency separation). Since there is a frequency separation filter available in AP , manual method is not required unless one is experimenting or learning. I tried various advanced sharpening methods and found this PS video to produce very good results. With the above workaround, the video can be applied to AP also. If any expert or others on AP equations note any mistakes in the above formula or method, please step in and correct because I do not want anyone to follow wrong methods as I am not an expert in advanced methods of AP.
-
B&W conversion has many possibilities. various proportions of grey shades can be obtained by converting to bw using hsl/channel mixer/apply image/vibrance . it will be interesting to experiment. your image is relatively flat. i would have further adjusted for more local contrast and tonal separation. ofcourse,its a personal choice .
-
I have just tried with your uploaded image. The method may appear a bit complex. There are other ways also, of doing this. The basic steps are explained below. Duplicated tree image. Selected first layer, filters>apply image>use current layer>click equations> DR=SB, DG=SB. This will replace the red and green channel with blue channel. I selected blue channel because it gives max contrast for this image. Now there is a B&W image of the tree. This is the last layer renamed as mask before blur. This is blurred at 0.3 pixels and a layer is made with name mask blur. CNTR+ALT+Left click on the layer mask blur will load a selection and marching ants can be seen. Move cursor to the tree layer and select it. Then click on the mask icon. A mask will be created with the selection. This mask has to be inverted using the channels tab at the bottom. A curves adjustment layer is put above the mask and alpha channel is selected in the curves adjustment. Now the curves adjustment will affect the mask and not the tree layer. See the image preview to observe the effect. My above description is not perfect and could be confusing but it conveys a way to do it. You can follow some of the youtube videos which explains things better. I have used a slightly complex way to achieve the same result. Hops this helps !
-
@zaflemos Welcome to the world of Affinity Photo. It is a very powerful software and also have Affinity Designer and Affinity Publisher for 2D vector and publishing related work, respectively. Your above attempt on sky replacement is a good start but requires some more refinement. Basically, masks have to be used and masks needs refinement to ensure good blending of all the layers. There are ways of tuning masks wherein manual tweaking finally required is a minimum. I am giving some links below. You can find several videos which will help a lot in understanding AP more . Background replacement details are also available. You may not be needing LAB mode at present because it can easily mess up the image . All the videos will be using the default RGB mode unless it is specifically mentioned. In the 2nd image you have posted, tree mask needs further refinement for an improved blending. Since there is good contrast between the tree and sky in original image, it will not be difficult to achieve this, once you watch a few videos on background separation. https://www.youtube.com/channel/UCQZN-kIrZUQyoTnexM3jJAw https://www.youtube.com/channel/UC6xPJ4dx82vSjysPUyjlCsw https://www.youtube.com/channel/UCOnLUmyPHr2rayOHVHWsHVw
-
Thank you
-
Here is another image processed similarly. The basic workflow is as below. Simple mask is used for the flower. So from the A&B colour adjusted layer, only the flower was passed through. In the Lightness channel, sharpening was done and a mask was used to pass through the flower alone. In another layer, L channel was adjusted to make the full image bright and the same mask was used to pass through the flower only. Again in another layer, full image was made darker and inverted mask was used to pass the background except flower. No blurring of A&B channel was done because there was no colour noise. The colour separation and vibrance seems to be better when done in LAB. It may be possible to get same result in RGB mode but could be more difficult. First image is LAB processed, 2nd image is original. Camera Nikon D3100, Lens was a Sigma 70-300 DG macro. A humble camera system.
-
Lumenzia
unni replied to Snowcap's topic in Pre-V2 Archive of Affinity on Desktop Questions (macOS and Windows)
http://changingminds.org/disciplines/photography/affinity_photo/resources/resources.htm -
Original and LAB colour space processed image. Converted image to LAB space, added Curves adjustment layer, improved contrast using the L curve, applied slight unsharp mask to L channel, moved A and B curves by equal amounts of 0.25 at both ends (left point to 0.25 and right point to 0.75) Applied Filters>noise>dust and scratches at 1.7 radius only to A and B channels. The above made image sharper, less prominent colours deeper and removed little bit of colour noise that was present. Based on details from one of the best authors on LAB colour space : Dan Margulis First image is LAB processed image and second is original
-
@KKat Affinity photo is a great advanced photo editing software similar to photoshop. Use it as a stand alone package and do not call from LR or other similar applications. AP has all the photo editing features built into it. Watch a couple of introductory videos at the official website to get a good start. You will never regret purchasing this software. If you are looking for animation movies, try the free Blender software which is a 3D application with a steep learning curve. If your need is only slides and ppt, use the free Openoffice software.
-
As i understand, in new version this is implemented.
-
Brush in Overlay Mode
unni replied to Glenar's topic in Pre-V2 Archive of Affinity on Desktop Questions (macOS and Windows)
The brush overlay mode for masks seems to be working now in the latest version. -
Request: Numeric values in Curves adjustment
unni replied to Gunny's topic in Feedback for Affinity Photo V1 on Desktop
There are various image processing softwares available in the market and PS is one of the best applications. Whichever software suits, one should go with it and ignore the rest. In the end, its what we do with a tool that matters and there is no point in keeping an unusable tool. -
Request: Numeric values in Curves adjustment
unni replied to Gunny's topic in Feedback for Affinity Photo V1 on Desktop
For anyone who has used PS a lot, there will be a natural expectation to have same or similar interface. As i know, AP internals are different from PS and it has only kept some of the basic PS type interfaces to aid in easy transition. As long as the requirements are met, it is fine and i keep going forward, otherwise will get stuck in comparing. AP team is very good in listening to the customers voices, providing solutions and implementing whatever is possible or required. @Jowday -
@walt.farrell Thank you for the alternative way, just checked , it meets my requirement.
-
There is another thread on this topic "Adjustment selections,Double click" where @MEB says this is intentional. So I don't think it will revert back. So have to get used to this ! BR, Unni
-
I have been off AP for a few months. So do not know whether this observation applies to earlier beta version also. In AP stable version, when single clicking on any adjustment (Level/curve/HSL etc), the adjustment layer opens. In the present beta version, single clicking does not create the adjustment layer. Instead, the sub menu opens with icons like default/darken/lighten (as appropriate) and one of these icons have to be clicked again. I do not know whether this is intentional or not. Single click makes the work flow faster and hope single click method will be considered to be retained in future release. Best regards, unni