

Lem3
-
Posts
157 -
Joined
-
Last visited
Posts posted by Lem3
-
-
I don't know about Photo, but applications don't usually get involved with where files are located -- that's what the operating system is for. I think the error message you are seeing is AP's attempt to repeat what Win8 is telling it when the operating system can't save the file.
Take a look for errors in the system Event Viewer. Start with Administrative Events.
-
When was the last time you ran chkdsk against your drive?
-
Right-click on the file immediately after saving from the web. Click Properties on the Context Menu. At the bottom of the General tab, click Unblock, then OK. Are things better?
-
I cannot duplicate.
- I went to some random website, used the browser "Save Image As.." function to save files I called first.jpg and second.jpg on the local drive.
- I used File->Open in AP released (1.9.1.979) and beta (1.9.2.1005) to open first.jpg. I'm working in first.jpg
- Duplicated the layer and used File->Place to bring in second.jpg as the third (Image) layer. Rasterized that layer.
- Clicked File->Save As... AP opens the Save As dialog, offering to save first.afphoto in the original folder.
- Clicked Save, all is well. I'm now working in first.afphoto.
Same result for released and beta versions. Windows 10, I am a system administrator.
-
-
Probably the same issue: I have gray brush strokes if instead of a B/W adjustment layer the entire image is converted to Gray/8.
-
On 11/26/2020 at 3:34 AM, Chris B said:
Hey Lem3,
With Live Filters, you want to be viewing them at 100% zoom. Anything less than that and you might not see their effect because the pxiel ratio is not 1:1.
Further testing indicates it's HOW I get to 100% (or whatever) zoom that controls whether the filter effect is shown. The attached file opens at 82.5% zoom on my 24" monitor, toggling the filter has no visible effect. There are several options for changing to 100% zoom (close and reopen the file after each option):
- Open the Zoom tool, either change the "82.5" to "100", move the slider to 100 or use the drop down menu. The filter effect is not displayed with any of these choices.
- Click Ctrl+1. The effect is not displayed.
- Click Ctrl+=. The effect is not displayed.
- Hold Ctrl+Spacebar, drag slowly to the right until zoom is 100%. The effect is not displayed.
- Click Ctrl+(minus) then Ctrl+=, the effect is displayed.
- Hold Ctrl+Spacebar, drag until effect suddenly becomes visible (around 115% on my system), reduce zoom to 100%, the effect remains displayed.
Is this actually working properly?
-
The Dust & Scratch effect isn't always visible.
- The image in the attached file opens (full screen) at 88.6% zoom. It is very "noisy".
- Turning on the Dust & Scratches filter layer has no visual effect on the image. If I export a jpeg at this point I see the filter has been applied.
- Click Ctrl+(minus) then Ctrl+(plus), the image is now at 100% zoom and the filter effect is visible.
- Select the zoom tool and slowly click-drag left and right. As the zoom level changes the filter effect turns off and on. For me, the zoom levels where this occurs are not closely repeatable, but the noise seems to always correctly disappear from view below 50% and above 200%.
As a check, I see a similar issue with production 1.8.5.703
Windows 10 build 19041
-
Open any image, apply a Live Perspective Layer.
Drag the two top corners inwards enough so the change is quite noticeable.
Select the pixel layer and the Clone Brush Tool. Alt+ Click anywhere in the image to select the source.
Move the cursor to another part of the image. The preview ( and the drawn pixels if you click and drag) are offset from the brush. The Clone Tool doesn't seem to recognize the perspective transformation. Same problem with the Inpainting Brush.
-
On 8/14/2020 at 10:52 AM, artcare said:
I just updated Affinity Photo 1.8.4. on my Lenovo A940, and the issue which started this thread is back: the source for the patch tool is not applied when I use the pen. Disabling the ink tool solved this, but unfortunately, this option is no longer available - at least I did not see this. To keep me working reinstalled the previous version, but if 1.8.4 can be made working I would appreciate to know how.
I skipped 1.8.4, but in 1.8.5 Preferences->Tools->Tablet Input Method has options Low Precision, High Precision and Windows Ink.
-
I skipped 1.8.4, but the key sequence is certainly different in 1.8.5. Now you begin with Ctrl+Alt, left click to cycle through the brush options. Drag with LMB down to change size/hardness, etc.
-
I need it as well on Windows.
-
I have the same need:
- Make a selection
- Create an adjustment layer (usually Levels)
- Adjust RGB sliders based on the histogram of the selected area showing in the Levels panel
A very quick and effective tool in PS.
-
One more vote for having blend modes apply for brushes when painting on masks.
-
After a few too many "why isn't this tool working?" moments in PS I turned OFF AutoSelect and never looked back.
-
I found this thread because today I had a case where this capability would have been very helpful.
-
-
58 minutes ago, telemax said:
Yes, but there is a solution.
Place the layer in a group. (select your layer, press Ctrl+G)
But this is merge layer to the mask... 😓
You're right...VERY destructive. I'd like something a bit more friendly.
-
On 1/31/2018 at 1:18 PM, machadodesign said:
When editing a layer that has a mask using the Mesh Warp tool, it only effects the image layer and not the mask which then makes the mask not align with the image and is completely worthless. Am I doing something wrong? This seems completely illogical.
This one caught me today. I spent considerable time constructing a mask for an image and was shocked when the Warp tool only modified the image.Why would you ever want to warp an image without making the same change to the layer mask?
-
I asked for this improvement to Select Color Range in the Feature Requests forum, still hoping to see it someday.
This is one of the holes in AP that makes me still pay for Photoshop.
-
I use the Select Color Range tool in PS almost daily. The limitations in the AP Select Sampled Color tool makes it frustratingly useless in my applications. I would like these features added:
Add or subtract from selection with additional clicks on the image.
Additional options for viewing selection beyond marching ants, e.g., overlay, black on white, etc.- beardedband, jc4d, Krustysimplex and 2 others
-
 5
5
-
Yes, I should have mentioned: all operations were on the Background(Pixel) layer.
-
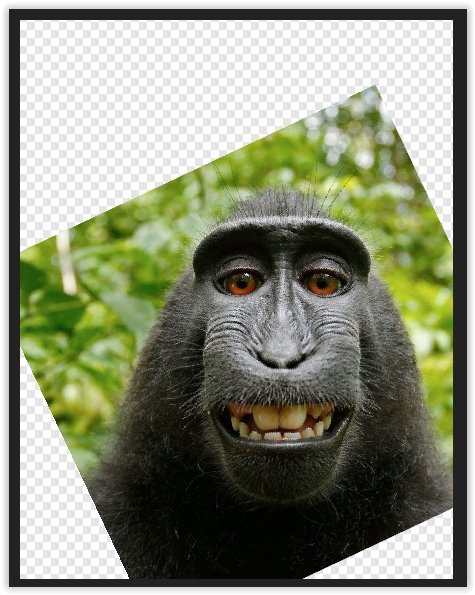
I first noticed this problem in 1.6.5.123 but it's also in 1.7.0.251 so I'm adding it here. The issue is at least one of the clone brush options do not recognize image rotations.
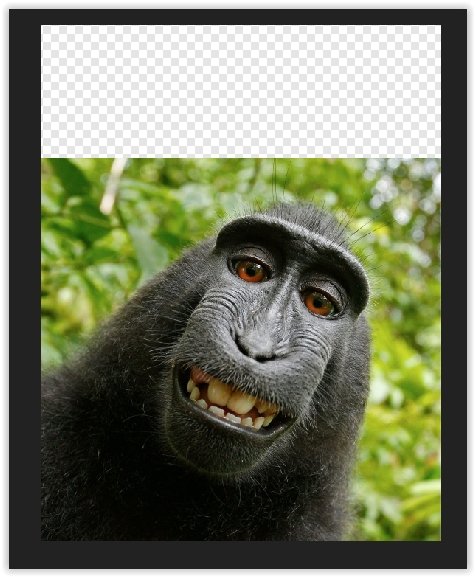
I open an image

which I straighten
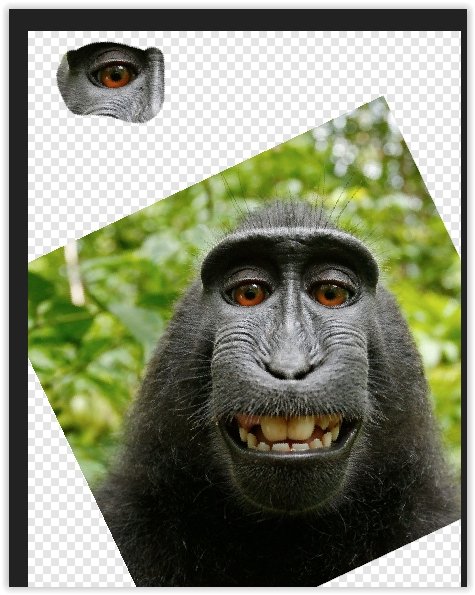
I select the clone brush, alt-click the inner corner of the monkey's right eye (our left) and clone it to the upper left.
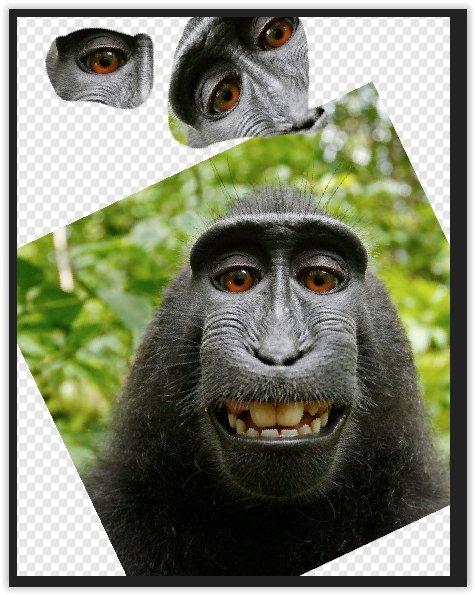
Then I change the clone Flip option to Horizontal and repeat the clone:
Note the highlights in the eyes: AP flipped the cloned section horizontally, but is sampling from the original, unrotated image. I expected to get a mirror image of the same leveled eye.
Lemuel Johnson
-
I would like the values entered in Refine Mask for an adjustment layer mask to be saved with the mask (like the PS mask Properties Panel) for future review or modification. Now every time you open the Refine Mask dialog all values start at zero instead of how the mask is currently defined. AP is using the current values to correctly display the mask, I'd like the dialog to be pre-populated with those numbers.

Affinity Photo 1.9.0 CRASH.
in V1 Bugs found on Windows
Posted
Another user solved a similar problem by making sure he had a clean install of Photo.