KLE-France
-
Posts
46 -
Joined
-
Last visited
-
Well, it doesn't have to be yellow. Or an exclamation point. It just needs to be something. And there's a long history of indicating layer states in AP: the locked layer indicator, the FX indicator, the brush indicator... There's no reason why a deactivated-layer-in-a-group indicator would be any more distracting than those others. Indeed, and should Preflight ever make it to AP, that's a good idea. However, this is also a problem during processing itself (you forget you deactivated a layer, you change something elsewhere, then you remember and reactivate the layer, and that change elsewhere now has to be re-modified or deleted...). Hence the need for an indicator on the layer group itself.
-
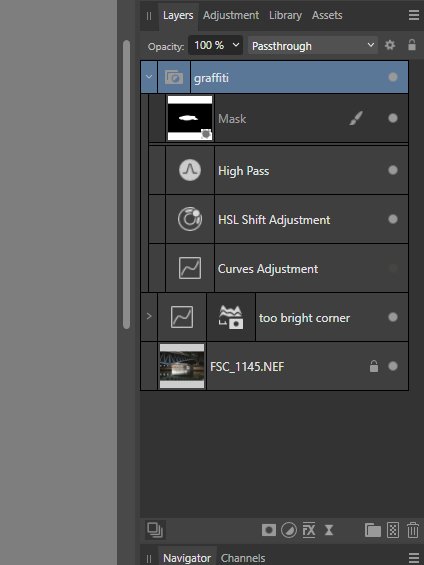
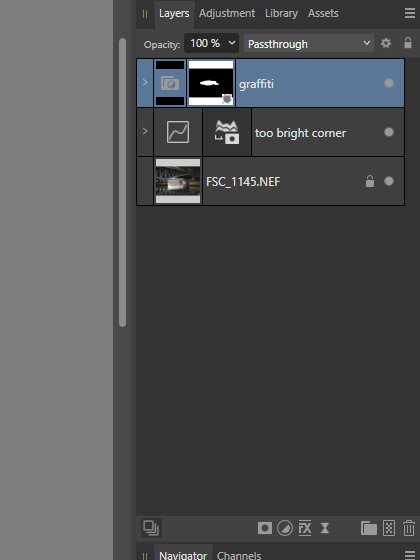
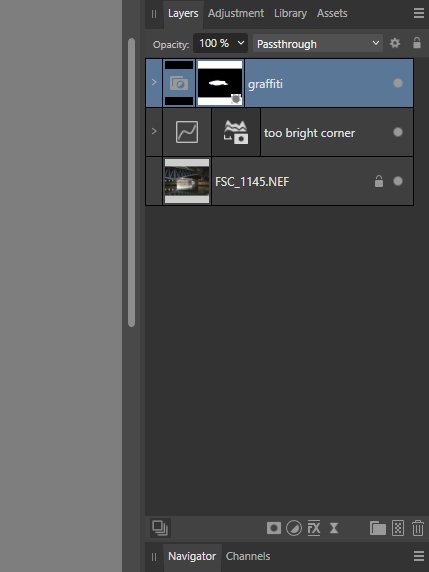
Hello to all! This suggestion concerns at least Affinity Photo. Beyond the very good suggestions concerning groups of layers made here and here, I also want to suggest adding some iconography to indicate when a layer is deactivated within a collapsed group of layers. For example, here is the Layers panel with a group of layers called "graffiti": All of the layers in it are activated: But if I inactivate a layer: then re-collapse the group: there is nothing to indicate that one layer is inactivated in that collapsed group, and thus it is very easy to forget about it, continue the development of the image and then export it with that layer still deactivated. I'm not speaking from experience or anything 😐 Thus, yes, there needs to be some indication—a simple yellow exclamation point would do the trick—that a or several layer(s) are deactivated in a collapsed group. Thanks for hearing me out!

-
 KLE-France reacted to a post in a topic:
Affinity Photo selection tool in Develop persona to add/move guides
KLE-France reacted to a post in a topic:
Affinity Photo selection tool in Develop persona to add/move guides
-
 Aurea Ratio reacted to a post in a topic:
Zoom to Fit isn't big enough
Aurea Ratio reacted to a post in a topic:
Zoom to Fit isn't big enough
-
Zoom to Fit isn't big enough
KLE-France replied to John74's topic in Feedback for the Affinity V2 Suite of Products
Have to sign in against this request. Having a neutral zone around the entire image is necessary for judging it correctly. Ctrl+0 should always maintain the negative space around the entire image. Enlarging the image to true window width/height could be assigned to Ctrl+Shift+0, or something along those lines, why not, but AP does default "fit to window" correctly. -
KLE-France reacted to a post in a topic:
Canva
-
KLE-France reacted to a post in a topic:
Canva
-
GripsholmLion reacted to a post in a topic:
Feature Request: "Current Layer & Below" as Default for Inpainting and Patch tools
-
The famous "+1". All the more so in that the clone tool does this already—or does it remember the last use? In any case, that would be fine too.
-
KLE-France reacted to a post in a topic:
Feature Request: "Current Layer & Below" as Default for Inpainting and Patch tools
-
KLE-France reacted to a post in a topic:
The HSL adjustment, when checked HSV, change the Luminosity Shift text to the Value Shift
-
KLE-France reacted to a post in a topic:
White balance tool bugged for non-raw files both in develop and photo persona
-
KLE-France reacted to a post in a topic:
White balance tool bugged for non-raw files both in develop and photo persona
-
KLE-France reacted to a post in a topic:
Xnview and .aphoto
-
KLE-France reacted to a post in a topic:
Top rotation handle often blocking distance measurement number
-
KLE-France reacted to a post in a topic:
Photo Develop Persona - Invert Overlays
-
walt.farrell reacted to a post in a topic:
Soft Proof adjustment (still) lists deleted icc profiles
-
Thanks @walt.farrell, and good to know that one can't accidentally import an ICC. At C:\Users\[Me]\.affinity\Photo\2.0\profiles, there is only the empty "Blacklist.txt" file, which we had seen the last time. And at C:\Users\[Me]\AppData\Roaming\Affinity\Photo, there appear to be only remnant 1.0 files in both \Common and \Photo. Following through in this latter to \Profiles, there is again only an empty "Blacklist.txt" file. So, at least that's ruled out. Already a good thing. Thanks again and happy shooting to you.
-
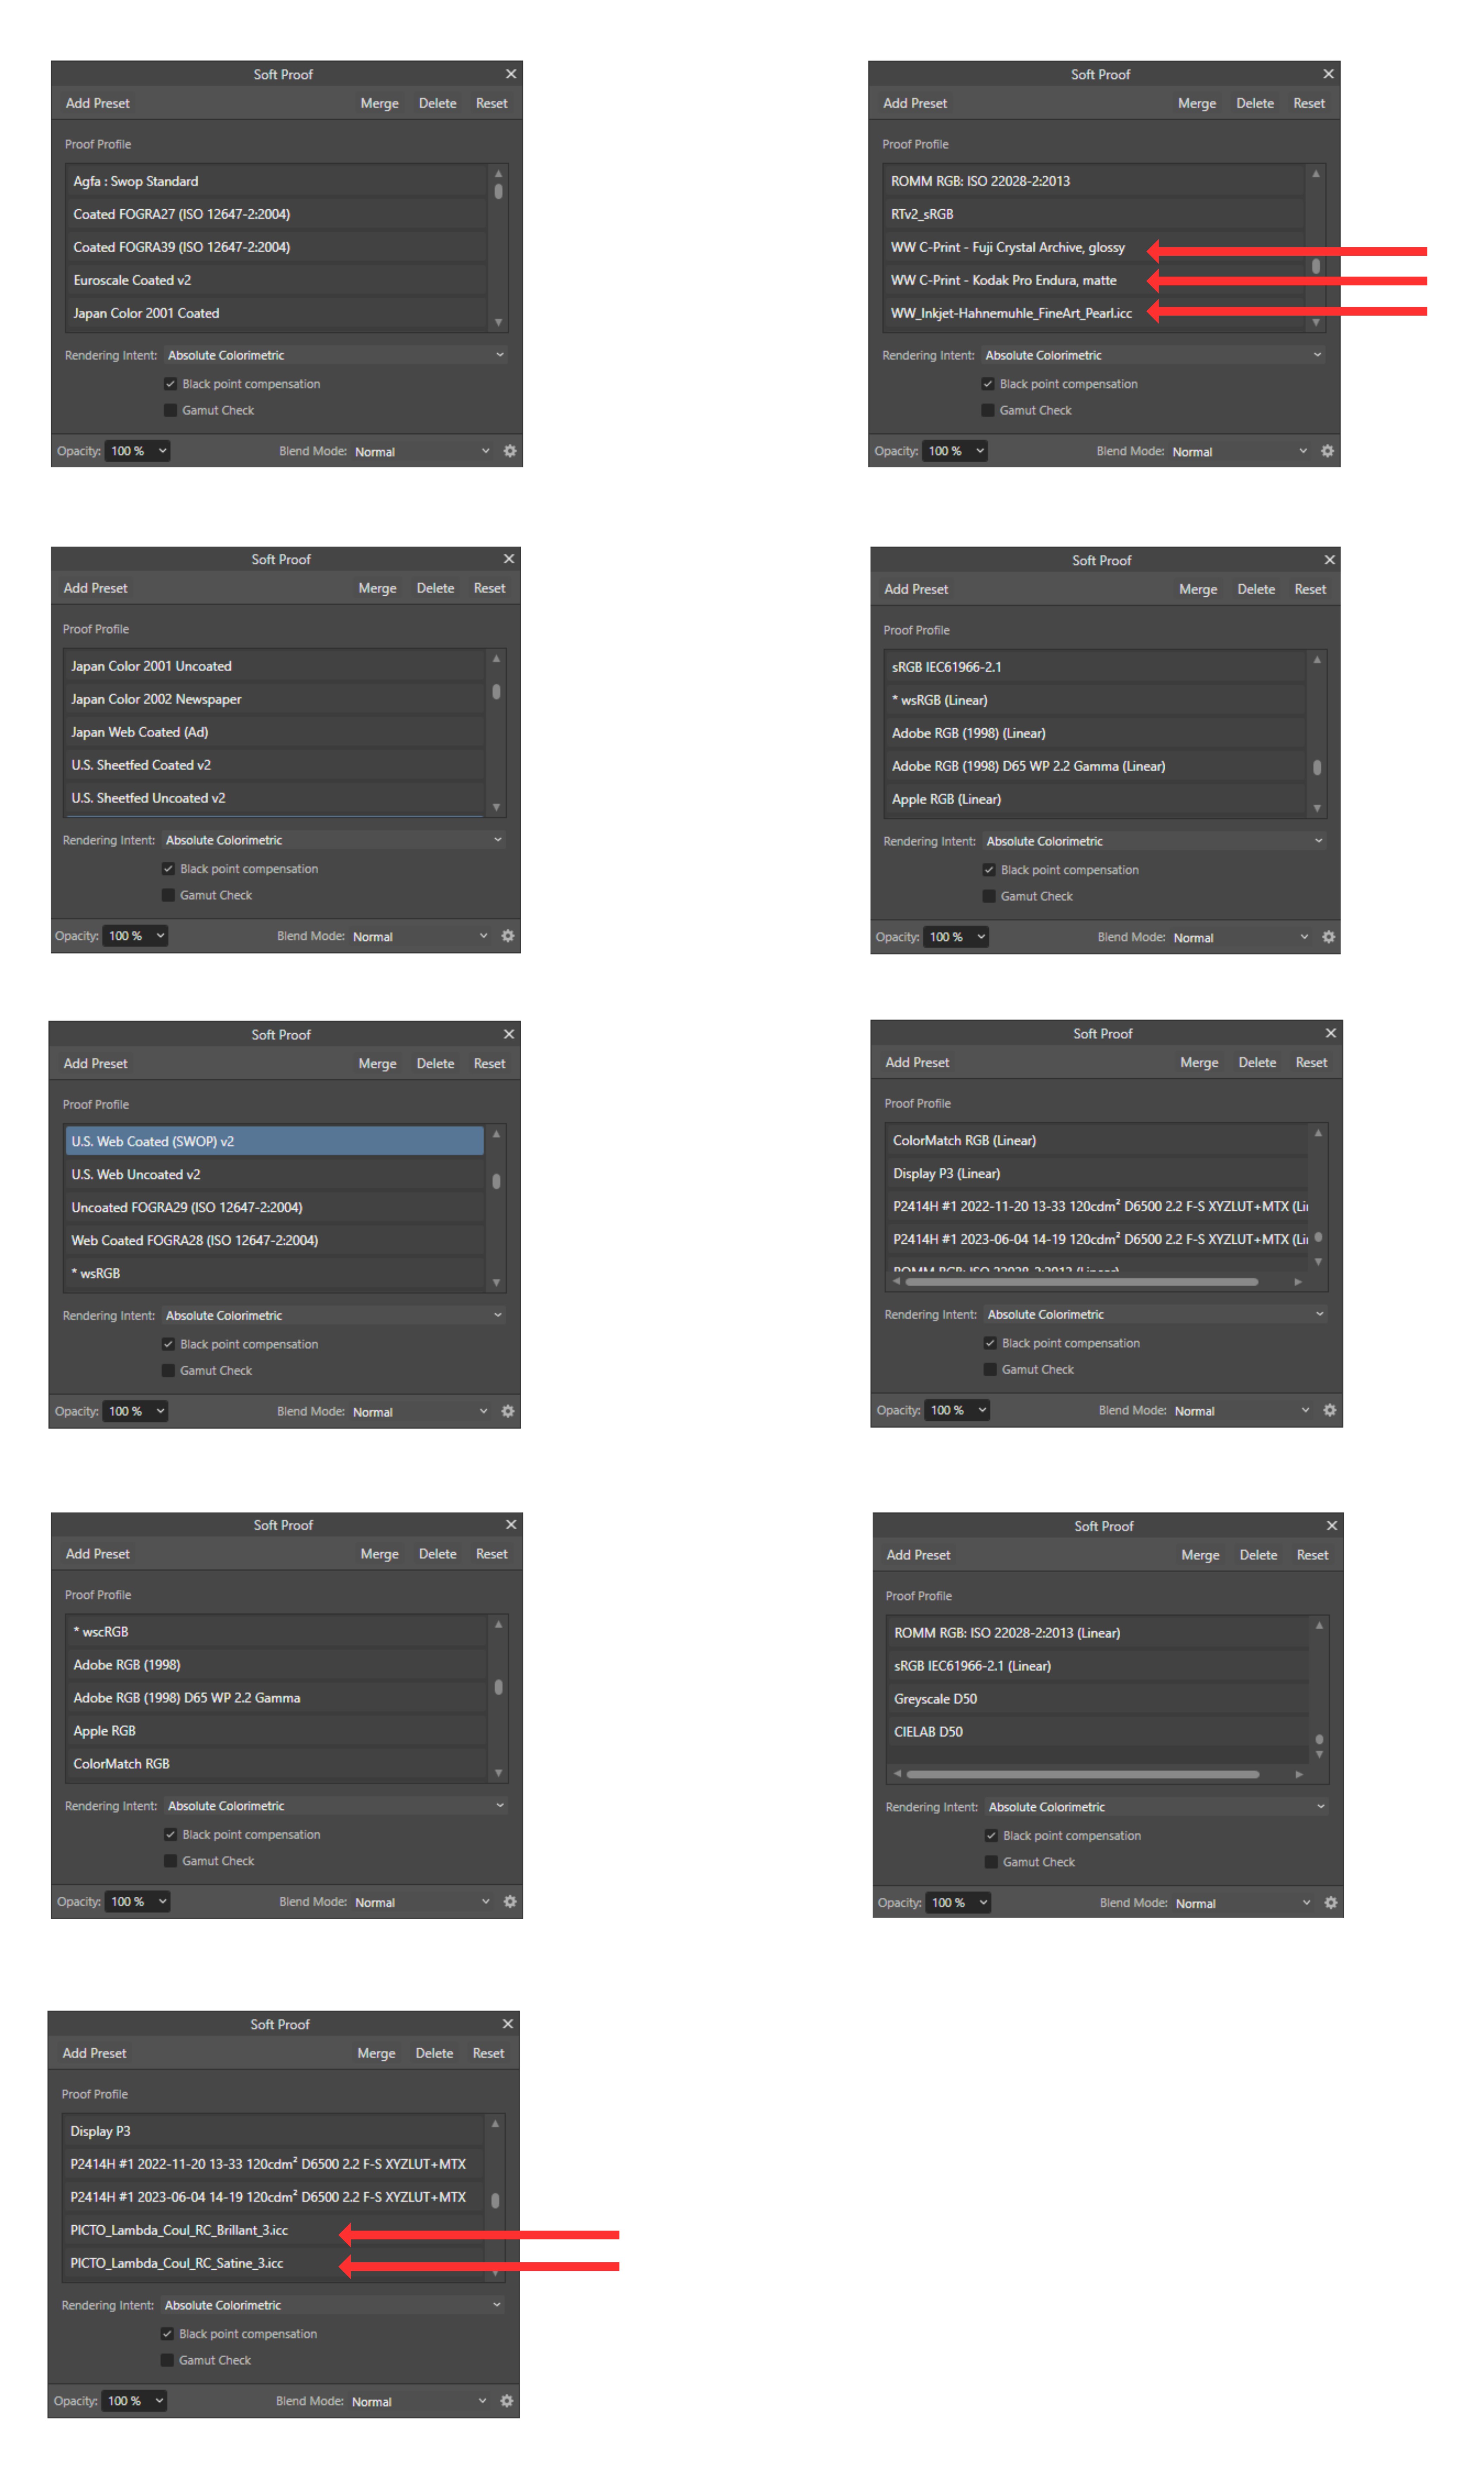
Hi @Lee D Thank you so much for your interest and sorry for the slow response; I was away this week-end and only checked the forums last night. So, Here is my C:\Windows\System32\spool\drivers\color, noting that in the Folder Options, "Show hidden files, folders and drives" is activated: I don't have screen recording apps on my computer, but here is the Soft Proof's Proof Profile list, one screen after another (left column then right column): And perhaps more usefully, here's everything together: Notice that in the "C:\Windows\System32\spool\drivers\color" image, there are no "PICTO" or "WW" (Whitewall) profiles. The "ghost" profiles from those two printing companies are indicated with red arrows. ("U.S. Web Coated (SWOP) v2" is highlighted in blue only because it is the "default" profile when a Soft Proof layer is opened.) Again, I first reported this problem back in AP V1. Note particularly that the file I had used as an example in that original post, "PICTO_Lambda_Coul_RC_Brilliant_3.icc", is still present as a ghost profile even though I have now updated to AP V2. I'll add that not all icc profiles do this. Indeed, I've installed dozens and dozens of icc profiles, always from PICTO and Whitewall, and most behave as you described above: if they are deleted from C:\Windows\System32\spool\drivers\color, they disappear from the Proof Profile list. Moreover, some previous V1 ghost files did disappear with the update to V2, but not all of them, like the PICTO icc in the preceding paragraph. And finally I'll re-mention that I never knowingly imported the ICCs via File > Import ICC Profile... But is there maybe some keyboard shortcut that I infinite monkey-ed? And if so, where do I need to look in V2's folder structure? Again thanks a million, and happy shooting to you.
-
This is one last Hail Mary before reporting the following as a bug. I'm rolling this over to this forum because the problem is still present in Affinity Photo 2. But do please see this post in the Pre-V2 Archive of Affinity on Desktop Questions. A brief summary: I'm on a Windows 10, 64-bit machine, now running Version 2.2.1 of AP. When I first reported this problem on February 4, 2020, it was in Version 1.7.3.481 of AP. The "Proof Profile" list in the Soft Proof adjustment layer continues to list icc files that were deleted from C:\Windows\System32\spool\drivers\color years ago thus. This continues to be the case even after a restart of Affinity, and for that matter after a restart of the computer, and for that matter after having updated from AP1 to AP2. To my knowledge, I never imported these ICC files into AP using the "Import ICC Profile..." function on the File menu. I think I've been through all of the various AP files installed on my computer, but have not been able to find these "ghost" ICC profiles. These "ghost" profiles actually work, i.e., selecting them changes the look of the image. So it's not just that they're still listed, it is that they are still active somehow... I'm hoping the fact that this problem continues to exist even after having updated from AP1 to AP2 might set off some bells for someone... Thanks in advance and happy shooting to all.
-
Hi to all, One last "Hail Mary" before I report this as a bug. Please read the above posts, especially the first one dated February 4, 2020 and the one dated January 28, 2022. The ones in between are other members trying to help (thanks again!), but to no avail. Most notably, I can find no AP folder (and I think I've been through them all) in which these "ghost" ICC profiles can be found. I still have this problem, even though I am now in Affinity Photo 2 (version 2.2.1 as of this writing). Perhaps the fact that this problem continues to exist even after having updated from AP1 to AP2 might set off some bells for someone? Note that I have bumped this over to the Version 2 Affinity on Desktop Questions forum. Thanks in advance!
-
To v_kyr: In theory my AP sends crash reports automatically (a choice at Edit > Settings > General > Other) To Dan C: Thank you, and send my pre-thanks to the development team; I know they'll have this fixed in a jiffy.
-
Affinity Photo 2.2.0 Windows 10 Home version 22H2 Reproducible: Yes Hardware acceleration: No (graphics card incompatible with AF hardware acceleration) Occurring using .nef raw files, .dng raw files, and .jpg files (all I'm able to test) EDIT: and with a new file (File > New... > (...) add pixel layer > Change to Develop Persona) No unusual hardware attached to computer (no tablets, duel monitors, etc.), no unusual programs This is a new problem that has appeared with the 2.2.0 version upgrade. No other recent changes have been done for my computer. Trying to delete a preset from the Tones tab in the Develop Persona causes Affinity Photo version 2.2.0 to crash. Recipe: Open any of the above file types, go to the Develop Persona if not already there. Go to the tones tab. Choose a preset from the Preset dropdown menu. From the hamburger menu, choose "Delete preset." On the confirmation dialog, click "Yes." Expected behavior: AP 2.2.0 deletes preset and resets tab to "Default" preset. Observed behavior: AP 2.2.0 crashes.
-
John74 reacted to a post in a topic:
Levels window Gamma number field
-
Levels window Gamma number field
KLE-France replied to John74's topic in Feedback for the Affinity V2 Suite of Products
As the kids say these days, this, this and more this: Then Ctrl+Shift to move by 0.001 -
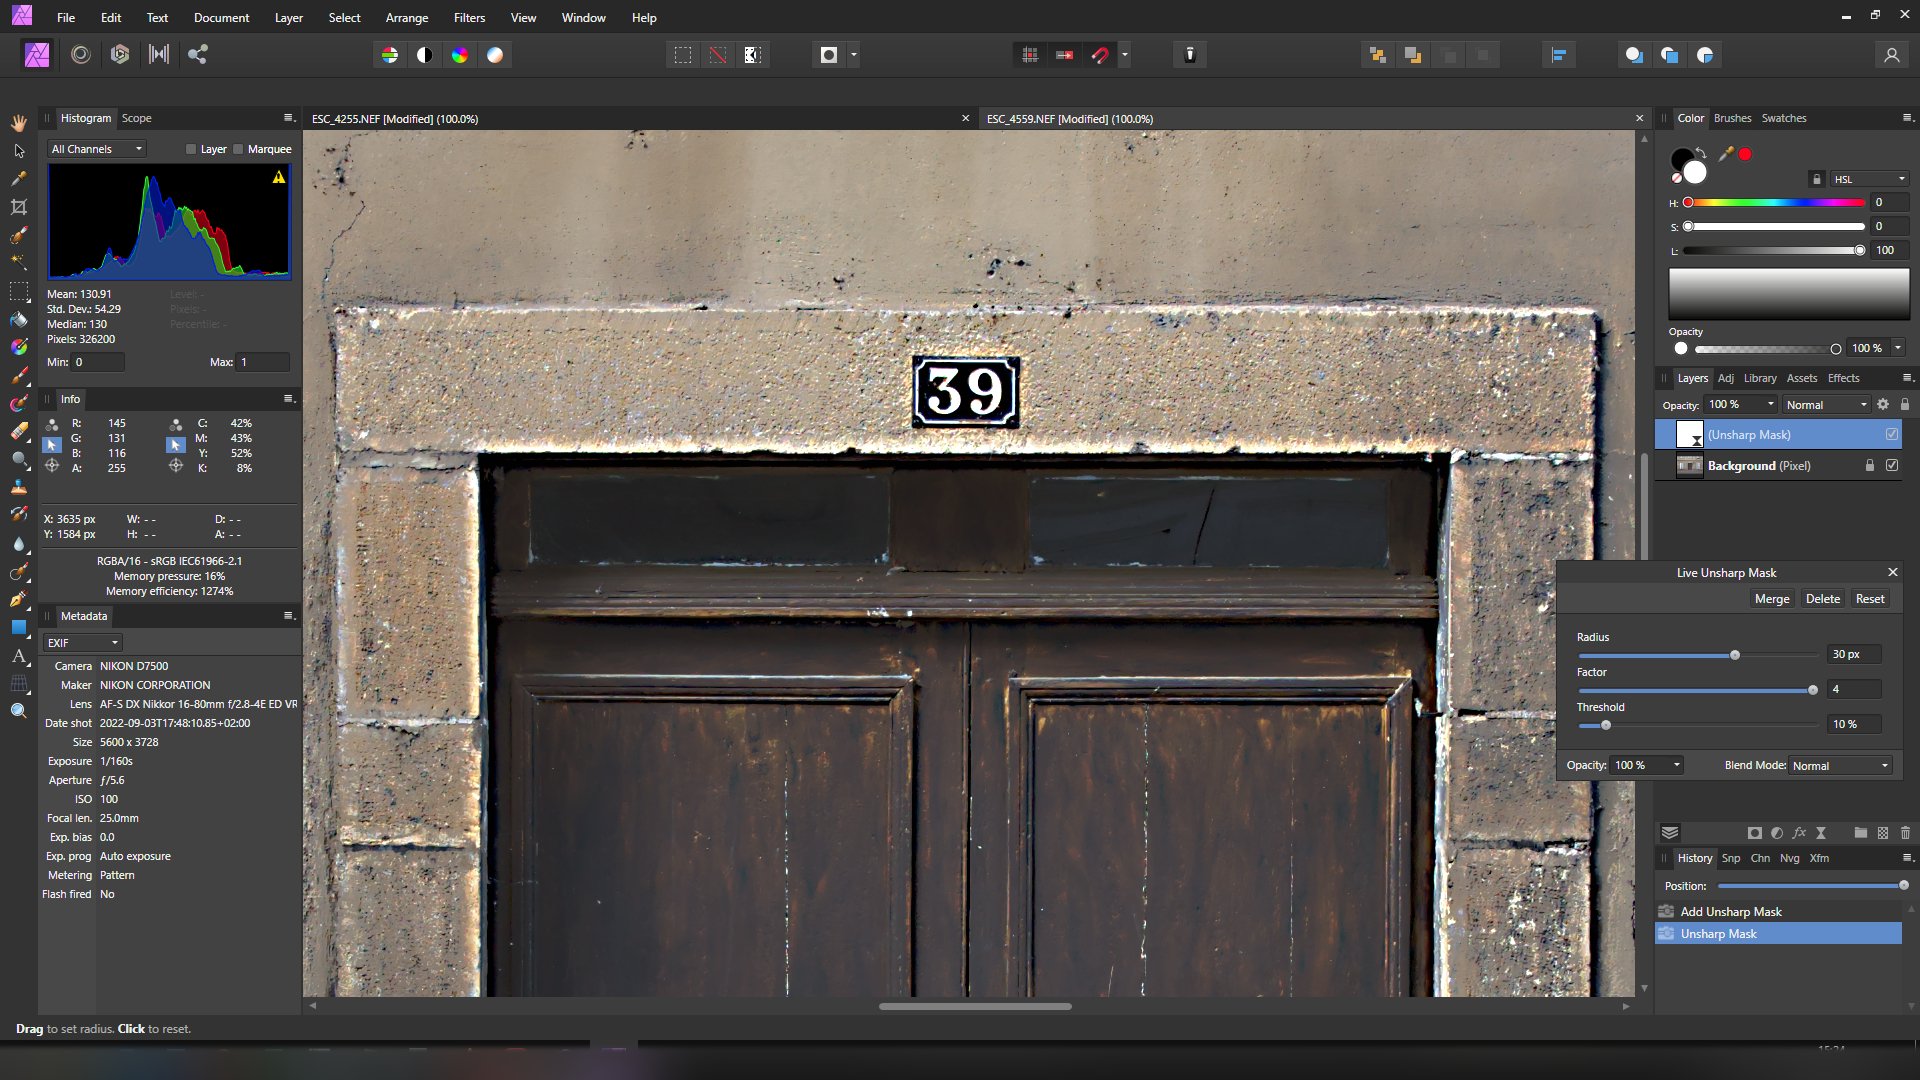
@Old Bruce "Why is 4 assumed to be 100%?" Because 4 is the maximum factor applicable on the USM filter (thus "100%", like I did for Amount in Detail Refinement). 'Not me naming these things! "And why "a bit" for the Threshold?" Because a applied "a bit" of noise reduction to the same ends (avoid oversharpening small details) in the Develop Persona. 'Not performing a carefully-designed scientific experiment here! And see below. @Lisbon "In the image that I tested I got very similar results with [these] settings: Detail Refinement (Develop Persona) Radius: 100% / Amount: 100%; USM (Photo Persona) Radius: 4px / Factor: 2 / Threshold: 0" Yes, I'm not contending that you can't get similar results with the USM filter. But now, crank up that USM filter's radius to 100 px (100% like in Detail Refinement) and its Factor to 4 (100% like in Detail Refinement) and see what you get. What's interesting to me, is that in Detail Refinement, Which, according to James and others, "is indeed an unsharp mask filter," you can do exactly what you did and have perfectly acceptable, que dis-je, very good sharpening. I have never seen a USM filter that can be pushed to its maximums and give good results; doing so in any USM filter in any photo retouching program (well, those I've known) will give garish, clownish results. But doing so in Detail Refinement doesn't. Which suggest that its underlying calculations are different from those of a "conventional" USM filter, or in any case that something is different with it (continue reading). "In your first screenshot you have "Detail Refinement" and "Noise Reduction" active. They have almost like an opposite effect. One tends to soften. The other sharpens." Yes, I know. The noise reduction tactic for Detail Refinement is nothing more than that: just a tactic. It happens to limit fine detail sharpening when using Detail Refinement, in a "visually similar" way to Threshold in the USM filter (yes I know they're different). "Different units of measurement. Notice that one comes in percentage and USM in pixels. A radius of 30% is different from 30px." Not according to James Ritson, who, in his response here (same link as above) says: "(...) detail refinement is indeed an unsharp mask filter. The use of percentage rather than pixels for the radius is basically an oversight: at one point, there may have been further designs (e.g. adaptive sharpening), but as it stands, the percentage is simply 1:1 with the pixel radius (so 100% = 100px)." If 100% equals 100 pixels in Detail Refinement then 30% equals 30 pixels. James's comment is by far the most qualified explanation that I've been able to find. If someone has a better one, or a newer one, from a qualified person, please post a link! That's exactly what I'm looking for. But that "percentages equals pixels" doesn't seem to make sense, which is my point: Detail Refinement does not behave like the USM filter does. Or, if it does, its indications are extremely misleading when placed in comparison to AP's own USM filter. You finished with this: "After a bit of trial and error, Radius: 30% / Amount: 100% should correspond more like Radius: 3px / Factor: 2 / Threshold: 0." Quite possibly! And if so, Detail Refinement's indications should be: Radius 0 to 10 pixels (or to 4 pixels? See your first equivalency test) and: Amount 0 to 2 factors (currently no Threshold adjustment there). I Note too that there is a precedent for limited effects in the Develop Persona. For example, Saturation increase is limited to 50% in the Develop Persona; If one wants really garish saturation, one has to jump over to the Photo Persona. So yes, what I'm hoping for is not how to-s but an explanation on the very different (and very good!) behavior of the Detail Refinement function in the Develop Persona. Thanks to both for your input!
-
Hi to all. The basics: Windows 10, Affinity Photo 1.10.5 (but this has been true since my first-ever version of AP), usually 20 mp-ish images out of a Nikon D7500. Here's what one gets searching for site:https://forum.affinity.serif.com/ "detail refinement". Therein is this post where James Ritson (of Affinity Photo's how-to videos (excellent work James!)) says that "detail refinement is indeed an unsharp mask filter," and adds, speaking of the strange use of percentages therein, that "(they are) simply 1:1 with the pixel radius (so 100% = 100px)." There are also other finds in the search result where various people say that Detail Refinement is basically a USM filter, that the USM filter in the Photo Persona does the same thing, etc. etc... But it doesn't. At least in my case. The Detail Refinement function gives way, way way better results than any of the other various methods of sharpening in AP. But it does not behave like a USM filter does. Going through the various search results and the AP help, I cannot find any convincing explanation for how it works. Because in my experience at least, it does not work like a USM filter. Try this: Open a raw photo in AP, get your exposure somewhere acceptable, then activate Detail Refinement, set Radius to 30% (or even 100%) and amount to 100%, and use Noise Reduction to tame any over-sharpening of tiny detail (or not!). So, according to James's description above, you've got a 30 pixel radius and 100% sharpening. That should, especially in my 20, 21 mpx images, give horrendous halos. But it doesn't: But hey, it's supposed to be a USM filter, so let's deactivate Detail refinement, develop the image (opening it in the Photo Persona), then apply an equivalent USM, i.e., 30 px radius, 100% factor (4) and a bit of threshold to keep it from over-sharpening small detail: Yikes! No, that's not behaving at all like Detail Refinement. Detail Refinement seems to be doing something in the vague concept of capture sharpening. And it's splendid. I love it. You can push it as far as you want, Detail Refinement won't halo; even 100% for both Radius and Amount won't cause haloing--and sometimes even works fine for certain images. But how? I am hoping that maybe a developer can step in to clarify what exactly Detail Refinement does. Sure, I don't need to know the answer to that question; I can just take advantage of this unmatched sharpening tool. But, enquiring minds and all that... By the way and to all: you can also use it post Photo Persona: once you've got your image where you want it do a Merge Visible and send that layer over to the Develop Persona for Detail Refinement. You won't be disappointed. Discuss discuss and thanks in advance to anyone who can shed light on this AP element.
-
sfriedberg reacted to a post in a topic:
Soft Proof adjustment lists deleted icc profiles
-
Hi to all, A post to relaunch this subject. I just went through another round of cleaning out C:\Windows\System32\spool\drivers\color and the Affinity Photo Soft Proof adjustment continues to list long-deleted icc files. Everything in the preceding exchanges continues to be true except for being on AP version 1.10.4.1198 now. The "long-deleted" above is important: In the \color folder, there were many icc files downloaded for various printers and papers. After cleaning out the folder, most disappeared from the Soft Proof adjustment's Proof Profile list, but there remains a handful of them that continue to be listed, despite the fact that they no longer exist anywhere on my computer, as best as I can determine. So again, if anyone has an idea as to how to eliminate these "ghosts" from the Soft Proof adjustment's Proof Profile list, I'm all ears. And, should this thread be sent over to whoever as a bug report? Thanks and happy shooting to all.
-
Reporting back on the idea of deleting the metadata under discussion. I need to note here that there was a third line in the XMP metadata that I hadn't noticed before, labelled "History When" in photos affected by the problem presented here. So we actually have three potential problem lines in the XMP metadata: "Metadata Date" "History When" "Modify date" So, I made a copy of one of the images affected by the issue discussed above (in this case, a photo taken in summer but reprocessed in winter), and deleted the "Metadata Date" line using ExifToolGUI, and re-uploaded it to Google Photos. This first test photo remained affected by the problem, that is, it was out of place, because it had the "GMT+01:00" descriptor in a series of photos of "GMT+02:00" images. Remember that this first copy still had the "History When" and "Modify Date" lines (with the "+01:00" affix) in the XMP metadata. I then made a copy of the copy (thus with "Metadata Date" already deleted), and deleted the "History when" line and uploaded it to Google Photos. This second test photo too remained affected by the problem. I thereafter made a copy of the copy of the copy (thus with with "Metadata Date" and "History When" already deleted) with the intention of deleting the "Modify Date" line in the XMP metadata. But that proved a bit more difficult, because there is also a "Modify Date" line in, for example, the EXIF group, and I didn't want to delete both of those lines. So, I just used the ExifToolGUI's built-in "Remove metadata" function to delete all of the XMP metadata (but no other metadata). I thereafter uploaded this third copy to Google Photos, and this third test photo was unaffected by the problem. It went right where it belonged and showed the correct "GMT+02:00" affix on the date and time in the Google Photos info. Ideally of course, I would have liked to delete just the "Modify Date" line in the XMP metadata, for this third copy but I note that in those XMP metadata, only these three lines, "Metadata date", "History When" and "Modify Date" show the date and time at which the photo had been re-processed (in winter), with the "+01:00" affix. The only other date mentioned in the XMP metadata is "Create Date", which gives the date and time at which the photo was actually taken (in summer), and it does not have a time zone affix. So, we now know that deleting "Metadata Date" alone does not fix the problem. We know that deleting "Metadata Date" and "History When" does not fix the problem. We also know that deleting all three lines does fix the problem. What is left unknown, is whether deleting "History When" alone or deleting "Modify Date" alone would fix the problem... But I don't have the energy to go on! Hope all this helps, and I'm gonna step away from the computer now.