.jpeg.1b727463d44a0d52bc3499597e28d11c.jpeg)
James Ritson
-
Posts
855 -
Joined
-
Last visited
Everything posted by James Ritson
-
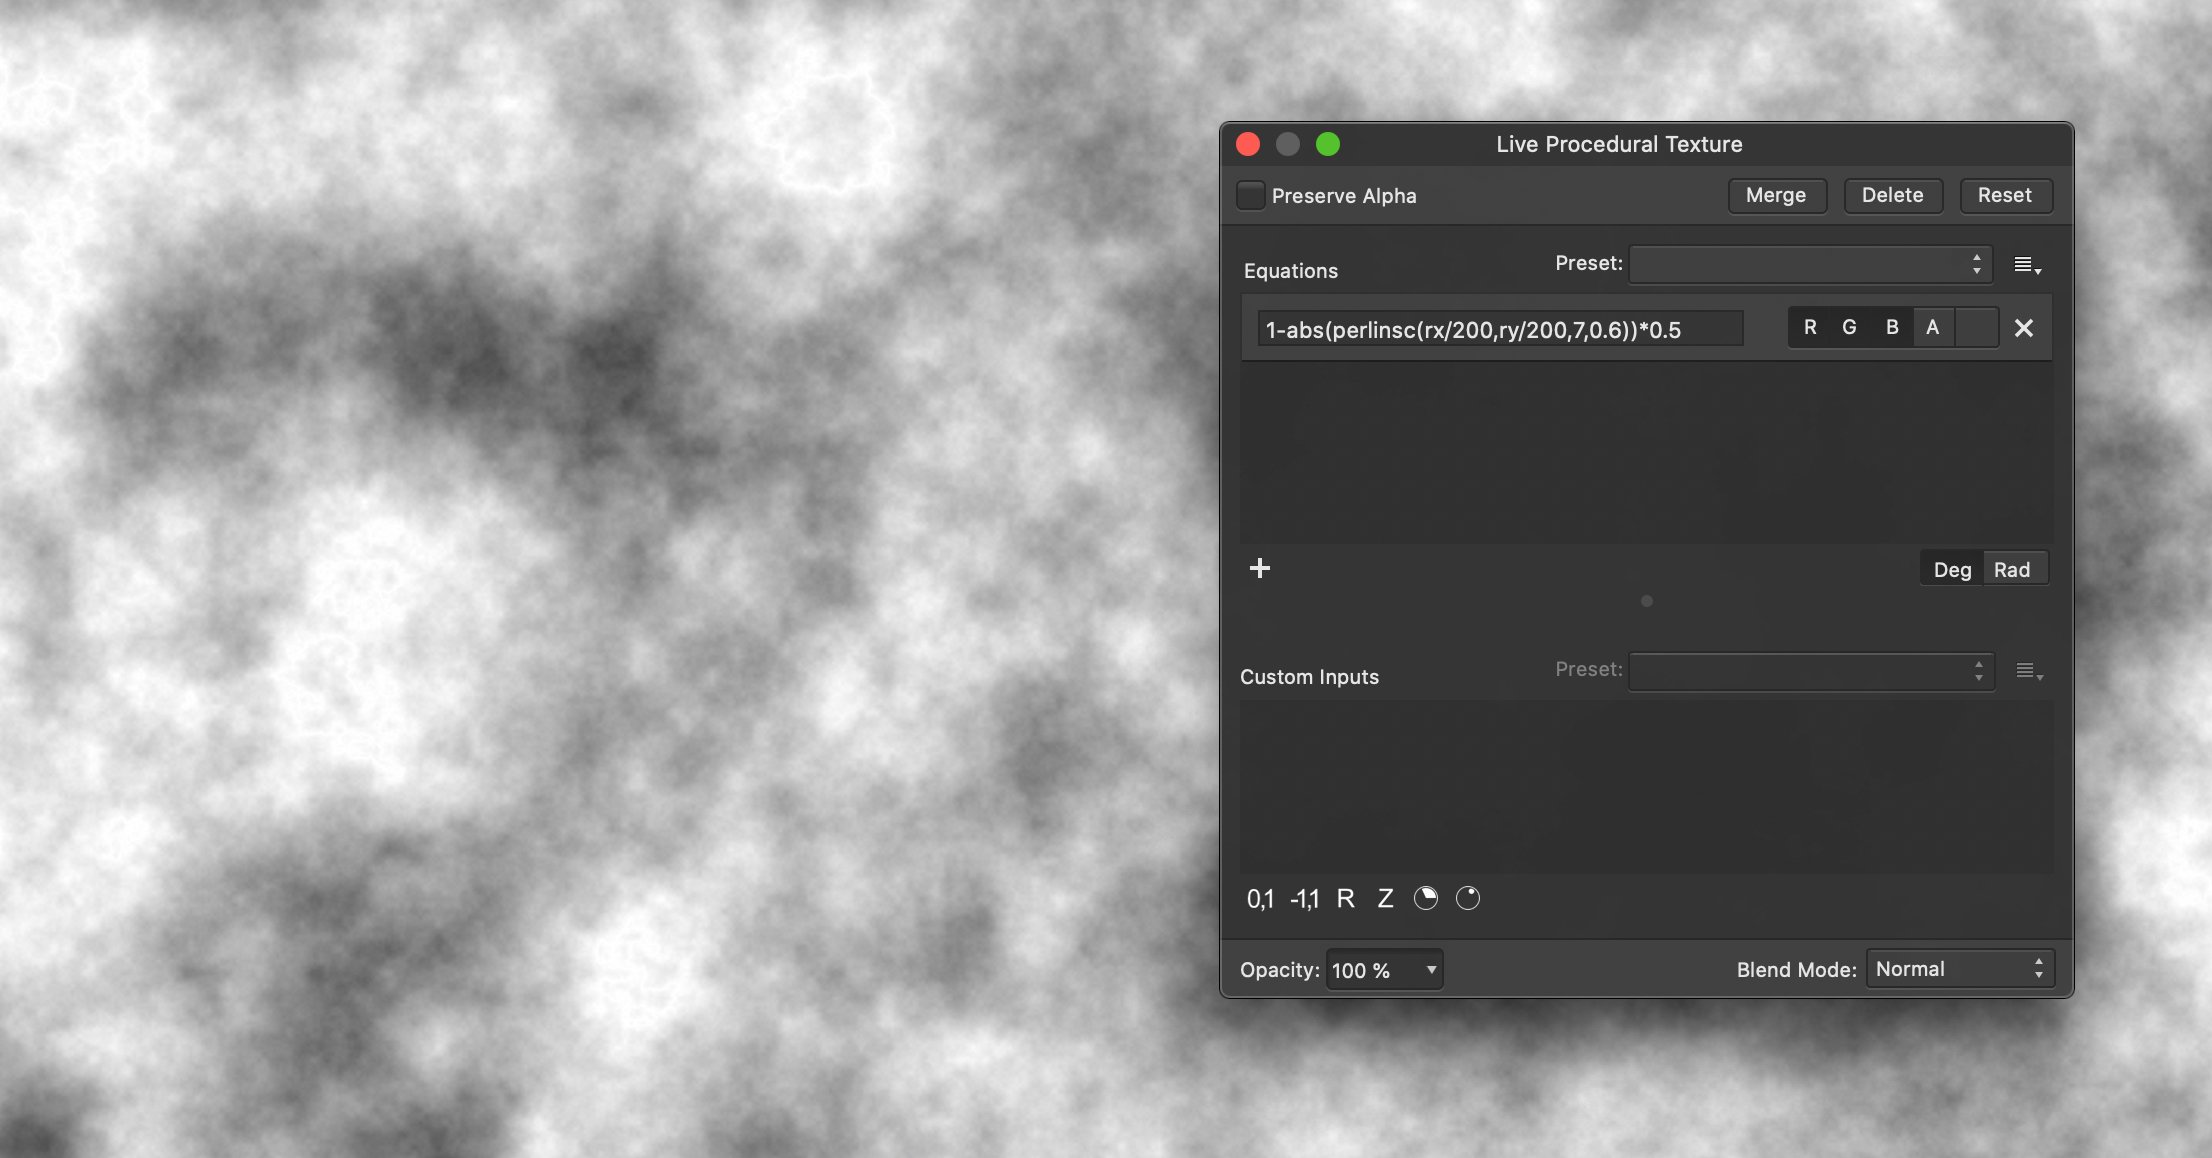
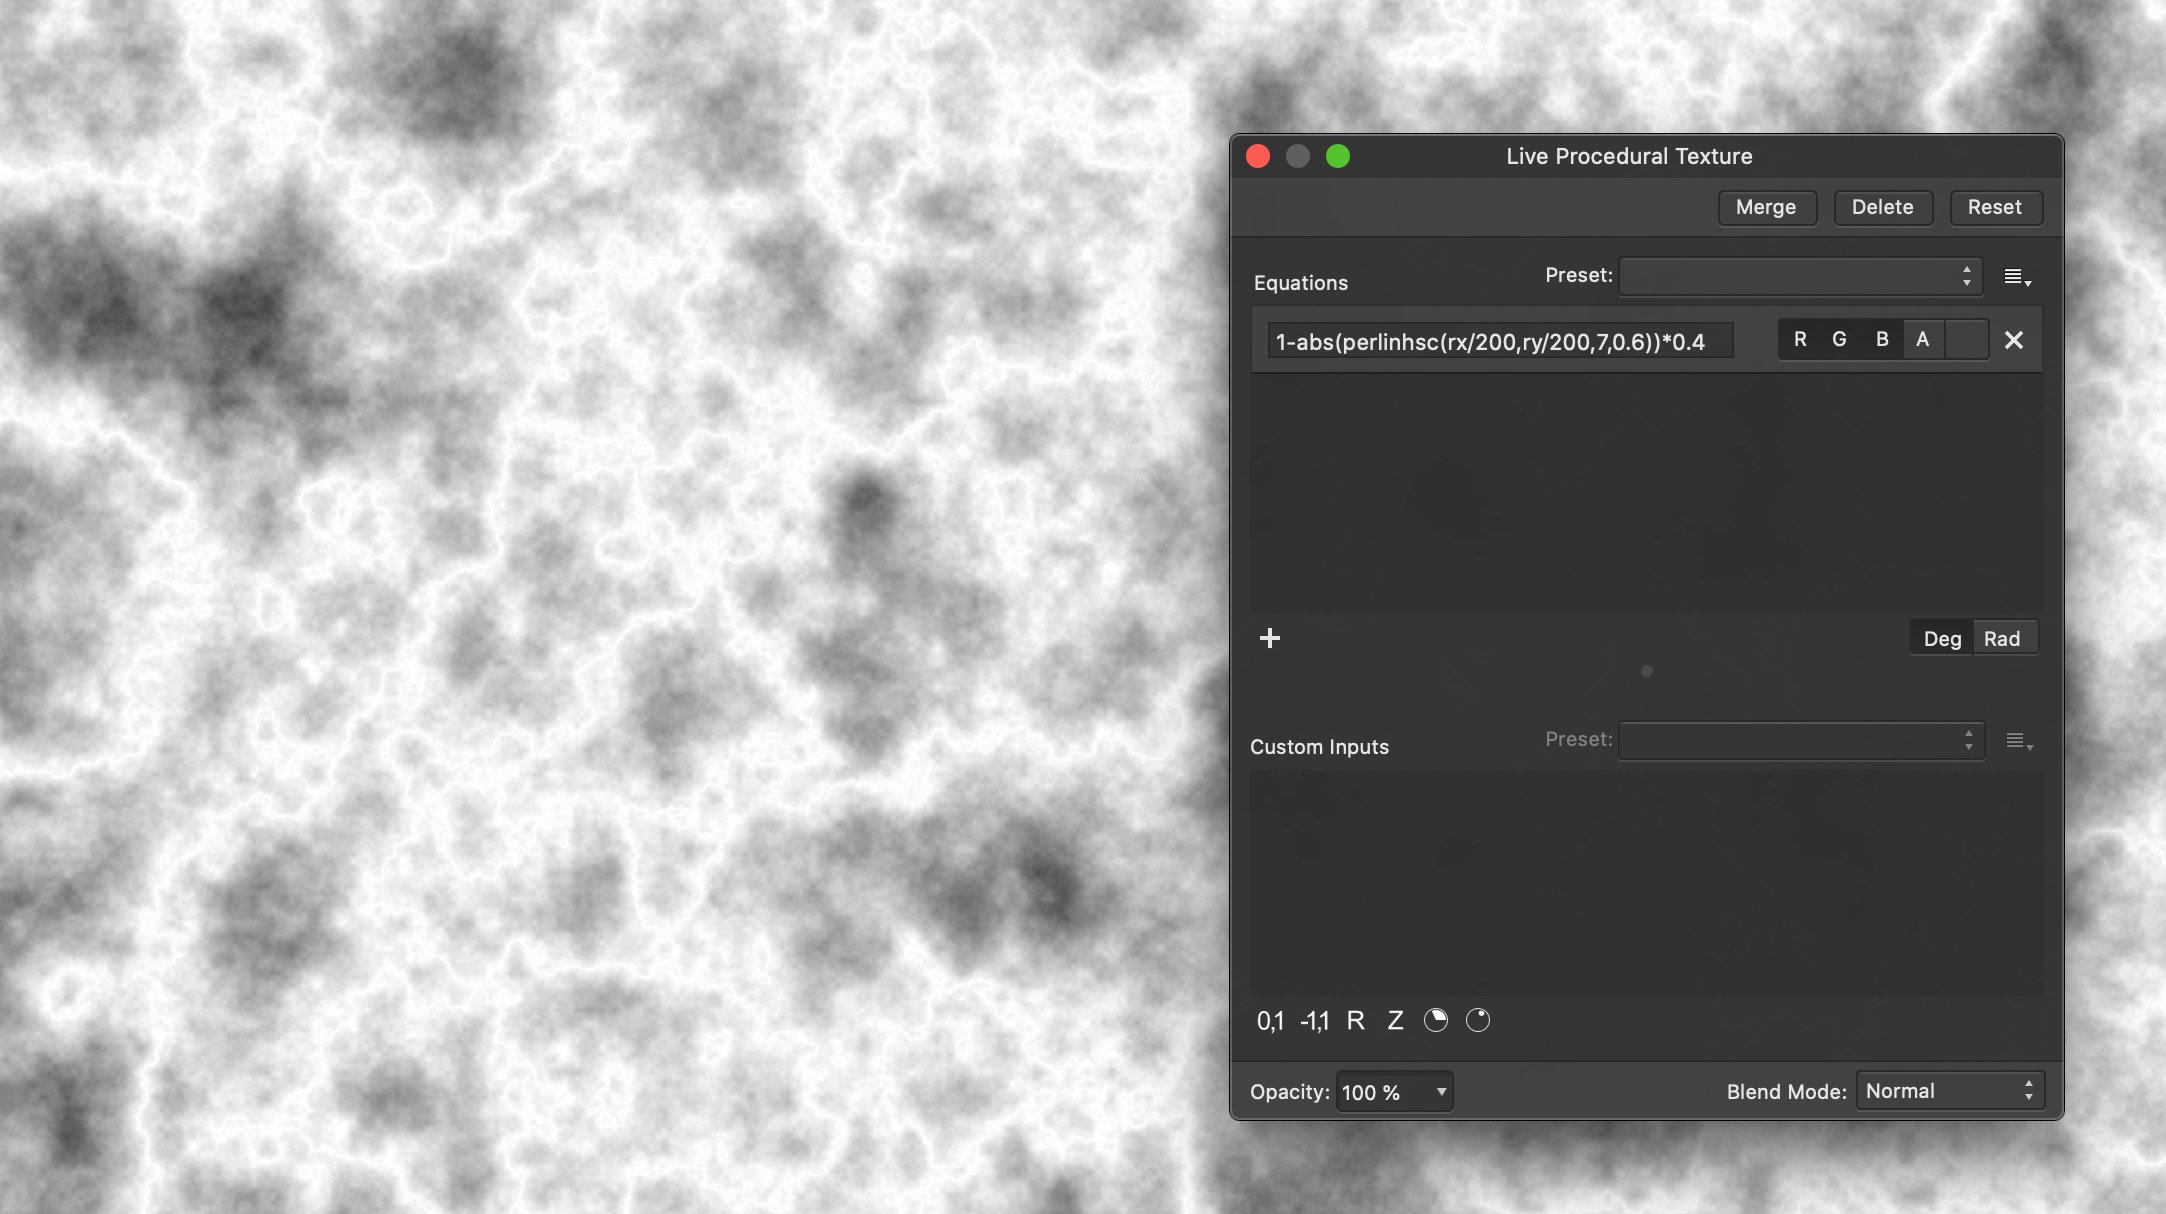
.thumb.jpeg.6f143e8223547aba974205ef53397036.jpeg) Hi @desdemoli, from reading various discussions and threads about it, ridged multifractal noise appears to be perlin noise modified by an absolute function and inverted. I make no guarantee as to whether this works, but I believe you can do both using a live Procedural Texture filter. Add a new equation field and enable the RGB channels for it, then try: 1-abs(perlinsc(rx/200,ry/200,7,0.6))*0.5 Here's a screenshot of what it looks like: However, there's this quote from a StackOverflow thread: For perlin noise with values in the range of -1 to 1, you would want to use a harmonic perlin noise function, so the equation would need to be adapted like so: 1-abs(perlinhsc(rx/200,ry/200,7,0.6))*0.4 And another screenshot: You will want to experiment with the multiplication value at the end—I lowered it to 0.4 for the harmonic perlin noise example. It's also possible to adapt the comprehensive Perlin Noise preset that ships with the app (not Simple Noise, but the Perlin Noise preset) like so: var v=vec2(rx,ry)*cells/w; tocui(1-abs(perlinhsc(v,oct,pers))*cont)+br You can then use the parameters such as Octaves, Persistence, Cell count etc whilst having the ridged multi fractal perlin noise—at least that's what I think would happen. Hope that helps!
Hi @desdemoli, from reading various discussions and threads about it, ridged multifractal noise appears to be perlin noise modified by an absolute function and inverted. I make no guarantee as to whether this works, but I believe you can do both using a live Procedural Texture filter. Add a new equation field and enable the RGB channels for it, then try: 1-abs(perlinsc(rx/200,ry/200,7,0.6))*0.5 Here's a screenshot of what it looks like: However, there's this quote from a StackOverflow thread: For perlin noise with values in the range of -1 to 1, you would want to use a harmonic perlin noise function, so the equation would need to be adapted like so: 1-abs(perlinhsc(rx/200,ry/200,7,0.6))*0.4 And another screenshot: You will want to experiment with the multiplication value at the end—I lowered it to 0.4 for the harmonic perlin noise example. It's also possible to adapt the comprehensive Perlin Noise preset that ships with the app (not Simple Noise, but the Perlin Noise preset) like so: var v=vec2(rx,ry)*cells/w; tocui(1-abs(perlinhsc(v,oct,pers))*cont)+br You can then use the parameters such as Octaves, Persistence, Cell count etc whilst having the ridged multi fractal perlin noise—at least that's what I think would happen. Hope that helps!
-
Hi @creamelectricart, I've previously tested ACES 1.0.3 with no issues, and managed to get 1.0.2 working here. I would suggest copying the OCIO configuration file and supporting files to a general folder rather than Application Support—there might be a sandboxing/permissions issue here. If you copy the files to Documents for example, then point the configuration and support directory options to them, does it load successfully? Hope that helps!
-
Hi @fochardo, I'm not sure that what you're asking is relevant to RAW development—PPI (or DPI, as we refer to it in the Affinity apps) has no bearing on the pixel resolution here. It does have meaning regarding the relationship between physical measurements and the pixel resolution, but this does not factor into RAW development. Are you asking whether it is possible to "resample" the RAW file before developing it? If so, this is not possible (I'm not sure why you would do this either). Affinity Photo processes RAW files at their original given pixel resolution—DPI/PPI is irrelevant here, so please don't be concerned about losing quality or resolution. Affinity Photo will arbitrarily use the DPI value specified in the RAW metadata (often tagged as XResolution and YResolution)—e.g. in Sony ARW files this tends to be 350, whereas I've just opened a Canon CR3 which is set to 72. Again, though, this DPI value does not affect the pixel resolution of the developed RAW file—you are always developing at the original (and highest) resolution. Hope that helps!
-
No problem, definitely give 32-bit a try! I use DeepSkyStacker—not sure if APP's export settings are similar but you'll want to use 32-bit float/rational, not integer. A couple of other useful things I've found: You can use a live Clarity filter (Layers>New Live Filter Layer>Sharpen>Clarity) to bring out structure in nebula objects etc. Add a live Clarity, then invert it (Layer>Invert) and you can paint the effect back into specific areas. If you duplicate the main Background pixel layer, you can apply the destructive version (Filters>Sharpen>Clarity), which has the benefit of being more aggressive since it doesn't have to render in real-time. Synthetic flat frame creation: I've had to use this, not for lens vignetting as I shoot flats, but for light pollution and skyglow that creeps in when you do extreme tonal stretching. Unfortunately, Median filtering is too computationally expensive in 32-bit and cannot be used, so what I do is: Create a merged layer of my work so far (Layer>Merge Visible), copy it, then go to File>New from Clipboard. WIth this new document, I'll convert it to 16-bit (Document>Convert Format / ICC Profile), run Dust & Scratches to get rid of all the stars, then use the Inpainting brush to remove any traces of deep sky objects. Finally, I'll convert back to 32-bit, run Gaussian Blur at its max radius of 100px, then copy and paste the layer back into my 32-bit document. Once the layer is pasted in, set its blend mode to Subtract. The sky will be way too dark: to counteract this, add a Levels adjustment layer and clip it into your pasted layer (drag it over the layer's text/label). Now raise the black level (input, not output) until you're happy with the result. Hope that helps!
-
Hi @schmety, hope you're well. Good old Astrobackyard, been following Trevor since the start of this year as I've gotten into astrophotography! I believe you can approximate the Photoshop workflow by using Select>Select Sampled Colour. Click on the middle of a star, then adjust Tolerance to select the rest (you might have to go up to 100%). Also, you may want to try switching the colour model from RGB to Intensity, as stars will typically be the brightest parts of the image. Once you've made the selection by clicking Apply, go to Select>Grow/Shrink. Grow the selection by what is appropriate (I ended up with 16px for my image) and check the Circular option for nice round selection marquees around the stars. Finally, go to Edit>Inpaint and the stars will be removed. This might take a couple of minutes to complete if you're working in 32-bit—which you should be! Not sure if you're aware but Affinity Photo can use practically all of its tools, filters, adjustments etc in 32-bit, so there's no need to tone stretch then flatten and convert to 16-bit. The only time I've needed to use 16-bit is when creating a synthetic flat frame to combat gradients/skyglow etc. You can also use Select>Tonal Range>Highlights to make the initial selection, but you get less flexibility as there's no Tolerance option. Also, if you're in 32-bit Linear, what constitutes highlight detail will differ from 16-bit Nonlinear, so you may not find all the stars are successfully selected. Hope that helps!
-
Pixelated alpha on groups // Octane EXR
James Ritson replied to tobecg's topic in V1 Bugs found on Windows
Hi again @tobecg, a couple of suggestions based on what you've said here: When you say using the OCIO with source colour, are you referring to the OCIO adjustment layer (and not the OCIO transform on the 32-bit preview panel)? If so, one thing you should be aware of is that EXR documents are converted to scene linear upon import. Since EXR doesn't have the concept of tagged colour spaces, you can specify an input colour space by affixing the document file name with a valid colour space name from the configuration. For example, if you are using the ACES OCIO configuration and you know that your linear colour values in the EXR file are in ACES colour space, you can rename your file to "filename aces.exr". When you import it into Affinity Photo, you'll get a toast in the top right saying it has converted from that ACES colour space to scene linear—the colour values in your document should now look correct without having to do that initial OCIO adjustment layer transform. However, if it's too late for that, you could also achieve the same transform by adding your OCIO adjustment layer and on Source Colour Space choosing "ACES - ACES2065-1". Leave the Destination Colour Space as "role_scene_linear" since that's what you want to be converting to. You could then theoretically add another OCIO adjustment layer going from "role_scene_linear" to "out_srgb", which I think is what you were referring to in your post? That would give your document a gamma-corrected nonlinear appearance. A further complication is that in Affinity Photo EXR documents are (by default) given a linear sRGB colour profile, since Affinity Photo needs something to colour manage with. If you are working in Unmanaged (linear) or OCIO transform modes then this colour profile is completely arbitrary. It does however factor in if you use ICC Display Transform, since the colour values will be bounded to sRGB space during the document to screen profile conversion. Colour values outside sRGB are still there since you're working in unbounded floats, but I believe you won't see them as long as your document profile is linear sRGB. Hope that helps! [Edit] Forgot to add—I don't think this will affect you since you've mentioned there's no need to export back to EXR, but you can also affix the export filename with a colour space and Affinity Photo will convert colour values from scene linear to that colour space during export (e.g. "export filename acescg.exr"). Useful if you're taking your EXR into other software and need it to be in a certain colour space. -
Pixelated alpha on groups // Octane EXR
James Ritson replied to tobecg's topic in V1 Bugs found on Windows
Hi @tobecg, I've had a look at the files you provided to try and puzzle out what's happening. I can't replicate your exact setup as I'm not sure which OCIO configuration you're using? Unless you're using a filmic transform from a blender configuration? It looks like there are two separate issues working in tandem, both related to groups and how group nodes render. You've got a mask on your beauty pass group, and also a separate group of adjustment layers. This is what was throwing me, because with your workflow both of these are contributing to the rendering issue. There are a couple of quick workarounds you can try whilst we investigate this further: the first is to simply drag your OCIO, Lut, Gain group and clip it into the Beauty group—so drag and offer it to the text (not the thumbnail) of the Beauty group. In terms of node positioning, the mask in the Beauty group will now render above the adjustments, so all should be OK there. Alternatively, Ctrl/CMD-select both the OCIO, Lut, Gain and Beauty groups and group them together, then drag the mask out from the Beauty group and offer it to the thumbnail of your newly-created master group. This will basically achieve the same thing as the above approach, but just means you can have child groups and stay more organised. It should look like this: I've tried reproducing the issue with my own renders, and I can see a distinct difference in alpha rendering when the mask is rendering on a group as opposed to a pixel layer. I have however been unable to reproduce the pixellation you're experiencing. I'm not familiar with Octane—is it very expensive for render time to create a straight alpha pass? I can't help but wonder about the object colour pass and whether it's intended for use with alpha masking, because it seems to contain erroneous pixel values. For example, if you open the original EXR document and push the exposure of the object colour pass, you will see this: Whereas if we look at the same Exposure adjustment on a genuine straight alpha pass we will see: I'm certainly not trying to absolve Affinity Photo of responsibility here 😉 there's definitely an issue with group nodes that needs looking into, and thank you for bringing it to our attention. Would it be worth trying a straight alpha pass on your end however to see if the issue can be mitigated that way? Also, I noticed with your document file that you've chosen Unmanaged in the 32-bit preview panel, so you're seeing scene-referred linear values rather than managed display referred values. It's worth asking what your intended delivery is: are you planning to export to nonlinear 8-bit/16-bit delivery formats? If so, you have to use ICC Display Transform otherwise you'll get a nasty shock when you look at your exported images. ICC Display Transform exists so you can accurately preview what a linear 32-bit document will look like when exported to a non-linear, display-referred delivery format. This causes an issue if you try and use certain OCIO transforms. Case in point, blender's Filmic transform, which is designed to go from linear to nonlinear gamma. You effectively double-up the nonlinear gamma transform which makes the resulting image look too bright and washed out. An easy solution to this is to add a live Procedural Texture filter (Layers>New Live Filter Layer>Colour>Procedural Texture). Click the plus icon three times to add red, green and blue channel entries, then raise each channel value to the power of 2.2 (linear transform) like so: Given that most OCIO transforms (that I know of) are bounded and so will clip values outside 0-1, you will probably want to put this Procedural Texture filter underneath your OCIO adjustment layer. If you're using Affinity Photo as an intermediary in a compositing pipeline (and so will be exporting back to EXR), you'll want to use the OCIO transform option instead of ICC Display Transform. Hope the above helps!
-
Out of curiosity, I extracted the embedded JPEG from the DNG file. It's a low resolution copy but looks like this: I realise everything is subjective, but I don't find this result particularly pleasant, and some light editing in Affinity Photo can absolutely achieve a much better image. The camera tech in the Pixel 3A clearly has some shortcomings, namely severely narrow dynamic range which appears to be compensated for with underexposure and heavy in-camera image processing. Looks like some degree of tone mapping is applied to compress the tonal range, but unfortunately it can't mitigate the ugly clipped dark tones. These are especially noticeable in the foliage on the left hand side of the image. Affinity Photo's RAW engine doesn't apply any kind of "adaptive" tone curve or initial processing, which leads users into believing it has shortcomings in this department when they are presented with a dark, underexposed image to begin with. The Pixel 3A has intentionally underexposed the image and then attempted to correct for the underexposure with in-camera processing. However: Ignoring the "fix it or die" comment which is a little inflammatory, I can reassure you that the app isn't "destroying" the photo. RAW files are processed in linear, unbounded floats. This means that no pixel colour values are being clipped or compromised during the development process. Yes, the DNG is initially quite dark. With processing, however, you can not only achieve the result you see with the in-camera JPEG, but frankly you can far surpass it. Editing is mostly subjective, a matter of taste, therefore everyone's opinion on how you would process this image will be different. I had a quick go at editing: I removed the default tone curve, used Curves for my own tone curve, then developed the image. I then used some adjustment and filter layers in the main Photo Persona to create a fairly balanced edit. My main goal was simply to even out the tonal range of the scene and have a pleasing, natural looking result. I also straightened/rotated it, as the original orientation was a little crooked. I've attached it below: The reality is that Affinity Photo may not be for you (and there's nothing wrong with that). If you want the RAW development to match the exact result you get with the in-camera processed image, that cannot be guaranteed. Aside from an adapted tone curve, there may be additional in-camera processing (e.g. structure enhancement, tone compression, noise reduction, sharpening) that is introduced to take what is technically a very underwhelming initial result and make it more palatable. You can of course apply all of these techniques and more in Affinity Photo, but that requires engaging with the software and finding a workflow that suits you. There is actually an argument to be made here. I've mentioned it above briefly, but for how much smart phone photography has come the last few years, they are still technically compromised devices: tiny image sensors, trying to cram in greater pixel density in the name of the megapixel race, coupled with small optics. Any linear RAW data from a smartphone camera is going to be quite underwhelming, and there's been a lot of focus recently on AI enhancement/machine learning to overcome these physics-based limitations. Generally speaking, photographers shooting on larger sensor devices like typical DSLRs/compact system cameras have far fewer complaints with Affinity Photo's RAW processing. There are fewer issues with dark images because the camera metering generally exposes for a balanced scene, rather than underexposing to compensate for limited dynamic range. The other factor here is that photographers generally want manual control over their camera settings, so will be more likely to determine their own exposure, and this is reflected accurately when you open the RAW file in Affinity Photo. The main sticking point is, as you mention, not automatically applying some "smart" initial processing which would have to vary between each RAW format, and indeed each camera. There is perhaps some work that could be done here, but crucially not so that it compromises existing photographer's workflows who are happy with the RAW handling. Hopefully that's understandable. Thanks for reading!
-
Hi all, got another couple of videos for you: Brush modifier (keyboard and mouse) PSD write-back and PSB import Thanks again, James
-
Hi again, today we've got another video: Manual lens corrections Enjoy! There will be a break for the weekend then the videos will start rolling on Monday again...
-
Hi all, to accompany the 1.8 updates for the Affinity apps, I'm going to be releasing one tutorial video a day on YouTube—all videos are already available on the website here: https://affinity.serif.com/tutorials/photo/desktop I'll be updating this thread for every new video released. Hope you find them useful! Here's the first: PSD smart object import
-
Hi @grunnvms, as @Murfee mentioned above you can choose a colour profile on export under the More options dialog. I'm not so sure about converting to a Fuji paper profile on export, however—my understanding is that you should use that during the print process (via the print dialog) for print colour management. E.g. on Mac, you have the choice of using printer colour management or ColorSync. With the latter, you can specify a colour profile, and that's where you would use the paper profile. You can always preview the effect of the paper profile by using a Soft Proof adjustment layer, but don't forget to hide/disable it before exporting your image. Finally, I would recommend against using 32-bit unless you have a specific need for it. By all means, use ROMM RGB to avoid clipping colour values (and then export to sRGB for web), but 32-bit is a linear compositing format as opposed to nonlinear. This means adjustments, filters and tools that perform tonal modifications will behave differently. Because 32-bit is unbounded, you can also run into issues when using certain adjustments or blend modes that do not clamp properly (although we're working on making this more user friendly). Improper clamping may result in NaNs (not a number) rather than colour values, or negative values, both of which may cause issues when converting to a bounded format on export. Unless you work predominantly with HDR imagery, 3D renders or astrophotography, I would advise staying away from 32-bit, 16-bit will give you more than enough precision for 99% of image editing cases. Maybe this article on Spotlight might be worth a read if you're trying to figure out colour profiles and colour management? https://affinityspotlight.com/article/display-colour-management-in-the-affinity-apps/ Hope the above helps!
-
Raw editing problem with Panasonic RW2
James Ritson replied to Depa's topic in [ARCHIVE] Photo beta on macOS threads
Hi all, I believe this was identified and fixed when the beta was first available, I was getting it with my Sony ARW files. I believe it was a mixup with the input colour profile—check out the next beta when it's available and hopefully the issue will be sorted. I'll double check with the developer that the fix was implemented for multiple camera formats and not exclusively for Sony raw files. -
Glad it's all working for you! I'll have to test the group export again, did you have layers within the group that you gave .RGB affixes for it to work? If you have any other questions regarding EXR/32-bit/linear compositing etc don't hesitate to ask. All the best, James
-
Hi again, I think the export error is because of your layer stack. Check out the help topics on OpenEXR at https://affinity.help — particularly this one: https://affinity.help/photo/English.lproj/pages/HDR/openexr.html Generally, all of your pixel layers should have an .RGB or .RGBA affix (for example "Layer02.RGB" or "Layer02.RGBA" if it has a distinct alpha channel). If you don't specify layers as RGB pixel data they will be discarded on export. The reason you have to do this is because Affinity Photo has lots of different layer types: pixel layers, image layers, curves, fills, groups, etc. The OpenEXR spec is much narrower and you have to dictate what type of channel information each layer becomes when exporting to EXR. If you don't specify the channel type, Photo will ignore or discard the layer in question during export. If you have a pixel layer with a mask inside it, you must use the .RGBA prefix if you want to export the alpha channel separately—if you just use .RGB the alpha channel will be baked into the pixel layer and will be non-editable. Separate colour channel information can also be exported, so you could affix layers with .R, .B, .G and .A etc and they will be stored as individual channels in the EXR document. You don't appear to be working with any spatial layers like .Z or .XYZ so you can probably ignore them. Embedded documents and placed images should be correctly rasterised as long as you give them an .RGB or .RGBA prefix. Groups you will have to rasterise, even if you give them an .RGB prefix, otherwise they won't export. Right click the group and choose Rasterise to do this (make a duplicated backup beforehand and hide it though). I'm actually struggling to reproduce the error message now—if you try the naming conventions listed above and are still getting the error message, please could I send you a private Dropbox link to upload the document so I can have a look? It would only be used internally and then deleted once the issue is addressed. Thanks and hope the above helps, James
-
Hi @spoon48, I've seen this before and can't quite remember how I fixed it—would it be possible to see a screenshot of your entire layer stack, and also your export settings (the expanded settings on the More dialog)? Thanks! James
-
Hi @extremenewby, on Affinity Photo's Levels adjustment dialog you'll want to use the Gamma slider as an equivalent to Photoshop's mid-point slider. If you have any other questions about editing astrophotography please ask, I've been working with various deep sky imagery lately and adapting various techniques to an equivalent approach in Affinity Photo. Hope that helps!
-
Hi @marisview, you should be able to select the mask layer, then use Layer>Merge Down (Ctrl+E or CMD+E), which will "rasterise" or flatten the mask into the alpha channel of the parent layer—does this work for you? This also works if you have the mask layer above the target layer. Note that this only applies to Pixel layers—Image layers (if you drag/place an image into your document) are immutable and cannot be merged. You must rasterise them first (Layer>Rasterise), but doing so will actually achieve the same effect as Merge Down, so no additional steps are required! Hope that helps.
-
Hi @SeanZ, here's a quick breakdown of the pixel formats and what happens: As you've observed, when you open a RAW file in Affinity Photo it's processed in a working pixel format of 32-bit float, which is unbounded. This prevents values outside the range of 0-1 from being clipped and discarded, and allows for highlight recovery. Colour operations are processed in ROMM RGB (ProPhoto), which helps colour fidelity even if the intended output colour space is sRGB. You are essentially working in the highest quality that is reasonable. When you click Develop, by default, the pixel format is converted to 16-bit integer, which is not unbounded. Any values outside the range of 0-1 will be clipped and rounded, so you should ensure you are happy with the tones before you proceed (e.g. using highlight recovery, changing black point etc). The colour space is also converted to whichever option you have chosen—by default, this is sRGB, but you can change this by clicking the Profiles option on the right hand side and choosing another output profile like ROMM RGB or Adobe RGB. I say by default, because you can change the output format to 32-bit HDR on the develop assistant (the tuxedo/suit icon on the top toolbar). Be very mindful, however, that 32-bit in Affinity Photo is a linear compositing format as opposed to nonlinear. Adjustments will behave differently (typically they will seem more sensitive) and blend modes may produce unexpected results. I would avoid working in 32-bit unless you either want to author HDR/EDR content—this is not the same as HDR merging and tone mapping—or you need the precision for more esoteric genres like deep sky astrophotography. A lot of customers think working in 32-bit is going to offer them the best quality possible. Whilst this is technically true, there are many caveats and I would seriously advise against it unless you have a specific requirement for this format. To answer your questions: Technically, the answer is yes, but it's like I mentioned above: unless you have a very specific requirement to work in 32-bit, any loss in quality will be negligible. 16-bit nonlinear precision is more than enough for 99% of image editing use cases. Here's an example of my workflow: I will often choose a wider colour profile like ROMM RGB, then make my image look as flat as possible in the Develop Persona, usually by removing the tone curve and bringing in the highlights slightly if they are clipping. I'll then develop to 16-bit and do all of my tonal adjustments in the main Photo Persona. I have yet to complain about any loss in quality The functionality is more or less the same, but the Develop Persona has more intuitive sliders. In fact, in demos I will frequently explain to people that if you want to do some simple destructive edits to an image, you can simply go into that persona and use a few sliders rather than have to build up a layer stack. One key difference will be the white balance slider: when developing a RAW file, it has access to the initial white balance metadata and the slider is measured in Kelvin. Once an image is developed, however, this slider then becomes percentage based and takes on an arbitrary scale. Whatever works best for you, I think. My approach, which I explained above, is pretty fool proof, but you can do as little or as much work during the initial development as you feel is appropriate, e.g. you might want to add luminance noise reduction during the development stage, perform defringing, change white balance etc. Just be aware that if you perform certain steps like noise reduction during the initial development, you can't undo them. With noise reduction, I prefer to add a live Denoise layer in the Photo Persona, then mask out the areas I want to keep as detailed as possible. Again, though, it's down to personal choice. Hope that helps!
-
Hi @ijustwantthiss**ttowork OK, so my suspicion is that the blade.icc profile is deficient—out of curiosity, is this the Razor Blade laptop? Can I ask where you got the blade.icc profile from, did you download it from a website or did it come preinstalled with the laptop? So if you switch the colour profile to the sRGB device profile, everything looks fine inside Affinity Photo? No issues, and when you export to JPEG/TIFF etc with an sRGB document profile everything looks good with an external image viewer etc? This is expected, as Affinity Photo needs to restart to colour manage with the newly chosen profile if you change it on the fly. Definitely don't do this! The reason it looks OK if you use blade.icc as your document profile is because you're matching the document profile with the display profile, negating colour management entirely—the document numbers are being sent to the display with no alteration. It might look OK for you, but it won't for anyone else. Colour managed applications are supposed to use the display profile to translate the colour values in the document as they're sent to the display. This is especially important for wide colour profiles beyond the scope of sRGB. The thing that seriously isn't working has to be the blade.icc profile—not sure where you got it from but it's defective as regards compatibility with colour management. We've seen this a lot with various monitors that people are using, Windows Update seems to push specific display profiles that just don't work with colour management solutions at all—in the article that was linked above you'll see I invited people to search for "whites are yellow" in relation to apps like Photoshop because it's not just Affinity Photo that is affected. Have you got access to a colorimeter, e.g. i1Display Pro, Spyder, ColorMunki etc? If so, I would download either the manufacturer's profiling software or DisplayCal and use that to profile your own monitor—any profile created by the software will be valid and work correctly with Affinity Photo. If you can't profile the display by yourself, the best solution is simply to use the sRGB display profile rather than this factory-calibrated blade profile—when you say factory calibrated, that instantly makes me sound very skeptical. Again, this all points to the blade profile being incompatible with colour management. Not many applications are actually colour managed—to be honest, I've lost track of whether Windows Photos/Photo Viewer/whatever it is in Windows 10 is colour managed or not. I think web browsers by and large should be colour managed by now, but there's no guarantee there. The fact that things look different in Affinity Photo is a clear sign that it's performing colour management based on your active display profile, but unfortunately if that display profile is incompatible then everything is going to look whacked. As I just mentioned above, unless you can create your own accurate and compatible profile with a measuring device, I think your only solution here is to use the sRGB display profile. From your screen grabs, you haven't touched Affinity Photo's default document colour profiles (they're left on sRGB) which is good—just avoid using blade.icc as your document profile altogether and stick with standardised device profiles like sRGB, Adobe RGB, ProPhoto/ROMM RGB etc. If you do use a wide profile like Adobe RGB, don't forget to convert to sRGB on export if you're going to view it in other applications that aren't colour managed—the article explains how to achieve that. Hope all the above helps! [Edit] From a bit of searching, I found someone had posted their Razer Blade 2019 profile that they had created with DisplayCal here: https://drive.google.com/file/d/1l07D8CtFjXYVsDpeTAyLBEkZpELNomYo/view (from this Reddit discussion: https://www.reddit.com/r/razer/comments/ase96x/razer_blade_15_2019_color_profile/) I definitely wouldn't recommend using it for professional/production work (I'd seriously advise getting a colorimeter and creating your own profile to the standards you require) but it's worth installing and switching to it just to see if it helps. It could go either way, since if that person's display is wildly different to yours it will still look terrible, but it could also produce a much better result than the blade.icc profile you're currently using..
-
Hi again @wlickteig, this sounds like you had OpenColorIO configured on the old MacBook (or you changed the 32-bit view to Unmanaged), whereas on your new MacBook it's likely defaulting to ICC Display Transform, especially if you don't have OpenColorIO configured. In this case, you don't actually need to add the nonlinear to linear layer, just try exporting it without. The reason I developed the nonlinear to linear macro was for users who were trying to match the transform view from 3D software like blender e.g. when using the Filmic view transform. You can emulate Filmic by using an OCIO adjustment layer and going from Linear to Filmic sRGB, but because you have the added non-linear transform when you convert to 8-bit or 16-bit (this is what ICC Display Transform emulates) you need to add that final correction. If you're using ICC Display Transform and are happy with the results you're seeing on screen, just export without adding the correction. Easiest way to check what view transform you're using is to go to View>Studio>32-bit Preview and see which option is checked. ICC Display Transform will show you what your image will look like with a non-linear colour profile (e.g. in 8-bit or 16-bit), whereas Unmanaged will use linear light. If configured, you can use an OpenColorIO device/view transform as well.
-
Hi @wlickteig, are you using OpenColorIO or have you accessed the 32-bit preview panel (From View>Studio) and set the view to unmanaged (linear light)? If you switch the view to ICC Display Transform you will see what your document looks like with a non-linear gamma transform, which is what will be used when it is converted to 16-bit or 8-bit. Thankfully there’s a simple way to emulate the linear view: add a live Procedural Texture filter with three channels and do a power transform of 2.2 for each one. Please see this thread for an explanation: Also, there’s no real need to copy to clipboard and paste as new image if all you want to do is export—just add the procedural texture layer at the top then export to TIFF/JPEG etc, all the bit depth and colour profile conversion will be taken care of during export. There is also a macro that will automate this process in my workflow bundle, it might be useful to you: Hope that helps!
-
Hi @smadell, hopefully this will give you a clearer answer! What upgraded GPU option are you considering over the standard one, and is it the 21" or the 27" model you're after? Looking at the specs, for the 21" the cheapest model has Intel Iris Plus graphics whereas you can upgrade to a Radeon 555X or 560X. With the 27" model the cheapest option is a 570X, and the most expensive upgrade gets you a 580X. Any of the upgraded GPU options will give you an appreciable boost in performance with pretty much all operations in Photo: the vast majority of raster operations are accelerated with a few exceptions—for example, blend ranges will currently fall back to software (CPU). Vector layers/objects are also not accelerated. The biggest advantage I've noticed is being able to stack multiple live filters without significant slowdown: I typically use unsharp mask, clarity, noise reduction, gaussian blur, motion blur and procedural texture filters with compositions and photographs, and being able to use compute is incredibly helpful as it keeps the editing process smooth and quick. Export times are also drastically reduced when you have live filters in your document: in software (CPU), as soon as you start stacking several live filters the export time can easily take over a minute, whereas with compute on the GPU this is reduced to no more than several seconds. However, the biggest limiting factor in my experience has been VRAM, and you will need to scale your requirements (and expectations) in accordance with a) the screen resolution, b) the pixel resolutions you typically work with and c) the bit depth you typically work in. To give you a rough idea, 4GB of VRAM is just about sufficient to initially develop a 24 megapixel RAW file and then work in 16-bit per channel precision on a 5K display (5120x2880). If you move down to 4K (3840x2160) 4GB becomes a much more viable option. This is somewhat subjective, but I would say forget about 2GB VRAM or lower if those are your baseline requirements—you simply won't have a good editing experience as the VRAM will easily max out and swap memory will be used, incurring a huge performance penalty. Ironically, if you can't stretch budget-wise to a GPU with 4GB or even 8GB of VRAM, the Intel Iris Plus graphics option may provide a better experience since it dynamically allocates its VRAM from main memory, therefore it can grow to accommodate larger memory requirements. From early Metal Compute testing I often found that disabling my MacBook's discrete GPU (with 2GB VRAM) and only using the Intel integrated graphics would alleviate the memory bottleneck. I believe the memory management has improved since then, but if you're on a budget that is an option to consider. However, if you're looking at the more expensive iMac models, I think you should weigh up your requirements and what content you work with in Photo. Here are a few scenarios I can think of: 4K resolution, light editing—development of RAW files, then adding some adjustment layers and live filter layers—you could get away with a 2GB VRAM GPU. 5K resolution, light editing—definitely go with a 4GB VRAM GPU. 4K resolution, moderate editing—development of RAW files, lots of adjustment layers and live filter layers, some compositing work with multiple layers—go with a 4GB VRAM GPU. 5K resolution, moderate editing—4GB VRAM GPU minimum. 4K/5K resolution, heavy editing—working with compositions that have many image/pixel layers, clipped adjustments, live filter layers—absolutely consider an 8GB VRAM GPU. 4K/5K resolution, 32-bit/16-bit compositing e.g. 3D render work, using render passes, editing compositions in 16-bit—8GB VRAM GPU minimum. However, if budget allows, do also consider the possibility of an external GPU: this might even work out cheaper than having to choose an upgraded iMac model. In the office I have a MacBook with a 560X GPU that has 4GB VRAM—this is sufficient for demoing/tutorials at 4K or the MacBook panel's resolution (3360x2100) but I work with an external monitor at 5K and for that I use an eGPU enclosure with a Vega 64 that has 8GB VRAM. The additional compute power is incredibly useful, but it's mainly the larger pool of VRAM that helps out here. You don't have to use a Vega, I believe the new Navi cards are supported so you could look at a 5500XT with 8GB VRAM which is a reasonably cheap option (although you would still have to get the GPU enclosure...) As you mentioned, your timeframe is 6 months so it might be worth waiting for Apple to refresh the iMac lineup as they will hopefully switch to Navi-based cards like they have with the new MacBook range. No doubt the cheapest option will have 4GB VRAM but models with 8GB should also be available. Apologies for the wall of text, but hopefully that gives you some more information to work with!
-
Hi Sean, best advice is not to touch the default colour settings in Preferences: leave the RGB/RGB32 colour profiles set to sRGB. RAW files are not mapped to sRGB/Adobe RGB etc, the camera setting is used for the in-camera JPEG and may also be used to dictate the initial output profile with RAW development software. After demosaicing, the colours are translated from the camera's colour space to a working space, then mapped to the output colour space which you get to choose. By default this is sRGB. If you wish to use a wider profile, check the Profiles option in the Develop Persona and choose an option from the dropdown. If you want to edit in ProPhoto, you can pick ROMM RGB which is the equivalent that ships with the Affinity apps. As mentioned above, the easiest option is to keep everything as sRGB. If you choose to work in a wider profile like Adobe RGB or ROMM RGB and you export to JPEG/TIFF etc you will generally want to convert to sRGB during export because other apps/web browsers/image hosts may not be colour space aware or colour managed. To do this, click More on the export dialog, and from the ICC profile dropdown choose sRGB IEC61966-2.1 There is a good argument for using a wider colour space if you tend to print your work, but you also need to be able to see these colours on your screen—do you know what coverage your monitor has of Adobe RGB/ProPhoto RGB, i.e. have you profiled it? If not, the safest tactic is simply to stick to sRGB again. Hope that helps!
- 4 replies
-
- 3
-

-

-
- affinity photo
- photo processing
- (and 1 more)
-
Rodeo
James Ritson replied to VLBurdick's topic in Pre-V2 Archive of Affinity on Desktop Questions (macOS and Windows)
Hi @GarryP, the new tutorials are very much focused on this approach, are you referring to them or the legacy set? For example, the new set (https://forum.affinity.serif.com/index.php?/topic/87161-official-affinity-photo-desktop-tutorials/) has a Selective Colour tutorial amongst other tutorials that look at specific filters and adjustments—Curves, Gradient map, Levels, Shadows/highlights, Displace, Denoise, Radial blur, Clarity, Channel mixer, White balance, Black & white, Zoom blur, Procedural Texture, etc... With the new tutorials, there's less of a focus on multiple techniques in one video, although sometimes this approach may be required. The videos also need to be kept fairly to-the-point because we now get them transcribed and translated into 8 different languages (which is particularly expensive)—there's also the issue of engagement, where many viewers don't make it through lengthy videos, and we have to take that into consideration as well. I would love to be able to produce more videos in-between major releases but time is quite limited, so it will tend to be during or just after updates to the app when you'll find more tutorials being made available. Hope the above helps, and thanks for your feedback!