.jpeg.1b727463d44a0d52bc3499597e28d11c.jpeg)
James Ritson
-
Posts
855 -
Joined
-
Last visited
Everything posted by James Ritson
-
.thumb.jpeg.6f143e8223547aba974205ef53397036.jpeg) Good afternoon all, just letting you know I've added three more videos to the first post: Basic Image Editing Workflow, Removing Lens Flares and Quick Masking. Hope you find them useful! The basic workflow video in particular is in response to customers requesting a tutorial to take them through a general import-edit-export process.
Good afternoon all, just letting you know I've added three more videos to the first post: Basic Image Editing Workflow, Removing Lens Flares and Quick Masking. Hope you find them useful! The basic workflow video in particular is in response to customers requesting a tutorial to take them through a general import-edit-export process. -
When you say you're tried all three resampling methods, which ones did you try, as there are actually five? - are you resampling on export or by resizing the document? The result you've posted looks like Lanczos resampling (either non-separable or separable). Whilst Lanczos is exceedingly sharp, it's renowned for ringing because of its brick-wall impulse response and overshoot. If you have lots of fine detail with tricky variations in contrast (the trees and branches against the sky in your image being a prime example), I'd recommend Bicubic or even Bilinear. You should find Bicubic provides a good middle ground between sharpness and artefacting. Lightroom likely uses Bicubic or Bilinear - stick to these and you should find comparable results. Definitely avoid Nearest Neighbour as that will be too soft. Hope that helps.
-
Hi Joschi, thanks for your feedback. The majority of the tutorials are unscripted and as such the transcriptions would have to be manually written - there are over 200 for Photo alone, so it would be a big undertaking. I'm sorry I can't offer a more robust solution at the present time, but have you checked our YouTube channel rather than Vimeo? (http://affin.co/photoyt) It contains all of the tutorials and although it's not perfect, YouTube has an automatic subtitling system that does a reasonable job of understanding British inflections ;) - therefore you could watch the videos and gain an understanding of what's being said. I hope that's of some use? We're also working on a Photo workbook to accompany the Designer one which will hopefully be out later this year.
- 8 replies
-
- 1
-

-
- accessibility
- subtitles
- (and 2 more)
-
Hi paparatzy, as Paul mentioned, Photo's raw engine has an issue with decoding Canon RAWs shot in mRAW or sRAW. You can however try using Apple's Core Image RAW engine - in the Develop persona, click the tuxedo icon to get to the assistant menu and change the RAW engine from Serif Labs to Apple Core Image RAW. As far as I know, Apple's engine can handle these files. I would advocate against shooting in mRAW or sRAW though, and instead just use full resolution RAW; I appreciate the reasons for doing so but you are unnecessarily compromising image quality. The end result is not a pure RAW file - in addition to a reduced resolution and demosaicing performed in-camera, I understand that chroma subsampling is also used to further reduce the file size, resulting in reduced colour accuracy - if you're familiar with video tech, sRAW and mRAW are the equivalent of subsampling to 4:2:2 and 4:2:0, so you're working with reduced colour resolution. However, I notice you've posted this in the iPad forum - have you tried loading the RAW files on the iPad version yet? It uses Apple's engine and shouldn't present any issues. I would definitely check as to whether you really need to shoot sRAW/mRAW though...
-
Hey Epman, did you make sure the OCIO folders were on your iCloud Drive first before adding the .ocio extension? It only seems to convert it to a valid package if they're on cloud storage... (not sure why, will investigate)
-
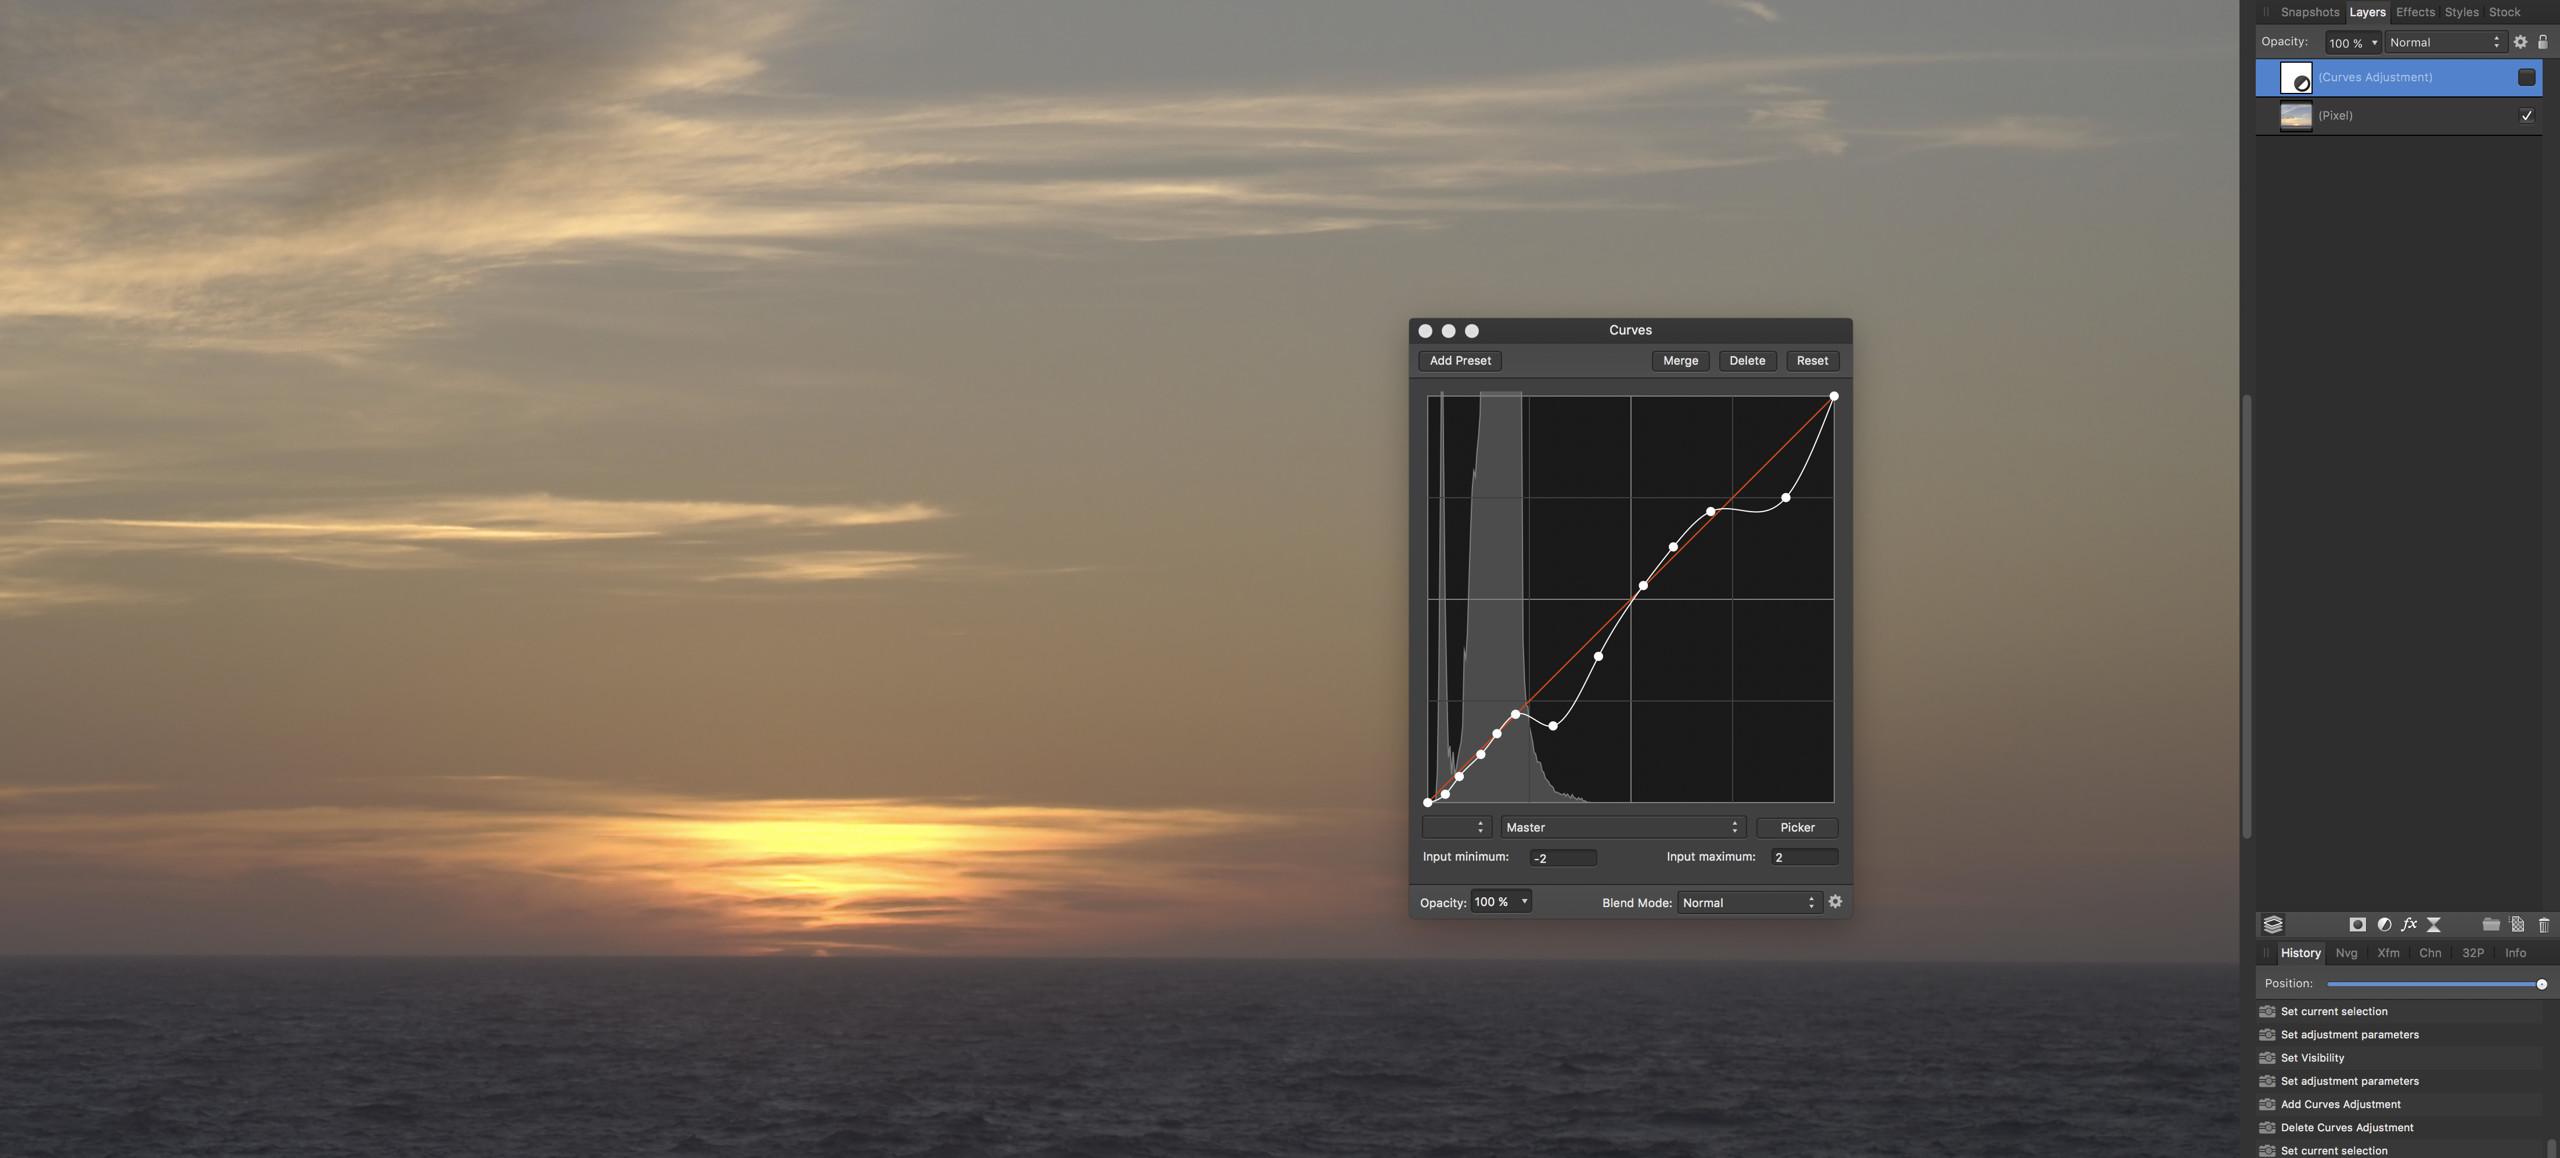
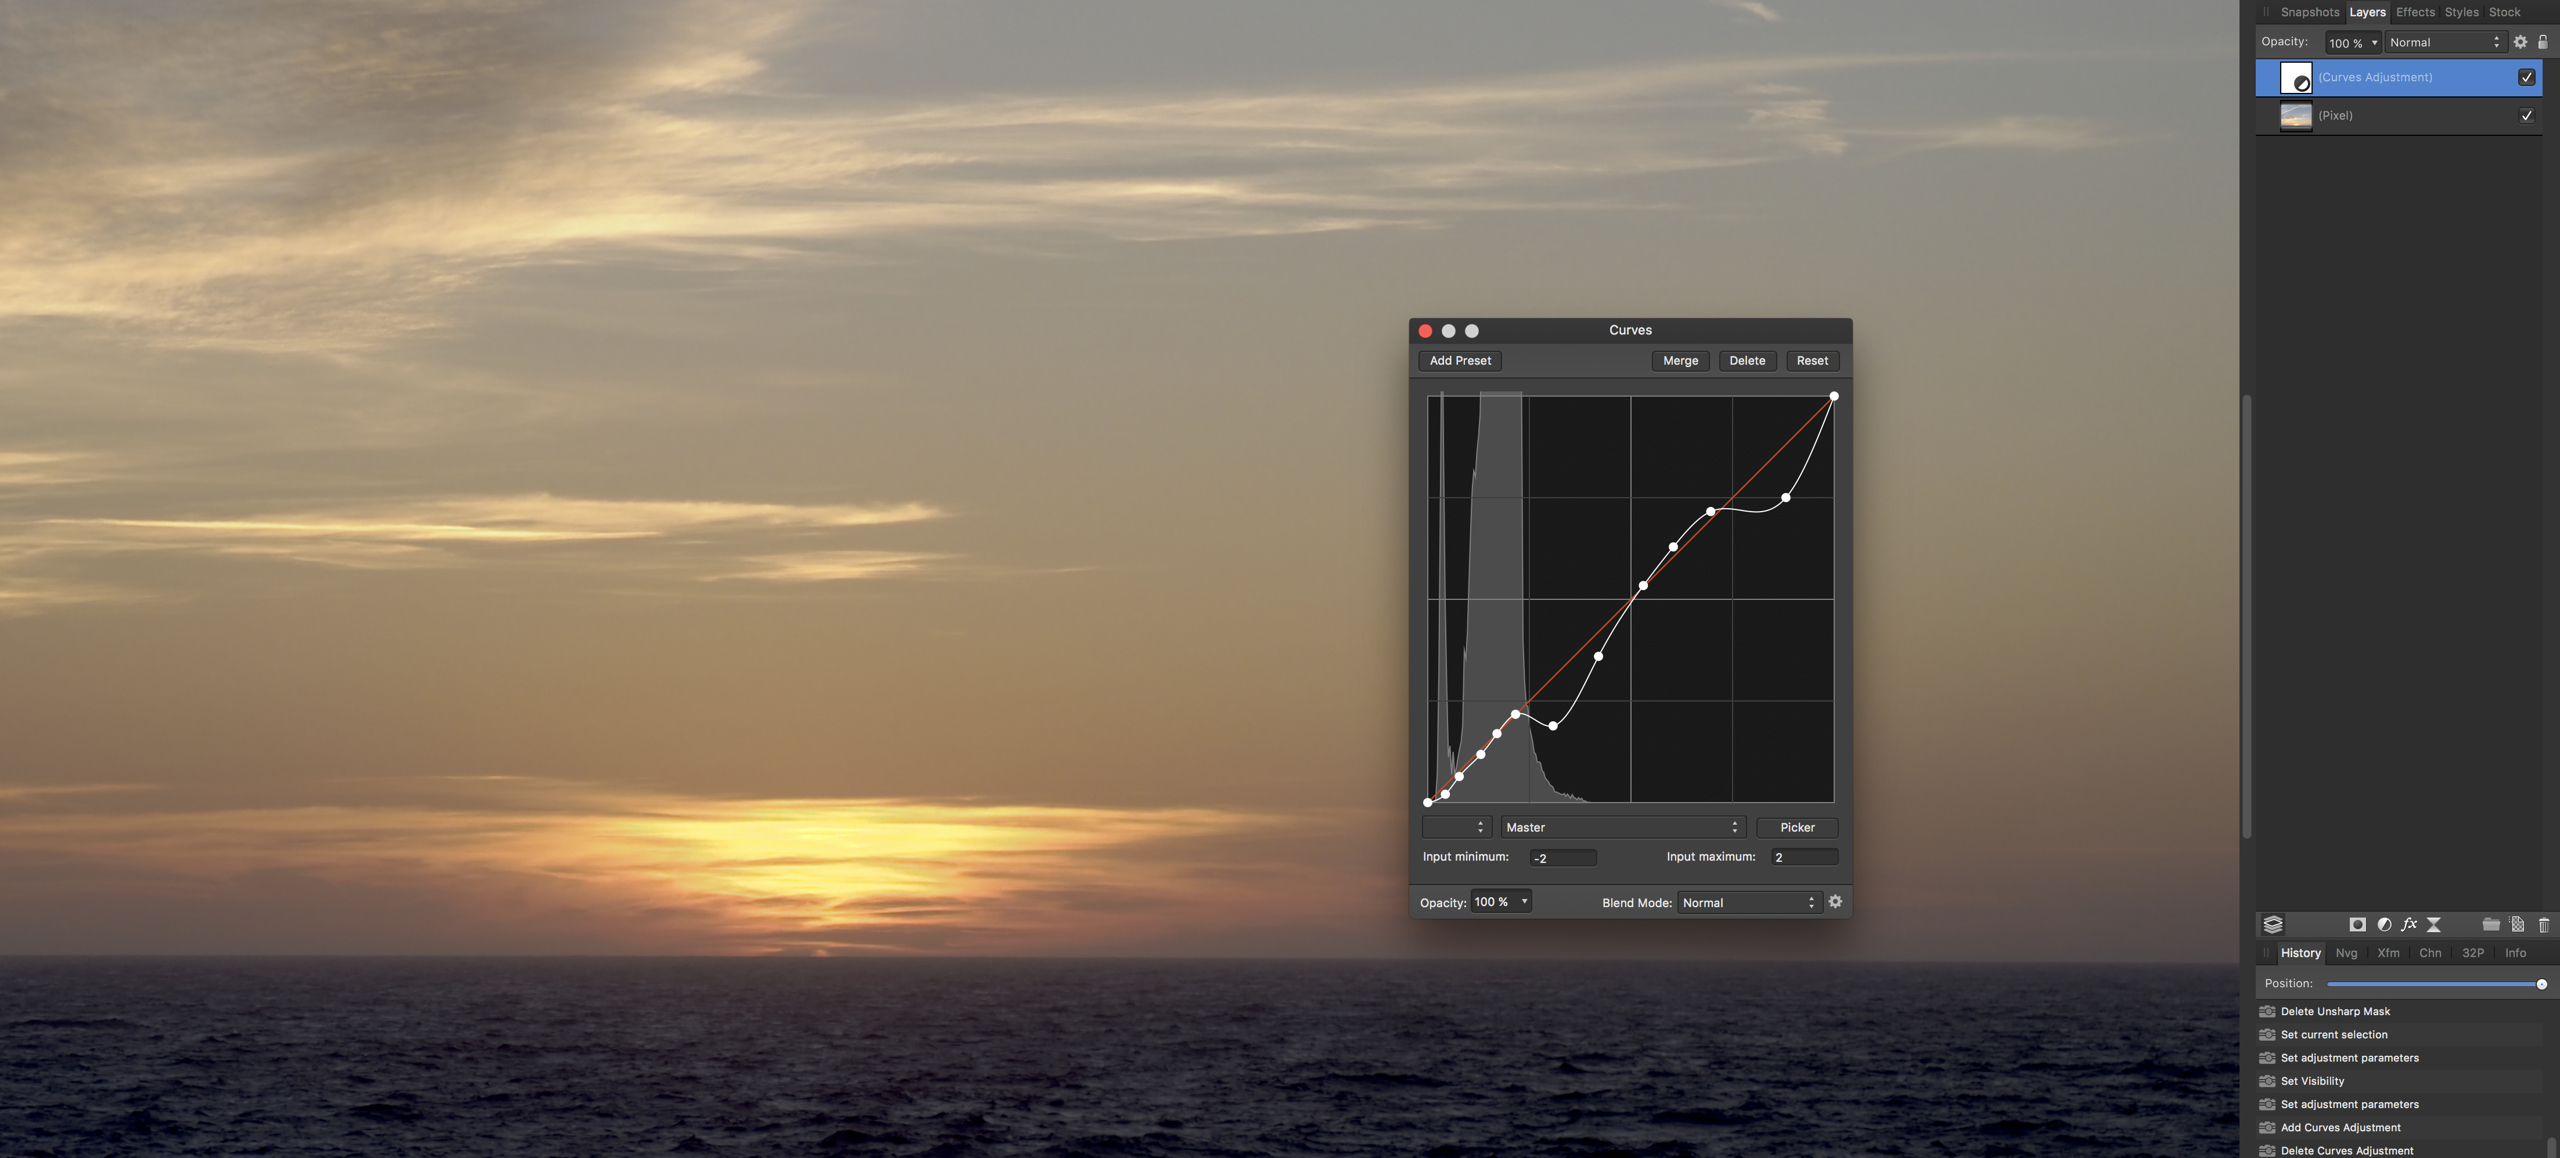
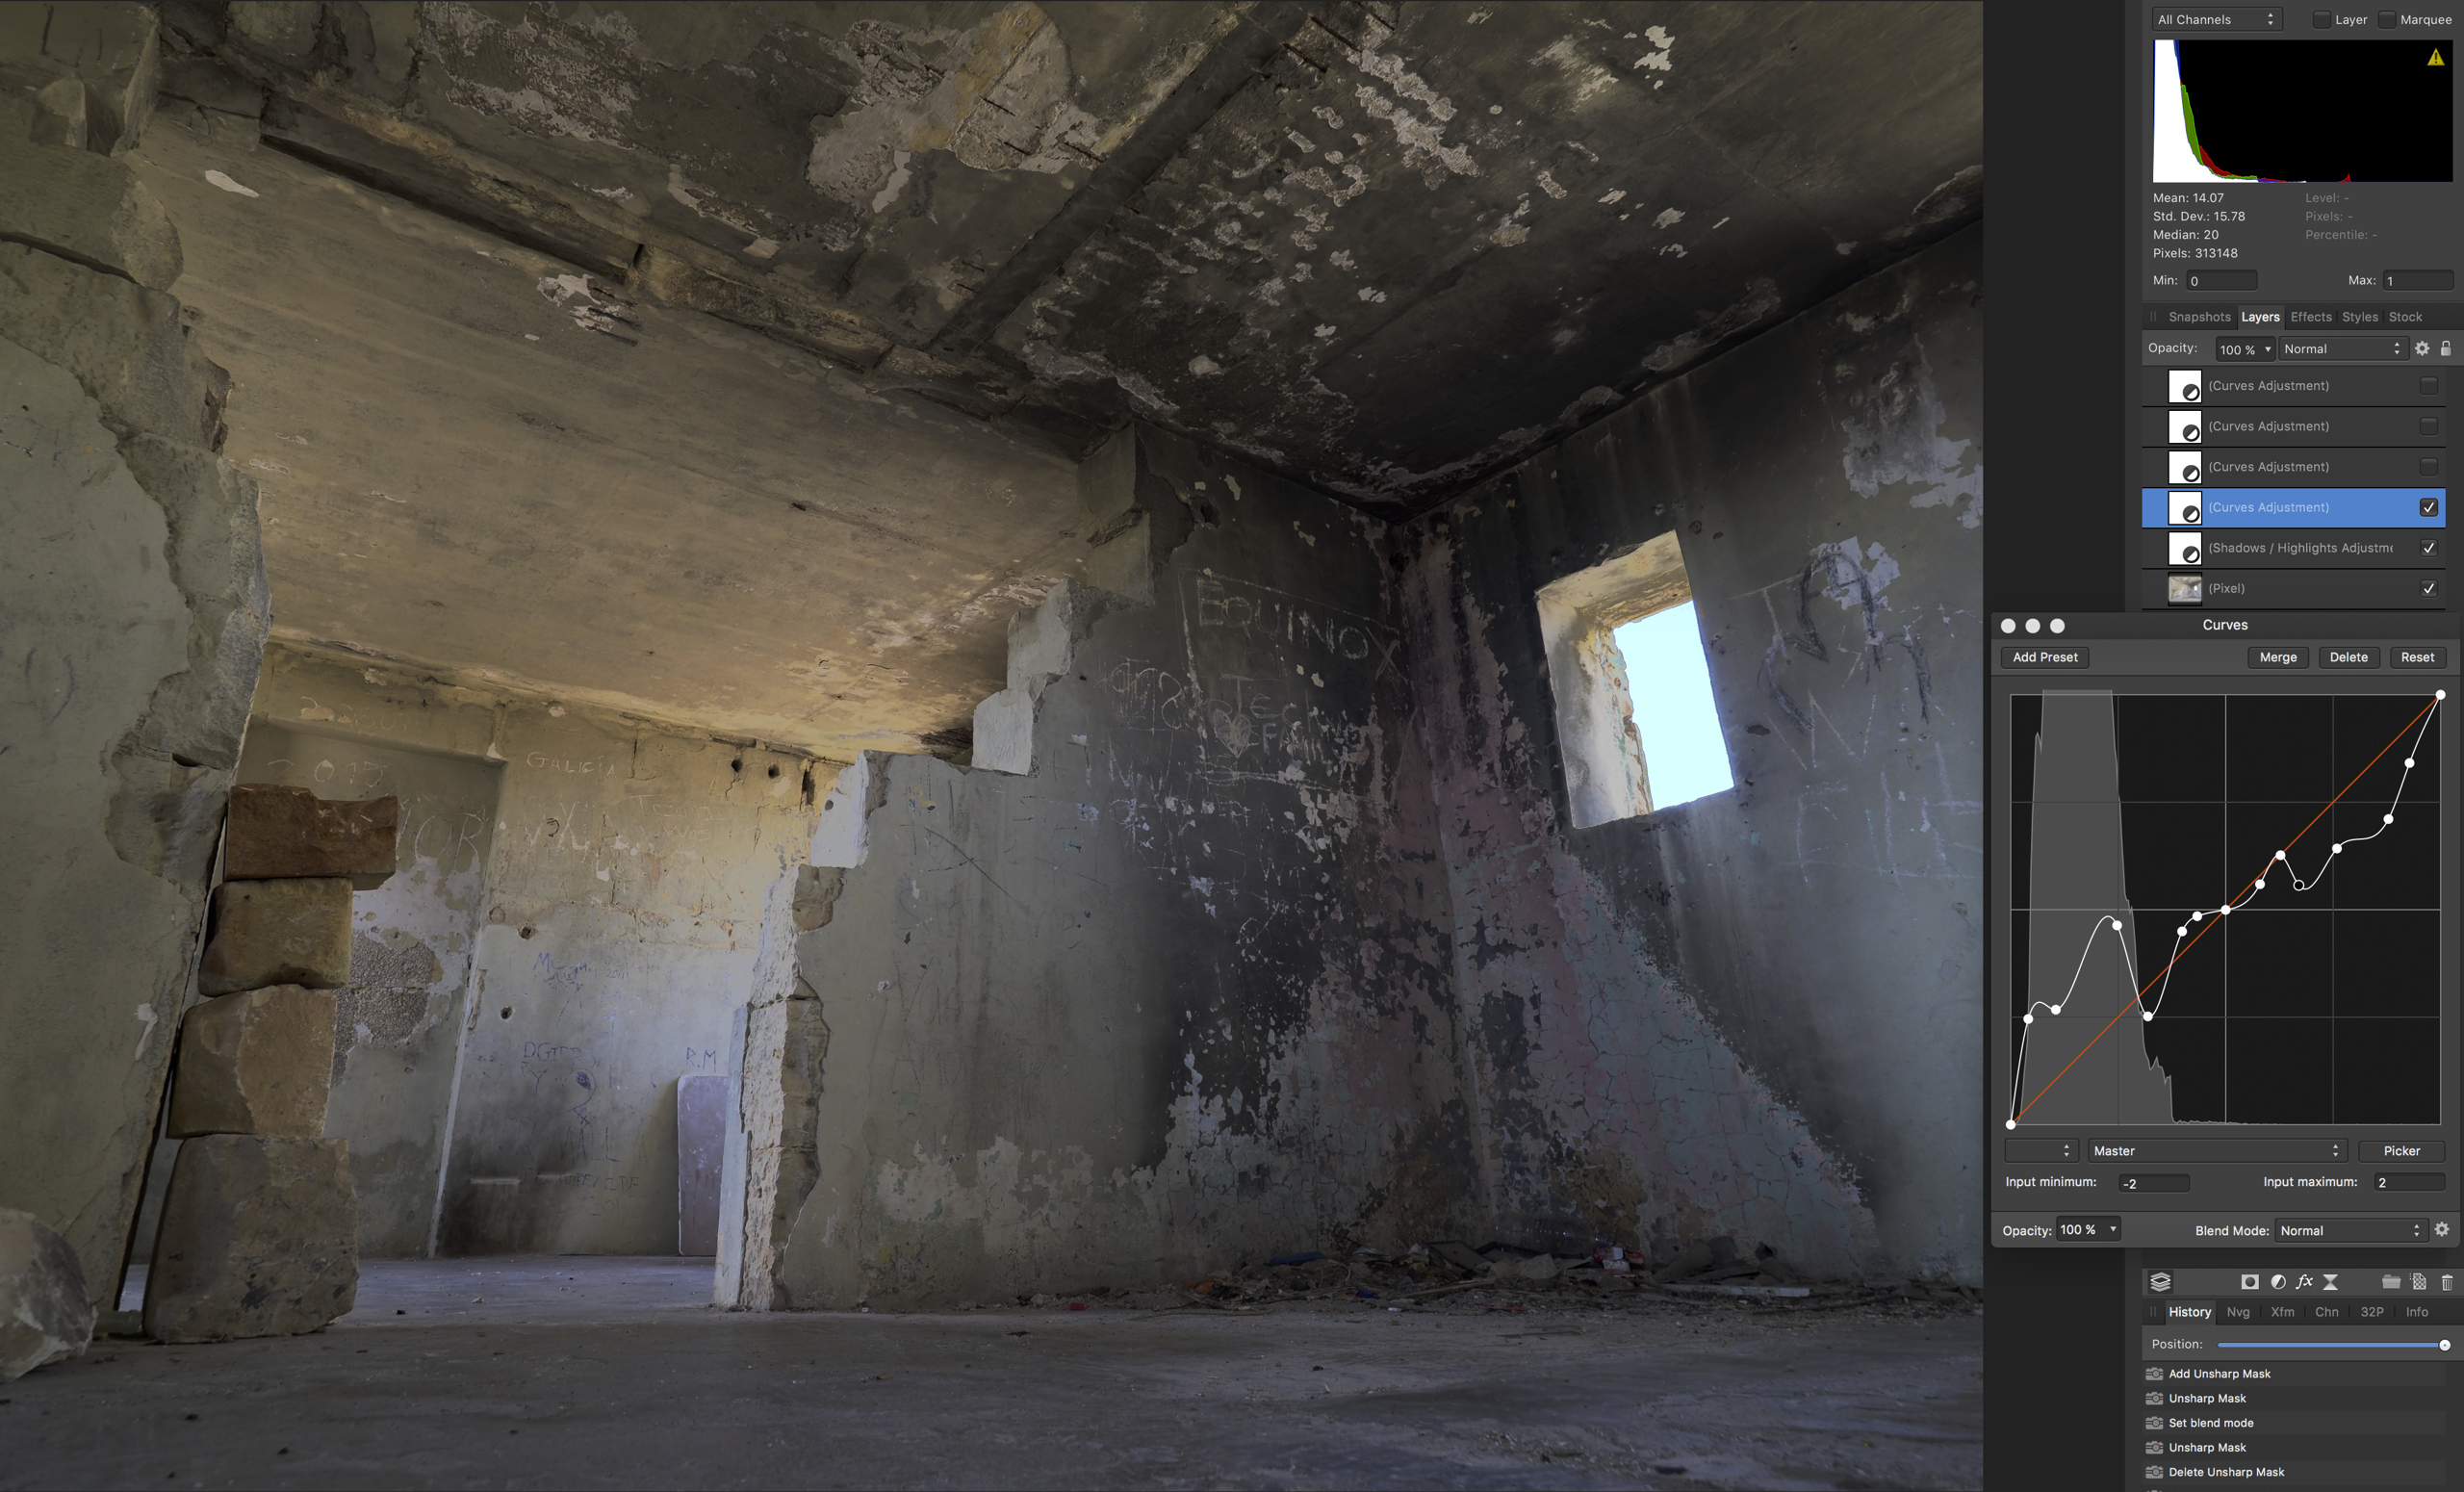
Hi theDavid, sorry this topic has gone unanswered for so long, I've had a little mull over your questions and done some experimentation. It is indeed possible to replicate similar tone mapping/tone compression using Photo's Curves adjustment, but you have to experiment with the min/max range. I've attached some screen grabs showing the before/after of a Curves adjustment with different min/max setups. It can always use further tweaking though - just placing another node or moving an existing one has a huge impact tonally. On the interior example I also used a Shadows/Highlights adjustment just to pull back that blue sky tone in the window. I've also managed to achieve some similar results by duplicating the pixel layer several times and running variations of a laplacian kernel on each one using the Custom Blur filter (it's just a convolution matrix grid). I don't think these target the kind of result you're after though, but there are various white papers available on local laplacian filtering as a method of tone mapping. In truth, I'm not sure exactly what happens behind the scenes (I could only offer half-guesses really, that might involve gaussian and laplacian filtering), that's best left to a developer to answer accurately. Hope that helps!

- 2 replies
-
- 1
-
-
- Tone Processing
- Local Contrast
- (and 6 more)
-
Thank you for your comments, a video that walks through a typical import-edit-export workflow is definitely worth thinking about - as you say, it would be beneficial for many. In the meantime, I'd recommend checking out the beginners videos for the desktop version (http://affin.co/phototuts) - although the iPad version has a different layout, the concepts explored in those videos remain the same, such as layers, adjustments, filters and so on. But yes, a video that cohesively puts these together would be a good idea. Thanks again :)
-
And this week I've added four more videos - Lighting, Generating Edge Masks, Blend Modes & Blend Ranges and Configuring OpenColorIO. Once again, hope you find them useful!
-
That's a really good point - Apple certified refurbished iPads are generally in excellent condition, I got my partner a refurbished Pro last Christmas and you honestly wouldn't know the difference (apart from the lack of fancy packaging). (And yes, she knew it was a refurb ;) )
-
Hi R-C-R, thanks for your support through expressing a desire to buy the app even without a supported device! Making the iOS help available online (or as a separate download) isn't something we're able to do, mainly for a couple of reasons. The iOS help has some specific styling and scripting that doesn't translate well to fluid width browsers. As the remit wasn't to make the iOS help compatible externally, we were able to make some specific adjustments to work better with the 4:3 aspect ratio. It also has a fair few inline video clips with certain encoding that may not be supported in other browsers. Making the content accessible externally means people would likely try and produce PDF copies, which would not end well... The help has mainly been adapted to facilitate gestures and heavier use of iconography to locate options and features. Generally, the feature set is similar to the desktop version. The only thing I can really recommend for now is to review the video tutorials (particularly Interface Tour which will give you the general layout). I'm planning and recording more over time, so they will hopefully give you a clear idea of the iPad version's feature set. Also, a little off topic, but I've also read and appreciate the various threads from customers about providing an online help. As much as it seems that it's just a case of throwing up some HTML files on a web server, we're a small team of currently two (maintaining documentation and tutorials) and somebody would have to take responsibility for that, including updating, localisation and support. There are considerations for such a service, but there is a lot of behind the scenes work required to make it a reality. It will hopefully happen, but as can be seen from the recent iPad launch, there are many dynamic things happening that require more attention ;) I realise that it's not hugely cheap, but from the testing I've seen, the cheaper 5th gen "iPad" actually runs Photo reasonably well - I believe it thrashed a 6-core i7 in a number of raster operations! Worth thinking about if you're able to consider a cheaper iPad? Thanks again, James
-
Long Exposure Look?
James Ritson replied to InfinitePhotos's topic in Tutorials (Staff and Customer Created Tutorials)
Hey InfinitePhotos, what dmstraker said is pretty much on the money. It's better to try and achieve this in effect in-camera if possible. You can replicate it in post-production but it's not quite the same. That said, some additional thoughts: If you're experimenting and don't want to spend a lot of money, search Amazon or eBay for something like an "ND1000" or "ND2000" filter. This will be a strong neutral density filter in a screw thread which you can just attach to the front of your lens. You can also get cheap variable ND filters but you'll likely find the strongest point is practically unusable because the two circular discs will meet and produce horrible vignetting. If you're definitely after long exposures, a strong, fixed strength filter is usually the way to go. You can also try the other type of filter - square filters held in front of the lens by a bracket. Beware though that the cheap ones really are cheap - you'll typically get colour casts and contrast reduction that's very hard to combat in post. For square filters you'll probably want Lee/Rollei/Cokin etc. In combination with the ND filter, you'll want to use the lowest ISO possible (some cameras extend lower than the base ISO at the expense of dynamic range, so be careful using those settings) and stop your lens down to a reasonable f-number. Using a stronger filter means you can avoid stopping down all the way to f/11 and smaller, which can often introduce diffraction and soften your image. Many cameras will limit the longest exposure time to 60s or 30s - to get around this, you can shoot several of these long exposures then stack them in Photo using a Mean/Median operator to make it look like a much longer exposure. See the Big Stopper Effect tutorial for an example of this. The astrophotography Star Trail Effect tutorial, whilst a different subject, also highlights the use of stacking long exposures and then blending them. Not sure which iPad tutorial you watched? I haven't done a long exposure/big stopper one yet ;) - maybe it was the sky replacement video? -
Hey BazHind, I've just posted in a similar thread - could I check which iPad model you're using? Also could I check whether you're watching the actual tutorial videos or the Interactive Introduction? If it's the latter, that's not supposed to have any sound. If it's the tutorials, then I'm trying to find a common link between people who aren't getting sound. Thanks!
-
iPad Help video sound
James Ritson replied to Patapata77's topic in Pre-V2 Archive of Affinity on iPad Questions
Hey Patapata, this seems to be a recurring issue but can I just check whether you're watching the tutorials or what's called the Interactive Introduction? The Interactive Introduction doesn't have sound. The tutorials however do - if you're not getting sound on these, could I check which iPad model you're using? Thanks! -
As promised, I've updated the list with four new videos: RGB/CMYK/LAB Interworking, Making Colours Pop, Channels and Storing Selections as Channels. Hope you find them useful!
-
Just a bump to let you know I've added two new videos to the list: Dodging & Burning and Mask Layer Compositing. Four more videos will be coming tomorrow so stay tuned!
-
Hi PhotoNewbie, I've just posted a thread in the Tutorials forum with the first batch of iPad tutorials, you can see them here: http://affin.co/ipadtuts- there are more coming so stay tuned... Regarding opening your photos, there's a video called Opening & Saving that will cover the different ways to import your images - you can automatically open most images if they're synced via the Photos app. With raw files, you're best off copying them to your iCloud Drive or equivalent cloud storage (Google Drive, Microsoft OneDrive, etc) and opening them using Import From Cloud. Raw support isn't fully integrated via the Photos app and it will likely pass the embedded JPEG to Photo rather than the actual raw file. To see the process of opening a raw file from cloud storage, it's near the beginning of the RAW Editing video. Hope that helps!
-
Official Affinity Photo iPad Tutorials New to the latest update of the app (1.6.9), we've got a brand new set of tutorials that follow a more structured approach. You can access them from the Tutorials option in-app or by following this link: https://affinity.serif.com/tutorials/photo/ipad They are sorted into categories: Basic Operations Advanced Corrective and Retouching Creative Tools Filters and Adjustments Export Persona Just some quick info about the new videos: They're all shot in 4K resolution (supported on desktop machines) for extra clarity. There are localised subtitles for all the languages supported by the app (English, German, Spanish, Italian, French, Russian, Brazilian Portuguese, Chinese Simplified, Japanese). Hope you find them useful! James
-
Help files
James Ritson replied to Mike Munson's topic in Pre-V2 Archive of Affinity on Desktop Questions (macOS and Windows)
Hey Mike, if you're referring to the in-app help, it's essentially a bundle of HTML files that you can open externally with a web browser. If you're on Mac: Go to Finder > Applications, right click Affinity Designer and choose Show Package Contents. Navigate to Contents > Resources and find AffinityDesigner.help Right click AffinityDesigner.help and choose Show Package Contents Navigate to Contents > Resources and copy Resources to somewhere externally on your drive (e.g. Documents) In the copied Resources folder, find your language (e.g. English UK is English.lproj, English US is en-US.lproj) and navigate into that folder. Open index.html in your preferred web browser. If you're on Windows: Go to Program Files/Affinity/Affinity Designer Navigate to DesignerHelp/Contents/Resources Either copy the Resources folder somewhere externally or you can simply open up the copy in the app's folder Find your language (as mentioned above) Open the language's index.html file in your preferred web browser. Hope that helps. We're hopefully planning to implement some changes for 1.6 (or beyond that) to make things a bit easier for people wanting to access the help externally. As it stands, though, the help is fully responsive and should scale gracefully to different screen sizes, let me know if you have any issues! -
Hey, if you're accessing them on Vimeo you can just click the Download button. I wouldn't recommend downloading the originals as they're fairly big in file size - instead, download "UHD 1440p" (for newer or re-recorded videos) or if that's not an option, "HD 1080p". This will ensure you get the best viewing quality. Hope that helps, let me know if you run into any issues!
-
Another Color Profile Problem
James Ritson replied to chris_s's topic in [ARCHIVE] Photo beta on Windows threads
Hey Chris, so if I understand correctly, Photo is decoding the RAF successfully? Is the only issue with the separate dcraw TIFF output? I've tested with a sample X-E2 raw file and I'm able to produce an output that opens properly within Photo in sRGB. Have you tried explicitly defining the output colour space? Try the -o command line switch, so use "-o 1" for sRGB, or you could use "-o 4" for ProPhoto. I can't account for why the gamma transform looks different in Photo compared to Windows Photo Viewer, but ideally you don't want to be working with unmanaged or untagged image files anyway (with the exception of JPEGs for web perhaps), because different programs will produce different results based on how they colour manage and transform the image. The TIFF sample you've provided isn't tagged with any colour space. Are you able to provide the command line parameters you've used? If you ensure you set an output colour space with dcraw you shouldn't run into any issues though. Hope that helps! -
Hey Attila, does the software you're using support EXR files? If so, you should be able to use the EXR exporter as it exports straight alpha. Out of interest, what kind of workflow are you using? Is your material editing node-based? Hope that helps, James
-
Hey Allsop, is it a Canon Powershot or another type of bridge camera by chance? These generally have cropping/correction instructions written into the exif data (I presume you're shooting raw?) in order to discard the edges of the frame, which as you can see are unusable. At the moment Photo doesn't read or use these instructions, so it just processes the entire image frame. There are some ways around this: Coming from a glass-half-full perspective, because Photo isn't discarding any pixel data, you can at least determine exactly how much to crop out. For example, you might want to crop out just some of the edge detail, then use inpainting to try and replace the remaining unusable detail. As Jack has mentioned, in the Develop Persona (when you first open the raw) you can move across to the Lens panel and use Scale to scale the image up and gradually remove the unusable areas. If you're on Mac, you can switch across to Apple's Core Image Raw engine rather than SerifLabs, and this will automatically crop into the image so you'll never see the unusable areas. To do this, in the Develop Persona, click the tuxedo icon on the top toolbar, and change RAW Engine to Apple (Core Image RAW). Hope that helps! (Apologies for the bolding, just wanted to highlight key areas of the UI)
-
Hey Dennis, are you developing from RAW? The Develop Persona has a Lens panel that has horizontal and vertical corrections which would probably achieve what you need. If you're working with a JPEG or other image format, you can still access these. Just select the image pixel layer and switch to the Develop Persona from the top left, then go to the Lens panel. Horizontal correction should get you a better result, but if it still needs additional correction, then either the Perspective Tool or Mesh Warp Tool would give you more options here. Hope that helps. As Uuiop posted above, the panorama distortion correction video (YouTube link) covers how to set the initial nodes in Source mode then transform them in Destination mode if you're using mesh warping.
-
Hi Karl, I'm not sure if I've followed you 100%, but have you tried grouping your layers into a group then applying live filters to that group? For example, you could have your text layer plus an image layer, group them, then apply Live Perspective and Live Displace filters to that group. You can then avoid rasterising your text and other layers and keep them editable. There's no live mesh warp unfortunately, but you might be able to use other live filters - spherical, pinch/punch, distortion, perspective etc - to achieve what you're after. I've attached a mockup (apologies for the random robin shot!) to show what I mean. Hope that helps, and apologies if it's not the approach you're after.
-
You can also expand the canvas again by using the crop tool - just drag the crop corners out to be larger than the current canvas then apply the crop, and you'll get more of your image back. Hope that helps!