.jpeg.1b727463d44a0d52bc3499597e28d11c.jpeg)
James Ritson
-
Posts
855 -
Joined
-
Last visited
Everything posted by James Ritson
-
.thumb.jpeg.6f143e8223547aba974205ef53397036.jpeg)
Random Slow/Freeze When Saving in Photo
James Ritson replied to Doren Sorell's topic in V1 Bugs found on macOS
Unless I'm missing something, the reasoning behind write-back to a TIFF/PSD being so slow is because you're using multiple live filters stacked on top of one another. Live filters are expensive (slow) to render at export time on the CPU, and they have to be rasterised when writing to a format that doesn't support them. Affinity Photo supports layered TIFF/PSD write-back and will of course write its layer data into the files, but no other software supports its implementation of live filter layers, therefore it has to create a full resolution composite that can be shown and also edited in this other software. With the native .afphoto format it doesn't have to do this, it only needs to write a small resolution thumbnail for file browsing. Looking at your screen grab, you have live Clarity, Shadow and Highlights and Noise Reduction layers—Clarity and Noise Reduction are almost certainly slowing down the export time significantly because you'll likely be CPU-limited. I don't believe your GeForce GPU is supported for Affinity's Metal compute hardware acceleration, as this would reduce the save/export time dramatically—likely no more than 5 seconds on a moderate AMD GPU found in the recent MacBook Pro models (2016 and newer). As you've discovered, doing a Merge Visible operation also takes a similar amount of time, as it's essentially doing the same thing—merging a composite layer that has the filter effects baked in. If you go to File>Export and try exporting to any format, do you experience the same export time? If round-tripping is an essential part of your workflow, it's not the most elegant solution but I would recommend trying the old school non-destructive approach to filters: duplicate your image layer and apply the destructive filter to it. It's not ideal, but short of upgrading to a more recent Mac system that supports Metal compute, I'm not sure if there's an immediate solution. Live filters are great for non-destructive workflows, but are hugely taxing on the CPU with large resolution documents. I've tested and confirmed my above explanation on a 24-megapixel 16-bit TIFF file with just live Noise Reduction, Shadows & Highlights and Clarity filters. On a Core i9 (mobile) CPU, writing back as a layered TIFF takes about a minute. It appears to hang (beach ball) for 10 seconds or so, then continues with the export. Whilst this is quicker than your 4-5 minute export time, the CPU architecture is more mature and powerful, so would explain the difference here (plus I didn't have additional adjustment layers and other layer work). If you're able to, however, there is one thing to check based on the GPU you've listed in your specs. Could you go to Preferences>Performance (under the Affinity Photo menu, top left) and see what is listed under the Hardware Acceleration checkbox option? Is it greyed out, or is your GPU listed with the checkbox enabled? I'm fairly sure it won't be supported, but if it is, that GPU only has 1GB VRAM, which will be insufficient for 16-bit large resolution document work and may actually be causing a performance bottleneck. In this case, I would try disabling Metal compute and seeing if things improve. Hope the above helps—apologies as it looks like the round-tripping workflow you're wanting to use is subject to limitations. These can be worked around, but it's not ideal. -
Hi Geddy, we do ship what is effectively a ProPhoto RGB profile with the Affinity apps but it’s called ROMM RGB. You can safely use that in the knowledge that it’s ProPhoto. The ProPhoto profile on your HP machine will likely have been installed with other software—I gather you might not have installed that same software on your Surface? Hope that helps!
-
The Panorama merge operation should get its document colour profile from what is mandated in the image's metadata—this is often sRGB or Adobe RGB. I've just tested with my default RGB Colour Profile option set to ROMM RGB, but the panorama stitch correctly uses sRGB instead since the images are in that colour space. This is on Mac—perhaps it's not working as intended on Windows 1.7.2?
-
Hi John, thanks for your reply, we can hopefully do some more investigation tomorrow (it's bank holiday here at the moment). That behaviour you describe is expected for 1.7.2, it appears the non-linear view transform is only applied once the document window is restored (un-minimised), we've seen that happen on all the Windows machines here. The concern is that for yourself and others, the view transform wasn't being applied at all until you did a Ctrl-runup and cleared the user defaults. Thank you again for getting back to us about this issue—can I just confirm that everything is working for you now after clearing the defaults? Thank you for the comment about the videos too
-
Hi Steve, no, you shouldn't need to touch that option, Affinity Photo will automatically use any valid GPU devices. The easiest way to confirm this would be to add something like a Live Motion Blur layer to an image and click-drag on the canvas to make the radius value extreme. As you add/remove GPU devices this should speed up or slow down significantly. I believe Photo supports hot-plugging devices so you can add/remove your Blackmagic eGPU whilst in-app for a more direct comparison. Hope that helps!
-
Hi John, thanks for trying all that, it's helping to narrow it down. Looks like it may be something the developers need to know about as the same issue is occurring for another customer, albeit when developing RAW files. There are a couple of things to try, and then a final solution if those don't work. My apologies for all this, I believe there was a change in 1.7.2 to fix the 32-bit document view for people who had HDR enabled within Windows, and it may/may not be behind the issue we're seeing here. For the customer I mentioned, minimising and then bringing the app back up seems to apply the non-linear view transform as intended, maybe that would be something to try? Just open up your HDR merge or a RAW file, minimise to desktop, then click on the taskbar icon to bring the window back up and see if that corrects it. Because there are only two reports of this so far (that we know about), it's worth seeing if there's any correlation with PC specifications—I can't find yours listed anywhere, but the other customer's are: Windows 10 Processor: Intel(R) Core(TM) i5-8400 CPU @2.80GHz 2.81 GHz RAM: 16GB Graphics card: NVIDIA GeForce GTX 1050 Ti Do you have anything similar to the above setup? Another thing to try would be a factory reset of the app. If you double-click the app icon (or launch it through the start menu) then immediately hold down Ctrl after doing so, a dialog box should pop up. It will have three options checked by default—leave these checked and click Clear. This will wipe user defaults and window settings—see if this helps your issue. Finally, failing that, I believe a patch will be on its way soon to fix some smaller issues. To get things working for now, it may be worth downgrading—did you purchase through the Affinity store and activate with a serial number? If so, you can download older versions from this page: https://store.serif.com/en-gb/update/windows/photo/1/ — I would normally recommend 1.7.1 but in your first post you mentioned downgrading already. Does that mean you also get the issue with 1.7.1? If so, I would recommend trying 1.7.0 since that definitely doesn't have the HDR document view fix. Again, apologies for the issue. I've been unable to reproduce it on my work and home PCs, so at the moment am unsure of what factors into causing it. Looking forward to your reply!
-
Hi John, thank you for replying and looking at your settings. One more thing to investigate then—if you go to the top menu and choose Document>Convert Format / ICC Profile, then from the Colour Format dropdown change from RGB/32 to RGB/16 and click Convert, I suspect your image will become brighter and look the same as when you export it. Please would you be able to try this and confirm for me? Just going on a hunch, have you tried loading and editing any RAW files directly in Affinity Photo? If so, could you try opening one, then clicking Develop and seeing if you get the same noticeable tonal shift (i.e. the image looks dark when you're editing the RAW but when you click Develop it then becomes much brighter). To explain the above: the Develop Persona also operates in 32-bit linear when developing RAW files—the same format your HDR merged document uses—so I'm trying to ascertain whether the issue is with the non-linear view transform being applied. The non-linear transform is required to make your image consistent with how it will look when exported. If it's somehow not being applied to the document view (or canvas as we also call it), that would explain the huge discrepancy you're seeing. Thanks again and hope to hear back from you.
-
Hi, please could I advise not to touch the options on the 32-bit Preview Panel—the Display Transform should be set to ICC Display Transform and left on that option. Unmanaged is for edge cases when you need to see the scene-referred (linear) representation of the image, it doesn't apply to most photography/image editing workflows. By default (when developing to 16-bit), if you try and make edits with an Unmanaged view and then click Develop, the developed image will appear significantly brighter. This is because you are moving from Unmanaged (linear) to a non-linear view transform, and this behaviour is by design. When editing 8-bit and 16-bit documents, the non-linear view transform is accurate and will reflect how your image will look when exported. It's possible to type several paragraphs about all of this, but that wouldn't really have much relevance. In order to troubleshoot this issue, please could you ensure Display Transform is set to ICC Display Transform, perform some edits to your image, develop it, then see if the developed result looks the same? What we need to do is eliminate the 32-bit Preview Panel settings as a factor as they're only complicating the issue. As an aside, this is likely because the navigator preview still has the non-linear view transform applied—in this instance, that's actually correct and is an accurate representation of how your image will look in the main Photo Persona and when exported. Just a side note, you shouldn't change preview exposure and gamma with the expectation of them having an effect on the final image–they're non-destructive and applied at the view stage, they have no bearing on the numbers (pixel values) within the document. To be blunt, for the majority of photographic image editing cases, the 32-bit Preview panel should just be left alone it does have a valid use if you want to enable HDR and see the extended brightness values of your document/image, but until HDR adoption becomes more widespread and supported within image viewers, web browsers etc its usefulness is limited since you would still have to tone map an SDR version of your image for export.
-
Hi, this is a little suspect since you should be seeing a difference. ICC Display Transform will be performing a non-linear gamma transform using the display profile (and thus is closest to how you will see your image when exported to an 8-bit or 16-bit image format with a non-linear profile). Unmanaged will be viewing in linear light since there is no management from the document profile to display profile. It sounds like you might have HDR enabled in Windows and possibly Affinity Photo—a couple of things to check if you'd be happy to? On your 32-bit Preview Panel within Affinity Photo, is "Enable HDR" checked? Within Windows Display Settings, is "Play HDR games and apps" enabled? (https://support.microsoft.com/en-gb/help/4040263/windows-10-hdr-advanced-color-settings) If possible, could you attach screen grabs of your 32-bit preview panel and the Windows display settings? Specifically, if you have HDR enabled, there's a text option called "Windows HD colour settings" which will open a dialog that gives you a slider to balance HDR/SDR content. If you could get a screen grab of that, it would be much appreciated. If the above doesn't apply to you at all (e.g. you don't have an HDR capable display), would it be possible to just get a screen grab of your 32-bit Preview Panel? I did also notice in Dan's screenshot that you appear to be using a custom sRGB document profile? It has "black scaled" appended to its name. Can I check if this was a conscious choice to use it? I'm not sure about XnView's colour management capabilities, so if this profile has some kind of deviation from a typical sRGB profile it may also be a factor in why your image looks different when opened in that software. Apologies for the wall of text, hope to hear back from you so we can try and narrow down this issue!
-
Hi Don, you'll also need to be working with a 32-bit float document—typically these would originate from 3D renders (OpenEXR, Radiance HDR), merging bracketed exposures or simply creating a 32-bit document from one raw image. These tutorial videos should hopefully prove helpful: Since you're on Windows, the working terminology will be slightly different (EDR on Mac versus HDR on Windows), but all the functionality remains the same. Hopefully that will work for you—if not, please let us know! HDR on Windows is still a bit hit and miss but I've used Affinity Photo's HDR capability on several setups, and as long as you ensure Windows is compositing in HDR and you're editing a 32-bit document it should all work.
-
Hi, are you referring to Affinity Photo? Given your specs, I wonder if the new Metal compute hardware acceleration may be more of a detriment than an improvement. Your GeForce GPU won't be supported, but the Intel HD graphics may well register as compatible—the issue is that the older generation of Intel integrated graphics are quite weak, and the compute performance is likely slower than just using CPU. If you go to Preferences>Performance and disable Metal compute at the bottom (then restart the app) does performance improve? This should at least return it to 1.6 levels of performance with additional 1.7 optimisation in some key areas. Hope that solves your issue—if not, let us know!
-
Hi, this issue comes up quite frequently. The Affinity apps perform colour management from the document colour profile to the display/monitor profile—it's possible you have a defective display profile which was installed by default along with your monitor. You will likely come across the issue with any colour managed applications (including Adobe products, just google "Photoshop whites are yellow" and this will be corroborated). Ideally, you need to profile your monitor using a colorimeter/measurement device e.g. i1 Display Pro using either the software it comes with or displayCal. This will produce a proper display profile that works correctly with colour managed software. If this is not possible, you'll need to reset your display profile within Windows to the default sRGB device profile. Here's a thread post with a solution, look specifically at step 6 for how to assign the sRGB device profile to your monitor: https://forum.affinity.serif.com/index.php?/topic/91411-100-red-in-document-and-color-picker-looks-orange/&tab=comments#comment-485651 Note that while this should work, it's not an ideal solution. In order to ensure accurate colour representation you should really consider investing in a colourimeter device and creating a custom profile. The Affinity apps are colour managed, so they will be able to use this custom profile to accurately convert the colour values from the document to your monitor. The reason you're not seeing the issue in other apps such as Xara Designer is because they likely do not perform colour management. Hope the above is helpful to you. [Edit] Here is another thread with the same issue (which also links to the steps provided in the thread above):
-
Hey all, just a quick update, here's another video for you about using the Infer LUT functionality: Infer LUT Stay tuned for more videos soon!
-
Hi @Wireman, just to quickly answer this: Photo is taking parts of the wire from the left/right of the bird. It will analyse and try and replace the content in the most logical way, which means it will often "complete" lines or similar subjects. It does this with or without the non-destructive approach. I'm not on a Mac at the moment so I can't test, but I've never had this experience. I'll have a look when I'm in the office tomorrow. I would have suggested some kind of keyboard setting (perhaps accessibility?) but you say it doesn't happen in other apps, so probably not...
-
Hi, all the videos are on YouTube—they're linked in the first post... alternatively, you can get to the channel here: http://youtube.com/c/AffinityPhotoOfficial/ Just a quick update to make you aware of a new video I've uploaded. It still needs subtitling/localisation before appearing on the Affinity website but you can watch it on YouTube in advance: Changing DPI It was created to address some of the confusion around using the Document Resize feature, so hopefully it will clear things up a bit! As usual, the first post has been updated.
-
help Affinity Online Help Resource (Printable)
James Ritson replied to James Ritson's topic in Resources
Hello all, apologies as the online help had been updated since Thursday but I didn't get around to updating this thread. Affinity Publisher has now been added to https://affinity.help and there have been a couple of new features added: Search: we've implemented our own bespoke search for the online help which is fast and accurate. Access it via the tab system along the top left. Favourites: you can add topics to your favourites list to easily access them during future browser sessions. Simply click the + (plus) icon next to the "Favourites" tab to add the current topic. -
Hi csj, don't worry, I've got more videos planned soon including perspective-related tutorials. It won't be this following week as I'm taking a (hopefully well-deserved) holiday break, but when I'm back the plan is to start gradually building up the library of tutorials. Watch this space
-
Hey all, just a quick update to say there are three new videos available to watch: Canvas resizing Metal compute Blend ranges Blend ranges in particular should be quite helpful to people. As always, hope you find them useful!
-
Hey all, just updating you with a new tutorial: HDR from one exposure The list in the first post has been updated too. This video looks at taking advantage of Photo's 32-bit unbounded colour format to tone map a single RAW image and make the most of its dynamic range. Hope you find it useful! Hi Dave, I can definitely say that it makes a big difference. I think people naturally engage more if they see the person presenting, but I believe it benefits the presenter equally. When you're constantly on camera, it becomes more of a performance and you have to engage with what you're saying. It makes the speech and flow more natural because it's as if you are presenting to someone rather than at them—that's what I've found anyway It also encourages a single take process, as opposed to having the crutch of being able to edit the video afterwards. With the exception of a couple of videos (e.g. noise reduction stacking where creating the stack takes some time) the Photo videos are all done live (including the fade in/out) and it's something I'm keen to continue. It is quite challenging however! The whole one take, live studio concept is still relatively fresh so I'm evolving things as I go. Thank you for your suggestion of cropping, I may well give that a go. Regarding swapping the iMac direction, some videos actually put the picture-in-picture in the Navigator panel area so there would always be an issue of which way the presenter is facing. I'm aware of Unmesh, he's great. The whole studio concept came about from watching a variety of teaching channels. There are some consistent themes between them all like having a studio "set" and using picture-in-picture. We wanted a live environment where the presenter could mix on-the-go and have a video file at the end which can be uploaded straight away, so everything is tailored around that approach. Colour grading for the camera, audio EQ and compression, fading in and fading out—these are all applied in real time as opposed to part of an editing process. In terms of presentation style, I believe I'm a bit dry compared to Unmesh, he's a very lively character
-
Hi all, thanks for the feedback so far! (Pinpointing has been renamed ) I'm aiming to get a few more videos done over the next 2-3 weeks (there is of course the Publisher launch to think about as well...). For now, here's a new one that covers how to use the new HDR/EDR display support. EDR support on macOS is limited to the newer MacBook Pro and iMac Pro panels (other models may be supported but I'm not sure), plus the new XDR display that was announced at WWDC. If you have a Windows machine you stand a better chance of using this feature since you just need an HDR-capable display and suitable graphics card. For example, I used my HDR TV at home to get the clips in this video! The video has also been added to the list above. Hope you find it interesting!
-
Official Affinity Photo Desktop Tutorials We've got a brand new set of tutorials that follow a more structured approach and are sorted into logical categories. You can access them by following this link: https://affinity.serif.com/tutorials/photo/desktop Please note that the previous thread is now considered legacy and has been unpinned. The videos linked in the thread are also considered legacy—they will remain accessible (albeit unlisted) but ultimately my goal is to produce suitable replacements over time using the new studio setup with live mixing and picture-in-picture. There's been a clear increase in quality of teaching and production values since Affinity Photo was first released back in 2015, and we hope to continue this moving forward. The videos listed at the above link are hosted on Vimeo. Alternatively, please find a list below with YouTube links: Basics UI overview New document with templates Light UI Open and save Placing images Pixel vs Image layers Moving, scaling and rotating Layers Advanced layer options Selecting layers Mask layers Undo, redo and history Exporting Resizing & resampling Canvas resizing RAW development Tool cycling Studio presets Hardware acceleration External file linking and Resource Manager Advanced Adding lens profiles Manual lens corrections Keyboard and Mouse Brush Modifier Colour management Compression efficiency Channels Channels: Selections HDR merging HDR ghosts removal HDR from one exposure Liquify Stacking: Object removal Stacking: Noise reduction Stacking: Exposure blending Focus merging Panoramas RAW advanced development HDR/EDR workflow Macros 360 live editing OpenColorIO setup Blend modes Blend ranges LAB Infer LUT Importing and creating LUTs Luminosity masks from layers Masking vs clipping layers Paste/move inside Isolating layers Layer Z order and hierarchical view Linked layers Corrective & Retouching Cropping Straightening Images Inpainting Haze removal Dodge, burn and sponge brush tools Clone brush tool Sky replacement Chromatic aberration reduction and defringing Creative Tools Colour picker tool Gradient tool Paint mixer brush Selection refinement Fill layers Pen tool Bitmap pattern fills Selecting sampled colours Selection Brush Tool Freehand Selection Tool: Freehand, Polygonal and Magnetic modes Pattern layers Text on a path Custom brushes from layer selections Divide blend mode Filters & Adjustments Curves Levels Masking adjustment layers Filters Live filter layers Displace filter Shadows/highlights Gradient map Denoising/Noise reduction Radial blur Clarity Channel mixer White balance Black & white adjustment Zoom blur Selective colour Procedural Texture: Tone Mapping HDR to SDR Procedural Texture: Nonlinear Transform Correction Affine filter: seamless textures Frequency Separation: Gaussian, Bilateral and Median blur methods Export Persona Exporting slices Workflows & Techniques PSD write-back and PSB import PSD smart object import Editing infrared photography Relighting 3D renders Using Matte ID render passes for masking Lock children (Masking) Editing metadata Retouching scanned line drawings Applying Blender Filmic looks Compositing 3ds Max and V-Ray render passes Frequency Separation: Retouching lens flares with Median method Frequency Separation: Portraiture retouching Perspective compositing Astrophotography Astrophotography stacking: SHO composition Astrophotography stacking: One shot colour workflow Astrophotography stacking: Monochrome colour mapping Astrophotography stacking: LRGB composition Astrophotography stacking: HaRGB composition Astrophotography stacking: Bi-colour composition Astrophotography: Removing background gradients Astrophotography: Equalising colours Astrophotography: Sigma Clipping Astrophotography: File Groups and Filters Hope you find them useful! James

-
Hi, is this your first 1.7 beta? The colour format fly-out on the Document menu is now found on the Convert Format / ICC Profile option (still under the Document menu). It allows you to convert bit depth and colour profile at the same time. You could for example go from 32-bit sRGB (which is unbounded) to 16-bit ProPhoto/ROMM RGB to preserve values that would have been out of bounds with sRGB but still available in 32-bit.
-
I appreciate it's from last year but I've only just seen this post because of the thread bump. Based on your more recent posts I've read, however, I would ask you to reign in your combative attitude: it's counterproductive and contributes nothing to the overall goal of this forum. The assumption that the purpose of my response was to somehow undermine and contradict you is incorrect. I was stating that you cannot create initial out-of-bound colour values in the Windows version because of a UI bug. Whilst I would ordinarily agree that the statement was wrong, I had to point out this inconsistency for the benefit of the user, and also cover how you would go about creating out-of-bound values within the user interface, since that was not actually explained.
-
They're not set by default, but you can assign them by going to Preferences>Keyboard Shortcuts. You should see them straight away if you're on Mac. If you're on Windows, scroll down slightly to see them. Worth noting that you'll need to switch to another persona category at the top (e.g. Liquify) to set a shortcut for the main Persona (Photo, Draw, depending on the app). Hope that helps!
-
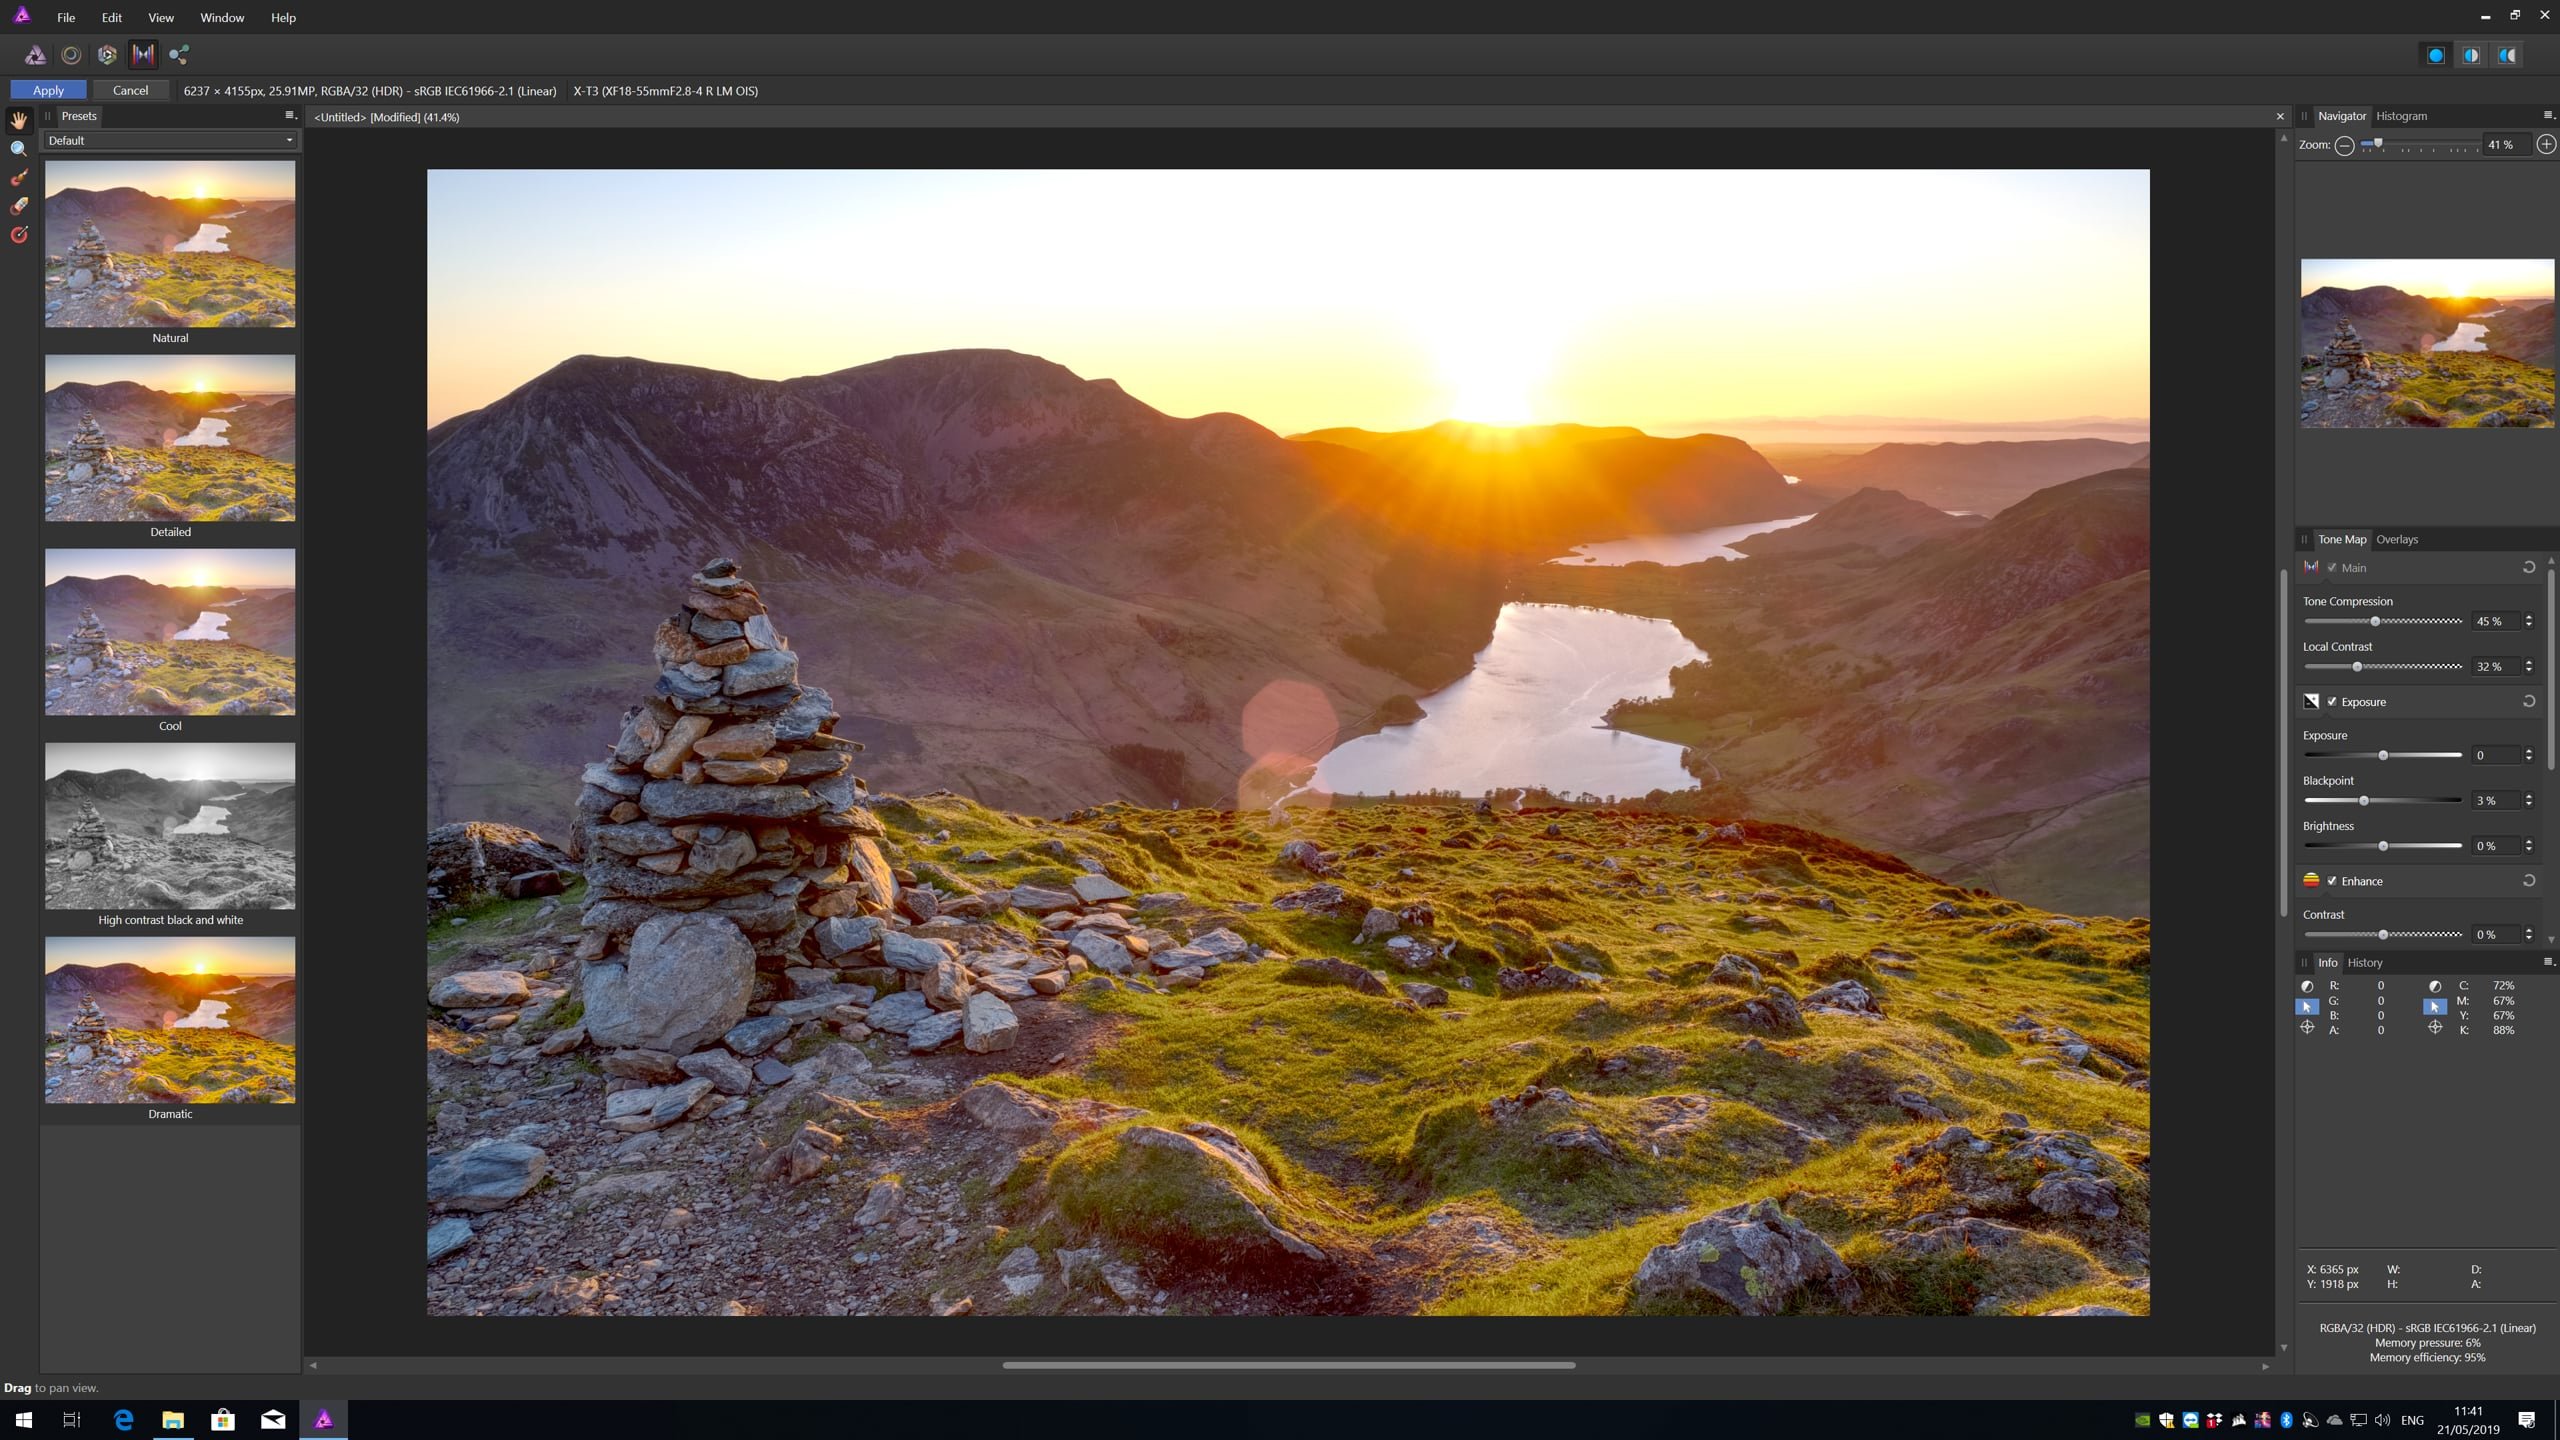
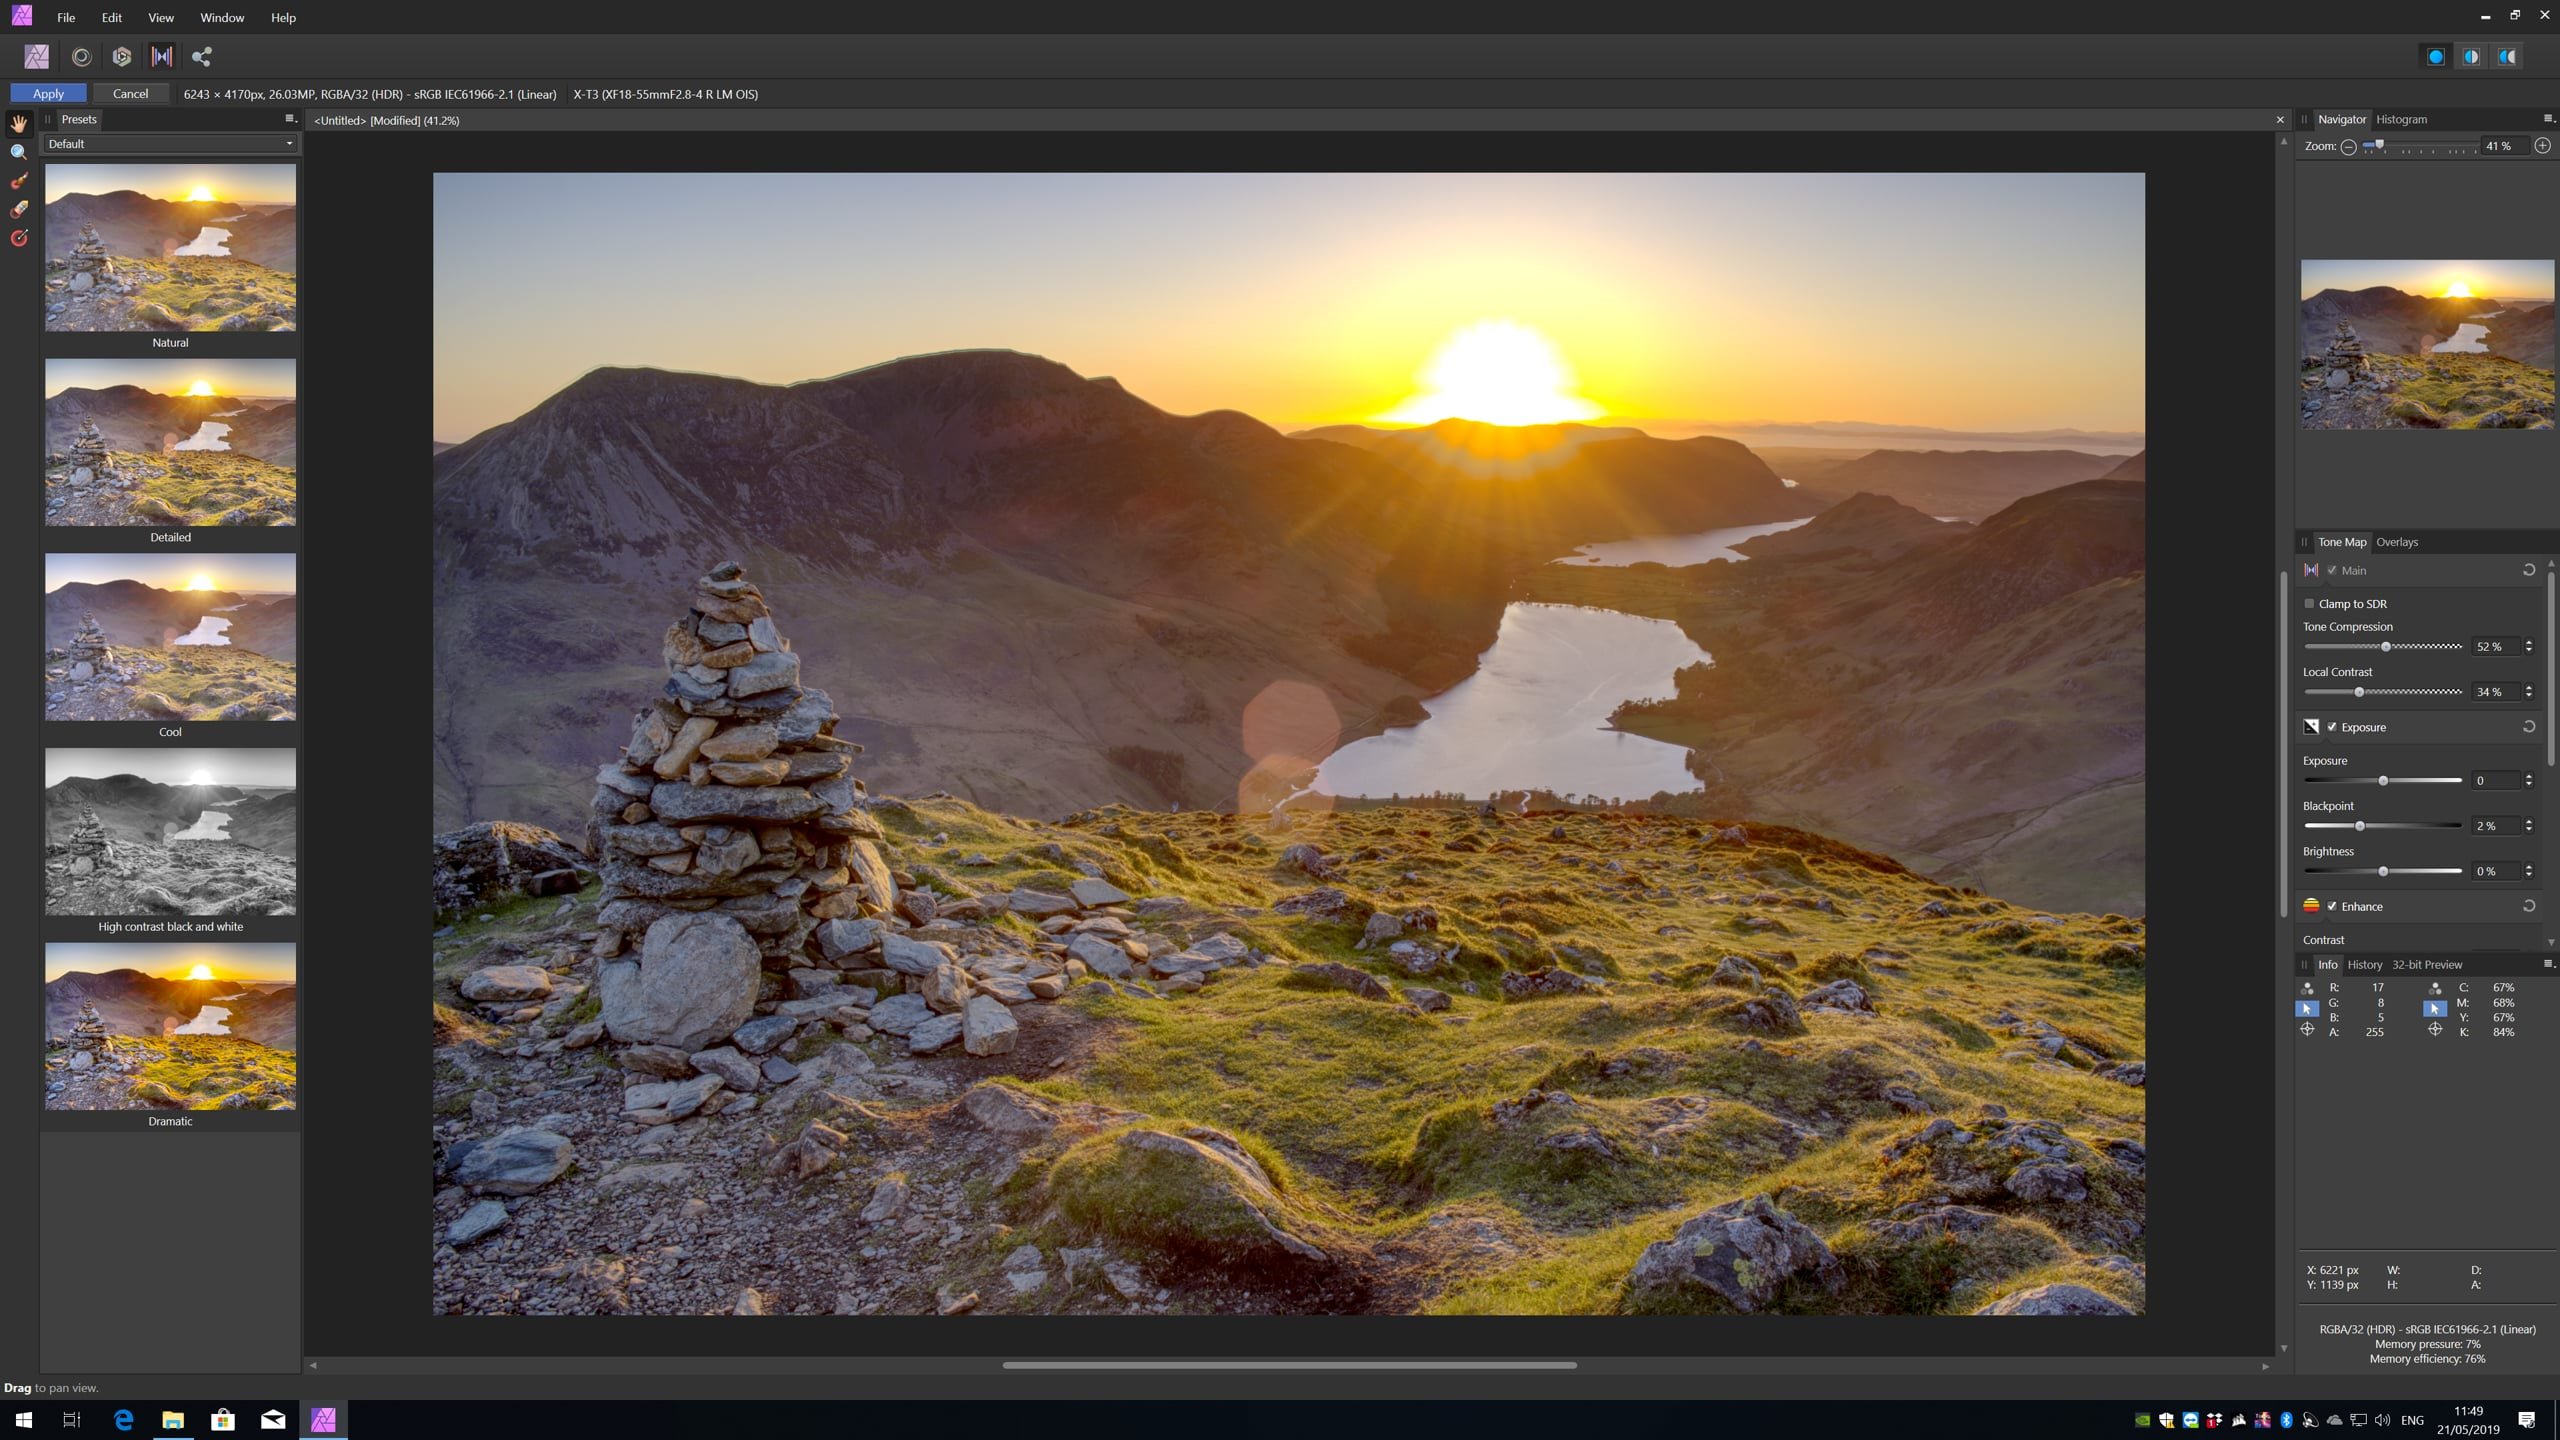
Hey again, the issue appears to be specifically with how the RAW images are aligned and merged in Photo 1.6—notice on your screen grab (and mine) that there is a column of black pixels to the right of the image. If I merge the JPEGs I don't get any issues and can effectively tone map the image. Out of interest, I tried both the RAWs and JPEGs in our current 1.7 public beta and both were fine. I believe 1.7 includes some improved handling of RAF files. I would still either use JPEGs or pre-process the RAWs to TIFFs, since merging the RAW files directly results in some discolouration around the sun—plus you don't get automatic lens distortion correction. Can I just double check that you've tried merging JPEGs in Photo 1.6 as well? As mentioned above, I had no issues when doing so, and I'd recommend trying that if you haven't already. Another option is to download the latest 1.7 beta (https://forum.affinity.serif.com/index.php?/forum/34-photo-beta-on-windows/ - look for the stickied thread at the top). It sits alongside the release build and doesn't interfere, but I think you'd be pleasantly surprised at the improvements, particularly with the speed of tone mapping. I've attached some screen grabs to this post to illustrate the results I'm getting. Hope they're of some help! In order, they are: 1.6 RAW files tone mapped 1.6 JPEG files tone mapped 1.7 RAW files tone mapped