PLShutterbug
-
Posts
76 -
Joined
-
Last visited
Everything posted by PLShutterbug
-
Copy selection to new image
PLShutterbug replied to PLShutterbug's topic in Affinity on Desktop Questions (macOS and Windows)
Thanks, that was it. I was working with an Image layer rather than a raster layer. Using Copy Flattened, then Paste into my new document, got me the result I need. I didn't even realize this was a thing. I know about background layers, and have added layers, and have created raster layers, but have never considered the real differences between them. I'll have to study this. It might solve a bunch of other frustrations with Photo. -
Using Affinity Photo 2.3. Hi, I can't figure out how to copy a selection in an image, then paste it into a new image, or create a new image with just the selection. I've used a combination of the Flood Select and Selection Brush tools to create a selection. I've tried simply pressing Ctrl-C to copy the selection and then pasting into a new document I've created, like I can do with other Windows applications. What gets pasted into the new document is the entire original image, not just the selection. What am I doing wrong, and how can I end up with what I want? Thanks.
-
That's exactly what I did, and I worked on the problem page first since it was the last I copied and then chose the specific PDF page from. I think maybe that is the root of the issues I experienced. The rest of what you say makes sense, now that you've explained it.
-
Thanks, this does look better. In your first reply were you saying that that one page of the original PDF file I downloaded from IMSLP was translucent rather than opaque like all the other pages in the doc? And that's partially why it printed in such a different way?
-
Thanks for your responses. It's my first chance to get back to this. My first comment is, I don't know why it is relevant that the page image is translucent. Why is that important? On my monitor, despite the fact that that page is ... to me it's transparent, not translucent, but maybe that's just semantics ... the notes look just as black on that page as they do on the previous page. So that doesn't tell me why they print "faded-looking." Can you explain why that would be? I'll comment about your other messages too, but I'd like to know why what you are saying is important.
-
Hi, I'm new to Publisher. I'm trying to remove the grey scanning "background" from a piece of music (that's public domain - downloaded from IMSLP). The original is a PDF file. I created a new document in Publisher, Placed the document, and copied each page I need to print, converted to a Picture Frame, rasterized, then discovered I needed to make a Curves adjustment to make the background drop out. The second page of my document (the first page of the violin solo part) prints on my Epson WorkForce 7720 printer just fine. The third page (the second page of the violin part) though, prints so light at the bottom of its page I cannot use it. This despite it looking "fine" on my display, next to page 2. If I print to PDF instead, I get the same effect. I'm attaching it here. What am I doing wrong that it looks ok on my display but just that one page prints too light? Aside ... The Curves adjustment on the first page that worked was to the Main channel, on the second page it was Intensity, and on the third page it was Alpha. So a related question is, why doesn't a change to the same channel work on all three pages? Attached: original downloaded source PDF from IMSLP, the afpub doc with that document embedded, and a "Microsoft print to PDF" 'soft print' that illustrates the problem. Thanks in advance. Ysaye - Reve d'Enfant violin solo part.afpub Ysaye - Reve d'Enfant violin solo part.pdf IMSLP36567-PMLP81457-Ysaye_-_Rêve_d'enfant_Op14_Violin_Piano.pdf
-
Finish crop in Develop persona
PLShutterbug replied to PLShutterbug's topic in Pre-V2 Archive of Affinity on iPad Questions
@Callum: this is a current model iPad Air (5th gen), 64 GB, running iPad OS 15.5. I’m running Photo 1.10.5.280. -
Finish crop in Develop persona
PLShutterbug replied to PLShutterbug's topic in Pre-V2 Archive of Affinity on iPad Questions
@Callum: here is a video. IMG_1621.MOV -
Finish crop in Develop persona
PLShutterbug replied to PLShutterbug's topic in Pre-V2 Archive of Affinity on iPad Questions
Right. I am sending a video showing where all I double-tapped to try and close the box. -
Finish crop in Develop persona
PLShutterbug replied to PLShutterbug's topic in Pre-V2 Archive of Affinity on iPad Questions
@Callum No. I hope you are not implying I should be … -
Finish crop in Develop persona
PLShutterbug replied to PLShutterbug's topic in Pre-V2 Archive of Affinity on iPad Questions
@Callum, no - I just tried it. I double-tapped all over the grid: edges, intersections of thirds lines, in the middle, on the handles … none saved the crop. -
Finish crop in Develop persona
PLShutterbug replied to PLShutterbug's topic in Pre-V2 Archive of Affinity on iPad Questions
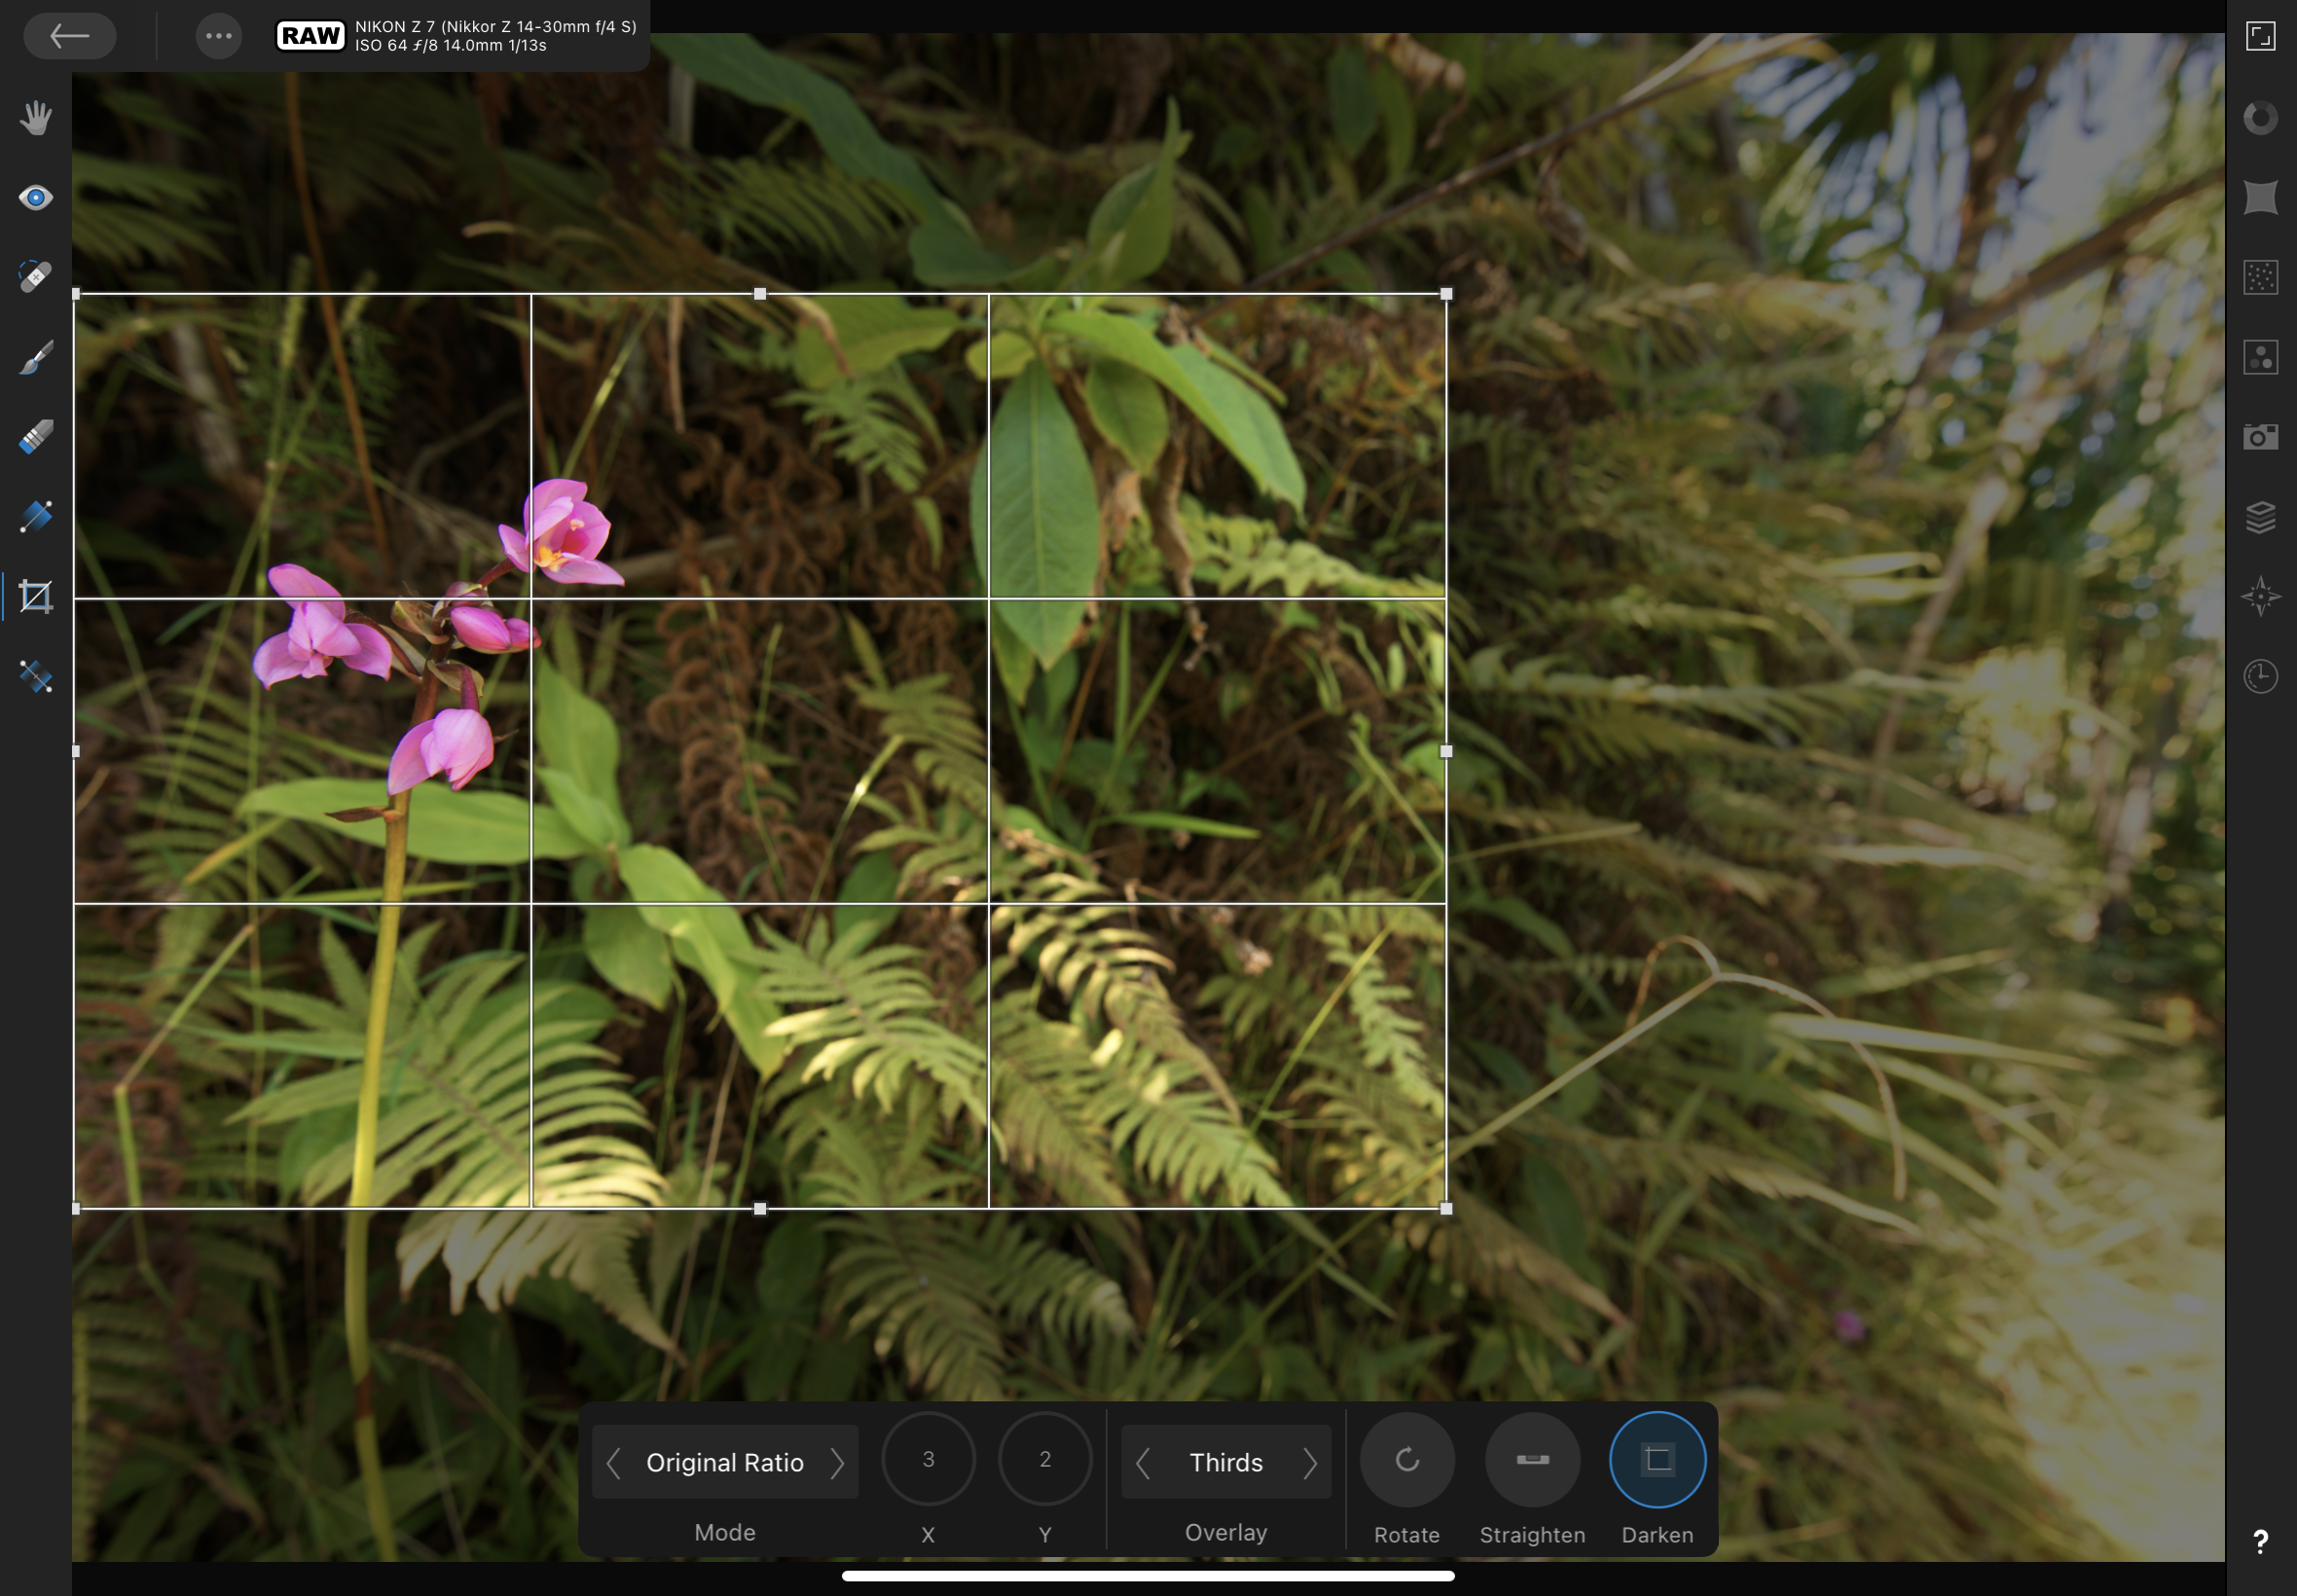
Accidentally discovered that choosing another tool completed the crop. But … why isn’t there a “Done” button or equivalent? -
I am trying to crop an image in the Develop persona but cannot figure out to complete the crop. See attached screenshot … Can someone help? Please don’t suggest doing this in the Photo persona. I want to do it in Develop. Thanks in advance.

-
I just started using Photo on iPad. I was able to open a Nikon .NEF file directly from my Synology SAN drive via DSFile, but after editing I see no way to use “save a copy” and put the new file back in the same place. DSFile is a choice, but there is no way to indicate where in the directory structure to put the file. DSFile shows as “on my iPad” … my only other choice is to save in my iCloud Drive. Is it possible to save to a SAN drive?
-
I will do that. I actually already did, but then decided to work on the balance some more before trying a print. I saved as JPG once and it did print the image when I opened that file, so I know I can get it to work. I like the idea though of just adding a Merge Visible layer. One thing: do I need to make the other layers invisible when I print with Merge Visible at the top of the stack, or does it matter?
-
Note this sentence from my original post: "(I realize there is still some color correction to do ... don't worry about that now.)" And this one: "... then used a curves adjustment to reverse the colors, then a fill layer to remove the mask, then a second curves adjustment to adjust colors." I knew and still know I have to work on the image to get it right. I acknowledged that in my original post. However, if I get the color balance, contrast, etc. perfect but it still prints black then all that work won't help, will it? What's amazing to me is how the human eye adapts to see the color that something should be, regardless of what it actually is. I thought I had it nailed, tried these prints, sent the plea here, and then went back a couple of hours later to see if any responses had shown up and was astounded at how much the color is still off.
-
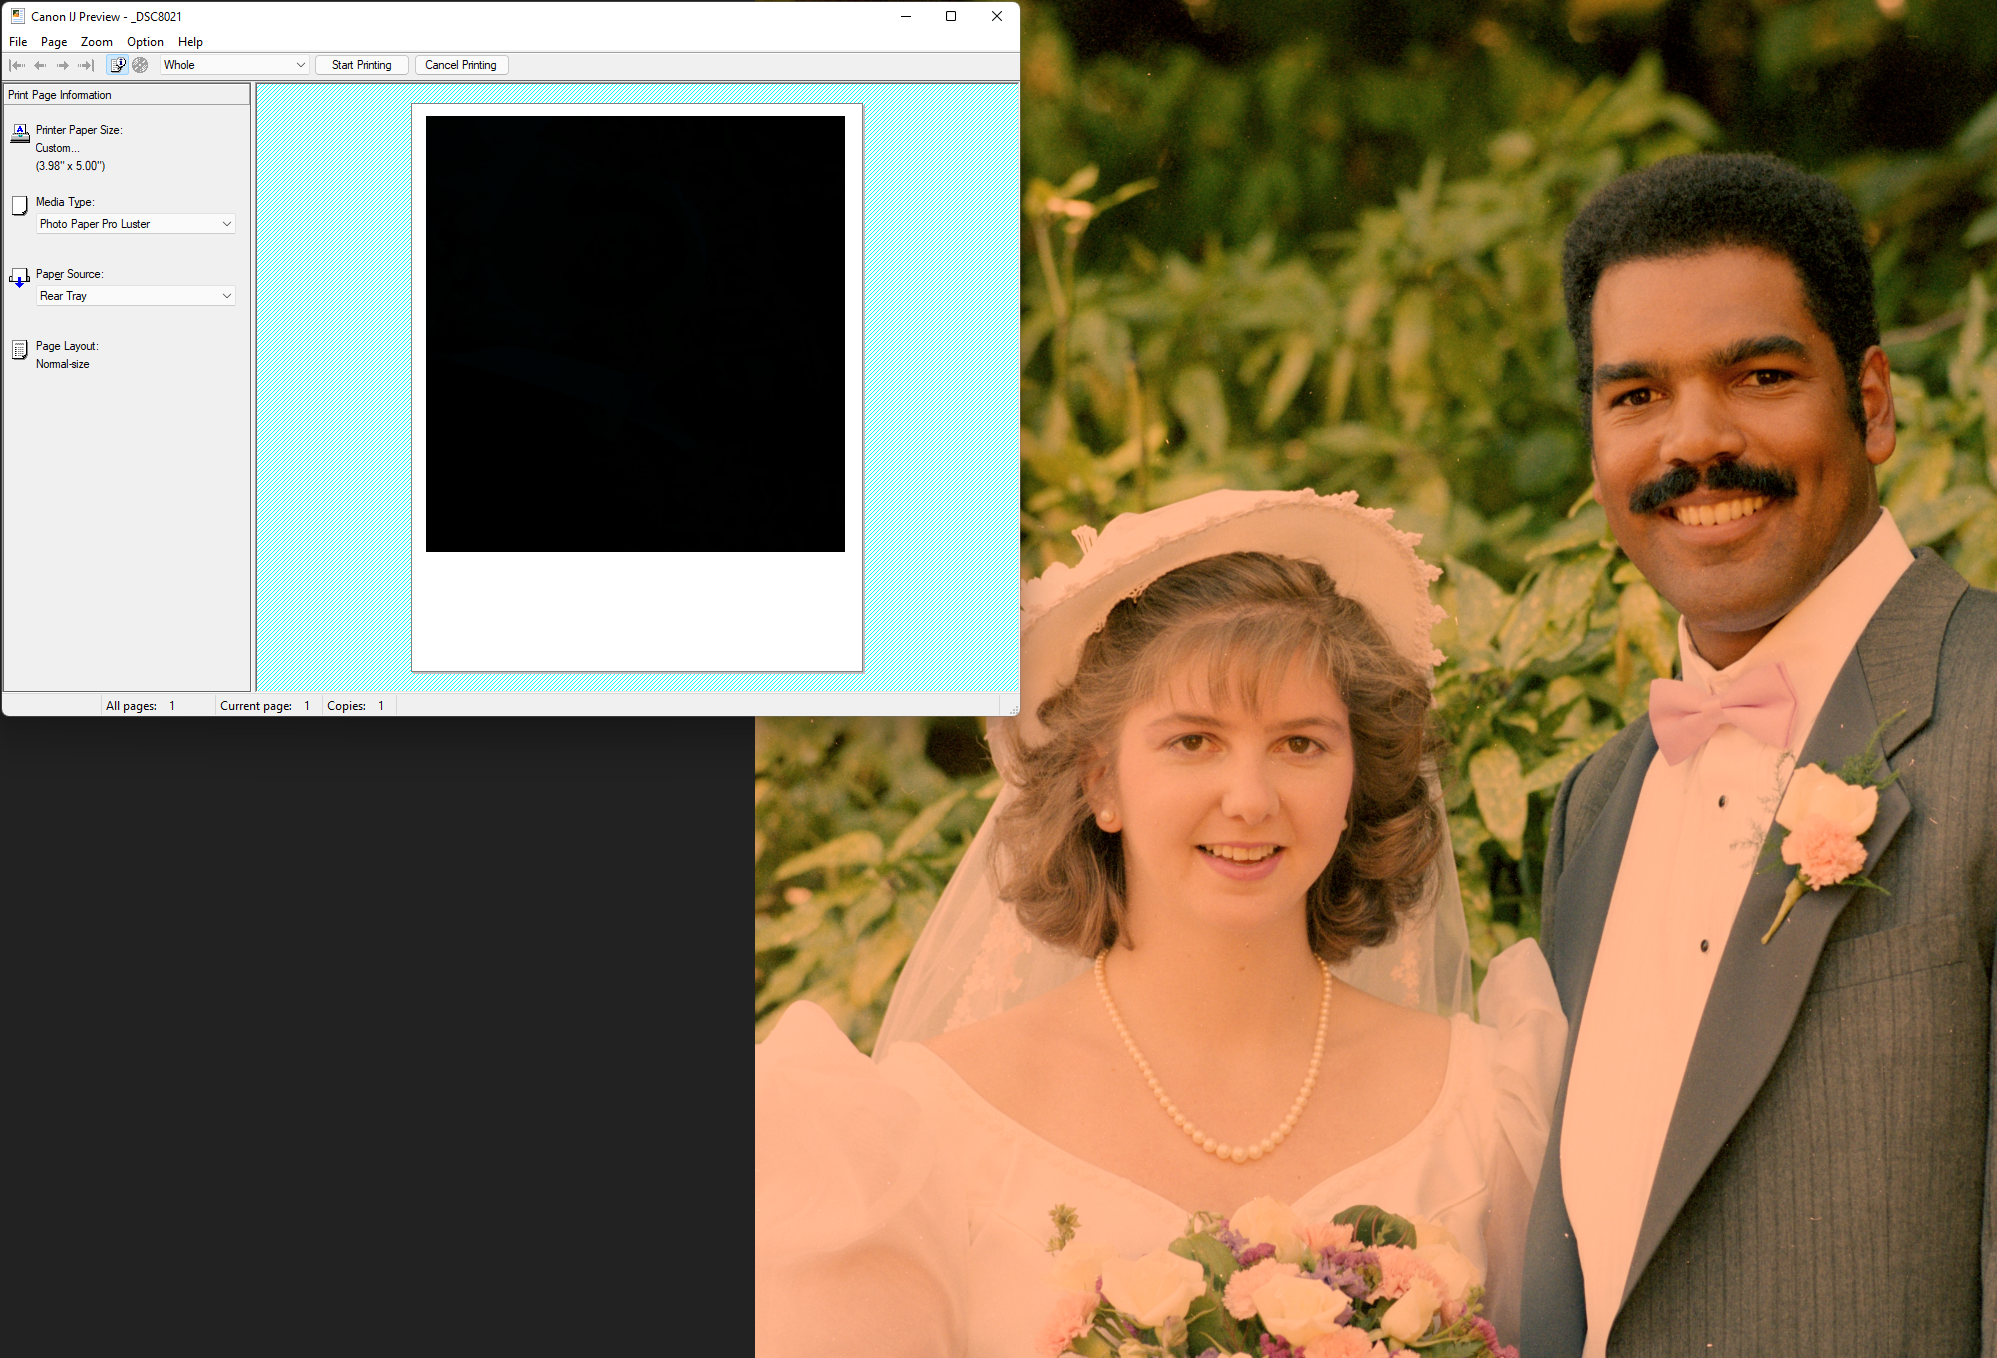
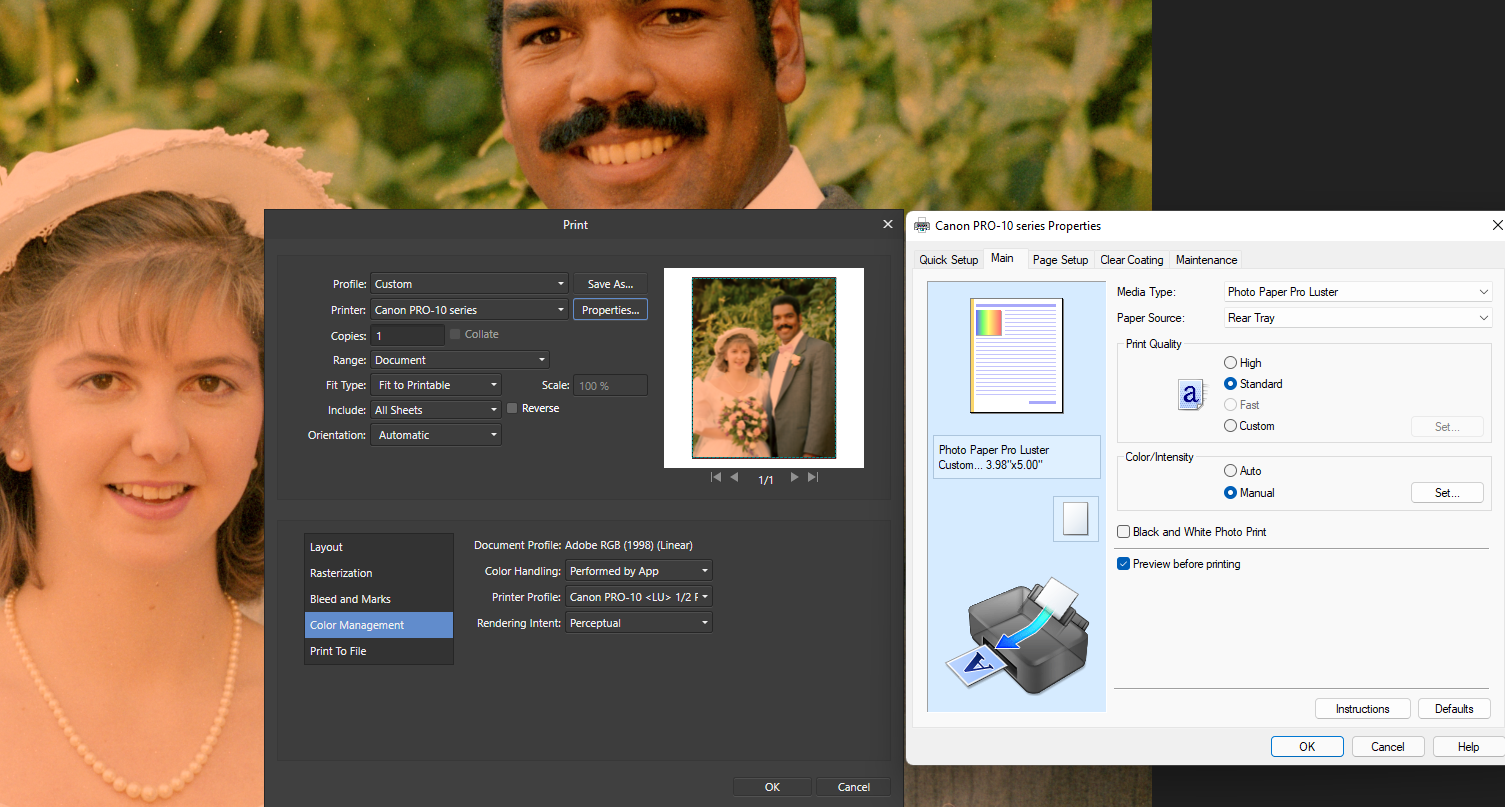
Using latest Affinity Photo version. Printing to Canon Pixma Pro-10 printer using Canon Photo Paper Pro Luster profile. An image of a "normal scene" previews and prints as expected. I'm trying to print some wedding photos from my sister's wedding some years ago originally taken on 2-1/4" Vericolor III film. I used my macro lens on my Nikon Z 7 to photograph the negative, then used a curves adjustment to reverse the colors, then a fill layer to remove the mask, then a second curves adjustment to adjust colors. I have an HSL adjustment at the top of the layer stack but it is turned off. When I print straight from the .afphoto file the resulting preview in Canon IJ Preview is completely black, and so is the resulting print. See the screenshot. If I save as a .JPG, then open the .JPG and print that, it prints. The colors are not right, but that's probably a profile thing - I'm not going to worry about that now. My question: why is this image that looks ok in Photo and prints if saved as a .JPG and then opened in Photo, printing completely black? (I realize there is still some color correction to do ... don't worry about that now.) Thanks in advance.
-
Thanks for that. I already understand that dynamic range and bit depth are not the same. Dynamic range expresses the intensity difference between the darkest and lights area of a scene a sensor is capable of capturing before highlights or shadows clip, while bit depth constrains the steps between each difference in intensity. Low-DR sensor output saved with high bit depth will block highlights or shadows but the detail that is captured is richer because there are more gradations within the DR. Conversely, a hi-DR sensor image saved with low bit depth will not block as fast, but each tonal gradation is larger and results in more pronounced banding. Thanks for the validation that working with 16-bit TIF probably won't cost me anything. Now the big issue I have is I shot a partially backlit image of a mountain range, with a north-facing treelined ridge in deep shadow but the mountain tops very bright with snow. There is subtle detail in the snow I can't figure out how to capture without blocking the shadowed slopes (with a bit of tree detail). The attached photo is a small section of a 250MB TIF file ... I cannot seem to get both the shadows and the highlights to show detail at the same time. Turnagain arm section for Affinity forum - no Affinity layers.tif
-
"If you have severely overexposed or ..." Are you saying that simply converting from RAW 14-bit to TIF16 in DX Studio won't accomplish that? I always shoot and edit using AdobeRBG. Thanks.
-
I use a Nikon Z7 and always shoot in 14-bit RAW, which produces .NEF files. My question: if I open the .NEF in Nikon NX Studio and then export to 16-bit TIF, will I have the same dynamic range in that TIF file as I had in the .NEF, and will all the highlight and shadow data still exist in that TIF? In short: what does it cost me to convert to TIF before starting my edit session in Affinity? I ask because Nikon's lens corrections are better than Affinity's, and I haven't been able to correct particularly barrel distortion with my Nikkor 200-500 in Affinity while it's completely corrected by default in NX Studio. Starting with a TIF with just that lens correction is ideal, but only if I'm not losing other editing capabilities by doing so.
-
Affinity Photo for Windows - 1.9.2
PLShutterbug replied to Patrick Connor's topic in News and Information
Was using Photo 1.9.1. Tried to open a .PDF file via "Open with ..." from Windows Explorer. In the dialog box, I changed from 300dpi to 192dpi, and changed the color space to Greyscale. Photo 1.9.1 would crash - it never opened the file and the UI simply disappeared. I then upgraded to v1.92 and opened the file from within the app using File/Open, and left the settings as they were in the original file. The file opened, I was able to add the content necessary and export it again. I then closed Photo, returned to Windows Explorer and repeated the exact steps described above to see if 1.9.2 still crashes. I'm pleased to report that it does not. So ... if users have reported opening PDFs caused 1.9.1or earlier to crash, they seem to have been fixed in this new version. -
I just meant that since all frames were shot on the same roll, they will require the same initial corrections to get to a common positive image. If at some point I want to tweak that macro for a slightly different workflow (i.e.: digitize Kodacolor instead of Vericolor, so I have to adjust the mask color), it would be nice to be able to directly edit the color settings for the mask color instead of having to delete the macro step and then recreate it from scratch.
-
Well ... I need to create a fill layer of a specific color. If I can accomplish that by choosing the color first and then adding the layer then that works. I just tested and it does indeed work. I was able to create a macro to manage this workflow and apply it to two other images. I need to tweak it, but it does work. Now the issue is how to edit things like the number, and position of curve adjustment points. In this workflow every image is exposed on the same film stock and under similar conditions, so the same adjustments should be applicable. Being able to change all the settings of a "Add Curves Adjustment" and other controls in a macro, via an Edit capability for that entire control, would be very helpful.
-
Semi-longtime Affinity user here, continually frustrated that it is half done. You guys really need to start charging maintenance (or release a paid 2.0, then 3.0, etc. yearly or at least every 18 months or so) so you can afford to hire more people to improve your products faster. Your prices are very reasonable; there is no reason you should not be getting $60/year instead of $60 every 3 - or 4 - or ... 5 now? years. You're giving your software away and leaving a LOT of money on the table. Sorry for that mini-rant. I'm trying to use Affinity to digitize a thousands of negatives from my childhood and early adulthood, that my dad took - even from my parents' wedding in 1952 (which was done using an early version of Kodacolor). A key to doing this reasonably will be to automate reversal and color-caste correction of rolls of negatives. I just watched James's video about creating macros and that got me excited. Imagine my disappointment then, that I cannot record specific Fill Layer colors. I imagine this will also extend to adding points to curves. This dramatically decreases Affinity's utility. Please increase the macro capability: Add support for every command and capability in Affinity. VOC to determine the commands to support first would be a very good first step. Add a way to apply settings absolutely (i.e.: Set Red Channel Shadow setting to X=0.01, Y=0.02) A scripting language would be really, really nice. Even an XML file that can be edited with Notepad++, with a solid tag definition schema, would be great. If you already have the ability to support curves, fill layers etc. to automate a negative digitizing workflow, I'm all "ears." Thanks for listening.
-
Affinity Photo for Windows - 1.9.0
PLShutterbug replied to Patrick Connor's topic in News and Information
Just installed 1.9 and so far looks good. Nikon RAW images appear to take longer to load than before, but maybe that's my own impatience. Using a Z7 so the files are around 50MP. Hardware acceleration looks brilliant. I have an NVidia GForce 1050 and I see massive increases in performance. Before it was many seconds and now it's instant. I don't see my camera or its presets supported in RAW editing, nor the brilliant Nikkor Z 14-30 f/4. I've requested that lens be added - months ago - in the open-source lens profiler you use. When are you going to add it? It's been on the market two years. I'd really like to figure out how to save my own RAW editor presets to apply to RAW files as I first load them. Is there a video available for that? I haven't really found one yet ... maybe I haven't looked hard enough.